There are several preconditions to the export via bcp.
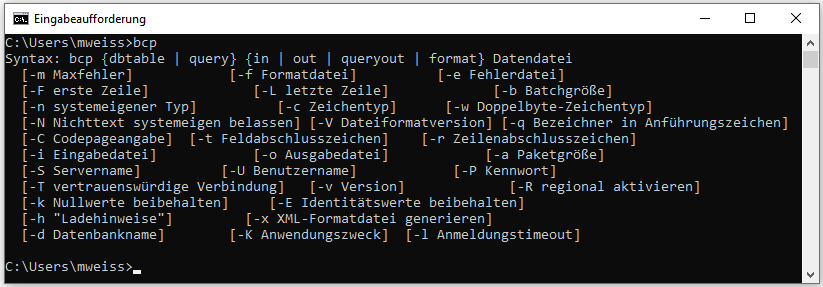
The export relies on the external bcp software that must have been installed on the database server.To test if you have bcp installed, start the command lind and type bcp. If bcp is installed you get a result like shown below.
The transfer via bcp is not possible with SQL-Server Express editions. To use this option you need at least SQL-Server Standard edition.
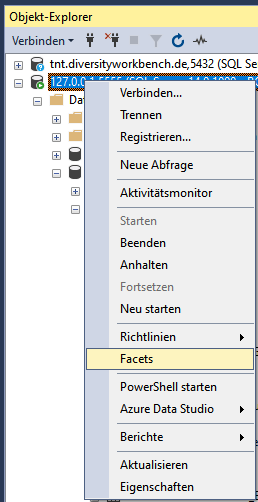
To enable the transfer the XP-cmd shell must be enabled on the SQL-Server. Choose Facets from the context menu as shown below.
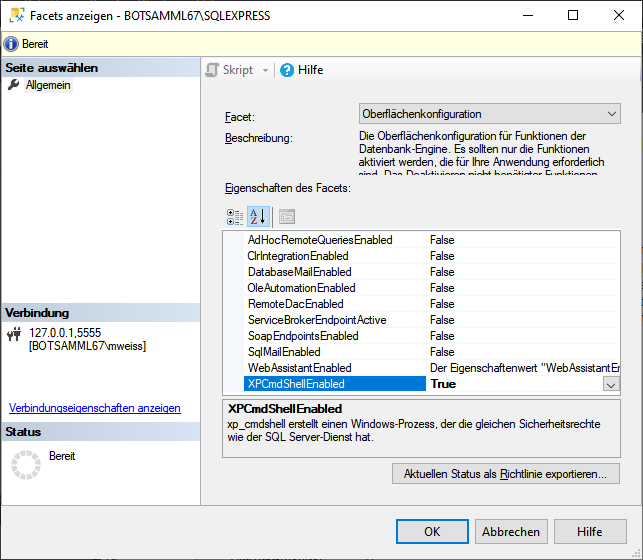
In the window that will open change XPCmdShellEnabled to True as shown below.
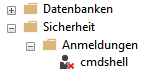
The update script for the cache database will create a login cmdshell used for the transfer of the data (see below). This login will get a random password and connecting to the server is denied. This login is needed to execute the transfer procedures (see below) and should not be changed. The login is set to disabled as shown below.
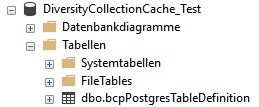
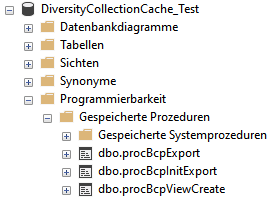
Furthermore 4 procedures and a table for the export of the data in a shared directory on the Postgres server are created (see below).
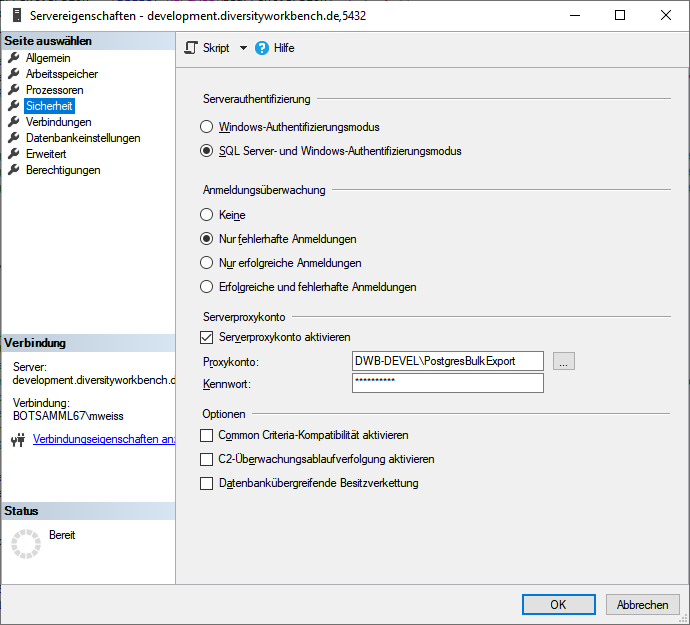
You have to create a Windows login (e.g. PostgresBulkExport) on the server with full access to the shared directory and set this account as the server proxy:
Open
Windows Administrative Tools -
 Computer Management -
 System-Tools -
 Local Users and Groups
left klick on folder Users and
select New User...
in the window that will open enter
the details for the user and create the user
(e.g. PostgresBulkExport) and click OK to create the
user.
In the File Explorer select the shared folder where the
files from the export will be stored
From the context menu of the
shared folder (e.g. u:\postgres) select Properties
In the Tab security click on button Edit...
In the window that will open click
on button Add...
Type or select the User
(e.g. PostgresBulkExport) and click OK
Select the new
user in the list and in Permissons check Full Controll at
Allow
Leave with Button OK
Close Window with Button OK
Go through the corresponding steps for the share (e.g. u: ) to ensure access.
As an alternative you may use SQL to great the Login:
CREATE LOGIN [DOMAIN\LOGIN] FROM WINDOWS;
where DOMAIN is the domain for the
windows server and LOGIN is the name of the windows user.
exec sp_xp_cmdshell_proxy_account
'DOMAIN\LOGIN','?password?';
where DOMAIN is the domain for the windows server, LOGIN is the name of the windows user and PASSWORD is the password for the login.
After the user is created and the permissions are set, set this user as cmdshell proxy (see below)
creat a new login:
Open
Sql Server Managment Studio

select Security

select Logins
in the
context menu select New Login ...
in the window that will open, click on the
Search... button
Type in object name (e.g.:
PostgresBulkExport)
click on the Button
Check Names (name gets
expanded with domain name)
click button
OK twice to leave the window and create the new login
in the context menu select
Properties and include the login in the users of the cache
database (see below)
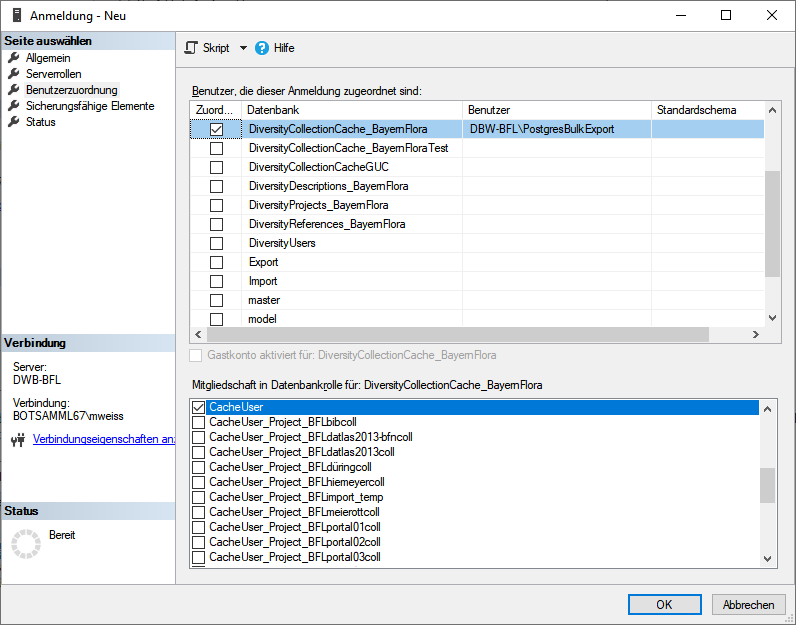
On the database server add this user as new login and add it to the cache database. This login must be in the database role CacheUser to be able to read the data that should be exported (see below).

Another login (e.g. PostgresTransfer) on the Windows server is needed with read only access to the shared directory to read the exported data and import them into the Postgres database. This login is used by the Postgres server to access the shared directory. It does not need to have interactive login permissions.
On the Windows side the program needs an accessible shared directory in which sub-directories will be created and into which the files will be exported. This directory is made accessible (shared folder) to CIFS/SMB with read only access for the login used for the data transfer (e.g. PostgresTransfer). This shared directory is mounted on the Postgres server using CIFS (/database/exchange/INSTANCE). The INSTANCE is an identifier/server-name for the windows server. If more windows server deliver data to one postgres server these INSTANCE acronyms need to be unique for each windows server.
On the Windows-server this directory is as available as "postgres". The directory will be mounted depending on the INSTANCE under the path /database/exchange/INSTANCE. The corresponding fstab entries for the INSTANCEs 'bfl and 'devel' are:
/etc/fstab:
//bfl/postgres /database/exchange/bfl cifs ro,username=PostgresTransfer,password=?password? 0 0
//DeveloperDB/postgres /database/exchange/devel cifs ro,username=PostgresTransfer,password=?password?0 0
| //?Instance?/postgres | is the UNC path to the shared folder |
| /database/exchange/?Instance? | is local path on the postgres server where to mount the shared folder |
| PostgresTransfer | is the windows user name to access the shared folder |
| ?password? | is the password for the windows user to access the shared folder |
These mounts are needed for every Windows-server resp. SQL-Server instance. Instead of fstab you may use systemd for mounting.
If you get the following error:
An error occurred during the execution of xp_cmdshell. A
call to
'LogonUserW' failed with error code: '1326'.
This means normally, that the passwort is wrong, but
could also be a policy problem.
First recrate the proxy user with the correct password:
use [Master];
-- Erase Proxy user:
exec sp_xp_cmdshell_proxy_account Null;
go
-- create proxy user:
exec sp_xp_cmdshell_proxy_account
'?domain?\PostgresBulkExport','?your password for
PostgresBulkExport?';
go
And if this does not work, change the policy:
Add proxy user in the group to run as batch job:
Open the Local Security Policy

- Local Policies
-- User Rights Assignment
Log on as a batch job
Add user or group ...
Type user in object name field (e.g. PostgresBulkExport)
Leave Local Security Policy editor by clicking Button OK twice
For further information see
https://www.databasejournal.com/features/mssql/xpcmdshell-for-non-system-admin-individuals.html
NOT FOR PRODUCTION!
Setup of a small test
routine.
Remove cmdshell account after your tests and
recreate it with the
CacheDB-update-scripts from
DiversityCollection (Replace ?marked values? with the values of your environment):
USE [master];
CREATE LOGIN [cmdshell] WITH PASSWORD = '?your password for cmdshell?',
CHECK_POLICY=OFF;
CREATE USER [cmdshell] FOR LOGIN [cmdshell];
GRANT EXEC ON xp_cmdshell TO [cmdshell];
-- setup proxy
CREATE LOGIN [?domain?\PostgresBulkExport] FROM WINDOWS;
exec sp_xp_cmdshell_proxy_account
'?domain?\PostgresBulkExport','?your password for PostgresBulkExport?';
USE [?DiversityCollection cache database?];
CREATE USER [cmdshell] FOR LOGIN [cmdshell];
-- allow execution to non privileged users/roles
grant execute on
[dbo].[procCmdShelltest] to [CacheUser];
grant execute on [dbo].[procCmdShelltest] to [?domain?\AutoCacheTransfer];
-- recreate Proxy User:
exec sp_xp_cmdshell_proxy_account Null;
go
-- create proxy user:
exec sp_xp_cmdshell_proxy_account
'?domain?\PostgresBulkExport','?your password for PostgresBulkExport?';
go
-- Make a test:
create PROCEDURE [dbo].[procCmdShelltest]
with execute as 'cmdshell'
AS
SELECT user_name(); -- should always return 'cmdshell'
exec xp_cmdshell 'dir';
go
execute [dbo].[procCmdShelltest];
go
-- Should return two result sets
-- 'cmdshell'
-- and the filelisting of the current folder
-- Check Proxy user:
-- The proxy credential will be called ##xp_cmdshell_proxy_account##.
select credential_identity from sys.credentials where name =
'##xp_cmdshell_proxy_account##';
-- should be the assigned windows user, e.g.
?domain?\PostgresBulkExport
To enable the bulk transfer
via bcp enter
the path of the directory
 on the Postgres server,
the mount point
on the Postgres server,
the mount point
 of the
postgres server and the
bashfile
of the
postgres server and the
bashfile
![]() as shown
below.
as shown
below.
![]()
To use the batch transfer for a project, click in the checkbox as shown below.

The image for the transfer will
change from
 to
to
![]() . Now the data
of every table within the project will be transferred via bcp. To
return to the standard transfer, just deselect the checkbox.
. Now the data
of every table within the project will be transferred via bcp. To
return to the standard transfer, just deselect the checkbox.
The user
 executing
the transfer must be in the role
executing
the transfer must be in the role
 pg_execute_server_program.