
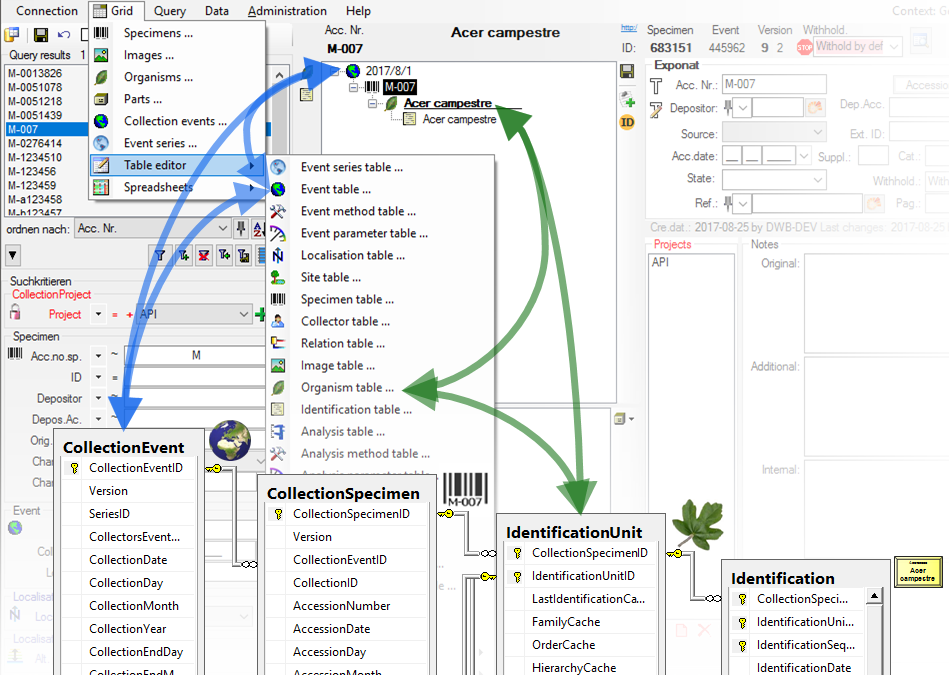
For the data selected in the main window the table editors offer a direct access
to the tables of the database as shown in the image below. In the hierarchy tree
of the main window every entry corresponds to a table in the database, marked
for the image below for the tables CollectionEvent and IdentificationUnit. Underneath the menu
 Grid select one of the
 Table editors (see below). For an introduction see a short tutorial
 .
.
A window with the content of the
table will open. Columns with a gray background can not be edited here.
Columns with a light gray background are linked to the contents of lookup tables
where you can change according to the contents of these tables. If you are using the optimzed query
 certain columns that are linked to lookup
tables show the translated content instead of the IDs. With the
ID button
you can change back to the original, not translated content of the table.
The tables below are examples for those that are included for direct access via a table editor:
certain columns that are linked to lookup
tables show the translated content instead of the IDs. With the
ID button
you can change back to the original, not translated content of the table.
The tables below are examples for those that are included for direct access via a table editor:
 Collection events
 Collection event localisations
 Collection event site properties
 Specimens
 Collectors
 Specimen images
 Organisms
 Identifications of the organisms
 Analysis of the organisms
 Specimen parts
 Processings of the specimen parts
Select
 Set timeout ... from the menu to
increase the
default timeout from 5 seconds to a higher value, e.g. for
greater amounts of data.
Set timeout ... from the menu to
increase the
default timeout from 5 seconds to a higher value, e.g. for
greater amounts of data.
With the
 button you can set the widths
of the columns according to the header and the content. With the
button you can set the widths
of the columns according to the header and the content. With the
 button the width is set
to the content. After the column width is set, this will be indicated with a
yellow background
button the width is set
to the content. After the column width is set, this will be indicated with a
yellow background
 . Click again on the
button to release the setting of the column
width
./font>
. Click again on the
button to release the setting of the column
width
./font>

You can either edit the contents of the table directly or perform changes to
any number of marked fields. For an introduction see a short tutorial
. To mark a whole column use the  button. Once you have selected the contents to change, select one of the modes
of change that appear in the upper left corner. The modes of change are:
button. Once you have selected the contents to change, select one of the modes
of change that appear in the upper left corner. The modes of change are:
Insert: Insert the given value at the
beginning of the content
 Append: Append the given value at the end of the content
 Replace: Replace a string in the content with the given value
 Clear: Remove the content
of the field (for removal of the whole dataset see below - Deleting
Clear: Remove the content
of the field (for removal of the whole dataset see below - Deleting
 )
)
 Trim: Remove leeding and trailing space
After selecting the change mode, enter the text in the field where necessary and click on the corresponding button to perform the changes.
The
Replace option allows to handle
the return � and tab → sign via the context menu
.

To filter the content of the table, click in the column that should be used for filtering. Then choose the mode of comparison:
If you want the filtering to be case sensitive, choose the
 a<>A option. After all parameters are set, click on the
button. To undo the filtering, click on the
a<>A option. After all parameters are set, click on the
button. To undo the filtering, click on the
![]() button. This will reset the data to the
last saved version. If you want your changes to be saved, click the
button. This will reset the data to the
last saved version. If you want your changes to be saved, click the
 button before you reset the filtering. If you close the window all changes so
far will be saved automatically. So if you do not want to save your changes,
click on the
button before you reset the filtering. If you close the window all changes so
far will be saved automatically. So if you do not want to save your changes,
click on the
![]() button before closing the window. For an
introduction see a tutorial
.
button before closing the window. For an
introduction see a tutorial
.
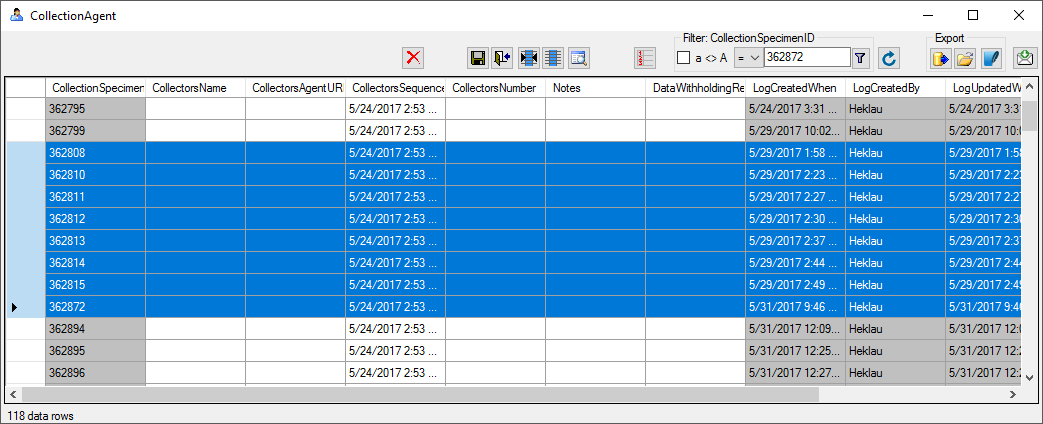
To
delete the data from the database, mark them as shown in the image below and click on the
button.

To
move data within a table, you can select them and choose
Copy from the context menu. Then select the
place where the data should be copied to and choose
 Paste from the context menu. To remove selected data, choose
Clear selected cells. This is demonstrated in a short tutorial
.
Paste from the context menu. To remove selected data, choose
Clear selected cells. This is demonstrated in a short tutorial
.

For an introdution see a short tutorial
.
To
export the data as a tab separated text file, click on the
button. The file will be automatically saved in
your application directory..
To export the data in a SQLite database click on the
 button. The data will be exported into the SQLite database
DiversityCollectionTables.sqlite in the folder Export in your application
directory. If you want to save previous exports, please rename the SQLite
database or copy it to a different directory.
button. The data will be exported into the SQLite database
DiversityCollectionTables.sqlite in the folder Export in your application
directory. If you want to save previous exports, please rename the SQLite
database or copy it to a different directory.
To
see the log data of the table, you can click on the
Log data
 button. The content of the log table can
not be changed, but is read only.
button. The content of the log table can
not be changed, but is read only.