 )
from http://www.microsoft.com/downloads/.
Start the program and follow the instructions for the installation. After the installation make shure to get the latest updates
using Windows Update.
)
from http://www.microsoft.com/downloads/.
Start the program and follow the instructions for the installation. After the installation make shure to get the latest updates
using Windows Update.DiversityDescriptions uses Microsoft SQL-Server 2012 or higher as database engine. When you have a database file from an older version of Microsoft SQL-Server, they can be attached to the newer version, since it will be updated automatically. You may use a centralized SQL-Server that is accessible by several users, e.g. over a local area network or run a local database server on your own PC.
If you do not have a database server with DiversityDescriptions already available, you have
to install the database engine first. Download the free version of Microsoft SQL Server Express (e.g. SQLEXPRADV_x86_DEU.exe )
from http://www.microsoft.com/downloads/.
Start the program and follow the instructions for the installation. After the installation make shure to get the latest updates
using Windows Update.
When you have installed and configured your database server, you need an empty database to be used with your client applications. In principle two different procedings are available:
 and DiversityDescriptions_Base_log.LDF
 from http://www.diversityworkbench.net/Portal/ provided
as a zip archive (DiversityDescriptions.zip) and copy them into your database directory. Then follow the steps described
below.
from http://www.diversityworkbench.net/Portal/ provided
as a zip archive (DiversityDescriptions.zip) and copy them into your database directory. Then follow the steps described
below.The first alternative is also feasable, if you get database files from a different server or if you want to relocate the database files to a different disk directory. In the latter case you first have to "Detach" ("Trennen") your database, move the files to the target directory and then "Attach" ("Anfügen") it.
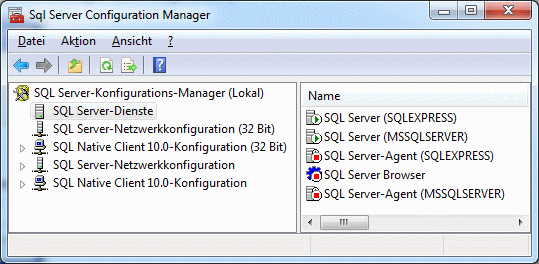
To configure your server, launch the SQL Server Configuration Manager (see image below, please consider that in this example the two SQL-Servers "SQLEXPRESS" and "MSSQLSERVER" are installed).
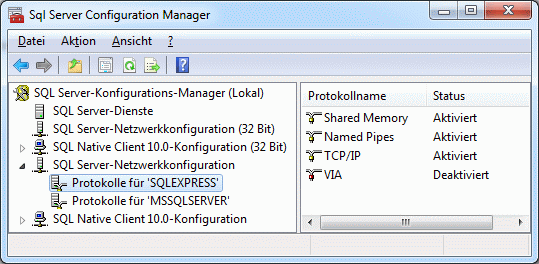
Then click on the "Protocols for SQLEXPRESS" node. Right click on "TCP/IP" in the list of Protocols and choose "enable" for TCP/IP.
Right click on the TCP/IP node and select "Properties" to open a window as shown below.
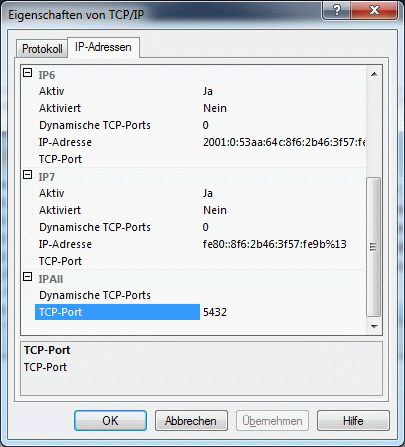
In the part IPALL clear out the value for "TCP Dynamic Ports". Give a TCP-Port number to use when making remote connections, e.g. "5432" as shown above. You have to restart the SQL Server Express service before you can connect to your database.
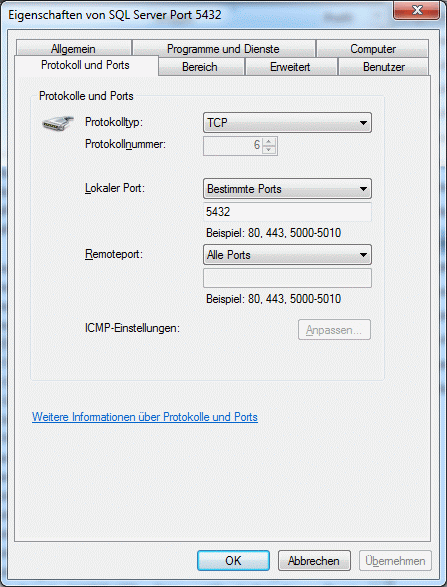
If you use a database on a centralized server that shall be reachable over a computer network, make sure that the firewall of the server allows access via the port you set for the connections (see below).
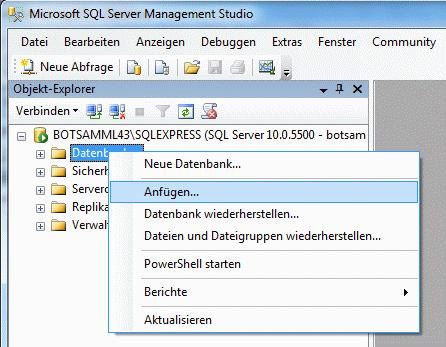
Start the Microsoft SQL Server Managment Studio and connect to the database server with a system administrator login. Attach the database as shown below: Choose the node "Databases" ("Datenbanken") and right-click on it to open the context menu (see below). Then choose "Attach" ("Anfügen") from the context menu. A window will open where you can choose the file DiversityDescriptions_Base.MDF from your database directory and attach it to the database engine. The database files you attach must be created by a database server of the same or a lower version. Usually the Mircosoft SQL Server supports three predecessor versions. E.g. if you are using Microsof SQL Sever 2014, you should be able to attach database files for SQL Server 2014, 2012 and 2008 R2.
Start the program  DiversityDescriptions.exe
and in the main window click on the
DiversityDescriptions.exe
and in the main window click on the  button or choose Connection ->
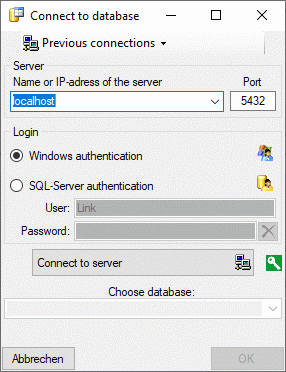
 Database ... from the menu. A window as shown below will open. Here enter the
server name or the IP address (here "localhost" for a local database on the own PC) and its IP port (5432 in example
below) to connect to your SQL-server and select the database file in your directory.
Database ... from the menu. A window as shown below will open. Here enter the
server name or the IP address (here "localhost" for a local database on the own PC) and its IP port (5432 in example
below) to connect to your SQL-server and select the database file in your directory.
To configure your database, use the client as described in Database configuration.