 Replicator
or Administrator.
Replicator
or Administrator.
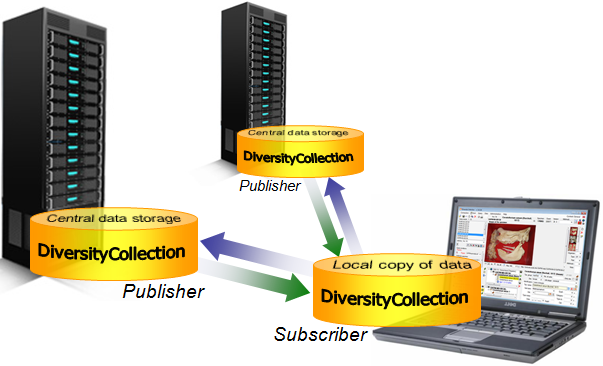
If you wish to work with your data on a local database (called subscriber), e.g. on your laptop, not linked to a database on a central server (called publisher) and these data should be synchronized with the data in the database on the server, you may use the replication function of DiversityCollection. To install the database on your local computer see the installation section.
To use the replication function you
require the
roles
Replicator
or Administrator.

To define a publishing database
choose Data ->
 Replication ->
Add Publisher
from the menu. A
window will open where you choose the publisher. After
the publisher is
set, you may transfer data between your local database
(subscriber) and the
publisher. This function is only available for
administrators.
Replication ->
Add Publisher
from the menu. A
window will open where you choose the publisher. After
the publisher is
set, you may transfer data between your local database
(subscriber) and the
publisher. This function is only available for
administrators.

To remove a publisher from the list
choose Data ->
Replication ->
[Publisher] ->
Remove from
the menu (where
[Publisher] is the name of the publishing database on the
publishing server). This
function is only available for administrators.
Initially you may wish to remove
all previous data
from your local database (subscriber). Choose
Data ->
Replication ->
![]() Clean database ...
from
the menu. A window will open as shown below where you may choose
the ranges
which should be cleared:
Clean database ...
from
the menu. A window will open as shown below where you may choose
the ranges
which should be cleared:
Choose the data ranges you wish to
clear and click on the
![]() button. All
tables which contain data will be listed as shown
below.
button. All
tables which contain data will be listed as shown
below.

Choose the tables which should be cleared and click on the Clean database button. Please keep in mind that you can not delete data from a table as long as there is data in a related table depending on the data you wish to delete. The sequence of the tables is organized to avoid these problems.

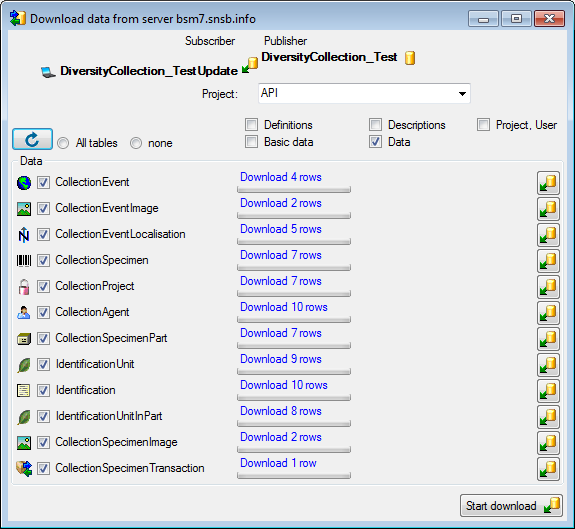
To download data from the
publisher choose Data ->
Replication ->
[Publisher] ->
Download from
the menu (where
[Publisher] is the name of the publishing database on the
publishing server). A
form will open as shown below. Choose the project of the data
and the data
ranges (see above) which you wish to download. Click on the
![]() button to
list the tables
containing data. To start the download click on the
Start download
button. With the
button to
list the tables
containing data. To start the download click on the
Start download
button. With the
 Force download, ignore conflicts option you can decide whether or
not the data in your local database (= Subscriber) should be checked for changes
before you download the data from the publisher.
Force download, ignore conflicts option you can decide whether or
not the data in your local database (= Subscriber) should be checked for changes
before you download the data from the publisher.
If not all data should be
included in the replication, you have the option to set a filter. Click on the
button for the table where the data should be filtered to set this filter. A window as shown
below will open.

All columns of the table
will be listed and allow you to set the filter. To inspect the filtered data,
click on the
 button. Click on the
 button to see the current filter. If a filter is set this will
be indicated with a blue background
button to see the current filter. If a filter is set this will
be indicated with a blue background
 .
.

To merge data from your local
subscriber database with the
publisher you must first choose a project. Choose
Data ->
Replication ->
[Publisher] ->
Merge
from the
menu ([Publisher] is the name of the publishing database
on the
publishing server). As described for the download, choose the data ranges
and
click on the
![]() button. To start
the upload click on the Start merge
button.
button. To start
the upload click on the Start merge
button.

To transfer data from your local
subscriber database to the
publisher you must first choose a project. Choose
Data ->
Replication ->
[Publisher] ->
Upload
from the
menu ([Publisher] is the name of the publishing database
on the
publishing server). As described for the download, choose the data ranges
and
click on the
![]() button. To start
the upload click on the Start upload
button.
With the
Force upload,
ignore conflicts option you can decide whether or not the data in server (=
Publisher) should be checked for changes before you upload the data from your
local database (= Subscriber).
button. To start
the upload click on the Start upload
button.
With the
Force upload,
ignore conflicts option you can decide whether or not the data in server (=
Publisher) should be checked for changes before you upload the data from your
local database (= Subscriber).
As described for the
download, data may be filtered with a click on the
button (see above).

To fix problems that may interfere with the
replication you find some tools under the menu Data ->
Replication ->
[Publisher] ->
Tools...
from the
menu ([Publisher] is the name of the publishing database
on the
publishing server). A window will open as shown below.
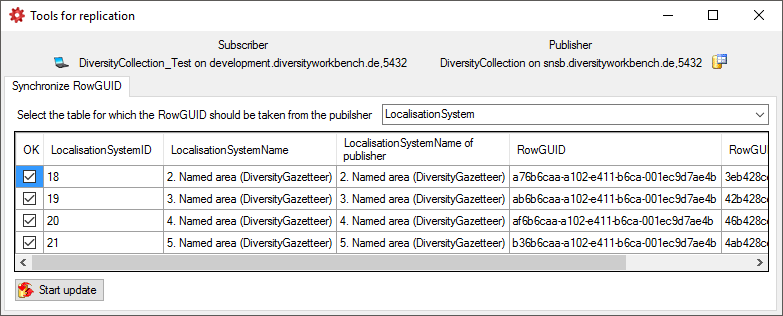
You may synchronize the RowGUIDs between basic
subscriber and publisher tables if for any reason these are differing, e.g. due
to manual insert. Choose the table that should be synchronized. The tables will
be compared for both publisher and subscriber. The datasets with identical key but different RowGUID will be listed
(see above). Click on the
 Start update button to synchronize the RowGUIDs.

If the transfer of data was successful, the numbers of the transferred data will be shown as below.

During the download or upload a conflict may occur, if the data has been edited in both databases. This will be indicated as shown below.

Click on the
button to open a
window as shown below where you can choose between the two
versions of the data
as found in the publisher and the subscriber
database.

The conflicting columns are marked
red.
For text values the program will create a combination of both
values (see above)
in a merged version of the data. Choose the preferred version of
the data and
click Solve conflict
 button.
If you can not
solve a conflict, use the Ignore conflict
button.
If you can not
solve a conflict, use the Ignore conflict
 or
Stop
conflict resolution
or
Stop
conflict resolution
 buttons respectively.
At the end of each transfer a report will be created with a summary for every table which has been included.