 Export ->
 Matrix wizard ... from the menu to open the window for the export.
With this form you can export the descriptor and description
data from the database to a tabulator separated text file. The output includes the
database keys. Furthermore you have the option to create rsp. update import mapping
data and generate an matrix import schema. Therefore you may correct the data, e.g.
by using a spreadsheet program and re-import the changes by using the
matrix import wizard. Choose Data ->
Export ->
Matrix wizard ... from the menu to open the window for the export.

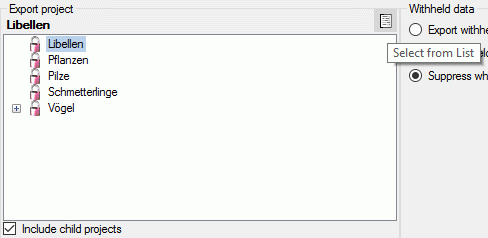
In the Export project section all projects of the
database are shown as a tree. Select here the project that shall be exported. In
case of hierarchically organized projects the subordinated projects will be included
for export, if the Include child projects option is checked. You may pass
a description list to the form by starting a query in mode "Edit descriptions".
Now you have the option to select single descriptions for export. In this case the
Export project section shows the button  to switch to the list view (see below).
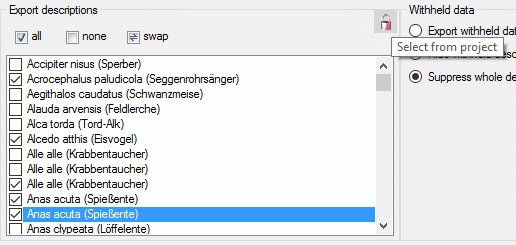
In the Export descriptions section you find all
description titles that have been passed to the export form (see below). You may
select all entries by clicking the
 all button, deselect all entries by clicking the
 none button or toggle your selection by clicking the
 swap button. By clicking the button
 you will return to the Export project view.
The Withheld data section allows control over export of datasets that contain entries with data status "Data withheld". Option Supress whole description (default) excludes all descriptions form export where at least on descriptor is marked with "Data withheld". Option Hide withheld descriptor excludes only the corresponding descriptor data from the description. Option Export withheld data does not exclude any data from export.
The Options section allows the selection of the Descriptor tree: and descriptor sequence number bounds (From descriptor: and to descriptor:) for restriction of output table columns.
If you select option Use sequence, the descriptor state sequence numbers will be inserted into the output table instead of the state names. These sequence numbers will be inserted into the selected import session (see below) for a later re-import of the data. If you export the descriptive data to edit them with a spreadsheet tool, e.g. Microsoft Excel, you have to identify the active categorical states by their sequence number.
To include all exported data in quotes, check option "quotes". Select Trim end to remove white characters (e.g. blank or word wrap) at the end of texts. By specifying the State separator: (default , ) you determine how multiple categorical state values will be concatenated in the table cells. By changing the selected Lang. settings: you may adapt the output of floating point numbers or date and time fields to your needs.
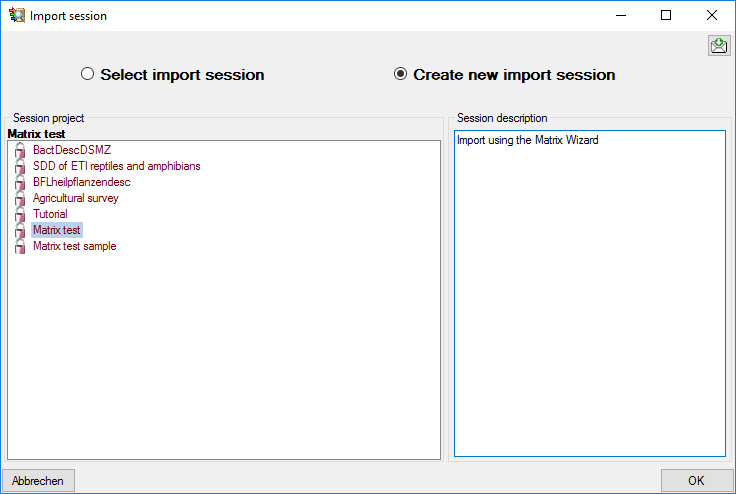
The section Import session: is relevant
if you want to edit the description data in a separate spreadsheet programme and
re-import the edited data using the Matrix Import Wizard. To select an import session
cick on button
 Select and a window as shown below will be opened. You may either
select an existing import session, which will be updated with the exported data,
or create a new one.
Select and a window as shown below will be opened. You may either
select an existing import session, which will be updated with the exported data,
or create a new one.
During generation of the matrix data file the relevant
data for re-import will be stored in the selected import session. Additionally an
xml import schema file will be generated as <resources
directory>\Export\Matrix_<Database name>_<Project>_Schema.xml.
If you do not require the data for re-import, simply do not select an import session
or click on button
 to cancel an existing selection.
Before starting the export, the export file name should
be checked. The file name is generated as <resources
directory>\Export\Matrix_<Database name>_<Project>.txt.
This default setting may be changed by editing the File name or
by navigating at the target location by pressing the
 button besides the file name. To generate an output without BOM, release the
 button.
To check the export, click on the Test export
 button.
In the Output preview data grid the first few lines will be displayed
(see picture above). To generate the table file press the Start export
button.
In the Output preview data grid the first few lines will be displayed
(see picture above). To generate the table file press the Start export
 button. During test and export the icon of the button changes to
 and you may abort processing by clicking
the button.
and you may abort processing by clicking
the button.