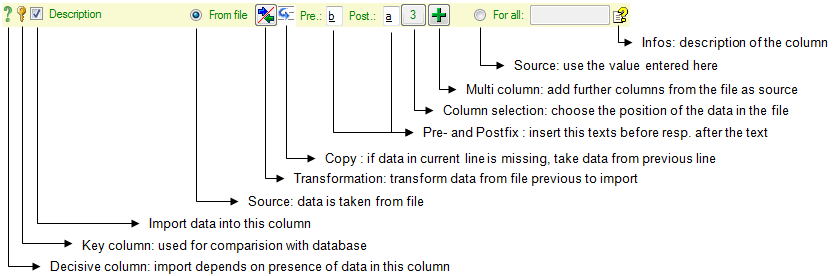
If the content of a file should be imported into a
certain column of a table, mark it with the
 checkbox.

The import depends upon the
data found in the file where certain columns can be chosen as decisive, that
means only those lines will be imported where data is found in
any of these columns. To
mark a column as decisive, click on the
icon at the beginning of the line.

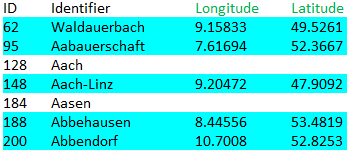
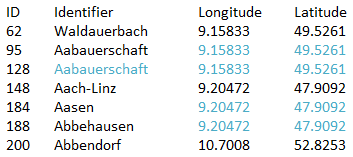
In the example shown below, the file columns Longitude, Latitude (resp. PlotGeography_Cache) were marked as decisive. Therefore only the five lines containing content in this columns will be imported.

For the options  Merge,
 Update and
 Attach the import
compares the data from the file with those already present in the database. This
comparision is done via key columns. To make a column a key column, click
on the
icon at the beginning of the line. You can
define as many key columns as you need to ensure a valid comparision of the
data.
Attach the import
compares the data from the file with those already present in the database. This
comparision is done via key columns. To make a column a key column, click
on the
icon at the beginning of the line. You can
define as many key columns as you need to ensure a valid comparision of the
data.

The data imported into the database can either be taken
From file or
the value, that you enter into the window or select from a list, can be used
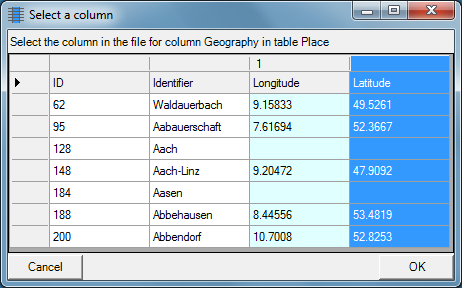
For all datasets. If you
choose the From file option, a window as shown below will pop up. Just click in
the column where the data for the column should be taken from and click
OK (see below).
If you choose the
For all option, you can either enter
text, select a value from a list or use a
checkbox for YES or NO.

The imported data may be transformed e.g. to adapt them to a format demanded from the database. For further details please see the chapter Transformation.

If data in the source file is missing in subsequent lines, e.g.
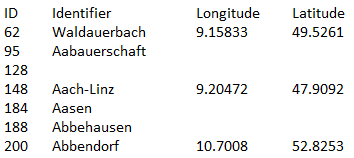
you can use the
Copy line option to fill in missing data
as shown below where the blue values are copied into empty fields during the
import. Click on the
button to ensure that missing values are filled
in from previous lines.
In addition to the transformation of the values from the file, you may add a pre- and a postfix. These will be added after the transformation of the text. Double-click in the field to see or edit the content. The pre- and a postfix values will only be used, if the file contains data for the current position.
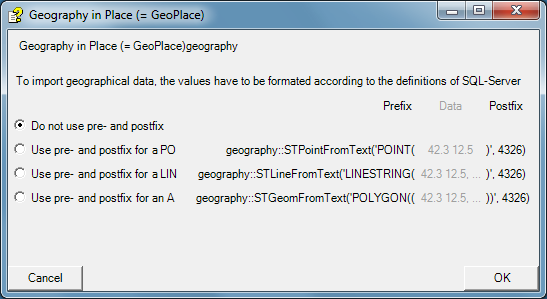
For the datatype geography the
pre- and postfixes will be automatically set to enable the import. The preset
values by default are set for points as geographical units. You may change this
to predefined types like lines or areas. Click on the  button at the end of the line to open the
information window. Here you can choose among the types mentioned above.
button at the end of the line to open the
information window. Here you can choose among the types mentioned above.

If, for any reason, a column which should take its
content from the imported file misses the position of the file or you want to
change the position, click on the
button. In case a position is
present, this button will show the number of the column. A window as shown below
will pop up where you can select or change the position in the file.

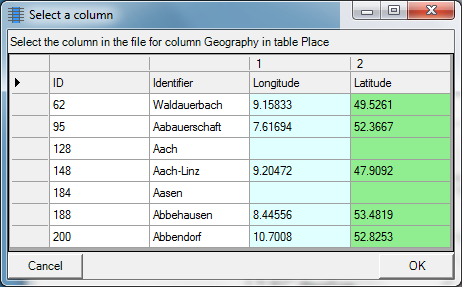
The content of a column can be composed from the
content of several columns in the file. To add additional file columns, click on
the button. A window as shown below will pop up, showing
you the column selected so far, where the sequence is indicated in the header
line. The first column is marked with a blue background while the
added columns
are marked with a green background.
To remove an added column, use the  button.

The button opens a window displaying the information
about the column. For certain datatypes additional options are included (see
Pre- and Postfix).