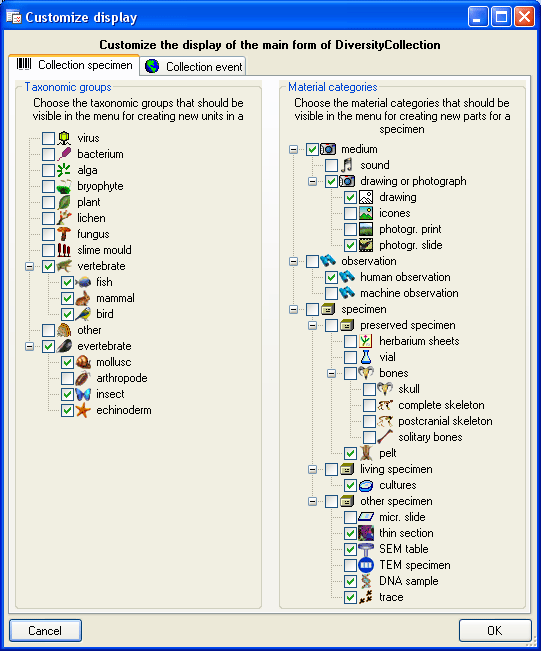
The main window can be customised in several parts. To change the visible parts in the main window select Administration - Customize display ... from the menu. A window (see below) will open where you can select the groups which should be displayed. In the first tab you can change the visibility for the taxonomic groups and material categories.
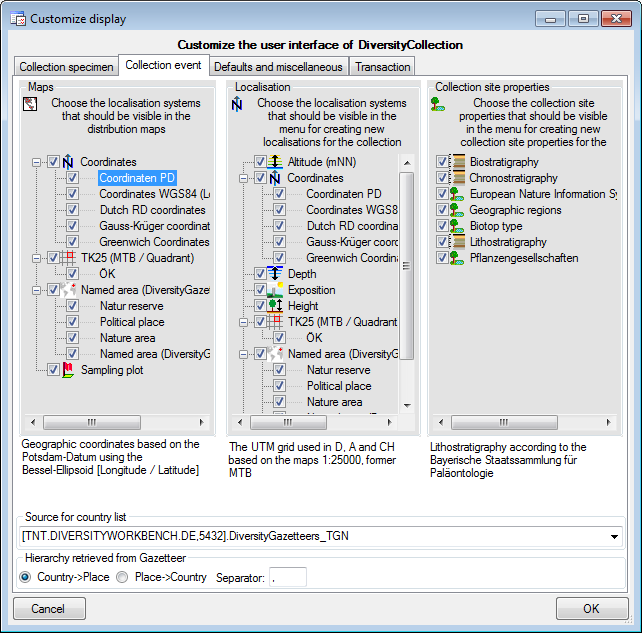
In the second tab (see
below) you can set
 distribution map
 localisation systems available for the selection in the drop down menus
 collection site properties available for the selection in the drop down menus
In the third tab (see below) you can add the name of the responsible person or choose the current user for several entries and show/hide the controls for the exsiccata.
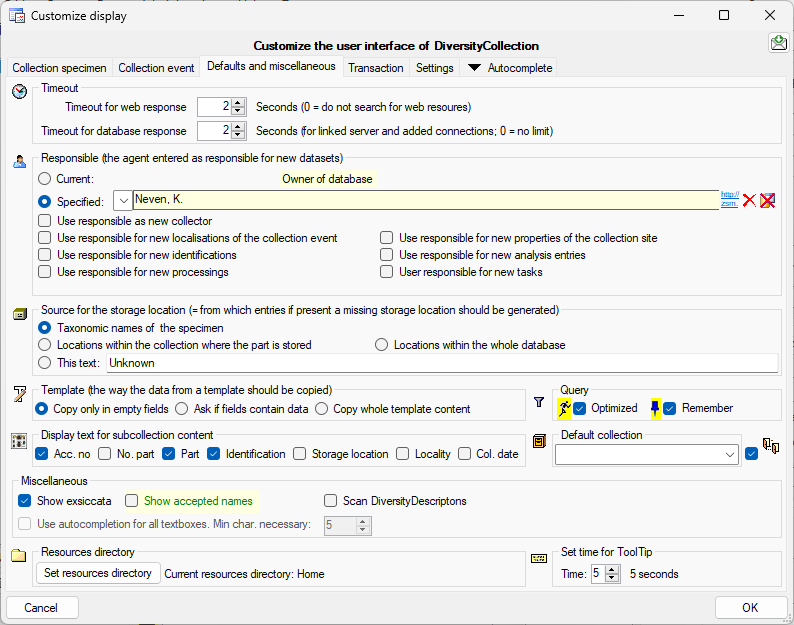

The timeout for web resources and databases either
added manually or via linked server can be set to adapt to the velocity of the
available net. If you set the Timeout for web response to 0, the application
will ignore any resources retrieved from the web. By default these values are
set to 30 seconds. This is demonstrated in a short tutorial
 .
.
You can choose to either use the current user or a specified user as a responsible for new datasets for various tables (see image above).
The source for the list for the storage location
can be set as shown below:


There are 3 possibilities:
The display text for the content of the
subcollection
 can be composed of the fields
listed below:
can be composed of the fields
listed below:

The maximal content of a subcollection
can be restricted hire
 for new parts can set here as well.
The default collection
for new parts can set here as well.

 Use translations: If
the data fields for the exsiccatal
series should be displayed.
Use translations: If
the data fields for the exsiccatal
series should be displayed.
 Show exsiccata: If
the data fields for the exsiccatal
series should be displayed.
Show exsiccata: If
the data fields for the exsiccatal
series should be displayed.
 Show accepted names: With this option
the names linked to DiversityTaxonNames will be checked for the synonymy status.
Accepted names will be shown with a green color and for synonyms the accepted
name will be displayed above the current name (see below).
Show accepted names: With this option
the names linked to DiversityTaxonNames will be checked for the synonymy status.
Accepted names will be shown with a green color and for synonyms the accepted
name will be displayed above the current name (see below).

 Scan DiversityDescriptions: If
accessible DiversityDescriptions databases should be scanned for
links to the current dataset.
Scan DiversityDescriptions: If
accessible DiversityDescriptions databases should be scanned for
links to the current dataset.
 Load datasources: If
the datasources on linked servers
should be loaded together with the start of the programm.
Load datasources: If
the datasources on linked servers
should be loaded together with the start of the programm.
Use autocompletion
for all textboxes: Available in upcoming version - If this
option is choosen, textboxes will autocomplete starting with the
specified text length.
You can choose the mode of the autocompletion. There are 4 options:
The set the option for optimized queries  and the option to
  remember
the query settings as default, select the
Optimized resp.
Remeber option. The corresponding buttons in
the query will be hidden providing more space.
remember
the query settings as default, select the
Optimized resp.
Remeber option. The corresponding buttons in
the query will be hidden providing more space.
The directory for the resource can be set with as shown in the area below. Here parameters for example the spreadsheets are stored. See chapter Resources for details.

You can set the time for which the tooltip should be shown. In the customize window the setting will be changed instantly while in the main windows the setting will only be effectiv after restart of the application.

You have 3 options:
To customize the sequence and format of the
transactions shown in the tree, choose Administration -> Customize display
... from the menu and then select the part Transaction (see below). If you
want to change the default sequence and/or display type, click on the
![]() button. Use the
button. Use the
 and
and
 buttons to change the position of a
certain type of transaction and choose one of the display types. To reset these
settings to the database default, use the
buttons to change the position of a
certain type of transaction and choose one of the display types. To reset these
settings to the database default, use the
![]() button. If your transactions are organized within a hierarchy, you can
include the titles of the superior hierarchies with the
Include superior transaction in title option.
button. If your transactions are organized within a hierarchy, you can
include the titles of the superior hierarchies with the
Include superior transaction in title option.
![]()
As an administrator you can add entries to the Standard comments for transactions (see above) that are used to enter standard phrases into the comment field of a transaction.
The default currency for all transaction payments
in the database is Euro. To change the default currency click on the
 Currency button.
The tab
 Settings shows an overview of all
settings set by the user e.g. when linking the sources for identification to a
certain database
Settings shows an overview of all
settings set by the user e.g. when linking the sources for identification to a
certain database
 or webservice
 via the
button (see below). Relations to Diversityworkbench modules include the database
and the project
via the
button (see below). Relations to Diversityworkbench modules include the database
and the project
 as shown below. With the Reset
  button, you can clear the whole
settings. These settings can not be defined here, but are set in the main form in
the corresponding parts e.g. the identification. These settings are stored in
the database for every user (UserProxy -> Settings).
button, you can clear the whole
settings. These settings can not be defined here, but are set in the main form in
the corresponding parts e.g. the identification. These settings are stored in
the database for every user (UserProxy -> Settings).
