Best practice
![]()
Loan transactions
The Loan Transactions section of DiversityCollection provides a solution for managing and documenting all aspects of loaned objects. This feature enables you to handle every stage of the loan process.
Within the Loan Transactions, you can:
- Create and manage new loans.
- Use customisable letter templates, including loan slips, reminders, dunning letters, acknowledgements of receipt and more.
- Record and track forwarded items.
- Manage returns and document any damage for future reference.
- Generate statistics to analyse loan activity.
Involved Modules of the DiversityWorkbench framework are:
This chapter outlines the recommended best practices for managing loan transactions within our software. It is divided into the following steps
- Prerequisites: All steps that must be completed before starting a loan process.
- Create a new loan: Initiate a loan, specify contact information, set loan conditions, list the requested objects, and prepare a cover letter.
- Record the returns of the loans: Document the return of loaned objects and write acknowledgements of receipt.
- Create reminders and dunning letters: Document expired loans and send reminders.
- Document and manage forwarding: Record and document forwarded loans.
For further information, see the chapter Loan in the module DiversityCollection.
Prerequisites
 DiversityAgents: The institution/lender and the borrowing institution must both be managed in DiversityAgents and must have address information stored there. The address information is used for creating letters, etc. For information on creating a new institution or person in DiversityAgents, see the chapter Add a new Instituition/Agent of the DiversityAgents module. For information on adding an institution’s address information, see the chapter Contact Data.
 DiversityCollection: Unlike other data, user authorisations for loans are not only managed via projects but also via assignment to collections. A prerequisite for processing loans is having the role of CollectionManager or Administrator. This means the user handling the loans must have the role CollectionManager or Administrator for the collection whose objects are being loaned. In addition to the authorization for the collection, the user must also have authorization for the project to which the items to be borrowed belong.
For more information on rights management in DiversityCollection see the chapter Rights management. For more information on handling collections in DiversityCollection, see the Collection chapter.
Create a new loan
To open the loan management window, select ![]() Transaction Management →
Transaction Management → ![]() Transaction… from the Administration menu in the main window (see screenshot below).
Transaction… from the Administration menu in the main window (see screenshot below).
![]()
A new window will open. Here, you can manage all the different types of transactions.
-
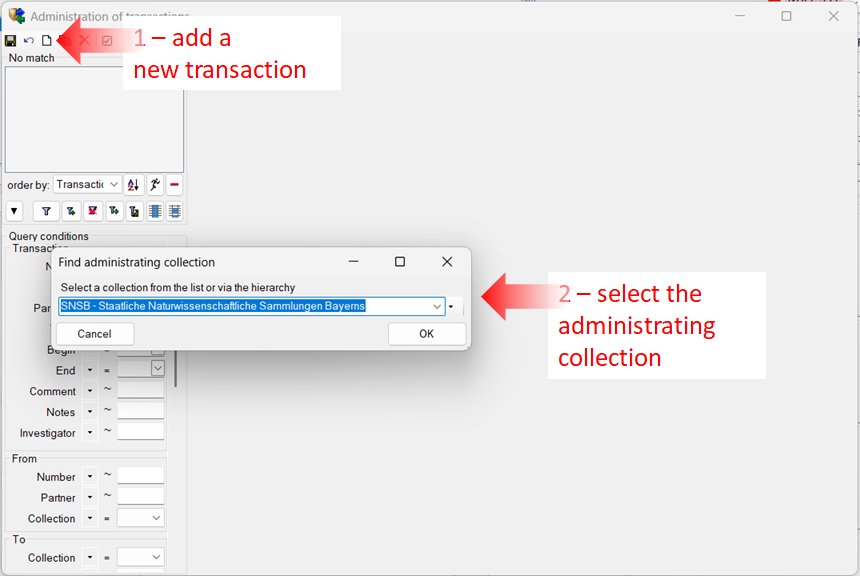
To add a new loan, click on the button with the white sheet
 (see point 1 in the screenshot).
 -
A first dialogue window will appear, in which you will have to select the administrating collection that contains the requested objects (see point 2 in the screenshot).
-
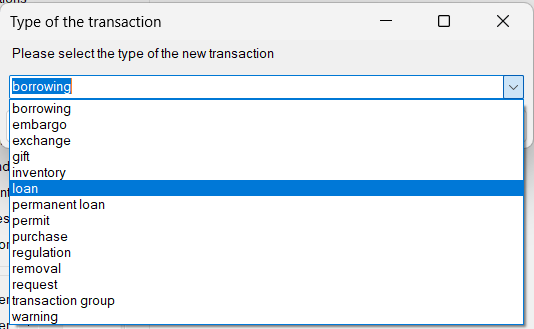
Another dialogue box will appear asking you to select the type of transaction. In our case, this is “Loan” (see image below).
-
In the next dialogue box, enter the name of the transaction. In our example it is “TestAusleihe”.

-
The new loan transaction is created.
-
There are some required fields. The first two are pre-filled after creation (see points 1 and 2 in the image below).
-
Next, you need to enter the “From” and “To” institutions. The “From” field refers to the institution/agent from which the objects are borrowed. The “To” field refers to the receiving institution. These fields are linked to the DiversityAgents module to retrieve the address information for letters.
-
To do so, click the “Ammonite” button
 next to the fields (see step 3).
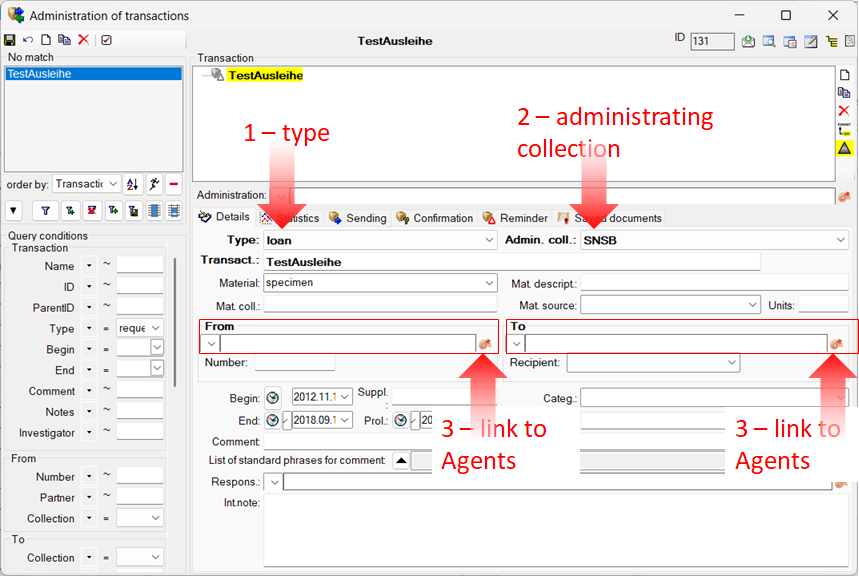
-
A query window for DiversityAgents will open. There, you can search for institutions/agents. Confirm your selection by clicking .

-
You can see the linked “From” and “To” fields (see point 1 and 2 in the image below).
-
Next, enter a start and end date for the loan (see point 3 in the image below). The loan period can be extended if necessary, either within predefined ranges using the ▿ button or by manually setting the date.
-
Don’t forget to save your entries. Click the Save button
 (see point 4 in the image below).
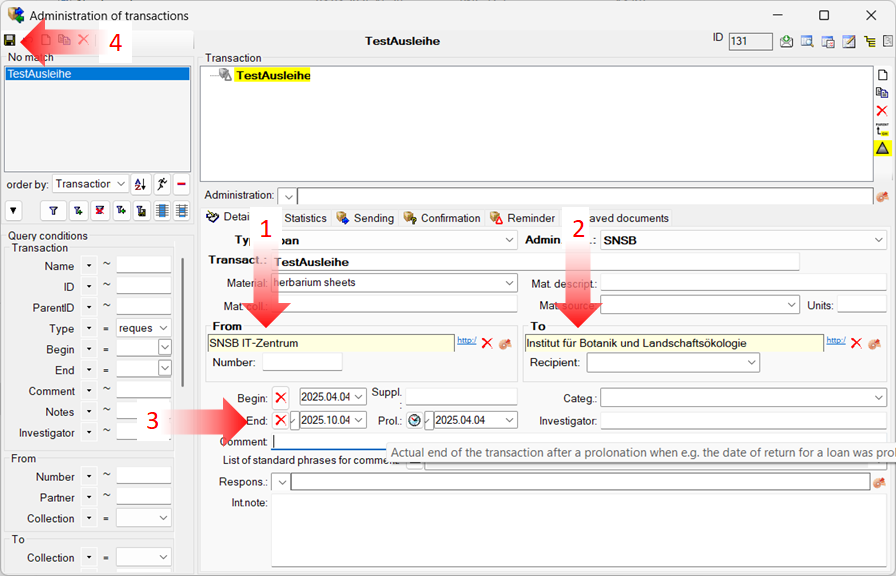
Next, we will add the requested object to the loan and create a cover letter.
Generate a loan slip
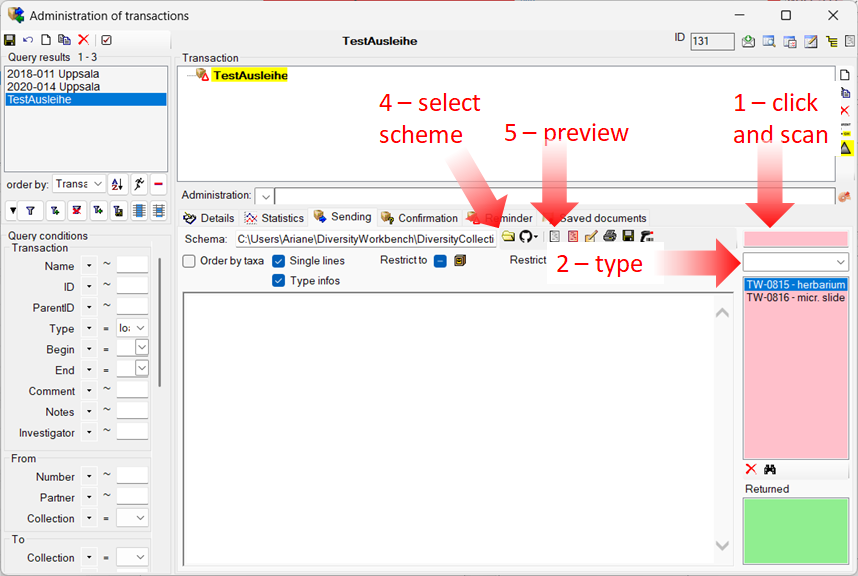
To enter the requested objects and create a cover letter, switch to the “Sending” tab (see image below).
To add the accession numbers, you can either scan the  barcode or enter the accession numbers manually.
-
To scan, right-click the red field (see step 1) and then scan the barcode
 . The accession number of your object will be added automatically to the red list.
 -
If you do not have a barcode scanner, you can manually enter and select the accession number of your object in the field below (see step 2).
-
The objects selected for loan are displayed in the red list.
-
To create a cover letter listing all requested objects, you must first select a schema. To do this, click the folder button (see point 4 in the image above). A few predefined XSLT schemas are provided with the DiversityCollection software; however, you may also create your own. In this example, Sending.xslt was selected.
-
To create and preview the cover letter, click the preview button
 (see point 5 in the image above).
 -
You will be asked if you want to save the cover letter. You can access saved documents at any time via the “
 Saved Documents” tab.
 -
A preview of the cover letter is shown. To print it, click on the printer button
 (see image below).
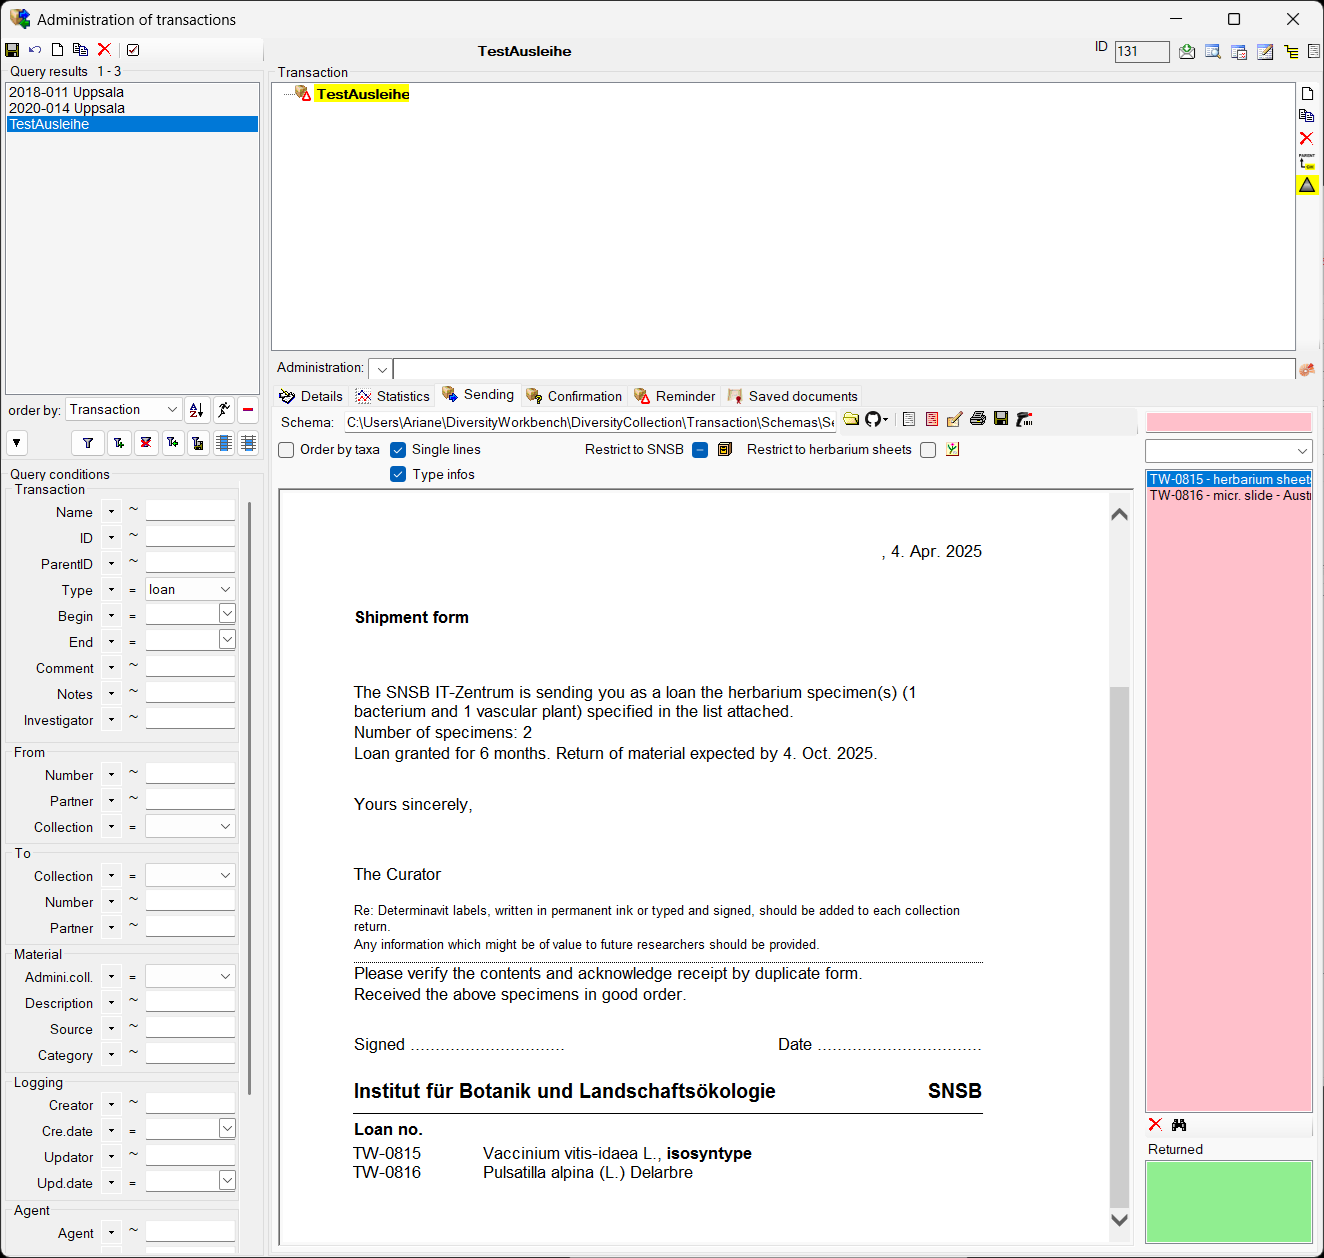
Record the returns of the loans
Once the loan has been partially or fully returned, the accession numbers and their barcodes are scanned and added to the list of returned receipts. In addition, a letter confirming receipt of the returned items is issued.
Create a return transaction
-
To enter a return, create a new object in the transaction tree. To do this, select the transaction for which the return is being made (see point 1 in the image below).
-
Click the “New” button
(see point 2 in the image below).
-
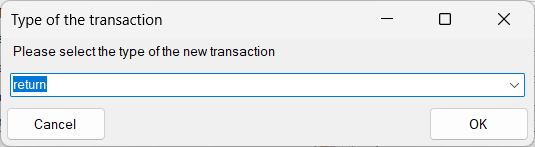
A dialogue will open. Select “return” from the drop-down menu.
-
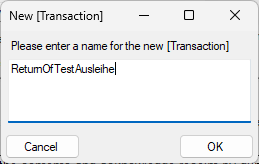
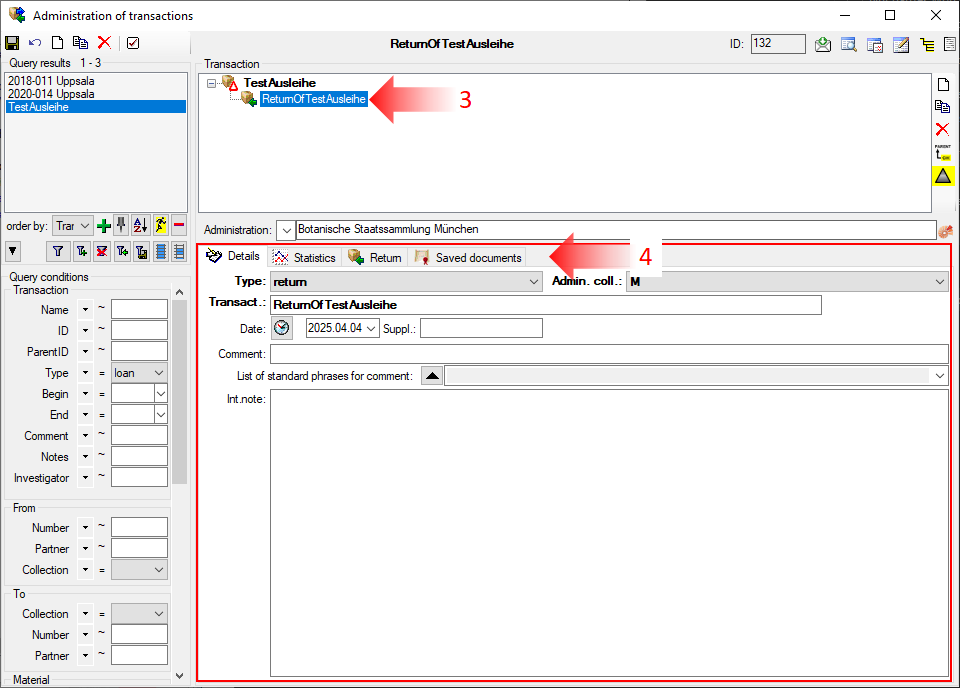
In the next dialogue, enter a name for the return transaction.
-
Then click on the newly created return transaction in the tree (see point 3 in the image below). At the bottom, you will see the tabs for entering your return (see point 4 in the image below).
Add returned objects to the list
To add the returned accession numbers, you can either scan the barcode or move the accession numbers manually.
-
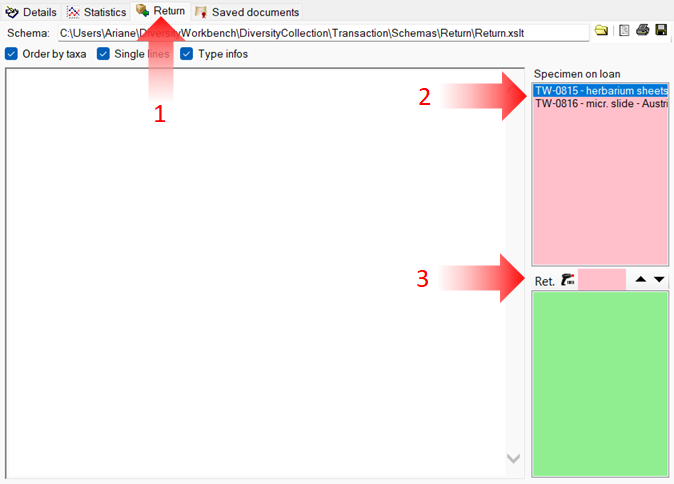
To add the returned accession numbers to the return transaction list, switch to the ‘Return’ tab (see point 1 in the image below).
-
To manually move the accession numbers, select the returned items in the red field. Then move them to the green ‘Return List’ by clicking the down arrow button
 (see point 2 and 3 in the image below).
 -
If you are using a barcode scanner, click in the red field below the green loan list (see point 3 in the image below) and scan your barcodes.
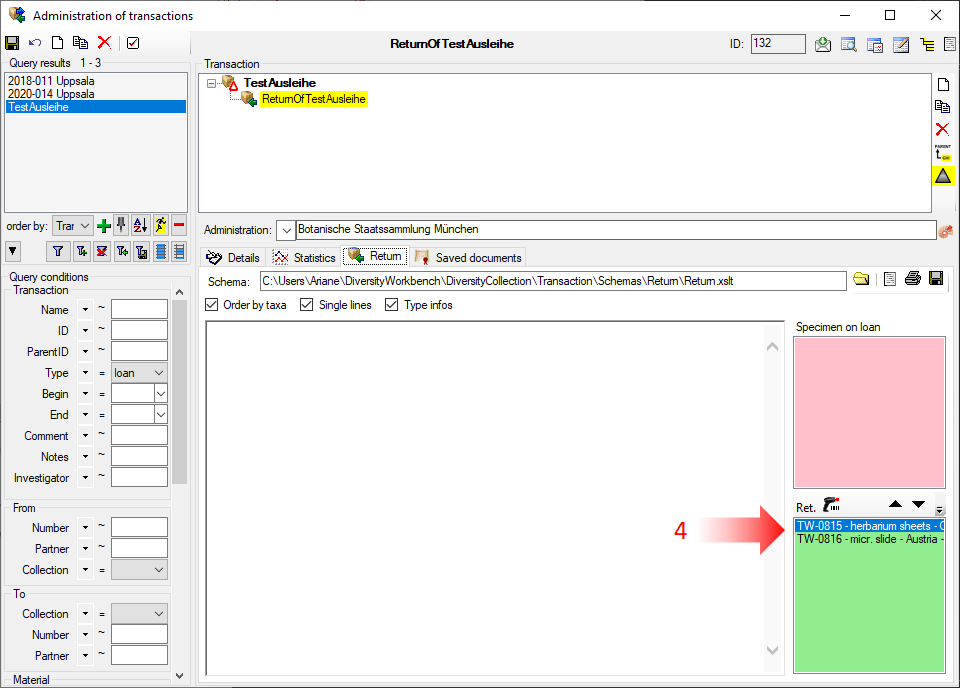
-
The returned accession numbers will appear in the green ‘Return List’ field (see image below).
Create an acknowledgement of receipt
-
To create an acknowledgement of receipt listing all returned objects, you must first select a schema. To do this, click the folder button (see point 1 in the image below). The DiversityCollection software provides a few predefined XSLT schemas; however, you may also create your own. In this example, Return.xslt was selected.
-
To generate and preview the acknowledgements of receipt, click on the preview button
(see point 2 in the image below). -
You will be asked whether you want to save the acknowledgement. Saved documents can be accessed at any time via the “
Saved Documents” tab. -
A preview of the acknowledgement of receipt will be displayed. To print it, click the printer button
(see point 3 in the image below).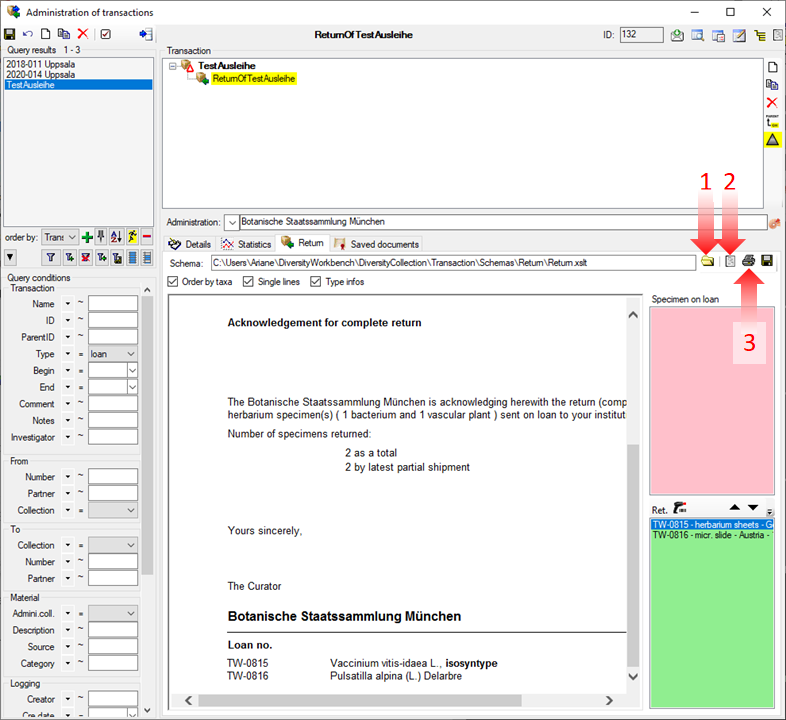
Create reminders and dunning letters
Create a reminder for the acknowledgement of receipt
After a loan has been sent, you can create a letter requesting confirmation of receipt.
-
To create a confirmation letter listing all borrowed items, first select the transaction for which the confirmation letter is being made (see point 1 in the image below).
-
Switch to the Confirmation tab (see point 2 in the image below).
-
To create a confirmation letter, you must first select a schema. To do this, click the folder button (see point 3 in the image below). The DiversityCollection software provides several predefined XSLT schemas; however, you may also create your own. In this example, ConfirmationReceiver.xslt was selected.
-
To generate and preview the confirmation letter, click the preview button
(see point 4 in the image below). -
You will be asked whether you want to save the confirmation letter. Saved documents can be accessed at any time via the “
Saved Documents” tab. -
A preview of the confirmation letter will be displayed. To print it, click the printer button
(see point 5 in the image below).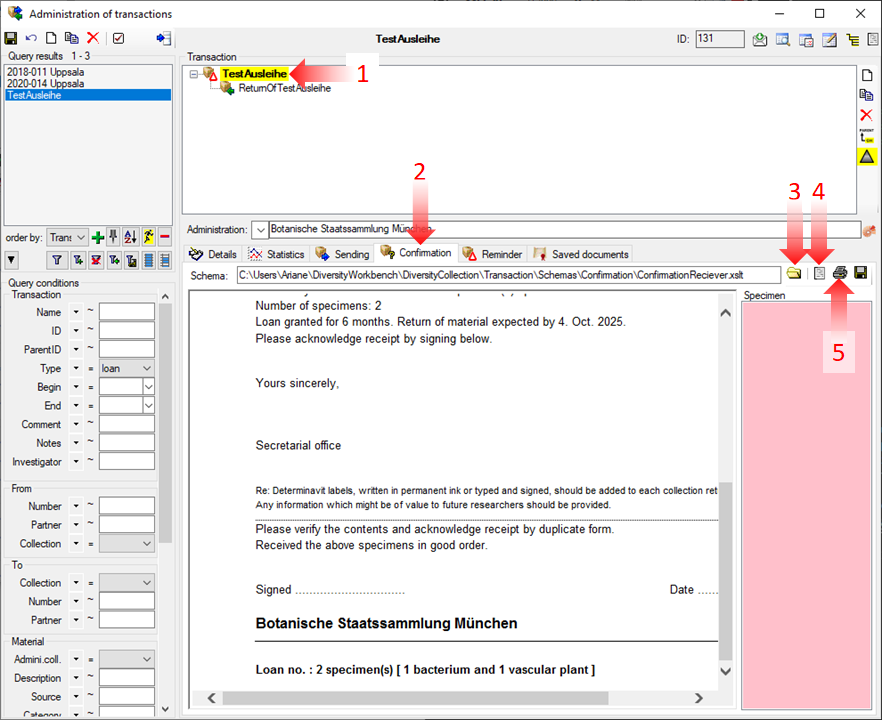
Create a dunning letter
After the loan has expired, you can generate a reminder letter.
-
To create a reminder letter listing all borrowed items, first select the transaction for which the reminder letter is being made.
-
Switch to the Reminder tab (see point 1 in the image below).
-
To create a reminder letter, you must first select a schema. Click the folder button (see point 2 in the image below). The DiversityCollection software provides several predefined XSLT schemas; however, you may also create your own. In this example, ConfirmationReceiver.xslt was selected.
-
To generate and preview the letter, click the preview button
(see point 3 in the image below). -
You will be asked whether you want to save the reminder letter. Saved documents can be accessed at any time via the “
Saved Documents” tab. -
A preview of the reminder letter will be displayed. To print it, click the printer button
(see point 4 in the image below).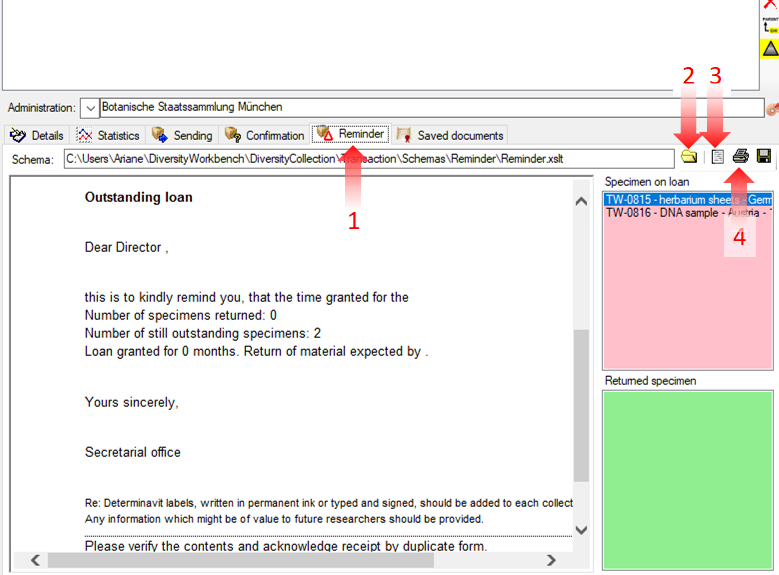
Document and manage forwarding
If the borrower requests forwarding, this can be entered into the database, and a letter of approval can be generated.
Create a forwarding transaction
-
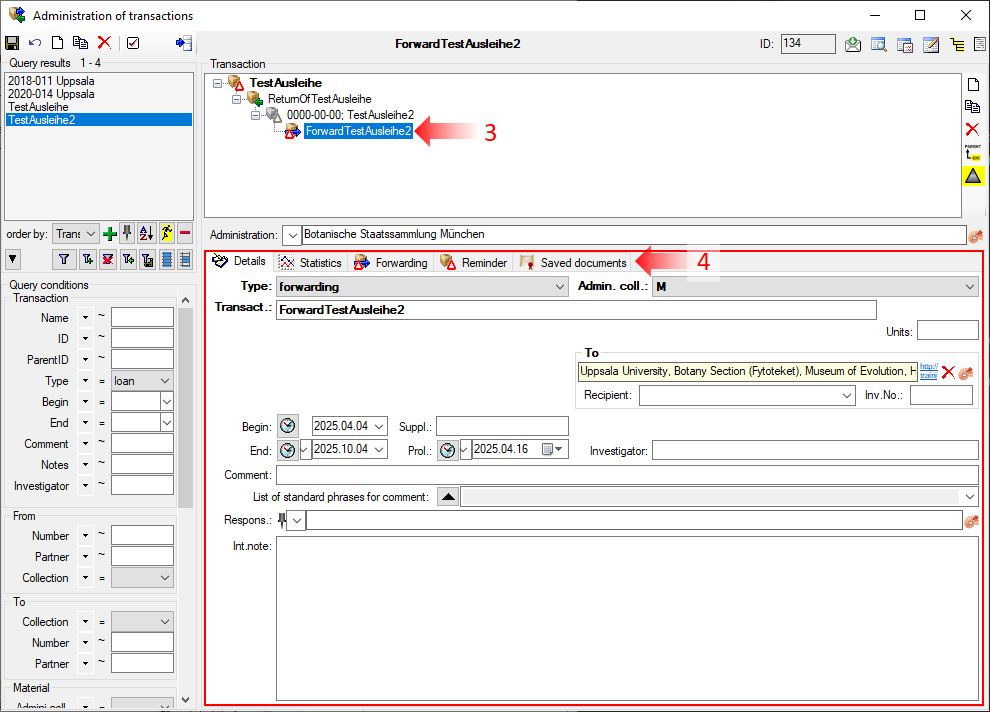
To record a forwarding, create a new object in the transaction tree. To do this, select the transaction for which the forwarding is being made (see point 1 in the image below).
-
Click the “New” button
(see point 2 in the image below). -
A dialogue window will open. Select “Forwarding” from the drop-down menu.

-
In the next dialogue, enter a name for the forwarding transaction.
-
Then click on the newly created forwarding transaction in the tree (see point 3 in the image below). The tabs for entering the forwarding will appear at the bottom of the window (see point 4 in the image below).
Add forwarding objects to the list
-
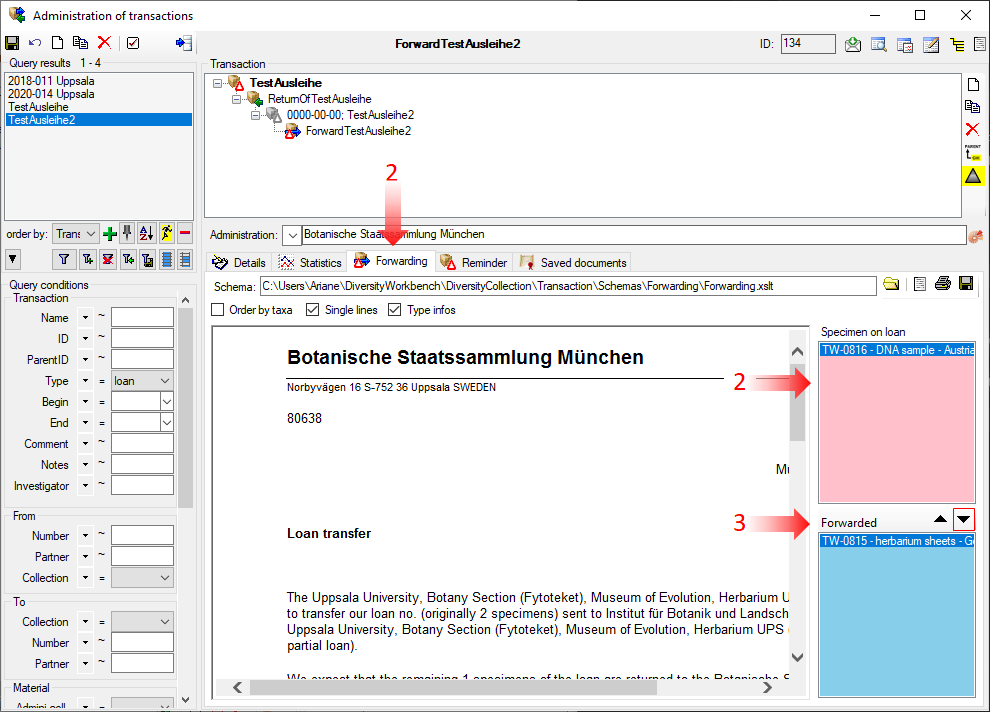
To add the forwarding accession numbers to the forwarding transaction list, switch to the ‘Forwarding’ tab (see point 1 in the image below).
-
To move the accession numbers, select the items you want to forward in the red field. Then move them to the blue ‘Forward List’ by clicking the down arrow button
(see point 2 and 3 in the image below). -
The forwarded accession numbers will appear in the blue ‘Forward List’ field (see image below).
Create a confirmation for Forwarding
-
To create a confirmation for forwarding, which lists all forwarded objects, you must first select a schema. To do this, click the folder button (see point 1 in the image below). The DiversityCollection software provides several predefined XSLT schemas; however, you may also create your own. In this example, Forwarding.xslt was selected.
-
To generate and preview the confirmation, click the preview button
(see point 2 in the image below). -
You will be asked whether you want to save the confirmation letter. Saved documents can be accessed at any time via the “
Saved Documents” tab. -
A preview of the confirmation will be displayed. To print it, click on the printer button
(see point 3 in the image below).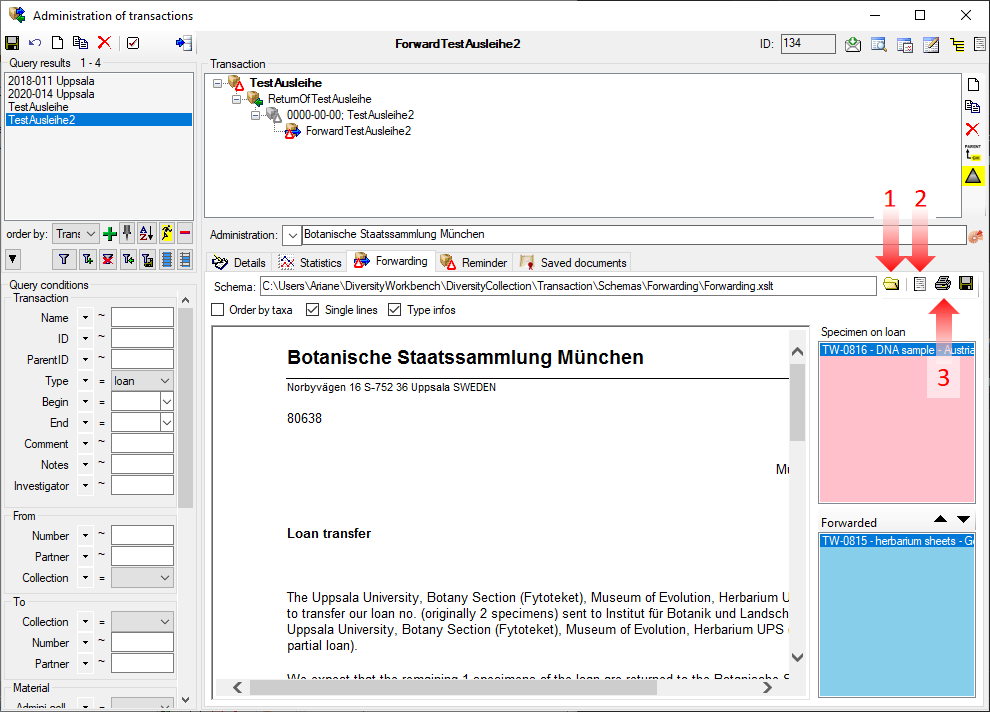
Illustration of the loan workflows
graph TD;
    Anfrage[Anfrage<br/>externer<br/>Sammlung]
    Belege[Belege<br/>in Sammlung]
    Leihe[Leihe mit Belegen]
    Begleit[Begleitschreiben]
    Dauer[Dauer der Leihe]
    Mahnung[Mahnschreiben]
    Ruecksendung[Rücksendung]
    Empfang[Erstellung von<br/>Empfangsbestätigung]
    Adresse[Adressen aus<br/>DiversityAgents]
    Bestimmung[Bestimmung<br/>durch Spezialisten]

    Anfrage -->| Eingang von Leihanfrage | Leihe
    Belege --> | Zusammenstellung der Belege | Leihe
    Leihe --> | Erstellung von Begleitscheiben | Begleit
    Leihe --> | Abruf der Adresse | Adresse
    Adresse --> Begleit
    Adresse --> Mahnung
    Leihe --> Dauer
    Dauer --> | Überschreitung des Rückgabedatums | Mahnung
    Leihe --> Ruecksendung
    Ruecksendung --> Empfang
    Ruecksendung --> Bestimmung