Diversity Agents
Documentation
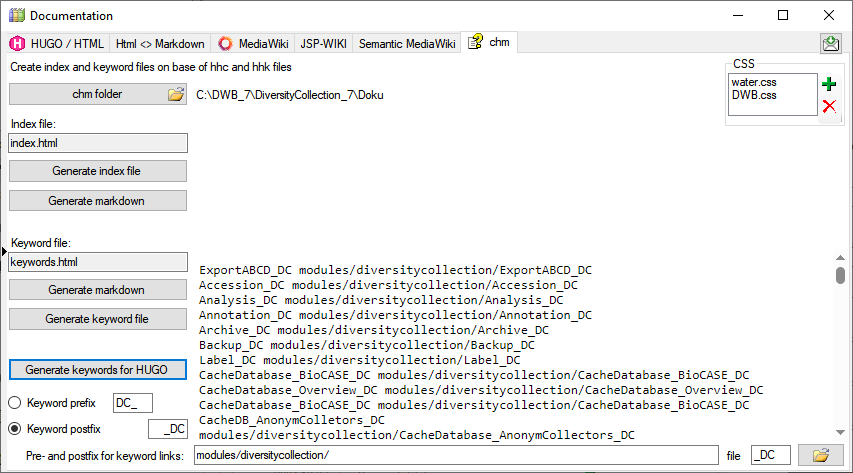
HUGO
In the  HUGO / HTML tab you generate markdown files according to HUGO and the relearn theme.
The conversion and adaptions are explained in a short tutorial: 
For enumeration tables the content can be exported as explained in a short tutorial:
In the tab you can fix links in markdown files according to HUGO shortcodes.
The fixes for broken links are explained in a short tutorial:
The adaptions for links for HUGO as related references are explained in a short tutorial:
To map the files in the original links to new files in the documentation follow the steps shown in a short tutorial:
Installation of HUGO
Update des Themes
um das Theme auf die letzte Version zu bringen kann man den Befehl
git submodule update --remote --merge themes/relearn
verwenden
Übersetzung des Bestands an html
- Übersetzung der *.html Seiten mit pandoc in *.md
- Aufbau einer Ordnerstruktur die dem Index der chm Datei entspricht
- Das Basisdokument der Ordner wird in die Ordner verschoben und in _index.md umbenannt
- Dort im Frontmatter steht der Titel der im Menü angezeigt wird, e.g.:
---
title: Installation
---
Überarbeitung der md Dateien
- Korrektur der Bildverweise
- Ordner mit den Bildern in den Ordner static kopieren
- von e.g.
 in 
- ACHTUNG - Case sensitiv. Namen müssen stimmen
- Icons gegebenenfalls freistellen für Darkmode
- Entfernung aller störenden Formatierungsangaben
- Entfernung der Kopfzeile (Überschrift wird von HUGO automatisch erzeugt)
- Korrektur der internen Verweise
- ändern von
[](http://media.snsb.info/Tutorials/dwb/Editing/OeffentlicheKontaktdaten.webm)
zu
[](http://media.snsb.info/Tutorials/dwb/Editing/OeffentlicheKontaktdaten.webm)
- ansonsten wird das Bild gezeigt statt das Video zu starten
- ändern von
zu e.g.
[Contact](editingdata/contact)
- Wenn als Basisadresse in hugo.toml etwas angegeben wurde, e.g.
baseURL = "http://www.diversityworkbench.de" dann muss diese auch für Verweise innerhalb der Files verwendet werden.
- e.g. Bildverweise

- Dateiverweise
[Anmelden](database)
- HUGO relearn erzeugt für Überschriften Anker die man ansteuern kann, e.g. kann man
### Table **AgentResource** über die Adresse database/database/#table-agentresource erreichen. Ein Index Eintrag dafür wäre e.g. [AgentResource](database/database/#table-agentresource). ACHTUNG - Case sensitiv: ### Table **AgentResource** wird in #table-agentresource übersetzt
- Kommentare starten mit # ohne folgendes Leerzeichen
Frontmatter
You can change the frontmatter to a default using the documentation tool
- Steht am Anfang der Datei und ist bei yaml durch
--- oben und unten abgegrenzt, e.g.
---
title: Login administration
linktitle: Logins
weight: 5
menuPre: img/Documentation.svg
alwaysopen: false
---
- Seiten die noch in Entwicklung sind kann man mit
draft: true im Frontmatter markieren. Diese werden dann nicht in die Ausgabe übernommen
- Der Titel wird mit
title: Login administration angegeben. Dieser erscheint dann auch in der Seite als Überschrift
- Der Text im Menü kann abweichend definiert werden mit
linktitle: Logins. Ansonsten erscheit der Titel im Menü
- Die Reihenfolge im Menü kann mit
weight: 5 angegeben werden. Ansonsten wird alphabetisch sortiert
- Ein Logo kann man mit `menuPre: img/LinkedServer.svg
- Wenn das Untermenue erst beim Anwählen geöffnet werden soll:
alwaysopen: false
Template files
Starting with a Dash: If the first line of your Markdown file starts with a dash (-), Hugo might misinterpret it as a YAML delimiter, leading to an error
Bilder
You can adapt the images to a default using the documentation tool
- Icons die e.g. in den Text integriert werden sollen, müssen folgedermassen eingebaut werden:

- Die Bilder am Anfang der Seite werde wie folgt eingebaut:

mit px wird das Bild mitgezoomt, bei vw bleibt es gleich gross
- noch nicht zu svg konvertierte Bilder die im Fliesstest erscheinen sollen werden wie folgt eingebunden:

- sonstige Bilder mit

mit der Angabe ...lightbox=false wird verhindert, dass ein Bild beim Anklicken mit der Maus geöffnet wird. Dies sollte bei Bildern die nicht nach svg konvertiert wurden und nicht im Fliesstext erscheinen nicht verwendet werden, damit der User bei kleinen Bildern diese in Originalauflösung betrachten kann. Unten 2 Beispiele


Für Bilder die aus der Quelle fontawesome kommen kann man hier suchen: fontawesome. Es funktionieren nicht alle die dort bereitstehen. Daher bitte testen!
Links innerhalb des Manuals
Für Links innerhalb des Manuals kann man shortcodes verwenden. Dafür entweder auf den Namen der Datei oder auf Links von Überschriften (ab ##) verwenden. Diese müssen innerhalb des Manuals eindeutig sein. Für Header als erstes Zeichen # dann Überschrift und alles lower case und Leerzeichen werden durch - ersetzt. Beispiel:
## Main form of diversityexsiccatae
wird zu sofern es sich in der gleichen Datei befindet:
2 x { und % relref "#main-form-of-diversityexsiccatae" % und 2 x }
Für Links ausserhalb der Datei werden Verweise unter Einschluss des Dateinamens verwendet:
Verweis auf ein Kapitel innerhalb einer Datei
2 x { und % relref "diversityexsiccatae#main-form-of-diversityexsiccatae" % und 2 x }
bzw. nur auf die Datei
2 x { und % relref "diversityexsiccatae" % und 2 x }
Leerzeichen zwischen 2 x { und % und % und 2 x } entfernen
Links auf das Manual
Von ausserhalb kann e.g. eine Überschrift mit
https://www.diversityworkbench.demodules/diversityexsiccatae/index.html#main-form-of-diversityexsiccatae
aufgerufen werden. Diese können direkt aus dem Manual kopiert werden.
Logo
- hierfür das Logo in den Ordner static kopieren
- im Ordner layouts einen Ordner partials anlegen
- dort eine Datei logo.html anlegen
- in dieser auf das Logo verweisen e.g.:
<h4><b>DiversityAgents</b></h4>
<img src="/DA_4D.svg">
- in static - layouts - partials die Datei menu-footer.html anlegen und anpassen
favicon
Im Ordner static den Ordner images anlegen
Datei favicon.ico in der Ordner static/images kopieren
Einschliessen von Dateien
Das Verzeichnis templates enthält Dateien die in andere Dateien über eine shortcode eingeschlossen werden können, e.g.:
2 x { und % include file="templates/template_workbench.md" % und 2 x }
Diese Dateien dürfen kein frontmatter enthalten. Shortcodes müssen überprüft werden, da diese in der Regel nicht ausgewertet werden.
ER-Diagramm
dieses kann als Mermaid eingebaut werden, e.g.
graph LR;
    A[Agent] --> B[AgentContact<br/>Kontaktdaten der Agents]
    A --> C[AgentReference]
    A --> D[AgentIdentifier]
    A --> E[AgentResource]
    A --> F[AgentExternalID]
    G[AgentExternalDatabase] --> F[AgentExternalID]
soll das Diagramm zoombar sein wird die Version 5.23 des Themes benoetigt. Ausserdem kann der Parameter nur für die Shortcode Version angegeben werden, nicht für die Codefences:
2 x { und % mermaid align="center" zoom="true" % und 2 x }
...
(remove space between 2 x { und  and < resp > and  und 2 x } in header and footer for correct code)
...
2 x { und % /mermaid % und 2 x }
Anpassung des Themes
Konfiguration - in hugo.toml:
```native
baseURL = "http://www.diversityworkbench.de"
languageCode = "en-us"
title = "DiversityAgents"
theme = "relearn"
[outputs]
home = ["HTML", "RSS", "SEARCH", "SEARCHPAGE"]
section = ["HTML", "RSS", "PRINT"]
page = ["HTML", "RSS", "PRINT"]
[params]
themeVariant = [ "auto", "dwb", "dwb-dark" ]
</code></pre>
<h2 id="start-des-testservers">Start des Testservers:</h2>
<ul>
<li>mit einem Terminal in das Verzeichnis des Projekts wechseln</li>
<li>dort <code>hugo server </code> eingeben.</li>
<li>bei Problem mit Sonderzeichen: den Inhalt der Datei config.toml in hugo.toml kopieren und config.toml löschen (beide sollten wenn vorhanden UTF8 sein - werden manchmal als UTF16 angelegt - dieses dann nach UTF8 ändern)
<ul>
<li>Error: “…\diversityworkbench\hugo.toml:1:1”: unmarshal failed: toml: invalid character at start of key: ÿ</li>
</ul>
</li>
<li>Im Browser an die angegebene Adresse navigieren, e.g. <code>localhost:1313</code></li>
<li>Wenn als Basisadresse in hugo.toml etwas angegeben wurde, e.g. <code>baseURL = "http://www.diversityworkbench.de"</code> dann muss die passende Adresse eingeben werden also e.g. <code>localhost:1313</code></li>
</ul>

 Database -

 button
resp.
button
resp.  button you can select
resp. deselect the types in the type selection and the object in the
list.
button you can select
resp. deselect the types in the type selection and the object in the
list. and
Remove from seletion
and
Remove from seletion  will use the
given strings with * as wildcard to add resp. remove items from the
selection.
will use the
given strings with * as wildcard to add resp. remove items from the
selection.