Diversity Collection
Transaction
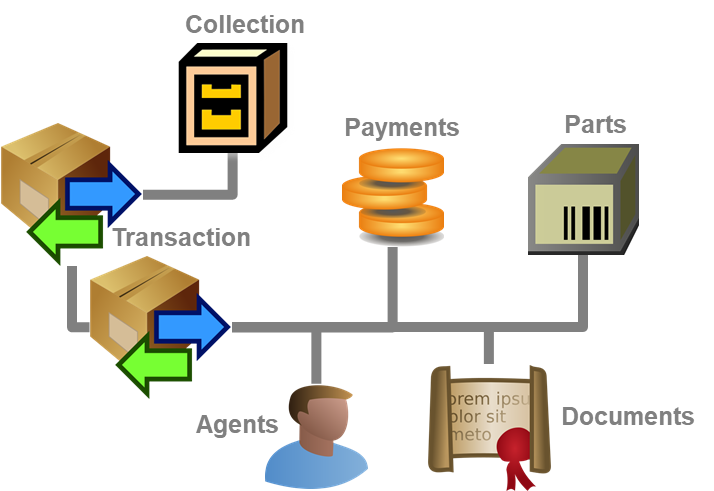
Main sectors
The image below gives you an overview of the main sectors related to the transaction.
Prerequisites to use transactions
The transfer of a specimen between collections is handled with
transactions. There are two prerequisites to use transactions in
DiversityCollection. You are required to be in the user group
CollectionManager (see UserAdministration)
and the collections in which you have the right to handle transactions
must have been assigned to you is shown in the
CollectionManagers section.
Historical development
To create charts for the historical development see chapter
Charts.
Visibility of transactions
A specimen may be involved in diverse transactions between collections
like loan, purchase, gift or exchange. The transactions are shown in the
tree for the parts of a specimen and symbolized with e.g. an
 icon. For specimens which are still on loan
an
icon. For specimens which are still on loan
an  icon is shown while a returned loan is
symbolized with an
icon is shown while a returned loan is
symbolized with an  icon (see image below). A
data embargo will be symbolized with an
icon (see image below). A
data embargo will be symbolized with an
 icon. If there are older accession numbers
linked to a specimen involved in a transaction, these numbers can be
documented together with the entry of the transaction of the respective
part of the specimen.
icon. If there are older accession numbers
linked to a specimen involved in a transaction, these numbers can be
documented together with the entry of the transaction of the respective
part of the specimen.
To customize the sequence and format of the transactions shown in the
tree, choose Administration → Customize display ... from the menu
and see the chapter customize for further details.
As an administrator you can edit and add entries to the Standard
comments for transactions click on the button
 in the header.
For details see chapter customize.
in the header.
For details see chapter customize.
If you are a CollectionManager, you may take a look at the details of a
transaction. Select the specimen part in the tree and click on the button which will be shown in the details
next to the name of the transaction. This will open the window for the
transactions as described below.

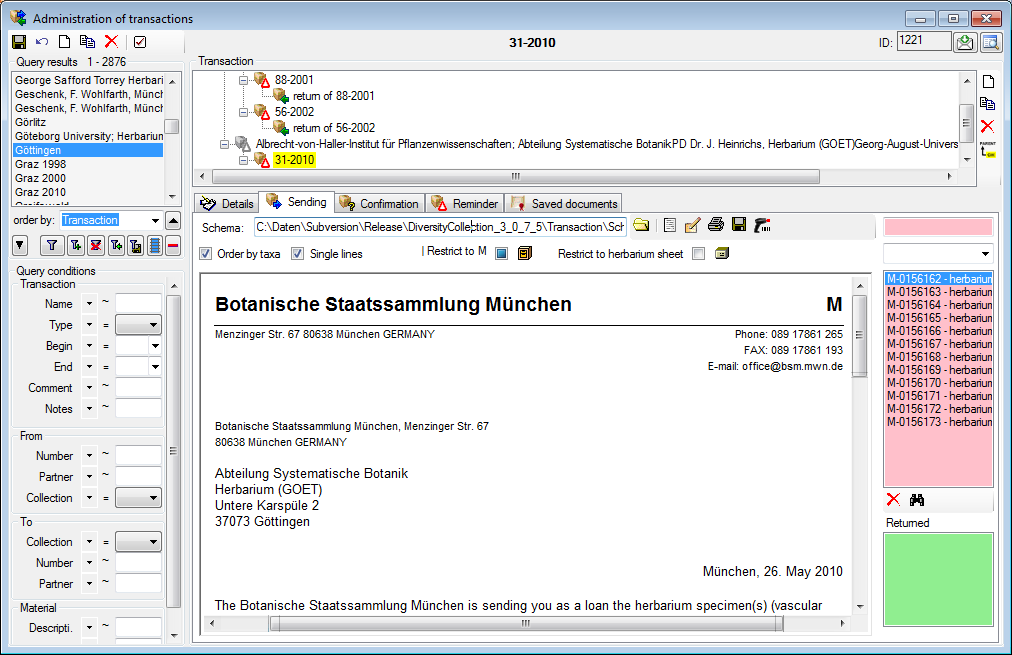
To edit the transactions choose Administration - Transactions from
the menu. A window will open as shown below. In the tree at the top the
relations between the transactions are shown. To create a transaction
dependent on another transaction choose the superior transaction in the
tree and click on the  button in the panel right of
the tree. With the
button in the panel right of
the tree. With the  button you may create a copy of
a transaction. To delete a specimen from the list click on the
button you may create a copy of
a transaction. To delete a specimen from the list click on the  delete button. To transfer all selected specimen in an
existing transaction choose Data →
delete button. To transfer all selected specimen in an
existing transaction choose Data →  Transfer
→ To transaction... from the menu and
choose the transaction where the specimen with all their parts should be
included. In two following dialogs you may restrict the transferred
parts to a certain collection or material category. The data for the
transactions is stored in the tables
Transaction and
CollectionSpecimenTransaction.
Transfer
→ To transaction... from the menu and
choose the transaction where the specimen with all their parts should be
included. In two following dialogs you may restrict the transferred
parts to a certain collection or material category. The data for the
transactions is stored in the tables
Transaction and
CollectionSpecimenTransaction.
The ID of the transaction is shown in the header. Behind the ID the
 maintenance button may
appear in case of missing units in parts which e.g. for the creation of
sending letters may cause unexpected results. Click on the maintenance button to
open the maintenance for fixing this problem. With the
maintenance button may
appear in case of missing units in parts which e.g. for the creation of
sending letters may cause unexpected results. Click on the maintenance button to
open the maintenance for fixing this problem. With the  feedback button you can
send a feedback to the software developer. To view the history of a data
set click on the
feedback button you can
send a feedback to the software developer. To view the history of a data
set click on the
 history button. A window
with the history will open. For more details see the section
History.
The settings
button will open the settings for the transaction. The
history button. A window
with the history will open. For more details see the section
History.
The settings
button will open the settings for the transaction. The  edit table button opens a table
editor for the selected transactions. For large
hierarchies the retrieval from the database may be time consuming. To
hide the hierarchy use the
edit table button opens a table
editor for the selected transactions. For large
hierarchies the retrieval from the database may be time consuming. To
hide the hierarchy use the  botton resp.
 to show the hierarchy. The list for the
specimen may be shown
to show the hierarchy. The list for the
specimen may be shown  or hidden
.
or hidden
.
Data entry
On this page you may edit the data of a transaction. Every transaction
is linked to an administrating collection (symbolized by the key
 ) and can be edited exclusively by
CollectionManagers of this collection. To
appoint managers choose Administration - Managers from the
menu.
) and can be edited exclusively by
CollectionManagers of this collection. To
appoint managers choose Administration - Managers from the
menu.
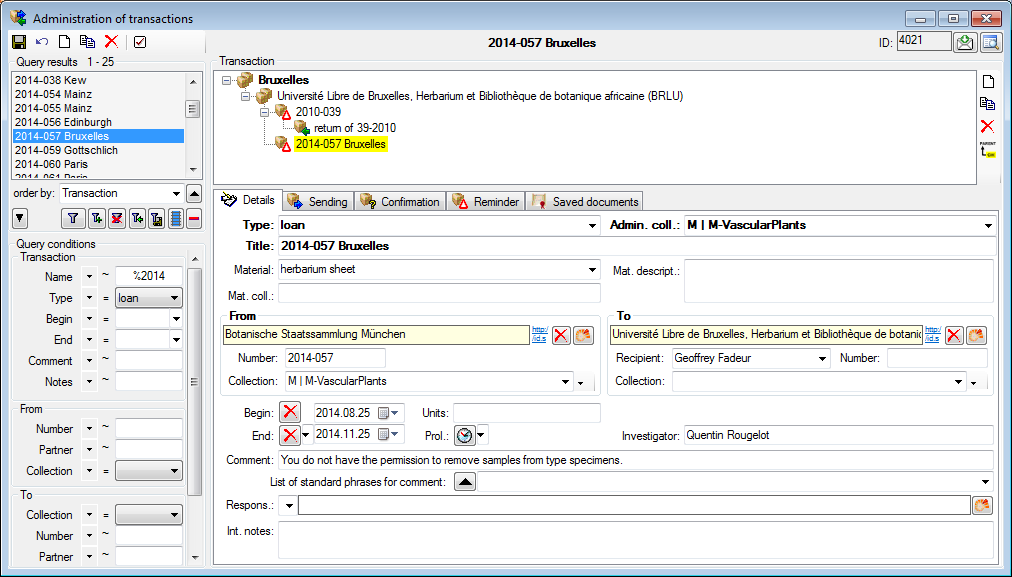
The transactions can be organized in a hierarchy as shown in the image
above, if e.g. you wish to keep together all loans to a certain
institution. To create a transaction of an inferior transaction choose
the superior transaction in the tree and click on the button in the panel at the right side of the tree.
To create of copy of a transaction, use the button
and the delete button to delete it. If you want to
change the position within the hierarchy, select the transaction and
click on the  button. A window will open where
you can select the new parent. Depending on the type of transaction you
have up to 3 dates, e.g. for a loan you have a begin date, an end date
and in case of a prolongation an end date of the prolongation.
button. A window will open where
you can select the new parent. Depending on the type of transaction you
have up to 3 dates, e.g. for a loan you have a begin date, an end date
and in case of a prolongation an end date of the prolongation.
There are the following types of
transaction:
| Transaction type |
Description |
| embargo |
Temporary data embargo for specimen that should not be published within the specified period |
 exchange exchange |
the exchange of specimens between institutions |
 gift gift |
the gift of specimens to an institution |
 inventory inventory |
the inventory of specimens within an institution |
| loan |
the loan of specimens of an institution to an external loan taker |
 permanent loan permanent loan |
permanent loan of specimens of an institution to an external loan taker |
 permit permit |
permit or certificate for the collection of specimen |
 purchase purchase |
the purchase of specimen by an institution |
 regulation regulation |
a regulation concerning a specimen in a collection |
 removal removal |
a removal of a specimen from a collection |
 return return |
a complete or partial return of a loan |
 transaction group transaction group |
an entry to organize your transactions |
The fields display in the Details tab will vary with the type of
the transaction as e.g. an embargo does not need any address
information. For the addresses use the links to the module
DiversityAgents as shown in the image above. You may optionally enter a
collection and the program will then use the corresponding address as
described below. As the recipient of e.g. a loan may not be entered in
DiversityAgents, you can enter the name of the person directly in the
To-address. The use of the collection as a reference in the From
and To section is deprecated. Please use a link to the module
DiversityAgents instead. If you need these controls please open the
settings and select the
 Show all address fields
option.
Show all address fields
option.
Common notes
On the tab pages for generating documents you need to specify a
xml-schema for your document. Click on the  open button
to choose one of the predefined schemas or create your own. To edit the
schema files (*.xslt) you may use a text editor or software like e.g.
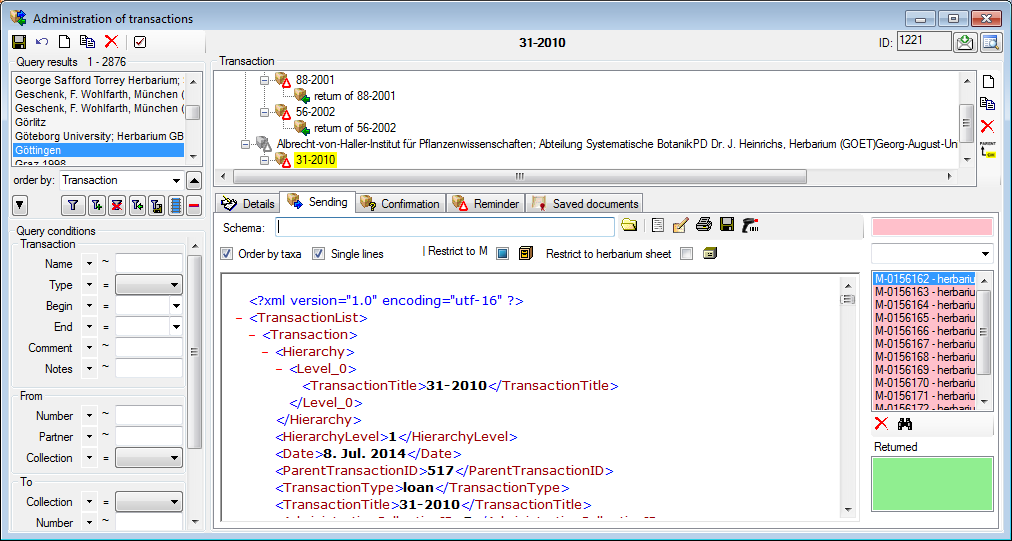
EditiX. If you do not specify a schema for
your form (i.e. the field for the path of the schema is empty - see
below), you will see the XML output created by the database as shown
below.
open button
to choose one of the predefined schemas or create your own. To edit the
schema files (*.xslt) you may use a text editor or software like e.g.
EditiX. If you do not specify a schema for
your form (i.e. the field for the path of the schema is empty - see
below), you will see the XML output created by the database as shown
below.
To choose a schema click on the open button and select
a schema from the list. DiversityCollection contains several ready to
use schemas in the folder Transaction - Schemas - Sending.

Feel free to change these schemas according to your own needs (editors
are available e.g. from http://www.altova.com/). Choose the schema you
need and click on the  button to
create a document. To print the document use the
button to
create a document. To print the document use the  printer button. To store the current document for
later reference in Documents click on the
printer button. To store the current document for
later reference in Documents click on the  save button.
An example for a document is shown
below.
save button.
An example for a document is shown
below.
Sending list
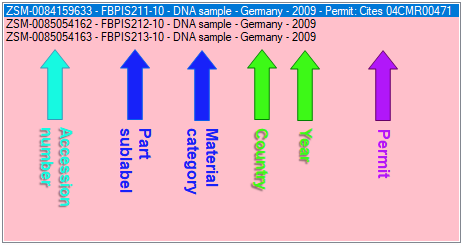
The specimens will be listed with their accession number, an optional label of the part, the material category and if available the country and the collection year to ensure discrimination in case a specimen contains more than one part. If available a permit will be shown at the last position (see image below).
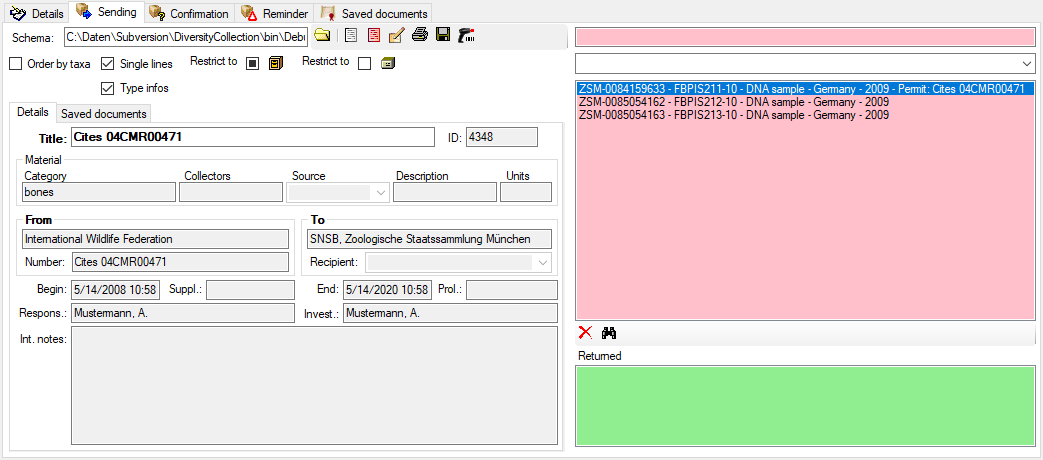
In the sending list - to see the details of a permit - click on the line containing the permit. The details will for the permit will be shown as in the example below.
Finding addresses
The addresses used for the documents are taken from the module
DiversityAgents, where addresses are stored. Therefore the entries must
at some point be linked to an entry in this module. The program will try
to find an address as shown below: First the transaction partners
(from ... and to ...) will be checked. If no address is
available (e.g. if the transaction partner is not linked to an entry in
DiversityAgents), the program will try to find an address in one of the
superior transactions from the transaction partners found there. If no
address exists in these transactions, the program will try to get an
address from the collections. Therefore, a transaction partner linked to
DiversityAgents is only necessary if either there are no addresses for
the collections or you wish to use a different address. The search path
as described is summarized in the image below.
No Access
If the data contain datasets, where you have no access to, this will be
indicated as shown below.
The access to the data rely on the result of the view TransactionList,
combining the transactions with missing administrating collection and
those where the current user is a member of the group CollectionManager
with allowance for the collection where the transaction is
administrated. Transactions within a hierarchy to which the user has no
access will be displayed with gray titles.
Subsections of Transaction
Diversity Collection
Transaction Loan
The Loan Transaction section of DiversityCollection provides a solution for managing and documenting all aspects of loaned objects. This feature enables you to handle every stage of the loan process.
To get an overview of the basic functions you can also have a look at the Best Practice - Loan management chapter .
Within the Loan Transactions, you can:
- Create and manage new loans.
- Use customisable letter templates, including loan slips, reminders, dunning letters, acknowledgements of receipt and more.
- Record and track forwarded items.
- Manage returns and document any damage for future reference.
- Generate statistics to analyse loan activity.
Involved Modules of the DiversityWorkbench framework are:
Loans of specimen from a collection are documented with the transaction
type loan (see below).
Prerequisites
 DiversityAgents: The institution/lender and the borrowing institution must both be managed in DiversityAgents and must have address information stored there. The address information is used for creating letters, etc. For information on creating a new institution or person in DiversityAgents, see the chapter Add a new Instituition/Agent of the DiversityAgents module. For information on adding an institution’s address information, see the chapter Contact Data.
 DiversityCollection: Unlike other data, user authorisations for loans are not only managed via projects but also via assignment to collections. A prerequisite for processing loans is having the role of CollectionManager or Administrator. This means the user handling the loans must have the role CollectionManager or Administrator for the collection whose objects are being loaned. In addition to the authorization for the collection, the user must also have authorization for the project to which the items to be borrowed belong.
For more information on rights management in DiversityCollection see the
chapter Rights management.
For more information on handling collections in DiversityCollection, see the Collection chapter.
Loan Transaction User Interface
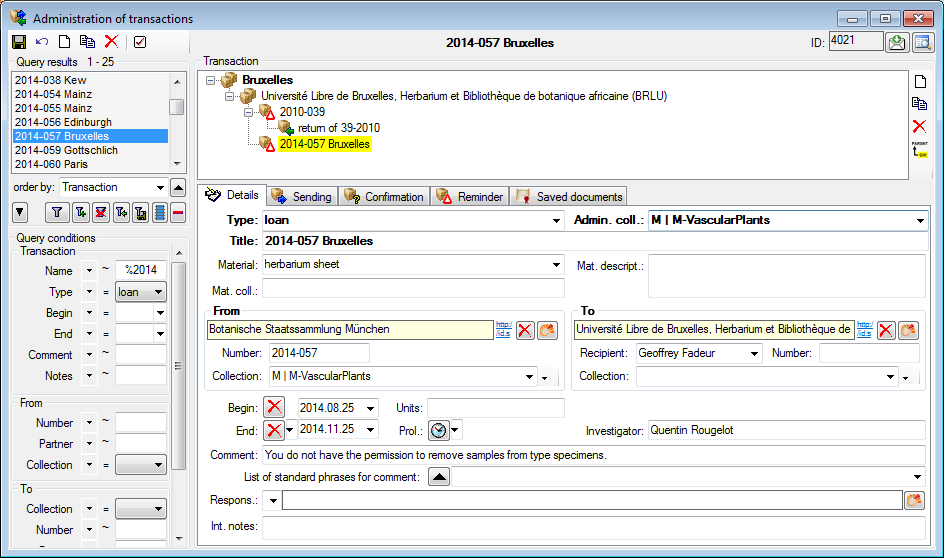
For a loan granted to a loan taker, create a new transaction and set its
type to loan. The loan needs an administrating collection, which is the
collection in which the specimen included in the loan are located and
for which the current user is registrated as collectionmanager  . The
addresses are entered as links to
DiversityAgents
in the From and To areas. The To area provides a recipient
for inclusion in the address. The collections in the From and To area
may be used optionally as source of the address. The Begin and
End fields mark the time span for the loan. If the time of the loan
should be prolonged, use the Prol.: field to enter the new end date.
Standard comments can be edited (Admin only) in the
Customize section. In the
. The
addresses are entered as links to
DiversityAgents
in the From and To areas. The To area provides a recipient
for inclusion in the address. The collections in the From and To area
may be used optionally as source of the address. The Begin and
End fields mark the time span for the loan. If the time of the loan
should be prolonged, use the Prol.: field to enter the new end date.
Standard comments can be edited (Admin only) in the
Customize section. In the
 Sending,
 Confirmation and
Reminder sections you can create documents
for the communication with the loan taker. Documents as sent to or
received from the loan taker are available in the
Confirmation and
Reminder sections you can create documents
for the communication with the loan taker. Documents as sent to or
received from the loan taker are available in the
 Saved documents
section. If after the end of the loan all or a part of the specimen are
returned, create a Return transaction as child
of the loan (see image above) and include all returned specimen in this
return transaction.
Saved documents
section. If after the end of the loan all or a part of the specimen are
returned, create a Return transaction as child
of the loan (see image above) and include all returned specimen in this
return transaction.
Subsections of Loan
Diversity Collection
Transaction Sending
In the sending tab page of the transaction window you can create the
covering note for a sent sample.
To choose a
schema click on the open button and select a schema from
the list. DiversityCollection contains several ready to use schemas in
the folder Transaction - Schemas.
To add a specimen to the list, you can use a  barcode scanner. The code detected by the scanner will be displayed in
the field behind the symbol and entered in the list below. If no
scanner or barcode is available, use the combobox underneath, enter the
first letters of the accession number of the specimen and select your
specimen from the drop down list. In case your scanner is reading only
parts of the barcode try to adjust the timer interval - click on the scanner button to open a window as shown
below.
barcode scanner. The code detected by the scanner will be displayed in
the field behind the symbol and entered in the list below. If no
scanner or barcode is available, use the combobox underneath, enter the
first letters of the accession number of the specimen and select your
specimen from the drop down list. In case your scanner is reading only
parts of the barcode try to adjust the timer interval - click on the scanner button to open a window as shown
below.
To restrict the selection of the specimens and parts of the specimens,
you can check the Restrict to collection ... and Restrict to material ... options. To remove a specimen from the list, use the delete button under the specimen list. If you want to
see the details of a specimen, choose it in the list and click on the  button. Click on the
scanner button to create the document as
shown below. The upper list shows
the parts on loan while the parts in lower
list are returned to another institution. For more
details about the upper list see chapter
transaction.
button. Click on the
scanner button to create the document as
shown below. The upper list shows
the parts on loan while the parts in lower
list are returned to another institution. For more
details about the upper list see chapter
transaction.
Units
If you need to include the units in the covering letter, choose the option . This will include all units linked to the parts in the generated xml. To include these data in the covering letter, the schema has to be adopted as shown a short video: 
Diversity Collection
Transaction Confirmation
On this page you may create an inquiry letter for a package sent, e.g.
if a parcel was sent to a loan taker and no confirmation that the parcel
reached its destination was returned so far.
With the open button choose the schema you need. Click
on the button to create a document.
To print the document use the button. To
store the current document for later reference in Documents click on the save button.
Diversity Collection
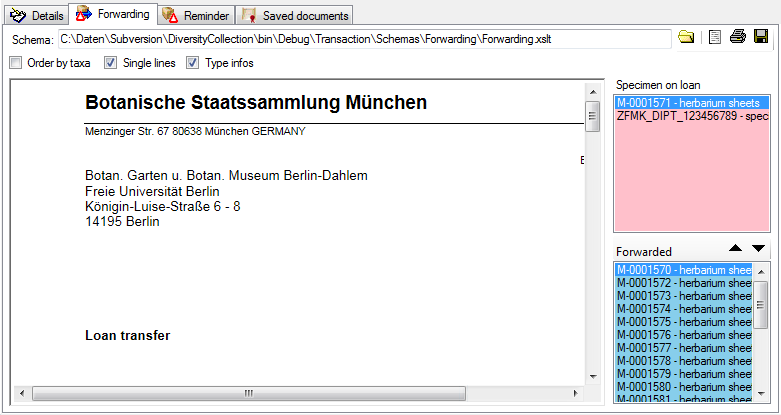
Transaction Forwarding
Specimen on loan may be forwarded to another institution. A forwarding
can only be part of a loan. Select the loan of which the specimens
should be forwarded and add a new transaction as a child of the loan.
Then set the type of this new transaction to forwarding as transaction
type.
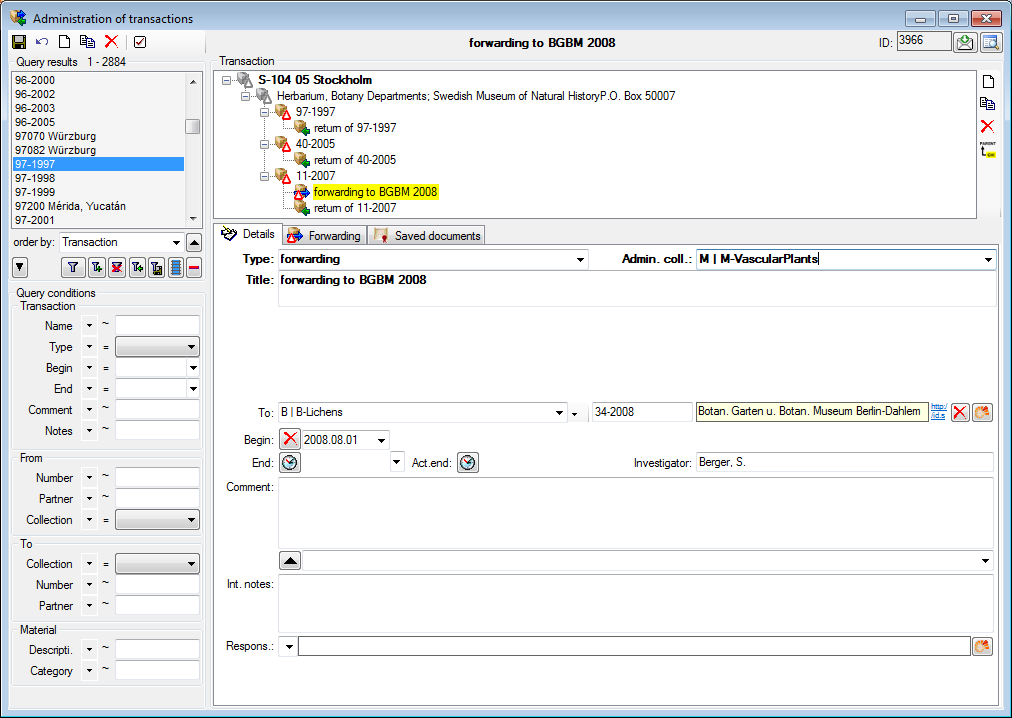
... and use the  button to move the selected
specimen from the initial loan into
the list of forwarded items (see
below).
button to move the selected
specimen from the initial loan into
the list of forwarded items (see
below).
Diversity Collection
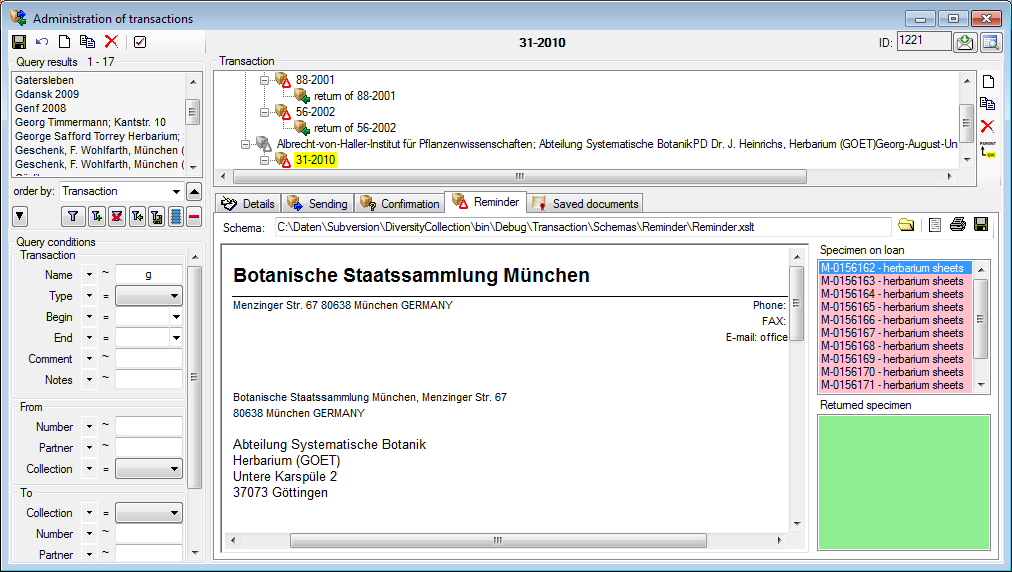
Transaction Reminder
If a loan or forwarding is due to return or a loan taker did not meet
the deadline, you may create a prompt note here.
With the open button choose the schema you need. Click
on the button to create a document.
To print the document use the button. To
store the current document for later reference in Documents click on the save button.
In the upper right list the missing
specimen and at the lower right list the returned specimen are listed.
Diversity Collection
Transaction Return
If a loan is returned, a child transaction of the
type return is created, containing the
returned items of the superior transaction. To do this, choose the loan
in the tree and add a new transaction as child as
shown below. Then set the type of this new transaction to
return.
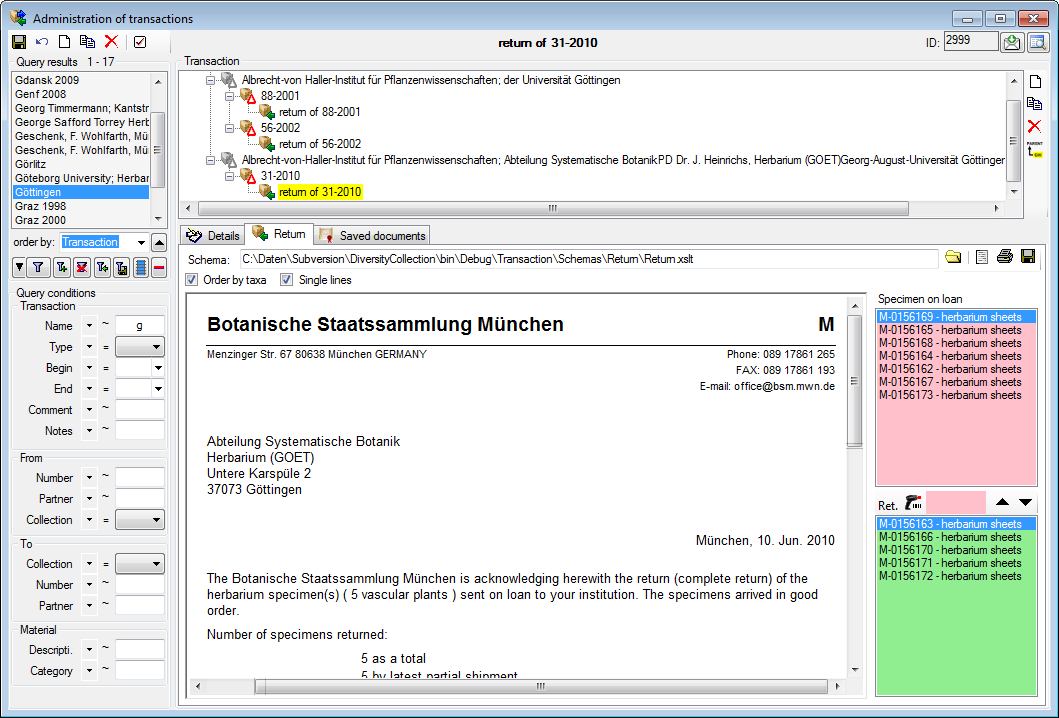
The state of the specimen will always be kept with the loan and you can
add return incidents as long as there are specimens on loan. A return
incident can only be part of a loan transaction. To
transfer items into the return transaction, you have two options: can
mark the items in the [loan list]that should be transferred and click on the  button
or click into the [text field] rightof the icon and use a barcode scanner. To remove
an item of the return list, mark it in the [list of returned
items] and click on the
button
or click into the [text field] rightof the icon and use a barcode scanner. To remove
an item of the return list, mark it in the [list of returned
items] and click on the  button.
To you may create a notice of arrival here. With the open button choose the schema you need. Click on the
button to create a document. To print
the document use the button. To store the
current document for later reference in Documents click on the save button.
Diversity Collection
Transaction
Request
There are 2 ways to enter a request for a loan.
- You are a CollectionManager and want to insert a foreign request. This request may be the starting point of a loan. To add a corresponding loan to the request, choose the request in the hierarchy and click on the copy botton. A loan depending on the
 request will be added.

- You want to place your own request in a collection. In this case you must be granted the role Requester (see Loginadministration for further details). The grants are given by the CollectionManagers for their collections. To enable a user
to place requests choose Administration - Transaction management -
 Loan requesters ... from the menu. A window
will open as shown below.
Loan requesters ... from the menu. A window
will open as shown below.
As a CollectionManager you may give requesters access to the
collections you manage. Click on the < or
> button to add or remove collections from the
list for which a user may place a request. If the option Include subcollections is chosen, a user is able to request specimens stored in subcollections of the administrating collection. To give you an
overview of the subcollections the hierarchy of the collection is shown in the tree below the list.
If you are a CollectionManager and there are requests for your
collections, the administration menu will contain a
Loan requests ... entry. Choose it in
order to open a window listing the requests for specimen in your
collections.
If you have entered a request for specimen in a foreign collection, the
administration menu will contain a  My requests... entry. To inspect your request choose this entry from the menu to open a window as shown below. The window will show your requests
and loans from foreign collections.
My requests... entry. To inspect your request choose this entry from the menu to open a window as shown below. The window will show your requests
and loans from foreign collections.
To enter a new request click on the button. Use the button to search for specimen in the collection and
the delete button to remove unwanted specimen from your
list.
Diversity Collection
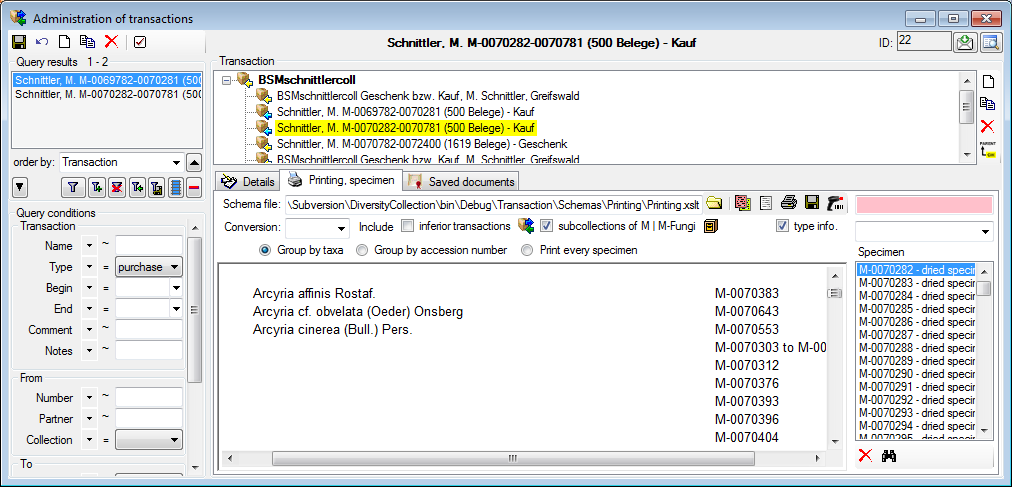
Transaction Printing
In addition to special pages for creating letters along with a loan,
this page provides the possibility to print cover letters, inventories
etc. You may restrict the selected specimen to the current collection,
include subcollections or all related collections - simply activate the
corresponding checkboxes.
To add a specimen to the list you may either use the combobox or a
barcode scanner. To use the barcode scanner move your mouse cursor into
the pink field on the right of the scanner. In case your scanner is
reading only parts of the barcode, try to adjust the timer interval.
Click on the button to open a window where you
may set the timer interval to a different value. To remove a specimen
from the list select it and click on the delete button.
With the open button choose the schema you need. Click
on the button to create a preview of
the document. To print the document use the
button. To store the current document for later reference in Documents
click on the save button.
Diversity Collection
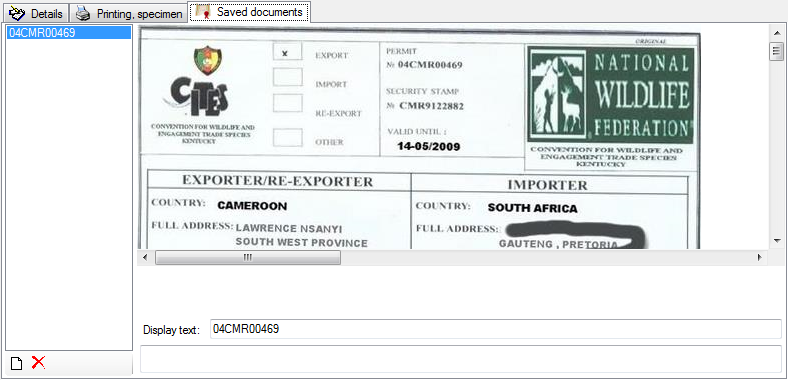
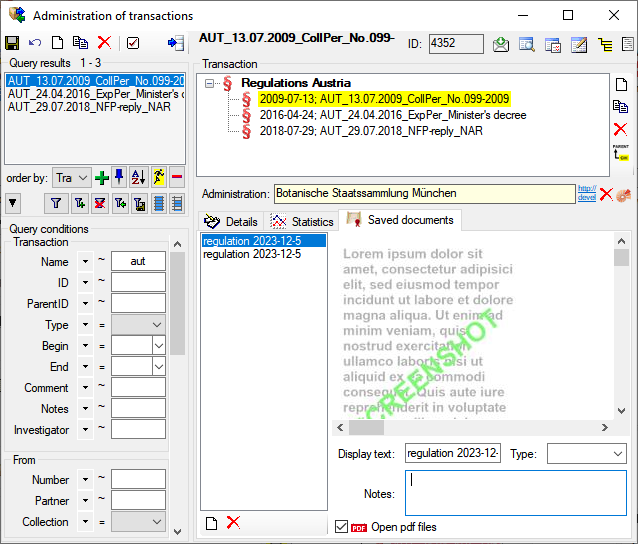
The page Saved documents stores all the
documents created or received along with a transaction. A display text
is automatically generated containing the type of the transaction and
the date. You may change this if you prefer a different text.
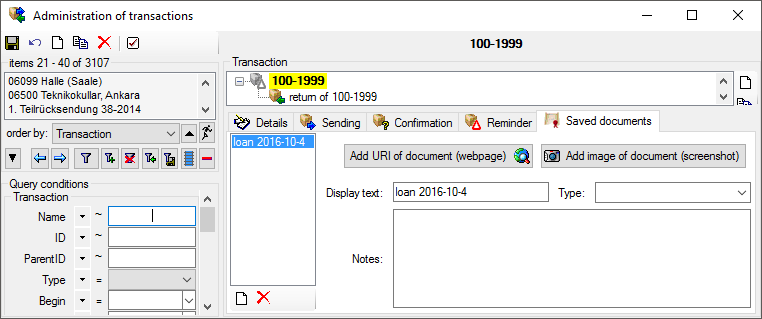
To add a document either use the save button after
creating a preview of a letter e.g. for Sending .
Next to the internal documents created within the program, you can
include external documents. You may scan an external document and create
a screenshot of it. Then create a new entry (click on
the new button) and use one of these options: Add URI
of document  or
or  Add image of document.
The first option uses public available sources from a webserver while
with the second option later screenshots will be stored directly in the
database and are not accessible outside the database. If you want to
print the document, double click on the image to open a window enabling
the printing of the document . For the first option
you may use the
Add image of document.
The first option uses public available sources from a webserver while
with the second option later screenshots will be stored directly in the
database and are not accessible outside the database. If you want to
print the document, double click on the image to open a window enabling
the printing of the document . For the first option
you may use the
 “https://…”
button to search for an
URL in your default browser instead of the inbuilt browser of the
software which may not provide the whole functionality of a modern
browser.
“https://…”
button to search for an
URL in your default browser instead of the inbuilt browser of the
software which may not provide the whole functionality of a modern
browser.
In the lower part you may enter the text that should be shown in the
interface (Display text), the type and notes related to the document.
With the type you may organize your documents as needed.
Dependent on the software installed on your local computer, pdf files
may open in the program or the default browser installed on your
computer. To avoid the automatic opening of these files deselect the
 option and use the
button of open them.
option and use the
button of open them.
Diversity Collection
Transaction Balance
This is the balance for the exchange between two collections.
With the open button choose the schema you need. Click
on the button to create a document.
To print the document use the button. To
store the current document for later reference in Documents click on the save button. To include either the subcollections of any
related collection or the collections of the current transaction select
the corresponding checkboxes.
Diversity Collection
Transaction Permit
Permits for collecting specimen parts are documented with the
transaction type permit (see below).
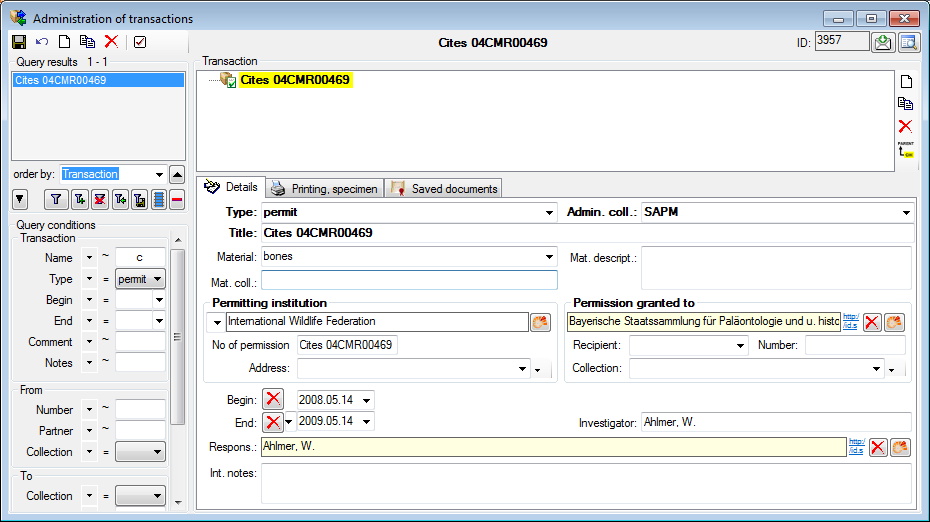
Documents as received by the permitting institution can be entered under
Saved documents (see below).
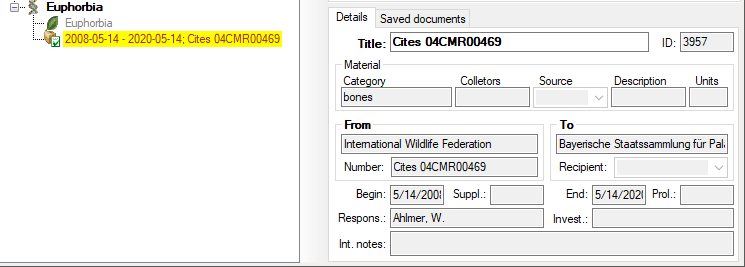
To add a permit to a
 specimen part, choose the part to which the
regulation should be added and click on the button. A window will open as shown
below where you can select the permit you want to insert.
specimen part, choose the part to which the
regulation should be added and click on the button. A window will open as shown
below where you can select the permit you want to insert.

In the main window, click on the permit to see the details as shown
below. The details of a permit will as well be shown for datasets in a
sending list for a loan (see chapter
Transaction).
Diversity Collection
Transaction Regulation
To administrate the regulations choose Administration - Transaction
management - Transaction ... from the
menu. A window as shown below will open where the you can administrate
and create regulations (see below).
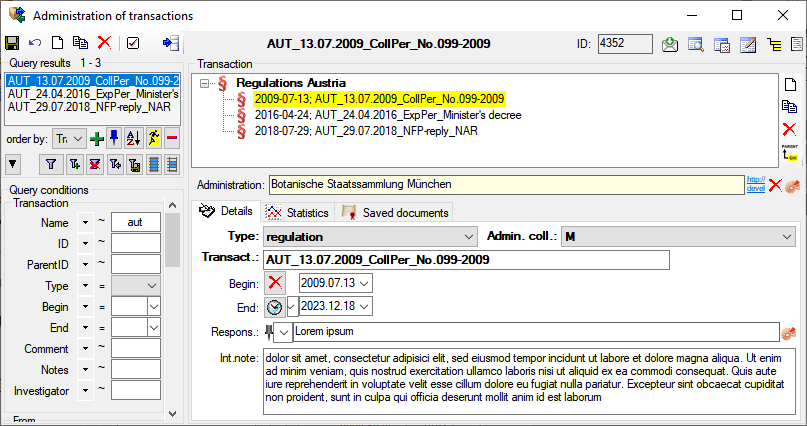
Documents can be added as e.g. screenshots or webresources. See below and for further details the chapter Transaction - Documents
Diversity Collection
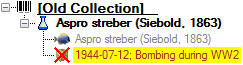
Transaction Removal
If specimens were removed from a collection e.g. by destruction or loss,
you can create a transaction of the type removal and add parts of the
specimen in question to this removal. If a specimen is part of a
removal, it is shown as in the image
below.
To create a removal choose Administration → Transaction management
→ Transaction from the menu, create a new transaction and choose the
type removal for the new transaction (see below).

Diversity Collection
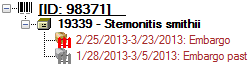
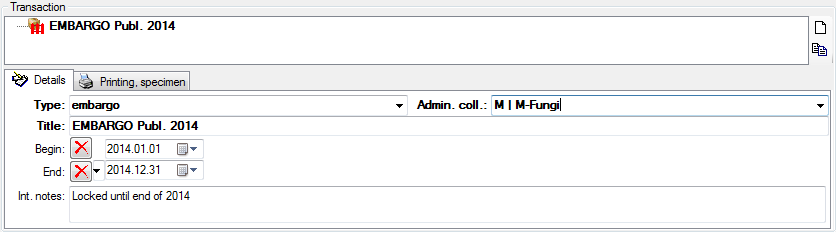
Transaction Embargo
If specimens should not be published for a certain period, you are able
to create a transaction of the type embargo and add parts of the
specimen in question to this embargo. If a specimen is part of an
embargo, it is shown as in the image below for current
and past or future embargos
 .
.
To create an embargo choose Administration → Transaction management
→ Transaction from the menu, create a new transaction and choose the
type embargo for the new transaction. The period of the embargo is
defined by its Beginning and End (see below).
To see the parts of a specimen that where selected and are included in
an embargo choose Administration →  Withhold
data... from the menu.
Withhold
data... from the menu.
Diversity Collection
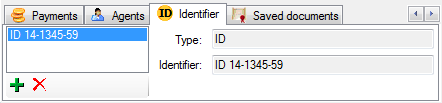
Transaction Identifier
The page  Identifier stores any additional
identifier related to the transaction (see below).
Identifier stores any additional
identifier related to the transaction (see below).
For the administration of the types of identifiers see chapter
External identifier.
Diversity Collection
Transaction Payment
The page  Payments stores any payment within
the transaction. To set the default currency (only dbo), choose
Administration - Customize display from the menu. In the
Transaction area use the Currency button
to set the default currency for all payments. This is done with the
setup of the database and can not be changed after any payment has been
entered.
Payments stores any payment within
the transaction. To set the default currency (only dbo), choose
Administration - Customize display from the menu. In the
Transaction area use the Currency button
to set the default currency for all payments. This is done with the
setup of the database and can not be changed after any payment has been
entered.
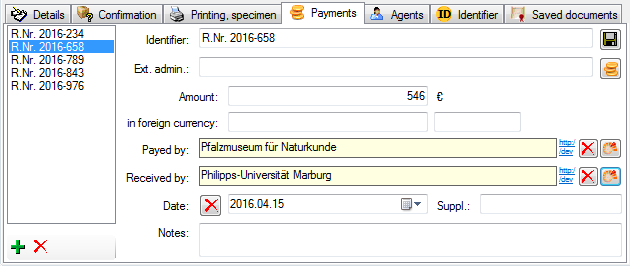
To add or remove payments use the  and
buttons. To set default currency for all payments
in the database choose Administration - Customize display... from
the menu and in the opening window the section Transaction (see
chapter Customize).
and
buttons. To set default currency for all payments
in the database choose Administration - Customize display... from
the menu and in the opening window the section Transaction (see
chapter Customize).
Diversity Collection
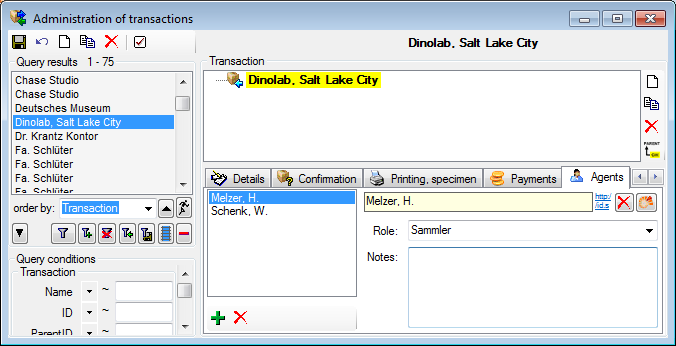
Transaction Agent
The page Agents stores additional agents
involved in the transaction (see image below) that are not recorded
otherwise.
Diversity Collection
Transaction Chart
The page  Chart provides the option to create
charts for the historical development of transactions (see image
below).
Chart provides the option to create
charts for the historical development of transactions (see image
below).
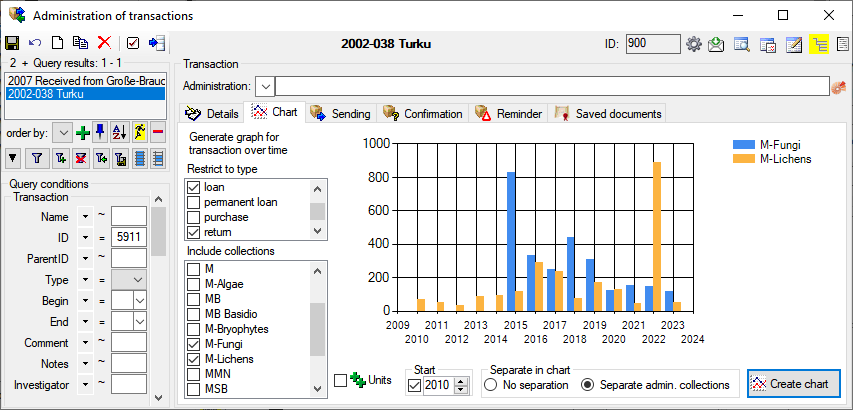
A direct access is available via the menu: Administration -
Transaction management -
Statistics.
Diversity Collection
Transaction
Customizing
As an administrator you can add entries to the Standard comments for
transactions (see above) that are used to enter standard phrases into
the comment field of a transaction (see below).
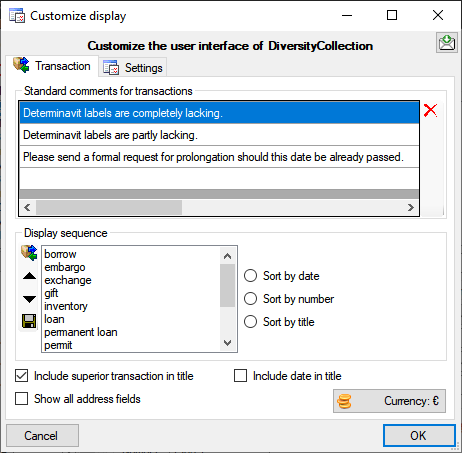
Transaction display sequence
To customize the sequence and format of the transactions shown in the
tree, choose Administration → Customize display … from the menu
and then select the part Transaction. If you want to change
the default sequence and/or display type, click on the button. Use the and
buttons to change the position of a certain type of
transaction and choose one of the display types (see above). To reset these settings
to the database default, use the  button.
Title options
- Include superior transaction in title:
If your transactions are organized within a hierarchy, you can include the
titles of the superior hierarchies with this
option.
- Include date in title:
If the title should include the date, you can choose this
option.
Address field
The address fields are displayed depending on the type of the transaction. If you need all address fields, choose the option Show all address fields.
Default currency
The default currency for all transaction payments in the database is
Euro (€). To change the default currency click on the Currency button. A Window will open where you can enter the symbol for the default currency.