Database Access
Database - access
The database engine for DiversityDescriptions is Microsoft SQL-Server
2012 or higher.
If you are connected to a database this is indicated by the icon of the
connection button  in left upper corner. If you
are not connected this will be indicated by the icon
in left upper corner. If you
are not connected this will be indicated by the icon
 . To access any database, you must specify the
server where the database is located. For the configuration of this
connection choose Connection →
Database… from the menu or click on the
button.
. To access any database, you must specify the
server where the database is located. For the configuration of this
connection choose Connection →
Database… from the menu or click on the
button.
If you want to use a database on a local or remote SQL-server, start the
program  DiversityDescriptions.exe and
in the main window click on the button or
choose Connection → Database … from
the menu. A window as shown below will open. Here set the connection
parameters as described below.
DiversityDescriptions.exe and
in the main window click on the button or
choose Connection → Database … from
the menu. A window as shown below will open. Here set the connection
parameters as described below.
Database name, IP-address and Port
A dialog will open, to specify the name or IP-address and port number of
the server and to select the authentication mode. The SQL-Server may be
addressed by its IP-address, e.g. 127.0.0.1 or by its name, e.g.
localhost. You can either choose Windows authentication (see left image
below) or SQL-Server authentication (see below - central middle image).
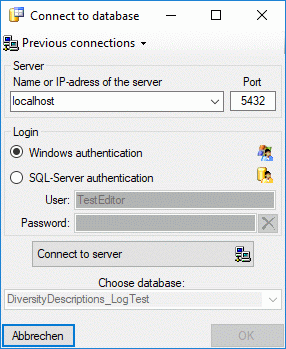
The standard port number for SQL-Server is 1433 and will be set as a
default. If the database server is configured using a port different
from that port, you must give the port number in the field Port. Click
on the 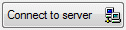 button to connect to the server.
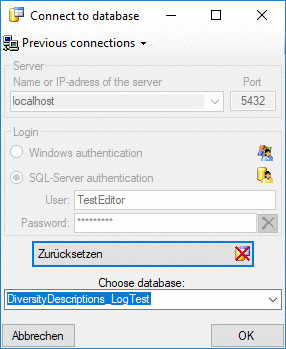
If the connection informations are valid, you can choose a database from
the server from the combobox at the base of the window (see right image
above). To restart the connecting process click on the
button to connect to the server.
If the connection informations are valid, you can choose a database from
the server from the combobox at the base of the window (see right image
above). To restart the connecting process click on the
 button. In menu
 you find a list of the latest login data
(server and port) used.
you find a list of the latest login data
(server and port) used.
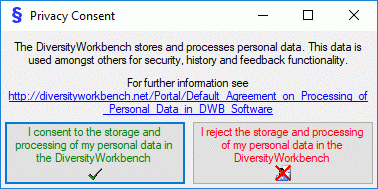
If you access a database for the first time you will be asked to consent
to the storage and processing of your personal data (see below)
according to the General Data ProtectionRegulation.
Without your consent the access is not possible.
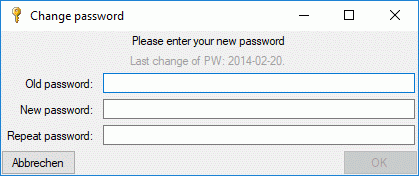
Password
If you are logged in with a SQL-Server account
 and are not restricted to the group
 DataUser or DataReader, you can change
your password. Choose Administration →
DataUser or DataReader, you can change
your password. Choose Administration →
 Change password... from the menu. In the
window that will open, enter your current password and the new password
(see below). The password must match the restrictions set by the
database server.
Change password... from the menu. In the
window that will open, enter your current password and the new password
(see below). The password must match the restrictions set by the
database server.
Module connections
The program will automatically try to get connect to Diversity Workbench
databases and webservices. For further details see the
Connections section.
Subsections of Database Access
Data Availability
Availability of the data
In the description data descriptors may be marked
with the data status Data withheld (see below).
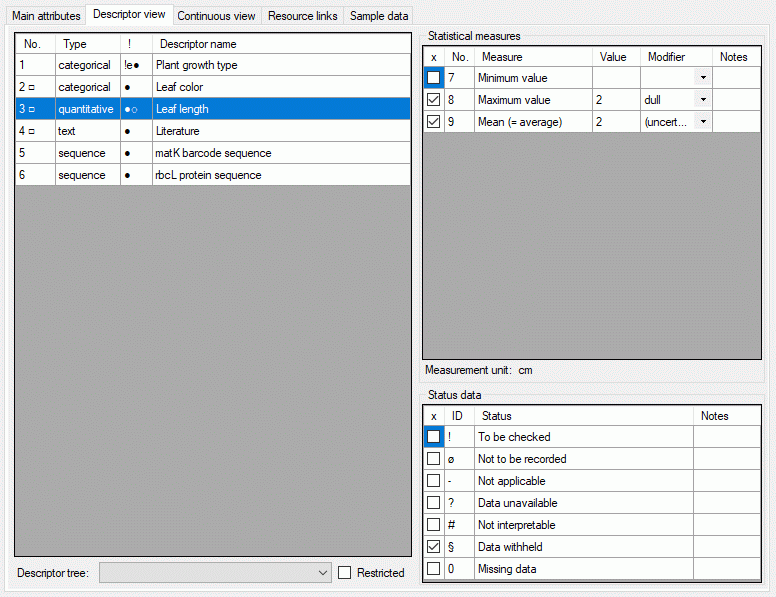
When you export data the export forms include
the “Withheld data” options where you can decide how to handle those
data (see below).
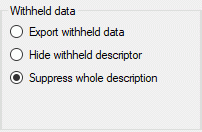
- The default setting Suppress whole description will exclude the
whole description dataset from the export.
- The setting Hide withheld descriptor will include the description
dataset in the export, but descriptor data that are marked as “Data
withheld” will be suppressed.
- The setting Export withheld data will include all data in the
export.
The options mentioned above are also available for the cachedatabase. Additionally there are powerful filters to
restrict the exported description items and dedicated descriptor and
scope data may be excluded from export.
Finally the document generation by default
excludes all descriptions that have any descriptor with data status
“Data withheld”. This is indicated by the  button in
the upper right corner of the form. By clicking this button the
descriptions may be included, which is indicated with the inactive icon
button in
the upper right corner of the form. By clicking this button the
descriptions may be included, which is indicated with the inactive icon
 . Withheld descriptors will be skipped. For the
document generators there is no option to include them.
. Withheld descriptors will be skipped. For the
document generators there is no option to include them.
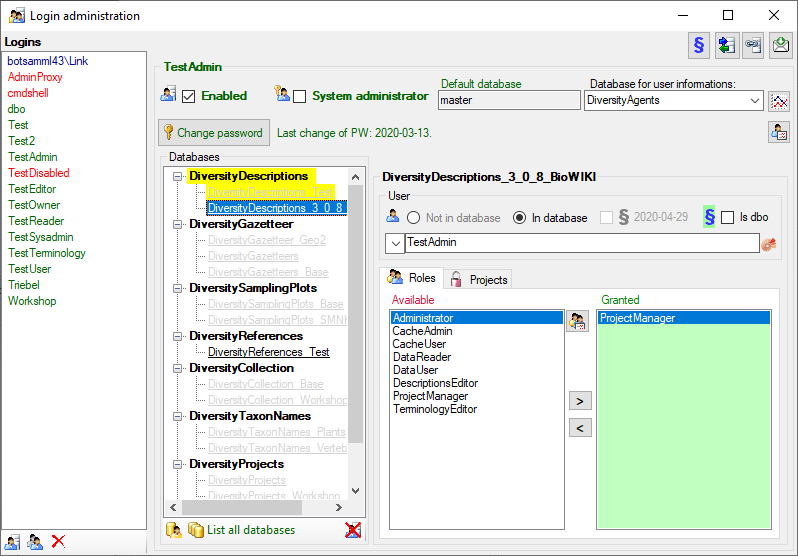
Login Administration
Login administration
To administrate the logins on the database server, their permissions
resp. roles and access to projects choose Administration ->
Database … →  Logins
… from the menu. A window as shown below will open.
Logins
… from the menu. A window as shown below will open.
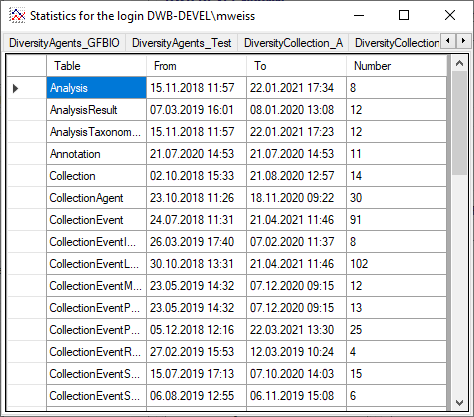
Statistics
To see the activity of a login click on the  button. A window will open as shown below listing all databases and
tables together with the timespan (From - To) and the number of data
sets where any activity of the current login has been found.
button. A window will open as shown below listing all databases and
tables together with the timespan (From - To) and the number of data
sets where any activity of the current login has been found.
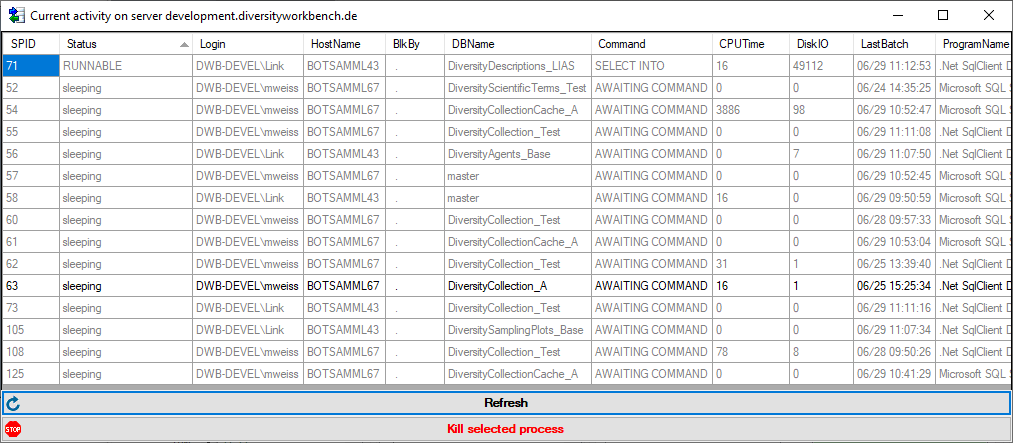
To see the current activity on the server click on the
 button. A window as shown below will open
listing all user related processes on the server.
button. A window as shown below will open
listing all user related processes on the server.
Create a login
To create a new login, click on the button in the
lower left corner. Another window will open.
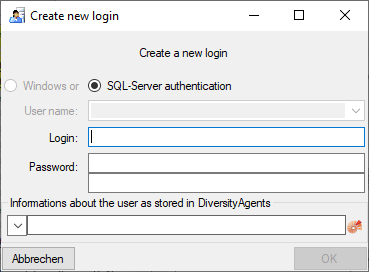
Here you can enter the name of the new login and the password. To assign
the user information click on the
button to search for a name in the DiversityAgents database.
Copy a login
To copy a login including all permissions etc. into a new login, select
the original login in the list and click on the
 button.
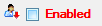
Edit login data
To edit the access for a login on the server, select the login in the
list. If a login should be disabled  , uncheck
the enabled checkbox.
, uncheck
the enabled checkbox.
All databases on the server will be listed, with the current database
showing a yellow
background. The databases where the login has no access will be
listed in gray while the databases
accessible for a login are black.
Access of a login to a database
To allow a login the access to a database, select the database from the
list and choose the database as shown below.

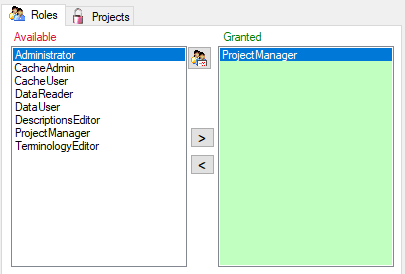
Roles of a login in a database
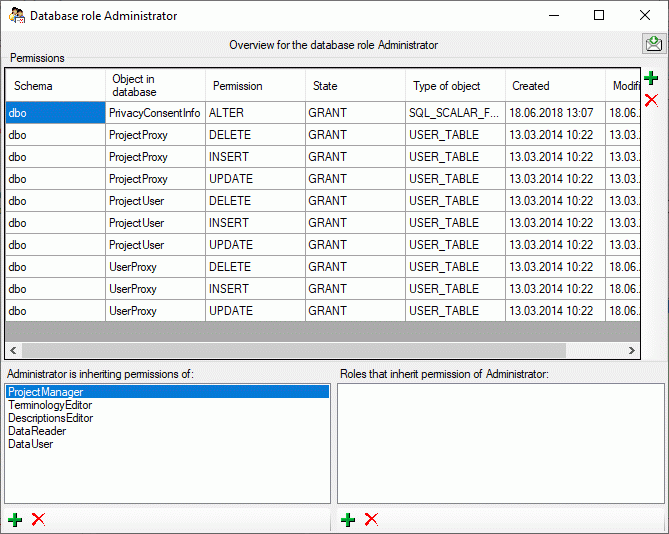
Use the > and < buttons to add or remove roles
for the login in the database (see below). By clicking the button
 you get an overview of the access rights
for the selected role.
you get an overview of the access rights
for the selected role.
Projects for a login in a database
Depending on the database you can edit the list of
projects accessible for a login (see below). Next to the
projects with full
access a second list provides projects with Read Only access (see
image below). Use the  and
and  buttons to move projects between Accessible and Read Only. Projects
are related to the module DiversityProjects. To get additional
informations about a project, select it in the list and click on the
button.
buttons to move projects between Accessible and Read Only. Projects
are related to the module DiversityProjects. To get additional
informations about a project, select it in the list and click on the
button.
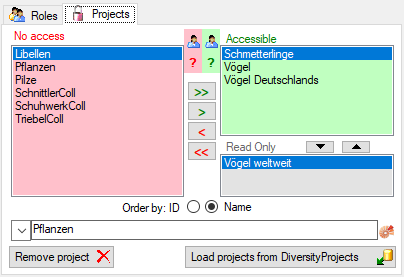
If a project is not used within DiversityDescriptions (see cachedprojects) you may delete it by shifting it to
No Access and clicking button Remove
project  . To load additional projects, click on
the Load projects
. To load additional projects, click on
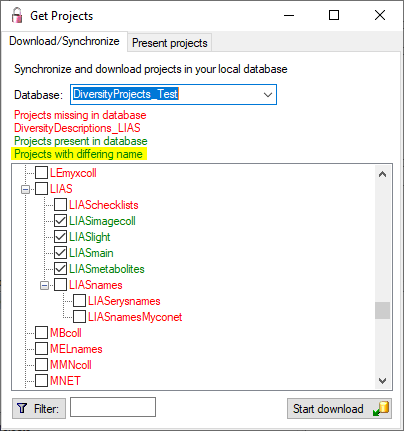
the Load projects  button. A window as shown
below will open. Projects already in the database will be listed in
green,
button. A window as shown
below will open. Projects already in the database will be listed in
green,
missing projects in red (see below). Check all projects you need
in your database and click the Start download
button.
Overview for a login
If you want to se see an overview of all permissions and project for a
login, click on the  button. A window as
shown below will open. It lists all
modules and their databases, the
roles,
button. A window as
shown below will open. It lists all
modules and their databases, the
roles,  accessible projects
and
accessible projects
and  read only projects for a login.
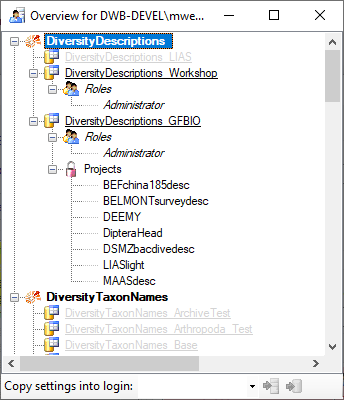
To copy the permissions and projects of the current login to another
login, select the login where the settings should be copied to from the
list at the base of the window and click on the  button to copy the settings for all databases or the
 button to copy the settings of the selected
database into this login.
button to copy the settings of the selected
database into this login.
Overview for a database
If you see an overview of all user and roles in a database, click on the
 button. A window a shown below will
open. It lists all
button. A window a shown below will
open. It lists all  user and
roles in the database.
user and
roles in the database.
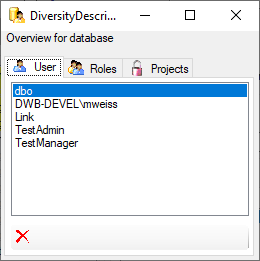
To remove a user, select it in the list and click on the
button.
Correction of logins
If you select one of the databases, at the base a
 button may appear. This indicates, that
there are windows logins listed where the name of the login does not
match the logins of the server. This may happen if e.g. a database was
moved from one server to another. To correct this, click on the button.
A list of deviating logins will be shown, that can be corrected
automatically.
button may appear. This indicates, that
there are windows logins listed where the name of the login does not
match the logins of the server. This may happen if e.g. a database was
moved from one server to another. To correct this, click on the button.
A list of deviating logins will be shown, that can be corrected
automatically.
If logins with the same name but different server are found, one of them
has to be deleted to make the correction possible. You will get a list
where you can select those that should be removed.
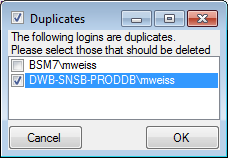
Select the duplicate logins that should be removed and click OK.
Diversity Descriptions
Projects
Within DiversityDescriptions you have to distinguish the local
projects and linked projects, which are connected to an entry in
DiversityProjects. Administration of both projects is done in editprojects mode. For linked projects data of
DiversityProjects are inserted during data publishing, e.g. by
the cache database.
To link an entry, first the project data must be downloaded from
DiversityProjects. For logins with Administrator rights there are
two ways available, the menu item Administration->
Projects … and the Login
administration.
In the login administration you may only download projects that are not
yet present in DiversityDescriptions. With the menu item
Administration-> Projects … you can
additionally update loaded projects, e. g. if their name has been
changed in DiversityProjects. In both cases a window as shown below will
open.
Projects already in the database will be listed in green, missing projects in red. Check all
projects you need in your database and click the Start download
button. After downloading a new project it is
not yet accessible within DiversityDescriptions. Therefore use the
Login administration to grant access rights
to the users.
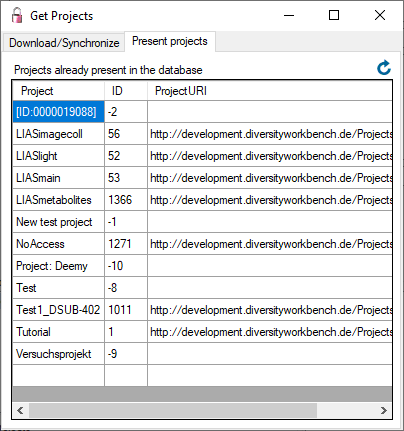
Within the Get Projects window you may get an overwiew of the
present project by opening the Present projects tab and clicking the
 button (see image below). You can distinguish
local project from linked projects by their negative “ID” and a
missing “ProjectURI”.
button (see image below). You can distinguish
local project from linked projects by their negative “ID” and a
missing “ProjectURI”.
Checking projects data
 With DiversityDescriptions version 3.5.0 a new project handling has been
introduced. Now for each project there is an entry in table
Project and
ProjectProxy with identical name.
Therefore each project appears in the Login
administration and individual access rights
may be administrated. During the database update of earlier versions to
database version 03.03.00 the existing project entries are processed the
following way:
With DiversityDescriptions version 3.5.0 a new project handling has been
introduced. Now for each project there is an entry in table
Project and
ProjectProxy with identical name.
Therefore each project appears in the Login
administration and individual access rights
may be administrated. During the database update of earlier versions to
database version 03.03.00 the existing project entries are processed the
following way:
- Projects that are uniquely assigned to a DiversityProjects entry and
have the same name in DiversityDescriptions stay unchanged.
- Projects that are uniquely assignment to a DiversityProjects entry
but have a different name, are renamed in DiversityDescriptions. The
original project name is entered in field Wording of the project
table.
- All other projects become local projects, i.e. they are not linked
to an DiversityProjects entry. Usually they keep their name, unless
it would collide with projects mentioned in the previous items. In
case of a collision a numeric value is appended to the original name
and the original name is inserted in the Wording field of the
project table.
With menu item Administration-> Database
…-> Check projects … you may check
the consistency of the Project and ProjectProxy table. It shows you
required database commands according the rules mentioned above. If you
are a system administrator, you will be asked if the suggested actions
shall be performed.
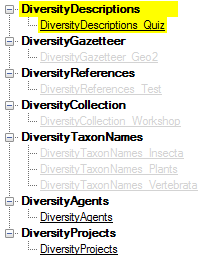
Projects and descriptions
 Each description is uniquely assigned to a project that determines
its “terminology”, i.e. the descriptors and categorical states (see
picture below from Edit description). Usually
only projects that are assigned to the user are displayed in the project
tree. The example beloe shows two projects assigned to the user that
have a parent that is not assigned to the user. Therefore the parent
(“Vögel”) is displayed with grey text colour
and icon
Each description is uniquely assigned to a project that determines
its “terminology”, i.e. the descriptors and categorical states (see
picture below from Edit description). Usually
only projects that are assigned to the user are displayed in the project
tree. The example beloe shows two projects assigned to the user that
have a parent that is not assigned to the user. Therefore the parent
(“Vögel”) is displayed with grey text colour
and icon  to indicate missing access
rights. The project “Vögel weltweit” is set to read-only for the current
user, therefore the display text has a grey
text colour and icon is grey, too.
to indicate missing access
rights. The project “Vögel weltweit” is set to read-only for the current
user, therefore the display text has a grey
text colour and icon is grey, too.

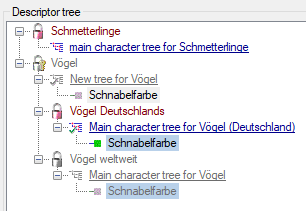
Projects and descriptors
 A descriptor is not directly assigned to a project, instead
“descriptor trees” are used. One descriptor may be included in several
descriptor trees and therefore belong to several projects or it might be
unassigned. The picture below (from Edit
descriptor) shows that one descriptor belongs to
several projects, since it is part of different descriptor trees. As in
the description example, the picture shows a parent project (“Vögel”)
that is not accessible for the actual user and therefore displayed in
grey text colour. Contained in that parent
project there are two parallel projects that include the same
descriptor: “Vögel Deutschlands” and “Vögel weltweit”, which is
read-only and therefore displayed in grey
colour.
A descriptor is not directly assigned to a project, instead
“descriptor trees” are used. One descriptor may be included in several
descriptor trees and therefore belong to several projects or it might be
unassigned. The picture below (from Edit
descriptor) shows that one descriptor belongs to
several projects, since it is part of different descriptor trees. As in
the description example, the picture shows a parent project (“Vögel”)
that is not accessible for the actual user and therefore displayed in
grey text colour. Contained in that parent
project there are two parallel projects that include the same
descriptor: “Vögel Deutschlands” and “Vögel weltweit”, which is
read-only and therefore displayed in grey
colour.
The Edit project panel provides the panel to edit
descriptor trees, too. Here all descriptors for the selected projects
are displayed (see picture below). For special purposes, e.g. copy of
descriptor trees, other projects and their trees may be included in this
view.

Diversity Descriptions
Security
A user can be in 6 groups with diverse rights in the database where
certain higher groups have all rights of lower groups in addition to
special rights for this group, e.g. the group DataReader can only read
the data while DescriptionsEditor has the rights of DataReader and
additionally can edit the data in descriptor tables - see overview
below.
Summarzied overview of the permissions of the groups
| Role |
Permissions in addition to lower role resp. user group |
Inculded rights |
| Administrator |
Edit own user permissions; use database maintenance functions |
ProjectManager, CacheAdmin |
| ProjectManager |
Create, edit and delete project data; import data with project information |
TerminologyEditor |
| TerminologyEditor |
Create, edit and delete descriptor data; import data without changing project information |
DescriptionsEditor |
| DescriptionsEditor |
Create, edit and delete description data |
DataReader |
| DataReader |
View description, descriptor, project and cache mapping data; export data |
DataUser |
| DataUser |
View descriptions without “withheld” descriptors and without resource data |
|
Two additional roles have been introduced for the handling of the cachedatabase
| Role |
Permissions in addition to lower role resp. user group |
Inculded rights |
| CacheAdmin |
Edit cache related table data |
CacheUser |
| CacheUser |
View cache database and project data |
DataReader |
In addition to the mentioned roles a “System Aministrator” may use the
Login administration to add other users to
one of these groups and grant access to one ore more
projects. If you are an “Administrator” you have the
right to modify the projects assigned to your own login.
To place a user in one of the groups, go to the loginadministration. In the window that will open
select a login and a database. The roles available in the selected
database will be listed as shown below. Use the > and < buttons to add
or remove roles for the login in the database (see below).
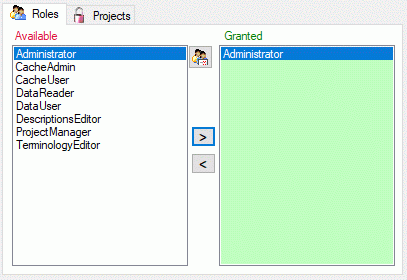
To see the detailed permissions of a role, select it in the list of
Available roles and click on the
button. A window as shown below will open
listing all objects in the database the role has permissions for (see
below).