Export Questionnaires
Export questionnaires
With this form you can export description data from the database to HTML
forms. You can open the generated HTML files, edit the data in the form
and re-import the changes by using the import questionairedata function. Choose Data ->
 Export →
  Export questionnaires … from the menu to open the window for the
export.
Export questionnaires … from the menu to open the window for the
export.
In the Export project section all projects of the database are shown
as a tree. Select here the project that shall be exported. In case of
hierarchically organized projects the subordinated projects will be
included for export, if the Include child projects option is
checked. You may pass a description list to the form by starting a query
in mode “Edit descriptions”. If all descriptions in the list belong to
the same project, you have the option to select single descriptions for
export. In this case the Export project section shows the
button  to switch to the list view (see below).
In the Expot descriptions section you find all description titles
that have been passed to the export form (see below). You may select all
entries by clicking the  all button,
deselect all entries by clicking the
all button,
deselect all entries by clicking the  none
button or toggle your selection by clicking the
none
button or toggle your selection by clicking the
 swap button. By clicking the button
 you will return to the Export project view.
The Withheld data section allows control over export of datasets
that contain entries with data status “Data withheld”. Option Supress
whole description (default) excludes all descriptions form export
where at least on descriptor is marked with “Data withheld”. Option
Hide withheld descriptor excludes only the corresponding descriptor
data from the description. Option Export withheld data does not
exclude any data from export.
Options
The Options section allows the selection of a Descriptor tree to
determine the sequence and selection of descriptors for output. If a
structured descriptor tree is selected, the first level descriptor tree
nodes will be inserted as headers to structure the document. If option
Adapt descriptor names is checked, the descriptor names will be
prefixed with the headers from the derscriptor tree. In this case you
may specify a string to connect the names in the texrt box at the right
of the option. If Generate index page is checked, an alphabetically
sorted index with links to the individual description pages will be
generated.
You may Hide descriptor status data in the generated forms.
Furthermore output of the ordinal numbers for descriptors rsp.
categorical states may be suppressed by using the options Hide
descriptor numbers rsp. Hide state numbers. With options
Include notes and Include modifier/frequency you can control if
notes and modifier or frequency values shall be included in the
generated questionaires. With Include details a text field for
editing the item details will be inserted.
By default a font type with serifes is used for the HTML output, select
Sans serif font for an alternative. The colors of several HTML
elements may be adapted to the personal preferences by clicking on
button  . With Text rows you can adjust the size
of text boxex used for text and molecular sequence descriptors. Option
Scrollable states generates an alternative layout for categorical
descriptors, where the state values are arranged in scroll boxes.
. With Text rows you can adjust the size
of text boxex used for text and molecular sequence descriptors. Option
Scrollable states generates an alternative layout for categorical
descriptors, where the state values are arranged in scroll boxes.
Check Include resources to include images for descriptions,
descriptors, categorical states and descriptor tree nodes in the
questionnaire. In the generated HTML questionnaire the images will be
zoomed by a dedicated factor, when the mouse cursor is moved over it.
The zoom factors may be adjusted by clicking on button
 . If you check the option Insert
fields for new resources, the specified number of input fields for
entering new description resources (name and URL) will be inserted in
the forms (see image below on the left).
. If you check the option Insert
fields for new resources, the specified number of input fields for
entering new description resources (name and URL) will be inserted in
the forms (see image below on the left).


Check Include scopes to include a section for scope data in the
questionnare. The scope values of the types “Sex”, “Stage”, “Part” and
“Other scopes”, which may be administered in the Edit
project section, are included as check boxes. For the
other (general) scope types input boxes will be generated, where new
values may be entered or existing values can be edited. If a scope value
is linked to a database entry, e.g. of a DiversityTaxonNames database,
it cannot be modified. In this case only a fixed text with the reference
to the target database will be inserted in the questionnaire.
By clicking on button  you may open an
option window where you can change this default behaviour. You may
adjust for which scope types an input box for a new scope value shall be
inserted or if scopes that cannot be modified shall be displayed (see
image above on the right).
you may open an
option window where you can change this default behaviour. You may
adjust for which scope types an input box for a new scope value shall be
inserted or if scopes that cannot be modified shall be displayed (see
image above on the right).
See below an example of a questionnaire where imput fields for a new
description resource and all general scope types are present..
If for the selected projects translations are stored in the database,
you may chose the Export language. If for any element no translation
in the chosen export language is present, automatically the original
text will be used. With field Language settings you can control the
presentation of floating point values in the output, in field Send
answer to you may enter the mail address to return the results.
Test
To check the export, click on the Test export
 button. In the Output preview section an empty form for entering a
new item will be displayed (see picture below). The file name is
generated as <resources
directory>\Questionnaires\<Database
name>_<Project>.txt. This default setting may be changed by
editing the File name or by navigating at the target location by
pressing the
button. In the Output preview section an empty form for entering a
new item will be displayed (see picture below). The file name is
generated as <resources
directory>\Questionnaires\<Database
name>_<Project>.txt. This default setting may be changed by
editing the File name or by navigating at the target location by
pressing the  button
besides the file name. Button
button
besides the file name. Button  opens the form in
an external web browser.
opens the form in
an external web browser.
Since the generated form can be opened with any modern web broswer, you
may distribute it to easily collect item data by people that do not have
access to the Diversity Descriptions database. Even if the form is
published as a web page, the collected data stay completele local in the
user’s web browser and are not uploaded to any server. To get the data
into the database, they must be “downloaded” form the form and sent back
to a database editor for import (see item Send reply below).
Export
Before starting the export, the export file name should be checked. The
file name is generated as <resources
directory>\Questionaires\<Database
name>_<Project>.html. This default setting may be changed by
editing the File name or by navigating at the target location by
pressing the button
besides the file name text box. During export a number of HTML files
will be generated. The document for entering a new item has the
specified file name. For entries present in the database the description
id is appended. Furthermore an index file with postfix “_Index” will be
generated, where you may navigated to each exported questionnaire.
To generate the HTML files press the Start export
button. During export the icon of the button changes to
 and you may abort processing by clicking the
button. Button opens the form visible in the
Output preview section in an external web browser (see image above).
and you may abort processing by clicking the
button. Button opens the form visible in the
Output preview section in an external web browser (see image above).
Send reply
When you opened a HTML form in the web browser and modified data, you
may download them as a text file for databaseimport. At the bottom of the HTML form click
the button Download revised description (see image below). Data
collection is completely done in the user’s local web browser, nothing
is uploaded to a server. Since data collection is done using javascript,
please take care that the script is not blocked by the web browser.
Subsections of List Export
Export
Descriptions List
With this form you can export description data from the database to a
tabulator separated text file. Choose Data →
Export →  Export lists ->
 Descriptions list … from the menu to open the
window for the export.
Descriptions list … from the menu to open the
window for the export.
In the Export project section all projects of the database are shown
as a tree. Select here the project that shall be exported. In case of
hierarchically organized projects the subordinated projects will be
included for export, if the Include child projects option is
checked. You may pass a description list to the form by starting a query
in mode “Edit descriptions”. If all descriptions in the list belong to
the same project, you have the option to select single descriptions for
export. In this case the Export project section shows the
button to switch to the list view (see below).
In the Export descriptions section you find all description titles
that have been passed to the export form (see below). You may select all
entries by clicking the all button,
deselect all entries by clicking the none
button or toggle your selection by clicking the
swap button. By clicking the button
you will return to the Export project view.
The Withheld data section allows control over export of datasets
that contain entries with data status “Data withheld”. Option Supress
whole description (default) excludes all descriptions form export
where at least on descriptor is marked with “Data withheld”. Option
Hide withheld descriptor excludes only the corresponding descriptor
data from the description. Option Export withheld data does not
exclude any data from export.
The Export settings allows the inclusion of a header line in the
output by checking the option Generate headers in output.
Additionally the lines displayed in the Test output section may be
selected by specifying the first and last line number in Test lines
[start] to [end]. For the generated output you may adjust the
lines that shall be exported in Exp. lines [start] to [end]. For
the end line a maximum value of 99999
may be entered, which means export of the whole data beginning from the
start line.
Columns
To generate a list output, you have to determine the data columns that
shall be present in the descriptions list. To include a new column press
the  Add button in the tool strip of the
Columns section. A control representing a single output column will
be added at the end of the column list (see picture below).
Add button in the tool strip of the
Columns section. A control representing a single output column will
be added at the end of the column list (see picture below).
The Columns control shows the column number, a text box for the
column header (title) and the source selector (see below).
As source you may select one of the following values:
|
|
| **Line number ** |
Number of the data line in the output file |
| Description |
Description data, e.g. name of the description entry |
| Description scope |
Description scope data, e.g. taxon, specimen or sex |
| Descriptor value |
Value(s) of a certain descriptor |
| Descriptor status |
Data status of a certain descriptor |
Depending on the selected data source one or more additional selection
boxes will appear in the description column control. The target (see
picture below left) selects the field from the database that shall be
inserted. If you select “Description scope” as data source, a selection
box for filtering will be inserted to determine the scope category (see
picture below right).
If you select “Descriptor value” or “Descriptor status” as data source,
a selection box for the descriptor will be inserted (see picture below).
The descriptor can be selected from an alphabetical list or from the
descriptor tree by clicking . In case of
“Descriptor value” the target selection box entries depend on the
descriptor type. For categorical descriptors you may select “Name”,
“Abbreviation”, “Detail”, “Wording”, “ID” or “Notes” of the categorical
ssummary data. For quantitative descriptors you may select the “Value”
or “Notes” of a specific statistical measure (separate selection box).
For text and sequence descriptors you may select the “Text” or “Notes”.
Categorical descriptors offer an additional special target type called
“<Binary columns>”. If you select this value, an additional selection
window will appear, where you can select either “<all>” or a specific
categorical state. If a specific categorical state is selected, a column
will be inserted in the outptu, that contains either “1” if the state is
present or “0” otherwise. If you select “<all>”, a column for each
categorical state will be inserted that contains the binary presence
sign. An examble is shown in the picture below (column 6).
As long as you did not enter a value for the column header, a reasonable
suggestion depending on the selected values will be inserted. You may
enter a different column header, then the background color changes to
light yellow to indicate that it will not
be updated automatically anymore (see picture below, column 3).
Double-click on the header to open a separate edit window.
Output formatting is controlled with check box “quotes” that
includes the whole output text in quotes and text boxes Pre: and
Post:, which allow inclusion of the values in prefix and postfix
strings (default is “). By selecting the check box Skip empty a
blank output will be inserted instead of the specified prefix and
postfix strings, if no value is present. If for a column multiple values
may be present, e.g. in case of categorical descriptors several
categorical states might be present, there is the choice of insterting
additional lines for multiple values (Separate line), selecting a
single value (Select) or merging the values to a single output
string (Merge). For option Select you have specify if the first,
second or other values shall be selected. For option Merge you may
specify a separator string that shall be inserted between two values
(default is ; ). To open a separate edit
window for the Pre:, Post: or Merge strings, e.g. because a
longer value shall be entered, double-click on the correspondent text
box.
Any selected column may be shifted to another position using the
 Up and
  Down buttons or
deleted with the
Down buttons or
deleted with the  Remove button of the tool
strip. With button
Remove button of the tool
strip. With button  you may delete all
columns. The complete export schema may be saved into an XML file using
the button
you may delete all
columns. The complete export schema may be saved into an XML file using
the button  , which opens a dialog window to enter
the file name and location. By default the schema file name is generated
as:
, which opens a dialog window to enter
the file name and location. By default the schema file name is generated
as:
<resources
directory>\ExportSchema\DescriptionList_<Database
name>_<Project>.xml
The XML schema file includes information concerning the database, the
project, handling of withheld data and the output columns. By pressing
the  button in the Columns section, a schema
file can be opened. If the schema does not meet the active database,
especially descriptor dependent columns might be erroneous because of
unknown values. This is indicated by a red
background color (see picture below).
button in the Columns section, a schema
file can be opened. If the schema does not meet the active database,
especially descriptor dependent columns might be erroneous because of
unknown values. This is indicated by a red
background color (see picture below).
Export
Before starting the export, the export file name should be checked. The
file name is generated as <resources
directory>\Export\DescriptionList_<Database
name>_<Project>.txt. This default setting may be changed by
editing the File name or by navigating at the target location by
pressing the button
besides the file name. If you uncheck the option Generate preview,
no output preview will be generated for the export. To generate an
output without BOM, release the  button.
To check the export, click on the Test export
 button. By
changing the selected Language settings: you may adapt the output of
floating point numbers or date and time fields to your needs. In the
Output preview grid view the lines specified in the Export
settings (Test lines [start] to [end]) will be displayed (see
picture above). To generate the table file press the Start export
button.
During test and export the icon of the button changes to
and you may abort processing by clicking the
button.
button. By
changing the selected Language settings: you may adapt the output of
floating point numbers or date and time fields to your needs. In the
Output preview grid view the lines specified in the Export
settings (Test lines [start] to [end]) will be displayed (see
picture above). To generate the table file press the Start export
button.
During test and export the icon of the button changes to
and you may abort processing by clicking the
button.
Export
Descriptors List
With this form you can export descriptor data from the database to an
tabulator separated text file. Choose Data →
Export → Export lists ->
 Descriptors list … from the menu to open the
window for the export.
Descriptors list … from the menu to open the
window for the export.
In the Export project section all projects of the database are shown
as a tree. Select here the project that shall be exported. In case of
hierarchically organized projects the subordinated projects will be
included for export, if the Include child projects option is
checked.
The Export settings allows the inclusion of a header line in the
output by checking the option Generate headers in output.
Additionally the lines displayed in the Test output section may be
selected by specifying the first and last line number in Test lines
[start] to [end]. For the generated output you may adjust the
lines that shall be exported in Exp. lines [start] to [end]. For
the end line a maximum value of 99999
may be entered, which means export of the whole data beginning from the
start line.
Columns
To generate a list output, you have to determine the data columns that
shall be present in the descriptors list. To include a new column press
the Add button in the tool strip of the
Columns section. A control representing a single output column will
be added at the end of the column list (see picture below).
The Columns control shows the column number, a text box for the
column header (title) and the source selector (see below).

As source you may select one of the following values:
|
|
| **Line number ** |
Number of the data line in the output file |
| Descriptor |
Descriptor data, e.g. name of the descriptor |
| Descriptor tree |
Assigned descriptor tree(s) |
| Categorical state |
Categorical state(s) of a certain descriptor |
Depending on the selected data source one or more additional selection
boxes will appear in the descriptor column control. The target (see
picture below) selects the filed from the database that shall be
inserted.
As long as you did not enter a value for the column header, a reasonable
suggestion depending on the selected values will be inserted. You may
enter a different column header, then the background color changes to
light yellow to indicate that it will not
be updated automatically anymore (see picture below, column 4).
Double-click on the header to open a separate edit window.

Output formatting is controlled with check box “quotes” that
includes the whole output text in quotes and text boxes Pre: and
Post:, which allow inclusion of the values in prefix and postfix
strings. By selecting the check box Skip empty a blank output will
be inserted instead of the specified prefix and postfix strings or
quotes, if no value is present. If for a column multiple values may be
present, e.g. in case of categorical descriptors where several
categorical states might be present, there is the choice of inserting
additional lines for multiple values (Separate line), selecting a
single value (Select) or merging the values to a single output
string (Merge). For option Select you have specify if the first,
second or other values shall be selected. For option Merge you may
specify a separator string that shall be inserted between two values
(default is ; ). To open a separate edit
window for the Pre, Post or Merge values strings, e.g.
because a longer value shall be entered, double-click on the
correspondent text box.
Any selected column may be shifted to another position using the
Up and Down buttons or
deleted with the Remove button of the tool
strip. With button you may delete all
columns. The complete export schema may be saved into an XML file using
the button , which opens a dialog window to enter
the file name and location. By default the schema file name is generated
as:
<resources
directory>\ExportSchema\DescriptiorList_<Database
name>_<Project>.xml
The XML schema file includes information concerning the database, the
project and the output columns. By pressing the
button in the Columns section, a schema file can be opened.
Export
Before starting the export, the export file name should be checked. The
file name is generated as <resources
directory>\Export\DescriptorList_<Database
name>_<Project>.txt. This default setting may be changed by
editing the File name or by navigating at the target location by
pressing the button
besides the file name. If you uncheck the option Generate preview,
no output preview will be generated for the export. To generate an
output without BOM, release the button.
To check the export, click on the Test export
button. By
changing the selected Language settings: you may adapt the output of
floating point numbers or date and time fields to your needs. In the
Output preview grid view the lines specified in the Export
settings (Test lines [start] to [end]) will be displayed (see
picture above). To generate the table file press the Start export
button.
During test and export the icon of the button changes to
and you may abort processing by clicking the
button.
Export
Resource List
Export resource data list
With this form you can export the resource data (see tables
Resource and
ResourceVariant) from the
database to a tabulator separated text file. Since the output includes
the database keys, you may correct the data, e.g. by using a spreadsheet
program and re-import the changes by using the importwizard. Choose Data →
Export → Export lists ->
 Resource data list … from the menu to open the
window for the export.
Resource data list … from the menu to open the
window for the export.
In the Export project section all projects of the database are shown
as a tree. Select here the project that shall be exported. In case of
hierarchically organized projects the subordinated projects will be
included for export, if the Include child projects option is
checked.
The Withheld data section allows control over export of datasets
that contain entries with data status “Data withheld”. Option Supress
whole description (default) excludes all descriptions form export
where at least on descriptor is marked with “Data withheld”. Option
Hide withheld descriptor excludes only the corresponding descriptor
data from the description. Option Export withheld data does not
exclude any data from export.
The Options section allows the selection of the Entity types for
output (“Description”, “Descriptor”, “Categorical state” and “Descriptor
tree node”). To include all export data in quotes, check option
“quotes”. If option Fill all columns is checked, resource
variant data that are inherited from the row above will be explicitely
repeated in the actual row. To include all data rows that do not have
resources select option Show empty entities. If you select Show
descriptors, the descriptor titles will be inserted for categorical
states. By checking option Show duplicates only you may list
resource links that are referenced by more than one entity of the same
type.
You may restrict the resource data list to resource links that include a
specified substring by selecting the URL filter option and entering
the required string in the text field below.
Export
Before starting the export, the export file name should be checked. The
file name is generated as <resources
directory>\Export\ResourceDataList_<Database
name>_<Project>.txt. This default setting may be changed by
editing the File name or by navigating at the target location by
pressing the button
besides the file name. To generate an output without BOM, release the
button.
To check the export, click on the Test export
button. In
the Output preview data grid the first few lines will be displayed
(see picture above). To generate the table file press the Start export
button.
During test and export the icon of the button changes to
and you may abort processing by clicking the
button.
Re-import
The review output includes all database keys that can be sufficiently
used to identify the affected data row. When the modified data shall be
re-imported, the internal keys must be available to the import wizard.
This can easily be done by creating a new import session and using the
option  Generate mapping … in form
Import sessions.
Generate mapping … in form
Import sessions.
Export
Samples List
Export Sample Data List
With this form you can export sample data from the database to a
tabulator separated text file. Choose Data →
Export → Export lists ->
 Sample data list … from the menu to open the
window for the export.
Sample data list … from the menu to open the
window for the export.
In the Export project section all projects of the database are shown
as a tree. Select here the project that shall be exported. In case of
hierarchically organized projects the subordinated projects will be
included for export, if the Include child projects option is
checked.
The Export settings allows the inclusion of a header line in the
output by checking the option Generate headers in output.
Additionally the lines displayed in the Test output section may be
selected by specifying the first and last line number in Test lines
[start] to [end]. For the generated output you may adjust the
lines that shall be exported in Exp. lines [start] to [end]. For
the end line a maximum value of 99999
may be entered, which means export of the whole data beginning from the
start line.
Columns
To generate a list output, you have to determine the data columns that
shall be present in the descriptions list. To include a new column press
the Add button in the tool strip of the
Columns section. A control representing a single output column will
be added at the end of the column list (see picture below).
The Columns control shows the column number, a text box for the
column header (title) and the source selector (see below).
As source you may select one of the following values:
|
|
| **Line number ** |
Number of the data line in the output file |
| Description |
Description data, e.g. name of the description entry |
| Sampling event |
Sampling event data, e.g. name, detail or start date |
| Sampling unit |
Sampling unit data, e.g. ID, specimen or specimen URI |
| Descriptor value |
Sample value(s) of a certain descriptor |
Depending on the selected data source one or more additional selection
boxes will appear in the description column control. The target (see
pictures below) selects the field from the database that shall be
inserted..
If you select “Descriptor value” as data source, a selection box for the
descriptor will be inserted (see picture below). The descriptor can be
selected from an alphabetical list or from the descriptor tree by
clicking . The target selection box entries
depend on the descriptor type. For categroical descriptors you may
select “Name”, “Abbreviation”, “Detail” or “ID” of the categorical
sampling data, for quantitative descriptors you may select the “Value”
or “Notes”, for text and sequence descriptors you may select the “Text”
or “Notes”.
As long as you did not enter a value for the column header, a reasonable
suggestion depending on the selected values will be inserted. You may
enter a different column header, then the background color changes to
light yellow to indicate that it will not
be updated automatically anymore (see picture below, column 3).
Double-click on the header to open a separate edit window.

Output formatting is controlled with check box “quotes” that
includes the whole output text in quotes and text boxes Pre: and
Post:, which allow inclusion of the values in prefix and postfix
strings (default is “). By selecting the check box Skip empty a
blank output will be inserted instead of the specified prefix and
postfix strings, if no value is present. If for a column multiple values
may be present, e.g. in case of categorical descriptors several
categorical states might be present, there is the choice of inserting
additional lines for multiple values (Separate line), selecting a
single value (Select) or merging the values to a single output
string (Merge). For option Select you have specify if the first,
second or other values shall be selected. For option Merge you may
specify a separator string that shall be inserted between two values
(default is ; ). To open a separate edit
window for the Pre:, Post: or Merge strings, e.g. because a
longer value shall be entered, double-click on the correspondent text
box.
Any selected column may be shifted to another position using the
Up and Down buttons or
deleted with the Remove button of the tool
strip. With button you may delete all
columns. The complete export schema may be saved into an XML file using
the button and a dialog window will be opened. By
default the schema file name is generated as:
<resources
directory>\ExportSchema\SampleDataList_<Database
name>_<Project>.xml
The XML schema file includes information concerning the database, the
project, handling of withheld data and the output columns. By pressing
the button in the Columns section, a schema
file can be opened. If the schema does not meet the active database,
especially descriptor dependent columns might be erroneous because of
unknown values. This is indicated by a red
background color (see picture below).
Export
Before starting the export, the export file name should be checked. The
file name is generated as <resources
directory>\Export\SampleDataList_<Database
name>_<Project>.txt. This default setting may be changed by
editing the File name or by navigating at the target location by
pressing the button
besides the file name. If you uncheck the option Generate preview,
no output preview will be generated for the export. To generate an
output without BOM, release the button.
To check the export, click on the Test export
button. By
changing the selected Language settings: you may adapt the output of
floating point numbers or date and time fields to your needs. In the
Output preview grid view the lines specified in the Export
settings (Test lines [start] to [end]) will be displayed (see
picture above). To generate the table file press the Start export
button.
During test and export the icon of the button changes to
and you may abort processing by clicking the
button.
Export
Translation List
Export translations list
With this form you can export the translations (see table
Translation) from the database
to a tabulator separated text file. Since the output includes the
database keys, you may correct the data, e.g. by using a spreadsheet
program and re-import the changes by using the importwizard. Choose Data →
Export → Export lists ->
 Translations list … from the menu to
open the window for the export.
Translations list … from the menu to
open the window for the export.
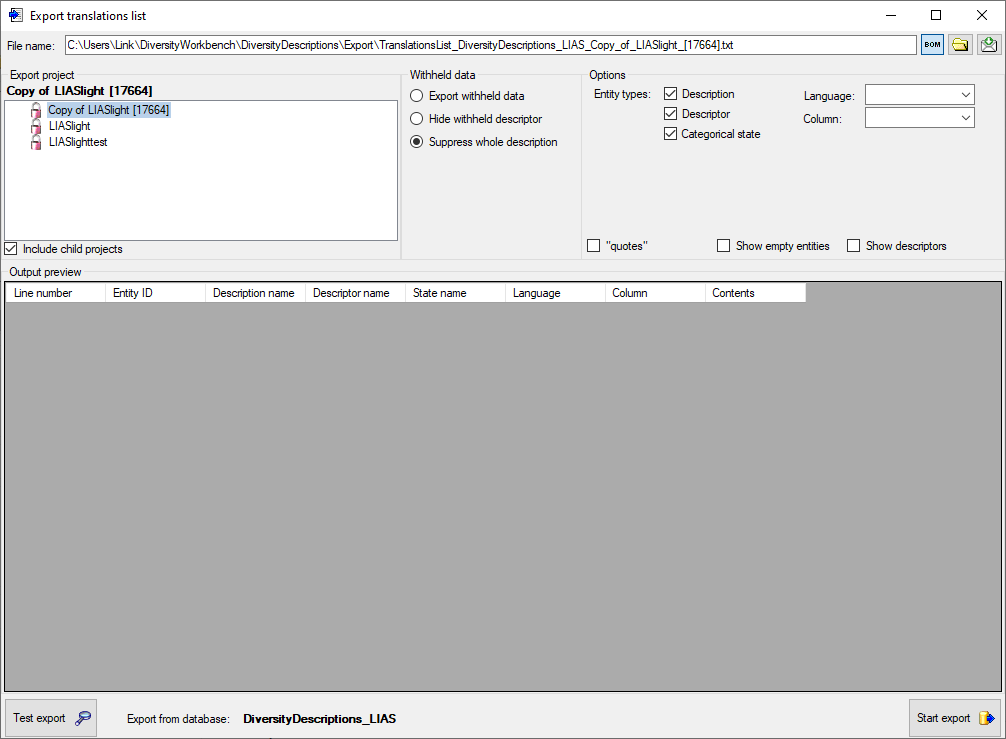
In the Export project section all projects of the database are shown
as a tree. Select here the project that shall be exported. In case of
hierarchically organized projects the subordinated projects will be
included for export, if the Include child projects option is
checked.
The Withheld data section allows control over export of datasets
that contain entries with data status “Data withheld”. Option Supress
whole description (default) excludes all descriptions form export
where at least on descriptor is marked with “Data withheld”. Option
Hide withheld descriptor excludes only the corresponding descriptor
data from the description. Option Export withheld data does not
exclude any data from export.
The Options section allows the selection of the Entity types for
output (“Description”, “Descriptor” and “Categorical state”). To include
all export data in quotes, check option “quotes”. To include all
data rows that do not have translations select option Show empty
entities. If you select Show descriptors, the descriptor titles
will be inserted for categorical states.
You may restrict the translations list to a certain Language or to a
certain data Column by selecting a value in the mentioned combo
boxes. The column value “wording” will output the translations of the
wording columns for descriptions, descriptors and categorical states.
Additionally translations of the columns “wording_before” and
“wording_after” for descriptors will be exported.
Export
Before starting the export, the export file name should be checked. The
file name is generated as <resources
directory>\Export\TranslationsList_<Database
name>_<Project>.txt. This default setting may be changed by
editing the File name or by navigating at the target location by
pressing the button
besides the file name. To generate an output without BOM, release the
button.
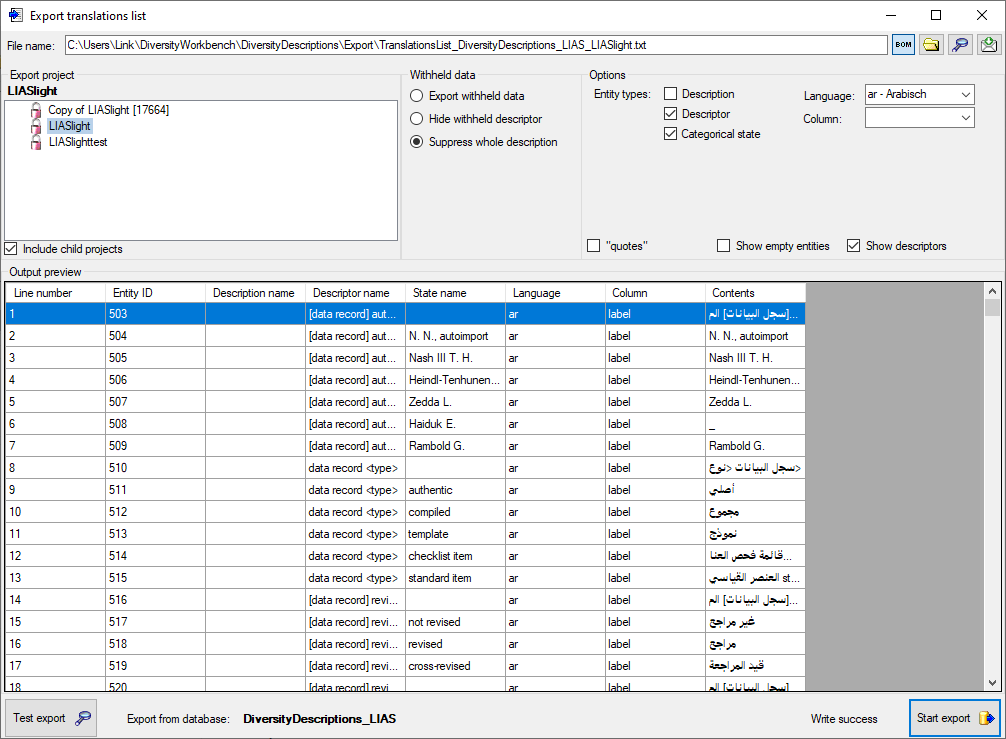
To check the export, click on the Test export
button. In
the Output preview data grid the first few lines will be displayed
(see picture above). To generate the table file press the Start export
button.
During test and export the icon of the button changes to
and you may abort processing by clicking the
button.
Re-import
The review output includes all database keys that can be sufficiently
used to identify the affected data row. When the modified data shall be
re-imported, the internal keys must be available to the import wizard.
This can easily be done by creating a new import session and using the
option Generate mapping … in form
Import sessions.
Please be aware that table
Translation has a numeric key
that is not directly accessible for the import wizard. If you want to
update an exsisting translation, the correct entry must be identified by
the alternate key consisting of “object_id”, “language_code” and
“column_id”, which correspond to the generated output table columns
“Entity ID”, “Language” and “Column” (see image above). In the import
wizard these three columns must therefore be marked as “key columns”
(see image below).

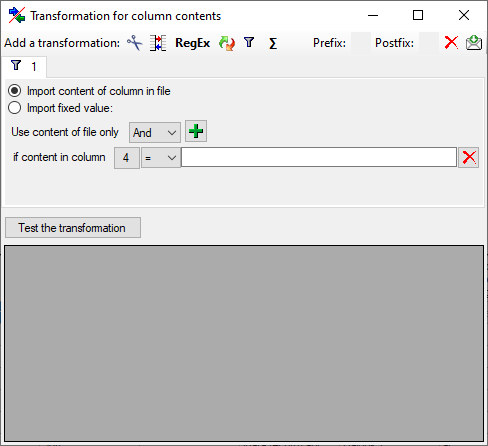
If you generate an output for several entity types, e.g. “Descriptor”
and “Categorical states” as shown in the example above, you will have to
insert a filter condition in the import wizard. E.g. if you want to
re-import descriptor translations, select the outptut column “Contents”
for the “contents” table column and mark it as decisive column. Insert a
filter to output column “State name” for equal “empty” (see image below)
to ignore lines with a categorical state.
Matrix Export Wizard
Matrix export wizard for tab separated lists
With this form you can export the descriptor and description data from
the database to a tabulator separated text file. The output includes the
database keys. Furthermore you have the option to create rsp. update
import mapping data and generate an matrix import schema. Therefore you
may correct the data, e.g. by using a spreadsheet program and re-import
the changes by using the matrix import wizard.
Choose Data → Export ->
 Matrix wizard … from the menu to open the
window for the export.
Matrix wizard … from the menu to open the
window for the export.
In the Export project section all projects of the database are shown
as a tree. Select here the project that shall be exported. In case of
hierarchically organized projects the subordinated projects will be
included for export, if the Include child projects option is
checked. You may pass a description list to the form by starting a query
in mode “Edit descriptions”. Now you have the option to select single
descriptions for export. In this case the Export project section
shows the button to switch to the list view (see
below).
In the Export descriptions section you find all description titles
that have been passed to the export form (see below). You may select all
entries by clicking the all button,
deselect all entries by clicking the none
button or toggle your selection by clicking the
swap button. By clicking the button
you will return to the Export project view.
The Withheld data section allows control over export of datasets
that contain entries with data status “Data withheld”. Option Supress
whole description (default) excludes all descriptions form export
where at least on descriptor is marked with “Data withheld”. Option
Hide withheld descriptor excludes only the corresponding descriptor
data from the description. Option Export withheld data does not
exclude any data from export.
The Options section allows the selection of the Descriptor tree:
and descriptor sequence number bounds (From descriptor: and to
descriptor:) for restriction of output table columns.
If you select option Use sequence, the descriptor state sequence
numbers will be inserted into the output table instead of the state
names. These sequence numbers will be inserted into the selected import
session (see below) for a later re-import of the data. If you export the
descriptive data to edit them with a spreadsheet tool, e.g. Microsoft
Excel, you have to identify the active categorical states by their
sequence number.
To include all exported data in quotes, check option “quotes”.
Select Trim end to remove white characters (e.g. blank or word wrap) at
the end of texts. By specifying the State separator: (default , ) you determine how multiple categorical state
values will be concatenated in the table cells. By changing the selected
Lang. settings: you may adapt the output of floating point numbers
or date and time fields to your needs.
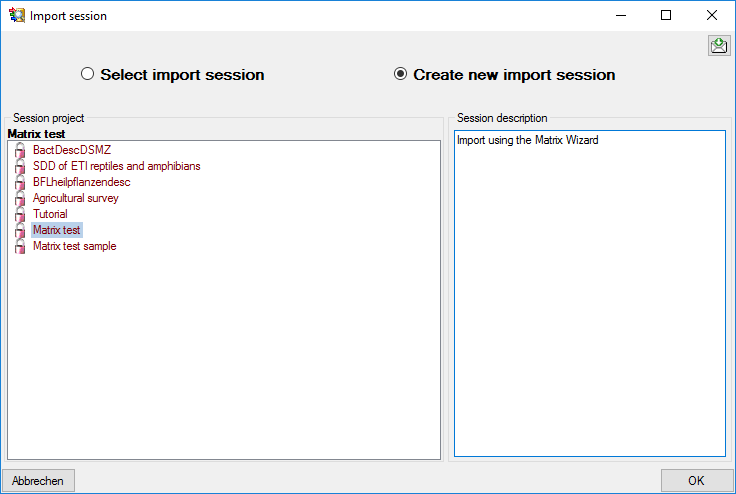
Import session
The section Import session: is relevant if you want to edit the
description data in a separate spreadsheet programme and re-import the
edited data using the Matrix Import Wizard. To select an import session
cick on button  Select and a window as
shown below will be opened. You may either select an existing import
session, which will be updated with the exported data, or create a new
one.
Select and a window as
shown below will be opened. You may either select an existing import
session, which will be updated with the exported data, or create a new
one.
During generation of the matrix data file the relevant data for
re-import will be stored in the selected import session. Additionally an
xml import schema file will be generated as <resources
directory>\Export\Matrix_<Database
name>_<Project>_Schema.xml. If you do not require the data for
re-import, simply do not select an import session or click on button
 to cancel an existing selection.
Export
Before starting the export, the export file name should be checked. The
file name is generated as <resources
directory>\Export\Matrix_<Database
name>_<Project>.txt. This default setting may be changed by
editing the File name or by navigating at the target location by
pressing the  button
besides the file name. To generate an output without BOM, release the
button.
button
besides the file name. To generate an output without BOM, release the
button.
To check the export, click on the Test export
 button.
In the Output preview data grid the first few lines will be
displayed (see picture above). To generate the table file press the
Start export
button.
In the Output preview data grid the first few lines will be
displayed (see picture above). To generate the table file press the
Start export
 button. During test and export the icon of the button changes to
and you may abort processing by clicking the
button.
button. During test and export the icon of the button changes to
and you may abort processing by clicking the
button.
 Matrix wizard:
Export descriptor and description data as tabulator separated text file
generate an import schema for the matrix importwizard.
Matrix wizard:
Export descriptor and description data as tabulator separated text file
generate an import schema for the matrix importwizard. List export: Export
data as tabulator-separated text file.
List export: Export
data as tabulator-separated text file. Structured export: Export
data as structued data file, e.g. XML according to the SDD schema 1.1
rev 5 or DELTA text file.
Structured export: Export
data as structued data file, e.g. XML according to the SDD schema 1.1
rev 5 or DELTA text file. CSV export: Export data in a tab
separated format for external analysis.
CSV export: Export data in a tab
separated format for external analysis. or uncheck it to suppress the BOM (image below).