Subsections of Advanced Tutorial
Wizard Advanced Tutorial Step 1
Step 1 - Preparations: Data import from DELTA file and new import session
Choose Data →  Import ->
 Import
DELTA … (see Import DELTA file) from the menu and
import the DELTA file to project “Deemy” (see below). If the original
database contains special characters, e.g. the German letters “ä”, “ö”
or “ü”, it is recommended to specify the export character set “Unicode”
or “UTF” if the application allows that. If the character set “ANSI” or
“ASCII” was used, you may try the corresponding encoding setting to get
a satifactory import result. The option “Accept comma as decimal
separator” was checked, because the export has been done on a German
computer system, where a value like “3.14” is exported as “3,14”.
Import
DELTA … (see Import DELTA file) from the menu and
import the DELTA file to project “Deemy” (see below). If the original
database contains special characters, e.g. the German letters “ä”, “ö”
or “ü”, it is recommended to specify the export character set “Unicode”
or “UTF” if the application allows that. If the character set “ANSI” or
“ASCII” was used, you may try the corresponding encoding setting to get
a satifactory import result. The option “Accept comma as decimal
separator” was checked, because the export has been done on a German
computer system, where a value like “3.14” is exported as “3,14”.

Close the window above and choose Data → Import
-> Wizard →
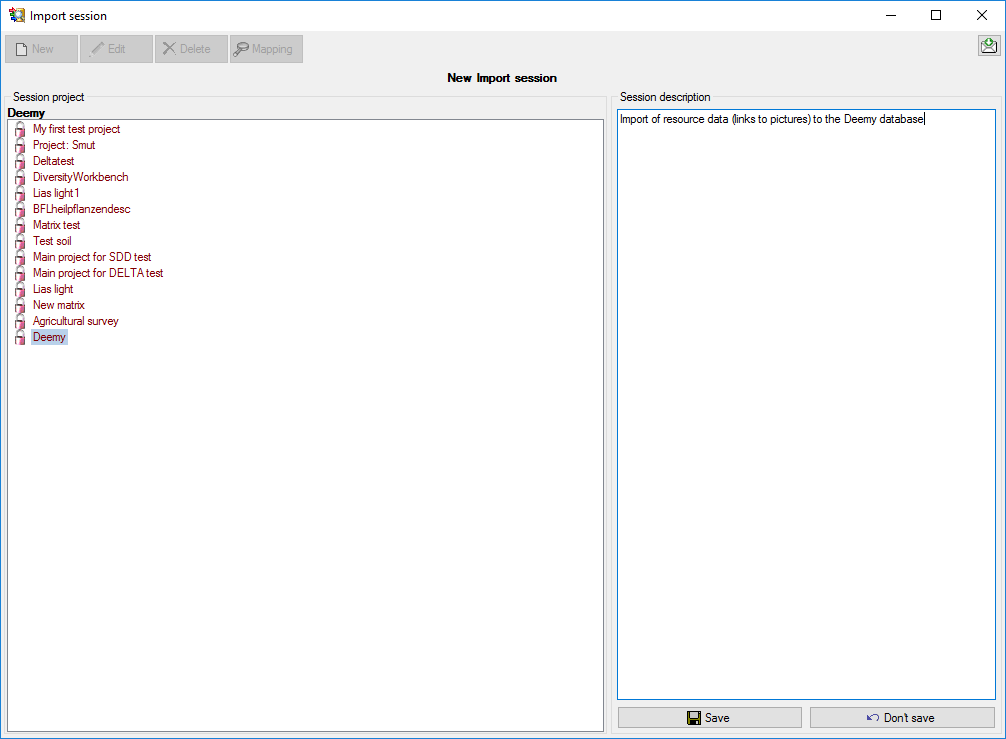
  Organize session … from the menu. A window as shown below will open,
click the
Organize session … from the menu. A window as shown below will open,
click the  New button to create a new import
session. Select project “Deemy” and enter a session description. Finally
click button
New button to create a new import
session. Select project “Deemy” and enter a session description. Finally
click button  Save to store the data (see
below).
Save to store the data (see
below).
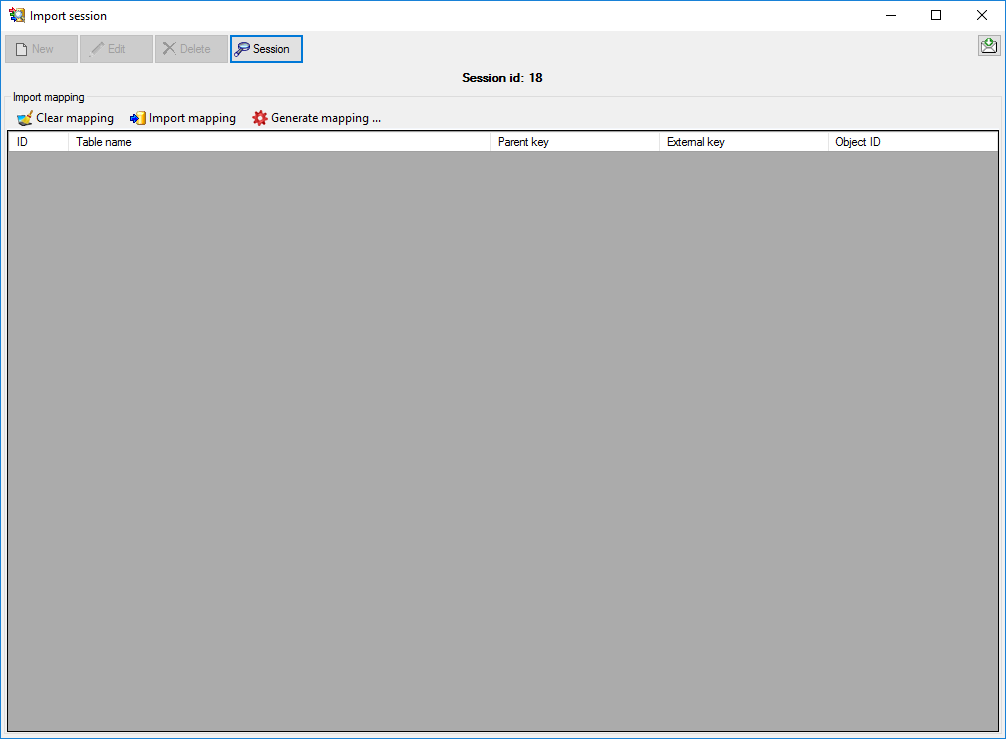
When you now click on button  Mapping you can
see that no mapping data are available (see below).
Mapping you can
see that no mapping data are available (see below).
Next: Step 2 - Import of categorical state
mapping
Wizard Advanced Tutorial Step 2
Step 2 - Import categorical state mapping
In the Import session form choose Import
mapping →  Descriptor … from the menu. A
window as shown below opens that will lead you through the import of the
descriptor mapping data.
Descriptor … from the menu. A
window as shown below opens that will lead you through the import of the
descriptor mapping data.
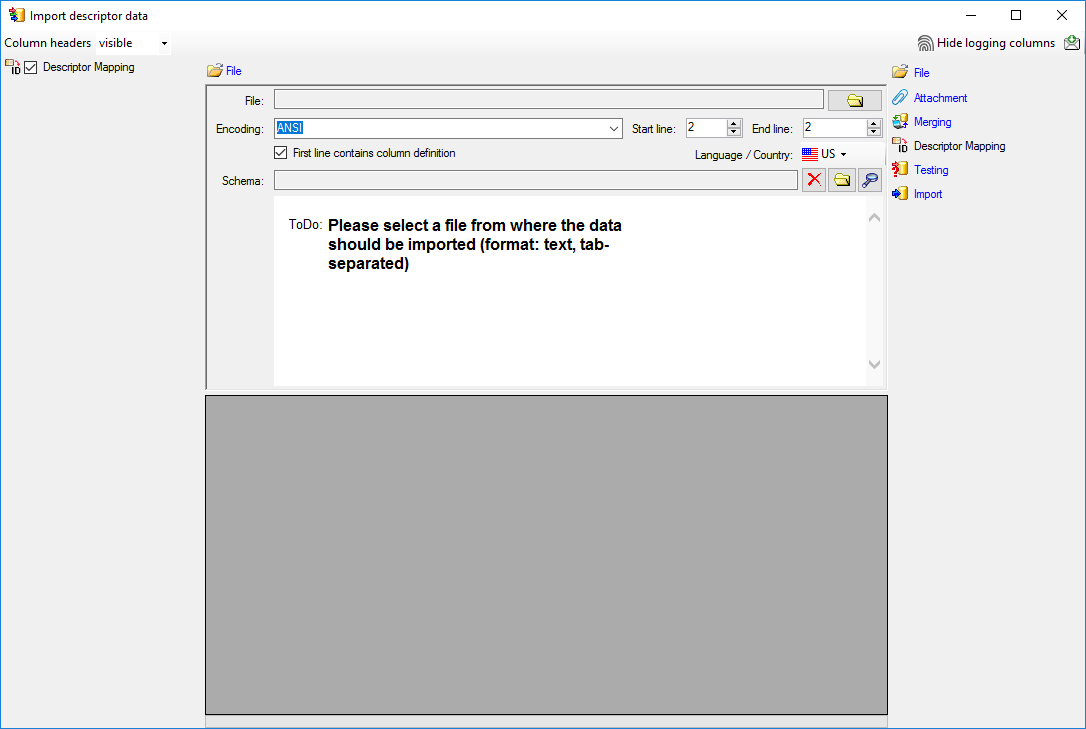
The only available import step  Descriptor
Mapping is already selected at the left side of the window. Now choose
the
Descriptor
Mapping is already selected at the left side of the window. Now choose
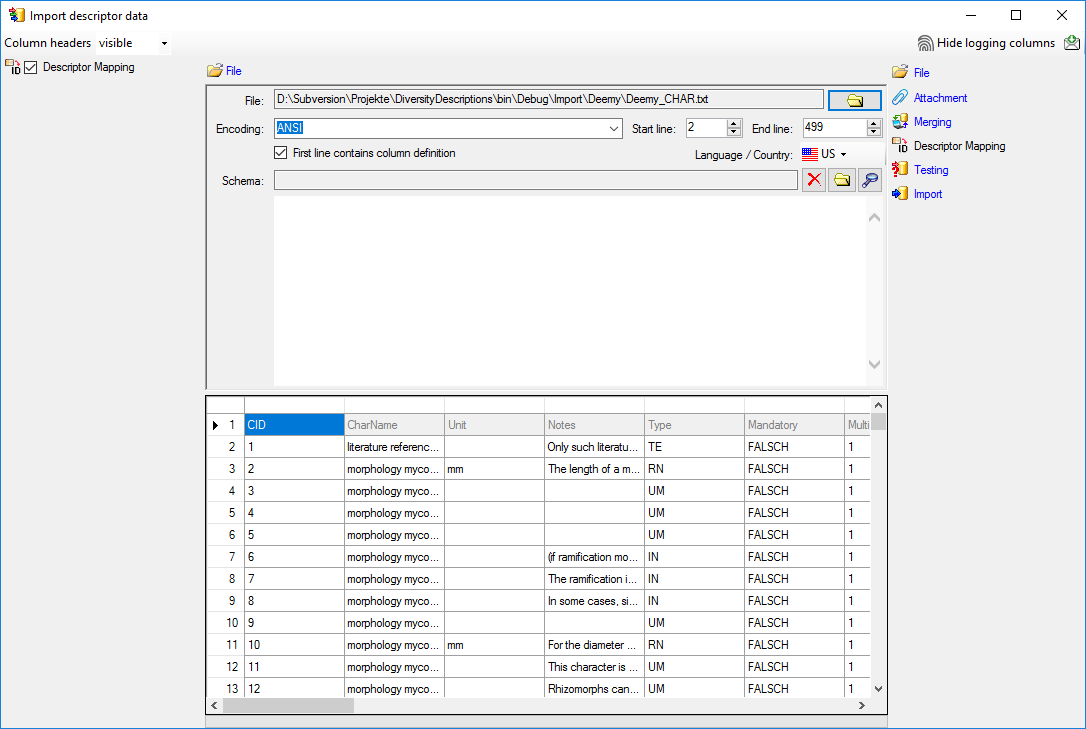
the  File from where the data should be
imported. Open file “Deemy_CHAR.txt”. The chosen encoding ANSI of
the file is sufficient. The file column “CharName” contains the
descriptor names and file column “CID” the external ID needed for the
import of the categorical state mapping import (see below).
File from where the data should be
imported. Open file “Deemy_CHAR.txt”. The chosen encoding ANSI of
the file is sufficient. The file column “CharName” contains the
descriptor names and file column “CID” the external ID needed for the
import of the categorical state mapping import (see below).
In the step table at the right side you find the import step
Descriptor Mapping. Click on it and in the
center window the assignemt data for the internal “object_id” and the
“external_key” are displayed. In column “object_id” click on
 to make this the decisive column, further click
on
to make this the decisive column, further click
on  From file to select the column
“CharName” as data source. Now click on the In column “external_key”
click on From file to select the
column “CID” as data source. After that the columns should look as shown
below.
From file to select the column
“CharName” as data source. Now click on the In column “external_key”
click on From file to select the
column “CID” as data source. After that the columns should look as shown
below.

Remark: In the import wizards for the import mapping “object_id” allways
represents the internal ID of the database. The matching database entry
is searched by comparing the label of the database entry to the selected
file column. If there are several descriptors (or descriptions) with
identical names, the import will generate errors. For categorical states
a special handling is available if the state names are not unique.
Testing
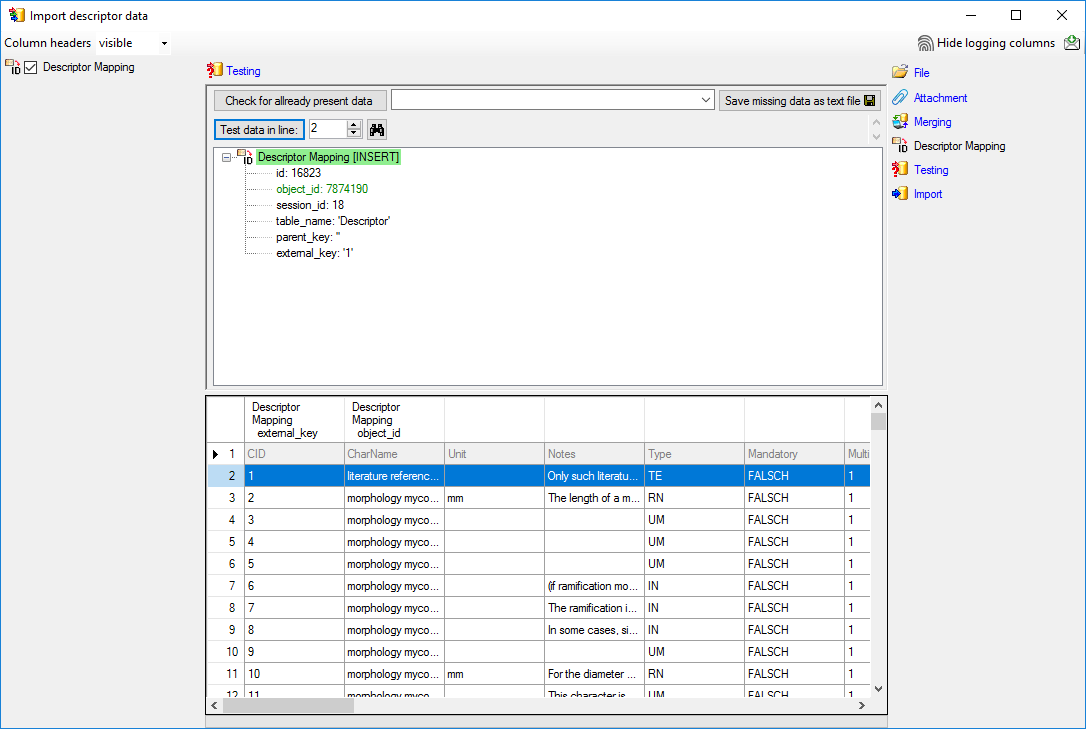
To test if all requirements for the import are met use the
 Testing step.
You can use a certain line in the file for your test and than click on
the Test data in line: button. If there are still unmet
requirements, these will be listed in a window. In our example no error
occured and the test for the first data line is shown below.
Testing step.
You can use a certain line in the file for your test and than click on
the Test data in line: button. If there are still unmet
requirements, these will be listed in a window. In our example no error
occured and the test for the first data line is shown below.
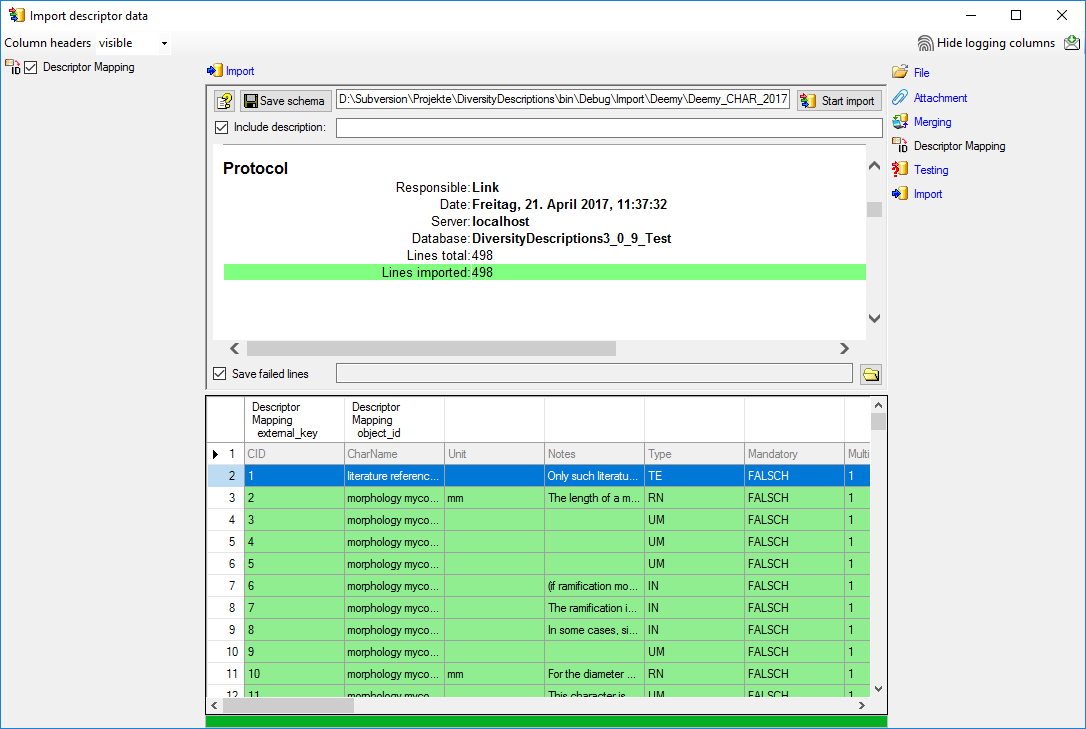
Import
With the last step you can start to import the data into the database.
If you want to repeat the import with the same settings and data of the
same structure, you can save a schema of the current settings (see
below).
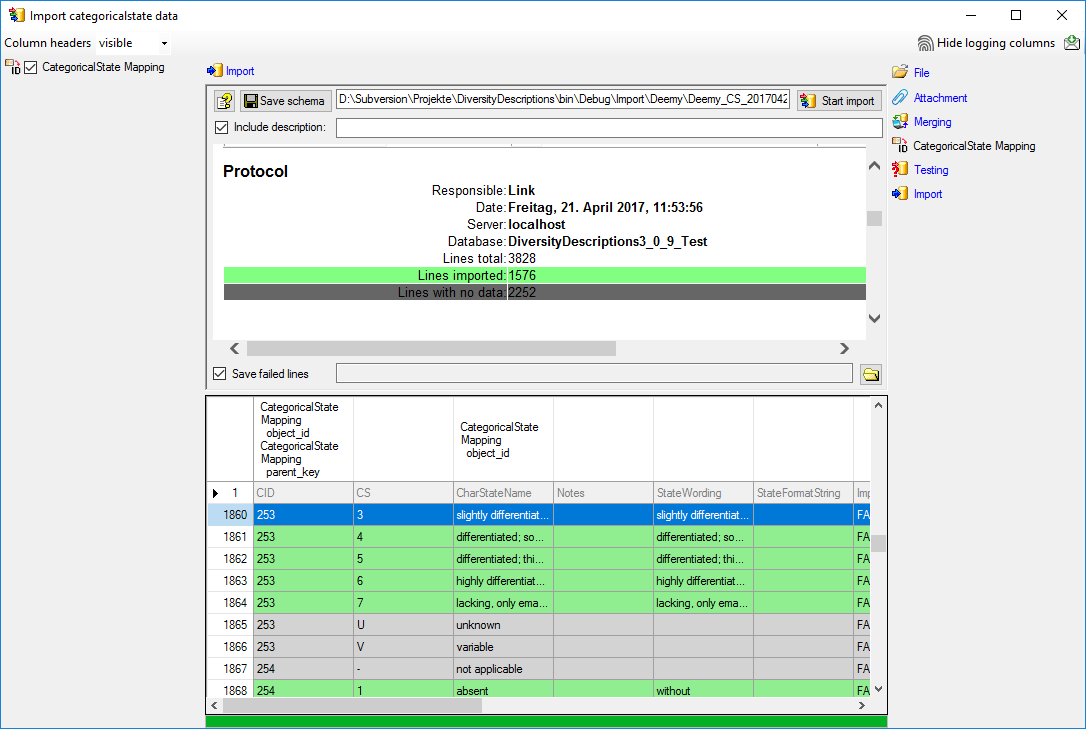
Append categorical state mapping
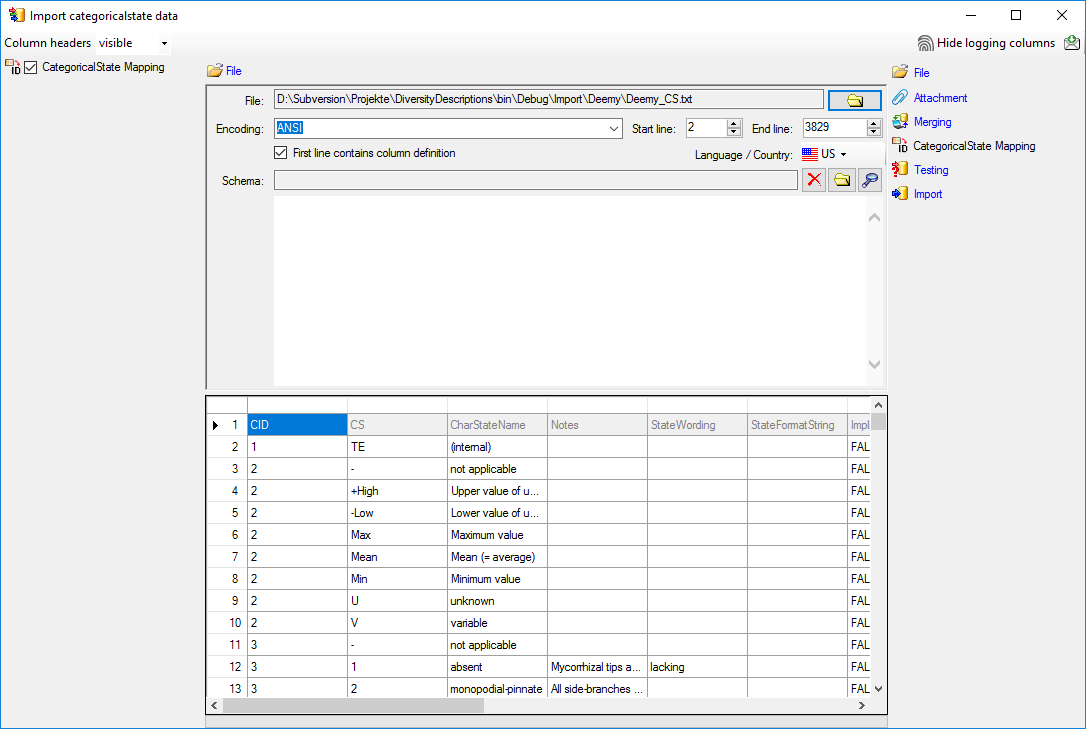
Close the import form for descriptors. In the Import session form
choose Import mapping ->
 Categorical state … from the menu and open
file “Deemy_CS.txt” (see below).
Categorical state … from the menu and open
file “Deemy_CS.txt” (see below).
The only available import step
CategoricalState Mapping is already selected at the left side of the
window. In the step table at the right side you find the import step
CategoricalState Mapping, too. Click on it
and in the center window the assignemt data for the internal
“object_id”, the “parent_key” and the “external_key” are displayed. In
column “object_id” click on to make this the
decisive column, further click on From
file to select the column “CharStateName” as data source. In column
“parent_key” you have to specify the parent of the categorical state,
i.e. the external descriptor ID. Therefore click on
From file to select the column “CID”
as data source. In column “external_key” click on
From file to select the column
“StateID” as data source. After that the columns should look as shown
below.

In the source database of this example not only the categorical states
as known in DiversityDescriptions are present, but also some “pseudo
states” that represent statistical measures of quantitative descriptors
or the data status value “not applicable”. The real categorical states
can be recognized by a numeric value in file column “CS”. In any case
the import wizard check if a categorical state with the label specified
in file column “CharStateName” exists in the database. Therefore let’s
do a first test for some selected file lines.
Testing
To test if all requirements for the import are met use the
Testing step.
You can use a certain line in the file for your test and than click on
the Test data in line: button. If there are still unmet
requirements, these will be listed in a window. Perform the import test
for file lines 2, 13 and 12 (see below).
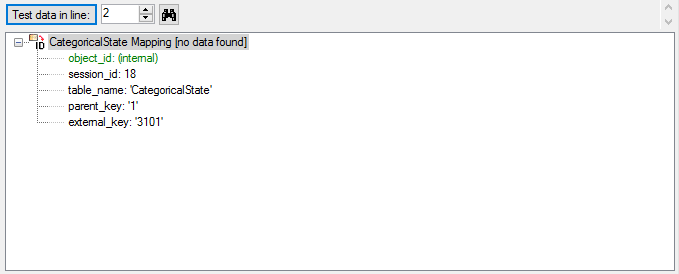
The file line 2 refers to parent “CID=1”, which belongs to a text
descriptor. The pseudo state “(internal)” was not found as a categorical
state in the database, therefore not import is performend for the file
line.
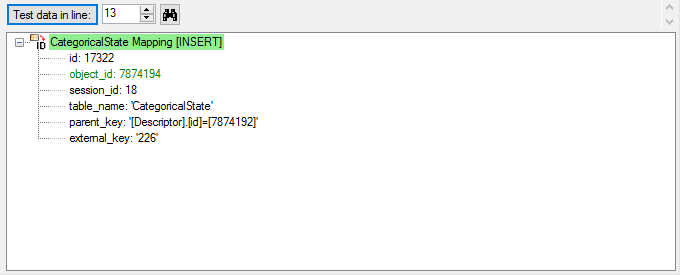
The file line 13 refers to parent “CID=3”, which belongs to a
categorical descriptor. The categorical state “monopodial-pinnate” was
found exactly once in the database, therefore the import test was
successful.
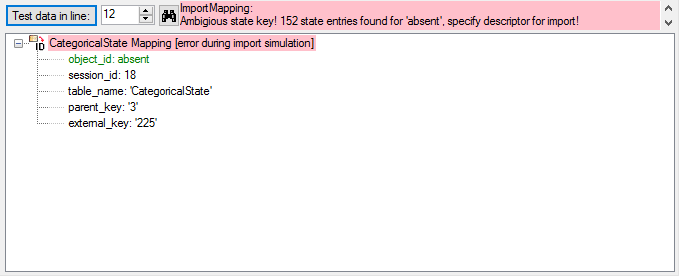
The file line 12 refers to parent “CID=3”, which belongs to a
categorical descriptor. But the categorical state “absent” was found 152
time in the database. Therefore it was not possible to find the correct
categorical state. But the error message already gives a hint how to
solve the problem: To get an unambigious match, additionally the
(external) descriptor ID must be specified.
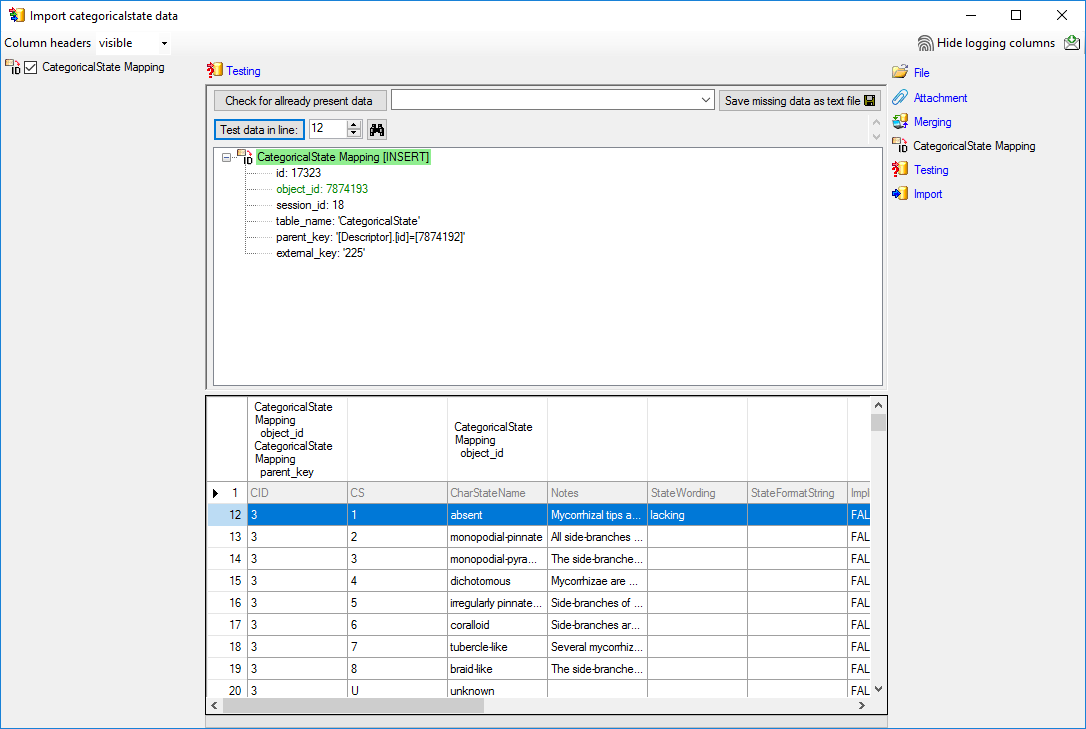
Select the import step CategoricalState
Mapping and click on the  add button at the end of line
“object_id”. Select file column “CID”, which contains the reference to
the descriptor and enter the separator character | (pipe symbol) in field Pre.: of the new
line. Additionally click on button
add button at the end of line
“object_id”. Select file column “CID”, which contains the reference to
the descriptor and enter the separator character | (pipe symbol) in field Pre.: of the new
line. Additionally click on button  in the first
line of “object_id”. In the transformation window insert one replacement
(button
in the first
line of “object_id”. In the transformation window insert one replacement
(button  ): Replace <br> by <br
/> . This transformation is neccessary, because the formatting
tag “<br>” will be converted to the standardized format “<br />
during export from the original database and import from DELTA. You can
check that transformation by the test functions for lines 1860 and 3555.
After that the column should look as shown below.
): Replace <br> by <br
/> . This transformation is neccessary, because the formatting
tag “<br>” will be converted to the standardized format “<br />
during export from the original database and import from DELTA. You can
check that transformation by the test functions for lines 1860 and 3555.
After that the column should look as shown below.

The import test with file line 12 now gives a positive result as shown
below..
Import
With the last step you can start to  import the data into the database.
If you want to repeat the import with the same settings and data of the
same structure, you can save a schema of the current settings. The
imported data lines are marked green (see below).
import the data into the database.
If you want to repeat the import with the same settings and data of the
same structure, you can save a schema of the current settings. The
imported data lines are marked green (see below).
Next: Step 3 - Import of descriptor
mapping
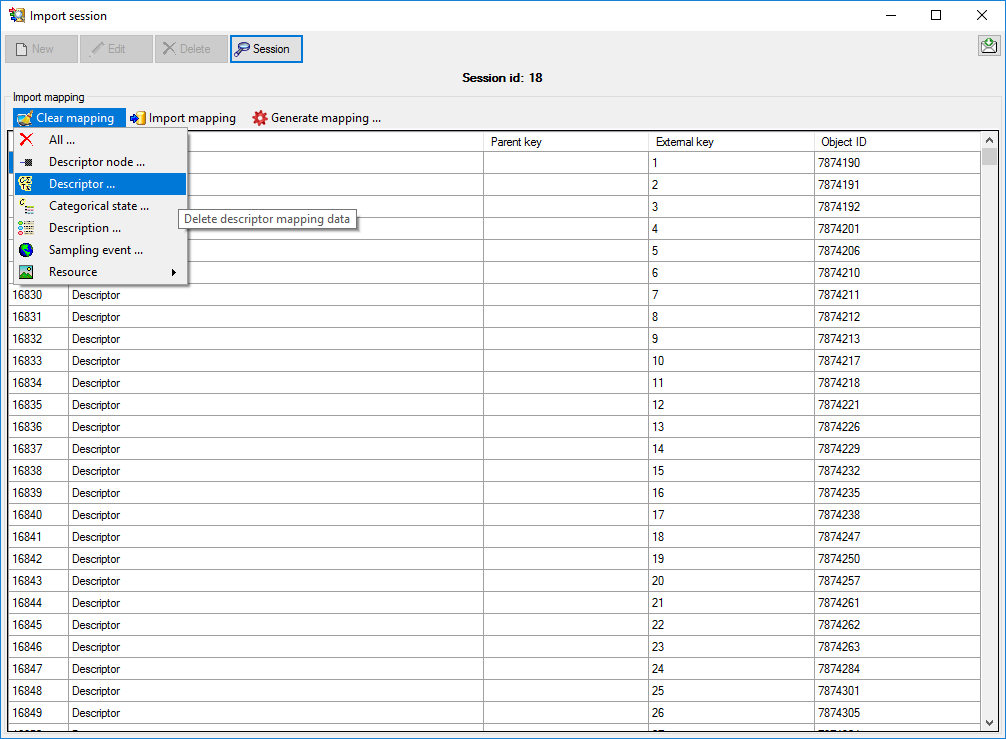
Wizard Advanced Tutorial Step 3
Step 3 - Import of descriptor mapping
Close the import form for the categorical state mapping. In the Import
session form choose  Clear mapping ->
Descriptor from the menu (see below) and answer
the followind question with “Yes”. This mapping is based on data column
“CID” and was needed in the previous step to append the categorical
state mapping data. For the picture import the descriptor mapping based
on data column “CharID” is required.
Clear mapping ->
Descriptor from the menu (see below) and answer
the followind question with “Yes”. This mapping is based on data column
“CID” and was needed in the previous step to append the categorical
state mapping data. For the picture import the descriptor mapping based
on data column “CharID” is required.
In the Import session form choose Import
mapping → Descriptor … from the menu and open
file “Deemy_CHAR.txt”. The file column “CharName” contains the
descriptor names and file column “CharID” the foreign ID (see below).
In the step table at the right side you find the import step
Descriptor Mapping. Click on it and in the
center window the assignemt data for the internal “object_id” and the
“external_key” are displayed. In column “object_id” click on
to make this the decisive column, further click
on From file to select the column
“CharName” as data source. Now click on the In column “external_key”
click on From file to select the
column “CharID” as data source. After that the columns should look as
shown below.

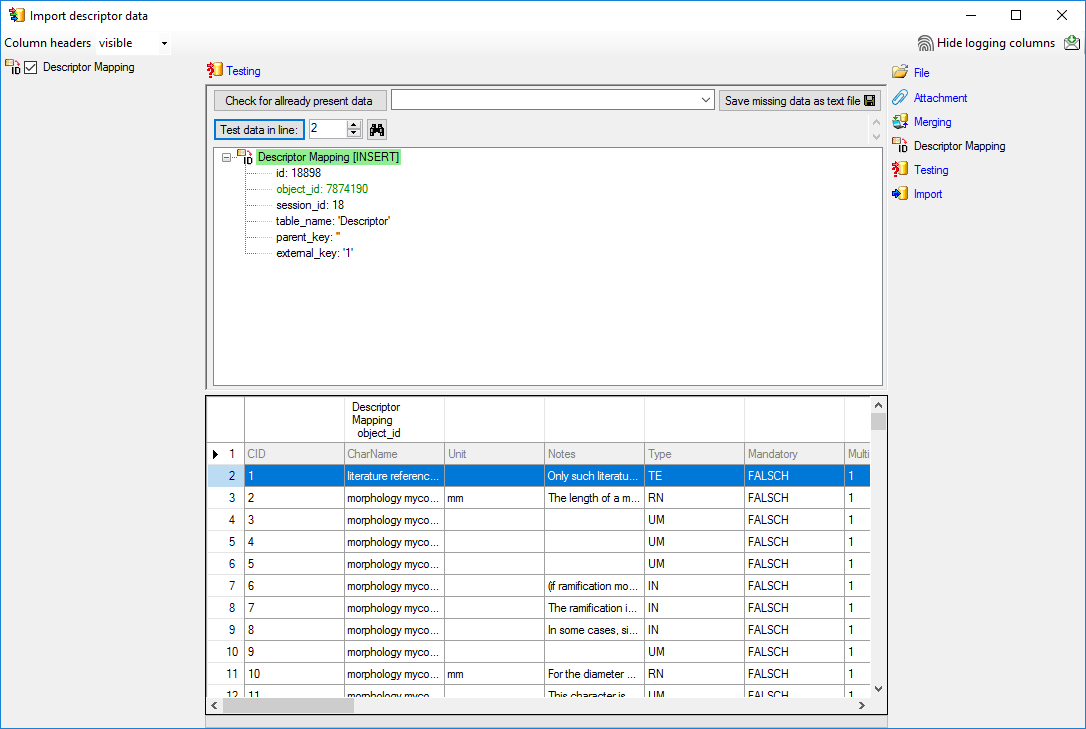
Testing
To test if all requirements for the import are met use the
Testing step.
You can use a certain line in the file for your test and than click on
the Test data in line: button. If there are still unmet
requirements, these will be listed in a window. In our example no error
occured and the test for the first data line is shown below.
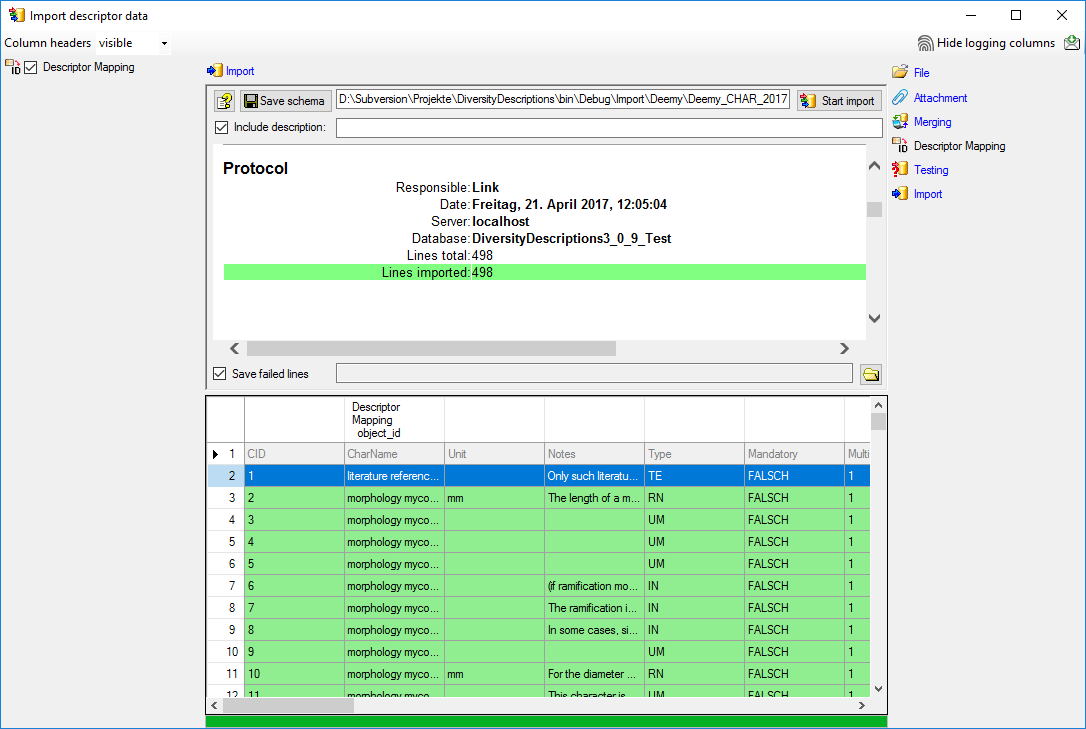
Import
With the last step you can start to import the data into the database.
If you want to repeat the import with the same settings and data of the
same structure, you can save a schema of the current settings (see
below).
Next: Step 4 - Import of description
mapping
Wizard Advanced Tutorial Step 4
Step 4 - Import description mapping
Close the import form for descriptors. In the Import session form
choose Import mapping →  Description … from the menu and open file “Deemy_ITEM.txt” (see
below).
Description … from the menu and open file “Deemy_ITEM.txt” (see
below).
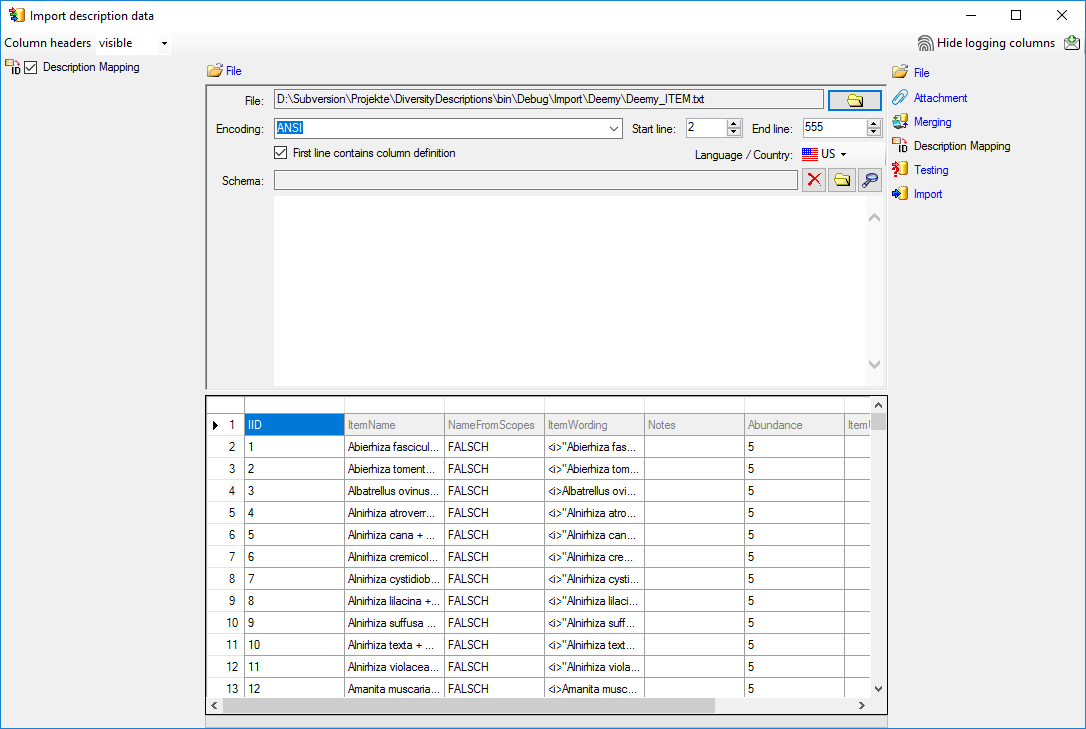
The only available import step Description
Mapping is already selected at the left side of the window. In the
step table at the right side you find the import step
Description Mapping, too. Click on it and in
the center window the assignemt data for the internal “object_id” and
the “external_key” are displayed. In column “object_id” click on
to make this the decisive column, further click
on From file to select the column
“ItemName” as data source. In column “external_key” click on
From file to select the column
“ItemID” as data source. After that the columns should look as shown
below.

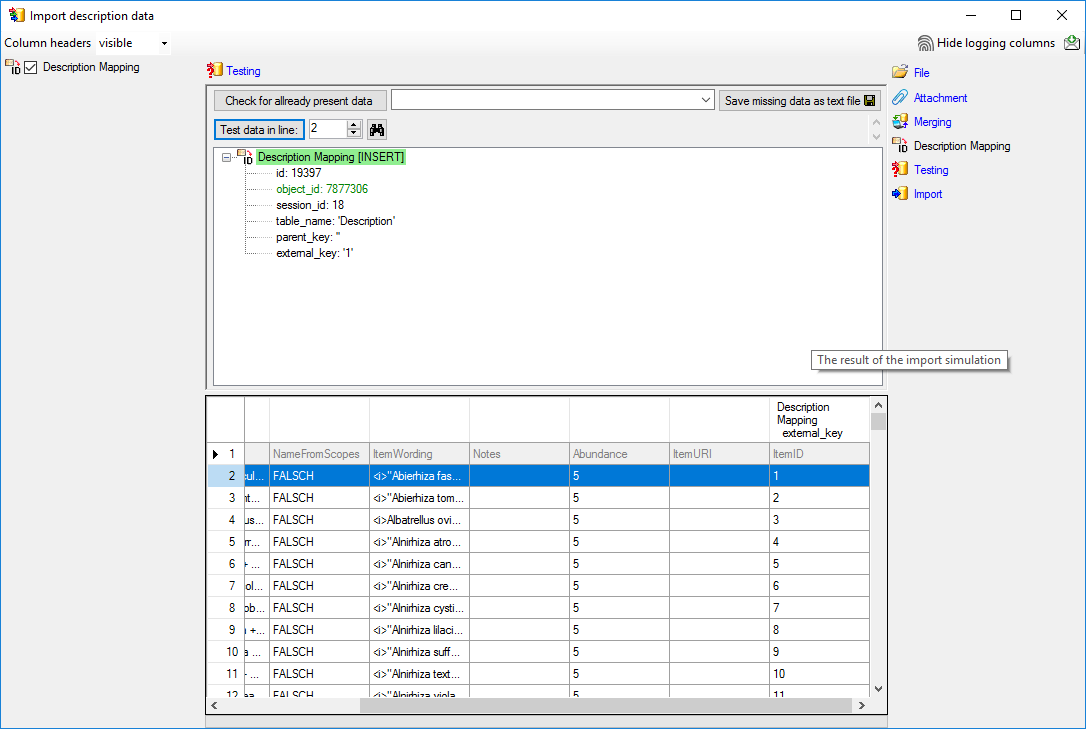
Testing
To test if all requirements for the import are met use the
Testing step.
You can use a certain line in the file for your test and then click on
the Test data in line: button. If there are still unmet
requirements, these will be listed in a window. In our example no error
occured and the test for the first data line is shown below.
Import
With the last step you can start to import the data into the database.
If you want to repeat the import with the same settings and data of the
same structure, you can save a schema of the current settings. The
imported data lines are marked green (see below).
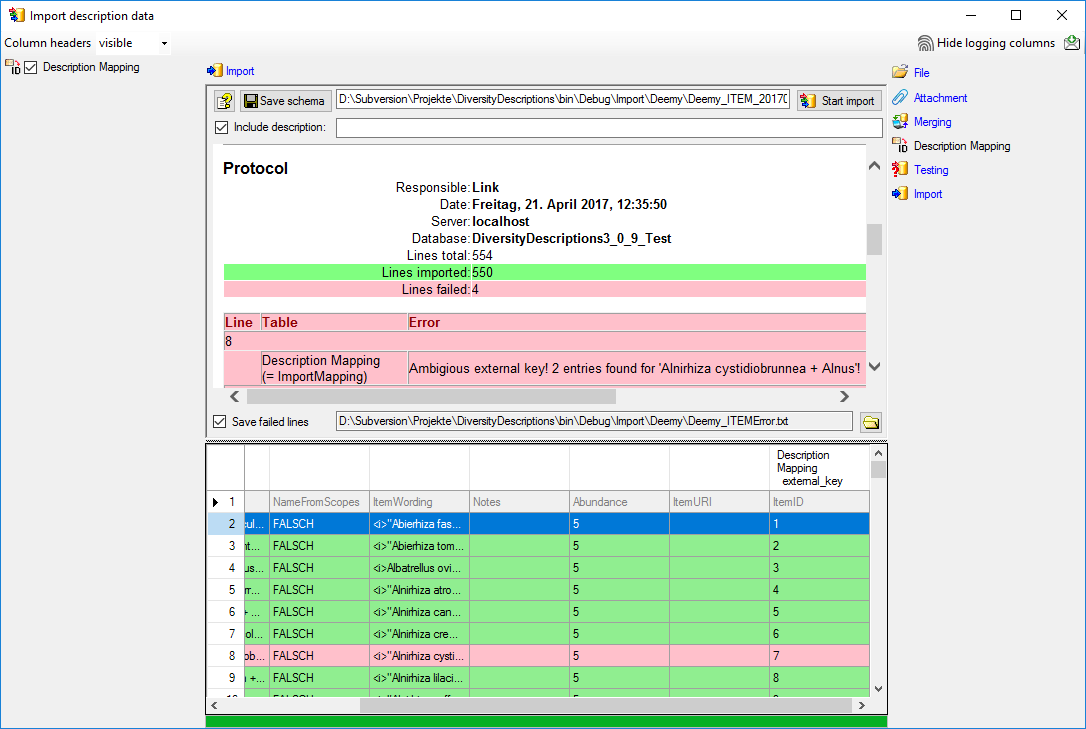
The failed lines are in this example caused by duplicate item names
twice in the database. This problem can be fixed by renaming the
ambigious entries in the database and the import file, e.g. to
“Alnirhiza cystidiobrunnea + Alnus 1” and “Alnirhiza cystidiobrunnea +
Alnus 2” rsp. “Lactarius omphaliformis Romagn. + Alnus 1” and “Lactarius
omphaliformis Romagn. + Alnus 2”.
Next: Step 5 - Import of resources for
descriptors
Wizard Advanced Tutorial Step 5
Step 5 - Import of resources for descriptors
Close the import wizard for the mapping data and the import session
window. Now choose Data → Import -> Wizard
->  Import resources →
  Descriptor resources … from the menu. A window as shown below will
open to select an import session. Select the session for project
“Deemy”.
Descriptor resources … from the menu. A window as shown below will
open to select an import session. Select the session for project
“Deemy”.
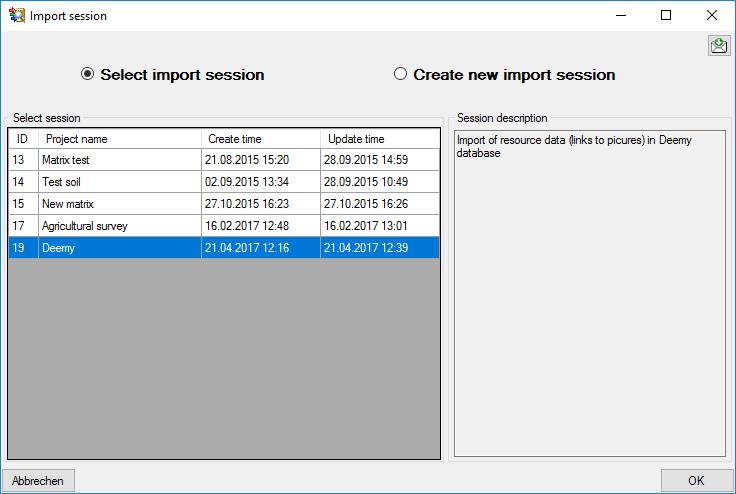
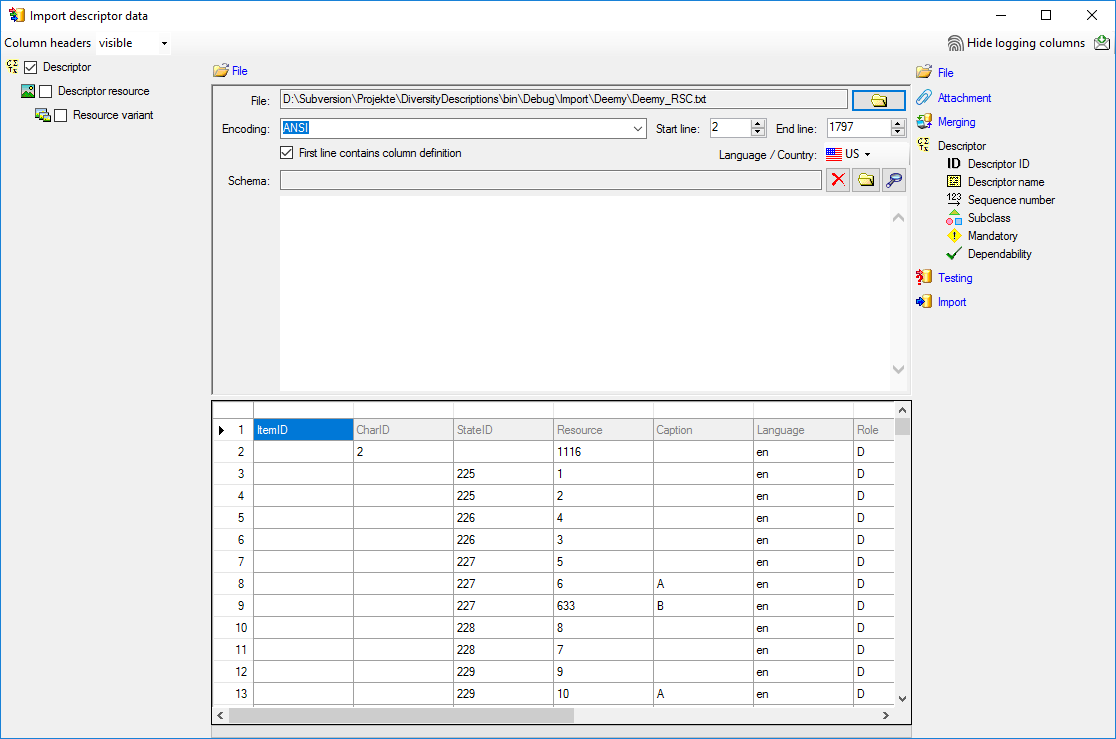
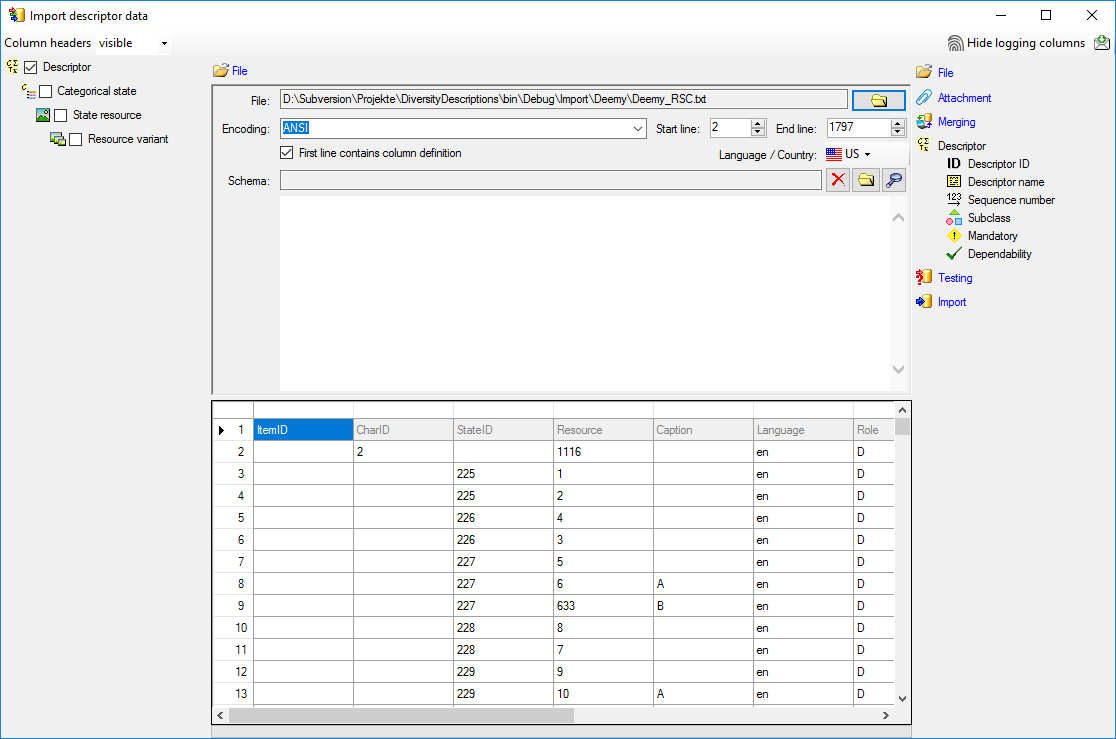
After clicking [OK] the following window opens that will lead you
through the import of the descriptor resource data. Open file
“Deemy_RSC.txt” (see below).
Selecting the data ranges
In the selection list on the left side of the window all possible import
steps for the data are listed according to the type of data you want to
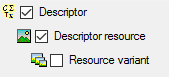
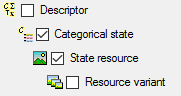
import. The step Descriptor is already
selected, additionally check the step
Descriptor resource (see below).
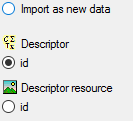
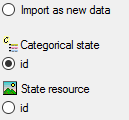
We attach the descriptor resource values to the descriptors, therefore
we will not change anything in the descriptor but will attach data. In
import step  Attachment at the right
side select Descriptor
Attachment at the right
side select Descriptor
 id (see below).
Select the import step  Merge from the list.
For Descriptor we select the
Attach option because this tables shall not
be changed, for the other step
Merge from the list.
For Descriptor we select the
Attach option because this tables shall not
be changed, for the other step  Insert
should already be selected, because a new entry has to be inserted (see
below).
Insert
should already be selected, because a new entry has to be inserted (see
below).

In the step table at the right side you find the import steps
Descriptor and
Descriptor resource and below them the data groups of the import
steps. Deselect every column from import step
Descriptor except “id”. Mark the “id” column as  Key column for comparison during attachment and click on
From file to select the column
“CharID” as data source. The “id” column of import step
Descriptor now looks as shown below.
Key column for comparison during attachment and click on
From file to select the column
“CharID” as data source. The “id” column of import step
Descriptor now looks as shown below.

In the import step Descriptor resource
click on  Resource ID and in the center window the
assignemt data for the resource id (“id”) are displayed. Click on
to make this the decisive column, further click
on From file to select the column
“Resource” as data source. After that the column should look as shown
below.
Resource ID and in the center window the
assignemt data for the resource id (“id”) are displayed. Click on
to make this the decisive column, further click
on From file to select the column
“Resource” as data source. After that the column should look as shown
below.

Click on  Resource name. The center window
shows the data column “label”. Click on
From file in the “label” line to select file column “Resource”. After
the resource number the value in data column “Caption” shall be
inserted, included in brackets, if it is present. Click on the
button at the end of line “label” and select column
“Caption”. Enter ( (blank and opening
bracket) in field Pre.: and ) in
field Post.: of the new line. After that the column should look as
shown below.
Resource name. The center window
shows the data column “label”. Click on
From file in the “label” line to select file column “Resource”. After
the resource number the value in data column “Caption” shall be
inserted, included in brackets, if it is present. Click on the
button at the end of line “label” and select column
“Caption”. Enter ( (blank and opening
bracket) in field Pre.: and ) in
field Post.: of the new line. After that the column should look as
shown below.

Finally click on  Sequence number. In the
center window select the data column “display_order”, click on
From file and select file column
“DisplayOrder” (see below).
Sequence number. In the
center window select the data column “display_order”, click on
From file and select file column
“DisplayOrder” (see below).

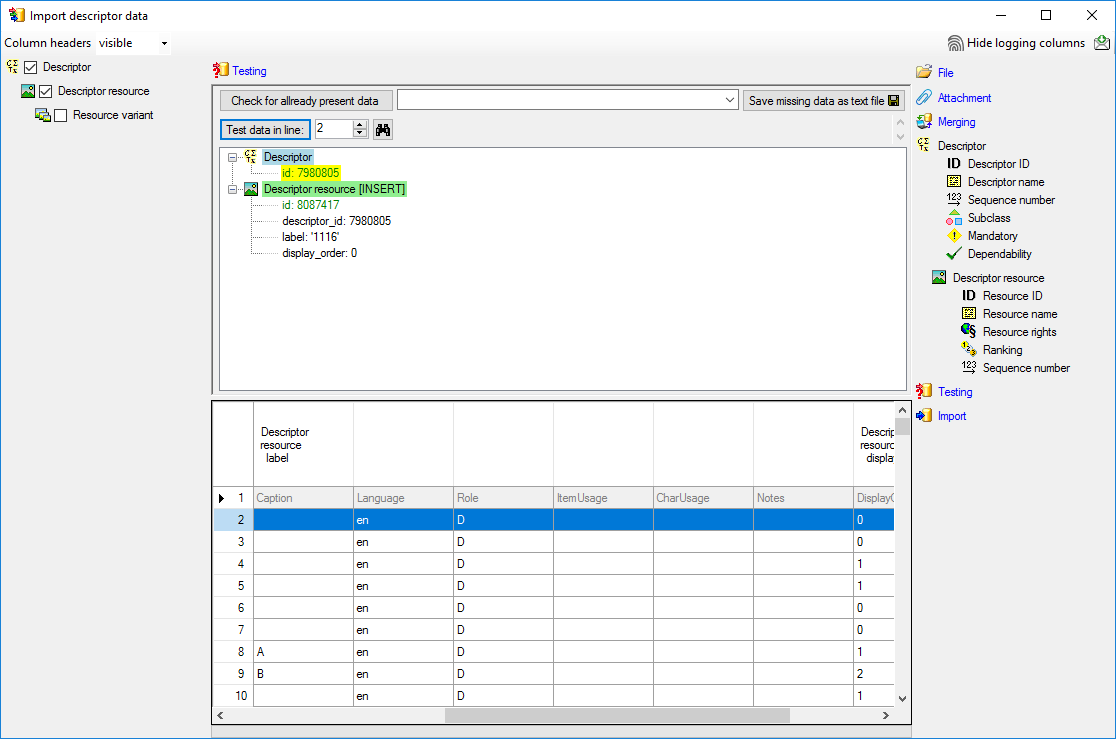
Testing
To test if all requirements for the import are met use the
Testing step.
The test for the first data line is shown below.
Import
With the last step you can start to import the data into the database.
If you want to repeat the import with the same settings and data of the
same structure, you can save a schema of the current settings. There are
86 lines that were not imported due to duplicate entries (see below).
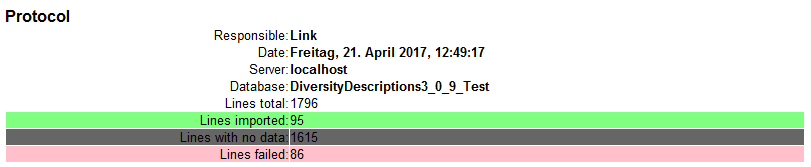
The failed lines are caused by duplicate entries, i.e. the resource was
already imported for the descriptor.
Next: Step 6 - Import of resources for categorical
states
Wizard Advanced Tutorial Step 6
Step 6 - Import of resources for categorical states
Close the import wizard for the descriptor resources. Now choose Data
-> Import -> Wizard →
Import resources →  State resources … from
the menu, select the session for project “Deemy”. The following window
opens that will lead you through the import of the categorical state
resource data. Open file “Deemy_RSC.txt” (see below).
State resources … from
the menu, select the session for project “Deemy”. The following window
opens that will lead you through the import of the categorical state
resource data. Open file “Deemy_RSC.txt” (see below).
Selecting the data ranges
In the selection list on the left side of the window all possible import
steps for the data are listed according to the type of data you want to
import. Deselect the step Descriptor, it is
not needed since the categorical states have been assigned unambiguous
external IDs in step 3. Check
the steps Categorical state and
State resource (see below).
We attach the state resource values to the categorical states, therefore
we will not change anything in the categorical state but will attach
data. In import step Attachment at the right
side select Categorial state
id (see below).
Select the import step Merge from the list.
For Categorical state we select the
Attach option because this tables shall not
be changed, for the other step Insert
should already be selected, because a new entry has to be inserted (see
below).

In the step table at the right side you find the import steps
Categorical state and
State resource and below them the data
groups of the import steps. Deselect every column from import step
Categorical state except “id”. Mark the
“id” column as Key column for comparison during
attachment and click on From file to
select the column “StateID” as data source. The “id” column of import
step Categorical state now looks as shown
below.

In the import step State resource click on
Resource ID and in the center window the
assignemt data for the resource id (“id”) are displayed. Click on
to make this the decisive column, further click
on From file to select the column
“Resource” as data source. After that the column should look as shown
below.
Click on Resource name. The center window
shows the data column “label”. Click on
From file in the “label” line to select file column “Resource”. After
the resource number the value in data column “Caption” shall be
inserted, included in brackets, if it is present. Click on the
button at the end of line “label” and select column
“Caption”. Enter ( (blank and opening
bracket) in field Pre.: and ) in
field Post.: of the new line. After that the column should look as
shown below.
Finally click on Sequence number. In the
center window select the data column “display_order”, click on
From file and select file column
“DisplayOrder” (see below).
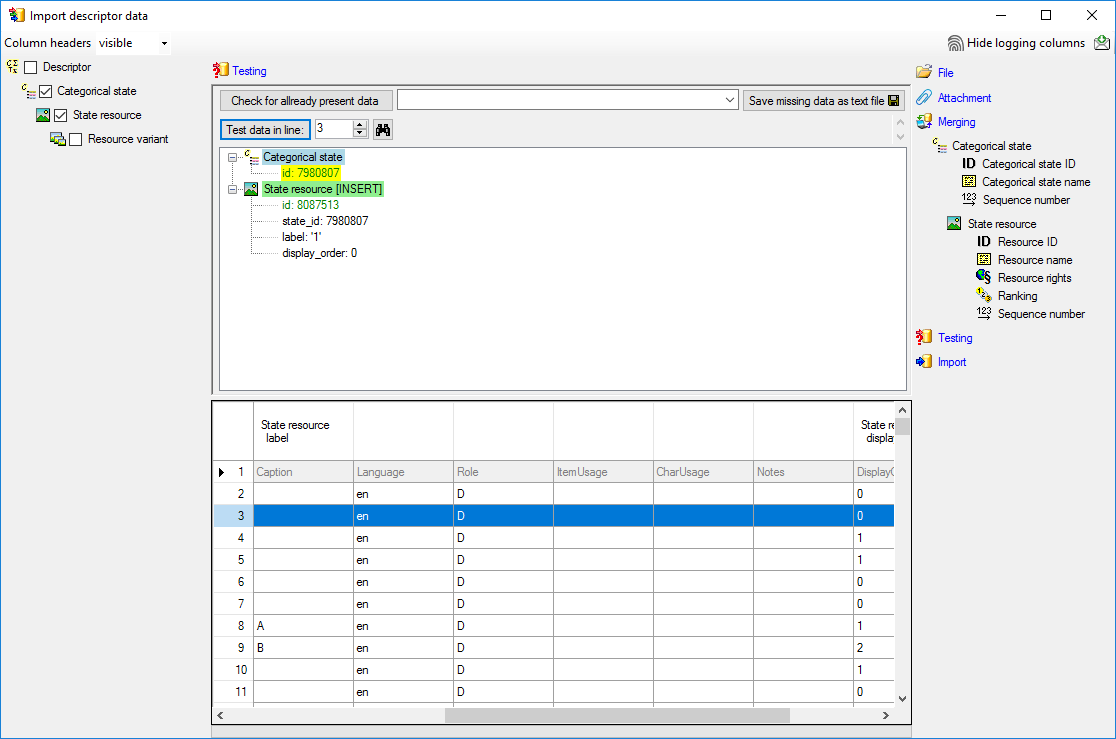
Testing
To test if all requirements for the import are met use the
Testing step.
The test for the second data line is shown below.
Import
With the last step you can start to import the data into the database.
If you want to repeat the import with the same settings and data of the
same structure, you can save a schema of the current settings. There are
561 lines that were not imported due to duplicate entries (see below).
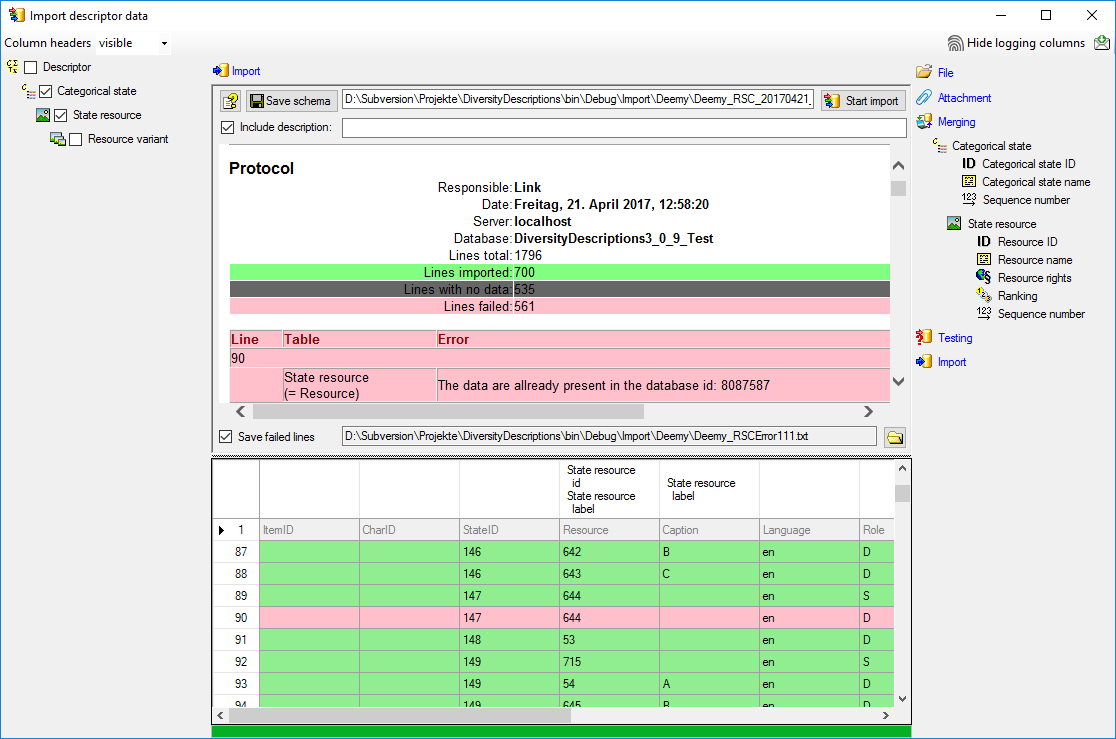
The failed lines are caused by duplicate entries, i.e. the resource was
already imported for the categorical state.
Next: Step 7 - Import of resources for
descriptions
Wizard Advanced Tutorial Step 7
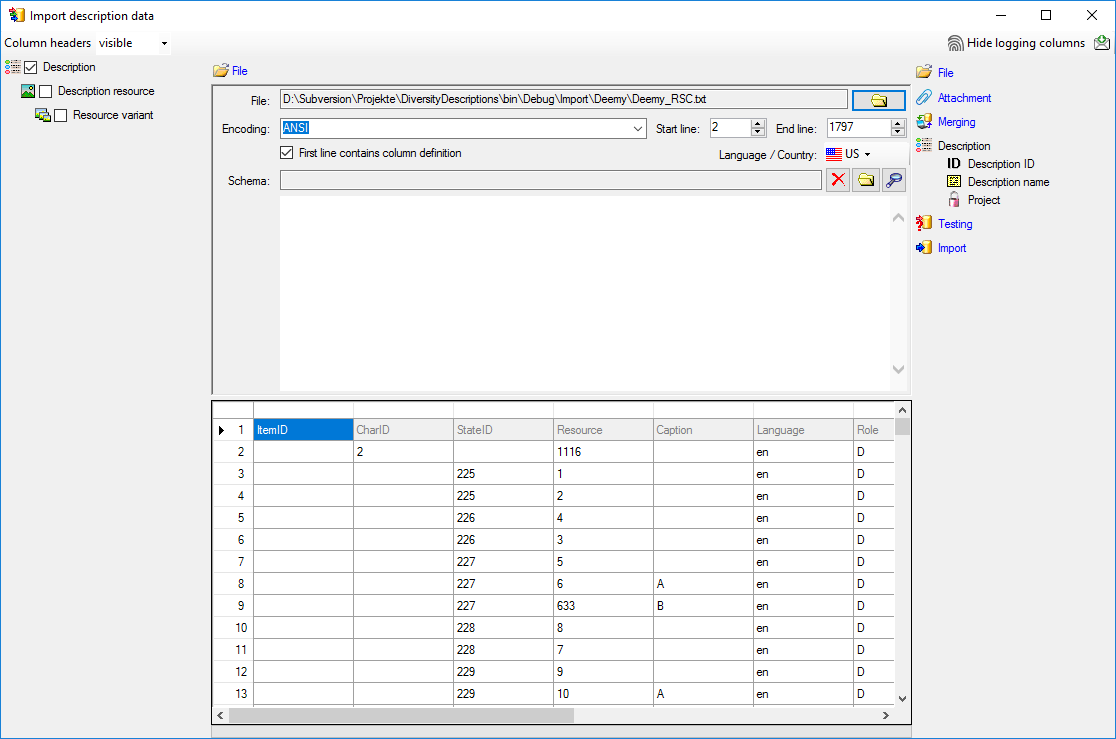
Step 7 - Import of resources for descriptions
Close the import wizard for the state resources. Now choose Data ->
Import -> Wizard →
Import resources →  Description resources …
from the menu, select the session for project “Deemy”. The following
window opens that will lead you through the import of the categorical
state resource data. Open file “Deemy_RSC.txt” (see below).
Description resources …
from the menu, select the session for project “Deemy”. The following
window opens that will lead you through the import of the categorical
state resource data. Open file “Deemy_RSC.txt” (see below).
Selecting the data ranges
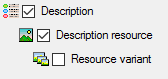
In the selection list on the left side of the window all possible import
steps for the data are listed according to the type of data you want to
import. Step Description is already selected.
Aditionally check step Description
resource (see below).
We attach the description resource values to the descriptions, therefore
we will not change anything in the description but will attach data. In
import step Attachment at the right
side select Description
id (see below).
Select the import step Merge from the list.
For Description we select the
Attach option because this tables shall not
be changed, for the other step Insert
should already be selected, because a new entry has to be inserted (see
below).

In the step table at the right side you find the import steps
Description and
Description resource and below them the data groups of the import
steps. Deselect every column from import step
Description except “id”. Mark the “id” column as
Key column for comparison during attachment and click on
From file to select the column
“ItemID” as data source. The “id” column of import step
Description now looks as shown below.

In the import step Description resource
clickon Resource ID and in the center window the
assignment data for the resource id (“id”) are displayed. Click on
to make this the decisive column, further click
on From file to select the column
“Resource” as data source. After that the column should look as shown
below.
Click on Resource name. The center window
shows the data column “label”. Click on
From file in the “label” line to select file column “Resource”. After
the resource number the value in data column “Caption” shall be
inserted, included in brackets, if it is present. Click on the
button at the end of line “label” and select column
“Caption”. Enter ( (blank and opening
bracket) in field Pre.: and ) in
field Post.: of the new line. After that the column should look as
shown below.
Finally click on Sequence number. In the
center window select the data column “display_order”, click on
From file and select file column
“DisplayOrder” (see below).
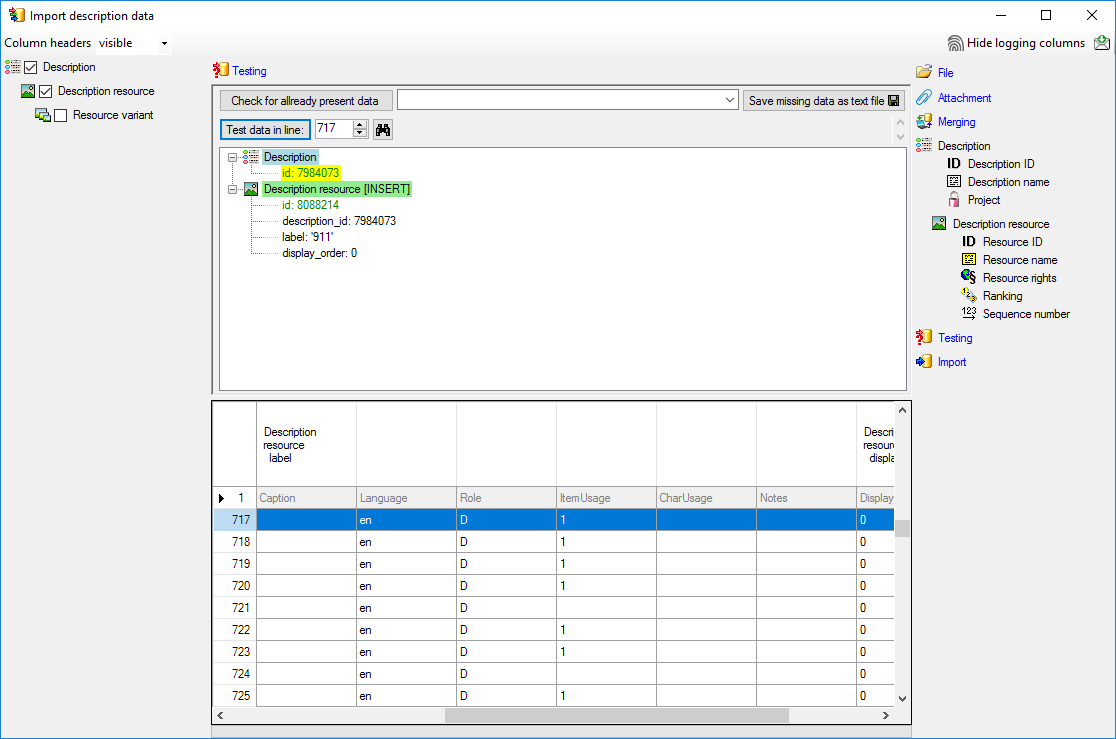
Testing
To test if all requirements for the import are met use the
Testing step.
The test for the data line 717 is shown below.
Import
With the last step you can start to import the data into the database.
If you want to repeat the import with the same settings and data of the
same structure, you can save a schema of the current settings. There are
177 lines that were not imported due to duplicate entries (see below).
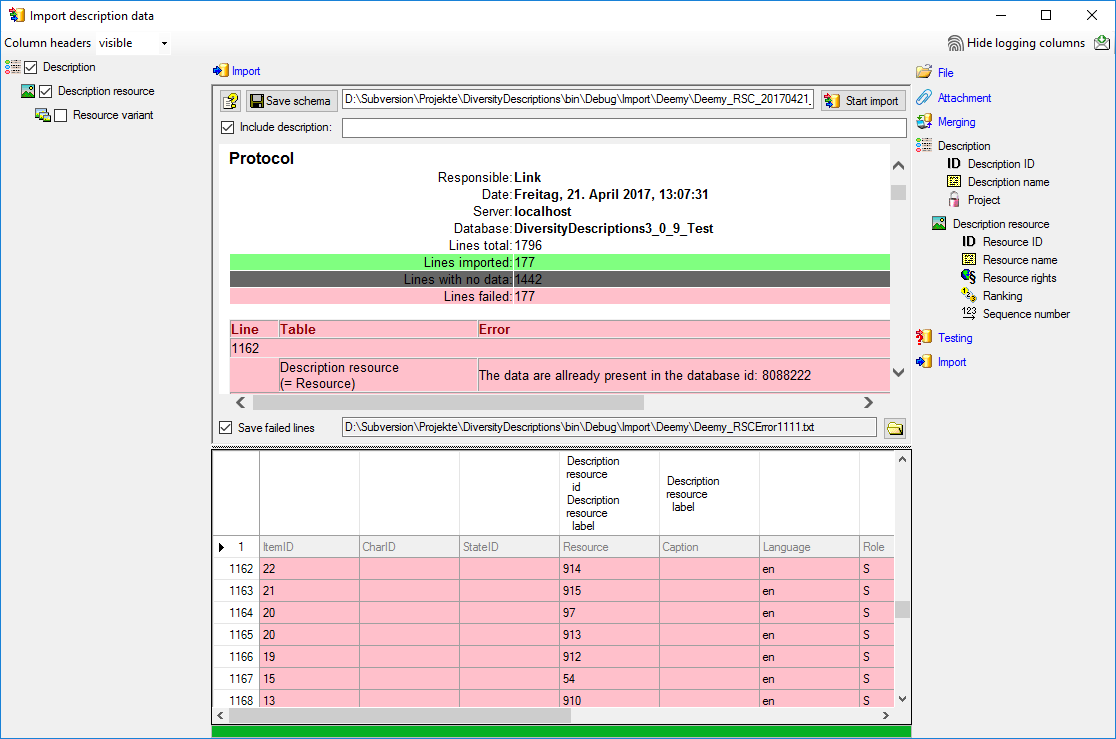
The failed lines are caused by duplicate entries, i.e. the resource was
already imported for the description.
Next: Step 8 - Import of resource
variants
Wizard Advanced Tutorial Step 8
Step 8 - Import of resource variants
The import wizards used in step 5 up to step 7 allow appending a
resource variant to one resource. Those wizards can be used most
efficiently if the data that are needed for the resource table and the
resource variant are located at the same file. In our example there is
the complication that the direction of the resource reference is in the
opposite direction than in the original database. In
DiversityDescription a resource references e.g. a descriptor and one or
more resource variants reference the resource. In the original database
several entities, e.g. descriptors or states, may reference the same
picture.
During the import of the resources we used the picture number as the
external key of the resources. Together with their parent key, e.g. a
descriptor ID, this gives unambiguous entries although the external
resource ID alone is ambiguous. Now we want to create a resource
variant, containing the URL of the picture, for each resource entry with
the same external resource ID.
Since this “multiple” import is no standard feature of the import
wizard, the following description shows a work-around: During the import
the first resource entry with a matching “Resource ID” that is not
referenced by any Resource variant will be available for data update and
appending of a new resource variant. A repeated import with the same
setting will find the next resource entry and so on until all ambigious
resource entries are processed.
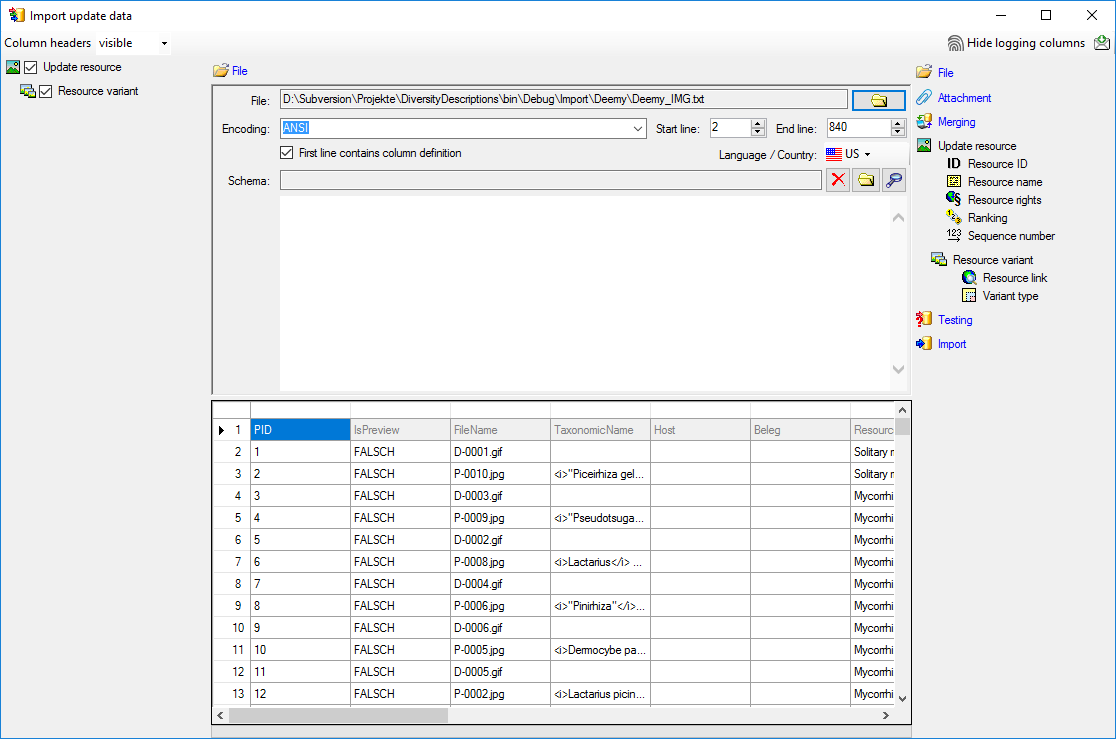
Close the import wizard for the description resources. Now choose Data
-> Import -> Wizard →
Import resources →  Resource variants
… from the menu, select the session for project “Deemy”. The
following window opens that will lead you through the import of the
categorical state resource data. Open file “Deemy_IMG.txt” (see below).
Resource variants
… from the menu, select the session for project “Deemy”. The
following window opens that will lead you through the import of the
categorical state resource data. Open file “Deemy_IMG.txt” (see below).
Selecting the data ranges
In the selection list on the left side of the window all possible import
steps for the data are listed according to the type of data you want to
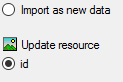
import. The available steps Update resource
and Resource variant are already
selected.
We want to update some fields of the resource table with values form the
data file attach the resource variant to the resource. In import step
Attachment at the right
side select Update resource
id (see below). Note: With this import
wizard only update of resources is supported.
Select the import step Merge from the list.
For Update resource we keep the
 Merge option because this table shall be
updated, for the other step Insert
should already be selected, because a new entry has to be inserted (see
below).
Merge option because this table shall be
updated, for the other step Insert
should already be selected, because a new entry has to be inserted (see
below).

In the import step Update resource click
on Resource ID and in the center window the
assignment data for the resource id (“id”) are displayed. Click on
to make this the decisive column. Mark the “id”
column as Key column for comparison during
attachment and click on From file to
select the column “PID” as data source. After that the column should
look as shown below.

Click on Resource name. The center window
shows the data column “label” and “detail”. Deselect the “label” entry
and select “detail”. Click on From
file to select the column “SourceTitle” as data source and enter Source: in field Pre.: (double-click in
the field to open a separate edit window). Now click on the
button at the end of line “detail”, select file
column “Volume” and enter , vol. in
field Pre.:. Repeat the last step for file columns “Pages” (, p. ) and “ReferenceNotes” (, notes: ). After that the column should look as
shown below.

Click on  Resource rights and in the center
window the assignment data for the resource rights are displayed. Select
“rights_text”. Click on From file to
select the column “Author” as data source and enter © (Alt+0169 and a blank) in field Pre.:.
Now click on the add button at the end of line
“rights_text”, select file column “DateYear” and enter , in field Pre.:. After that the column
should look as shown below.
Resource rights and in the center
window the assignment data for the resource rights are displayed. Select
“rights_text”. Click on From file to
select the column “Author” as data source and enter © (Alt+0169 and a blank) in field Pre.:.
Now click on the add button at the end of line
“rights_text”, select file column “DateYear” and enter , in field Pre.:. After that the column
should look as shown below.

In the import step Resource variant
click on  Resource link. The center window
shows the data column “url”. Click on to make
this the decisive column and on From
file in the “url” line to select file column “FileName”. Double-click
on the text box after Pre.: to open a separate edit window. Here
enter the web address of the picture server where the files are located
and confirm with “OK”. After that the column should look as shown
below.
Resource link. The center window
shows the data column “url”. Click on to make
this the decisive column and on From
file in the “url” line to select file column “FileName”. Double-click
on the text box after Pre.: to open a separate edit window. Here
enter the web address of the picture server where the files are located
and confirm with “OK”. After that the column should look as shown
below.

Click on  Variant type. In the center window
select the data column “variant_id”, click on
For all: and select the value “good
quality” (see below).
Variant type. In the center window
select the data column “variant_id”, click on
For all: and select the value “good
quality” (see below).

Click on the import step Resource
variant to find some ungrouped fields. In the center window select the
data column “pixel_width”, click on
From file and select the value “WidthD”. Now select the data column
“pixel_height”, click on From file
and select the value “HeightD”. Finally select the data column
“mime_type”, click on From file and
select the value “FileName”. Click on button to
define a transformation. In the transformation window click on the
 cut transformation, enter Position: 2, click on to enter
splitter character . (period) to extract
the file extension. Now click on
cut transformation, enter Position: 2, click on to enter
splitter character . (period) to extract
the file extension. Now click on  to insert a
translation table and
to insert a
translation table and  to insert the values
contained in the file column. “gif” shall be converted to image/gif, “jpg” will become image/jpeg (see below).
to insert the values
contained in the file column. “gif” shall be converted to image/gif, “jpg” will become image/jpeg (see below).
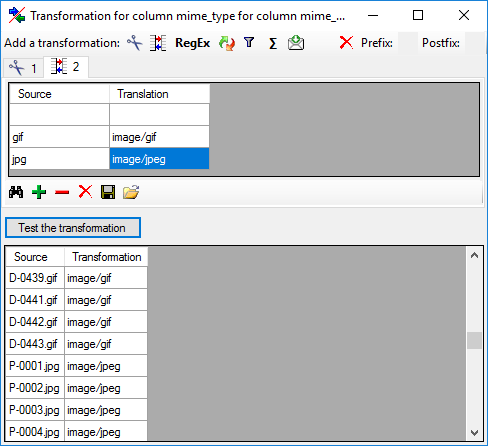
After that the columns should look as shown below.

Testing
To test if all requirements for the import are met use the
Testing step.
The test for the first data line is shown below.

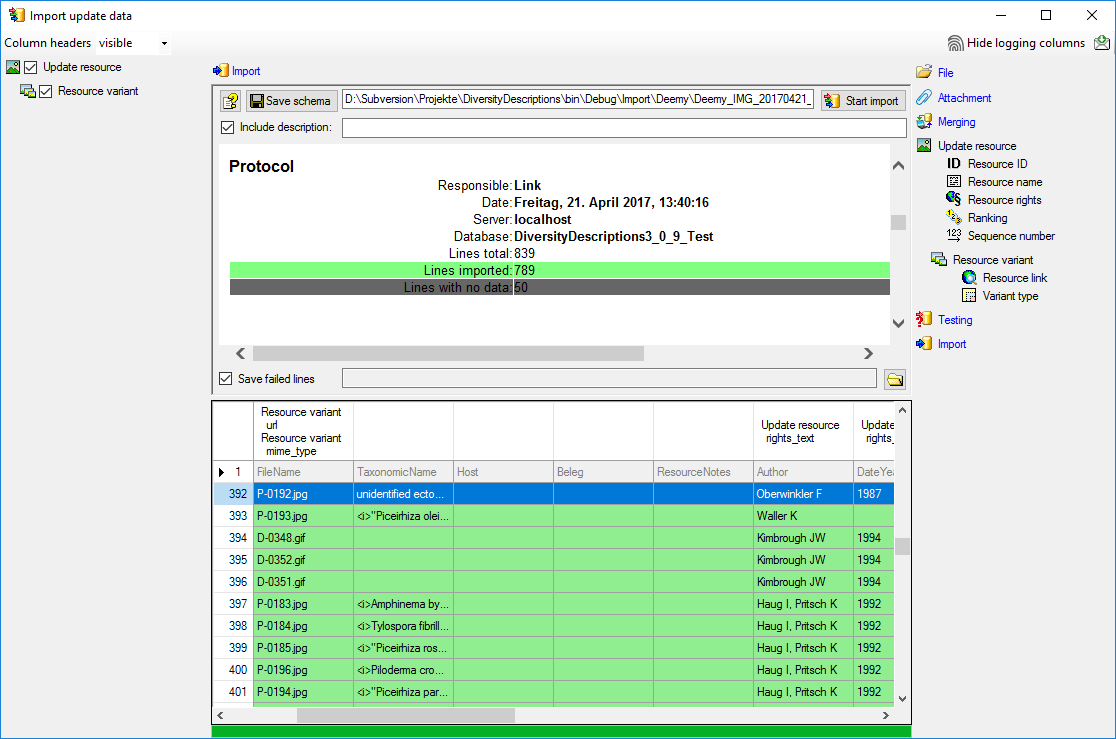
Import
With the last step you can start to import the data into the database.
If you want to repeat the import with the same settings and data of the
same structure, you can save a schema of the current settings. As
mentioned in the introduction, the import step has to be repeated until
no more resource variant is imported. At the first run 789 lines were
imported (see below).
At the second run, started by another click on
 Start import, 152 lines were imported
(see below).
Start import, 152 lines were imported
(see below).

Finally, at the seventh run no further line is imported (see below).

Wizard Advanced Tutorial Step Overview
Overview of the data tables and necessary import steps
From the original database several tables have been extracted that
contain the descriptor names, categorical state names and description
names, together with their internal IDs in the foreign database.
Additionally there is a table that assigns picture IDs to the IDs of
descriptors, categorical states and descriptions. The last table
connects the picture IDs to file names. In DiversityDescriptions
resources are represented by the tablese “Resource”, which holds some
general information and is linked to descriptors, categorical states or
descriptions. Table “Resource variant” holds the URL of the resources
and each table row is assigned to one entry in table “Resource”.
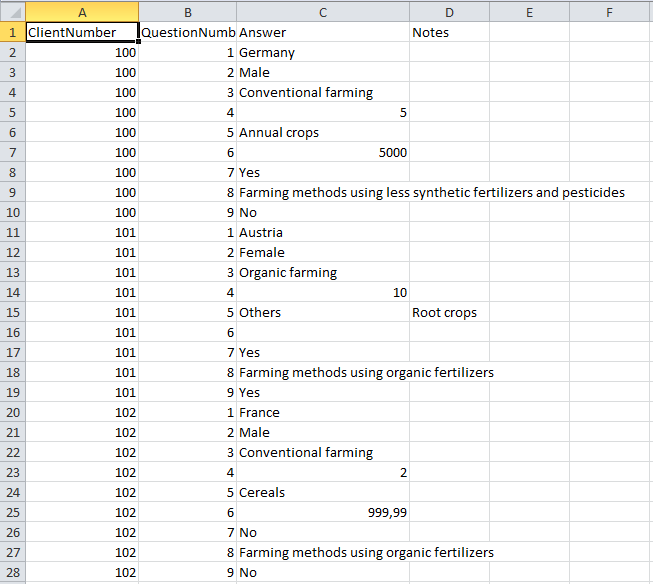
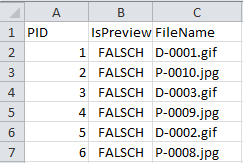
Find below a part of the table “Deemy_RSC.txt”, which corresponds quite
well to the table “Resource” in DiversityDescriptions. It references
either to a description (“ItemID”), a descriptor (“CharID”) or a
categorical state (“StateID”).
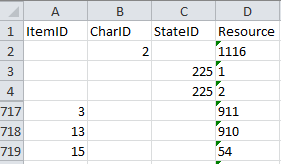
The value in column “Resource” corresponds to column “PID” of the table
“Deemy_IMG.txt” (see below), where the picture file name is specified.
Since all pictures are accessible over a URL containing that file name,
this table can be used for import to data table “Resource variant” in
DiversityDescriptions.
To import the picture data, first the data in table “Deemy_RSC.txt” must
be appended to the existing descriptors, categorical states and
descriptions. Then the data from table “Deemy_IMG.txt” must be appended
to the resource entries. Since the basic data are imported from a DELTA
file, no mapping information have been stored, which are needed to
append the resource data. Therefore at first the mapping information
must be imported from three additional tables.
Mapping data
To allow appending of resource data to the existing database objects, we
first must create the mapping information of the external IDs of the
foreign database to the actual IDs in DiversityDescriptions. Find below
the table “Deemy_Char.txt”, which contains the descriptor name
(“CharName”), the internal “CharID” and an external “CID”.
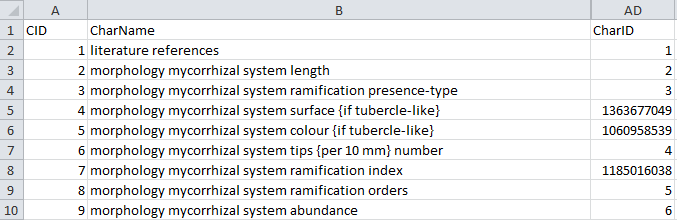
For the picture import each descriptor must be mapped to its “CharID”,
which can be done by a special mapping import available in the Import
session form. When we now take a look at the “Deemy_CS.txt” (see
below), which contains the categorical state data, we discover a
problem: The categorical states contain the required “StateID”, but they
are connected to their descriptors by the value “CID”, not “CharID”.
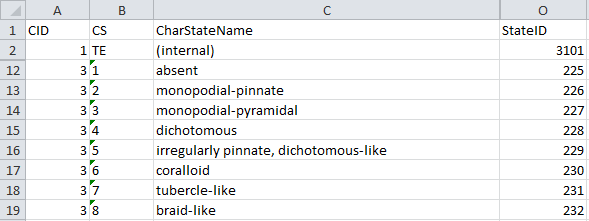
This problem can be solved by importing the descriptor mapping twice:
First the descriptor mapping is imported by using the “CID” and the
categorical states are appended to the descriptors. Then the descriptor
mapping is cleared and imported again, this time using the final value
from column “CharID”.
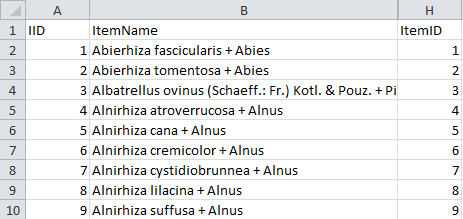
The last table is “Deemy_Item.txt”, which contains the mapping
information for the descriptions. Here the data column “ItemID” must be
mapped to the descriptions (see below).
Next: Step 1 - Preparations: Data import from DELTA file and new
import session
Import DELTA
Import DELTA file
Remark:
- To import data from a DELTA file at least TerminologyEditor rights are
neccessary.
With this form you can import data from a file in
DELTA format into the database.
Choose Data → Import ->
Import
DELTA … from the menu to open the window for the import. In the
window click on the
button to select the file with the data you want to import. If the
Multi-file option is selected before pressing the
button, a folder
selection window opens to select the folder where the DELTA files are
located. For muti-file processing currently the files “chars”, “items”,
“specs” and “extra” are evaluated. If during analysis or import any
problems occur, you may click on the  button to
reload the file and re-initialize the window.
button to
reload the file and re-initialize the window.
The contents of the file will be shown in the upper part of the File
tree section. If special characters are not displayed corretly, try a
different Encoding setting, e.g. “ANSI”, and reload the document
using the button. In the bottom part of the
window you find the import database and the actual processing state.
In the file tree you may deselect entries that shall not be imported
into the database. Use that option very carefully, because if you
deselect entries that are being referenced by other parts of the input
tree, e.g. descriptors referenced by descriptions, the analysis or
import step might become erronous!
If during reading of the files expressions cannot be interpreted,
suspicious entries are maked with yellow background
(warning) in the file tree. When you move the mouse curser over
the marked entries, you get additional information as tool tip or the
tree node text itself tells the problem (see example below).

Analysis
To analyse the data in the file click on the Analyse data
 button. During
the analysis the program checks the dependencies between the different
parts of the data and builds up an analysis tree in the lower part of
the window. The analysis tree contains all data in a suitable format for
the final import step. During data analysis the icon of the button
changes to
button. During
the analysis the program checks the dependencies between the different
parts of the data and builds up an analysis tree in the lower part of
the window. The analysis tree contains all data in a suitable format for
the final import step. During data analysis the icon of the button
changes to  and you may abort processing by clicking
the button.
and you may abort processing by clicking
the button.
In the Analysis settings section (see image below) you set the
document’s Language. You man change the display and sorting of the
entries in the Language combo box from “<code> - <description>”
to “<description> - <code>” (and back) by clicking the button
 . If you need language codes that are not included
in the list, click the
. If you need language codes that are not included
in the list, click the  edit button. For more details
see Edit language codes.
edit button. For more details
see Edit language codes.
The Insert “variable” state controls the handling of the DELTA state
“V” for categorical summary data. If possible, a categorical state
“variable” is inserted to the descriptor data and set in the summary
data, when the state “V” is present in the description data.
If the Check strings for illegal characters option is checked, all
string literals that shall be exported from database are scanned for
illegal non-printable characters and matches are replaced by a double
exclamation mark ("‼"). Activating this option may increase the analysis
processing time.
In DELTA text in angle bracket (<text>) usually denotes comments,
which are by default imported into the “Details” fields of the database.
In the lower parts of the Analysis settings you may adjust a
different handling for description, descriptor and categorical state
items.
- For DELTA comments in descriptions you may Move comments to
details (default) or Keep comments in description titles.
- For DELTA comments in descriptors you may Move comments to
details (default), Move comments to notes or Keep comments in
descriptor titles.
- For DELTA comments in categorical states you may Move comments
to details (default) or Keep comments in categorical state
titles.
After changing one of these settings click on the Analyse data
button to make
the changes effective.
After analysis a message window informs you if any warnings or errors
occured. You can find detailled error and warning information at the
file and/or analysis trees by entries with red text
(error) or yellow background
(warning). When you move the mouse curser over the marked
entries, you get additional information as bubble help or the tree node
text itself tells the problem (see example below). By clicking on the
status text besides the progress bar, you can open an analysis protocol
(see below, right).
If an analysis error occured, you are not able to proceed. You will
first have to correct the problem, e.g. by excluding the erronous
descriptor in the example above (after reloading the file). If a warning
occured, it might not cause problems during import, but you should take
a closer look if the imported data will be correct.
Import
If you want to import new data to a project you have two import options:
- New import - import new data and save mapping information to an
import session.
For descriptors, categorical states and descriptions the mapping
information from the DELTA import will be storen in an import session. Therefore by a subsequent import run
updated information, e.g. a modified label or detail information can
be done (see section “Update” below).
- No update - import new data without saving of mapping
information.
This option might be faster, but you will not be able to update the
titles or to import additional translations from a DELTA file.
Before starting the import, you should take a look at the import
settings:
- New project - import data to a new project.
The project name is specified in the text box right from this radio
button.
This option is only available if at least ProjectManager rights are
available.
- To project - import data to an existing project.
The combo box at the right shows all projects where write access is
possible.
If only TerminologyEditor rights are availabe, no changes in the
existing project (e.g. detail or copyright) will be done.
- Accept comma as decimal separator shall help to overcome problems
with localization of some programs that create DELTA files.
If this option is checked, a floating point value like “1,0” (e.g.
used in german localizations) instead of “1.0” will be accepted as
“1”.
- Create default descriptor tree creates a default descriptor tree
and assigns all imported descriptors to that tree.
Additionally the statistical measures “Minimum”, “Lower limit”,
“Mean”, “Upper limit” and “Maximum” are set as recommended for all
quantitative descriptors.
This option is useful to avoid unassigned descriptors if the import
file does not specify any descriptor tree assignments.
To start the import click on the Start import
button. Now the
data from the analysis tree are written into a local database cache and
finally stored into the database.
After import a message window inform you if any warnings or errors
occured. You can find detailled error and warning information at the
file and/or analysis trees by entries with red text
(error) or yellow background
(warning). When you move the mouse curser over the marked
entries, you get additional information as bubble help or the tree node
text itself tells the problem. By clicking on the status text besides
the progress bar, you can open an import protocol (see below).

Handling of special DELTA states
In the DELTA format the special states “-” (not applicable), “U”
(unknown) and “V” (variable) are available for categorical and
quantitative characters. These states are treated in the folloging
manner during import:
- “-” (not applicable)
The data status “Not applicable” is set.
- “U” (unknown)
The data status “Data unavailable” is set.
- “V” (variable)
The data status “Not interpreterable” is set.
Update
If you imported new data using option New import, a new import
session with the following data will be created:
- Descriptor keys - the “character number” that is used in DELTA to
identify a dedicated character.
- Categorical state keys - the “state number” that is used in DELTA,
together with the “character number”, to identify a dedicated
chategorical state.
- Description keys - the item position in the item list. Since in
DELTA there are no explicit item numbers, the position within the item
list is taken for this key. If you want to update the items using the
DELTA import, you must be sure that the item list has exactly the same sequence as for the first
import!
For those entities you may update the columns “label”, “detail” and
“data_entry_notes” (only for descriptors). To achive this, you must
specify the same Language in the Analysis settings as adjusted
as project language. If you specify a different Default language,
the data will be imported as translations for the columns “label” rsp.
“detail” (see image below). For descriptor column “data_entry_notes”
translations are not supported.
Preparation
By changing the Analysis settings and a clicking the Analyse data
button you may
modify the handling of DELTA comments. E.g. if you used the default
settings during a past import, a DELTA character “data record <type>”
was imported as descriptor “data record” and “type” was written into the
columns “detail”. In the Analysis settings you may now select option
Keep comments in descriptor titles to update the descriptor title to
“data record <type>".
Import settings
Before starting the import, you should take a look at the import
options:
- Update - perform an update import.
- Import session - click on button
Select to select the correct import session.
In the text box below that option the automatically generated
descriptive text of the import session is displayed.
- Remove optional columns - clear optional columns if no contents is
present.
If during update import for an optional column (“detail” rsp.
“data_entry_note”) no data are present, by default an existing entry
in the database will not be removed. Check this option to clear the
data.
Start the import click on the Start import
button. Now the
data from the analysis tree are written into a local database cache and
finally stored into the database.
Import Questionnaires
Import questionnaire data
With this form you can import response data generated by an HTML
questionnaire (see Export questionnaires).
Choose Data → Import ->
 Import questionnaire data … from
the menu to open the window for the import. In the window click on the
button to select the
text file with the data you want to import. If during analysis or import
any problem occurs, you may click on the button
to reload the file and re-initialize the window.
Import questionnaire data … from
the menu to open the window for the import. In the window click on the
button to select the
text file with the data you want to import. If during analysis or import
any problem occurs, you may click on the button
to reload the file and re-initialize the window.
The contents of the file will be shown in the upper part of the Import
contents section. You may edit the contents or even enter the whole
data by copy - paste. In the Import data part you find the basic
dataset parameters Export server, Export database, Import
project and Import description (see image below). If there is a
mismatch, e.g. because the questionnaire was generated from a different
database than your import database, an appropriate error will be
reported.
Analysis
To analyse the data in the file click on the Analyse data
button. During
the analysis the program compares the reported data to the entries in
the database and presents the planned database operations in the lower
part of the window (see image below). By checking Accept comma as
decimal separator in the Import options section you can overcome
problems with localization of the computer where the questionnaire was
filled in. If this option is checked, a floating point value like “1,0”
(e.g. used in german localizations) instead of “1.0” will be accepted as
“1”.
After analysis a message window informs you about errors or ignored
input lines. By clicking on the status text besides the progress bar,
you can open an analysis protocol (see below).
If an analysis error occured, you are not able to proceed. If ignored
lines are reported, this fact is usually uncritical. Most of them
concern “modifier” or “frequency” values (prefix CM, CF or QM) where the
questionnaire reports the actual values, not only the differences.
Import
Before starting the import, you should take a look at the remaining
Import options:
- Update description after backup
Create a backup of the original description data and then update the
original description in the database. If this option is chosen, you
may enter a Postfix that will be appended at the backup
description name. Additionally you may select the option Include
data and time to append these data at the backup name, too (see
image below).
- Create a new description (only option for new descriptions)
Make a copy of the original description data and then updatde the copy
in the database.
- Update description in database
The original description in the database will be updated.
If the description entries in your database are referenced by other
applications, you should update the original database entry, i.e. use
the first or third option. The reason is that references from other
databases usually use the description id, which will be different for
the copied description. To ensure that the questionnaire data are
correct, you can import them useing the option Create a new
description, verify the imported data and finally import them to the
original description using option Update description in database.
Before performing the import you may include or exclude single database
operations by setting or removing the check mark in column “OK”. You may
select or deselect all operations by clicking the buttons Select all
rsp. Select none. Please be aware that deselecting single operation
might lead to unexpected results.
To start the import click on the Start import
button (see image
below).
After import a message window inform you if any occured. Sucessful
database operations are shown with green
background, unsuccessful operations with red
background. When you move the mouse curser over the red entries,
you get additional information as bubble help. By clicking on the status
text besides the progress bar, you can open an import protocol (see
below).
Batch import
If you want to import several questionaire result files, there is the
comfortable option to do a batch import. When you select the option
Multi-file, the window changes as shown below. For batch import you only
have the option to create a new description that will be updated with
the questionnaire data.
Click on the button
and select all text files you want to import. In the lower part of the
window the selected files will belisted (see image below).

After checking the remaining Import options click on the Start
import button to
start the import. In the lower part of the window you find the
processing result for each selected file (see image below).
Import SDD
Import SDD file
Remarks:
- To import data from an SDD file at least TerminologyEditor rights are
neccessary.
- Currently SDD statements concerning natural laguage descriptions and
identification keys are not evaluated.
With this form you can import data from an XML file according schema
SDD 1.1 rev 5 into the database.
You may download an example SDD file with from the Diversity
Descriptions example file
repository. Choose
Data → Import →  Import SDD
… from the menu to open the window for the import. In the window
click on the button to
select the file with the data you want to import. If during analysis or
import any problems occur, you may click on the
button to reload the file and re-initialize the window.
Import SDD
… from the menu to open the window for the import. In the window
click on the button to
select the file with the data you want to import. If during analysis or
import any problems occur, you may click on the
button to reload the file and re-initialize the window.
The contents of the file will be shown in the upper part of the File
tree tab page. In the Analysis settings part you find the
document’s Default language. If additional laguages are contained in
the document, you may select one of them as the new default language of
the database. By checking Import translations you select all
additional document languages for the import. This option is
automatically pre-selected if more than one language has been found in
the file. In the bottom part of the window you find the import database
and the actual processing state.
If the Check strings for illegal characters option is checked, all
string literals that shall be exported from database are scanned for
illegal non-printable characters and matches are replaced by a double
exclamation mark ("‼"). Activating this option may increase the analysis
processing time.
In the file tree you may deselect entries that shall not be imported
into the database. Use that option very carefully, because if you
deselect entries that are being referenced by other parts of the input
tree, e.g. descriptors referenced by descriptions, the analysis or
import step might become erronous!
Analysis
To analyse the data in the file click on the Analyse data
button. During
the analysis the program checks the dependencies between the different
parts of the data and builds up an analysis tree in the lower part of
the window. The analysis tree contains all data in a suitable format for
the final import step. During data analysis the icon of the button
changes to and you may abort processing by clicking
the button.
After analysis a message window informs you if any warnings or errors
occured. You can find detailled error and warning information at the
file and/or analysis trees by entries with red text
(error) or yellow background
(warning). When you move the mouse curser over the marked
entries, you get additional information as tool tip or the tree node
text itself tells the problem (see examples below). By clicking on the
status text besides the progress bar, you can open an analysis protocol
(see below, right).
If an analysis error occured, you are not able to proceed. You will
first have to correct the problem, e.g. by excluding the erronous
descriptor in the example above (after reloading the file). If a warning
occured, it might not cause problems during import, but you should take
a closer look if the imported data will be correct.
Import
Before starting the import, you should take a look at the import
options:
- New project - import data to a new project.
The project name is specified in the text box right from this radio
button.
This option is only available if at least ProjectManager rights are
available.
- To project - import data to an existing project.
The combo box at the right shows all projects where write access is
possible.
If only TerminologyEditor rights are availabe, no changes in the
existing project (e.g. detail or copyright) will be done.
- Accept comma as decimal separator shall help to overcome problems
with localization of some programs that create SDD files.
If this option is checked, a floating point value like “1,0” (e.g.
used in german localizations) instead of “1.0” will be accepted as
“1”.
- Create default descriptor tree creates a default descriptor tree
and assigns all imported descriptors to that tree.
Additionally the statistical measures “Minimum”, “Lower limit”,
“Mean”, “Upper limit” and “Maximum” are set as recommended for all
quantitative descriptors.
This option is useful to avoid unassigned descriptors if the import
file does not specify any descriptor tree assignments.
- Import trees for natural language descriptions - currently natural
language descriptions are ignored.
- Import trees without “role” - usually those trees only contain
descriptor dependency information.
To start the import click on the Start import
button. Now the
data from the analysis tree are written into a local database cache and
finally stored into the database.
After import a message window inform you if any warnings or errors
occured. You can find detailled error and warning information at the
file and/or analysis trees by entries with red text
(error) or yellow background
(warning). When you move the mouse curser over the marked
entries, you get additional information as bubble help or the tree node
text itself tells the problem. By clicking on the status text besides
the progress bar, you can open an import protocol (see below).
Import Wizard
The data imported may be transformed e.g. to adapt them to a format
demanded by the database. Click on the button
to open a window as shown below.
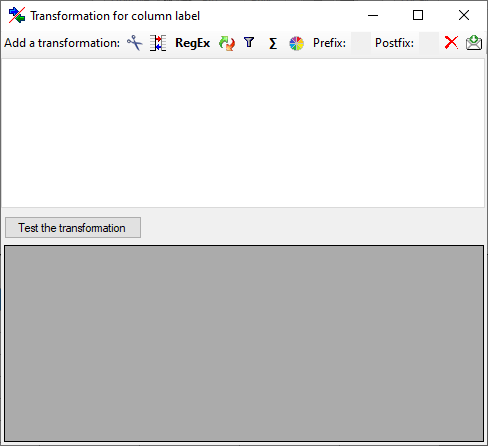
Here you can enter 4 types of transformation that should be applied to
your data. Cut out parts,
Translate contents from the file, RegEx
apply regular expressions or Replace text in the
data from the file. All transformations will be applied in the sequence
they had been entered. Finally, if a prefix and/or a postfix are
defined, these will be added after the transformation. To remove a
transformation, select it and click on the  button.
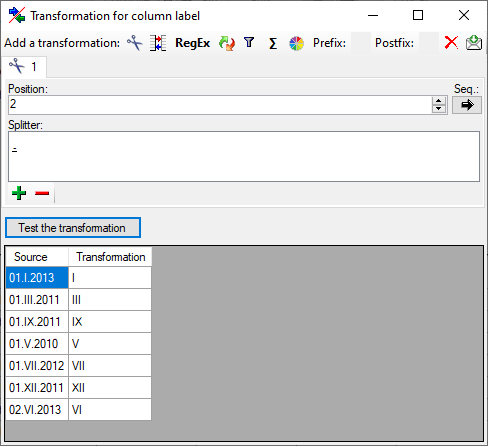
Cut
With the cut transformation you can restrict the
data taken from the file to a part of the text in the file. This is done
by splitters and the position after splitting. In the example below, the
month of a date should be extracted from the information. To achieve
this, the splitter ‘.’ is added and than the position set to 2. You can
change the direction of the sequence with the button
 Seq starting at the first position and
 starting at the last position. Click on
the button Test the transformation to see the result of your
transformation.
starting at the last position. Click on
the button Test the transformation to see the result of your
transformation.
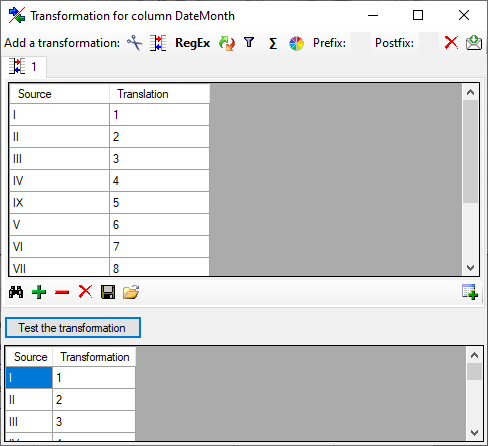
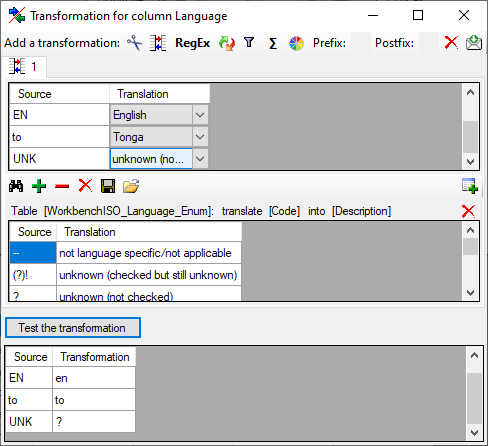
Translate
The translate transformation translates
values from the file into values entered by the user. In the example
above, the values of the month cut out from the date string should be
translated from roman into numeric notation. To do this click on the
button to add a translation transformation
(see below). To list all different values present in the data, click on
the button. A list as shown below will be created.
You may as well use the and  buttons to add or remove values from the list or the
button to clear the list. Than enter the
translations as shown below. Use the save button to
save entries and the Test the transformation button to see the
result.
buttons to add or remove values from the list or the
button to clear the list. Than enter the
translations as shown below. Use the save button to
save entries and the Test the transformation button to see the
result.
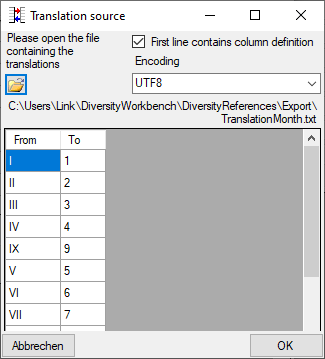
To load a predefined list for the transformation use the
button. A window as shown below will open.
Choose the encoding of the data in you translation source, if the first
line contains the column definition and click on the button to open a
file. Click OK to use the values from the file for the translation.
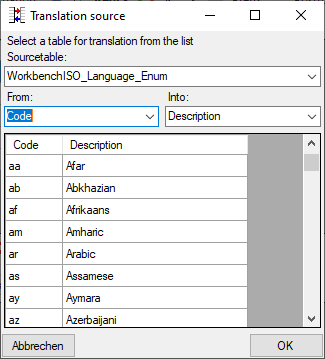
To load a database table for the transformation use the
 button (see main translation window above). A
window as shown below will open, where you may select a database table
for the translation. Choose the table and the columns for the
translation. Click OK to use the values from the table for the
translation. Only unique values from the table will be used to ensure an
unequivocal translation.
button (see main translation window above). A
window as shown below will open, where you may select a database table
for the translation. Choose the table and the columns for the
translation. Click OK to use the values from the table for the
translation. Only unique values from the table will be used to ensure an
unequivocal translation.
The values of the database table will be listed underneath as shown
below. For the translation will only be regarded if the manual list does
not contain the corresponding table. That means that content in the
manual table will overwrite corresponding content in the database table.
To remove the database table use the delete button.
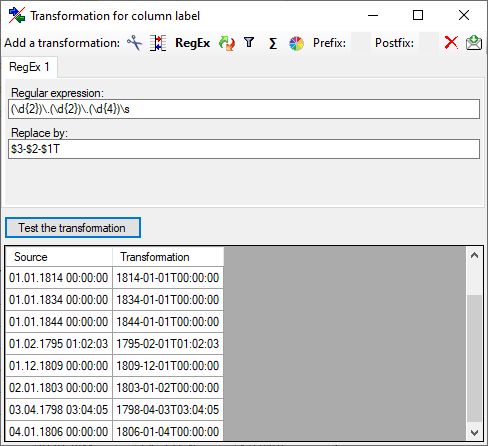
Regular expression
The transformation using regular expressions will transform the values
according to the entered Regular expression and Replace by
vales. For more details please see documentations about regular
expressions.
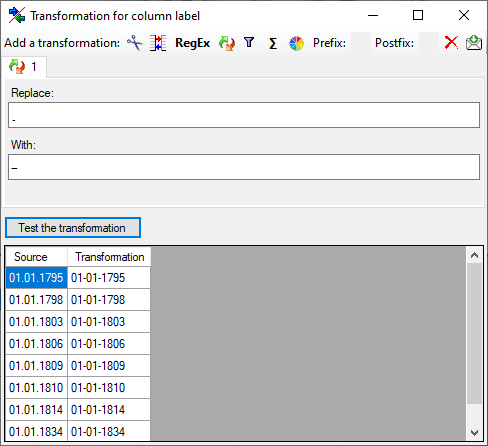
Replacement
The replacement transformation replaces any text in the data by a text
specified by the user. In the example shown below, the text “.” is
replaced by “-".
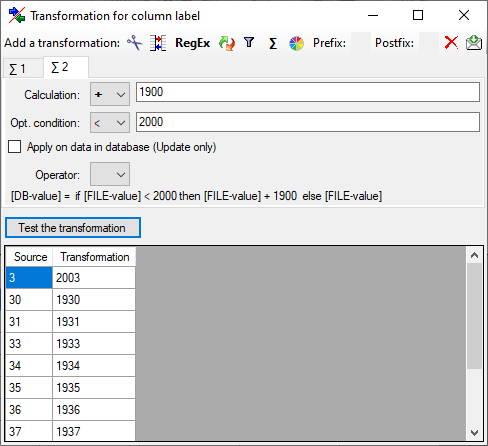
Calculation
The  calculation transformation performs a calculation on numeric value,
dependent on an optional condition. In the example below, 2 calculations
were applied to convert 2-digit values into 4 digit years.
calculation transformation performs a calculation on numeric value,
dependent on an optional condition. In the example below, 2 calculations
were applied to convert 2-digit values into 4 digit years.
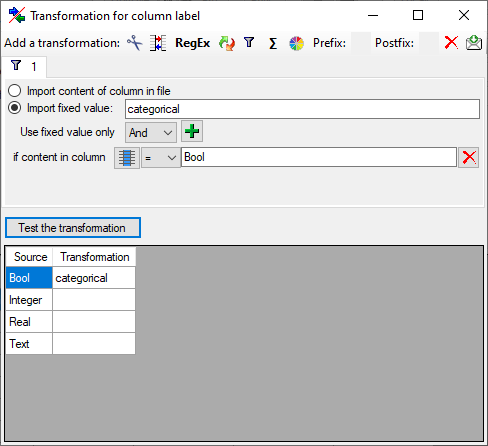
Filter
The  filter transformation compares the values from the file with a value
entered by the user. As a result you can either
Import content of column in file or
Import a fixed value. To select
another column that should be compared, click on the
filter transformation compares the values from the file with a value
entered by the user. As a result you can either
Import content of column in file or
Import a fixed value. To select
another column that should be compared, click on the
 button and choose a column from the file in
the window that will open. If the column that should be compared is not
the column of the transformation, the number of the column will be shown
instead of the symbol. To add further filter
conditions use the add button. For the combination of
the conditions you can choose among AND and OR.
button and choose a column from the file in
the window that will open. If the column that should be compared is not
the column of the transformation, the number of the column will be shown
instead of the symbol. To add further filter
conditions use the add button. For the combination of
the conditions you can choose among AND and OR.
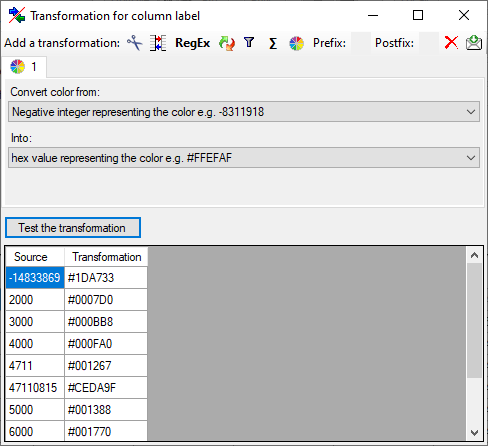
Color
The  color transformation offers the transformation of color values
between the three formats HEX values (#rrggbb), decimal value triples
(rrr, ggg, bbb) and (negative) integer numbers.
color transformation offers the transformation of color values
between the three formats HEX values (#rrggbb), decimal value triples
(rrr, ggg, bbb) and (negative) integer numbers.
Subsections of Tutorial
Wizard Tutorial Step 1
Step 1 - Preparations: New project and descriptor tree
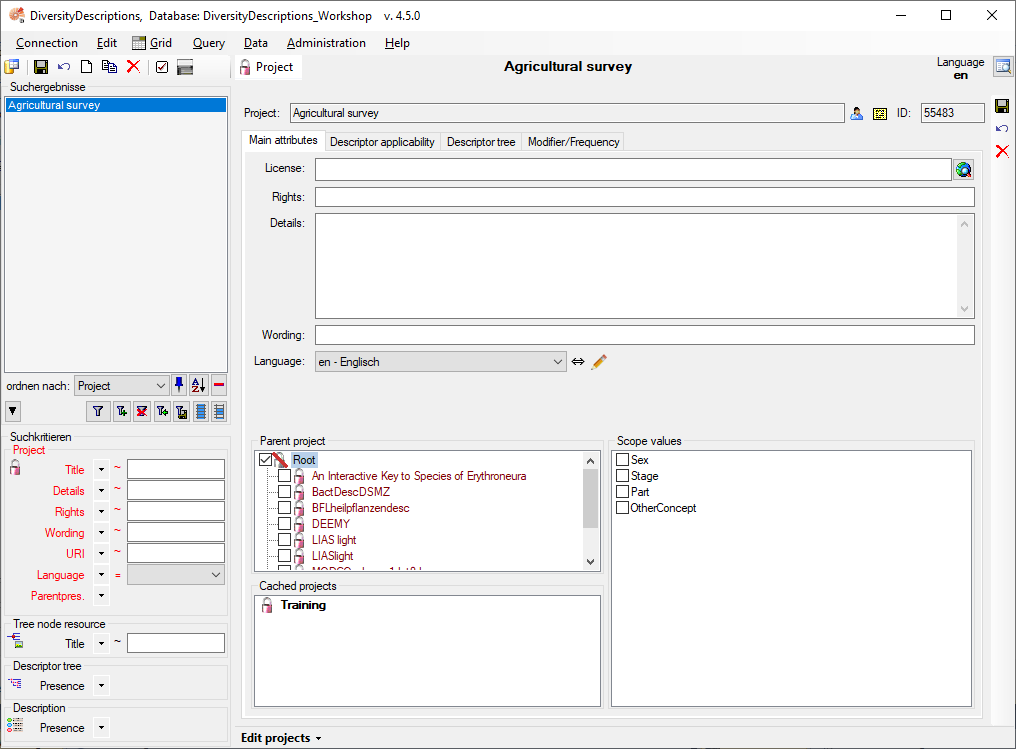
Choose Edit → Projects from the menu and create a new project by
clicking the button. Now click on button
to enter the project name “Agricultural survey”.
After entering the name the project will automatically be saved and the
display will be updated (see below).
Change to tab “Descriptor tree”, mark project “Agricultural survey”
in section “Descriptor tree” and press button  to insert a new tree. Change the tree name to “Main tree for
Agricultural survey” and click button to save all
changes (see below).
to insert a new tree. Change the tree name to “Main tree for
Agricultural survey” and click button to save all
changes (see below).

Next: Step 2 - Import of
descriptors
Wizard Tutorial Step 2
Step 2 - Import of descriptors
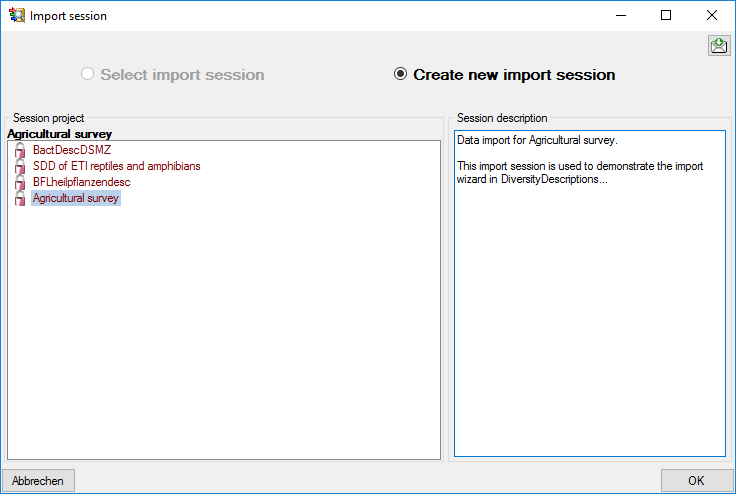
Choose Data → Import -> Import wizard ->
Import descriptors … from the menu. A window as
shown below will open to create a new import session. Select project
“MycoPhylogenyNet” and enter a session description.
After clicking [OK] the following window opens that will lead you
through the import of the descriptor data. The window is separated in
three areas. On the left side, you see a list of possible data related
import steps according to the type of data you choosed for the import.
On the right side you see the list of currently selected import steps.
In the center part the details of the selected import step are shown.
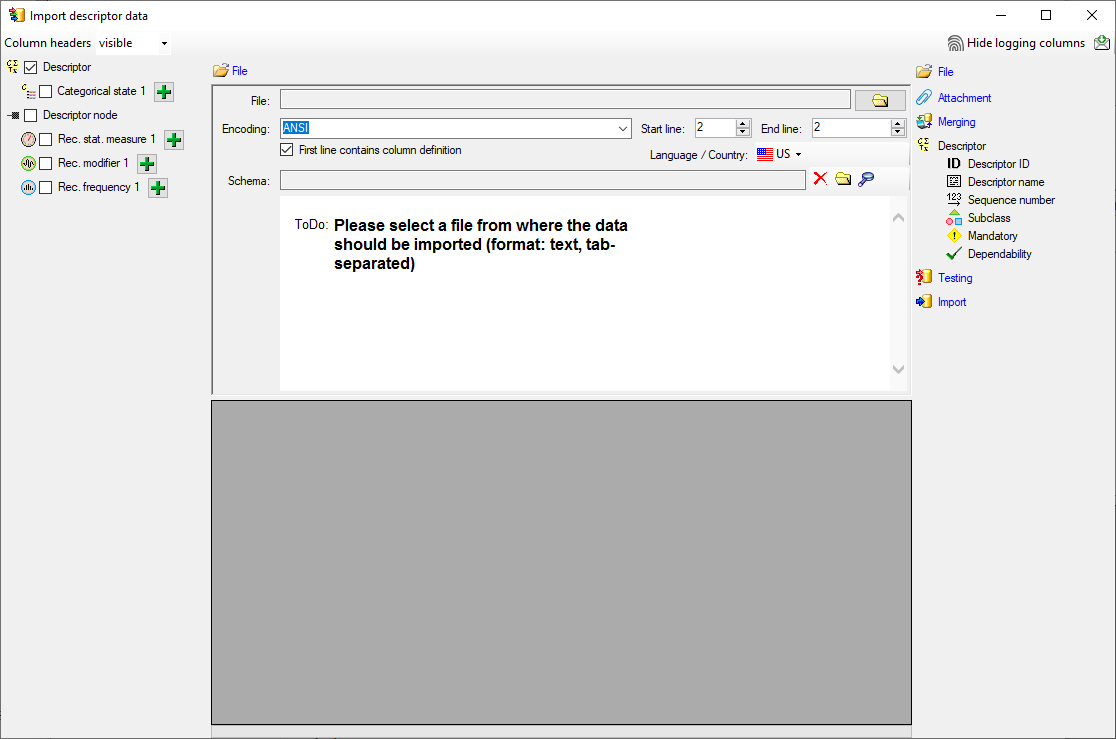
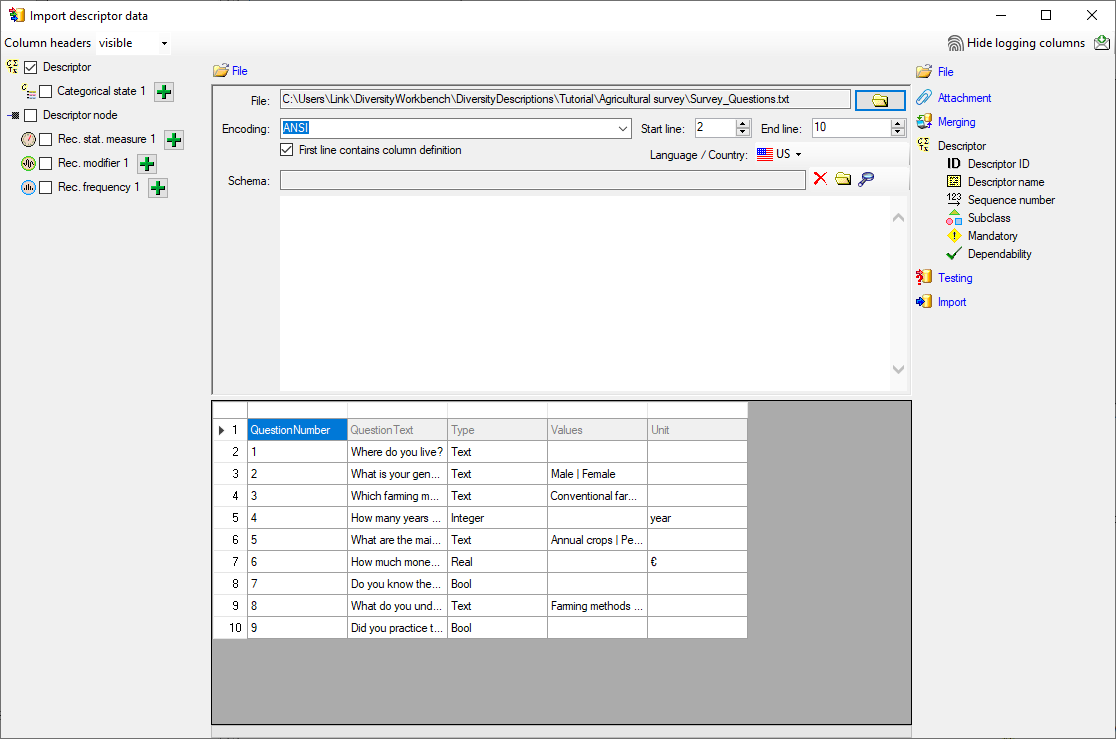
Choosing the File
As a first step, choose the File from where the data should be
imported. Open file “Survey_Questions.txt”. The preselected encoding
ANSI should be sufficient for our test file. The file column
“QuestionText” contains the descriptor names that shall be imported. In
file column “QuestionNumber” there is a unique number assigned to each
descriptor that will be used by other data tables to reference a certain
descriptor. “Type” might give a hint for the descriptor type
(categorical, quantitative or text) and “DisplayOrder” may be used to
determine the sequence number of the descriptor.
Selecting the data ranges
In the selection list on the left side of the window all possible import
steps for the data are listed according to the type of data you want to
import.
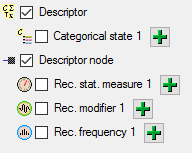
The step Descriptor is already selected and
cannot be de-selected, additionally we select
 Descriptor node, because we want to
assign each imported descriptor to a descriptor tree (see above). In the
step table at the right side you find the import step
Descriptor and below the most important data
groups of the import step. Click on Descriptor ID
and in the center window the assignemt data for the descriptor id (“id”)
are displayed. Click on to make this the
decisive column, further click on From
file to select the column “QuestionNumber” as data source. After that
the column should look as shown below.
Descriptor node, because we want to
assign each imported descriptor to a descriptor tree (see above). In the
step table at the right side you find the import step
Descriptor and below the most important data
groups of the import step. Click on Descriptor ID
and in the center window the assignemt data for the descriptor id (“id”)
are displayed. Click on to make this the
decisive column, further click on From
file to select the column “QuestionNumber” as data source. After that
the column should look as shown below.

Remark: The Descriptor ID is a number that is
generated automatically from the database when a new descriptor is
created. Anyway in the data file there is a field “QuestionNumber” that
is linked to a certein descriptor and used in other tables to reference
a certain descriptor. The mapping from the “QuestionNumber” values to
the internally generated Descriptor ID values
will be stored in a separate import mapping table for the actual import
session. In the later import steps this mapping table will allow to find
the correct descriptor assigned to a certain “QuestionNumber”.
Now the descriptor name must be selected, therefore click on
Descriptor name. The center window shows three
data columns: “label”, “abbreviation” and “detail”. Click on
From file in the “label” line to
select file column “QuestionText” (see below).

Next click on Sequence number. In the center
window select the data column “display_order”, click on
From file and select file column
“QuestionNumber”. (see below).

As already mentioned before the file column “Type” contains information
that can be used to determine the descriptor type. Therefore click on
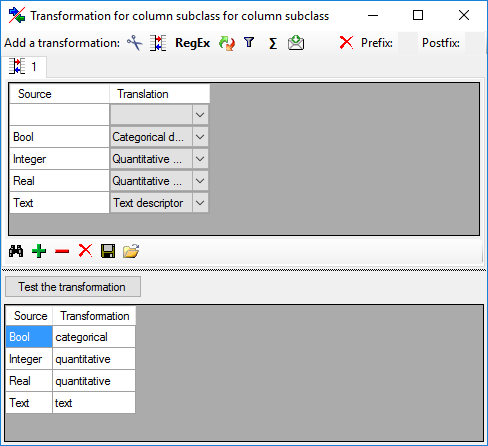
 Subclass, select the “subclass” line, click on
From file and select the file column
“Type”. Now click on button to open the
transformation window. As only transformation step select
to insert a translation table and
to list the values contained in the file column.
“Bool” shall be converted to “Categorical descriptor”, “Integer” and
“Real” will become “Quantitative descriptor” and the rest “Text
descriptor” (see below).
Subclass, select the “subclass” line, click on
From file and select the file column
“Type”. Now click on button to open the
transformation window. As only transformation step select
to insert a translation table and
to list the values contained in the file column.
“Bool” shall be converted to “Categorical descriptor”, “Integer” and
“Real” will become “Quantitative descriptor” and the rest “Text
descriptor” (see below).
The file rows that contain entries in column “Values” seem to specify
categorical descriptors but are simply inserted as text characters. We
will correct those values when we import the categorical states in a
later step. The “subclass” data column now looks as shown below.

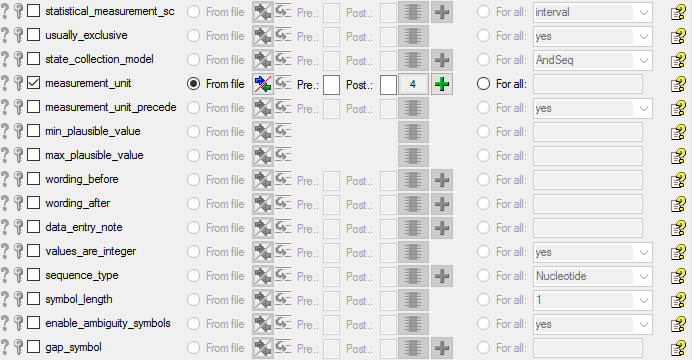
The descriptor step at the right displays the most important data
columns grouped in separate steps. Anyway, there are several additional
data columns available that can be accessed by clicking on the
Descriptor step itself. Here we select data
column “measurement_unit”, choose file column “Unit” (see below).
To do the assignment of the imported descriptors to the descriptor tree
that was created in the preparation step, select
Descriptor node ID from step Descriptor
node and supply it exactly the samy way as the
Descriptor ID. (Don’t forget to click on to
make it the decision column.) Furthermore supply the
Sequence number in the same way as described
above.
Finally select import step Descriptor tree,
select data column “descriptortree_id”, choose
For all: and select entry “Main tree
for Agricultural survey” from the drop down (see below). With this
adjustment every imported descriptor will automatically be assigned to
that descriptor tree.

Remark: Although descriptortree_id is a numeric value in the
database, the externally visible descriptor tree name is expected here.
Since this name is unambigious, the corresponding id will be determined
during import.
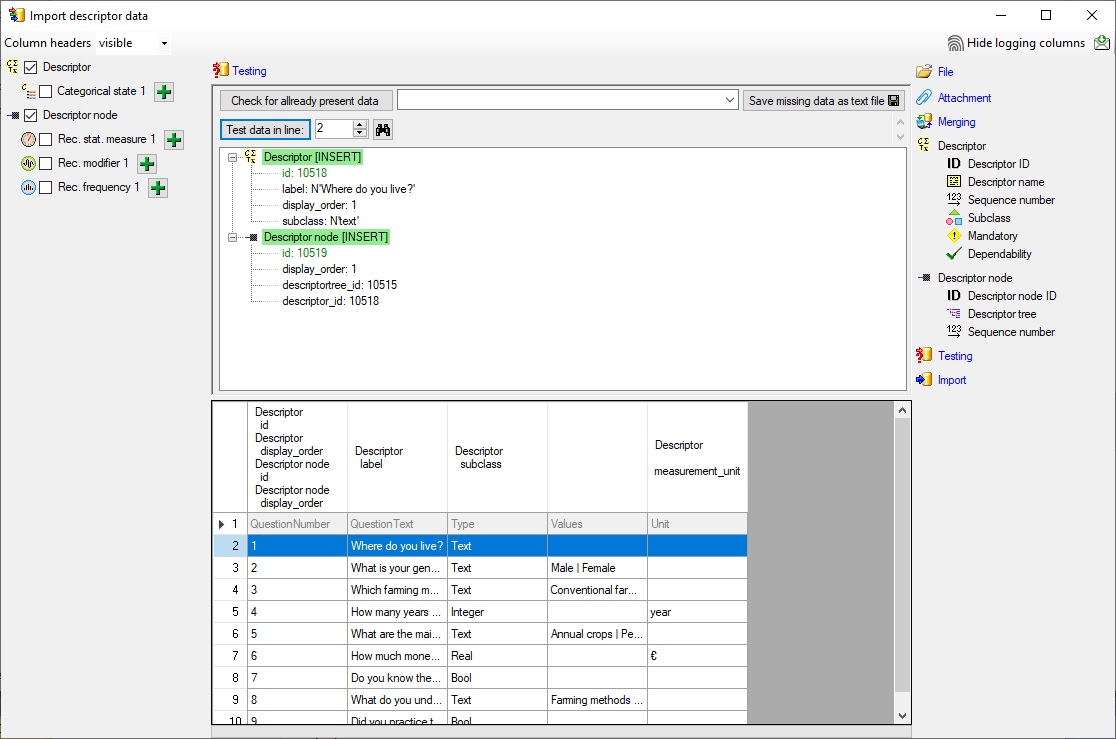
Testing
To test if all requirements for the import are met use the
Testing step.
You can use a certain line in the file for your test and than click on
the Test data in line: button. If there are still unmet
requirements, these will be listed in a window. In our example no error
occured and the test for the first data line is shown below.
You can see that in table “Descriptor” for data column “id” a new value
325050 is generated - remember that from file column “ParamID” the value
1 was selected. The mapping of the external value (1) to the internal
value (325050) in table “Descriptor” will be stored in the
“ImportMapping” table of the actual import session. I.e. if in a
subsequent import step for the same session a “Descriptor.id=1” is
specified in the import schema, it will automatically be translated to
the internal “Descriptor.id=325050”. Anyway, usually you do not have to
take care about this automatic translation. This example shall only
demonstrate the meaning of the import sessions.
Remark: Since testing works with transaction rollback, the “id” values
shown in the test window are different from the values resulting from a
real import.
As a second example data line 4 with “DataType=Integer” was selected to
demonstrate that the descriptor subtype is correctly set to
“quantitative” (see below).
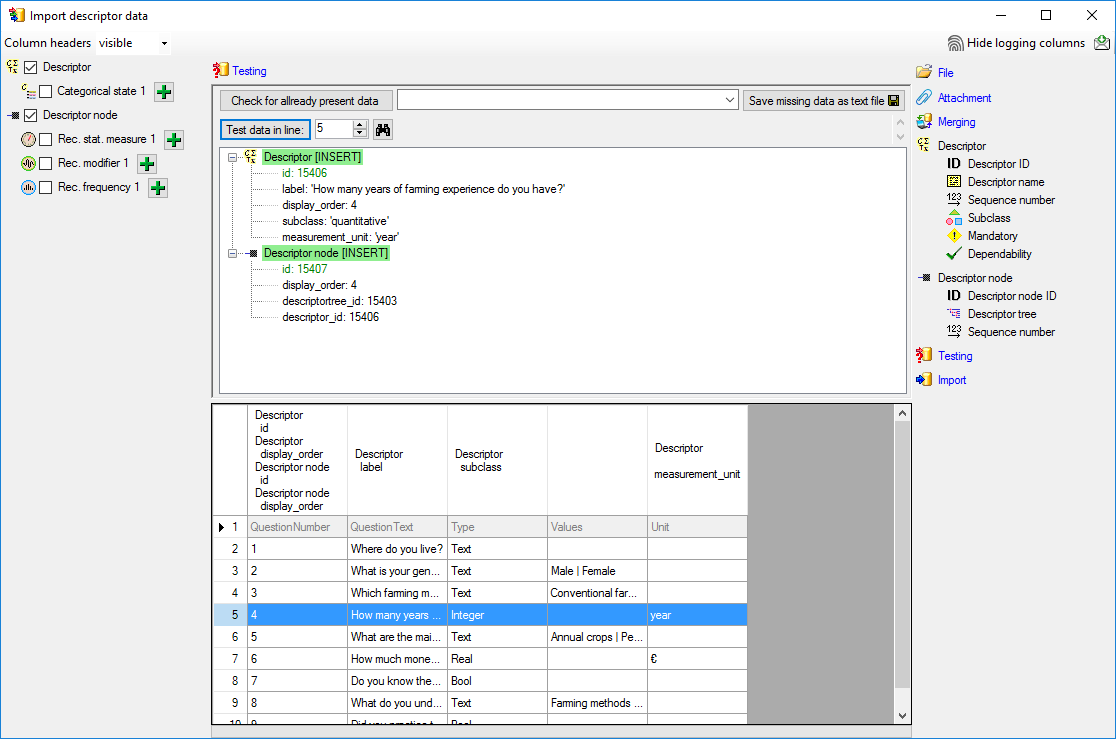
Import
With the last step you can start to import the data into the database.
If you want to repeat the import with the same settings and data of the
same structure, you can save a schema of the current settings (see
below).
|
|
|
|
| Schedule for import of tab-separated text files into DiversityDescriptions |
|
|
|
| Target within DiversityDescriptions: Descriptor |
|
|
|
| Schedule version: |
1 |
Database version: |
03.00.17 |
| Lines: |
2 - 10 |
First line contains column definition: |
✔ |
| Encoding: |
ANSI |
Language: |
US |
Tables
Descriptor
(Descriptor)
Merge handling:
Insert
| id |
? |
|
|
|
|
0 |
|
|
File |
|
| label |
|
|
|
|
|
1 |
|
|
File |
|
| display_order |
|
|
|
|
|
0 |
|
|
File |
|
| subclass |
|
|
|
|
|
2 |
| Translate |
Into |
|
|
| Bool |
categorical |
| Integer |
quantitative |
| Real |
quantitative |
| Text |
text |
|
|
|
File |
|
| measurement_unit |
|
|
|
|
|
4 |
|
|
File |
|
DescriptorTreeNode
(DescriptorTreeNode)
Parent: Descriptor
Merge handling:
Insert
| Column in table |
? |
Key |
Copy |
Pre |
Post |
File pos. |
Transformations |
Value |
Source |
Table |
| id |
? |
|
|
|
|
0 |
|
|
File |
|
| display_order |
|
|
|
|
|
0 |
|
|
File |
|
| descriptortree_id |
|
|
|
|
|
|
|
Main tree for Agricultural survey |
Interface |
|
| descriptor_id |
|
|
|
|
|
|
|
|
ParentTable |
|
Lines that could not be imported will be marked with a red background
while imported lines are marked green.
If you want to save lines that produce errors during the import in a
separate file, use the “Save failed lines” option. The protocol of the
import will contain all settings acording to the used schema and an
overview containing the number of inserted, updated, unchanged and
failed lines (see below).

Next: Step 3 - Insert recommended values of
descriptors
Wizard Tutorial Step 3
Step 3 - Insert recommended values of descriptors
Now we have imported the descriptors and assigned them to a descriptor
tree. Since we have several quantitative descriptors, we should at least
assign one recommended statistical measure to these descriptors. In this
step we will additionally insert recommended modifier and frequency
vales. If your database does not yet include modifier and frequency
values, you might like to interrupt here and insert them according
chapter Edit projects - Modifier/Frequencytab of this manual.
Finally we want to set the “values_are_integer” flag for the descriptor,
that is specified as “Integer” in the file column “Type”. We could have
done this during the previous import step, but here we can demonstrate
the update existing data sets with the import wizard.
In the selection list on the left side of the window select
 Rec. stat. measure 1,
 Rec. modifier 1 and
 Rec. frequency 1 (see below).
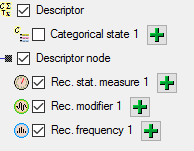
In this step we attach the recommended values to all descriptor nodes,
therefore we will not change anything in the descriptor or descriptor
node but will attach data. In import step Attachment at the right
side select id (see below).
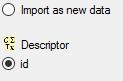
Select the import step Merge from the list.
For Descriptor we select the
Update option because the
“values_are_integer” column shall be updated. For
Descriptor node we select the
Attach option because this tables shall not
be changed. For all other steps Insert
should already be selected, because new entries have to be inserted (see
below).

Deselect every column from import steps
Descriptor and Descriptor node except
“id”. Mark the “id” columns as Key column for
comparison during attachment. The “id” column of import step
Descriptor now looks as shown below.

The “id” column of import step Descriptor
node now looks as shown below.

Selecting the values
In the step table at the right side click on the import step
Rec. stat. measure 1 and in the center
window the assignemt data for the statistical measure (“measure_id”) are
displayed. Click on to make this the decisive
column, further click on For all: and
select entry “Central or typical value (human estimate)” from the drop
down (see below).

Select values for Rec. modifier 1 and
Rec. frequency 1 in the same way, the
actually selected modifier and frequency values do not matter for this
tutorial (see below).


Remark: Although measure_id, modifier_id and frequency_id are
numeric values in the database, the externally visible names are
expected here. Since this names are unambigious, the corresponding ids
will be determined during import.
If you want to insert more than one recommended value of a type, click
on button of the import step at the left side of the
window. Select the new inserted step and supply the “measure_id”,
“modifier_id” or “frequency_id” as described above.
Now we will enter the update of the “values_are_integer” data column.
Select the import step Descriptor and
select the “values_are_integer” line. Click on
From file and select the file column
“Type”. Now click on button to open the
transformation window. As only transformation step select
to insert a translation table and
to insert the values contained in the file column.
For “Integer” the data column value shall be set to “yes” as shown
below.
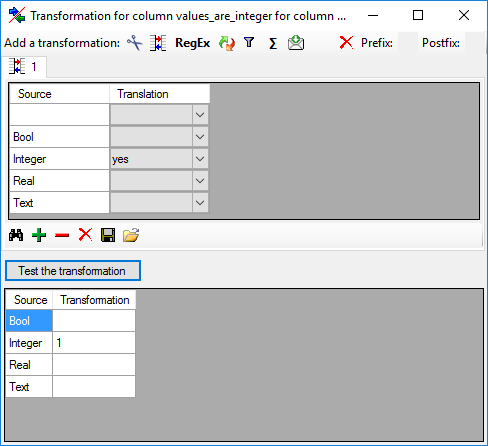
The “values_are_integer” column of import step
Descriptor now looks as show below.

Testing
To test if all requirements for the import are met use the
Testing step.
You can use a certain line in the file for your test and than click on
the Test data in line: button. If there are still unmet
requirements, these will be listed in a window. In our example no error
occured and the test for the fifth data line is shown below.
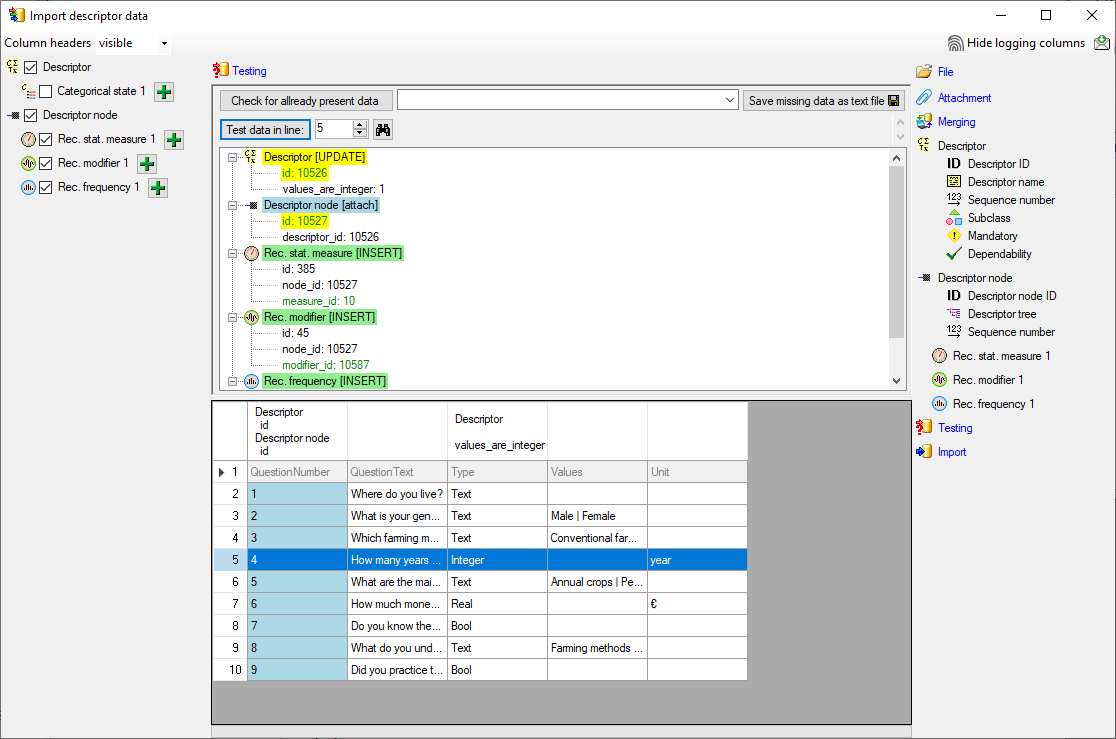
Import
With the last step you can start to import the data into the database.
If you want to repeat the import with the same settings and data of the
same structure, you can save a schema of the current settings. The
imported data lines are marked green (see below).

Next: Step 4 - Import of categorical states for boolean
data
Wizard Tutorial Step 4
Step 4 - Import of categorical states for boolean data
Now we want to import categorical states for the descriptors specified
as “Bool” in the table. In the selection list on the left side of the
window deselect Descriptor node,
Rec. stat. measure 1,
Rec. modifier 1 and
Rec. frequency 1. Select
Categorical state 1, click on the
button to insert a second categorical state and
select it, too (see below).
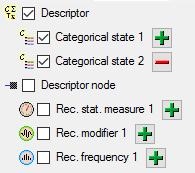
In this step we attach two categorical states named “Yes” and “No” at
those descriptors that are marked as “Bool” in file column “Type”. The
state values are not present in the “Survey_Questions.txt” file, but in
the “Survey_answers.txt” files we can see the values. In import step
Attach at the right
side we select id (see below). It
indicates that we do not want to insert new descriptors but attach data
to an existing descriptor.
Select the import step Merge from the list.
For Descriptor we select the
Attach option because this table shall not be
changed, for Categorical state 1 we select
Insert, because a new entry shall be
inserted (see below).

Deselect every column from import step
Descriptor except “id”. Mark the “id” column as
Key column for comparison during attachment (see below).
Inserting the categorical states
In the import step Categorical state 1
click on Categorical state ID and in the center
window the assignemt data for the categorical state id (“id”) are
displayed. Click on to make this the decisive
column, further click on From file to
select the column “Type” as data source. Now click on button
to define a transformation. In the
tranformation window click on to select a filter,
then select Import fixed value and
enter the value Yes. Now click on the
button choose column “Type” from the file and
enter compare value Bool (see below).

This filter has the following effect: If file column “Type” contains
value “Bool”, the value Yes is
provided for import, otherwise the file row will be ignored. The column
now looks as shown below.
Remark: The Categorical state ID is a number that
is generated automatically from the database when a new categorical
state is created. At first sight it seems confusing that we select a
string for this numeric key. The point is that in the file with the
description data the corresponding catogorical state is idenified by
exactly this categorical state name. Since we select this categorical
state name for the Categorical state ID, the
mapping between these two values will be stored in a separate import
mapping table for the actual import session. In the later import steps
this mapping table will allow to find the correct categorical state.

In the import step Categorical state 1
click on Categorical state name and in the
center window the assignemt data for the categorical state name
(“label”), its abbreviation and detailled description (“abbreviation”
and “details”) are displayed. Select “label” and click on
For all: and enter the value Yes. The column now looks as shown below.

Finally we supply the Sequence number. Select
For all: with 1 (see below).

In the import step Categorical state 2
click on Categorical state ID and in the center
window the assignemt data for the categorical state id (“id”) are
displayed. Click on to make this the decisive
column, further click on From file to
select the column “Type” as data source. Now click on button
to define a transformation. In the
tranformation window click on to select a filter,
then select Import fixed value and
enter the value No. Now click on the
button choose column “Type” from the file and
enter compare value Bool (see below).
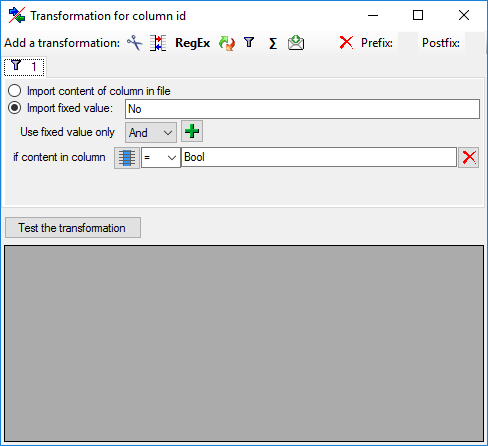
This filter has the following effect: If file column “DataType” contains
value “Bool”, the value No is
provided for import, otherwise the file row will be ignored. The column
now looks as shown below.
In the import step Categorical state 1
click on Categorical state name and in the
center window the assignemt data for the categorical state name
(“label”), its abbreviation and detailled description (“abbreviation”
and “details”) are displayed. Select “label” and click on
For all: and enter the value Yes. The column now looks as shown below.

Finally we supply the Sequence number. Select
For all: with “2” (see below).

Testing
To test if all requirements for the import are met use the
Testing step.
First the test for data line 2 is shown below, which is an example for a
non “Bool” descriptor.
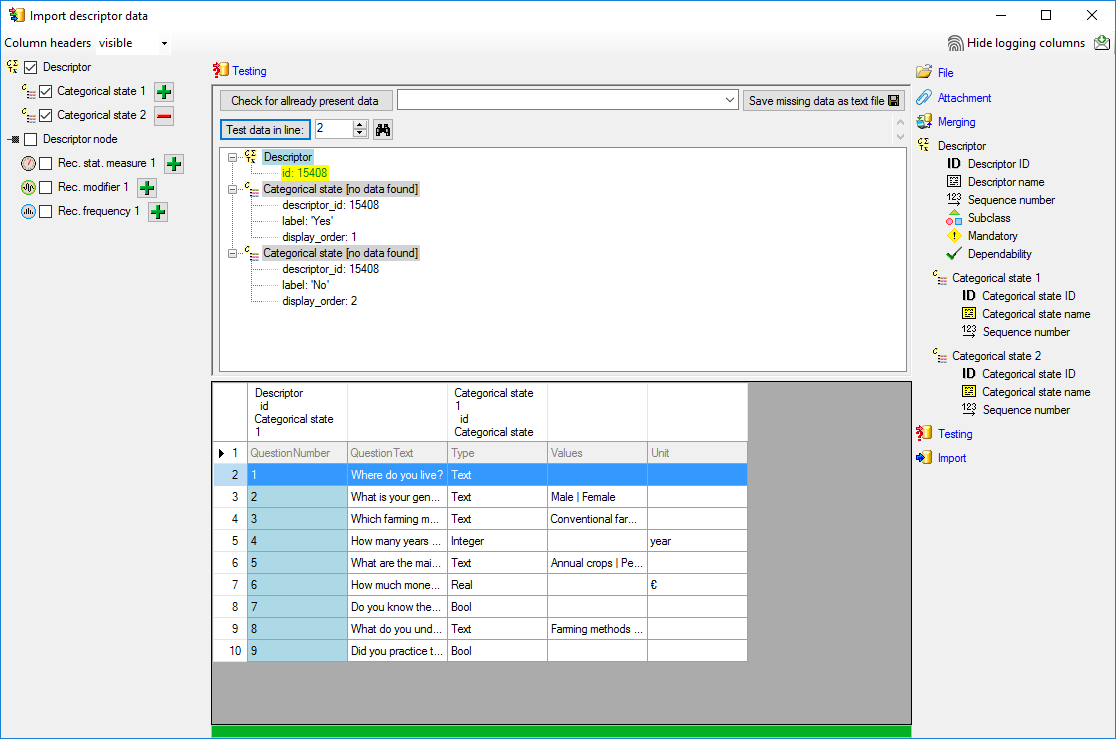
No data shall be inserted. Below the test result for data line 8, a
“Bool” descriptor, is shown.
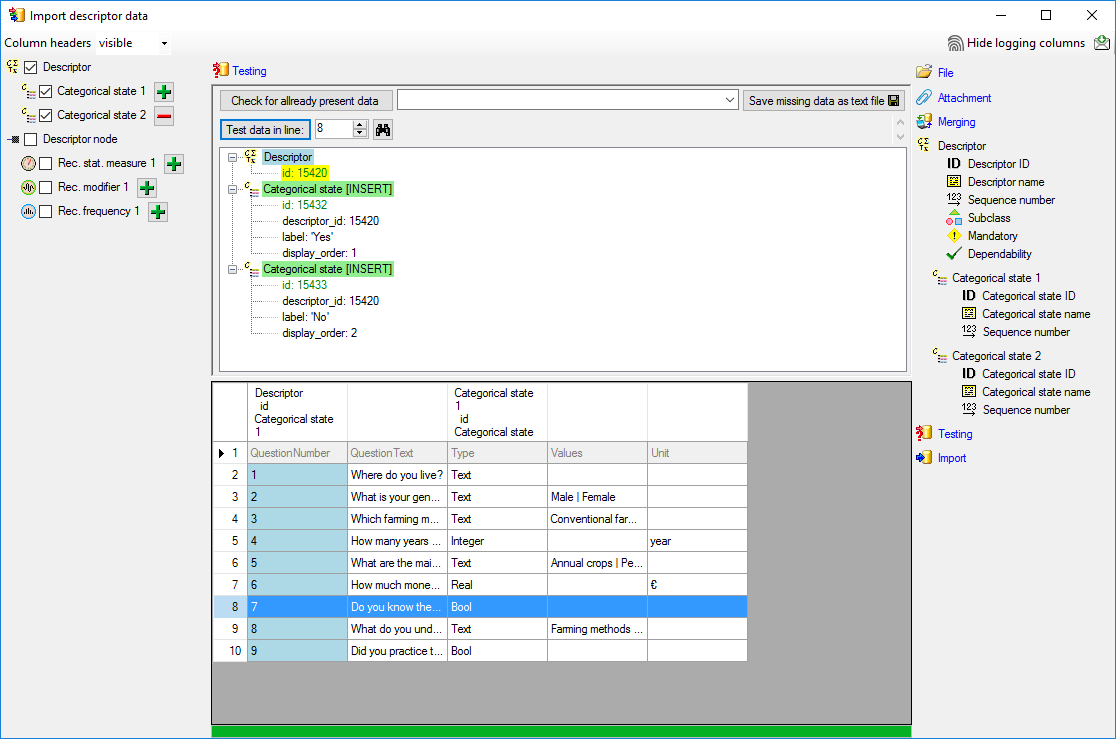
Import
With the last step you can start to import the data into the database.
If you want to repeat the import with the same settings and data of the
same structure, you can save a schema of the current settings. The
imported data lines are marked green, the
ignored data lines grey
(see below).
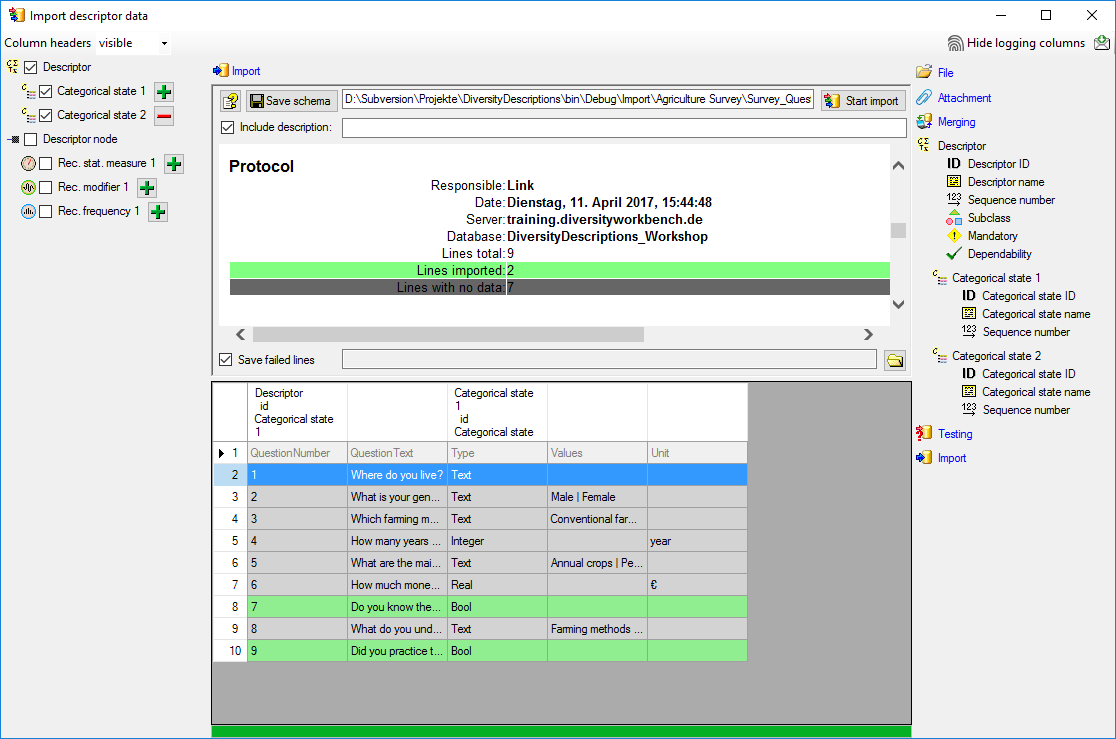
Next: Step 5 - Import of categorical states and update of
descriptor
Wizard Tutorial Step 5
Step 5 - Import of categorical states and update of descriptor data
Now we want to import the categorical states that are specified in file
column “Values” and set the subclass for those descriptors from “text”
to “categorical”. In the selection list on the left side of the window
 Descriptor,
Categorical state 1 and Categorical state
2 are still selected and Descriptor
node 1 is deselected (see below). Furthermore the descriptor id is
selected for attachment.
Descriptor,
Categorical state 1 and Categorical state
2 are still selected and Descriptor
node 1 is deselected (see below). Furthermore the descriptor id is
selected for attachment.
Since we want to change the descriptor data, we have to change the
import step Merge from the list.
For Descriptor we select the
Update option (see below).

In the import step Descriptor click on
Subclass, select file column “Values” and click
on button to open the transformations. By
clicking the delete button the transformations of
previous steps are removed. In the tranformation window click on
to select a filter, then select
Import a fixed value and enter the
value categorical. Now click on the
button choose column “Values” from the file
and select <not equal> blank (see below).
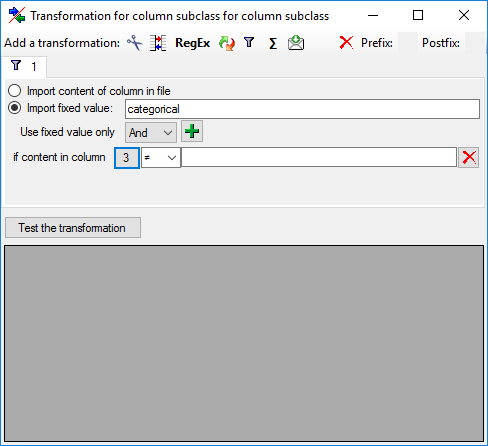
This filter will provide the value “categorical” for database column
“subclass” if file column “Values” is not empty. If “Value” is empty, no
value is provided and the “subclass” stays unchanged. The column now
looks as shown below.

Inserting the categorical states
A closer look on the “Values” file column shows that the states are
provided as a list of values separated by the pipe symbol and blanks ("
| “). To get the single state values, we have to split off a value at
the string " | “. This value will then be used for the
Categorical state ID and the
Categorical state name.
In the import step Categorical state 1
click on Categorical state ID and in the center
window the assignemt data for the categorical state id (“id”) are
displayed. Click on to make this the decisive
column, further click on From file to
select the column “Values” as data source. Now click on button
to define a transformation.
In the tranformation window click on the cut
transformation, enter Position: 1,
click on to enter splitter character | (blank, pipe, blank). By clicking on button
[Test the tranformation] you can check the transformation results
(see below).
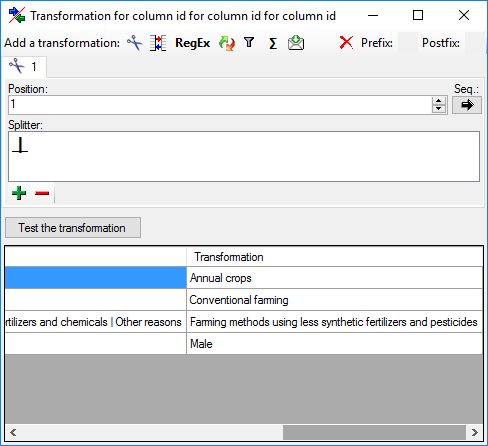
The column now looks as shown below.

Remark: The Categorical state ID is a number that
is generated automatically from the database when a new categorical
state is created. At first sight it seems confusing that we select a
string - the catigorical state name - for this numeric key. The point is
that in the file with the description data the corresponding catogorical
state is idenified by exactly this categorical state name. Since we
select this categorical state name for the
Categorical state ID, the mapping between these two values will be
stored in a separate import mapping table for the actual import session.
In the later import steps this mapping table will allow to find the
correct categorical state.
Now supply exactly the same filter settings for
Categorical state name but do not mark it as decisive column (see
below).

Finally we supply the Sequence number. Select
For all: with 1 (see below).
And now there is some “fun”:
The longest entry in column “Values” contains four entries separated by
pipes and blanks. Therefore click two more times on the
button of step
Categorical state 1 on the left side and select the new steps
Categorical state 3 and
Categorical state 4. For each of the
remaining steps supply the columns in the same way as for
Categorical state 1, but increase the
Position: value in the cut transformations and
the For all: value in Sequence number.
Testing
To test if all requirements for the import are met use the
Testing step.
The test for data line 9, where all eleven descriptor states are
present, is shown below.
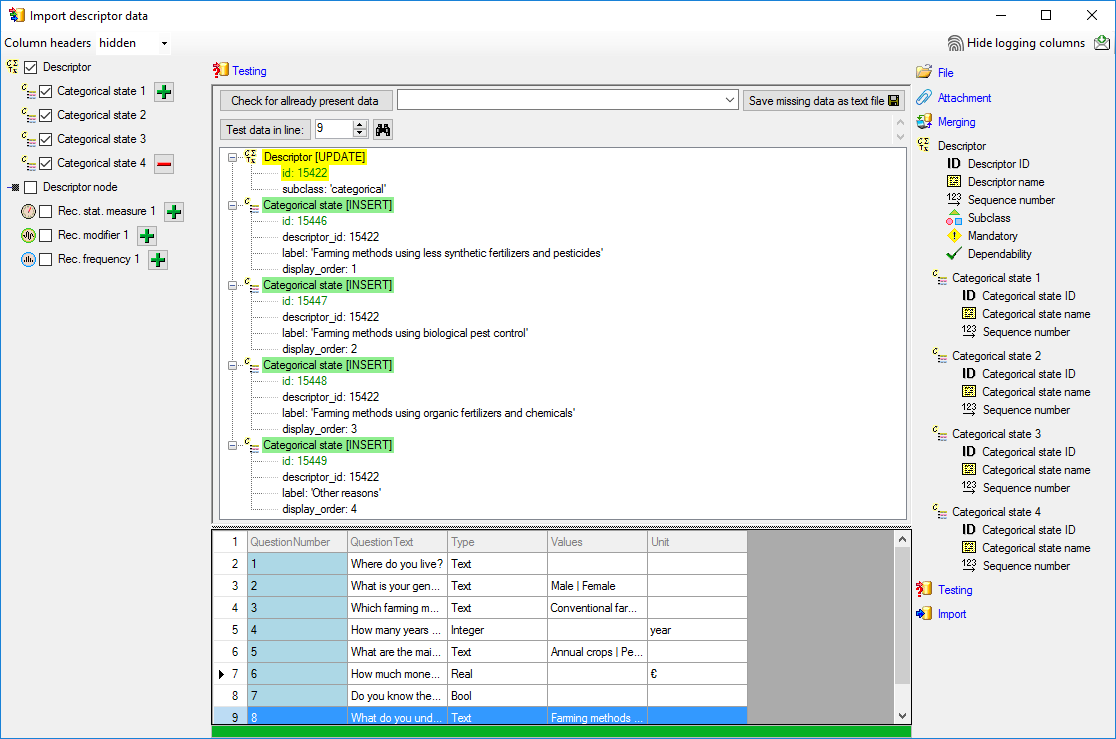
Import
With the last step you can start to import the data into the database.
If you want to repeat the import with the same settings and data of the
same structure, you can save a schema of the current settings. There
were 4 lines that contained descriptors (see below).

Next: Step 6 - Import of
descriptions
Wizard Tutorial Step 6
Step 6 - Import of descriptions
Choose Data → Import -> Wizard ->
Import descriptions … from the menu. A window
as shown below will open to select an import session. Select session for
project “MycoPhylogenyNet”.
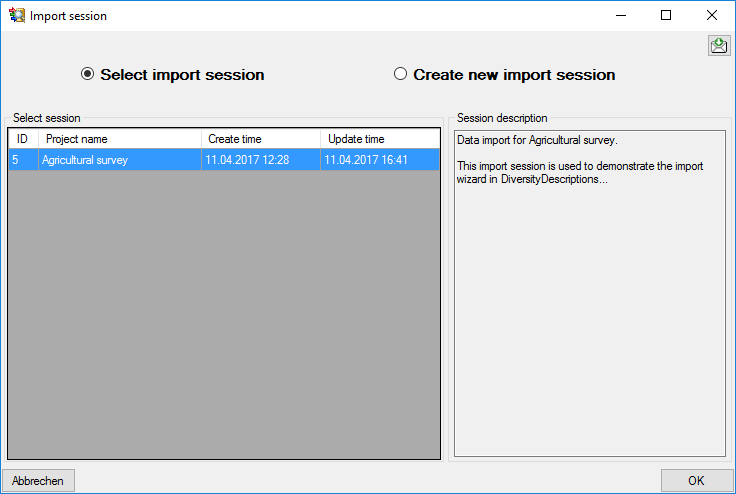
After clicking [OK] the following window opens that will lead you
through the import of the description data.
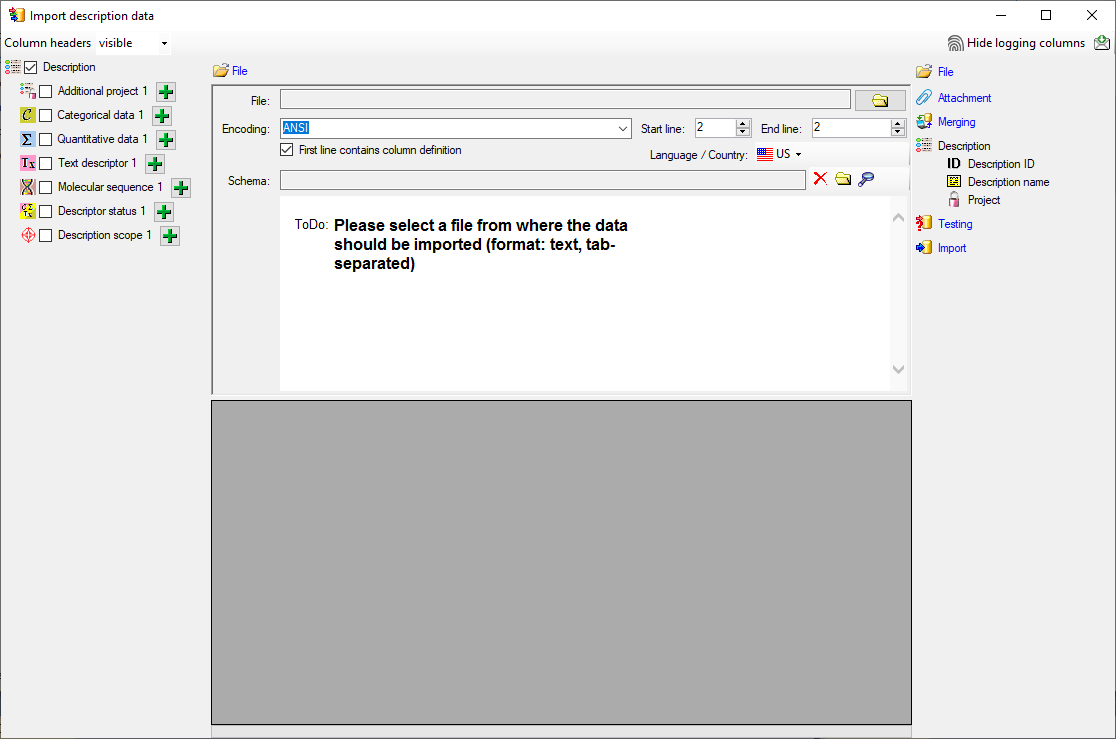
Choosing the File
Choose step File an open file
“Survey_Answers.txt”. The chosen encoding ANSI of the file should be
sufficiend. The file column “ClientNumber” contains the description
names that shall be imported. Since there are no other description
specific data, the same column will be used for the as unique ID to
identify each description.
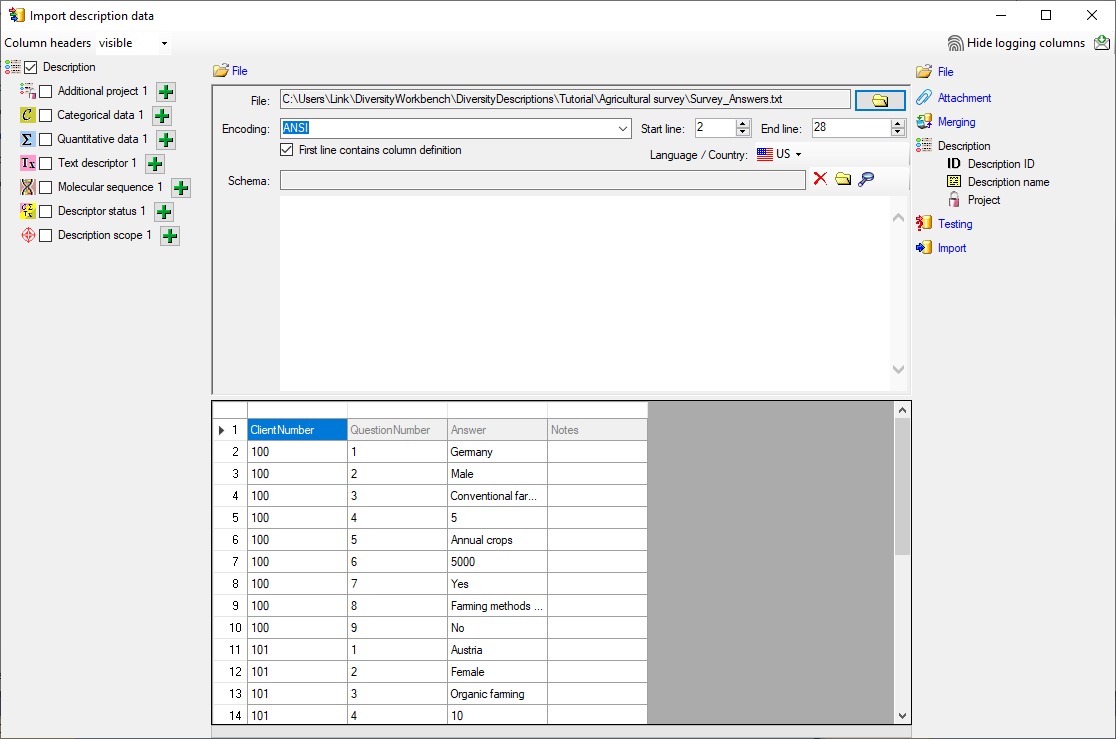
Selecting the data ranges
In the selection list on the left side of the window all possible import
steps for the data are listed according to the type of data you want to
import.
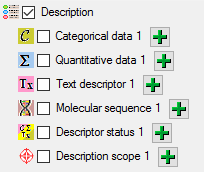
Since each description name rsp. ID occurs in several lines of the file,
subsequent tries to import the same description would cause errors, if
the standard merge handling Insert was
used. We have to change the import step Merge from the list.
For Description we select the
 Merge option (see below).

The step Description is already selected
and cannot be de-selected (see above). In the step table at the right
side you find the import step Descriptor and
below the data groups of the import step. Click on
Description ID and in the center window the assignemt data for the
description id (“id”) are displayed. Click on
to make this the decisive column and on to allow the
merge comparison, further click on From
file to select the column “ClientNumber” as data source. After that
the column should look as shown below.

Now the description name must be selected, therefore click on
Description name. The center window shows two
data columns: “label” and “detail”. Click on
From file in the “label” line to
select file column “ClientNumber”. After that the columns should look as
shown below.

Finally select import step  Project, select
data column “project_id”, choose For
all: and select entry “Agricultural survey” from the drop down (see
below). With this adjustment every imported description will
automatically be assigned to that project.
Project, select
data column “project_id”, choose For
all: and select entry “Agricultural survey” from the drop down (see
below). With this adjustment every imported description will
automatically be assigned to that project.

Remark: Although project_id is a numeric value in the database, the
externally visible project name is expected here. Since this name is
unambigious, the corresponding id will be determined during import.
Testing
To test if all requirements for the import are met use the
Testing step.
The test for the first data line is shown below.
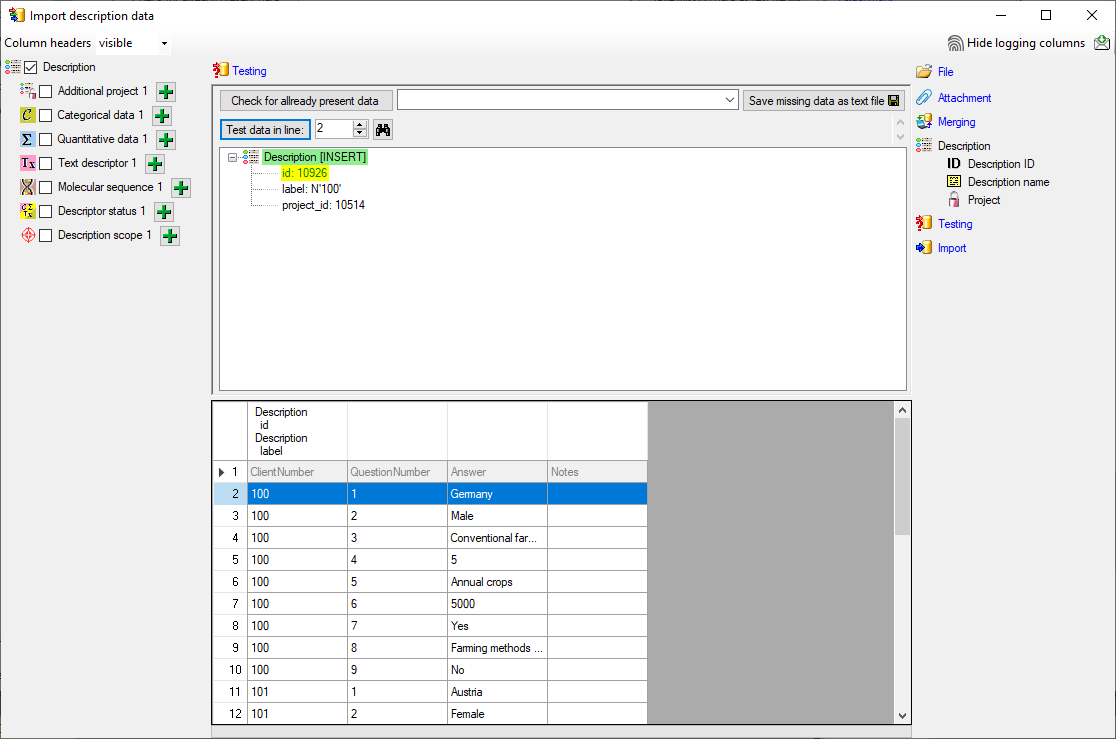
Import
With the last step you can start to import the data into the database.
If you want to repeat the import with the same settings and data of the
same structure, you can save a schema of the current settings. There
were three different descriptions (see below).

Next: Step 7 - Import of description
data
Wizard Tutorial Step 7
Step 7 - Import of description data
In this step we attach categorical, quantitative and text data to the
descriptions. In import step Attach at the right
side we select id (see below). It
indicates that we do not want to attach data to an existing description.
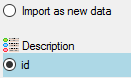
Select the import step Merging from the list.
For Description we select the
Attach option because this table shall not be
changed (see below).

Deselect every column from import step
Description except “id”. The “id” column was already marked as
Key column for comparison in the previous step.
Now the column looks as shown below.

Inserting text descriptor data
We will now include the text, quantitative, categorical and status data
step by step. First we will attach the text descriptor data. Select the
 Text descriptor 1 step at the left (see
below).
Text descriptor 1 step at the left (see
below).
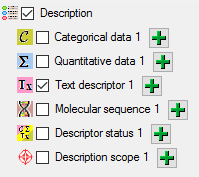
At the right side you find the import step
Text descriptor 1 and below the data groups of the import step. Click
on Descriptor ID and in the center window the
assignemt data for the referenced descriptor’s id (“descriptor_id”) are
displayed. Click on From file to
select the file column “QuestionNumber” as data source. After that the
column should look as shown below.

Now the description text must be selected, therefore click on
Text. The center window shows two data
columns: “content” and “notes”. In line “content” click on
to make it the decisive column, further on
From file to select file column
“Answer”. In line “notes” click on From
file to select file column “Notes”. After that the columns should look
as shown below.

Testing the text descriptor data import
To test if all requirements for the import are met use the
Testing step.
The test for the first data line is shown below.
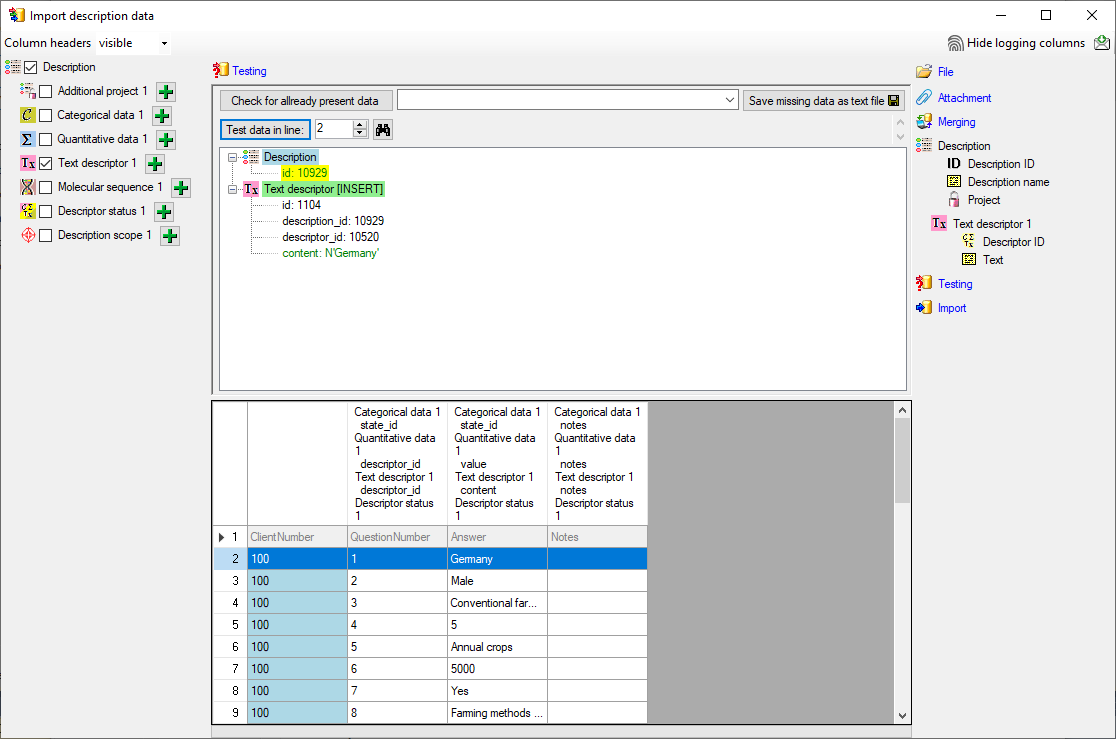
An additional test is done for the next data line. This line contains no
text data but a categorical state. You can see below that this line will
not be imported as text descriptor data, because the descriptor (given
by Descriptor ID) is automatically checked for
the correct type.
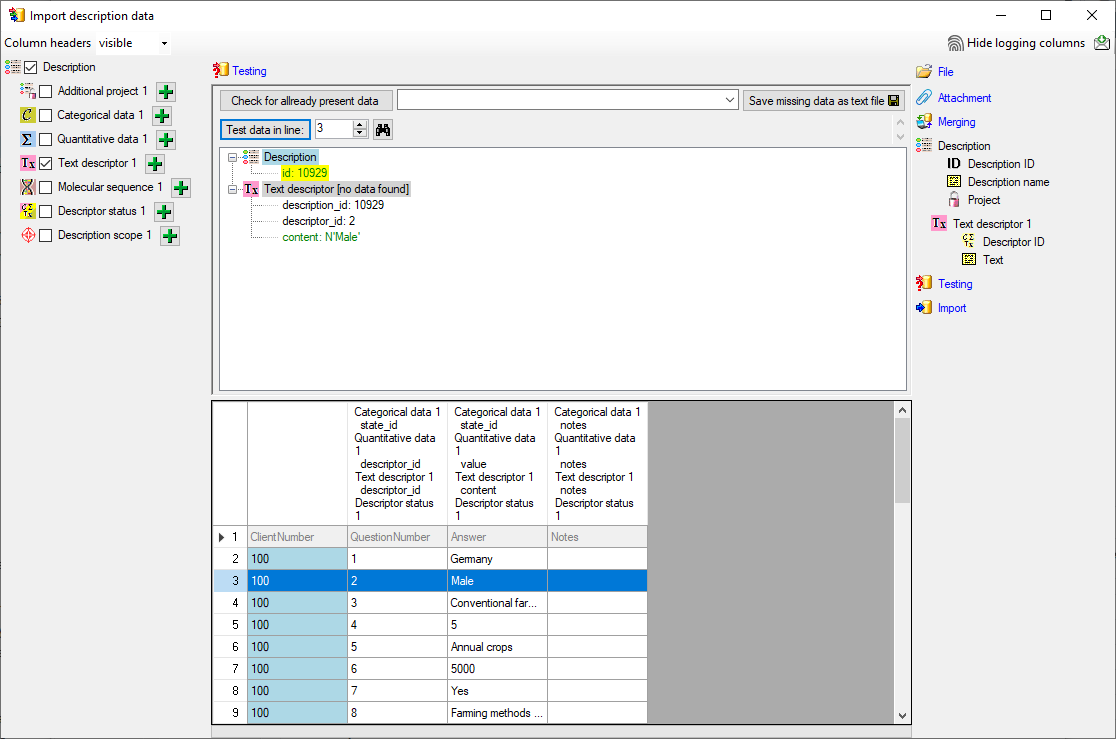
Inserting quantitative summary data
We will now include the quantitative summary data. Select the
 Quantitative data 1 step (see below).
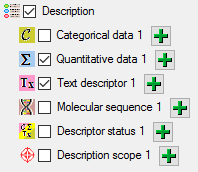
At the right side you find the import step
Quantitative data 1 and below the data groups of the import step.
Click on Descriptor ID and select the file
column “QuestionNumber” as data source.
Now the value must be selected, therefore click on
Value. The center window shows two data columns: “value” and
“notes”. In line “value” click on to make it
the decisive column, further on From
file to select file column “Answer”. In line “notes” click on
From file to select file column
“Notes”. After that the columns should look as shown below.

For quantitavie measures you must specify which statistical measure is
given by the value. We assume all imported values are mean values,
therefore click on the import step
Statistical measure and in the center window the assignemt data for
the statistical measure (“measure_id”) are displayed. Click on
For all: and select entry “Central or
typical value (human estimate)” from the drop down (see below).

Testing the quantitative summary data import
To test if all requirements for the import are met use the
Testing step.
The test for data line 25 with integer data is shown below.
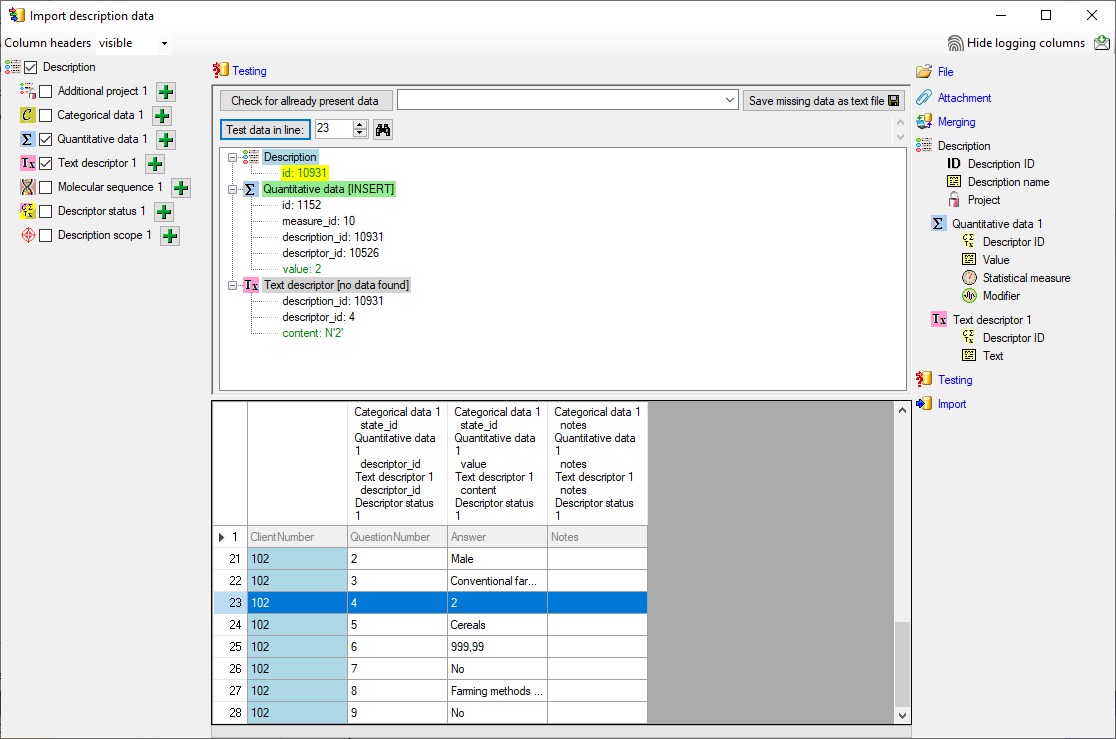
The test for data line 25, which contains real number fails (see
below).
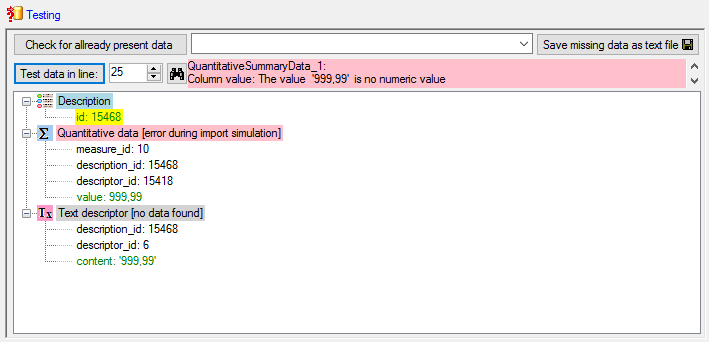
A closer look on the data in column “Answer” shows that the decimal
separator is a comma, because the table has been generated by a progam
using the German localization. The database expects a decimal point as
separator. To interpret the localized file values correctly, select the
step File and choose Language /
Country:  de (see below).
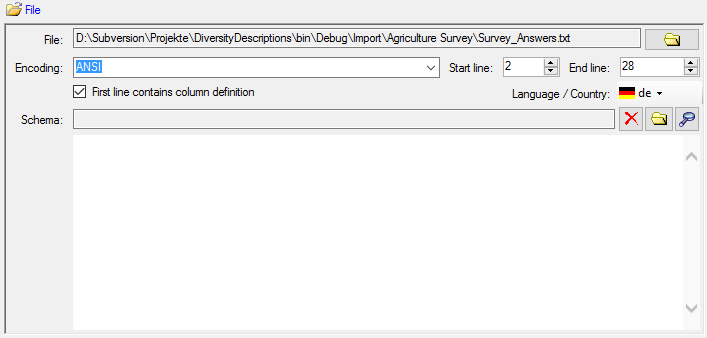
With this settings the test now works fine (see below).
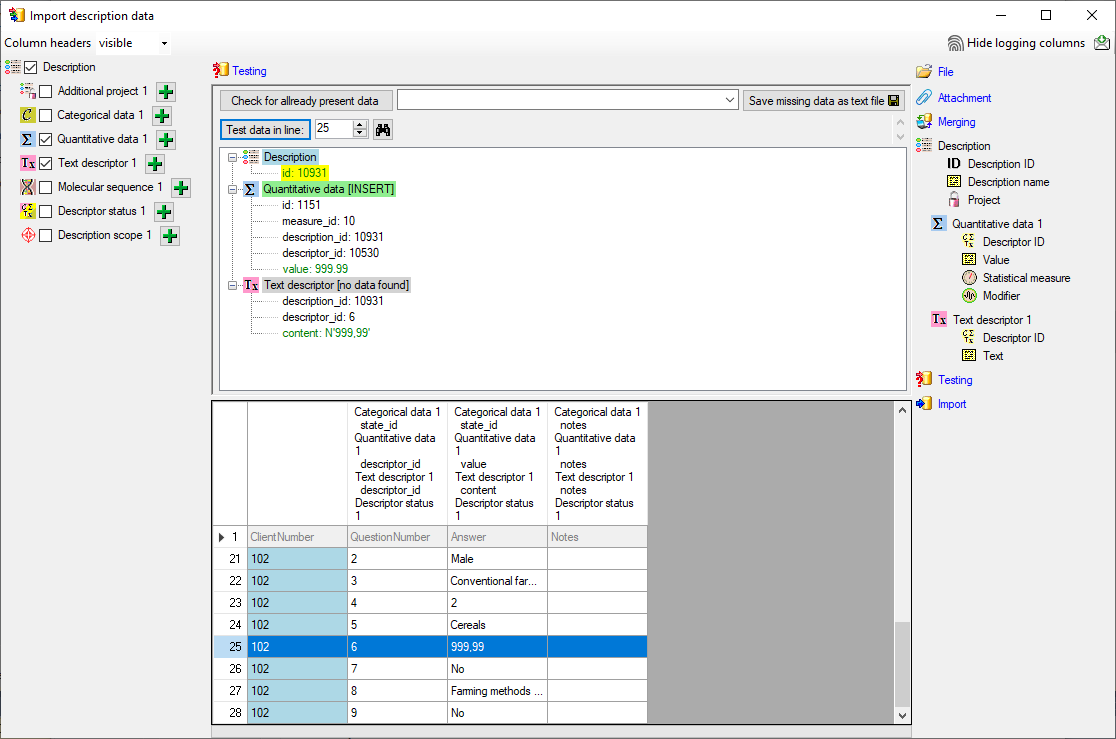
Inserting categorical summary data
Now we will include the categorical summary data. Select the
 Categorical data 1 step at the left (see
below).
Categorical data 1 step at the left (see
below).
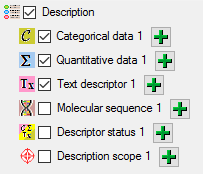
At the right side you find the import step
Categorical data 1 and below the data groups of the import step. Click
on Categorical state ID. The center window
shows the data column “state_id”. Click on to
make it the decisive column, further on
From file to select file column “Answer”. If you perform a quick
import test you will see that this setting works perfectly for data file
lines 3, 4 and 6, but fails for line 8 (see below).
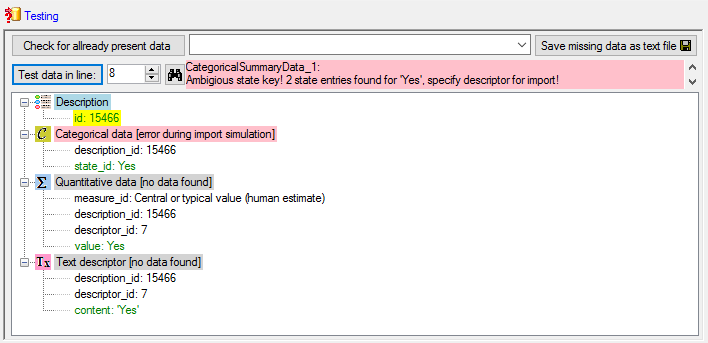
The reason is that we used the state name as external key for the
categorical state. For the descriptors 6 and 8, which both represent
boolean values, the states names are ambigious (“Yes” and “No” for both
descriptors), therefore the import wizard does not know which descriptor
shall be used. To overcome this ambiguity the
Categorical state ID step allows the additional specification of the
descriptor id. Select import step
Categorical state ID. In the center click on the
button at the end of line “state_id”. Select file column
“QuestionNumber”, which contains the reference to the descriptor and
enter the separator character | (pipe
symbol) in field Pre.: of the new line. After that the column should
look as shown below.

If you repeat the quick import test for line 8, it will now work.
Now click on Notes. The center window shows
the data column “notes”. Click on From
file to select file column “Notes”. After that the columns should look
as shown below.

Testing the categorical summary data import
To test if all requirements for the import are met use the
Testing step.
The test for data line 15 with categorical data and notes is shown
below.
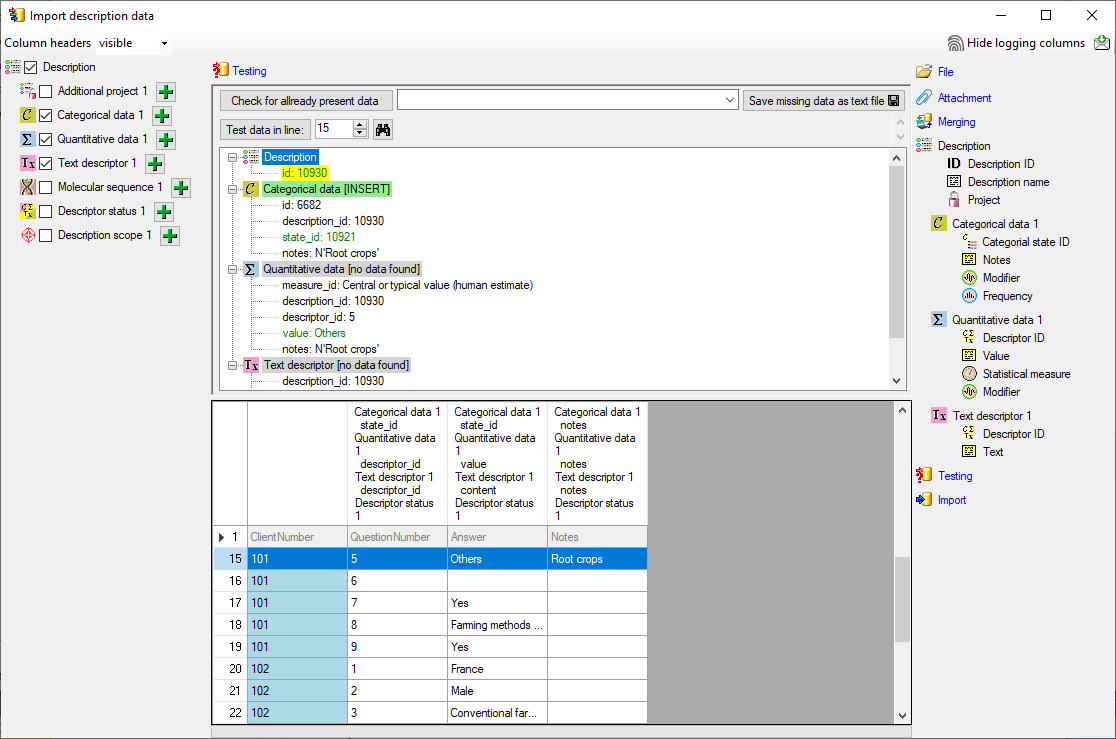
Inserting the descriptor status data
There is an empty lines in the file. For this line we want to set the
descriptor status “Data unavailable” to indicate that the descriptor
should be present in the description. Select the
 Descriptor status 1 step at the left (see
below).
Descriptor status 1 step at the left (see
below).
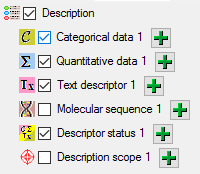
At the right side you find the import step
Descriptor status 1 and below the data groups of the import step.
Click on Descriptor ID and select the file
column “QuestionNumber” as data source. Furthermore click on
Notes and select the file column “Notes”.
Now click on  Data status. The center window
shows the data column “statusdata_id”. Click on
to make it the decisive column, further on
From file to select file column
“Answer”. Now click on button to define a
transformation. In the tranformation window click on
to select translation. In the translation
window click the button to list the values
contained in the file column. For the empty entry in the first line
select the translation value “Data unavailable” (see below). All data
entries will therefore be mapped to “empty”, i.e. no data status will be
set. Only if the data file line ist empty, the selected data status will
be inserted.
Data status. The center window
shows the data column “statusdata_id”. Click on
to make it the decisive column, further on
From file to select file column
“Answer”. Now click on button to define a
transformation. In the tranformation window click on
to select translation. In the translation
window click the button to list the values
contained in the file column. For the empty entry in the first line
select the translation value “Data unavailable” (see below). All data
entries will therefore be mapped to “empty”, i.e. no data status will be
set. Only if the data file line ist empty, the selected data status will
be inserted.
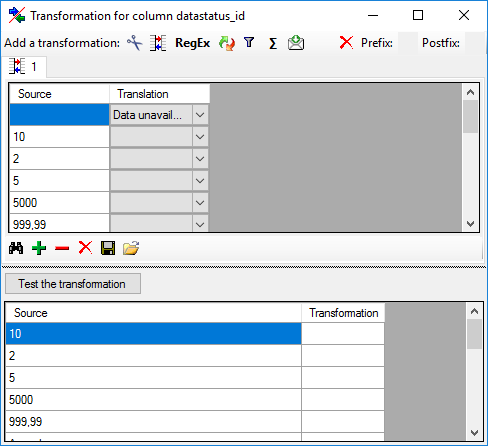
Testing the descriptor status data import
To test if all requirements for the import are met use the
Testing step.
The test for data line 16 is shown below.
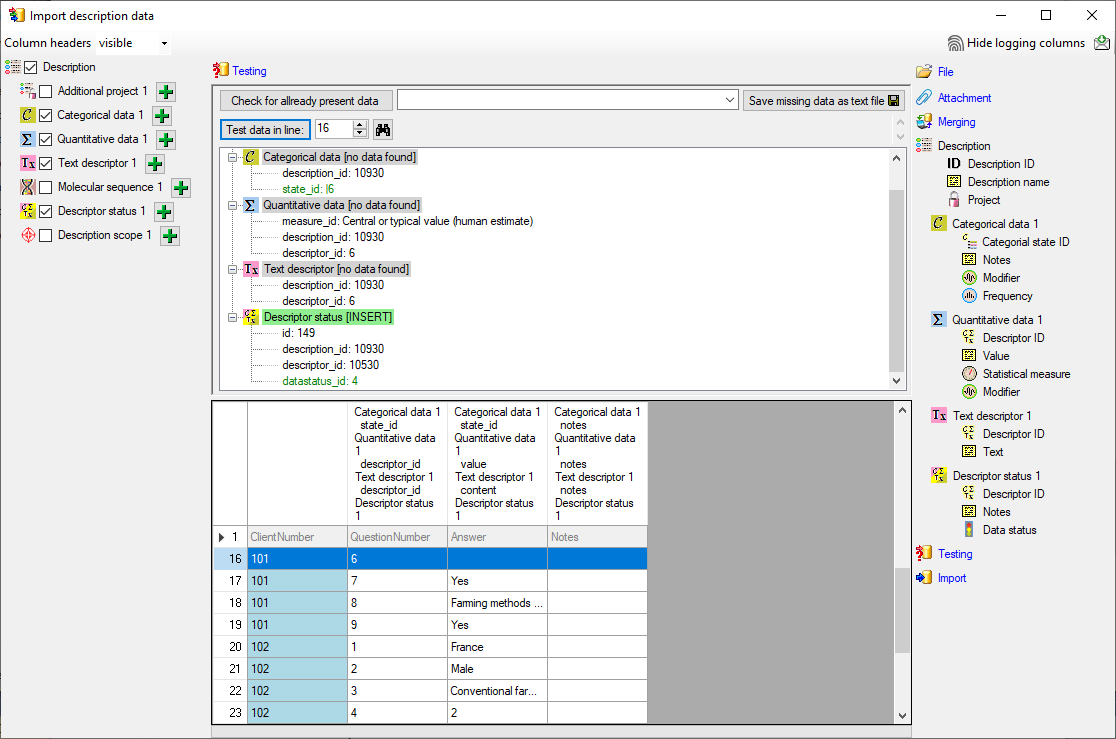
Import
With the last step you can start to import the data into the database.
If you want to repeat the import with the same settings and data of the
same structure, you can save a schema of the current settings. There
were 26 lines imported and one failed line (see below).
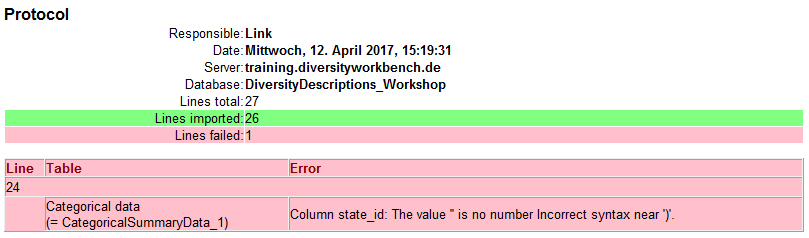
The erroneous lines are stored into separate text file (e.g.
“Survey_AnswersError.txt”) for a detailled analysis and a separate
import after error corrections. In our example the error is caused by
the undefined value “Cereals” in the “Answer” column of file line 24.
Next: Epilogue
Wizard Tutorial Step Epilogue
Epilogue
When you close the import wizard and start a query for descriptions of
project “Agricultural survey” you will find the three datasets and the
imported descriptor data (see image below).
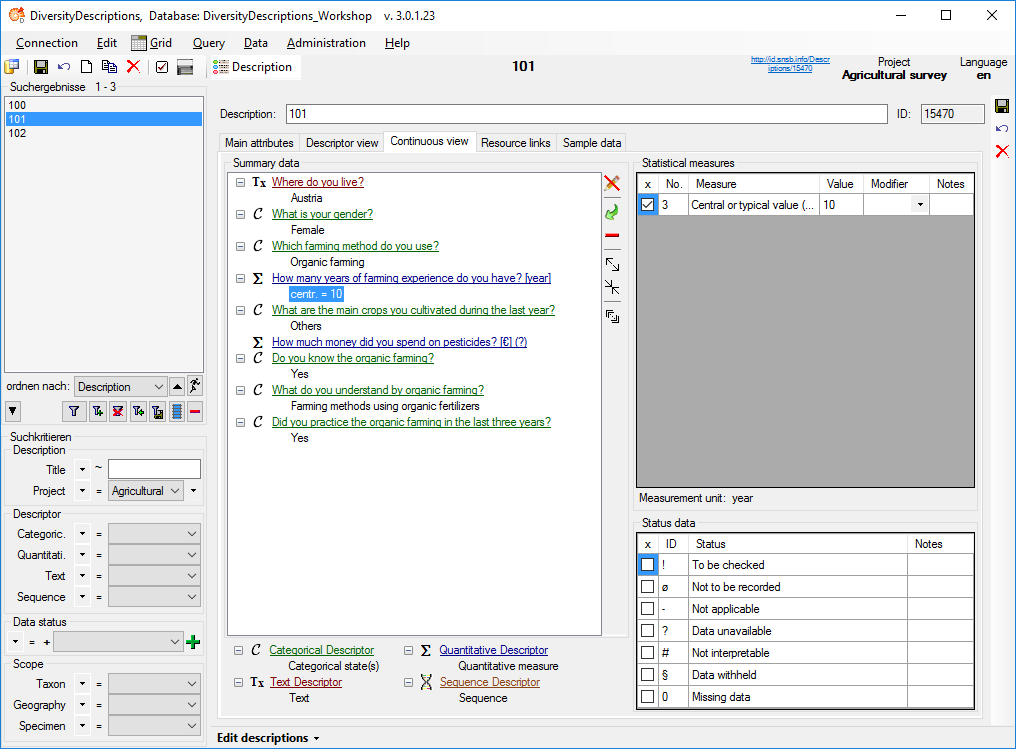
Finnally two more aspects of the imports wizard shall be discussed from
a retrospective view. The first one concerns the mapping of external and
internal keys and the role of the import session. The second one takes a
closer look on the role of the “ID” columns during import.
Mapping of external and internal keys
When opening the import wizard you have to select rsp. create an import
session. Imports into Diversity Descriptions usually require at least
two import operations, e.g. for descriptors and descriptions. The
description data reference descriptors or categorical states. Within the
database those relations are built based on numeric values that are
provided by the database during creation of the corresponding objects.
In the external data files the relations are usually built by numbers
coordinated by the user (“QuestionNumber”) or by the entity names.
The import session stores the external and internal key values in
separate database tables and therefore builds a bracket around the
different import operations. Each import session is assigned to one
project, but for each project several import sessions may be created.
The mapping data may be viewed by opening the menu item Data ->
Import -> Wizard ->
Organize sessions …, selecting the
session and clicking the button Mapping (see
image below).
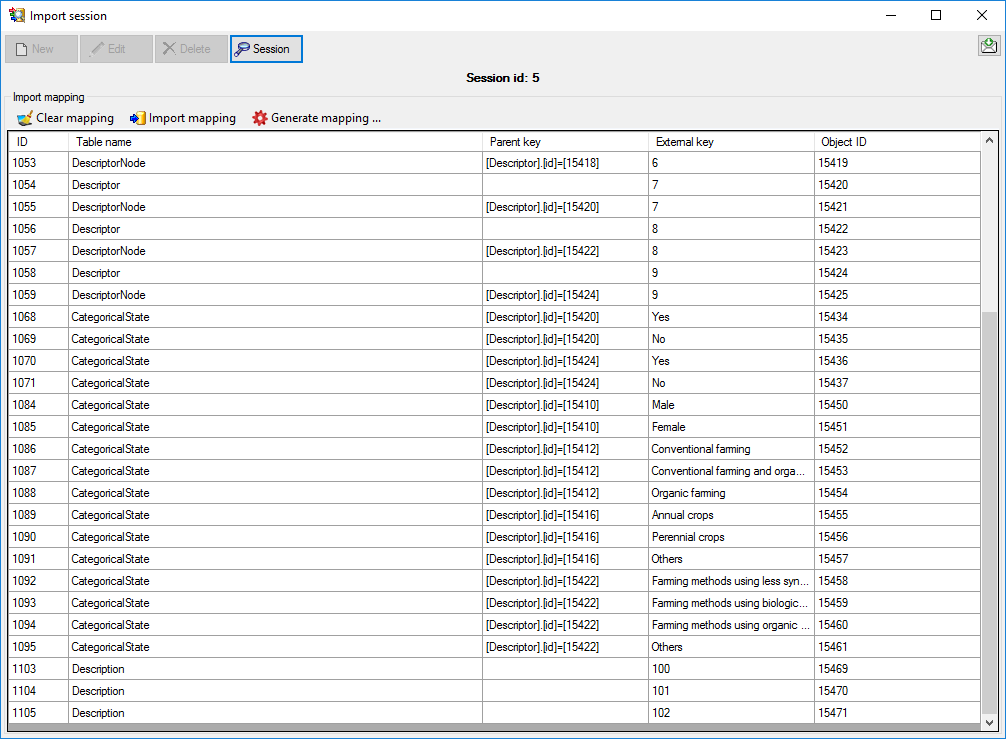
Selecting import columns for the “ID” fields
As an addition to the tutorial steps a closer look on the role of the
“ID” fields shall be taken. In principle the most important IDs during
import concern the Descriptor ID and the
Categorical state ID during descriptor import. To
decide which file column shall be used for that values during import, it
is important to know how these elements are referenced in the other
files.
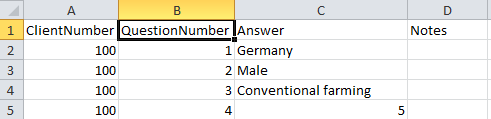
For the descriptor import, you should take a look at the description
data table (see above), which is part of the tutorial example. The
descriptor is referenced by column “QestionNumber”, which
matches homonymous column of the descriptor data table (see below).
Therefore the natural approach is to use this column as input for the
Descriptor ID during the descriptor import. Since
in most practical cases the descriptors will have a numbering column,
which is used in the referencing table. Surely more variety exists in
the way the categorical states are listed in the descriptor data file
and the way they are referenced by the description data file.

In the tutorial the first complication is that the possible states are
all concatenated, separated by a semicolon, into a single column of the
descriptor data file. This causes some effort in the transformation,
because the states have to be splitted into the single values. The
question is, what is the Categorical state ID?
The answer can be found in the upper table, because the state name is
explicitely mentioned in the description data file as reference. I.e.
for the descriptor import the state name must be used for the
Categorical state ID, too.
In Diversity Descriptions the categorical state names must be unique in
relation to their descriptor. But different descriptors may have states
with the same names. In our example this situation occures with the two
boolean descriptors (states “Yes” and “No”) and the state value
“Others”, wich is used by two descriptors. Therefore it is generally
recommended to specify the descriptor for the import of categorical
summary data as demonstrated in the tutorial.
Wizard Columns
Import wizard - Columns
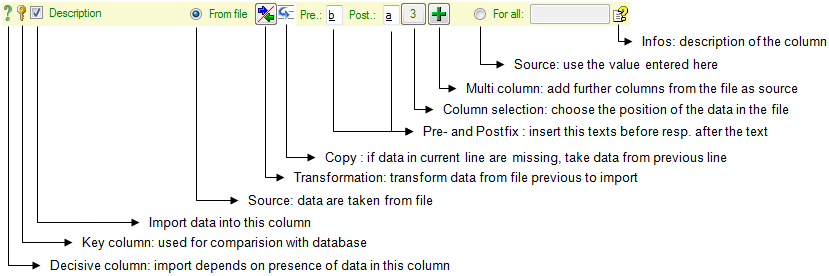
If the content of a file should be imported into a certain column of a
table, mark it with the  checkbox.
Decisive columns
The import depends upon the data found in the file where certain columns
can be choosed as decisive, that means only those lines will be imported
where data are found in any of these
columns. To mark a column as decisive, click on the
icon at the beginning of the line (see below).

In the example shown below, the file column Organims 2 was marked as decisive.
Therefore only the two lines
containing content in this column will be imported.

Key columns
For the options Merge,
Update and
Attach the import compares the data from the file with those already
present in the database. This comparision is done via key columns.
To make a column a key column, click on the icon at
the beginning of the line. You can define as many key columns as you
need to ensure a valid comparision of the data.
Source
The data imported into the database can either be taken
From file or the same value that you
enter into the window or select from a list can be used
For all datasets. If you choose the
From file option, a window as shown below will pop up. Just click in
the column where the data for the column should be taken from and click
OK (see below).
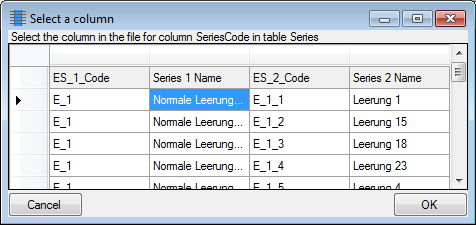
If you choose the For all option, you
can either enter text, select a value from a list or use a
checkbox for YES or NO.
The data imported may be transformed e.g. to adapt them to a format
demanded by the database. For further details please see the chapter
Transformation.
Copy
If data in the source file are missing in subsequent lines as shown
below,
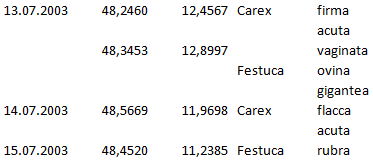
you can use the  Copy line option to fill in
missing data as shown below where the blue
values are copied into empty fields during the import. Click on
the button to ensure that missing values are
filled in from previous lines.
Copy line option to fill in
missing data as shown below where the blue
values are copied into empty fields during the import. Click on
the button to ensure that missing values are
filled in from previous lines.
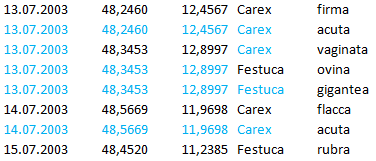
Prefix and Postfix
In addition to the transformation of the values from the file, you may
add a pre- and a postfix. These will be added after the transfromation
of the text. Double-click in the field to see or edit the content. The
pre- and a postfix values will only be used,
if the file contains data for the current
position.
For the datatype geography the pre- and postfixes will be automatically
set to enable the import. The preset values by default are set for
points as geographical units. You may change this to predefined types
like lines or areas. Click on the  button at the
end of the line to open the information window. Here you can choose
among the types mentioned above (see below).
button at the
end of the line to open the information window. Here you can choose
among the types mentioned above (see below).
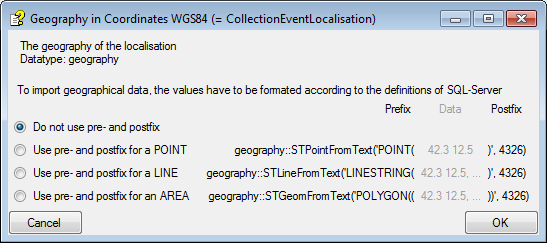
Column selection
If for any reason, a column that should take its content from the
imported file misses the position of the file or you want to change the
position click on the button. In case a
position ist present, this button will show the number of the column. A
window as shown below will pop up where you can select resp. change the
position in the file.
Multi column
The content of a column can be composed from the content of several
columns in the file. To add additional file columns, click on the
button. A window as shown below will pop up, showing
you the column selected so far, where the sequence is indicated in the
header line. The first
colum is marked with a blue background while the added columns are marked with
a green background (see below).
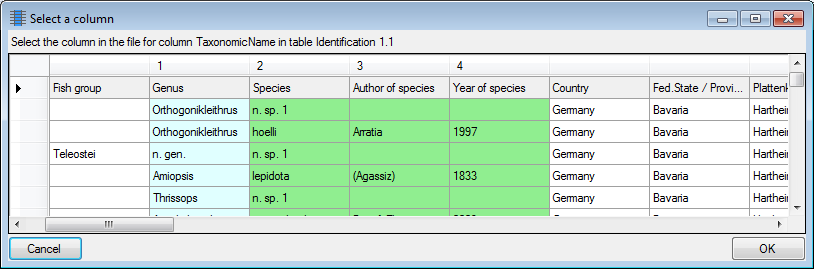
To remove a added column, use the button (see
below).

The button opens a window displaying the
informations about the column. For certain datatypes additional options
are included (see Pre- and Postfix).
 Matrix wizard:
Import descriptors, descriptions and sample data from tabulator
separated text file(s) organized as a matrix.
Matrix wizard:
Import descriptors, descriptions and sample data from tabulator
separated text file(s) organized as a matrix. SDD import: Import descriptive
data from an XML file according to the SDD schema 1.1 rev 5.
SDD import: Import descriptive
data from an XML file according to the SDD schema 1.1 rev 5. DELTA import: Import
descriptive data from DELTA text file(s).
DELTA import: Import
descriptive data from DELTA text file(s).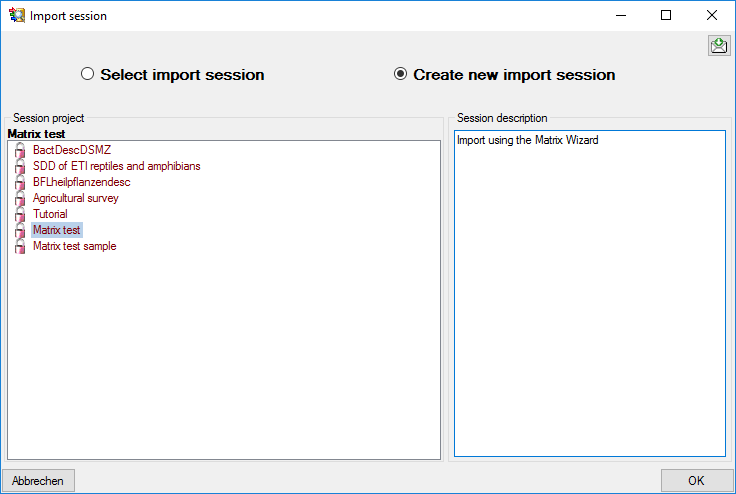
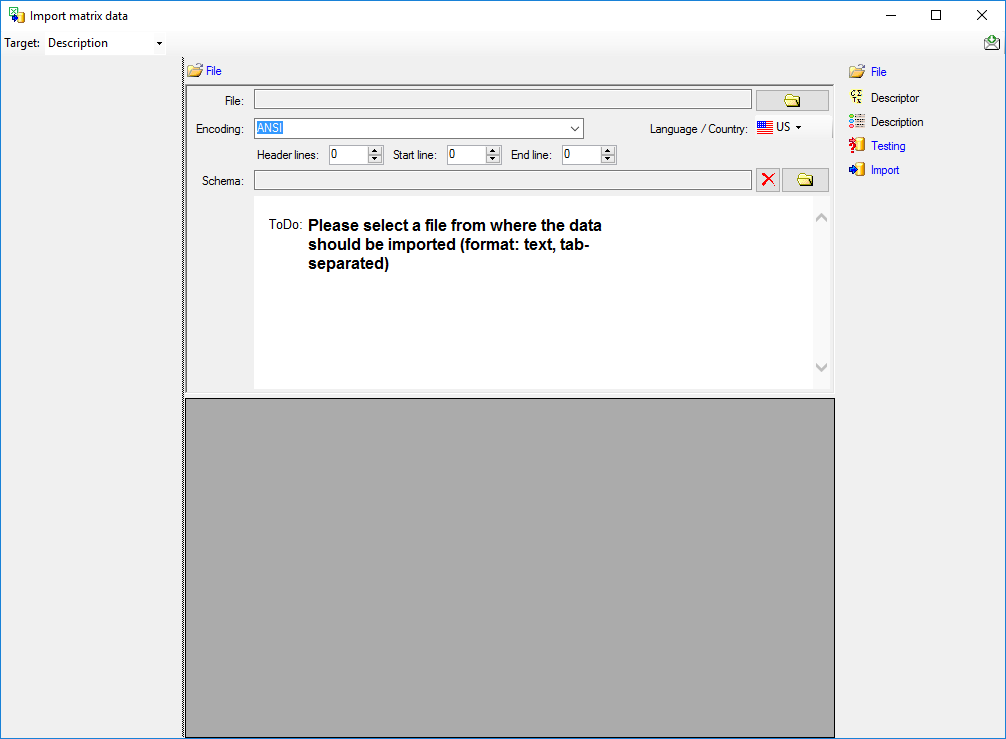

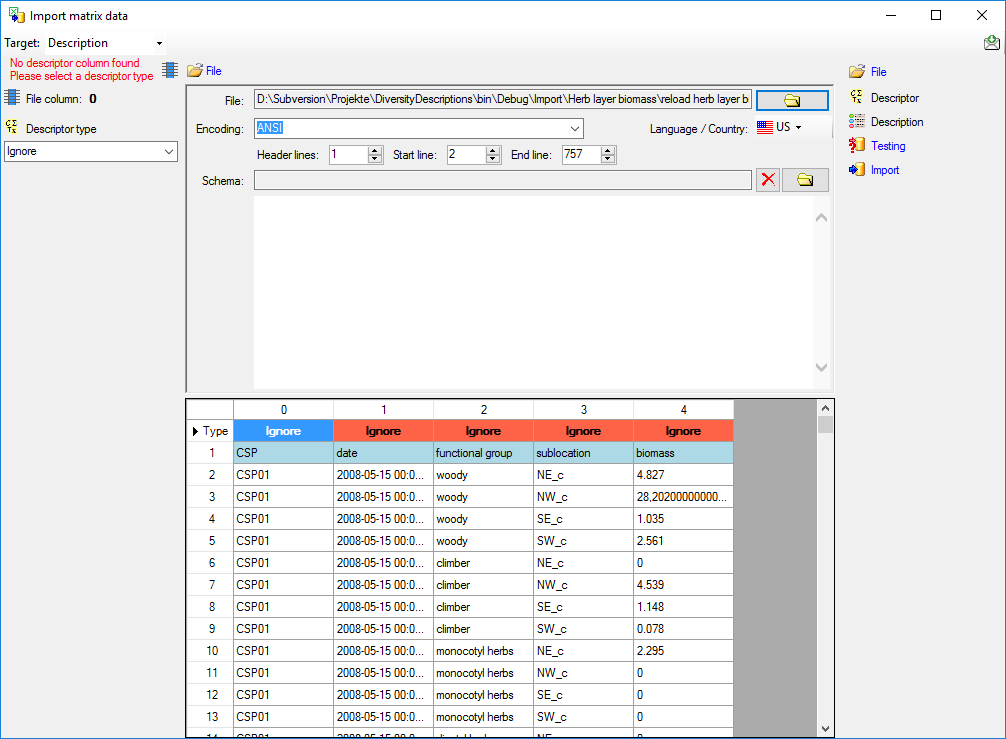
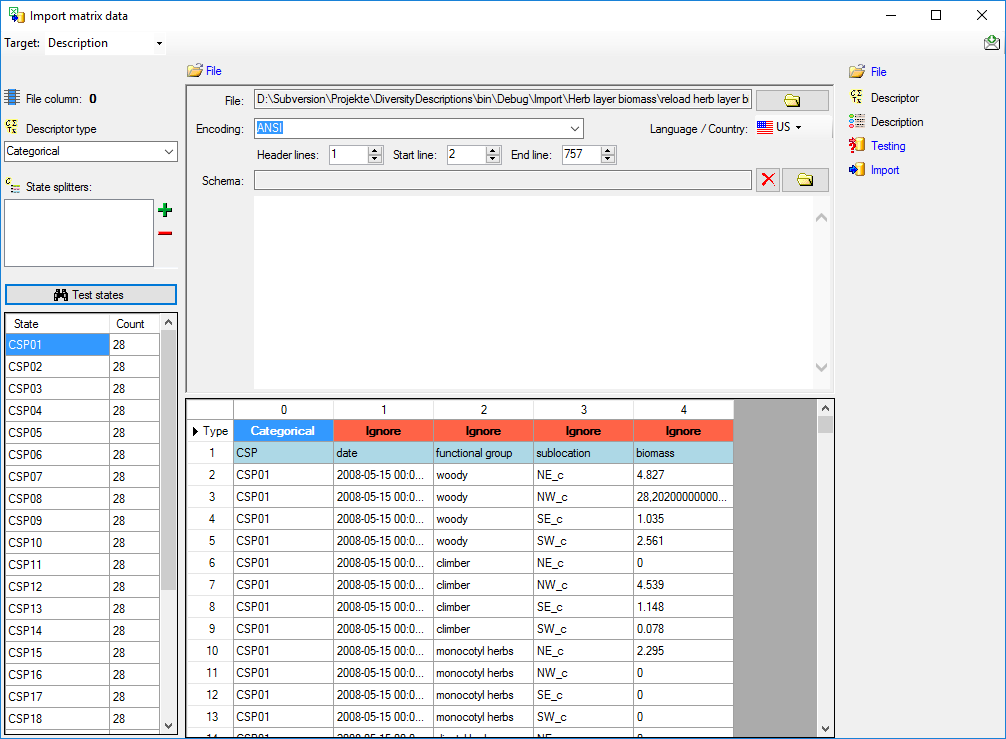
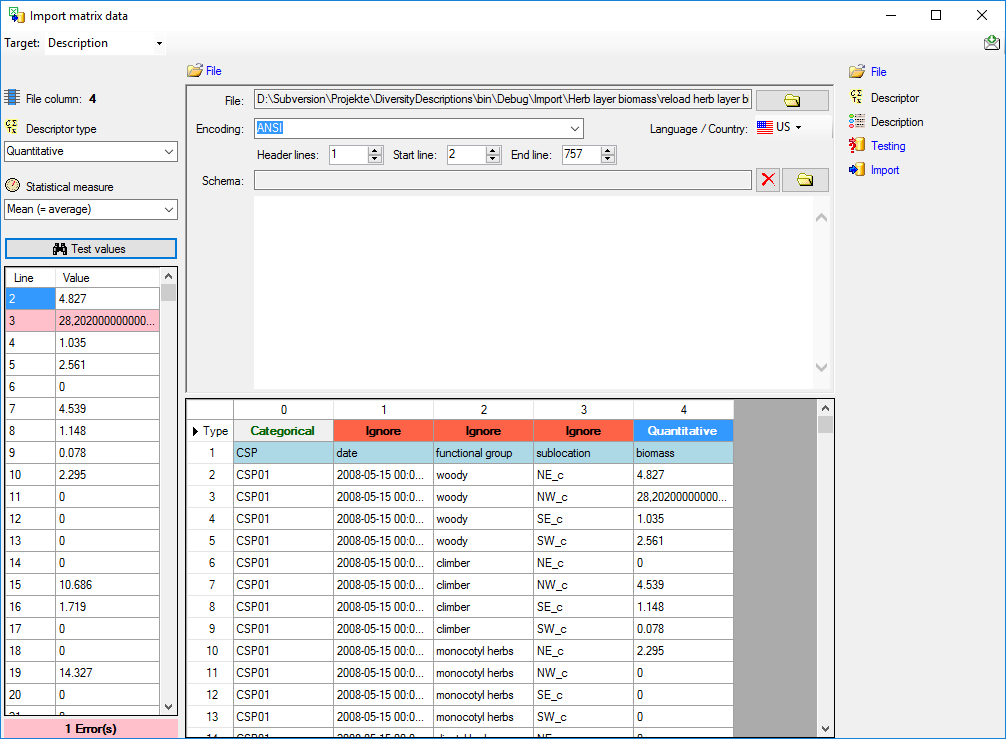
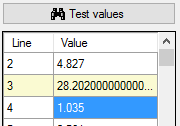


 = You have
to select a value from the provided list
= You have
to select a value from the provided list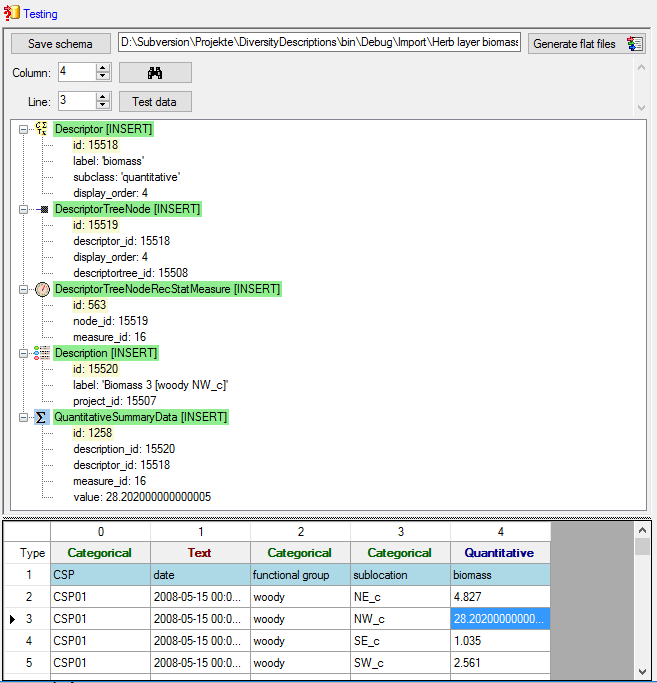
 according to your adjustments data and matching schema files for the
table oriented import wizards will be generated. This option may be
used, if you want to import additional data, e.g. a descriptor’s
measurement unit, that are not supported by the matrix wizard. Since all
mapping relevant data are stored in the selected import session, you may
import the basic descriptor and description data using the matrix wizard
and append additional data with the table oriented import wizards. In
this case the generated flat data and schema files might be useful to
have a defined starting point.
according to your adjustments data and matching schema files for the
table oriented import wizards will be generated. This option may be
used, if you want to import additional data, e.g. a descriptor’s
measurement unit, that are not supported by the matrix wizard. Since all
mapping relevant data are stored in the selected import session, you may
import the basic descriptor and description data using the matrix wizard
and append additional data with the table oriented import wizards. In
this case the generated flat data and schema files might be useful to
have a defined starting point. 
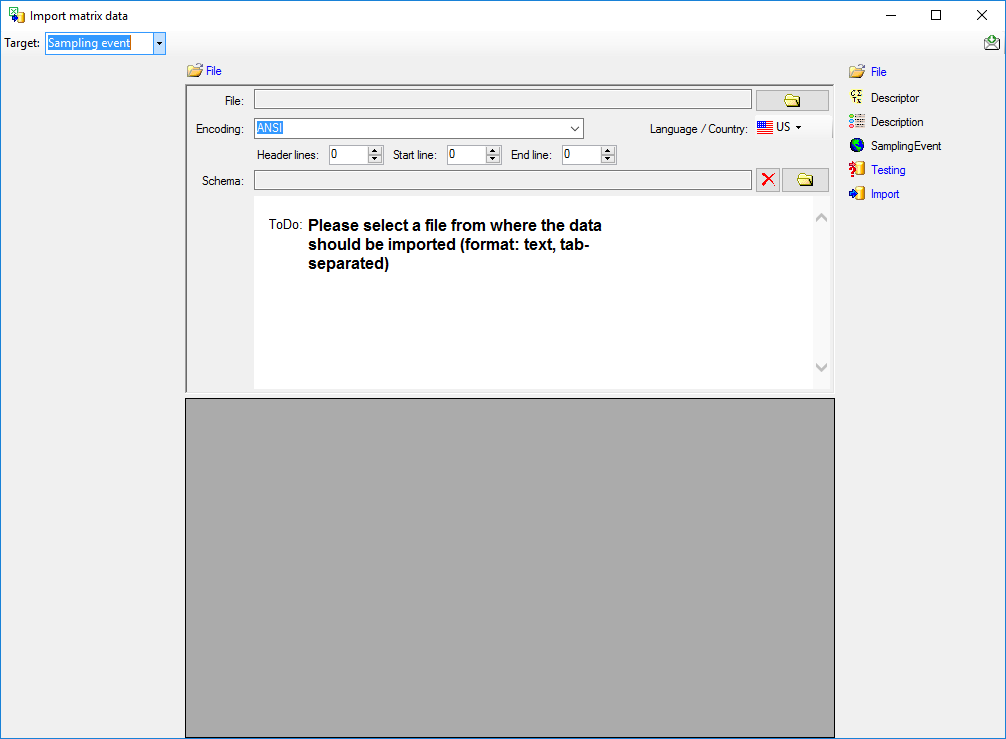
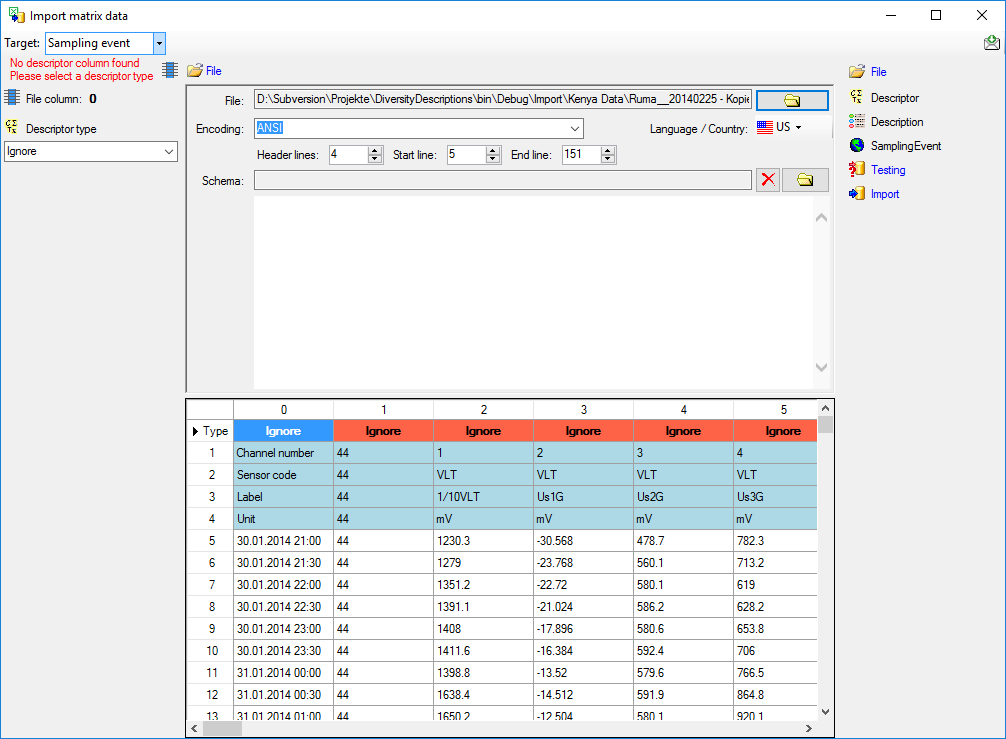


 Sampling event
table data columns must be selected. For id and label the file column 0
has been selected (see image below).
Sampling event
table data columns must be selected. For id and label the file column 0
has been selected (see image below).
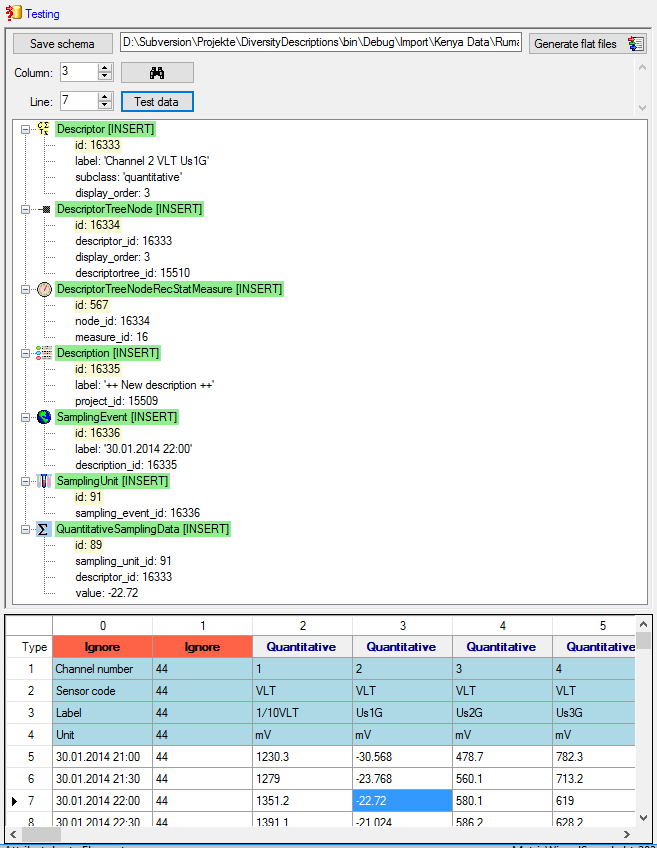

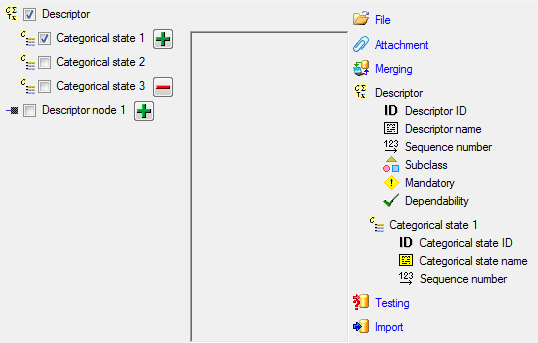
 button in the header line.
This will include an additional substeps for every step containing the
logging columns (see below). If you do not import these data, they will
be automatically filled by default values like the current time and
user.
button in the header line.
This will include an additional substeps for every step containing the
logging columns (see below). If you do not import these data, they will
be automatically filled by default values like the current time and
user.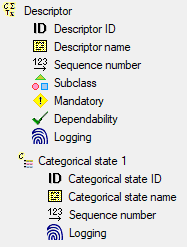
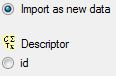


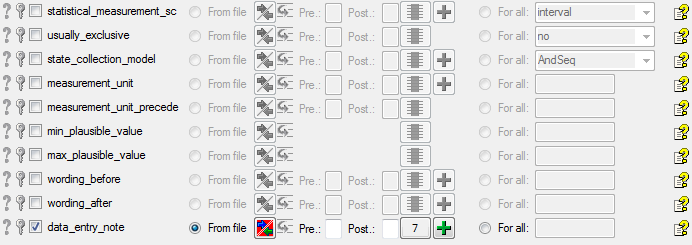
 = You have to enter a
value used for all datasets
= You have to enter a
value used for all datasets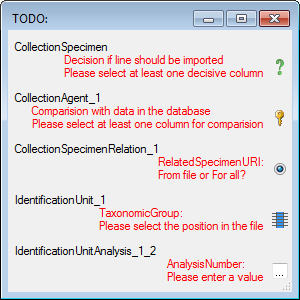
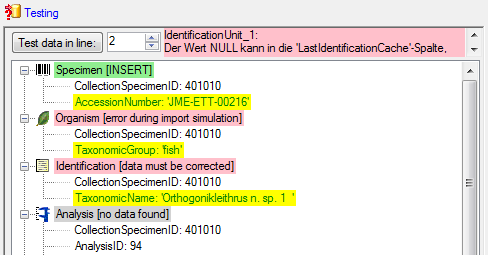
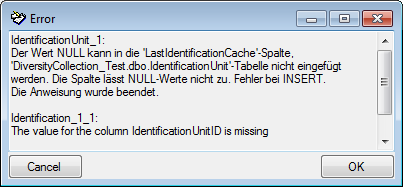
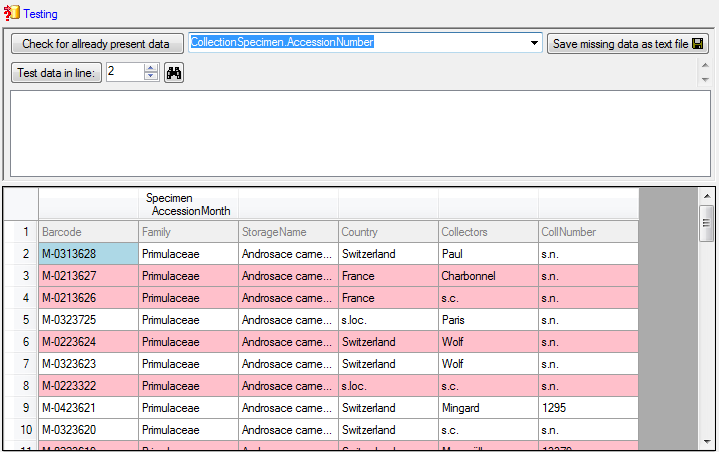
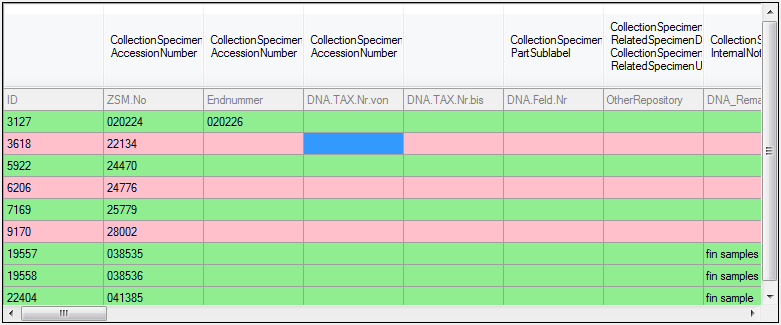
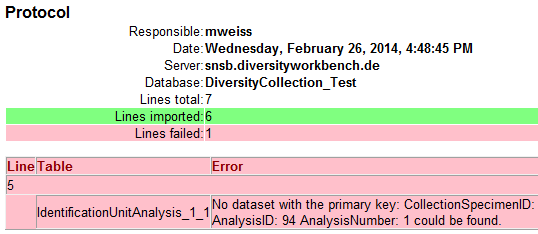


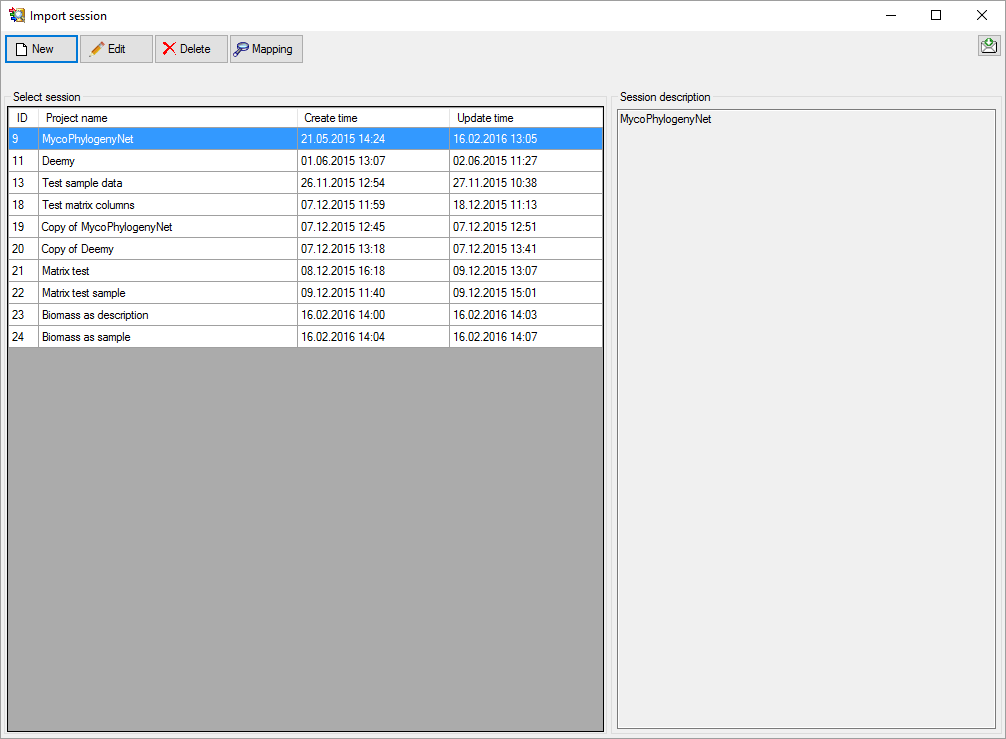
 Don’t save. A similar window can be opened by
selecting an existing import session and clicking
Don’t save. A similar window can be opened by
selecting an existing import session and clicking  Edit.
Edit. 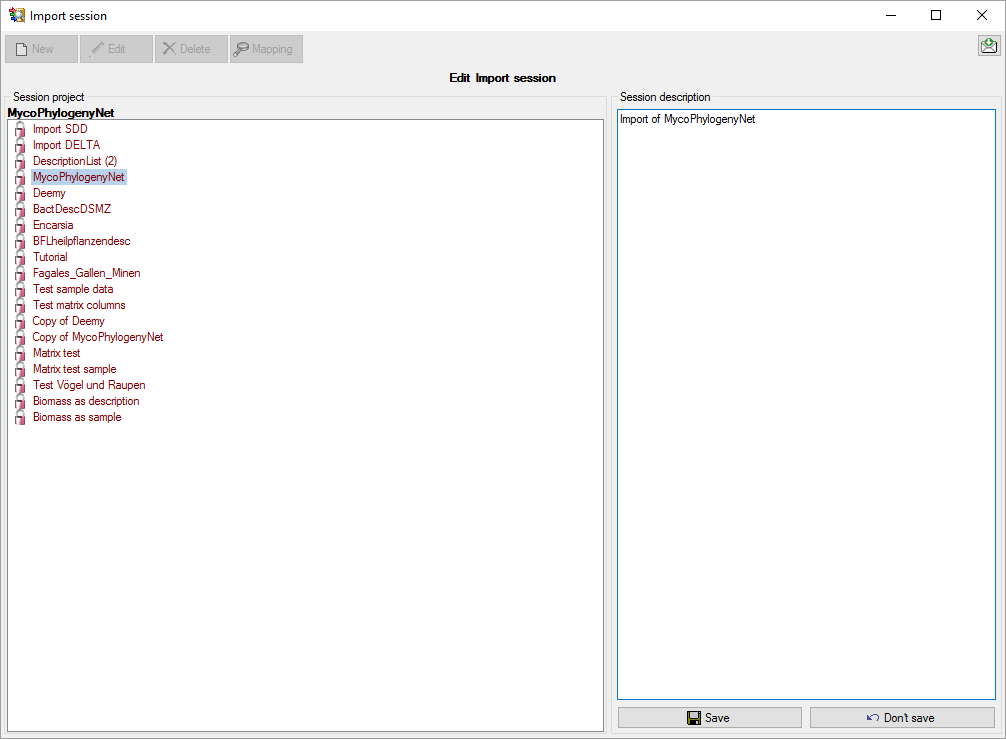
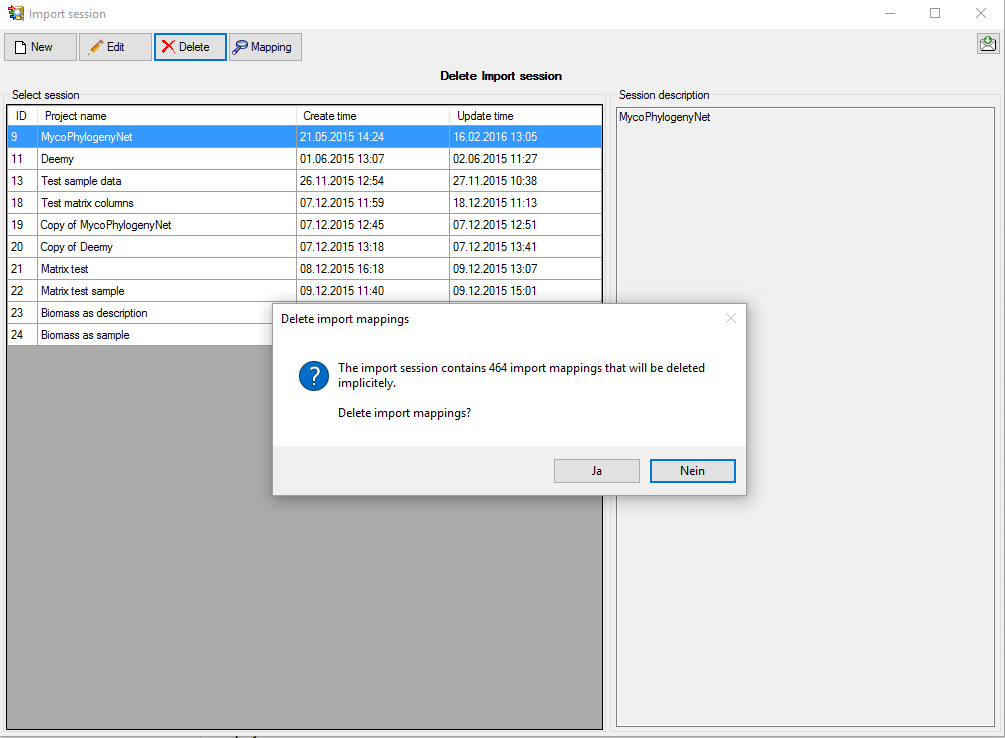
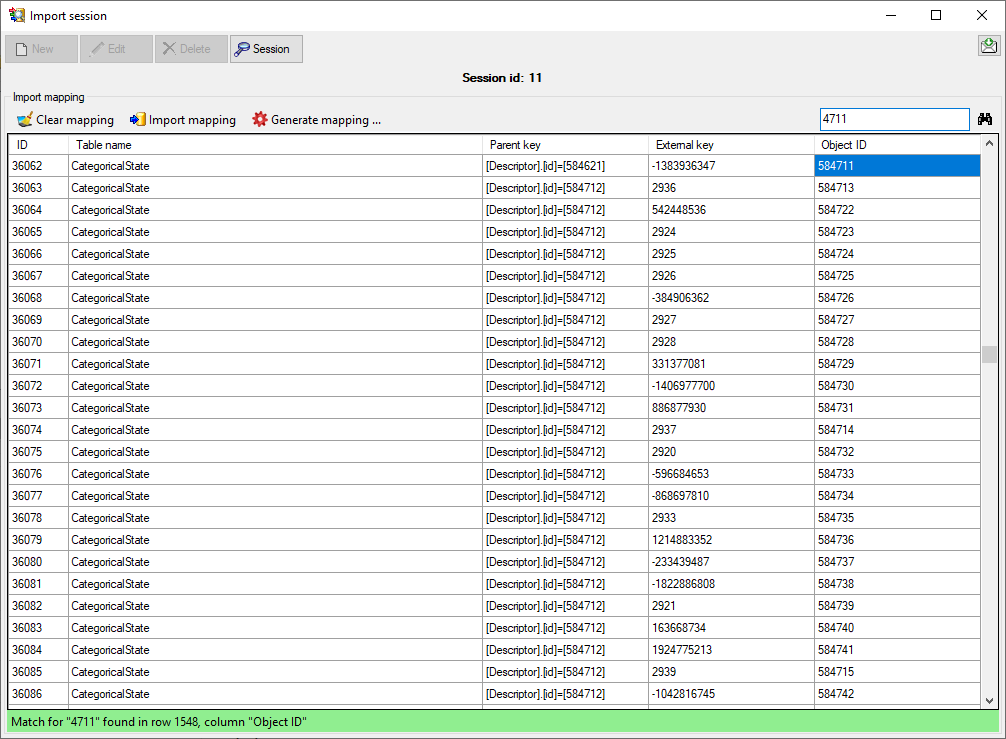
 Generate
mapping …. All mappings of the selected import session will be
deleted and the internal keys (“Object ID”) of descriptors, categorical
states, descriptions and their resources will be inserted as external
keys. By using this function you can re-import rsp. update data that
have been generated with the form
Generate
mapping …. All mappings of the selected import session will be
deleted and the internal keys (“Object ID”) of descriptors, categorical
states, descriptions and their resources will be inserted as external
keys. By using this function you can re-import rsp. update data that
have been generated with the form