Maintenance Descriptions
Maintenance - Maintain descriptive data
To open the maintenance form choose Administration →
 Database … →
 Maintenance … from the menu and
select the
Maintenance … from the menu and
select the  Maintain descriptive data tab. In
the
Maintain descriptive data tab. In
the  Descriptor status
data tab you may set or reset the
descriptor status of a categorical descriptor depending on its summary
data. In the
Descriptor status
data tab you may set or reset the
descriptor status of a categorical descriptor depending on its summary
data. In the  Categorical summary
data tab you may shift and copy
categorical summary data to a different descriptor or delete values for
selected categorical states. In the
Categorical summary
data tab you may shift and copy
categorical summary data to a different descriptor or delete values for
selected categorical states. In the  Quantitative summary data tab you
may perform such operations concerning statistical measures. With
tab
Quantitative summary data tab you
may perform such operations concerning statistical measures. With
tab  Description
project you may manage the
additional projects of your
description items. To find and delete corrupted descriptive data choose
the
Description
project you may manage the
additional projects of your
description items. To find and delete corrupted descriptive data choose
the  Clean descriptive
data tab. The
tab
Clean descriptive
data tab. The
tab  Find violation of
rules offers query functions to find
description items where rules concerning the descriptor usage are
violated.
Find violation of
rules offers query functions to find
description items where rules concerning the descriptor usage are
violated.

Commonly used description selection options
In the sub-panels you may set a descriptor status and move or copy
categorical rsp. quantitative summary data. By default all descriptions
from the selected project will be searched that fulfill the specified
conditions, i.e. a certain categorical state or statistical measure. In
certain cases it is neccessary to restrict the possibly affected
descriptions by some additional conditions. For this purpose there is
the option to define a restriction and/or an exclusion list (see example
below).
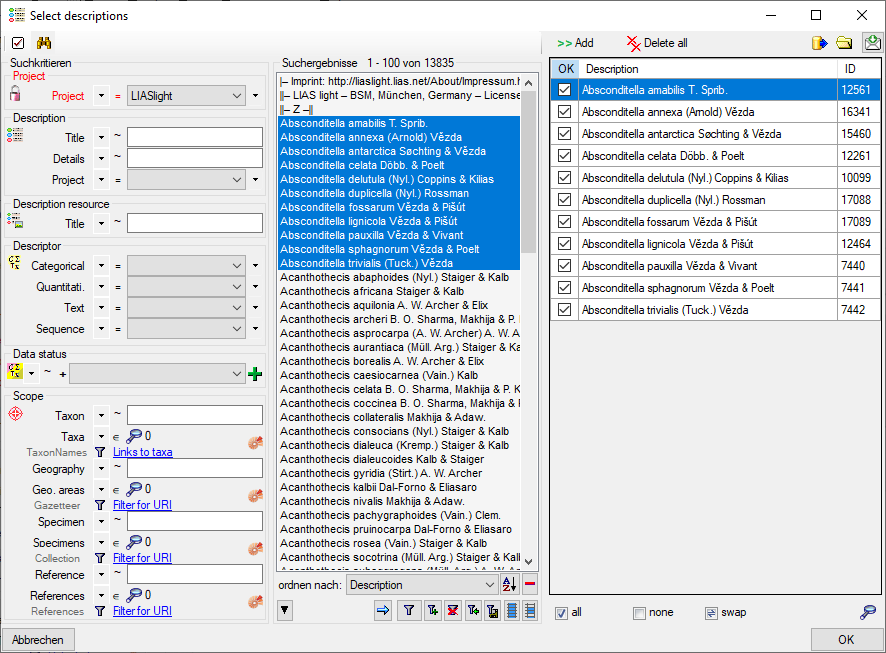
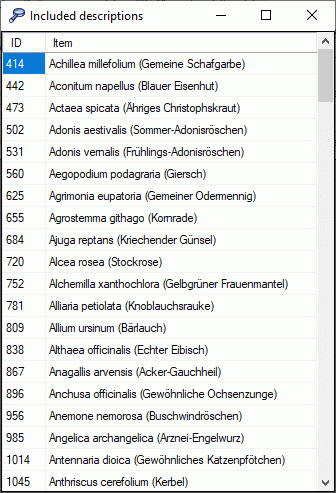
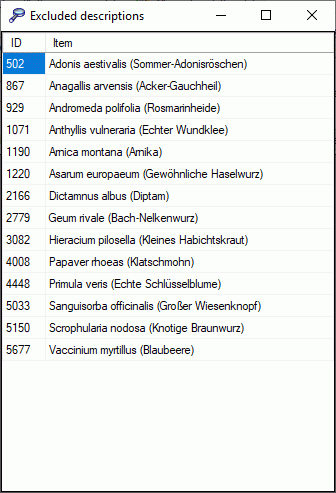
By opening a query window (button
 ) you can generate a list of descriptions (see
image below) that shall be included in the search (Description
restriction) or excluded from the search (Description
exclusion).
) you can generate a list of descriptions (see
image below) that shall be included in the search (Description
restriction) or excluded from the search (Description
exclusion).
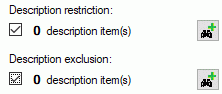
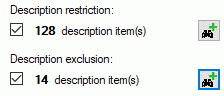
The resulting numbers of restricted and excluded descriptions will be
displayed in the controls. You may check the selected items by
double-clicking the numbers (see images below).
Subsections of Descriptions
Maintenance Clean Descriptions
Maintenance - Clean descriptive data
Descriptive data, which can be summary or sampling data, are stored in
the database in several tables, that reference the corresponding
descriptor rsp. categorical state and hold some additional data.
Depending on the descriptor type - categorical, quantitative, text or
sequence - different tables are used to represent the descriptive data.
Although Diversity Descriptions does not allow to change the type of a
descriptor if descriptive data are present, in some cases it cannot be
assured that such an action is rejected. The resulting data are then
meaningless and will not be displayed within Diversity Descriptions. To
find, check and delete such kinds of corrupted descriptive data, select
the Maintain descriptive data tab and choose
the tab Clean descriptive data.
Select the Data type (“Summary data” or “Sampling data”), the
Entity type (i.e. the type of descriptive data in database:
“categorical”, “quantitative”, “text” or “sequence”) and the
Project. Click on Check for invalid data  and all invalid data will be listed (see image below).
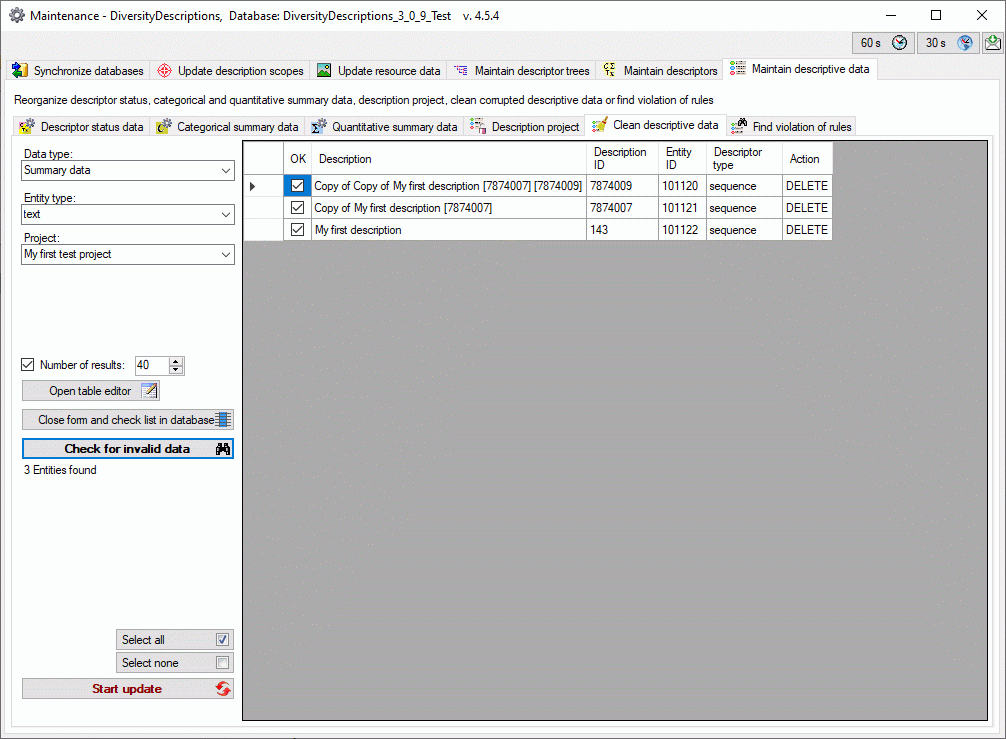
You may select or deselect all entries of the result list for the
database update by clicking the buttons  Select all rsp.
  Select none. To delete
the selected entries from the database click on the
Select none. To delete
the selected entries from the database click on the
 button. Instead of deleting the selecting
entries you may click Close form and check list in database
button. Instead of deleting the selecting
entries you may click Close form and check list in database
 to return to the main program with the
affected descriptions.
to return to the main program with the
affected descriptions.
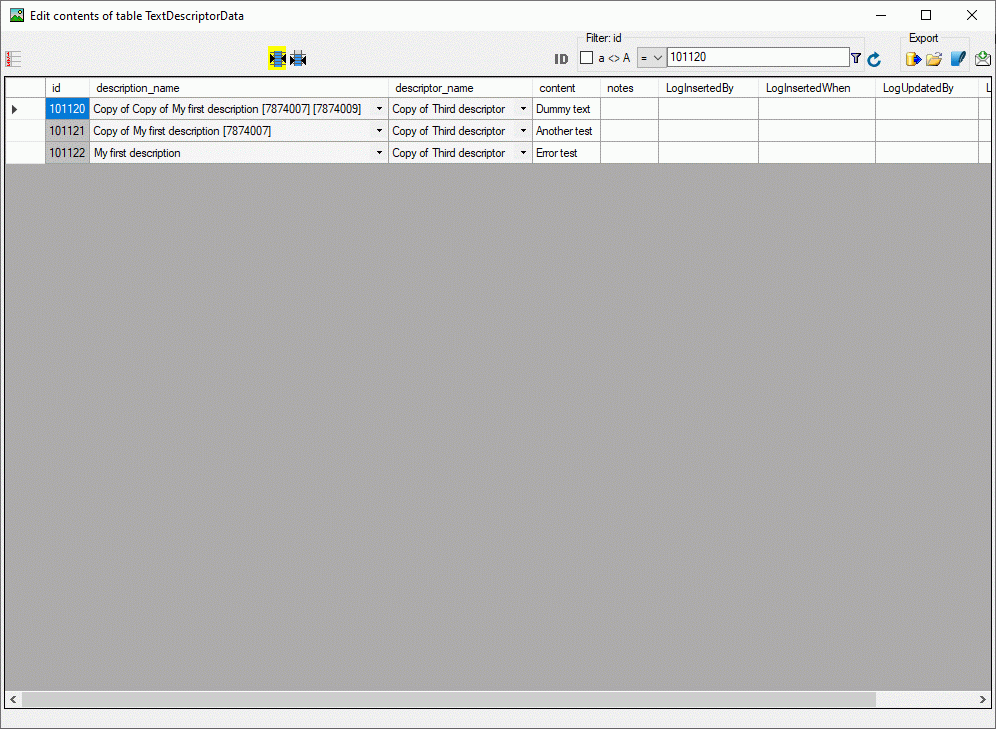
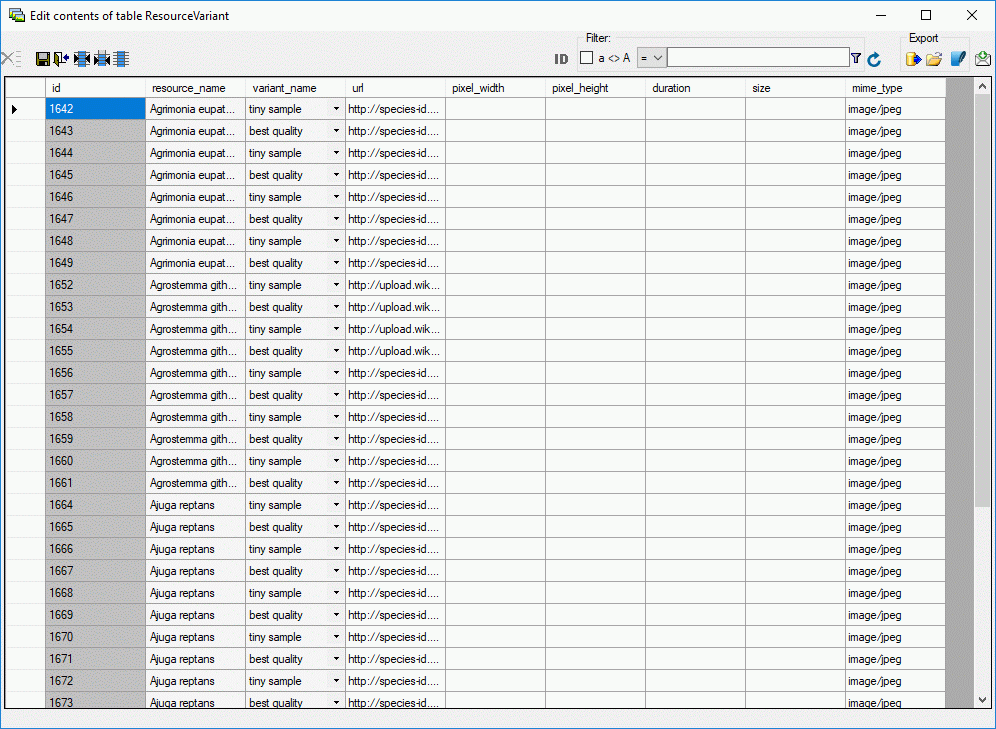
You may open a table editor for the selected entries by clicking the
Open table editor  button (see image
below). Here you may check the corrupted data to decide if further
measures are required.
button (see image
below). Here you may check the corrupted data to decide if further
measures are required.
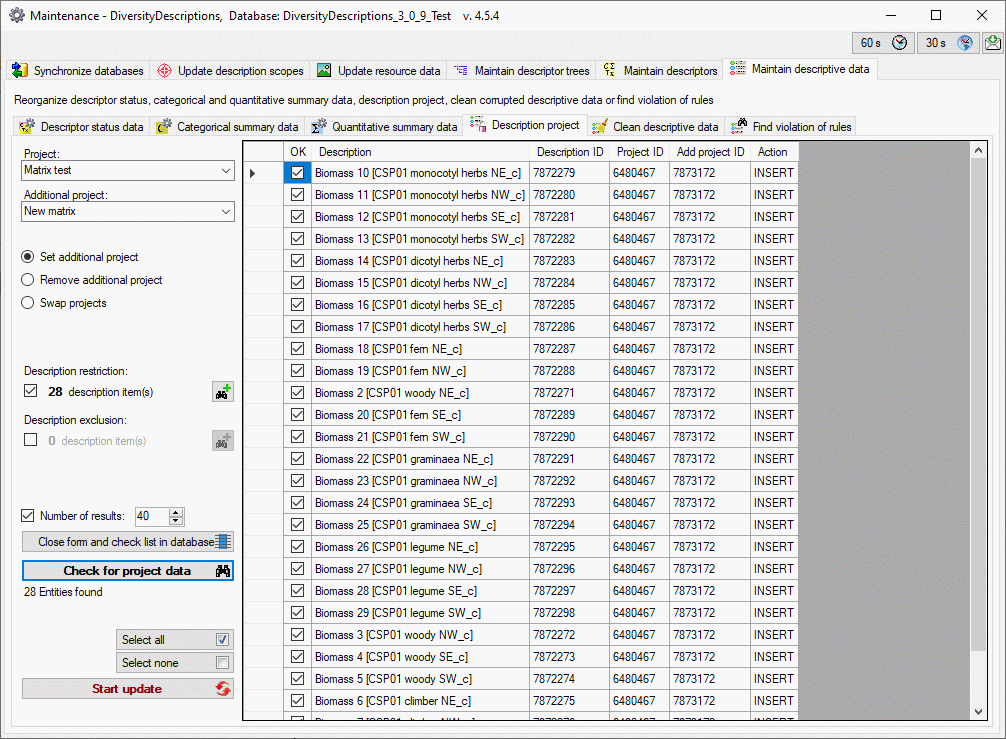
Maintenance Description Projects
Maintenance - Description project
Description items belong to one basic projects, that determines the
terminology. Additionally they may be assigned to additionalprojects to make them accessible within
other contexts. To set or remove additional projects, select the
Maintain descriptive data tab and choose the
tab Description project.
Select the Project, Addtitional project and the requested
operation Set additional project, Remove additional project or
Swap projects to exchange the project and additional project. Click
on Check for project data and the matching
descriptions will be listed (see image below). The Description
restriction and Description exclusion lists may be used for
refinement of the description selection (see Maintain descriptivedata).
You may select or deselect all entries of the result list for the
database update by clicking the buttons
Select all rsp. Select none. To delete
the selected entries from the database click on the
button. Instead of deleting the selecting
entries you may click Close form and check list in database
to return to the main program with the
affected descriptions.
Maintenance Summary Categorical
Maintenance - Categorical summary data
To shift and copy categorical summary data to a different descriptor or
delete values for selected categorical states, select the
Maintain descriptive data tab and choose the
tab Categorical summary data. In this panel
you operate on the categorical summary data of the descriptions. If
you want to shift or copy categorical states between descriptors, please
use Maintenance - Categoricalstates.
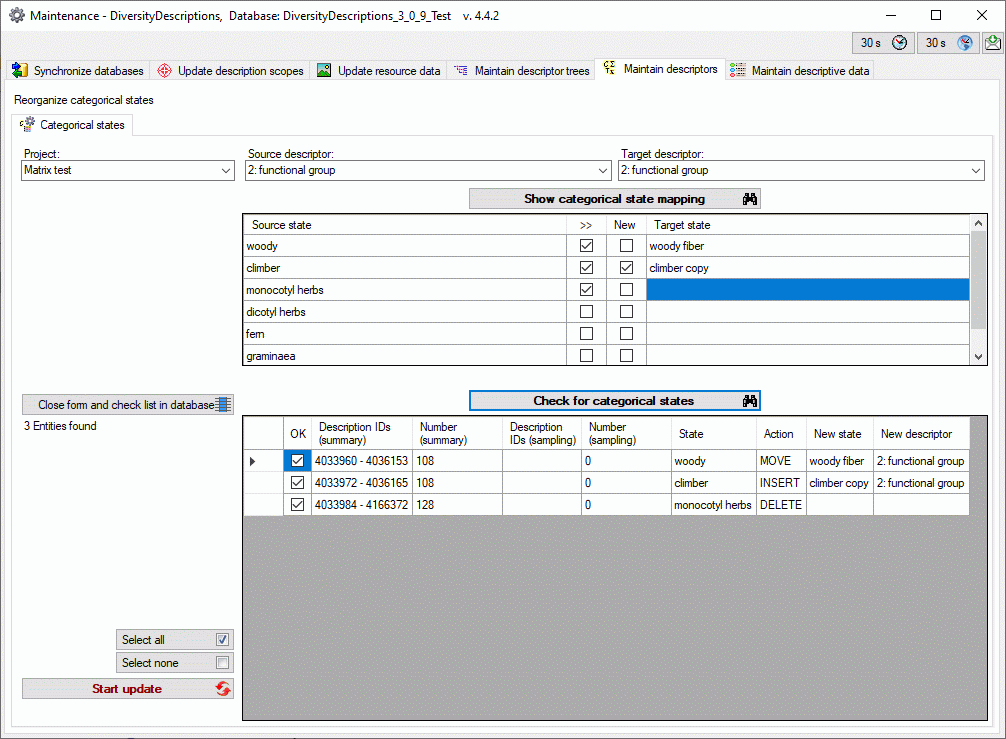
Select the Project and the Source descriptor. If you want to
select a Target descriptor that is different than the Source
descriptor, check the box before the Target descriptor and select
a value. Click on Show categorical state mapping
and all categorical state values of the
selected Source descriptor will be listed in the upper table (see
image below). Select the categorical states for which you want to modify
the summary data in column >>.
The following operations are available:
- Delete the summary data by leaving the Target state empty
- Move the summary data by selecting the Target state
- Copy the summary data by selecting the Target state and
selecting the New column
In case the summary data are moved or copied, all relevant data
including modifier and frequency values and notes will be processed.
After adjusting the required operations for the selected categorical
states click on Check for categorical states
and all affected summary data will be listed in the lower table (see
image above). The Description restriction and Description
exclusion lists may be used for refinement of the description
selection (see Maintain descriptivedata). For each affected
Description and State of the categorical summary data the
Action (DELETE, MOVE or INSERT) and New state are specified. If
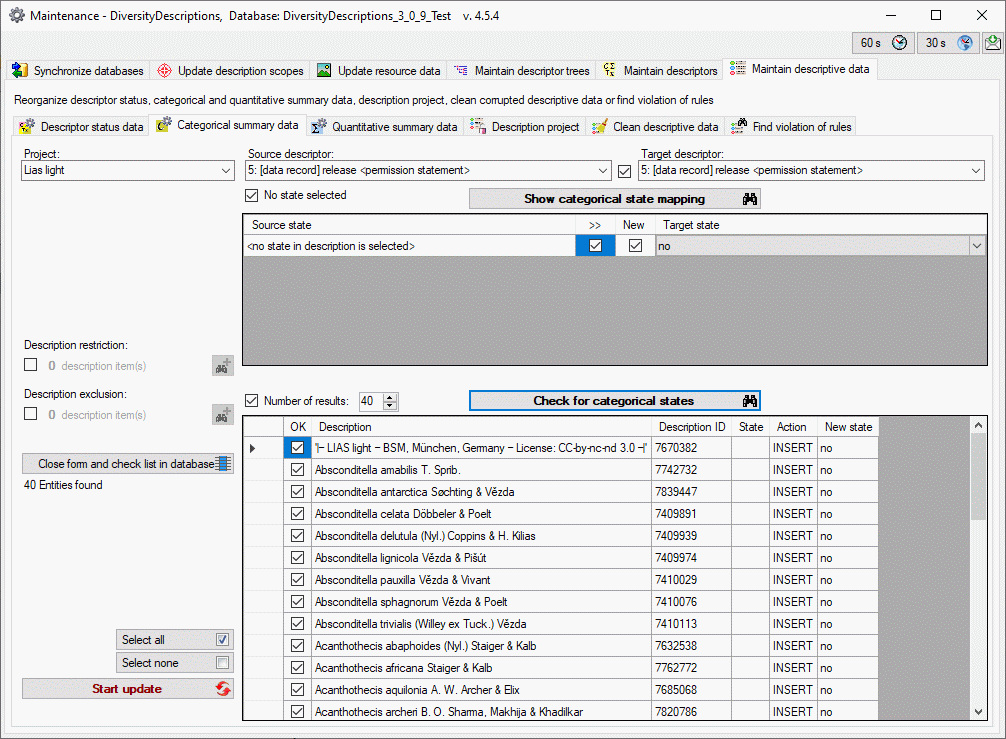
you check the option No state selected, you may search for
descriptions that do not reference any state of the Source
descriptor and set a state of the selected Target descriptor (see
image below).
You may select or deselect all entries of the result list for the
database update by clicking the buttons
Select all rsp. Select none. To
perform the selected operations click on the
button. Instead of updating the database you may click Close form and
check list in database to return to the
main program with the affected descriptions.
Maintenance Summary Quantitative
Maintenance - Quantitative summary data
To shift and copy quantitative summary data to a different descriptor or
delete values for selected statistical measures, select the
Maintain descriptive data tab and choose the
tab Quantitative summary data.
Select the Project and the Source descriptor. If you want to
select a Target descriptor that is different than the Source
descriptor, check the box before the Target descriptor and select
a value. Click on Show statistical measure mapping
and the assigned statistical measures of the
selected Source descriptor will be listed in the upper table (see
image below). If you want so process all available statistical measures,
not only that ones assigned to the descriptors in the descriptor tree,
check Show all source measures rsp. Show all target measures.
Select the statistical measures for which you want to modify the summary
data in column >>.
The following operations are available:
- Delete the summary data by leaving the Target statistical
measure empty
- Move the summary data by selecting the Target statistical
measure
- Copy the summary data by selecting the Target statistical
measure and selecting the New column
In case the summary data are moved or copied, all relevant data
including modifier values and notes will be processed.

After adjusting the required operations for the selected categorical
states click on Check for statistical measures
and all affected summary data will be listed in
the lower table (see image above). The Description restriction and
Description exclusion lists may be used for refinement of the
description selection (see Maintain descriptivedata). For each affected
Description and Measure of the quantitative summary data the
Action (DELETE, MOVE or INSERT) an New measure are specified.
You may select or deselect all entries of the result list for the
database update by clicking the buttons
Select all rsp. Select none. To
perform the selected operations click on the
button. Instead of updating the database you may click Close form and
check list in database to return to the
main program with the affected descriptions.
Maintenance Summary Status
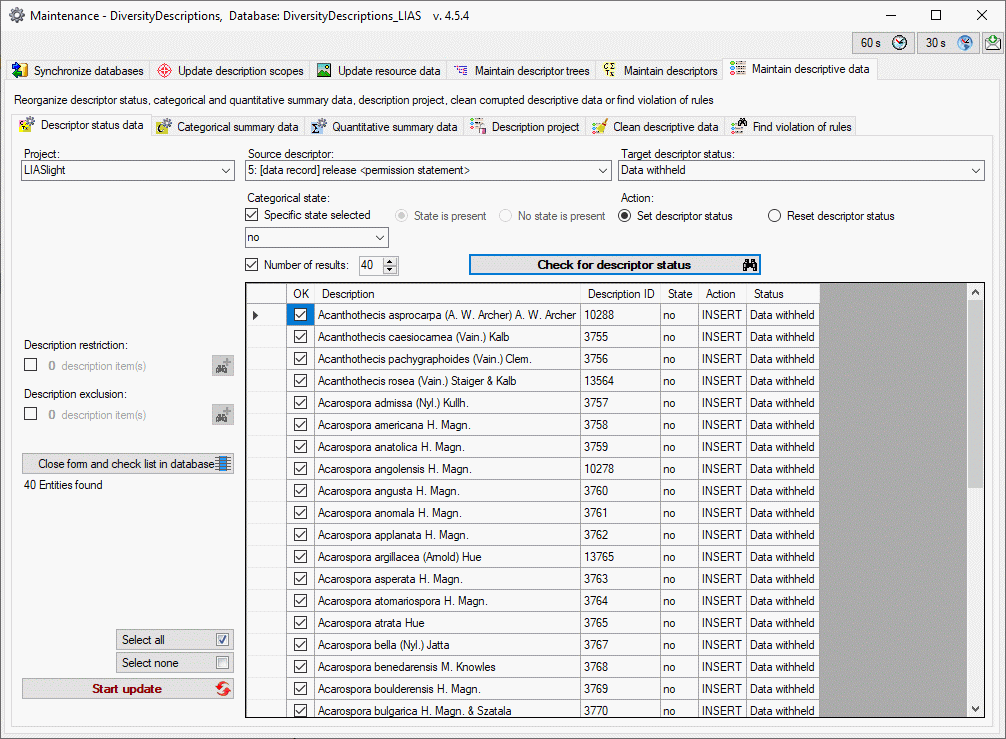
Maintenance - Descriptor status data
To set or reset a certain descriptor status for dedicated categorical
summary data, select the Maintain descriptive
data tab and choose the tab Descriptor
status data.
Select the Project, the Source descriptor and the Target
descriptor status. Depending on the Source descriptor type you
have different basic options to select the descriptions for which the
descriptor data status shall be modified. For quantitative, text and
molecular sequence descriptors, you may decide if the selected
Descriptor value shall be present (option Value is present) or
absent (option No value is present, see image below). This basic
restriction may further be refined by selecting Description
restriction and Description exclusion lists (see Maintaindescriptive data). Further
select the data status and if it shall be set or reset using Action
options.
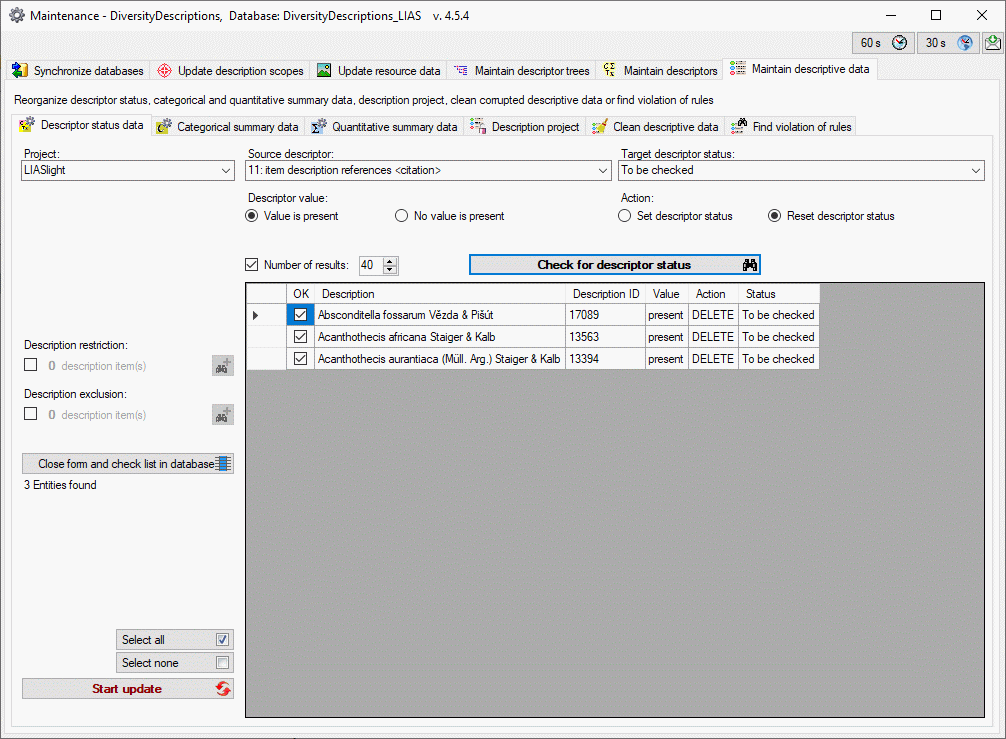
After adjusting the required operations click on Check for descriptor
status and all affected summary data will be
listed in the lower table (see image above). For each affected
Description the Action (DELETE or INSERT) and the Status are
specified.
If you select a categorical Source descriptor, you have the basic
selection options to modify the descriptor data status for specific
Categorical state (option Specific state selected, see image
below). In this case use the combobox to adjust the selected state. If
you uncheck Specific state selected, you may search for descriptions
where any State is present or No state is present. In any case
the Description restriction and Description exclusion lists may
again be used for further refinement of the description selection (see
Maintain descriptive data).
You may select or deselect all entries of the result list for the
database update by clicking the buttons
Select all rsp. Select none. To
perform the selected operations click on the
button. Instead of updating the database you may click Close form and
check list in database to return to the
main program with the selected descriptions.
Maintenance
Violations
Maintenance - Find violations of rules
With this form you ma easily search description items, that do not
fulfill certain requirements. With the  Mandatory descriptors tab you may find
descriptions where data for mandatory descriptors are missing. With the
Mandatory descriptors tab you may find
descriptions where data for mandatory descriptors are missing. With the
 Exclusive
descriptors tab you may find descriptions
that contain multiple states for exclusive descriptors. In the
Exclusive
descriptors tab you may find descriptions
that contain multiple states for exclusive descriptors. In the
 Applicability
rules tab you may descriptions that violate
rules administered in the Descriptorapplicability data. In the
Applicability
rules tab you may descriptions that violate
rules administered in the Descriptorapplicability data. In the
 Ambigious
descriptions tab you may search for ambigious
description titles.
Ambigious
descriptions tab you may search for ambigious
description titles.

Subsections of Violations
Maintenance Ambiguous
Maintenance - Ambiguous description titles
In DiversityDescriptions the description titles may be ambiguous, even
within one project. It depends on the informal project strategies if
duplicate description titels shall be accepted, therefore there is no
kind of highlighting. With this form you can easily find all
descriptions with ambigious titles within a project.
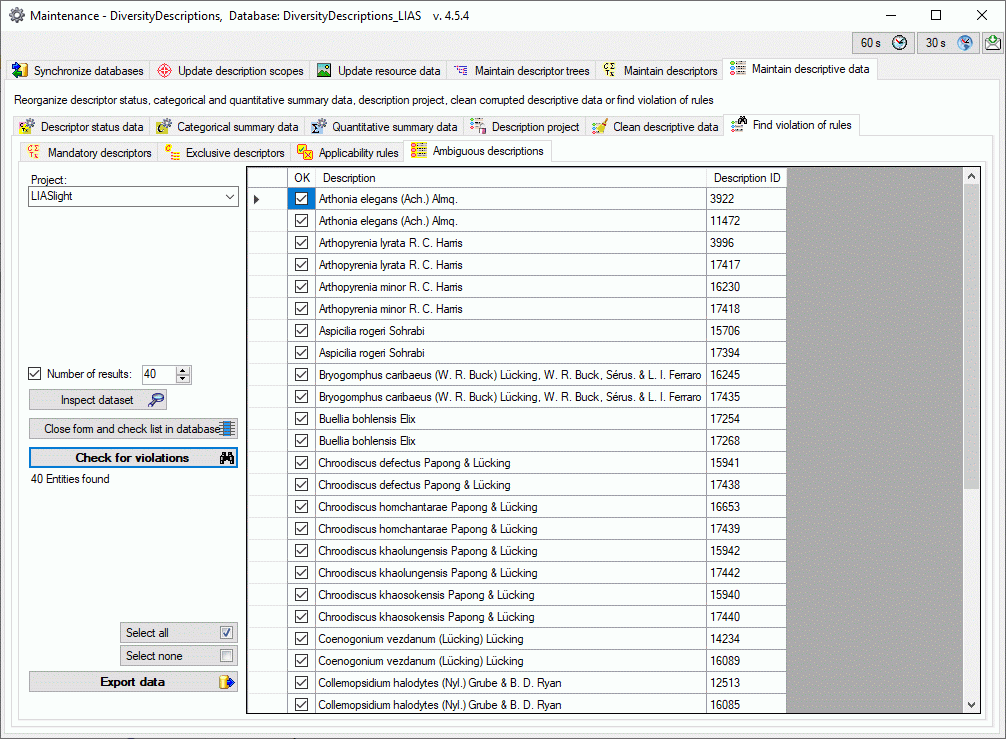
After selecting the Project click on Check for violations
and all found description items are listed in
the table (see image above). If you select the option Ignore same
state, mutiple occurances of the same state, e.g. when modifier of
frequency values have been selected, will be ignored. By selecting an
entry and clicking the button Inspect dataset  you may view that dataset in a separate window.
You may select or deselect all entries of the result list by clicking
the buttons Select all rsp.
Select none. To save the selected table
entries in a tab-separated text file click on the Export data
 button. Click Close form and check list in
database to return to the main program with
the affected descriptions.
button. Click Close form and check list in
database to return to the main program with
the affected descriptions.
Maintenance Exclusive
Maintenance - Exclusive descriptors
If a descriptor is marked as “exclusive”, in each description item only
one categorical state value for this descriptor should be present. When
you are editing a description in the Contiuousview violations of this rule are
usually highlighted by a yellow background
color. With this form you can easily find all descriptions violating the
exclusivity condition.
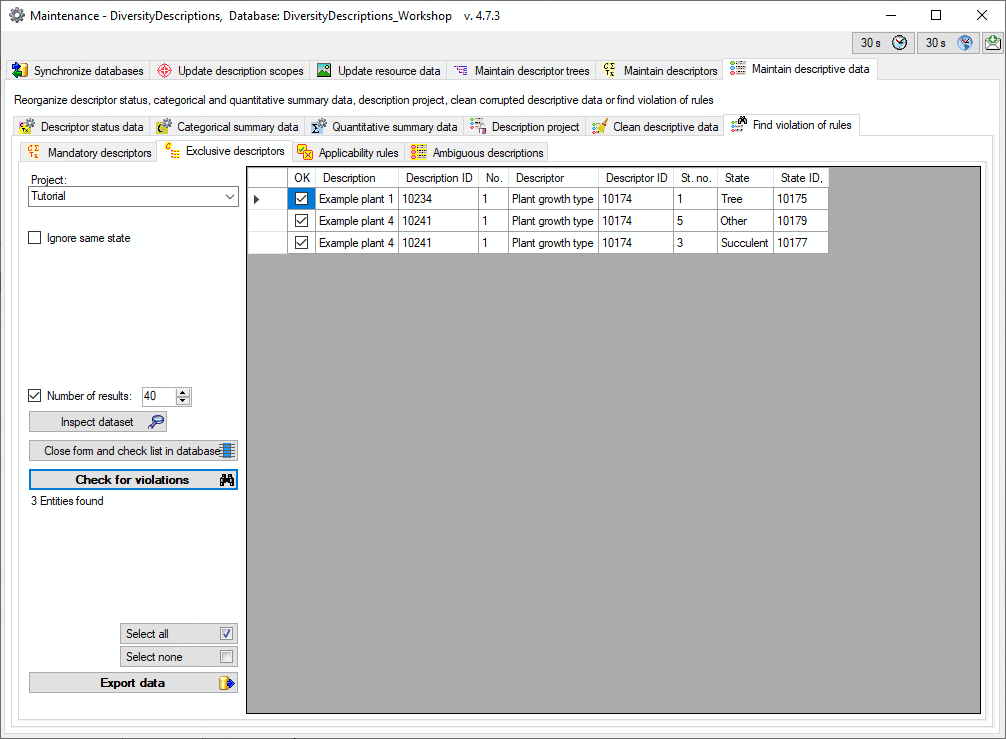
After selecting the Project click on Check for violations
and all found description items are listed in
the table (see image above). If you select the option Ignore same
state, mutiple occurances of the same state, e.g. when modifier of
frequency values have been selected, will be ignored. By selecting an
entry and clicking the button Inspect dataset
you may view that dataset in a separate window.
You may select or deselect all entries of the result list by clicking
the buttons Select all rsp.
Select none. To save the selected table
entries in a tab-separated text file click on the Export data
button. Click Close form and check list in
database to return to the main program with
the affected descriptions.
Maintenance Mandatory
Maintenance - Mandatory descriptors
If a descriptor is marked as “mandatory”, in each description item a
value for this descriptor should be present. When you are editing a
description in the Contiuous view
those missing data as usually highlighted by a yellow background color. With this form you can
easily find all descriptions with missing mandatory descriptor data.
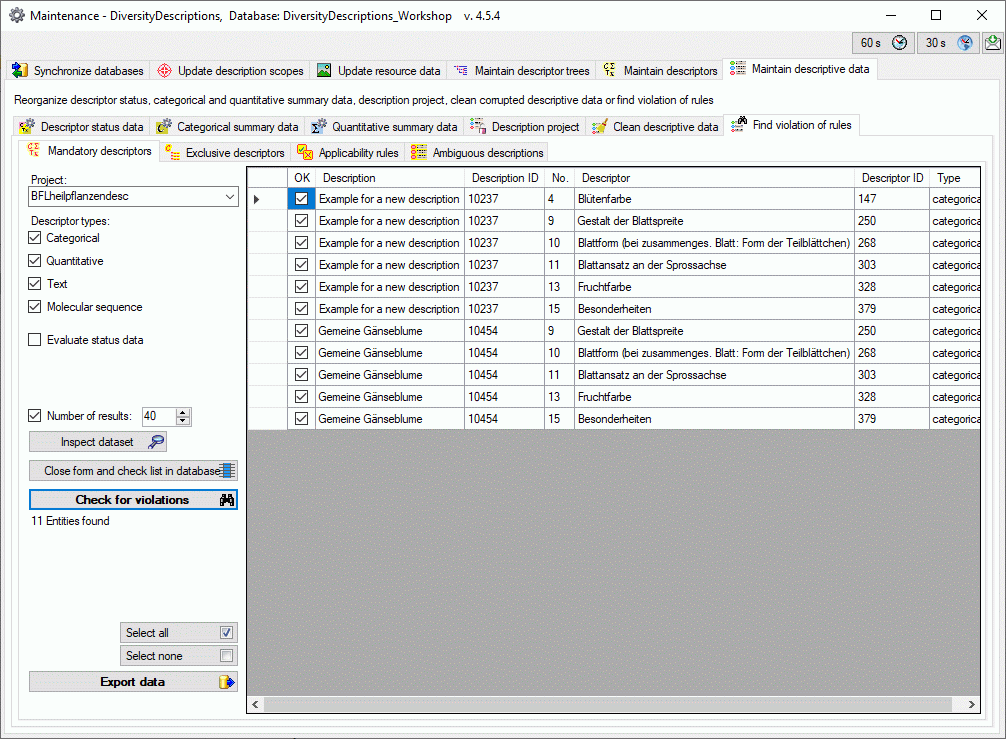
After selecting the Project click on Check for violations
and all found description items are listed in
the table (see image above). You may restrict the query to selected
Descriptor types. If you select the option Evaluate status data,
any present descriptor status, e.g. “To be checked” or “Data missing”,
will be treated as if descriptor data were present. By selecting an
entry and clicking the button Inspect dataset
you may view that dataset in a separate window.
You may select or deselect all entries of the result list by clicking
the buttons Select all rsp.
Select none. To save the selected table
entries in a tab-separated text file click on the Export data
button. Click Close form and check list in
database to return to the main program with
the affected descriptions.
Subsections of Resources
Maintenance Clean Resources
Maintenance - Clean resources
In the database the “Resource” table holds the general resource data,
e.g. copyright information, and links the resource to the target entity.
The “ResourceVariant” table holds the link to the resource and allows to
associate several links with distinguished quality levels to a single
resource. To find resource entries that are not associated with any
resource variant (“empty resources”), select the  Update resource data tab and choose the tab
 Clean empty resources.
Select the Resource target (“Description”, “Descriptor”,
“Categorical state” or “Descriptor tree node”) and the Project.
Click on Check for empty resources and all
resource links of the specified type will be listed where no resource
variants are present in the database (see image below).
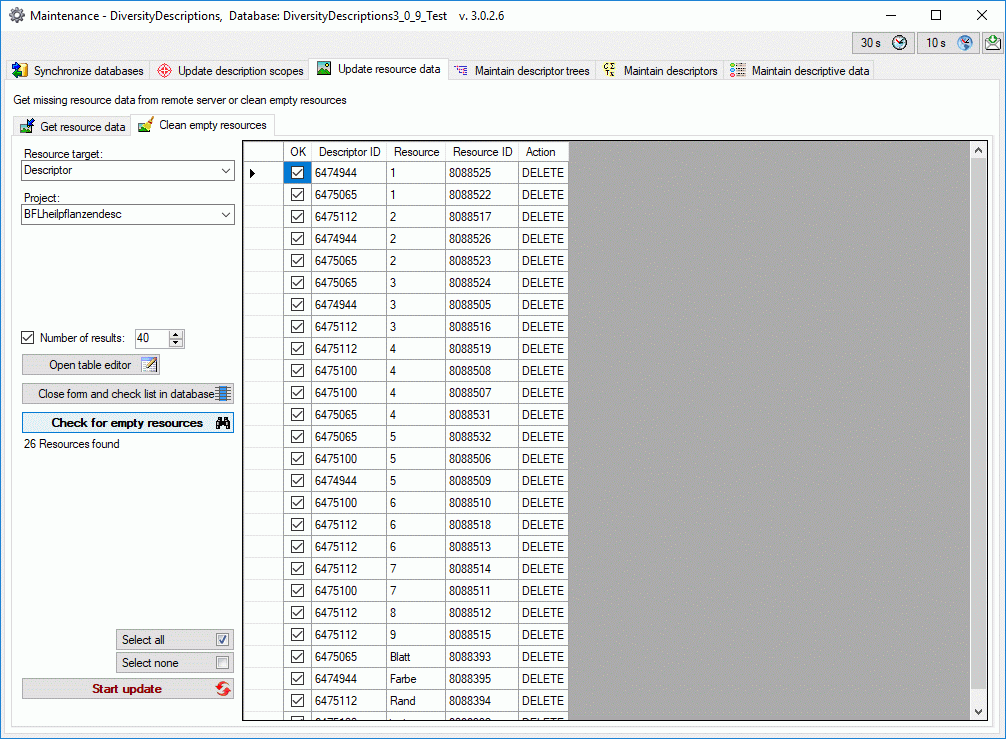
You may select or deselect all entries of the result list for the
database update by clicking the buttons
Select all rsp. Select none. To delete
the selected resource entries from the database click on the
button. Instead of updating the selecting
entries you may click Close form and check list in database
to return to the main program with the
corresponding data sets.
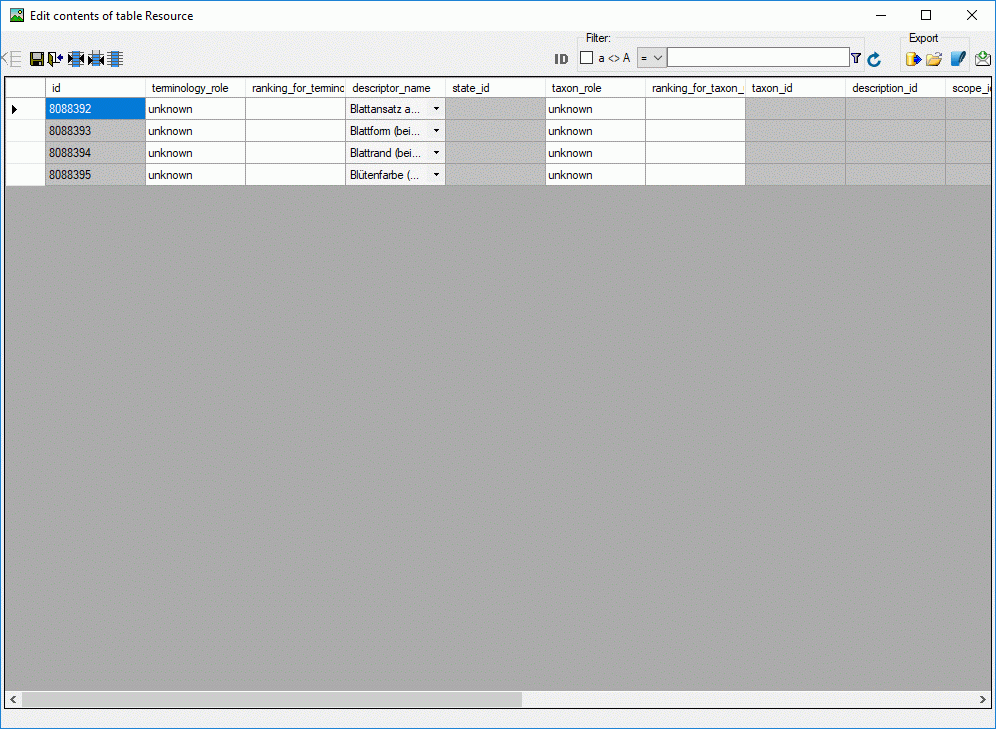
You may open a table editor for the selected resources by clicking the
Open table editor button (see image
below).
Maintenance Get Resources
Maintenance - Get resource data
In the resource edit forms the resource data, e.g. the file size, of a
single resource can be obtained from the remote server addressed by the
resource link. If for a large number of resouces the data shall be
updated it is much easier to select the Update
resource data tab and choose the tab  Get resource data.
Select the Resource target, (“Description”, “Descriptor”,
“Categorical state” or “Descriptor tree node”), the Resource type
(“image”, “audio”, “video”, “text”, “application” or “other”) and the
Project. Click on Check resource data and
all resource links of the specified type will be listed where the remote
data of (“Mime type”, “File size”, “Width”, “Height” or “Duration”)
differ from the database values (see image below). If the acces to a URL
was not successfull, this is indicated by a red
background color. To see the failure reason, move the mouse
cursor over the entry.
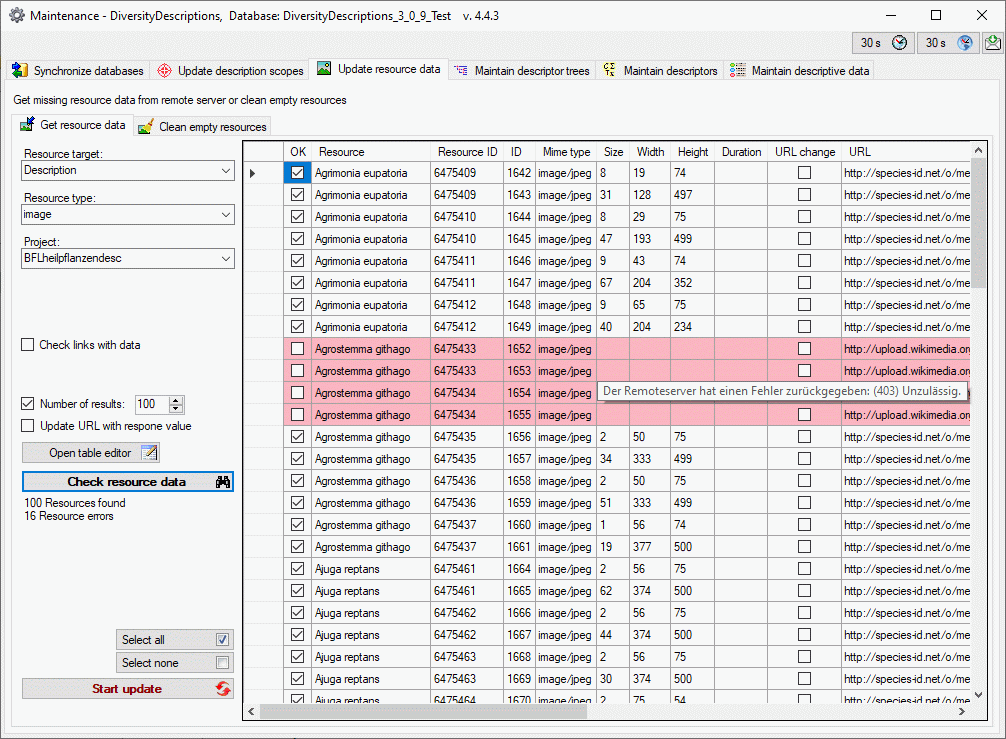
The size of the query result list may be adapted by changing the value
Number of results or unchecking this option to get the complete
list. Usually only database links are checked that do not have any entry
for “File size”, “Width”, “Height” and “Duration”. Select Check links
with data to check entries with data, e.g. to update manually entered
values. Since with this option allways all resources will be processed,
the numeric control Skip first rows is available (see image below).
So you may adjust Number of results to 200 and Skip first rows
to 100 to check only the resource entries 101 to 200.
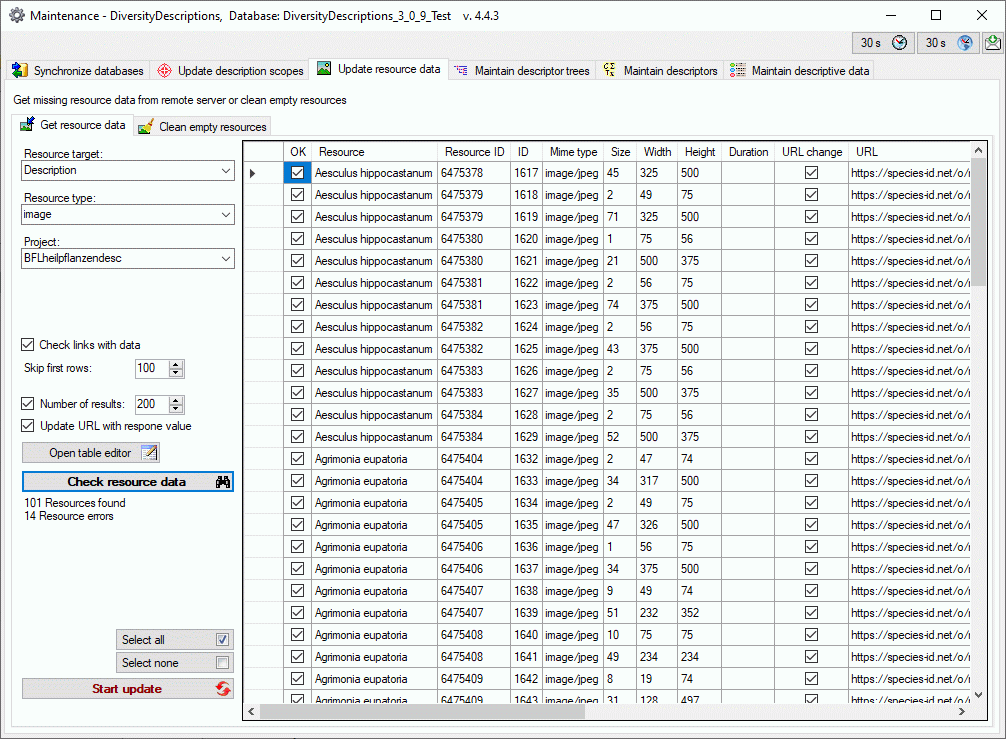
When you select the option Update URL with response value, the URL
returned by the web server will be compared with the requested URL. If
there is a difference, re returned URL will be entered in the table and
marked in column URL change (see image above). This option might be
useful, if you have resource links stored with protocol type “http://”
and the web server was updated to use encryption. In this case the URL
changes to “htttps://”.
You may select or deselect all entries of the result list for the
database update by clicking the buttons
Select all rsp. Select none. To update
the database click on the button.
You may open a table editor for the selected resource variants by
clicking the Open table editor button (see
image below).
Some resources, especially for resource types like “text” or
“application”, do not even provide a file size. Therefore you might not
get any new matches for subsequent check and update sequences if the
number of results is limited. In those cases you should try to increase
the number of results or deactivate the Number of results option.
Subsections of Scopes
Maintenance
Clean Scopes
Maintenance - Clean empty scopes
If you want to find and delete scope entries that do not contain any
data, select the  Update description scopes tab
and choose the tab
Update description scopes tab
and choose the tab  Clean empty scopes.
Select the Scope type, e.g. “Taxon name” and the Project. Click
on Check for empty scopes and all
descriptions will be listed where no scope of the specified type is
present and source data are available (see image below).
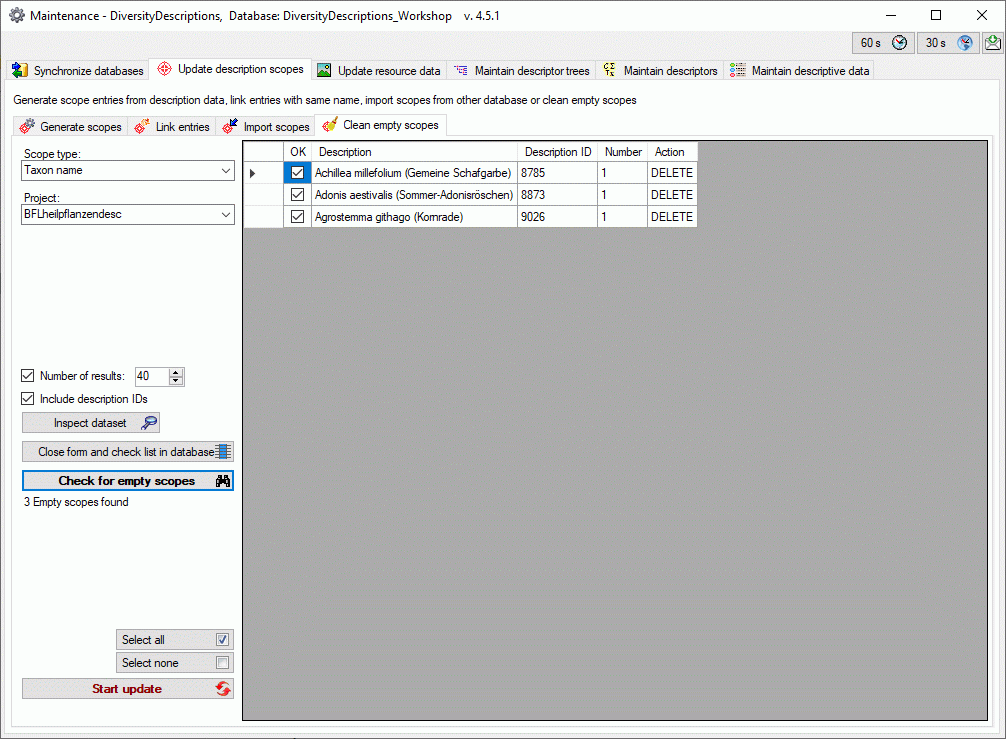
The size of the query result list may be adapted by changing the value
Number of results or unchecking this option to get the complete
list. You may select or deselect all entries of the result list for the
database update by clicking the buttons
Select all rsp. Select none.
If you select the option Include description IDs and start a new
query (button Check for empty scopes) the
result list will include the column DescriptionID. By selecting an
entry and clicking the button Inspect dataset
you may directly navigate to that dataset. If you click on button
Close form and check list in database ,
you will return to the main form and find the selected entries in the
description result list.
To update the database click on the button.
Maintenance
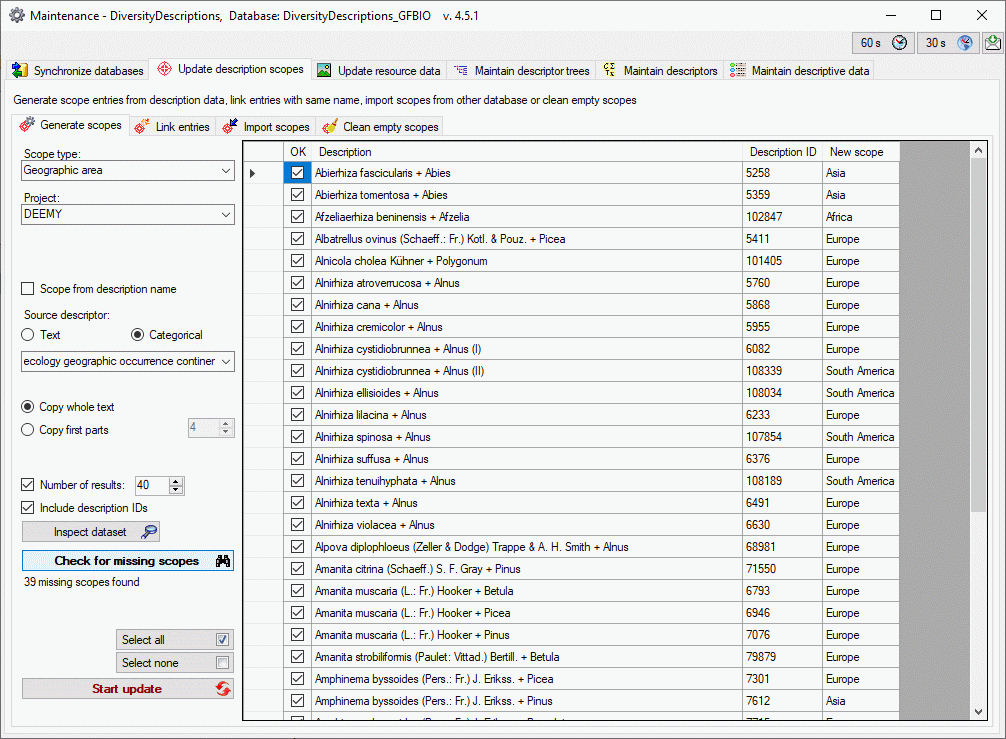
Generate Scopes
Especially if data are imported, e.g. from a DELTA file, data that can
be stored as scope of a description are often contained in dedicated
text or categorical descriptor data. For taxonomic descriptions often
the item/description names reflect the taxonomic names. To generate
formal scopes from such “embedded” data select the
Update description scopes tab and choose the
tab  Generate scopes.
Select the Scope type, e.g. “Taxon name” and the Project. You
may generate the Scope from description name or select a Source
descriptor and the type Text or Categorical. Furthermore the
whole source text (description name or text descriptor data) may be
selected (option Copy whole text) or only the first parts (option
Copy first parts). Click on Check for missing scopes
and all descriptions will be listed where no
scope of the specified type is present and source data are available
(see image below).
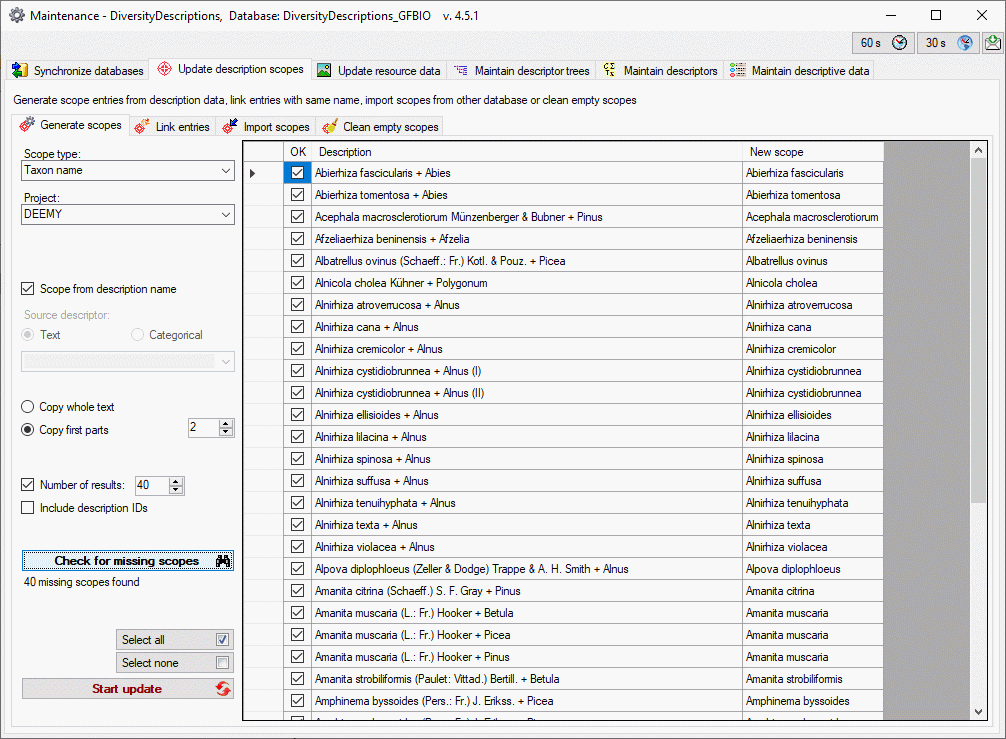
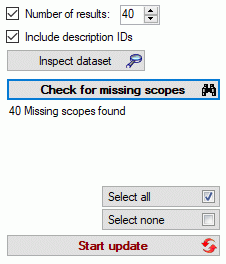
The size of the query result list may be adapted by changing the value
Number of results or unchecking this option to get the complete list
(see image below). You may select or deselect all entries of the result
list for the database update by clicking the buttons
Select all rsp.
Select none.
If you select the option Include description IDs the button
Inspect dataset will be shown (see image
below). By starting a new query (button Check
for missing scopes) the result list will now include the column
DescriptionID. By selecting an entry and clicking the button
Inspect dataset you may directly navigate to
that dataset. To update the database click on the
button.
Maintenance
Import Scopes
Maintenance - Import scopes
If you have linked description items to DiversityCollection, either by
as scope type “Specimen” or “Observation”, you have the option to import
links to other databases e.g. to a taxon entry that is present in
DiversityCollection. Select the Update
description scopes tab and choose the tab  Import scopes.
Select the Scope type that shall be imported, e.g. “Sampling plot”
and the Project. The Link to collection may be “Specimen” or
“Observation”. You have three options to search for descriptions that
are liked to DiversityCollection:
- Insert missing scopes searches any description item that is linked
to DiversityCollection and you may import the specified links as new
scope values.
- Insert if no scope is present searches only description items that
are linked to DiversityCollection and do not yet have an entry of the
selected Scope type.
- Delete not matching scopes offers the option to remove scope
entries from description items of the selected Scope type that are
not present in the references collection entry.
For the latter two options you may decide to Ignore unlinked scopes.
Click on Search for descriptions and all
descriptions will be listed where the selected conditions match (see
image below). You may select or deselect all entries of the description
list for the database query by clicking the buttons Select all
descriptions rsp. Select no description
. If you want to view a single description
item, click on it in the result list and then click button Inspect
dataset .
In a second step you can now check the linked collection entries for
matching links to the selected scope type. The size of the query result
list may be adapted by changing the value Number of results. Click
on button  to open the connections
administration form where you may connect missing
collection databases.
to open the connections
administration form where you may connect missing
collection databases.
Start a query for links in DiversityCollection with button
Check for matching entries. Description
entries with found links are marked with green background, without links with yellow background. If Number of results is
selected, only the specified number of entries in the descriptions list
will be processed. Depending on the selected options the modified
entries will be shown and the “Action” will be “INSERT” or “DELETE” (see
image below). After updatig the database, you may process the next
package in the description list by a further click on
Check for matching entries.
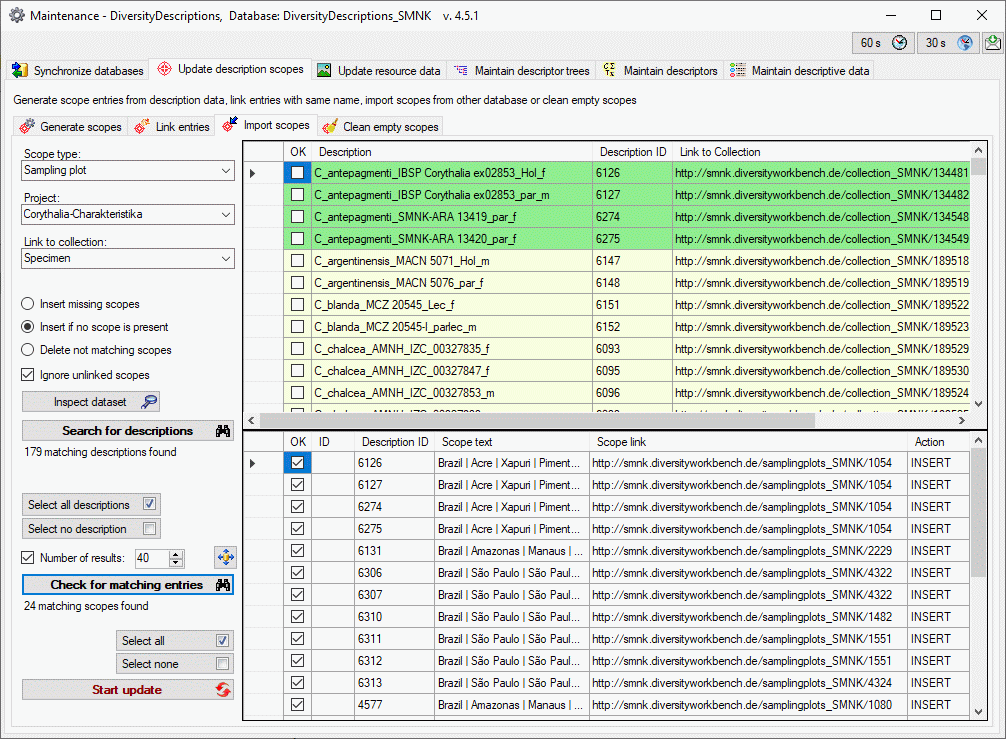
In case of new entries the “Scope text” will be taken over from
DiversityCollection if possible, otherwise it will be set to the
selected scope type. After updating the database, you may
use Synchronize databases to update the
display text in DiversityDescriptions.
You may select or deselect all entries of the result list for the
database update by clicking the buttons
Select all rsp. Select none. To update
the database click on the button.
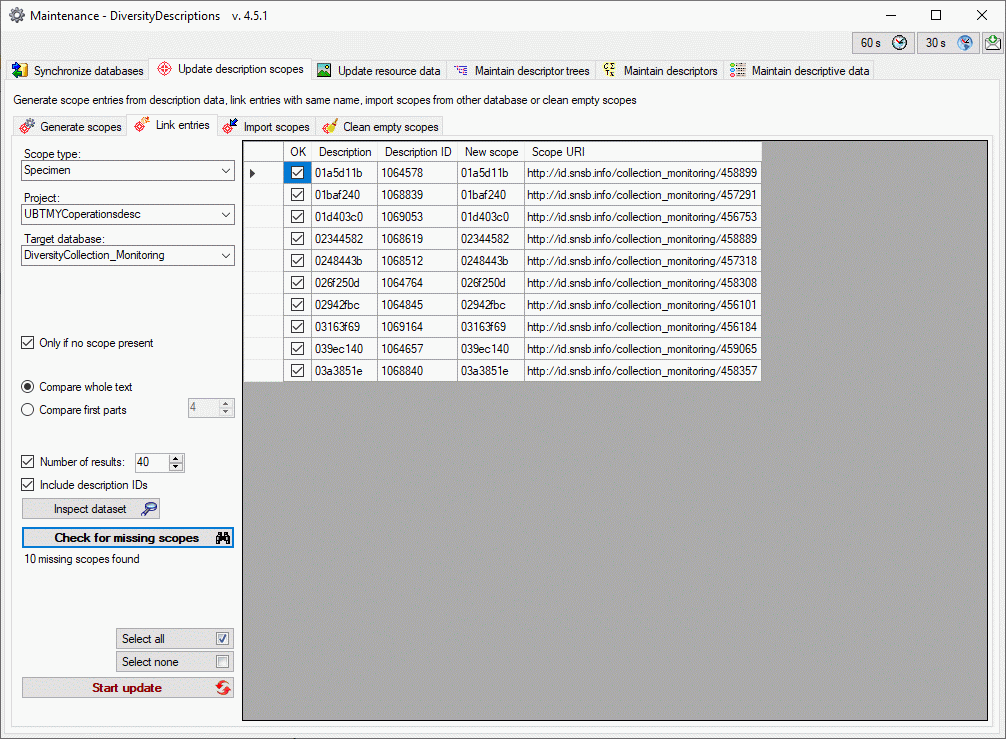
Maintenance
Link Scopes
Maintenance - Link entries
If you have entries in DiversityDescriptions that shall be linked with
data in other DiversityWorkbench databases that have a partly equal
name, this may generally be done with two subsequent maintenance tasks.
An example are taxonomic descriptions in that shall be linked with their
corresponding entries in DiversityTaxonNames. In a first step taxon
scopes must be generates, e.g. from the first two parts of the
description names with Generate scopes.
With a second step the generated scope may be linked to the target
database using Synchroniuze databases. For
descriptions without matching entries in the target database unlinked
scopes will be remaining.
To generate the links with one step and avoid generating unlinked scopes
select the Update description scopes tab and
choose the tab  Link entries. Select the
Scope type, the Project and the Target database. Option
Only if no scope present filters for description items that do not
have a scope entry of the selected scope type. Furthermore the whole
description name may be selected (option Compare whole text) or only
the first parts (option Compare first parts). Click on Check for
missing scopes and all descriptions will be
listed where no scope of the specified type is present and source data
are available (see image below).
Link entries. Select the
Scope type, the Project and the Target database. Option
Only if no scope present filters for description items that do not
have a scope entry of the selected scope type. Furthermore the whole
description name may be selected (option Compare whole text) or only
the first parts (option Compare first parts). Click on Check for
missing scopes and all descriptions will be
listed where no scope of the specified type is present and source data
are available (see image below).
The size of the query result list may be adapted by changing the value
Number of results or unchecking this option to get the complete list
(see image below). You may select or deselect all entries of the result
list for the database update by clicking the buttons
Select all rsp.
Select none.
If you select the option Include description IDs the button
Inspect dataset will be shown (see image
above). By starting a new query (button Check
for missing scopes) the result list will now include the column
DescriptionID. By selecting an entry and clicking the button
Inspect dataset you may directly navigate to
that dataset. To update the database click on the
button.

If more than one matching entry is available in the Target database
the entry is marked with blue background in
the result list (see image above). With button Select value
 you may view the available alternatives and
select the correct entry (see image below).
you may view the available alternatives and
select the correct entry (see image below).

Maintenance
Synchronize
Maintenance - Synchronize databases
To open the maintenance form choose Administration →
Database … →
Maintenance … from the menu and
select the  Synchronize databases tab.
With the maintenance functions you can update values cached from other
modules or external webservices. Entries in Diversity Descriptions can
be linked with several other modules of the Diversity Workbench, e.g. by
the Description scopes. If you link a data source to another module,
the URI of the data set in the other module together with one or several
cached values will be stored in Diversity Descriptions. Due to changes
in the source modules these cached values may differ from the original
values. To get the actual values you can use the synchronize functions
for
Synchronize databases tab.
With the maintenance functions you can update values cached from other
modules or external webservices. Entries in Diversity Descriptions can
be linked with several other modules of the Diversity Workbench, e.g. by
the Description scopes. If you link a data source to another module,
the URI of the data set in the other module together with one or several
cached values will be stored in Diversity Descriptions. Due to changes
in the source modules these cached values may differ from the original
values. To get the actual values you can use the synchronize functions
for  taxonomic names,
 specimen and
observations,
specimen and
observations,  geographical names,
 sampling
plots, and
sampling
plots, and  references. Additionally
 broken links
can be searched an repaired.
broken links
can be searched an repaired.
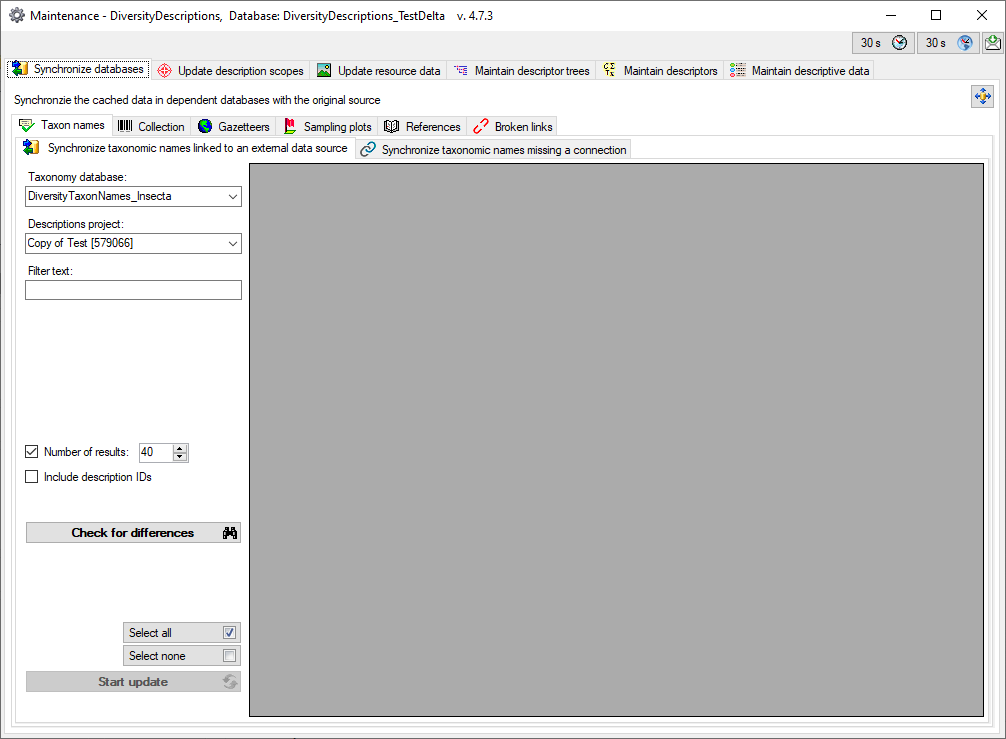
Commonly used database synchronization options
In the sub-panels several commonly used options and controls are
available. First the source database must be selected, where the
referenced data are stored. In the example shown below this is the
Taxonomy database. Click on button to
open the connections administration form where you
may connect missing databases. The second parameter that has to be
specified is the Descriptions project that contains the datasets
which have to be checked or updated. If datasets of Diversity
Descriptions are not yet linked to another module, the project of the
source database may be specified (Taxonomy project in example
below).

By starting a query (button Check for
differences, Check for identical names or Start check) you
will get a result list of database entries that can be updated (see
image below). In this example the first result entry represents two
datasets in Diversity Descriptions (column Number). In column
DescriptionIds the range of the affected database internal IDs is
shown. You may select or deselect single entries of the result list for
the database update in column OK.

The size of the query result list may be adapted by changing the value
Number of results or unchecking this option to get the complete list
(see image below). If datasets of Diversity Descriptions are not yet
linked to another module, the query in Diversity Descriptions may be
restricted by specifying a value in the field Restrict to names
starting with. You may select or deselect all entries of the result
list for the database update by clicking the buttons
Select all rsp.
Select none.
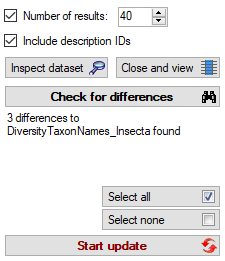
If you select the option Include description IDs the buttons
Inspect dataset and Close and view
will be shown. By starting a new query
(button ) the result list will now include the
columns Description and DescriptionID instead of
DescriptionIds and Number (see image below). Furthermore each
dataset entry will now be shown in an own result line.
 ?class=inlineimg
By selecting an entry in the result table and clicking the button
Inspect dataset you may view the dataset in a
sepate window. With button Close and view
you can close the maintenance form without changing the database and
view or edit all enteries that are checked in column “OK” of the result
table in the main program window.
?class=inlineimg
By selecting an entry in the result table and clicking the button
Inspect dataset you may view the dataset in a
sepate window. With button Close and view
you can close the maintenance form without changing the database and
view or edit all enteries that are checked in column “OK” of the result
table in the main program window.
Subsections of Synchronize
Maintenance
Broken Links
Broken links to other databases occur when the database’s name has been
change or if it was moved to a different server. To find and repair
broken links to the modules of the Diversity Workbench select the
Synchronize databases tab and choose the
tab Broken links. The meaning of some
generally used controls is explained in the introduction page of
database synchronization.
Select the Link type, e.g. “Taxon name” to search broken links to
DiversityTaxonNames and the Descriptions project. Select the
Search for broken links option and start the query with a click on
the Search for broken links button. If the
link type “Geographic area” or “Specimen” has been selected, an
additional selection box for the Descriptions table appears, where
you may select from “Description
scope” or " Sampling
event" rsp. " Sampling
unit". Each link of the
selected type and project will checked if it can be connected to the
referenced database and unsuccessful connection attemts will be listed
in the data grid view (see image below).
Keep in mind that the connection check might be unsuccessful for remote
databases, if the database connection was not set up before!
If you prefer to remove some broken links, you may now select them and
then click button  . If you want to connect the
links to a database, chose the new target in combo box Database and
click the Check matches in database button.
The check is successful, if the new databese contains an entry with the
same ID and display text and the results will be selected and shown with
white background (see image below).
. If you want to connect the
links to a database, chose the new target in combo box Database and
click the Check matches in database button.
The check is successful, if the new databese contains an entry with the
same ID and display text and the results will be selected and shown with
white background (see image below).
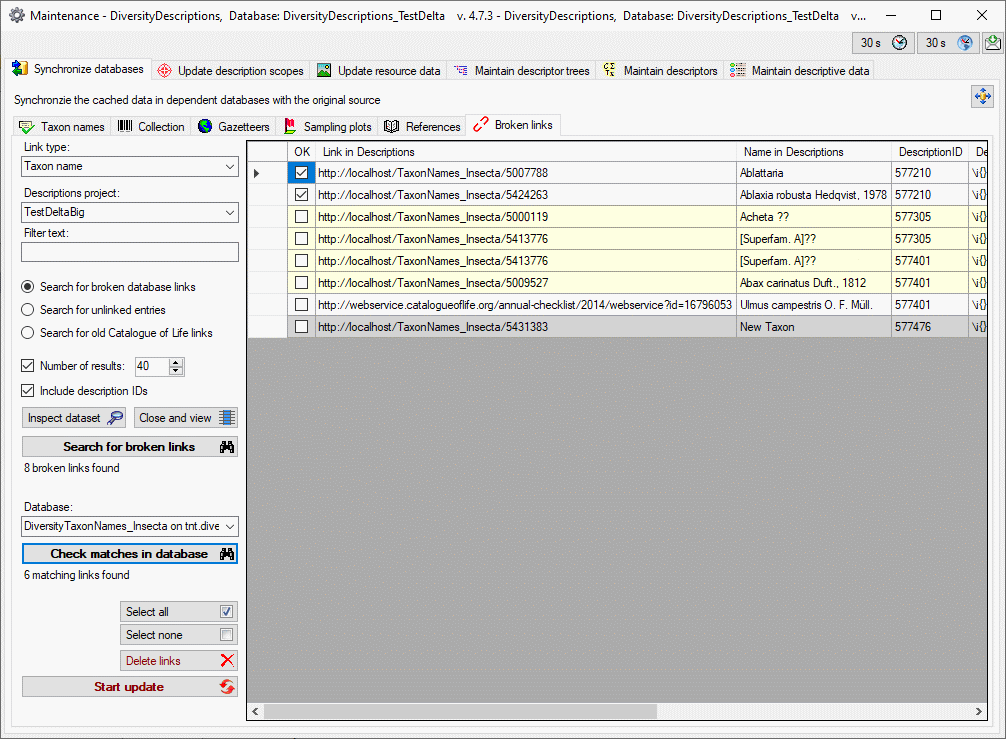
If in the new database a matching link was found but the display text
differs, the entries are marked with yellow
background. For these lines you should check the “New name”
column and if the found entry is applicable you may select the entry for
update. If no matching entry in the database was found, it is marked
with grey background (see image above). To
update the database click on the button.
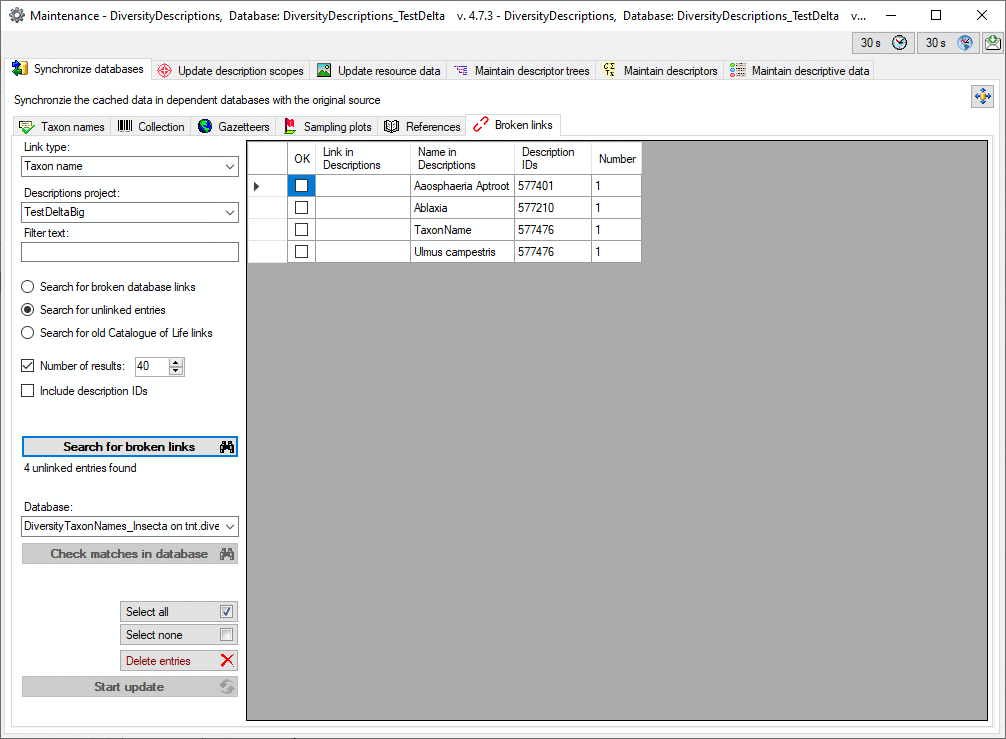
Delete unlinked scope entries
As an additional option you may search for unlinked scope entries and
remove them completely from the database. Select the option Search for
unlinked entries and then click on the Search for broken links
button. Select the entries you want to delete
and click button  (see image below).
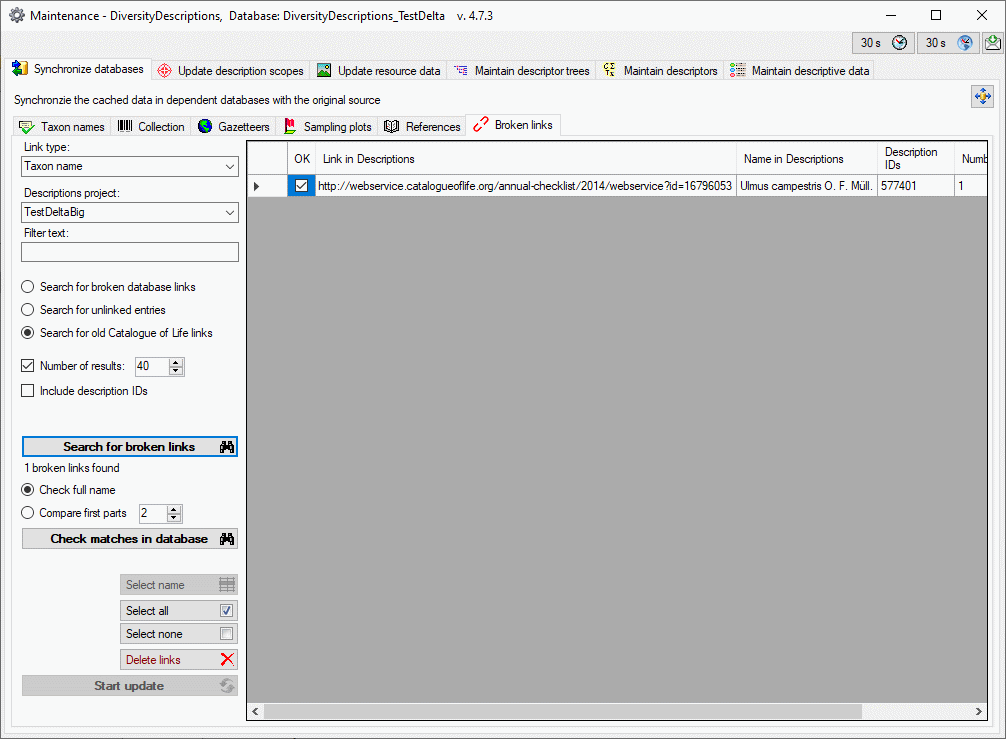
Find and correct links to old “Catalogue of Life” webservices
The webservice “Catalogue of Life” was changed several times. Links to
old versions are not readable anymore, therefore new matching entries
have to be found. Select the option Search for old Catalogue of Life
links and then click on the Search for broken links
button. If you only want to remove the invalid
links and keep the unlinked scope entry, click on button
(see image below).
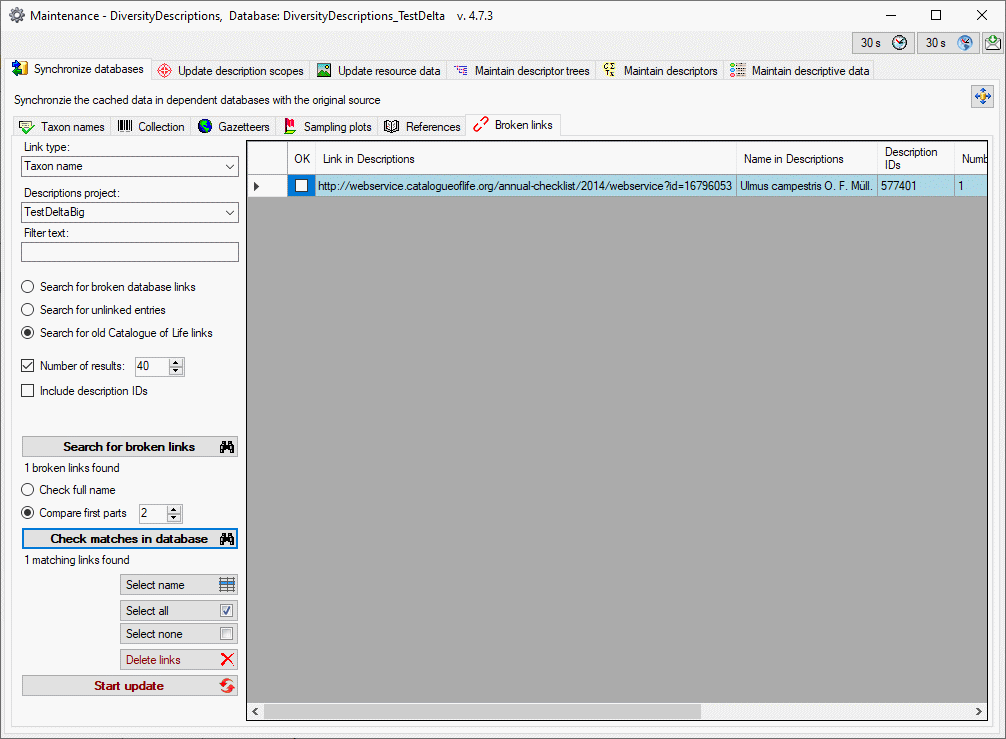
To find matching entries in the current webservice, select a option
Check full name or Compare first parts and click on the Check
matches in the database button. If the name in
your data does not match the name in the webservice perfectly, it will
be marked with a yellow background. If
no name matches exactly and there are several entries, the line is
marked with blue background (see image
below).
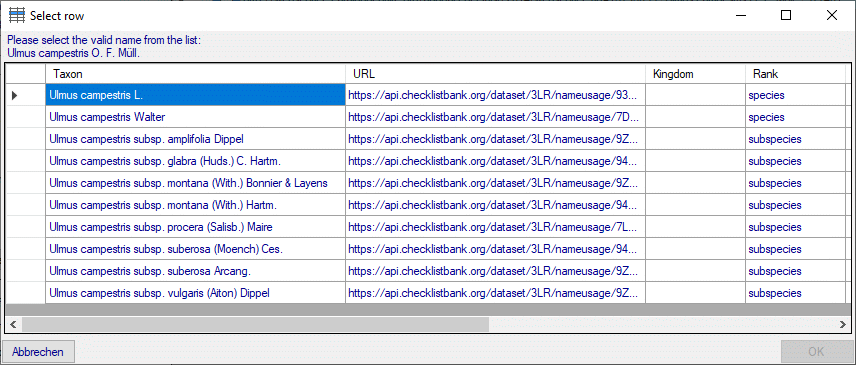
You have the option to select the best match by a click on button
Select name (see image below).
Finally, click on the button to enter the
results in the database.
Maintenance
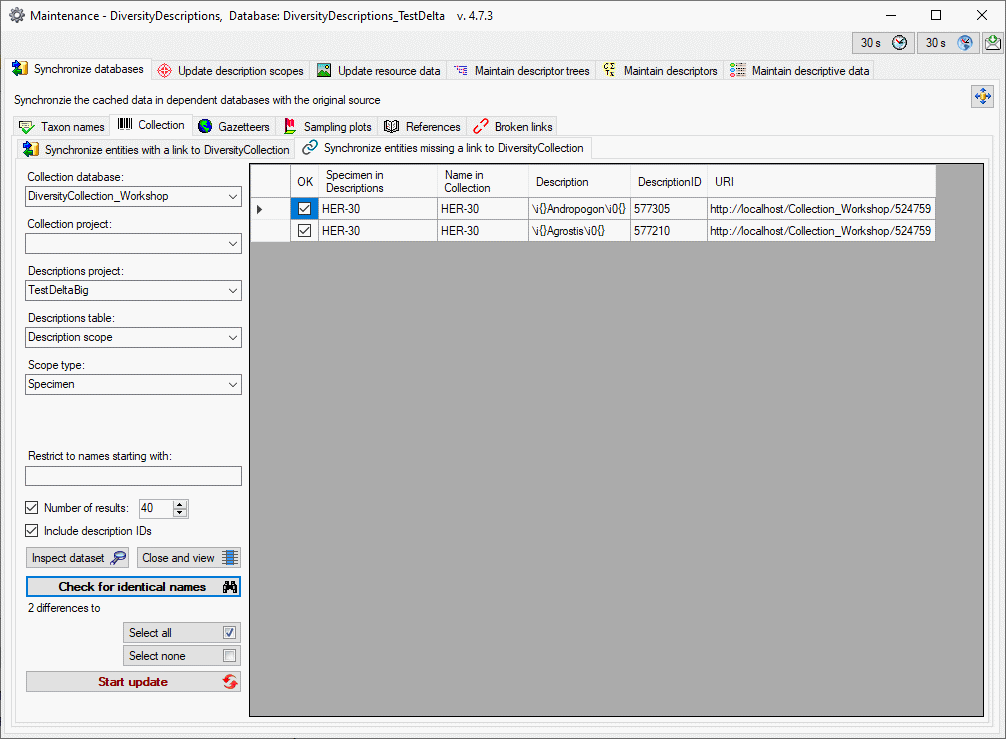
Collection
To synchronize the entries for the specimen or observations derived from
the module DiversityCollection select the
Synchronize databases tab and choose the tab
 Collection.
There are two ways to synchronize specimen and observations. You may
either Synchronize entities with a
link to DiversityCollection for entries where the link to a taxonomic
database is already established or you may
Collection.
There are two ways to synchronize specimen and observations. You may
either Synchronize entities with a
link to DiversityCollection for entries where the link to a taxonomic
database is already established or you may  Synchronize entities missing a link to DiversityCollection where no
link is established and you can query for identical names in one of the
databases. The meaning of some generally used controls is explained in
the introduction page of database
synchronization.
Synchronize entities missing a link to DiversityCollection where no
link is established and you can query for identical names in one of the
databases. The meaning of some generally used controls is explained in
the introduction page of database
synchronization.
Synchronize entities with a link to
DiversityCollection
The specimen and observations are stored as field “label” of table
DescriptionScope, where
the scope type Specimen
or Observation
specified. Alternatively the field collection_specimen of table
SamplingUnit can be updated.
Select a collection database, the descriptions project and the scope
type that shall be synchronized. Start the query with a click on
the  button.

The form will list all differences found. To update the database click
on the button.
Synchronize entities missing a link to
DiversityCollection
Select the collection database, optionally a project within this
database, a project in the descriptions database, the descriptions teble
and the scope type
Specimen or Observation to search for
identical names. Start the query with a click on the
 button. To use these similar names check them
in the OK column.
button. To use these similar names check them
in the OK column.
The form will list all matches found. To insert the links to the
database click on the button.
Maintenance
Gazetteer
To synchronize the entries for the geographic places derived from the
module DiversityGazetteers select the
Synchronize databases tab and choose the tab
Gazetteers. There are two ways to synchronize geographic names. You
may either Synchronize places linked
to DiversityGazetteers for entries where the link to a gazetteers
database is already established or you may
Synchronize places missing a link to DiversityGazetteers where no link
is established and you can query for identical names in one of the
databases. The meaning of some generally used controls is explained in
the introduction page of database
synchronization.
Synchronize places linked to
DiversityGazetteers
The geographic names are stored as field “label” of table Descriptionscope with the scope type
GeographicArea or in
field “geographic_area” of table
SamplingEvent. Select a
gazetteers database, the descriptions project and the descriptions table
that shall be synchronized. Start the query with a click on
the button.
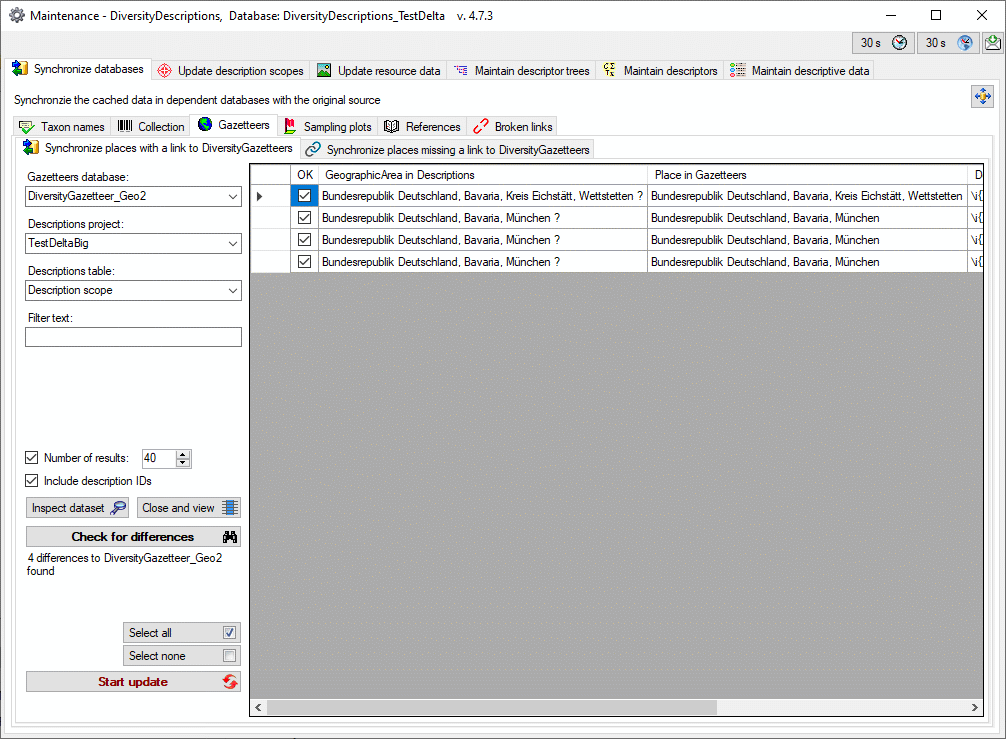
The form will list all differences found. To update the database click
on the button.
Synchronize places missing a link to
DiversityGazetteers
Select the gazetteers database, optionally a project within this
databas, a project in the descriptions database and the descriptions
table to search for identical names. Start the query with a click on the
Start check button. To use these similar
names check them in the OK column.
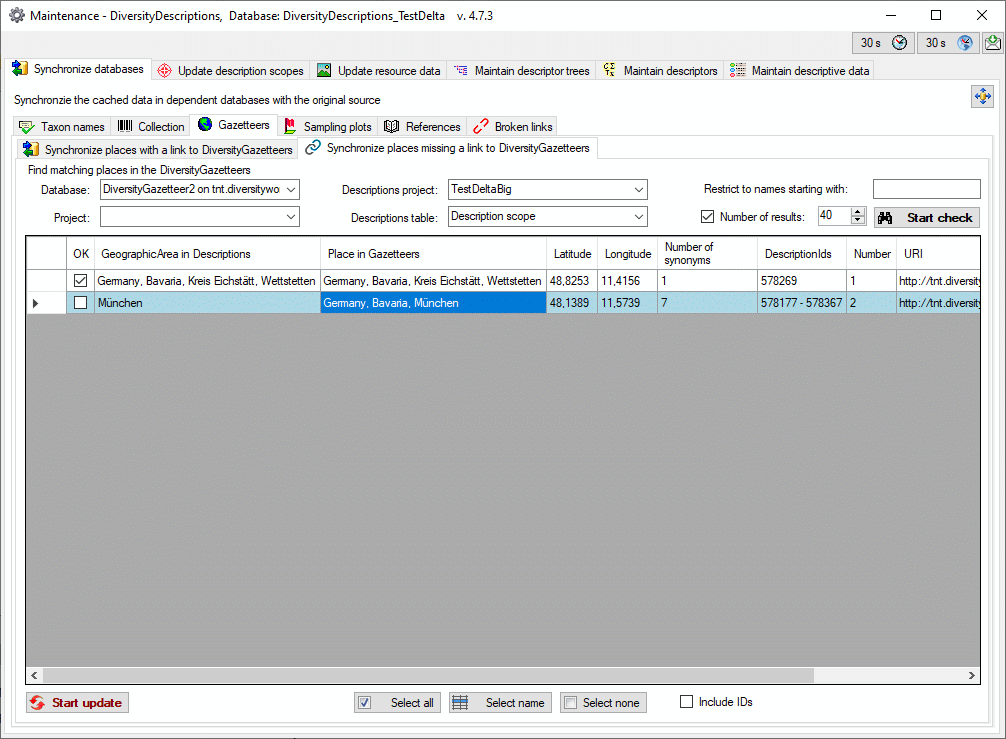
Many places have identical names in different regions. Names where
several results were found are marked in blue. To choose the correct
name among the list of results, click on the
Select name button and select the correct name from the list as
shown below.
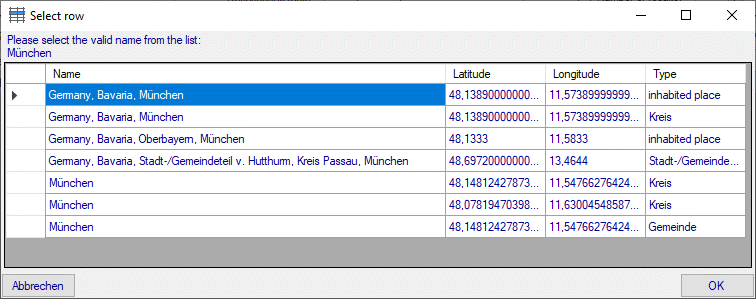
Finally, click on the button to enter the
results in the database.
Maintenance
References
To synchronize the titles of the references which are linked to the
module DiversityReferences select the
Synchronize databases tab and choose the tab
 References. Select the references database
and the project for which the reference titles should be synchronized.
The references are stored as field “label” of table
DescriptionScope, where
the scope type Citation
is specified. The meaning of some generally used controls is explained
in the introduction page of database
synchronization.
References. Select the references database
and the project for which the reference titles should be synchronized.
The references are stored as field “label” of table
DescriptionScope, where
the scope type Citation
is specified. The meaning of some generally used controls is explained
in the introduction page of database
synchronization.
Start the query with a click on the
button.
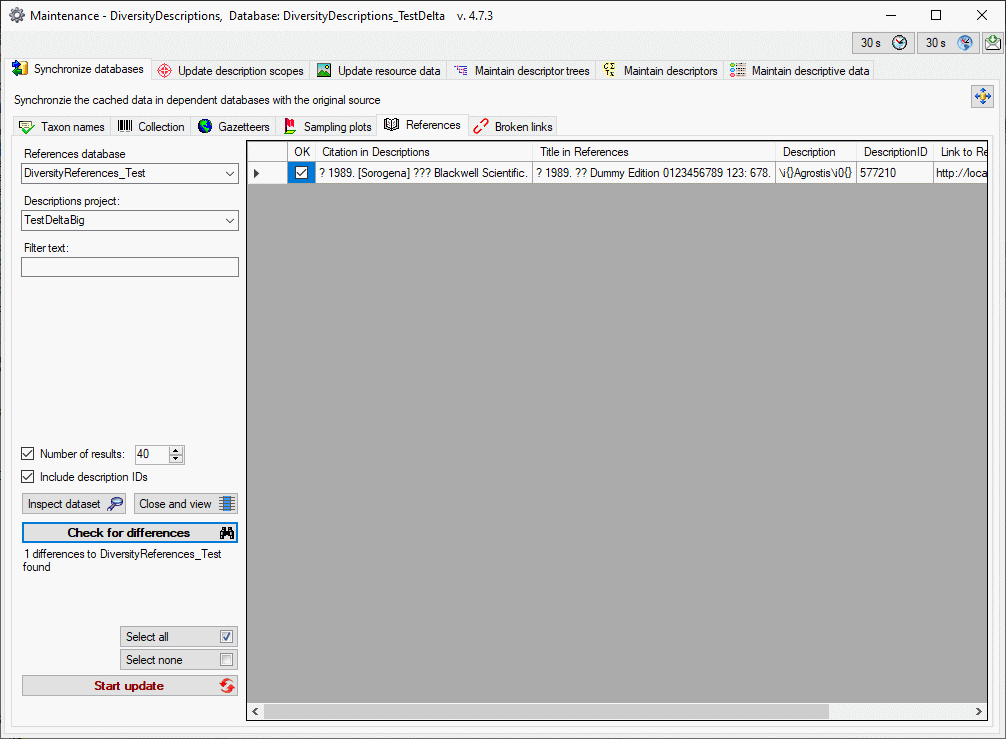
The form will list all differences found. To update the database click
on the button.
Maintenance
Sampling Plots
To synchronize the titles of the references which are linked to the
module DiversityReferences select the
Synchronize databases tab and choose the tab
Sampling plots. Select the references
database and the project for which the reference titles should be
synchronized. The references are stored as field “label” of table
DescriptionScope, where
the scope type Citation
is specified. The meaning of some generally used controls is explained
in the introduction page of database
synchronization.
Start the query with a click on the
button.
The form will list all differences found. To update the database click
on the button.
Maintenance
Taxon Names
To synchronize the entries for the taxonomic names derived from the
module DiversityTaxonNames select the
Synchronize databases tab and choose the tab  Taxon names. There are two ways to synchronize taxonomic names. You
may either Synchronize taxonomic names
linked to an external data source for entries where the link to a
taxonomic database is already established or you may
Synchronize taxonomic names missing a
connection where no link is established and you can query for
identical names in one of the databases. The meaning of some generally
used controls is explained in the introduction page of database
synchronization.
Taxon names. There are two ways to synchronize taxonomic names. You
may either Synchronize taxonomic names
linked to an external data source for entries where the link to a
taxonomic database is already established or you may
Synchronize taxonomic names missing a
connection where no link is established and you can query for
identical names in one of the databases. The meaning of some generally
used controls is explained in the introduction page of database
synchronization.
Synchronize taxonomic names linked to an
external data source
The taxonomic names are stored as field “label” of table
DescriptionScope, where
the scope type TaxonName
is specified. Select a
taxonomy database and the descriptions project that shall be
synchronized. Start the query with a click on
the button.
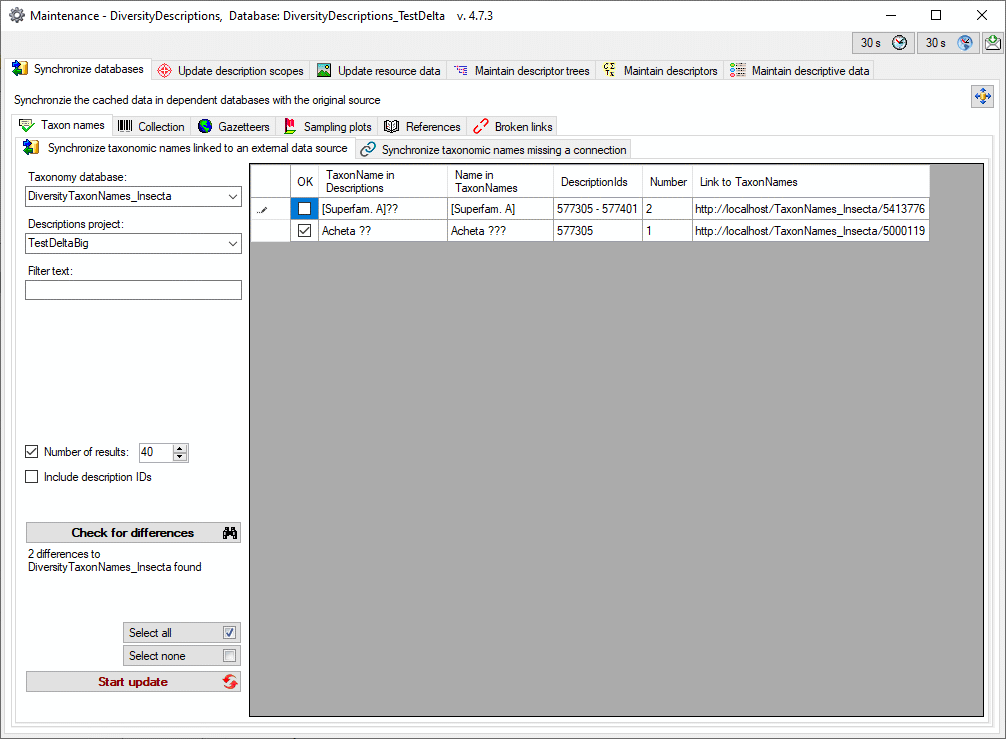
The form will list all differences found. To update the database click
on the button.
Synchronize taxonomic names missing a
connection
Select a taxonomic database, optionally a project within this database
and a project in the descriptions database to search for identical
names. Start the query with a click on the
button. You may either restrict the search to
an exact match (= Compare whole name) or to the first parts of the
name (= Compare first parts) as shown below. If the names do not
match exactly, you may either update the name (= Update similar
name) in the descriptions database or import the name from the
DiversityTaxonNames as a new scope (= Insert as new name - see
options in the window depicted below). In the result list only matching
names will be checked (column OK). The other results will be marked
indicating the difference. Yellow indicates a difference in the authors
while red indicates differences in main parts of the name. To use these
similar names check them in the OK column.
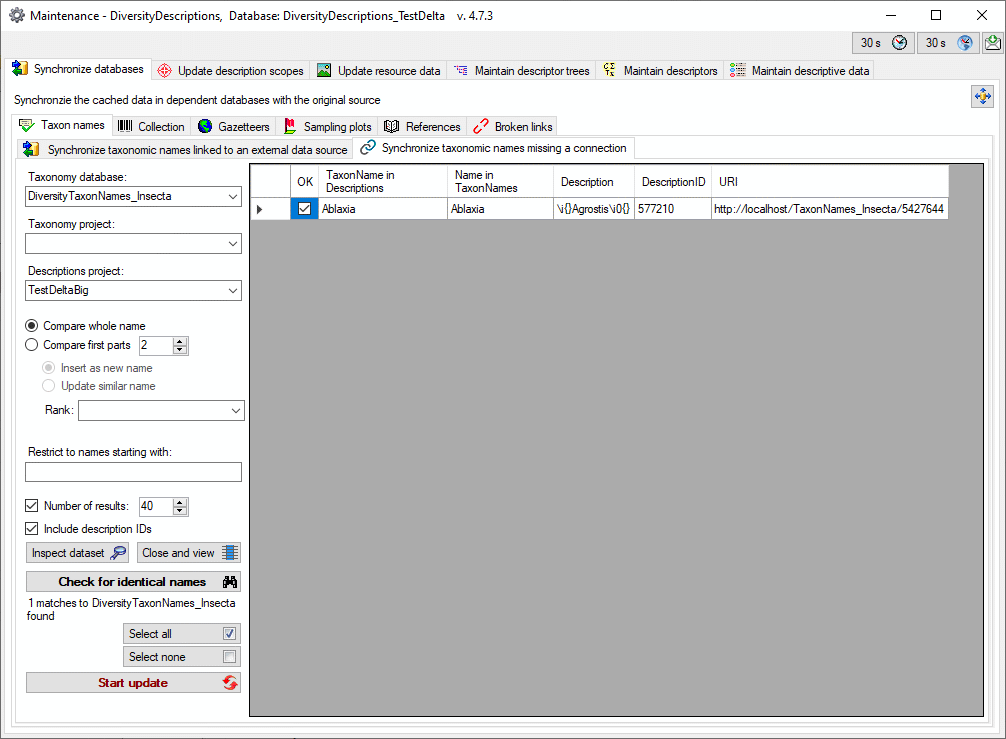
The form will list all matches found. To insert the links to the
database click on the button.
Synchronize taxonomic names missing a connection with a webservice
To synchronize the taxonomic names with a webservice
select it as Taxonomy database. You may either compare the entire
name or the first parts of the name (see image below and description
above). If the name in your data does not match the name in the
webservice perfectly, the name will be marked with a yellow background.
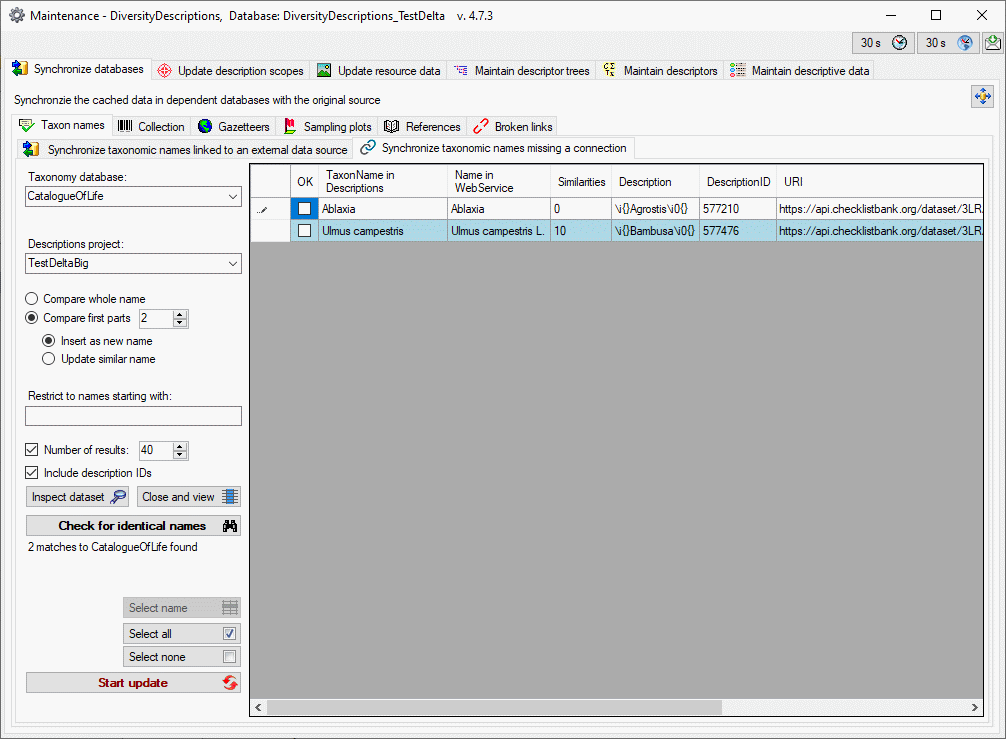
If several similar names were found, these lines will be marked with a
blue background (see image above). To
select one of the similar names click on the Select name
button. A window will open as shown below
listing all similar names found in the webservice. Select one name and
click OK to use it.

Subsections of Trees
Maintenance
Trees
Clean
Maintenance - Clean descriptor trees
To administer the recommended modifier values select the
 Maintain descriptor trees tab and choose
the tab
Maintain descriptor trees tab and choose
the tab  Clean decriptor trees. Select the
Project, the Descriptor tree and the Entity type
(“Statistical measure”, “Modifier” or “Frequency”) that shall be
cleaned. Currently three cleaning options are supported:
Clean decriptor trees. Select the
Project, the Descriptor tree and the Entity type
(“Statistical measure”, “Modifier” or “Frequency”) that shall be
cleaned. Currently three cleaning options are supported:
- Unsuitable recommended values - Clear recommended values the do
not match the descriptor type, e.g. statistical measures for a
categorical descriptor.
- Recommended values for tree nodes - Clear recommended values that
are not directly assigned to a descriptor, but a tree node. You should
only perform this operation if you are sure that the neccessary values
have been directly assigned to the approriate descriptors.
- All values in the descriptor tree - Delete all recommended values.
Only descriptor trees can be selected for this option, that are not
marked as “complete”. You should only perform this operation if you
are sure that the neccessary values have been assigned to a complete
descriptor tree of the project.
To start the search click on the Check for values to clean
button.
To start the update of the selected descriptor tree click on the
button.
Maintenance
Trees
Frequency
Maintenance - Frequency values
To administer the recommended frequency values select the
Maintain descriptor trees tab and choose
the tab  Frequency values. Select the
Project and the Descriptor tree that shall be checked and click
on the Check for frequency values button.
Behind the “Descriptor” column all used frequency values are shown in
the output table. Values that are not assigned for the selected
descriptor tree but anyway available in the project, e.g. due to a
different descriptor tree or inherited by a superior tree node, are
diplayed with blue background (see image
below).
Frequency values. Select the
Project and the Descriptor tree that shall be checked and click
on the Check for frequency values button.
Behind the “Descriptor” column all used frequency values are shown in
the output table. Values that are not assigned for the selected
descriptor tree but anyway available in the project, e.g. due to a
different descriptor tree or inherited by a superior tree node, are
diplayed with blue background (see image
below).
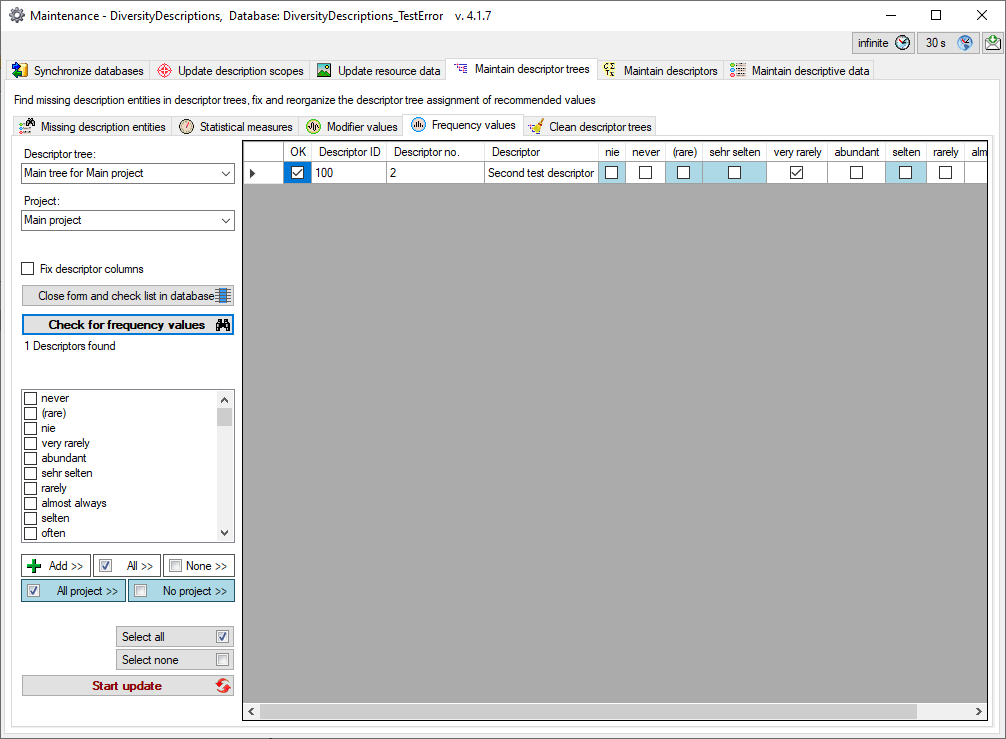
New values may be inserted in the table by selecting them in the check
list on the left and clicking the  Add >>
button. The check list shows the frequency values available in your
database. Additional values can be inserted in the Modifier/Frequency
tabs of Edit descriptor or Edit
project. By clicking the button
All >> rsp.
None >> may check or uncheck all checked values from the list box in
the table. The buttons
Add >>
button. The check list shows the frequency values available in your
database. Additional values can be inserted in the Modifier/Frequency
tabs of Edit descriptor or Edit
project. By clicking the button
All >> rsp.
None >> may check or uncheck all checked values from the list box in
the table. The buttons
 All project >> and
 No project >> check or uncheck the project specific entries
with blue background in the table. If one or
more lines in the output tables are selected (click on the fields before
the “OK” column), the mentioned functions operate only for the selected
lines, otherways for the whole table. With option Fix descriptor
columns you may fix the first data grid columns to scroll horizontally
thru the value list.
No project >> check or uncheck the project specific entries
with blue background in the table. If one or
more lines in the output tables are selected (click on the fields before
the “OK” column), the mentioned functions operate only for the selected
lines, otherways for the whole table. With option Fix descriptor
columns you may fix the first data grid columns to scroll horizontally
thru the value list.
To store the modifications to the selected descriptor tree click on the
button. Instead of updating the selected
entries you may click Close form and check list in database
to return to the main program with the
corresponding data sets.
Maintenance Trees Measure
Maintenance - Statistical measures
To administer the recommended statistical measures select the
Maintain descriptor trees tab and choose
the tab  Statistical measures. Select the
Project and the Descriptor tree that shall be checked and click
on the Check for statistical measures button.
Behind the “Descriptor” column all used statistical measures are shown
in the output table. Descriptors that have not assigned any statistical
measures are marked with yellow background.
Values that are not assigned for the selected descriptor tree but anyway
available in the project, e.g. due to a different descriptor tree or
inherited by a superior tree node, are diplayed with blue background (see image below).
Statistical measures. Select the
Project and the Descriptor tree that shall be checked and click
on the Check for statistical measures button.
Behind the “Descriptor” column all used statistical measures are shown
in the output table. Descriptors that have not assigned any statistical
measures are marked with yellow background.
Values that are not assigned for the selected descriptor tree but anyway
available in the project, e.g. due to a different descriptor tree or
inherited by a superior tree node, are diplayed with blue background (see image below).
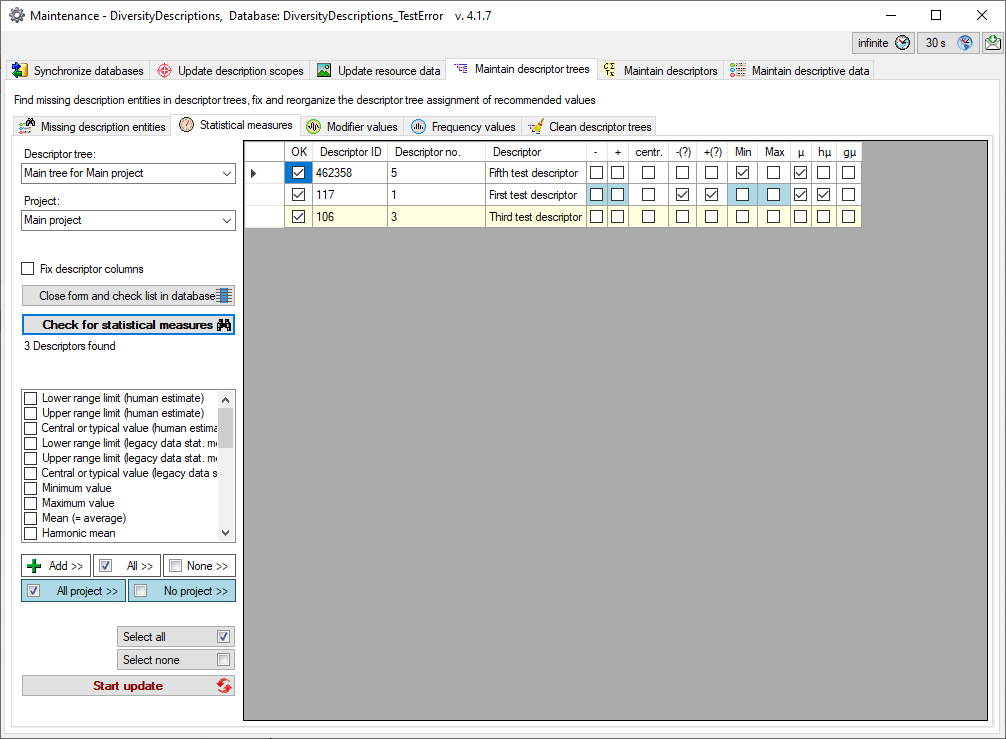
New values may be inserted in the table by selecting them in the check
list on the left and clicking the Add >>
button. By clicking the button All >>
rsp. None >> may check or uncheck all
checked values from the list box in the table. The buttons
All project >> and
>
No project >> check or uncheck the project specific entries
with blue background in the table. If one or
more lines in the output tables are selected (click on the fields before
the “OK” column), the mentioned functions operate only for the selected
lines, otherways for the whole table. With option Fix descriptor
columns you may fix the first data grid columns to scroll horizontally
thru the value list.
To store the modifications to the selected descriptor tree click on the
button. Instead of updating the selected
entries you may click Close form and check list in database
to return to the main program with the
corresponding data sets.
Maintenance Trees Missing
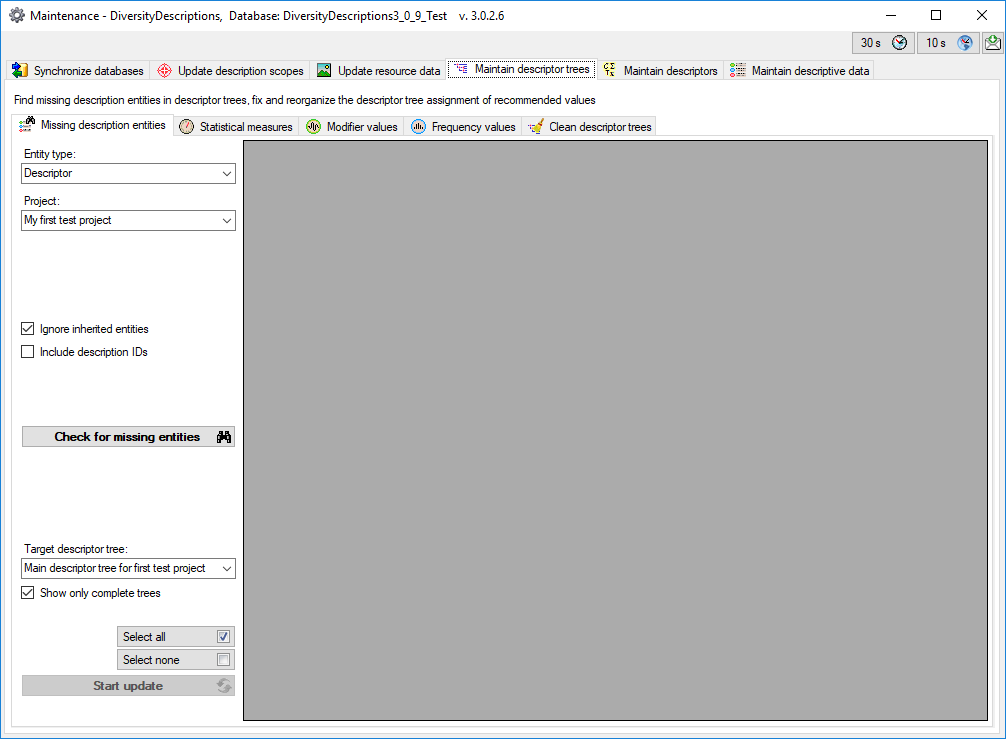
Maintenance - Missing description entities
To find description entities that are not correctly assigned to the
project’s descriptor trees, select the
Maintain descriptor trees tab and choose the tab
Missing description entities. Select the
Project and the Entity type that shall be checked. Currently the
following entity types are supported:
- Descriptor - Search for descriptors that are referenced in the
description data but not assigned to the project’s descriptor tree
- Statistical measure - Search for statistical measures that are
referenced in the description data but not assigned to the
quantitative descriptor
- Modifier - Search for modifier values that are referenced in the
description data but not assigned to the quantitative rsp. categorical
descriptor
- Frequency - Search for frequency values that are referenced in the
description data but not assigned to the categorical descriptor
By default the option Ignore inherited entities is checked,
therefore only descriptors of the own project and recommended values
directly assigned to the project descriptor are evaluated. If option
Include description IDs is checked you will have the option to
inspect the found data sets after the query. Start the query with a
click on the Check for missing entities
button.
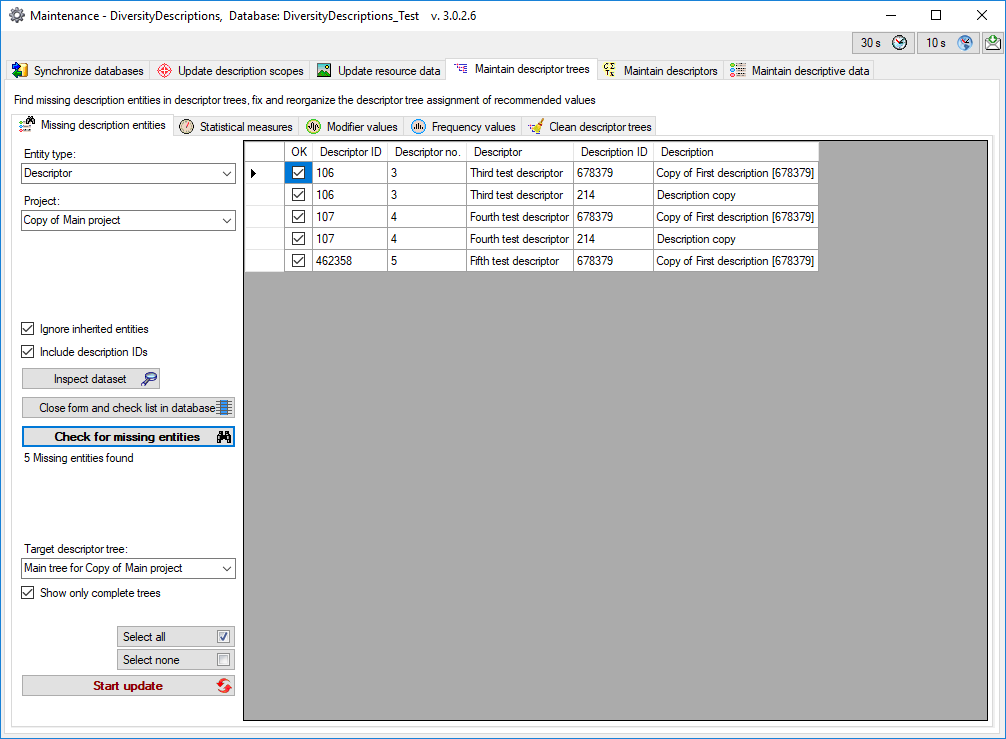
If you selected the option Include description IDs the button
Inspect dataset will be shown. By selecting an
entry and clicking the button Inspect dataset
you may directly navigate to that dataset.
Before database update select the Target descriptor tree where
missing entities shall be inserted. By default only descriptor trees
that are marked as “complete” are shown. You may uncheck option Show
only complete trees to display all present descriptor trees.
To update the database click on the button.
Instead of updating the selected entries you may click Close form and
check list in database to return to the
main program with the corresponding data sets.
Maintenance
Trees
Modifier
Maintenance - Modifier values
To administer the recommended modifier values select the
Maintain descriptor trees tab and choose
the tab  Modifier values. Select the
Project and the Descriptor tree that shall be checked and click
on the Check for modifier values button.
Behind the “Descriptor” column all used modifier values are shown in the
output table. Values that are not assigned for the selected descriptor
tree but anyway available in the project, e.g. due to a different
descriptor tree or inherited by a superior tree node, are diplayed with
blue background (see image below).
Modifier values. Select the
Project and the Descriptor tree that shall be checked and click
on the Check for modifier values button.
Behind the “Descriptor” column all used modifier values are shown in the
output table. Values that are not assigned for the selected descriptor
tree but anyway available in the project, e.g. due to a different
descriptor tree or inherited by a superior tree node, are diplayed with
blue background (see image below).
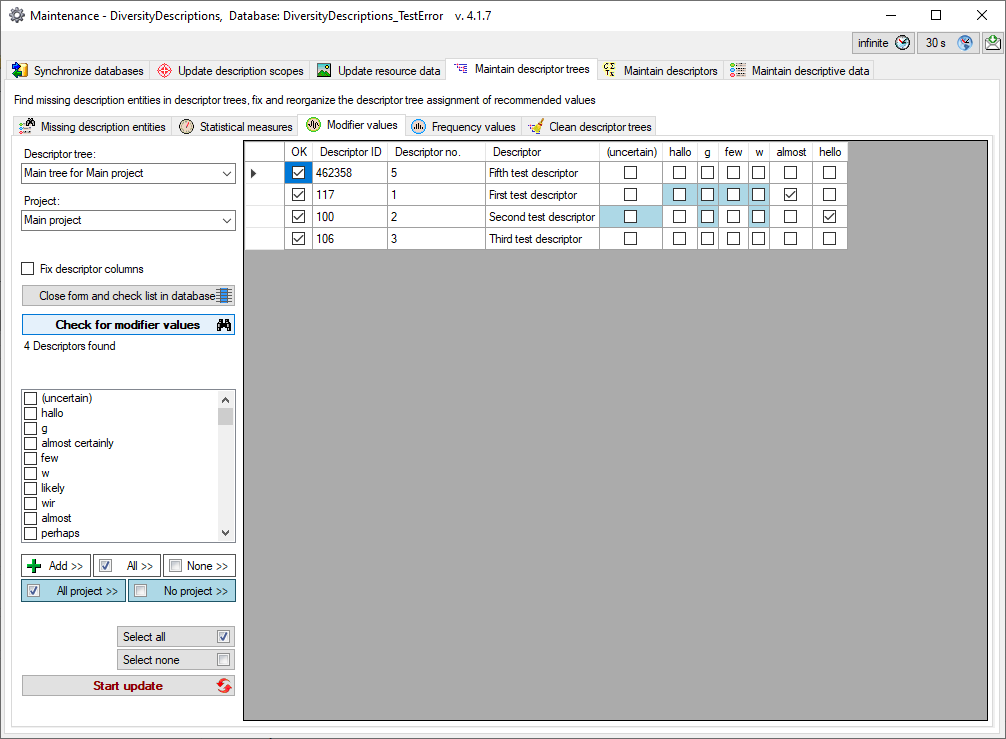
New values may be inserted in the table by selecting them in the check
list on the left and clicking the Add >>
button. The check list shows the modifier values available in your
database. Additional values can be inserted in the Modifier/Frequency
tabs of Edit descriptor or Edit
project. By clicking the button
All >> rsp.
None >> may check or uncheck all checked values from the list box in
the table. The buttons
All project >> and
No project >> check or uncheck the project specific entries
with blue background in the table. If one or
more lines in the output tables are selected (click on the fields before
the “OK” column), the mentioned functions operate only for the selected
lines, otherways for the whole table. With option Fix descriptor
columns you may fix the first data grid columns to scroll horizontally
thru the value list.
To store the modifications to the selected descriptor tree click on the
button. Instead of updating the selected
entries you may click Close form and check list in database
to return to the main program with the
corresponding data sets.

 Maintain
descriptors and
Maintain
descriptors and  you can set the timeout for
critical database queries, with the button
you can set the timeout for
critical database queries, with the button  you
can set the timeout for web requests used within maintenance. Feedbacks
can be sent with the button
you
can set the timeout for web requests used within maintenance. Feedbacks
can be sent with the button  .
.