Diversity exsiccatae
Editing the data
The main forms of all modules have a design as shown below
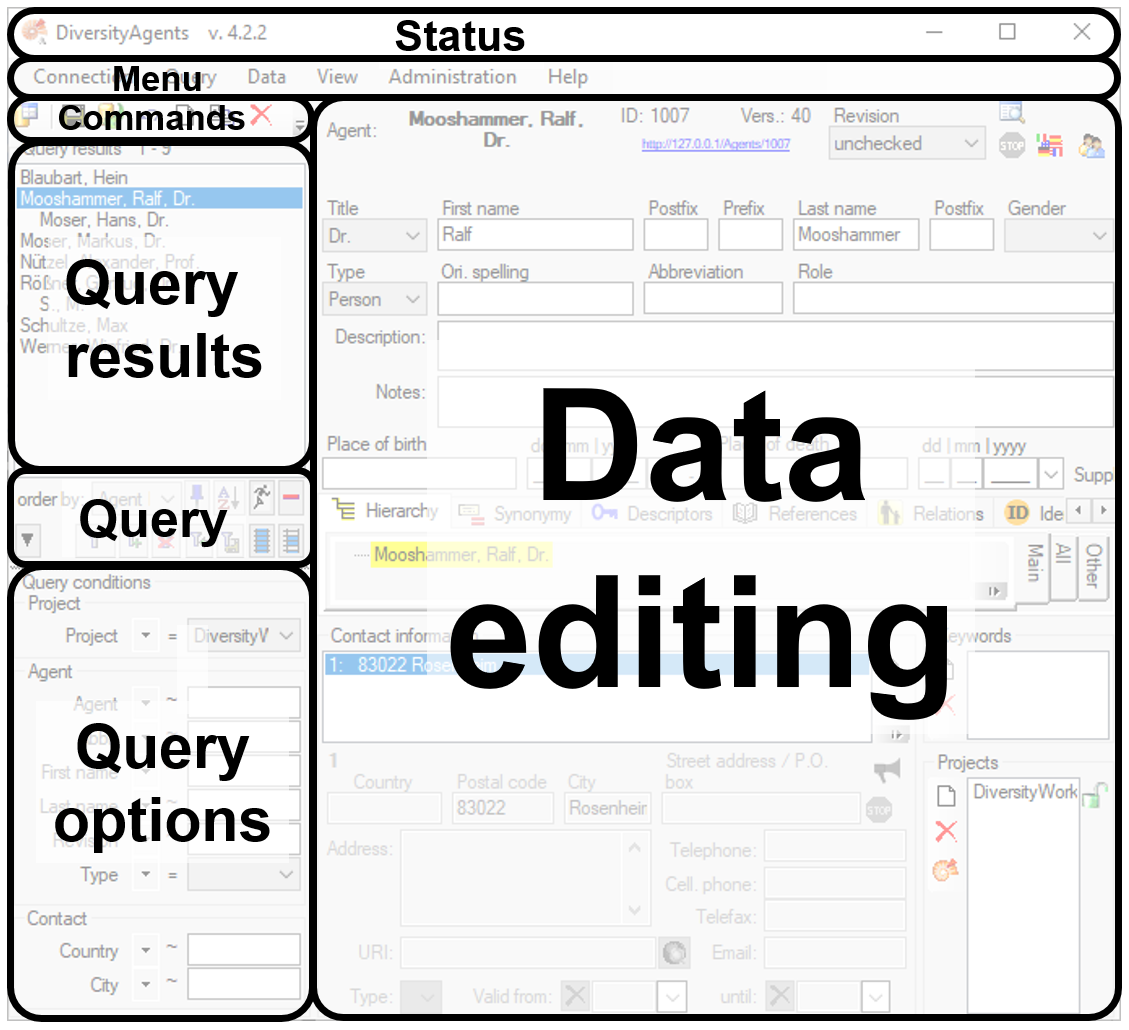
Status
In the status area you find
- The name of the module,
- The name of the database if different fron the module
- The version of the software
The menu contains the options provided by the module
Commands
The commands area contains buttons for e.g. handling the data:
 - To connect to a database click on the
button.
- To connect to a database click on the
button. - To save the changes in a dataset click on the
button.
- To save the changes in a dataset click on the
button. - To propagate the changes in a dataset to linked modules click on the
button.
- To propagate the changes in a dataset to linked modules click on the
button. - To undo the changes a dataset click the undo button. This will recover the original data unless the changes had been
saved or changes were done in certain tables or hierarchies were the
data must be stored to display the
hierarchy.
- To undo the changes a dataset click the undo button. This will recover the original data unless the changes had been
saved or changes were done in certain tables or hierarchies were the
data must be stored to display the
hierarchy. - To create a new entry in the database, click on
the new button below the
search result listbox. This will create a entry with the specimen and
show it in the list.
- To create a new entry in the database, click on
the new button below the
search result listbox. This will create a entry with the specimen and
show it in the list. - To copy a specimen, choose it from the list and click on the button
.
- To copy a specimen, choose it from the list and click on the button
. - To delete the selected datasets click on the
button.
- To delete the selected datasets click on the
button. - To options a dataset click on the button
.
- To options a dataset click on the button
. - To change the arrangement of the query click on the
resp.
- To change the arrangement of the query click on the
resp.
 button.
Create new exssicate
To create a new exssicate, click on
the button above the
search result listbox. You will be asked, if you are sure
Subsections of Editing
Diversity exsiccatae
Editors
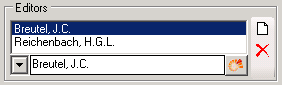
To add a new editor to the list click on the
Button. To delete an selected editor from the list click on
the delete button.
To open the module DiversityAgents to get more infomation about an
editor, click on the  Button.
Diversity exsiccatae
Evaluation
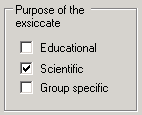
In the evaluation part, further informations on the exsiccatal series
are entered like the taxonomic coverage or the purpose of the exsiccatal
series.

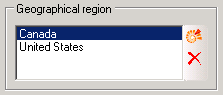
The geographcal regions covered in the exsiccatal series are in the
corresponding area. To insert a new region, click on
the Button and select a region offered by the module
DiversityGazetteer. To delete a region, select it in the list and click
on the button.
Diversity exsiccatae
Examples
The list of the examples is shown with their images in the list. If an
example misses an image, this will be indicated with an
 entry in the list.

To add a new example to the list click on the
Button. An window will open, where you can search for an image file. If
you want to create an example without an image, just click OK without
selecting any image. If you later want to add an image to you example
click on the  button and select an image
file. A form will open, where you can search for an image.
button and select an image
file. A form will open, where you can search for an image.
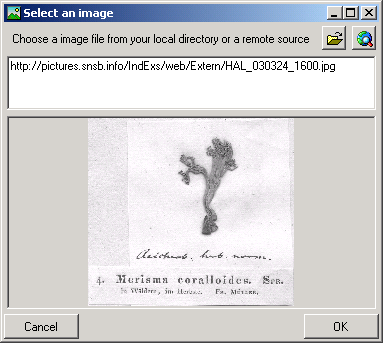
Click OK to take the image in your example.
To delete an selected example from the list click on the
Button. If you want to link to a collection
specimen from the module DiversityCollection , click on
the Button.To zoom a sector of the image, just drag
the mouse over the image. A red square will indicate the zoomed area. To
adapt the size of the image to the available space in the form click on
the  button. To change the orientation of the
image use the appropriate buttons (
button. To change the orientation of the
image use the appropriate buttons (
 flip horizontal,
 flip
vertical,
flip
vertical,  rotate
right,
rotate
right,  rotate left).
Only the file names are stored in the database. The directory for the
file must be set in the menu under Adminstraton - Image folder … .
Diversity exsiccatae
Publication span
Details about the Publication span are entered in the area Publication
span. The span of the numbers will be shown in the
sequence overview.

Diversity exsiccatae
References

To add a new reference to the list click on the
Button. To delete an selected reference from the list click on
the delete button.
To open the module DiversityReferences to get more infomation about an
reference, click on the Button.
Diversity exsiccatae
Sequence
Details about the sequence are entered in the area “Title or author /
editor changes”.

To enter a preceding exsiccatal series, click on
the button. This will open a form where you can search for an exsiccatal series. If you want to remove the relation
to a preceding exsiccatal series, click on the button. To change to a different exsiccatal series shown in the hierarchy, select it and click on the button.
If there happens to be a loop or a selfreference in the sequence the
client will show you this by highlighting the hierarchy as shown below.
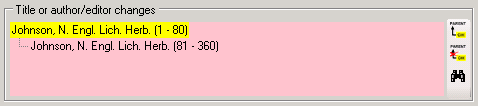
The button will be activated. You can
change to the exsiccatal series that should be to topmost one in a
sequence by using the button. Than click the button to remove the reference to the
predecessor of this series.
Diversity exsiccatae
Table editors
For the data selected in the main window the table editors offer a
direct access to the tables of the database. The menu Data -
 Table editors provide an editor for
 Exsiccata…,
  Editor… and
  Example…
A window with the content of the table will open. Columns with a gray
background can not be edited here. Columns with a light gray background
are linked to the contents of lookup tables that can be changed
according to the contents of these tables. Columns containing an ID
related to a lookuptable show the related value from the lookup table.
To see the ID behind, click on the ID button.
Select  Set timeout … from the menu to
increase the default timeout from 5 seconds to a higher value, e.g. for
greater amounts of data.
Set timeout … from the menu to
increase the default timeout from 5 seconds to a higher value, e.g. for
greater amounts of data.
Editing
You can either edit the contents of the table directly or perform
changes to any number of marked fields. To mark a whole column use
the  button. Once you have selected the
contents to change, select one of the modes of change that appear in the
upper left corner. The modes of change are:
button. Once you have selected the
contents to change, select one of the modes of change that appear in the
upper left corner. The modes of change are:
 Insert: Insert the given value at the beginning
of the content
Insert: Insert the given value at the beginning
of the content Append: Append the given value at the end of
the content
Append: Append the given value at the end of
the content Replace: Replace a string in the content with
the given value
Replace: Replace a string in the content with
the given value Clear: Remove the content
After selecting the change mode, enter the text in the field where
necessary and click on the corresponding button to perform the changes
Filtering
To filter the content of the table, click in the column that should be
used for filtering. Then choose the mode of comparision:
- = : The content must be exactly like the given value
- ~ : The content must contain the given value
- ≠ : The content must be different to the given value
If you want the filtering to be case sensitive, choose the
 a<>A option. After all parameters are set,
click on the
a<>A option. After all parameters are set,
click on the  filter button. To undo the filtering, click
on the
filter button. To undo the filtering, click
on the  button. This will reset the data to the
last saved version. If you want your changes to be saved, click the
button. This will reset the data to the
last saved version. If you want your changes to be saved, click the
 button before you reset the filtering. If you close
the window all changes so far will be saved automatically. So if you do
not want to save your changes, click on the
button before closing the window.
button before you reset the filtering. If you close
the window all changes so far will be saved automatically. So if you do
not want to save your changes, click on the
button before closing the window.
Export
To export the data as a tab separated text file, click on the
 button. The file will be automatically saved in
the client-folder.
button. The file will be automatically saved in
the client-folder.
Log data
To see the log data of the table, you can click on the
 button. The content of the log table can not be
changed, but is read only.
button. The content of the log table can not be
changed, but is read only.


