Diversity Projects
Editing
To save the changes in a dataset click
on the  button.
To undo the
changes in a dataset click the  undo button. This will
recover the original data unless the changes had been saved or changes
were done in certain tables or hierarchies were the data must be stored
to display the hierarchy.
undo button. This will
recover the original data unless the changes had been saved or changes
were done in certain tables or hierarchies were the data must be stored
to display the hierarchy.
To create a new entry in the database,
click on the  button below the search result listbox. This will create a entry with
the specimen and show it in the list.
button below the search result listbox. This will create a entry with
the specimen and show it in the list.
To copy a specimen, choose it from the
list and click on the button
 .
.
To delete a dataset click on the
button
 .
.
Subsections of Editing
Diversity Projects
Project
DiversityProjects - UI structure
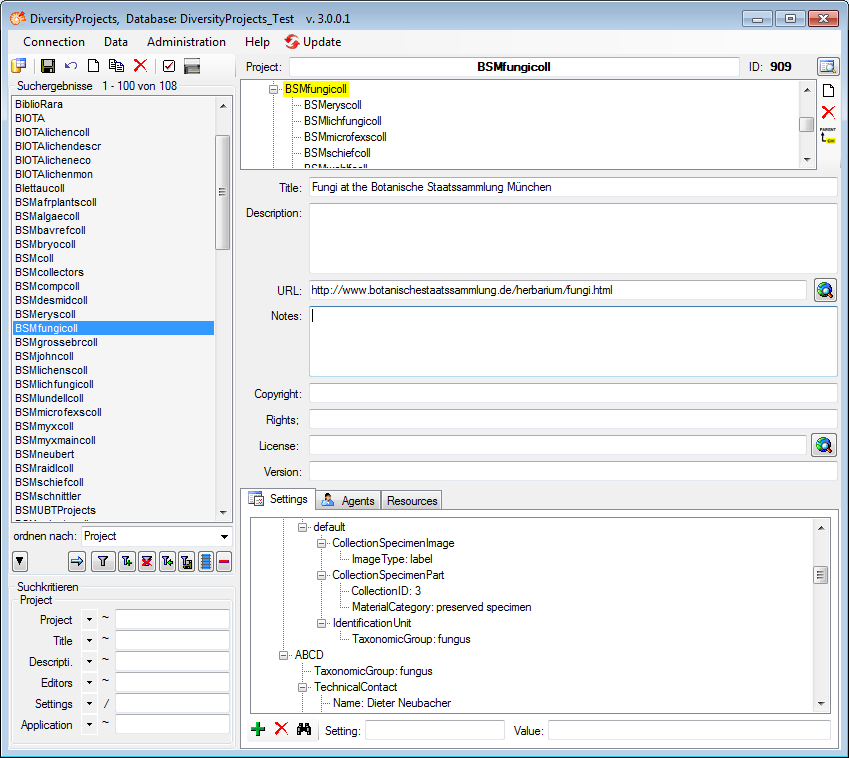
Like all Diversity Workbench modules, the main window of DiversityProjects consists of a search area (left) and an editing area (right) (see the image below).
List all available projects
- To list all available projects, click
on the button
 in the middle section of the search area.
- All available projects are listed in the Query results / Suchergebnisse list.
- To display the metadata of a project, select one in the results list by clicking on it.
Data about the project is stored in the table Project.
Diversity Projects
Agents
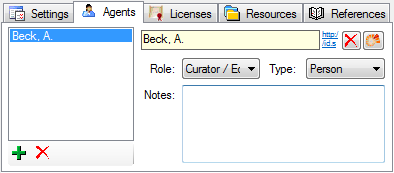
Institutions and editors of the project
You can manage the agents (editors and institutions) associated with a project in the Agents section. To edit, click the Agents tab at the bottom of the editing area (see the image below).
Add and remove an agent
- Use the button
 to add an agent or the button
to remove an agent.
to add an agent or the button
to remove an agent.
- If you want to link an editor to DiversityAgents, click the button
 .
.
- If you want to remove the link to the module, click the button .
- Select the type, either Person or Institution.
- You can add one or more roles to an agent, e.g. Author, Data Curator etc.. Therefor click on the button below the Roles label and select a role from the list.
- To change the order in the list, use the buttons
 .
.
The data about the agents are stored in the table ProjectAgent.
Diversity Projects
Archive
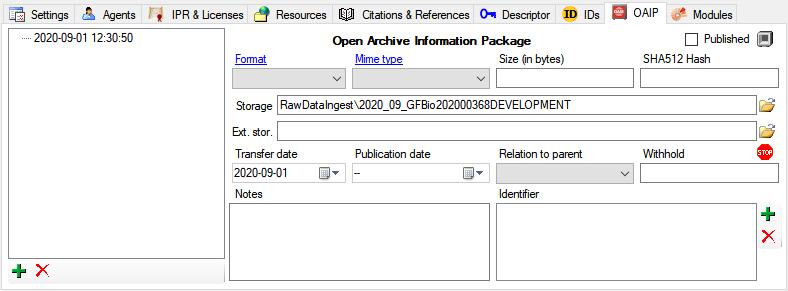
Archives of the project
You can manage the archives of a project in the Archives section. To edit, click the OAIP tab at the bottom of the editing area (see the image below).
Add and remove an archive
- Use the button to add an archive or the button
to remove an archive.
- Archives can be organized in a hierarchy. To add an archive dependent on an existing archive, you have to select the parent archive before you click on the button to add the depending archive. You will be ask if you want to add a dependent project.
The data about the archives are stored in the table ProjectArchive.
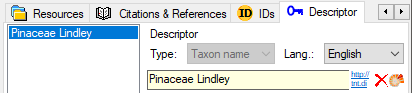
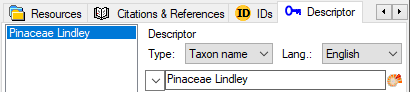
Diversity Projects
Descriptor
For an introduction see the video
 .
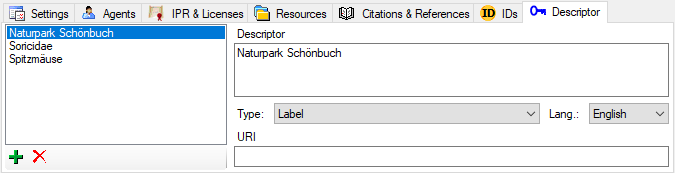
To add resp. remove descriptors of a project use the
and buttons as shown in the image below.
.
To add resp. remove descriptors of a project use the
and buttons as shown in the image below.
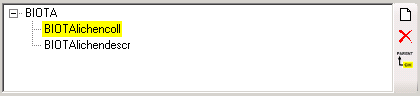
The types Geographical name, Scientific name and Taxon name are linked
to modules. As long as the entry is linked to the corresponding modules,
the type can not be changed (see below).
To change the type you have to remove the link to the module (see
below).
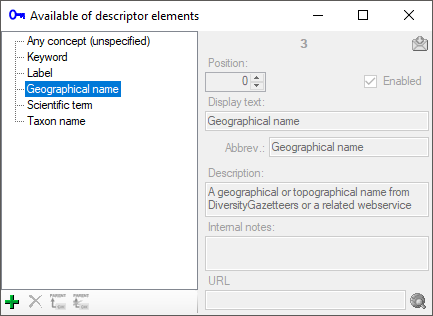
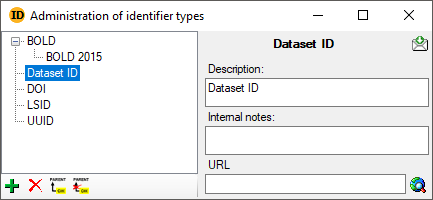
To administrate the types of descriptors, choose Administration -
 Descriptor types… from the menu. A window
as shown below will open. The descriptor types provided by the system
can not be changed (see below). The types Geographical name, Scientific
name and Taxon name are linked to the corresponding modules
DiversityGazetteer, DiversityScientificTerms and DiversityTaxonNames.
Descriptor types… from the menu. A window
as shown below will open. The descriptor types provided by the system
can not be changed (see below). The types Geographical name, Scientific
name and Taxon name are linked to the corresponding modules
DiversityGazetteer, DiversityScientificTerms and DiversityTaxonNames.
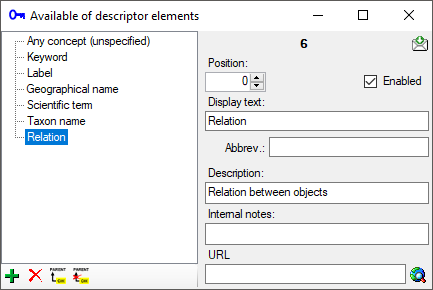
You can add, remove and edit your own types of the descriptors (see
below). Use the add button, to add a new descriptor
type, the delete button to remove the selected type and
the  resp.
resp.  button
to edit the hierarchy.
button
to edit the hierarchy.
The data for the descriptors are stored in the tables
ProjectDescriptor. and
ProjectDescriptorElement.
Diversity Projects
Hierarchy
To hierarchy of the
project is shown in the upper part of the form. Click on the
button to set the superior project of the
current project. To add and remove project related to the hierarchy, use
the and buttons. The
current project will be highlighted with a yellow background.
Diversity Projects
Identifier
Identifier of the project
Identifier related to a project can be administated in the
 IDs part (see below).

To edit the types of the identifier open Administration - Identifier
types… from the menu. A window as shown below will open where you can
manage the types available in you database.
As an Administrator you can add and delete types using the
and buttons.
The data for the references are stored in the table
ProjectIdentifier.
Diversity Projects
Licenses
Add or remove licenses to a project
You can manage the licenses which are related to a project in the IPR & Licenses section. To edit, click the IPR&Licenses tab at the bottom of the editing area (see the image below).
Use the and button
to add or remove a license.
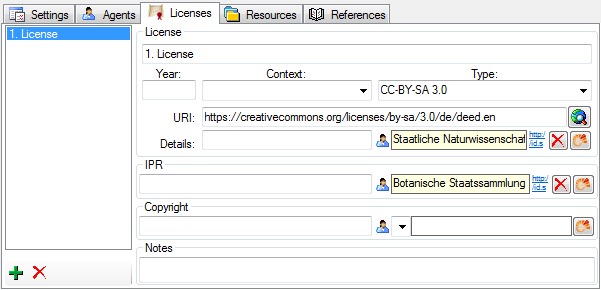
The data about the agents are stored in the table ProjectLicense .
Diversity Projects
References
Citations and references of the project
Citations and references used or related to a project can be managed in the
 Citations &
References part (see below).
Citations &
References part (see below).
Watch a short German video as an introduction:
.
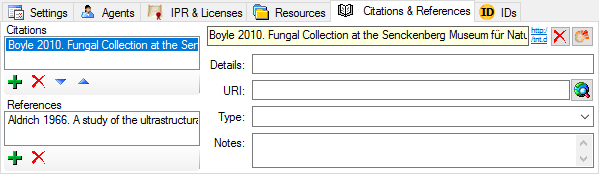
Add or remove citations and references
As an editor you can add and delete
citations and references.
- Add a citation using the button or remove a citation using the button
.
- To convert a citation into a reference
or vice versa you can use the
 resp.
resp.
 button.
The data for the references are stored in the table
ProjectReference.
Diversity Projects
Resources
Resources like images or data files that are related directly to a
project can be administated in the Resources part (see below). As an
editor you can add and delete resources using the
and buttons.
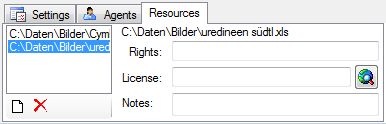
The data for the resources are stored in the table ProjectsResources.
Diversity Projects
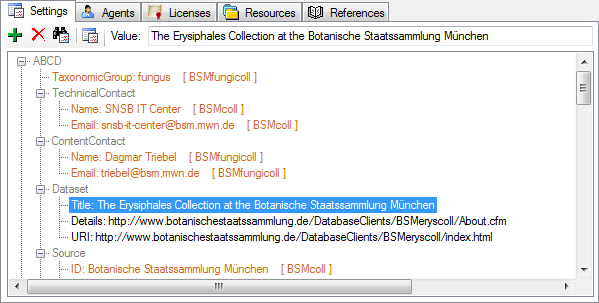
Settings
Deprecated
The settings are deprecated. Please use Descriptors instead.
For an introduction see the video
.The
settings of the project are shown in the lower part of the form. To edit
the template for the settings, select Administration - Settings from
the menu. A window as shown below will open. Use the
button to add a new setting. With the button you can define the superior setting for a selected setting. With the
button you can remove the relation to a
superior setting for the selected setting. To change the sequence of the
settings within a group of settings (having the same superior setting)
set the value of the display order (Ord.:) accordingly. With the
button a selected setting may be removed again.

To add settings to a
project, you choose among the settings defined as described above. To
edit the definition of the settings either use the menu as described
above or click on the  button (see below). Use
the and buttons to add or
remove a setting. To copy all settings from another project use the
button (see below). Use
the and buttons to add or
remove a setting. To copy all settings from another project use the
 button. To change the value of a setting,
choose it in the tree and edit the text in the Value textbox above
the tree (see below). According to the hierarchy of the projects,
settings defined in any project above the current project will be
inherited. This is indicated by a brown
color of the setting and the [ name of the superior project ].
To overwrite an inherited value just add the same setting in the current
project and enter the value that should be used instead of the inherited
value, an empty value in case no value should be given.
button. To change the value of a setting,
choose it in the tree and edit the text in the Value textbox above
the tree (see below). According to the hierarchy of the projects,
settings defined in any project above the current project will be
inherited. This is indicated by a brown
color of the setting and the [ name of the superior project ].
To overwrite an inherited value just add the same setting in the current
project and enter the value that should be used instead of the inherited
value, an empty value in case no value should be given.
Diversity Projects
History
To inspect the
history of a dataset click on the  history button. A form will open, showing all former states of the data in the tables with the current dataset at the top.
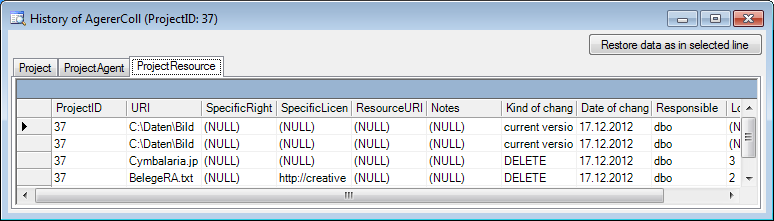
The version will be set automatically. If a dataset is changed the version will be increased
if the last changes where done by a different user or the last change is
more than 24 hours ago (for further details see topic Logging ).
Diversity Projects
Table Editors
For the data selected in the main window the table editors offer a
direct access to the tables of the database. The menu Data -
 Table editors provide an editor e.g. for
 Project… and
  Agent…
A window with the content of the table will open. Columns with a gray
background can not be edited here. Columns with a light gray background
are linked to the contents of lookup tables where you can change
according to the contents of these tables.
Select  Set timeout … from the menu to
increase the default timeout from 5 seconds to a higher value, e.g. for
greater amounts of data.
Set timeout … from the menu to
increase the default timeout from 5 seconds to a higher value, e.g. for
greater amounts of data.
For more details see chapter TableEditors


