Import Text
Import tagged text
Reference Manager
To import data stored in the commercial database Reference Manager use
the RIS-Export function of Reference Manager.
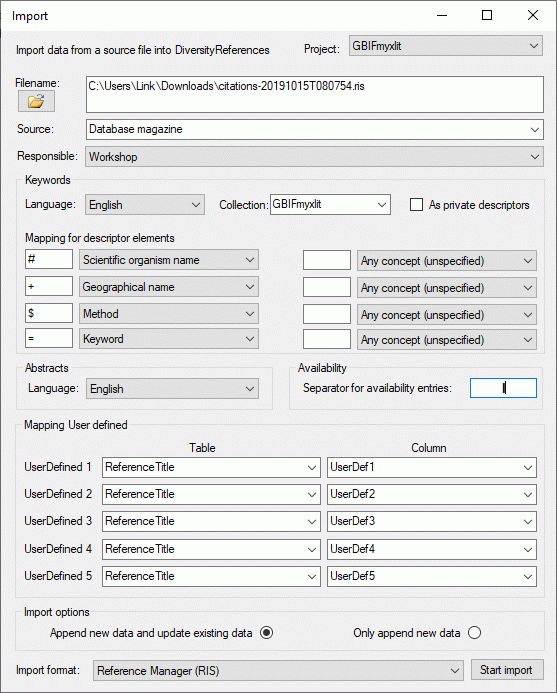
Import
Choose Data →  Import ->
Import tagged text … from the menu to start
the import. A form will open where you can set the import options.
Import ->
Import tagged text … from the menu to start
the import. A form will open where you can set the import options.
Filename: Click on the  open button to choose
the file you want to import from your file system.
open button to choose
the file you want to import from your file system.
Responsible: Select the user who is responsible for the imported
data.
Abstracts: Select the language of the abstracts in the references.
Availability: If more than one filing code is placed in one field,
enter the separator for the filing codes.
Keywords: Select the language of the keywords in the references. The
keywords can be transferred either to the private descriptors or the
public available the descriptors. If you use special signs to classify
you keywords you can use the mapping to translate this classification
into the descriptor concept in DiversityReferences. This is shown in the
Mapping for descriptor elements section in the image above.
Mapping User defined: The UserDefined fields within Reference
Manager will be transferred to the corresponding fields within the table
ReferenceTitle of DiversityReferences unless you specify it
otherwise. If possible, use the more exact targets within
DiversityReferences for your import.
Import options: You may either update data allready in the database
and import new data from the source or just import new data.
Import format: Currently there is only one import format that is
supported by DiversityReferences - Reference Manager (RIS).
Click the Start import button to start the import. You will be
informed about import errors and the number of imported datasets by
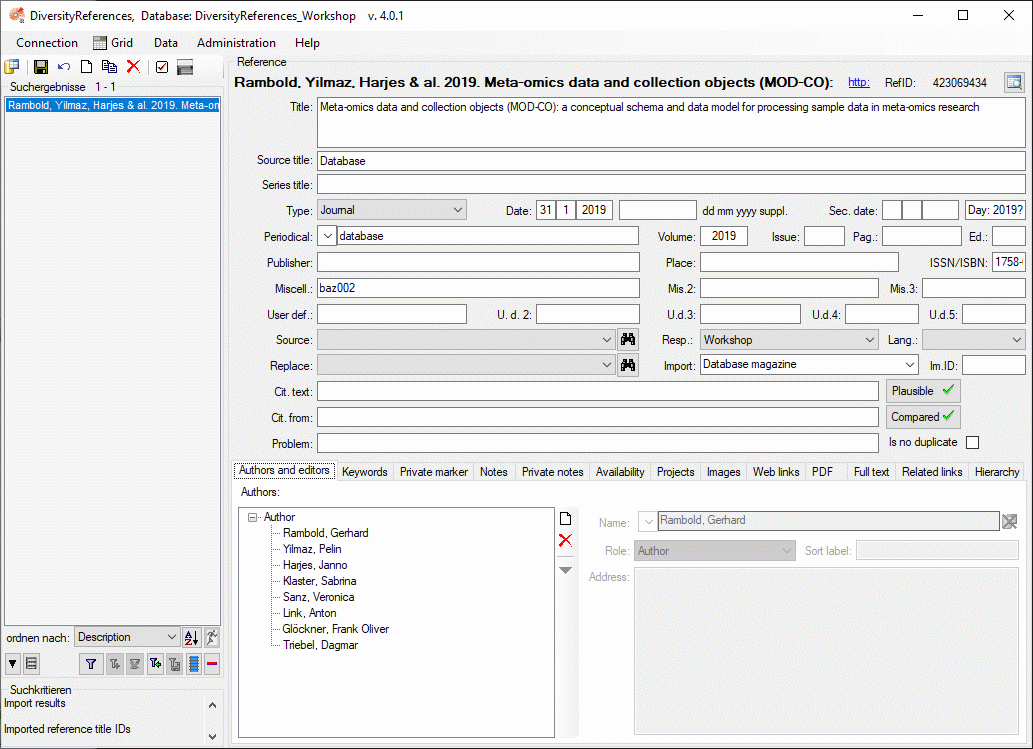
message windows. If any datasets have been imported, they will be
displayed in the query list of the main window, when you close the
import form (see image below).
Import wizard
The import wizard is the general way to import data into a Diversity Workbench module database. It allows the import from tab separated text files (tsv) into the database tables. The key import steps, the definition of a mapping from tab seperated columns in the text file to the coresponding database table columns, is designed in the import wizard. As the mapping can be sometimes cumbersom to develop, the import wizard allows to save the mapping for repeated import of equaly structured tsv files.
The examples below are from the module  DiversityAgents, but are valid for any other module as well.
With the current solution please ensure that there are no concurrent imports in the same database.
With this import routine, you can import data from text files (as
tab-separated lists) into the database. A short introduction is
provided in a video
 .
Choose Data → Import
→
.
Choose Data → Import
→  Wizard →
  Agent
from the menu. A window as shown below will open that will lead you
through the import of the data.
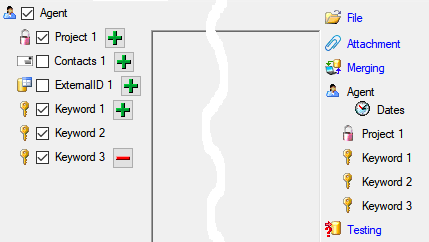
The window is separated in 3 areas. On the left side, you see a list of possible data related import steps according to the type of data you choose for the import. On the right side you see the list of currently selected import steps. In the middle part the details of the selected import steps are shown.
Agent
from the menu. A window as shown below will open that will lead you
through the import of the data.
The window is separated in 3 areas. On the left side, you see a list of possible data related import steps according to the type of data you choose for the import. On the right side you see the list of currently selected import steps. In the middle part the details of the selected import steps are shown.
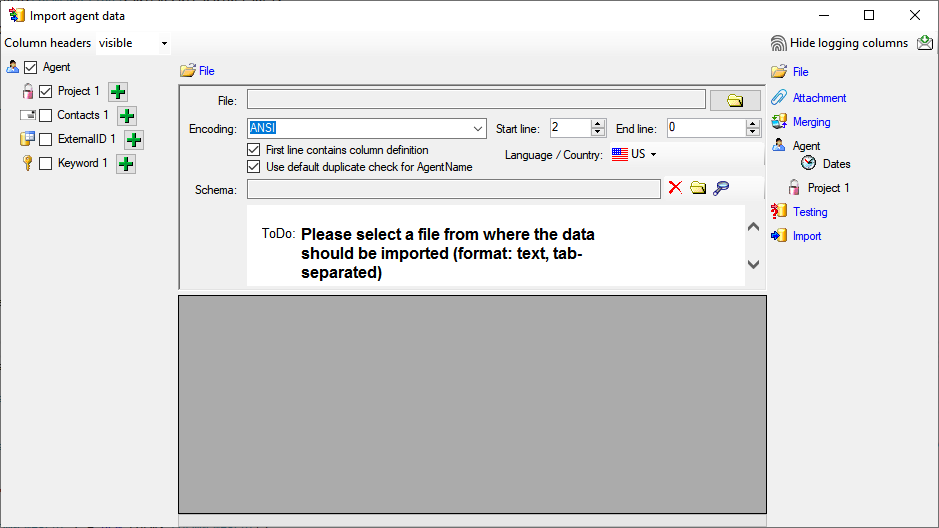
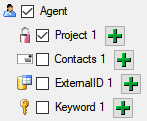
Choosing the File and Settings
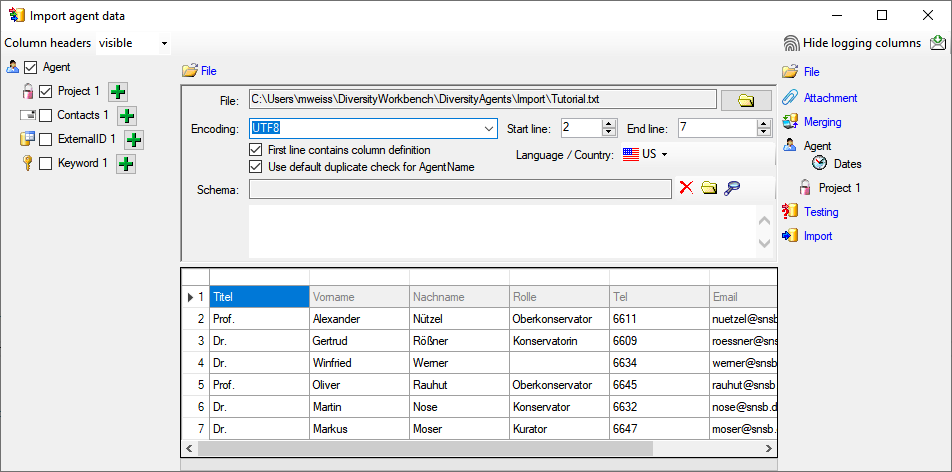
Choosing the data ranges
In the selection list on the left side of the window (see below) all
possible import steps for the data are listed according to the type of
data you want to import.
The import of certain tables can be paralleled. To add parallels click
on the  add button (see below). To remove parallels, use
the
add button (see below). To remove parallels, use
the  button. Only selected ranges will appear in
the list of the steps on the right (see below).
button. Only selected ranges will appear in
the list of the steps on the right (see below).
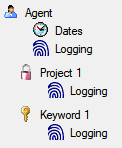
To import information of logging columns like who created and changed
the data, click on the  include logging columns button in the header line. This will include additional substeps for every step containing the
logging columns (see below). If you do not import these data, they will
be automatically filled by default values like the current time and
user.
include logging columns button in the header line. This will include additional substeps for every step containing the
logging columns (see below). If you do not import these data, they will
be automatically filled by default values like the current time and
user.
Attaching data
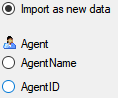
You can either import your data as new data or
 Attach
them to data in the database. Select the import step
Attachment
from the list. All tables that are selected and contain columns at which
you can attach data are listed (see below). Either choose the first
option
Attach
them to data in the database. Select the import step
Attachment
from the list. All tables that are selected and contain columns at which
you can attach data are listed (see below). Either choose the first
option  Import as new data or one of the
columns the attachment columns offered like SeriesCode in the table
Series in the example below.
Import as new data or one of the
columns the attachment columns offered like SeriesCode in the table
Series in the example below.
If you select a column for attachment, this column will be marked with a
blue background (see below and chapter Table data).

Merging data
You can either import your data as new data or  Merge them with data in the
database. Select the import step
Merge from the list. For
every table you can choose between
Merge them with data in the
database. Select the import step
Merge from the list. For
every table you can choose between  Insert,
  Merge,
 Update and
Attach (see below).
Update and
Attach (see below).
The Insert option will import the data
from the file independent of existing data in the database.
The Merge option will compare the data
from the file with those in the database according to the
 Key columns (see below). If no matching data are
found in the database, the data from the file will be imported.
Otherwise the data will be updated.
Key columns (see below). If no matching data are
found in the database, the data from the file will be imported.
Otherwise the data will be updated.
The Update option will compare the data
from the file with those in the database according to the
Key columns. Only matching data found in the
database will be updated.
The Attach option will compare the data from
the file with those in the database according to the
Key columns. The found data will not be changed, but used as a
reference data in depending tables.

Empty content will be ignored e.g. for the
Merge or Update option. To remove
content you have to enter the value NULL. As long as the column will
allow emty values, the content will be removed using the NULL value.
Table data
To set the source for the columns in the file, select the step of a
table listed underneath the Merge step. All
columns available for importing data will be listed in the central part
of the window. In the example shown below, the first column is used to
attach the new data to data in the database.
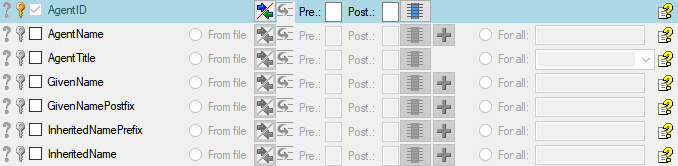
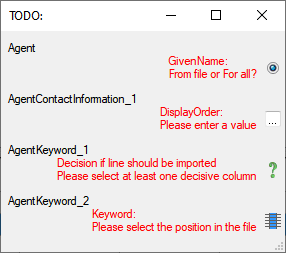
A reminder in the header line will show you which actions are still
needed to import the data into the table:
- Please select at least one column
 = No
column has been selected so far.
= No
column has been selected so far.
- Please select at least one decisive column
 = If data will be imported depends on the content of decisive
columns, so at least one must be selected.
= If data will be imported depends on the content of decisive
columns, so at least one must be selected.
- Please select the position in the file
 =
The position in the file must be given if the data for a column
should be taken from the file.
=
The position in the file must be given if the data for a column
should be taken from the file.
- Please select at least one column for comparison
= For all merge types other than insert columns
for comparison with data in the database are needed.
- From file or For all = For every you
have to decide whether the data are taken from the file or a value
is entered for all
- Please select a value from the list
 = You have
to select a value from the provided list
= You have
to select a value from the provided list
- Please enter a value
 = You have to enter
a value used for all datasets
= You have to enter
a value used for all datasets
The handling of the columns in described in the chapter
columns.
Testing
 - To test if all requirements for the import are met use the
Testing step. You can use a certain line in
the file for your test and then click on the Test data in line: button. If there are still
unmet requirements, these will be listed in a window as shown below.
- To test if all requirements for the import are met use the
Testing step. You can use a certain line in
the file for your test and then click on the Test data in line: button. If there are still
unmet requirements, these will be listed in a window as shown below.
If finally all requirements are met, the testing function will try to
write the data into the database and display any errors that occurred as
shown below. All datasets marked with a red
background, produced some error.
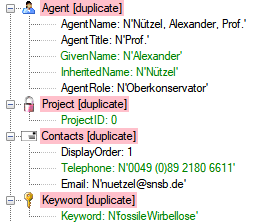
To see the list of all errors, double click in the error list
window in the header line (see
below).

If finally no errors are left, your data are ready for import. The
colors in the table nodes in the tree indicate the handling of the
datasets:
- INSERT
- MERGE
- UPDATE,
- No difference
- Attach
- No data
The colors of the table columns indicate whether a column is decisive
, a key column or an attachment column .
If you suspect, that the import file contains data already present in
the database, you may test this and extract only the missing lines in a
new file. Choose the attachment column (see chapter Attaching data) and
click on the button Check for already present data. The data already
present in the database will be marked red
(see below). Click on the button
Save missing data as text file  to store the
data not present in the database in a new file for the import. The
import of agents contains the option Use
default duplicate check for AgentName that is selected by default. To
ensure the employment of this option the column AgentName must be filled
according to the generation of the name by the insert trigger of the
table Agent (InheritedNamePrefix + ' ' + Inheritedname + ', ' +
GivenName + ' ' + GivenNamePostfix + ', ' + InheritedNamePostfix +
', ' + AgentTitle - for details, see the
documentation of the database).
to store the
data not present in the database in a new file for the import. The
import of agents contains the option Use
default duplicate check for AgentName that is selected by default. To
ensure the employment of this option the column AgentName must be filled
according to the generation of the name by the insert trigger of the
table Agent (InheritedNamePrefix + ' ' + Inheritedname + ', ' +
GivenName + ' ' + GivenNamePostfix + ', ' + InheritedNamePostfix +
', ' + AgentTitle - for details, see the
documentation of the database).

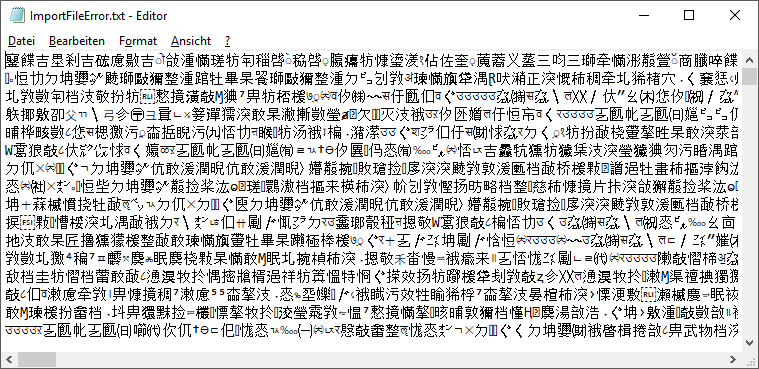
If you happen to get a file with a content as shown below, you may have
seleted the wrong encoding or the encoding is incompatible. Please try
to save the original file as UTF8 and select this encoding for the
import.
Import
- With the last step you can finally start to import the data into the
database. If you want to repeat the import with the same settings and
data of the same structure, you can save a schema of the current
settings (see below). You optionally can include a description of your
schema and with the  button you can
generate a file containing only the description.
button you can
generate a file containing only the description.
Schedule for import of tab-separated text files into DiversityAgents
- Target within DiversityAgents: Agent
- Database version: 02.01.13
- Schedule version: 1
- Use default duplicate check: ✔
- Lines: 2 - 7
- First line contains column definition: ✔
- Encoding: UTF8
- Language: US
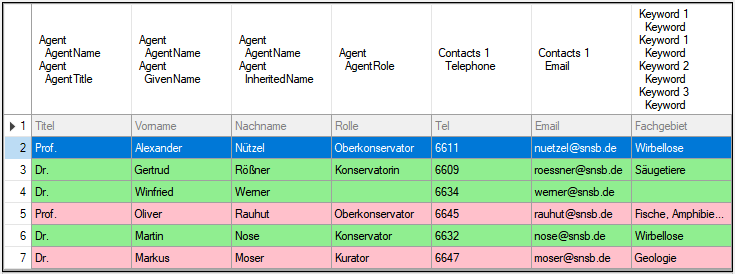
Lines that could not be imported will be marked with a red background
while imported lines are marked green (see below).
If you want to save lines that produce errors during the import in a
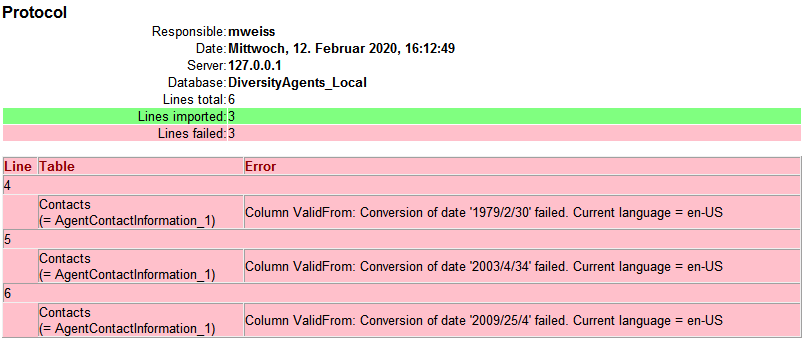
separate file, use the Save failed lines option. The protocol of the
import will contain all settings according to the used schema and an
overview containing the number of inserted, updated, unchanged and
failed lines (see below).
Description
- A description of the schema may be included in the schema itself or with
a click on the Import button generated as a
separate file. This file will be located in a separate directory
Description to avoid confusion with import schemas. An example for a
description file is shown below, containing common settings, the
treatment of the file columns and interface settings as defined in the
schema.
 button to choose the
file you want to import from your file system.
button to choose the
file you want to import from your file system.
 Record all SQL statements.