Diversity Scientific Terms
Archive
Creating an archive
Valid for all modules
This chapter describes the archiving for the module DiversityAgents, but is valid correspondingly in other modules
The data related to a project can be exported into an archive. Choose
Data -  Archive -
  Create archive... from the menu. A window as shown below will open.
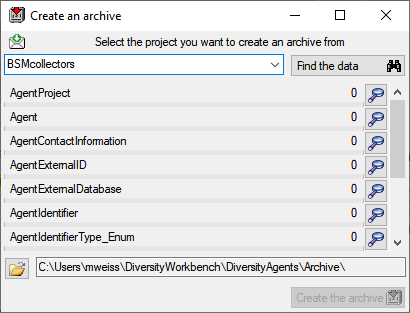
Select the project you want to create an archive of and click on the
Find the data  button. The data related
with the project will be imported into temporary tables to allow you to
inspect them in advance of the creation of the archive (use the
button. The data related
with the project will be imported into temporary tables to allow you to
inspect them in advance of the creation of the archive (use the
 buttons to see the data). To create the archive,
click on the Create the archive
button. A directory will be created containing a XML file for every
table. For a common introduction see the tutorial:
buttons to see the data). To create the archive,
click on the Create the archive
button. A directory will be created containing a XML file for every
table. For a common introduction see the tutorial:  .
.
You can include the log data by selecting the  option as described in the tutorial: .
Resetting the database
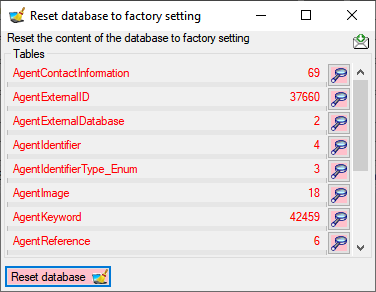
Before you restore an archive, please make sure that the data from the
archive do not interfere with the data in the database. In order to
avoid problems you should clean the database from any user data. To
clear the database from any user data, choose Data -
Archive -  Reset
database... from the menu. A window as shown below will open listing
all tables and the number of data within these tables. Click on the
Reset database button to remove
any of these data including any data in the log tables.
Reset
database... from the menu. A window as shown below will open listing
all tables and the number of data within these tables. Click on the
Reset database button to remove
any of these data including any data in the log tables.
Restoring an archive
To restore an archive choose Data - - Archive -
 Restore archive... from the menu. A
window as shown below will open listing the tables in the database. To
restore an archive click on the Choose archive directory
Restore archive... from the menu. A
window as shown below will open listing the tables in the database. To
restore an archive click on the Choose archive directory
 button and select the directory containing the
archive files. Next click on the Read data
button and select the directory containing the
archive files. Next click on the Read data
 button to import the data from the XML files
into temporary tables.
button to import the data from the XML files
into temporary tables.
With a click on the buttons you can inspect the
content of the temporary tables. Finally click on the Restore from
archiv  button. If you select the
  option, the import will ask you for a stop in case of an error.
You can include the log data by selecting the  option as described in the tutorial: .
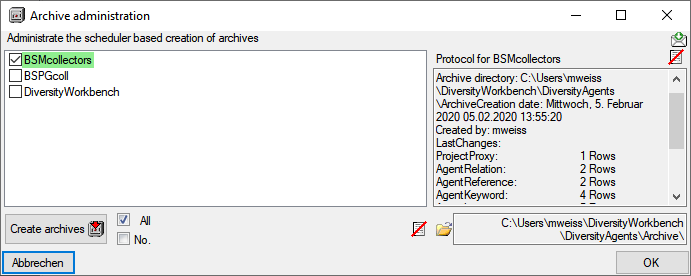
Planing
Plan schedule based archive creation
To administrate the schedule based creation of archives choose Data -
Archive - Administrate
archives... from the menu. A window as shown below will open listing
the projects in the database. Select the project that should be included
in the schedule based creation of archives. To create an archive for all
selected projects, click on the Create archives
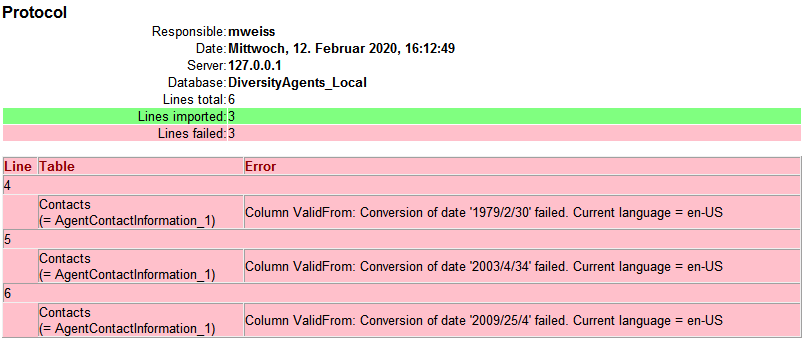
button. The protocol of a previous
archiving is shown as in the image below. Successful
runs are indicated with a green
color while failures have a red
background (see below).
Creation of xsd schemata
Next to the data, the archive files contain a xsd description of the
tables. To create xsd schemata independent of the content, select
Data - Archive - Create schema from the menu. A windows as shown below will open
with the list of all tables where the main tables of the database are
preselected.
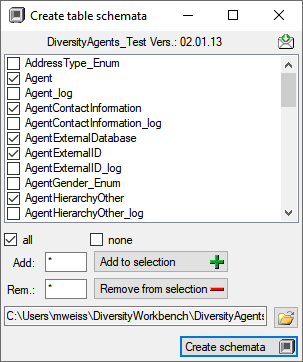
To change this selection you may use the  all and
  none buttons resp. the Add to
selection
none buttons resp. the Add to
selection  and
Remove from
selection
and
Remove from
selection  options
using * as a wildcard. Click on the Create schemata
options
using * as a wildcard. Click on the Create schemata  button
to create the schemata for the selected tables in the predefined
directory.
the open button
will open this directory containing the created files. The schemata
contain the name of the DiversityWorkbench module and its version, the
definition of the table, the primary key and the colums together with
their datatype and description (see the example below).
button
to create the schemata for the selected tables in the predefined
directory.
the open button
will open this directory containing the created files. The schemata
contain the name of the DiversityWorkbench module and its version, the
definition of the table, the primary key and the colums together with
their datatype and description (see the example below).
Creation of archives as a backgroud process
To archive the data in a scheduler based background process, you can
start the application with the following arguments:
- Archive
- Server of the SQL-server database
- Port of SQL-server
- Database with the source data
- Optional: Directory where the archive directories should be created
C:\DiversityWorkbench\DiversityAgents> DiversityAgents.exe Archive
snsb.diversityworkbench.de 5432 DiversityAgents
C:\DiversityWorkbench\DiversityAgents\Archive
The application will create the archives, generate the protocols as
described above and quit automatically after the job is done. The user
starting the process needs a Windows authentication with access to the
SQL-Server database and proper rights to archive the data. If the last
argument is not given the default directory …\Application
directory\Archive\ will be used.
Diversity Scientific Terms
Import wizard
The import wizard is the general way to import data into a Diversity Workbench module database. It allows the import from tab separated text files (tsv) into the database tables. The key import steps, the definition of a mapping from tab seperated columns in the text file to the coresponding database table columns, is designed in the import wizard. As the mapping can be sometimes cumbersom to develop, the import wizard allows to save the mapping for repeated import of equaly structured tsv files.
The examples below are from the module  DiversityAgents, but are valid for any other module as well.
With the current solution please ensure that there are no concurrent imports in the same database.
With this import routine, you can import data from text files (as
tab-separated lists) into the database. A short introduction is
provided in a video
.
Choose Data → Import
→  Wizard →
  Agent
from the menu. A window as shown below will open that will lead you
through the import of the data.
The window is separated in 3 areas. On the left side, you see a list of possible data related import steps according to the type of data you choose for the import. On the right side you see the list of currently selected import steps. In the middle part the details of the selected import steps are shown.
Agent
from the menu. A window as shown below will open that will lead you
through the import of the data.
The window is separated in 3 areas. On the left side, you see a list of possible data related import steps according to the type of data you choose for the import. On the right side you see the list of currently selected import steps. In the middle part the details of the selected import steps are shown.
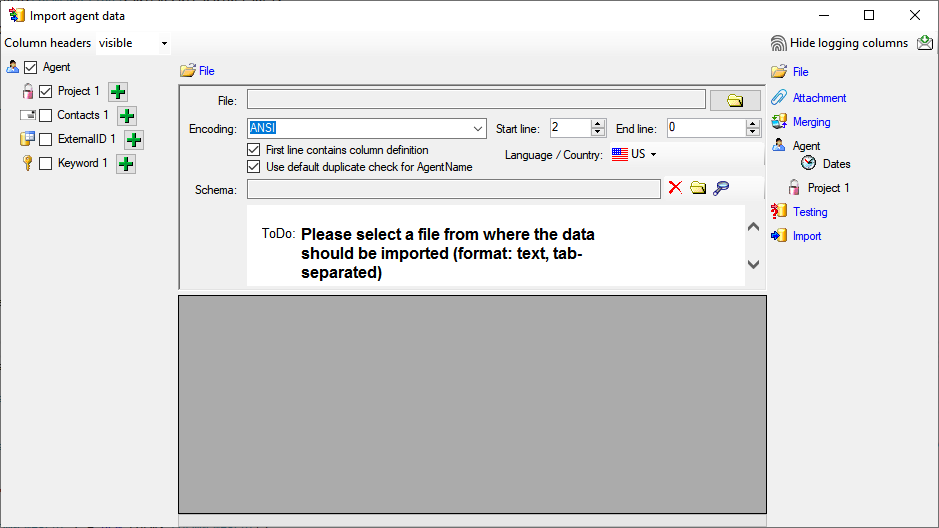
Choosing the File and Settings
Choosing the data ranges
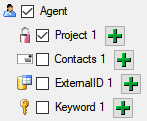
In the selection list on the left side of the window (see below) all
possible import steps for the data are listed according to the type of
data you want to import.
The import of certain tables can be paralleled. To add parallels click
on the add button (see below). To remove parallels, use
the  button. Only selected ranges will appear in
the list of the steps on the right (see below).
button. Only selected ranges will appear in
the list of the steps on the right (see below).
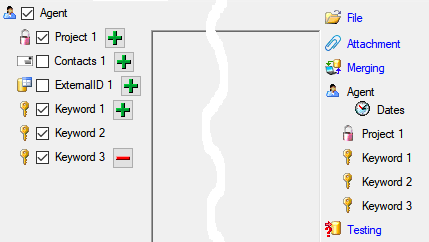
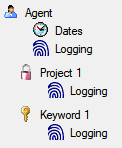
To import information of logging columns like who created and changed
the data, click on the  include logging columns button in the header line. This will include additional substeps for every step containing the
logging columns (see below). If you do not import these data, they will
be automatically filled by default values like the current time and
user.
include logging columns button in the header line. This will include additional substeps for every step containing the
logging columns (see below). If you do not import these data, they will
be automatically filled by default values like the current time and
user.
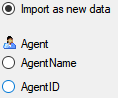
Attaching data
You can either import your data as new data or
 Attach
them to data in the database. Select the import step
Attachment
from the list. All tables that are selected and contain columns at which
you can attach data are listed (see below). Either choose the first
option
Attach
them to data in the database. Select the import step
Attachment
from the list. All tables that are selected and contain columns at which
you can attach data are listed (see below). Either choose the first
option  Import as new data or one of the
columns the attachment columns offered like SeriesCode in the table
Series in the example below.
Import as new data or one of the
columns the attachment columns offered like SeriesCode in the table
Series in the example below.
If you select a column for attachment, this column will be marked with a
blue background (see below and chapter Table data).

Merging data
You can either import your data as new data or  Merge them with data in the
database. Select the import step
Merge from the list. For
every table you can choose between
Merge them with data in the
database. Select the import step
Merge from the list. For
every table you can choose between  Insert,
  Merge,
 Update and
Attach (see below).
Update and
Attach (see below).
The Insert option will import the data
from the file independent of existing data in the database.
The Merge option will compare the data
from the file with those in the database according to the
 Key columns (see below). If no matching data are
found in the database, the data from the file will be imported.
Otherwise the data will be updated.
Key columns (see below). If no matching data are
found in the database, the data from the file will be imported.
Otherwise the data will be updated.
The Update option will compare the data
from the file with those in the database according to the
Key columns. Only matching data found in the
database will be updated.
The Attach option will compare the data from
the file with those in the database according to the
Key columns. The found data will not be changed, but used as a
reference data in depending tables.

Empty content will be ignored e.g. for the
Merge or Update option. To remove
content you have to enter the value NULL. As long as the column will
allow emty values, the content will be removed using the NULL value.
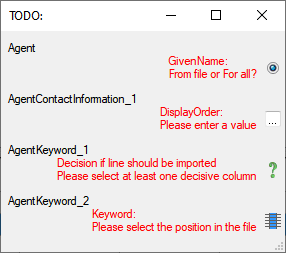
Table data
To set the source for the columns in the file, select the step of a
table listed underneath the Merge step. All
columns available for importing data will be listed in the central part
of the window. In the example shown below, the first column is used to
attach the new data to data in the database.
A reminder in the header line will show you which actions are still
needed to import the data into the table:
- Please select at least one column = No
column has been selected so far.
- Please select at least one decisive column
 = If data will be imported depends on the content of decisive
columns, so at least one must be selected.
= If data will be imported depends on the content of decisive
columns, so at least one must be selected.
- Please select the position in the file
 =
The position in the file must be given if the data for a column
should be taken from the file.
=
The position in the file must be given if the data for a column
should be taken from the file.
- Please select at least one column for comparison
= For all merge types other than insert columns
for comparison with data in the database are needed.
- From file or For all = For every you
have to decide whether the data are taken from the file or a value
is entered for all
- Please select a value from the list
 = You have
to select a value from the provided list
= You have
to select a value from the provided list
- Please enter a value
 = You have to enter
a value used for all datasets
= You have to enter
a value used for all datasets
The handling of the columns in described in the chapter
columns.
Testing
 - To test if all requirements for the import are met use the
Testing step. You can use a certain line in
the file for your test and then click on the Test data in line: button. If there are still
unmet requirements, these will be listed in a window as shown below.
- To test if all requirements for the import are met use the
Testing step. You can use a certain line in
the file for your test and then click on the Test data in line: button. If there are still
unmet requirements, these will be listed in a window as shown below.
If finally all requirements are met, the testing function will try to
write the data into the database and display any errors that occurred as
shown below. All datasets marked with a red
background, produced some error.
To see the list of all errors, double click in the error list
window in the header line (see
below).

If finally no errors are left, your data are ready for import. The
colors in the table nodes in the tree indicate the handling of the
datasets:
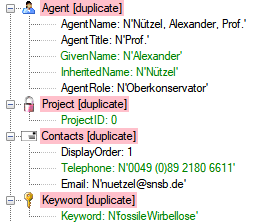
- INSERT
- MERGE
- UPDATE,
- No difference
- Attach
- No data
The colors of the table columns indicate whether a column is decisive
, a key column or an attachment column .
If you suspect, that the import file contains data already present in
the database, you may test this and extract only the missing lines in a
new file. Choose the attachment column (see chapter Attaching data) and
click on the button Check for already present data. The data already
present in the database will be marked red
(see below). Click on the button
Save missing data as text file  to store the
data not present in the database in a new file for the import. The
import of agents contains the option Use
default duplicate check for AgentName that is selected by default. To
ensure the employment of this option the column AgentName must be filled
according to the generation of the name by the insert trigger of the
table Agent (InheritedNamePrefix + ' ' + Inheritedname + ', ' +
GivenName + ' ' + GivenNamePostfix + ', ' + InheritedNamePostfix +
', ' + AgentTitle - for details, see the
documentation of the database).
to store the
data not present in the database in a new file for the import. The
import of agents contains the option Use
default duplicate check for AgentName that is selected by default. To
ensure the employment of this option the column AgentName must be filled
according to the generation of the name by the insert trigger of the
table Agent (InheritedNamePrefix + ' ' + Inheritedname + ', ' +
GivenName + ' ' + GivenNamePostfix + ', ' + InheritedNamePostfix +
', ' + AgentTitle - for details, see the
documentation of the database).

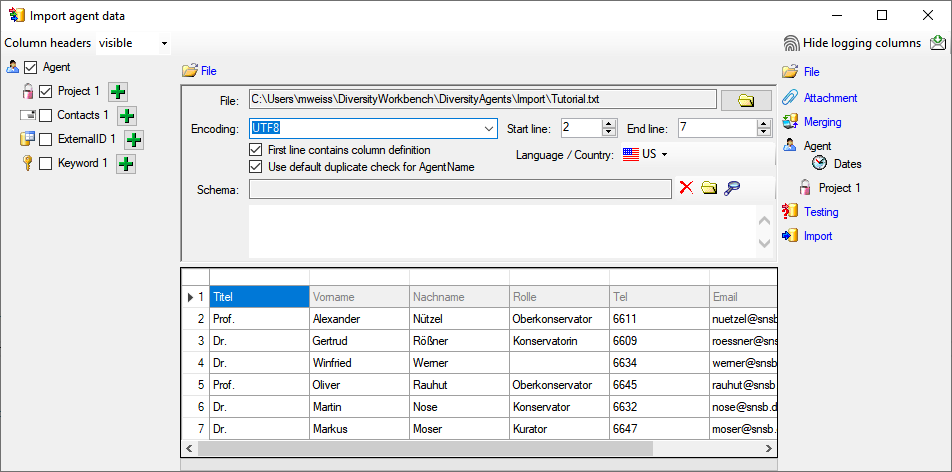
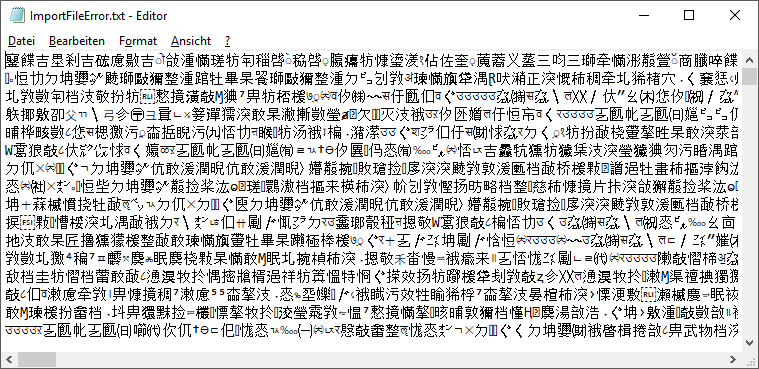
If you happen to get a file with a content as shown below, you may have
seleted the wrong encoding or the encoding is incompatible. Please try
to save the original file as UTF8 and select this encoding for the
import.
Import
- With the last step you can finally start to import the data into the
database. If you want to repeat the import with the same settings and
data of the same structure, you can save a schema of the current
settings (see below). You optionally can include a description of your
schema and with the  button you can
generate a file containing only the description.
button you can
generate a file containing only the description.
Schedule for import of tab-separated text files into DiversityAgents
- Target within DiversityAgents: Agent
- Database version: 02.01.13
- Schedule version: 1
- Use default duplicate check: ✔
- Lines: 2 - 7
- First line contains column definition: ✔
- Encoding: UTF8
- Language: US
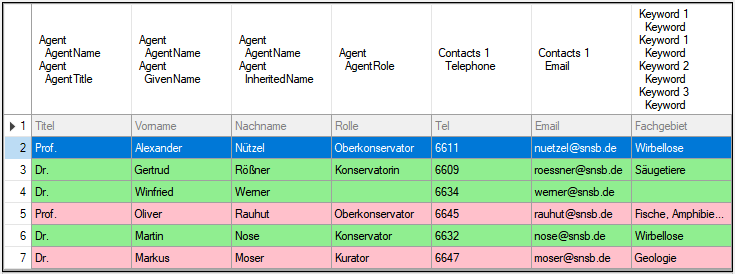
Lines that could not be imported will be marked with a red background
while imported lines are marked green (see below).
If you want to save lines that produce errors during the import in a
separate file, use the Save failed lines option. The protocol of the
import will contain all settings according to the used schema and an
overview containing the number of inserted, updated, unchanged and
failed lines (see below).
Description
- A description of the schema may be included in the schema itself or with
a click on the Import button generated as a
separate file. This file will be located in a separate directory
Description to avoid confusion with import schemas. An example for a
description file is shown below, containing common settings, the
treatment of the file columns and interface settings as defined in the
schema.
procFillJsonCache is started by an update trigger trgUpd… of the main table in the database
Interface in clients
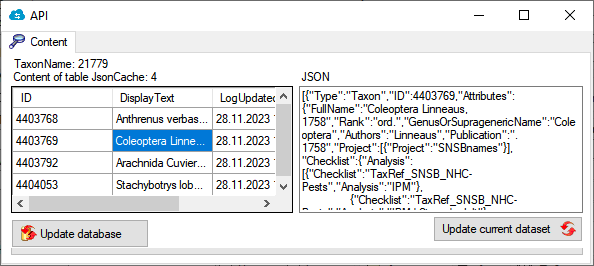
All modules provide data via a cache table. In the header of the clients you can inspect the content of the JsonCache with a click on the  button. For modules with a difference between local and public data, you can inspect the content of the public data with a click of the right mouse button.
Update
Apart of the update via the Trigger (see below) you can update the JsonCache via the  update button underneath the button.
To update the JsonCache for the whole database select Administration - JsonCache… from the menu. a window as shown below will open where you can update the JsonCache for single datasets or the whole database.
Summary
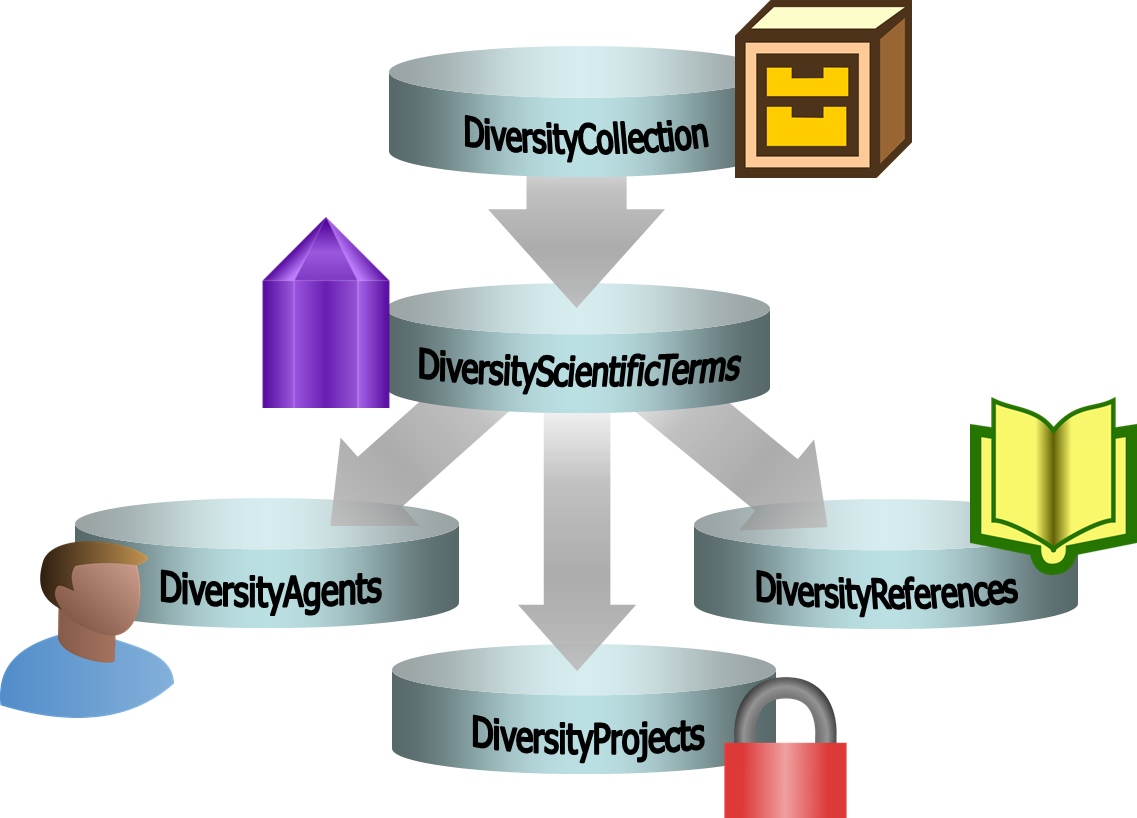
graph TD;
    TaxonName[Main table in database]
    trgUpdTaxonName[trgUpd.. of main table in database]
    TaxonName --> |Update in table| trgUpdTaxonName
    proc[Procedure procFillJsonCache setting the content in table JsonCache]
    trgUpdTaxonName --> proc
graph TD;
    Mainform[Main form]
    ButtonShow[Button show JsonCache of current dataset]
    Mainform --> ButtonShow
    Left[Show Data]
    ButtonShow --> |Left click| Left
graph TD;
    Mainform[Main form]
    Admin[Administration menu]
    Mainform --> Admin
    Cache[JsonCache...]
    Admin --> Cache
    Adminform[Administration form]
    Cache --> Adminform
    AdminUpdateSingle[Update single dataset]
    Adminform --> AdminUpdateSingle
    AdminUpdateDB[Update for whole database]
    Adminform --> AdminUpdateDB


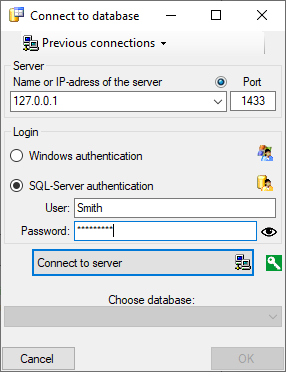
 DiversityCollection.exe.

 . A dialog form “Connect to database” opens.
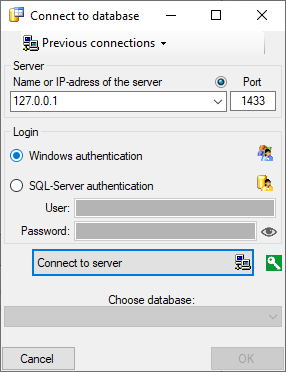
 .
. .
.
 next to the Connect to server button indicates an encrypted connection.
By clicking on the icon, you can switch to an unencrypted connection, indicated by the icon
next to the Connect to server button indicates an encrypted connection.
By clicking on the icon, you can switch to an unencrypted connection, indicated by the icon  .
. Module connections …
Edit the connections to the other modules within the
DiversityWorkbench.
Module connections …
Edit the connections to the other modules within the
DiversityWorkbench. Transfer previous settings
Transfer the settings of a previous version.
Transfer previous settings
Transfer the settings of a previous version. Table editors
Edit data as selected in the query data
directly in the data tables.
Table editors
Edit data as selected in the query data
directly in the data tables.
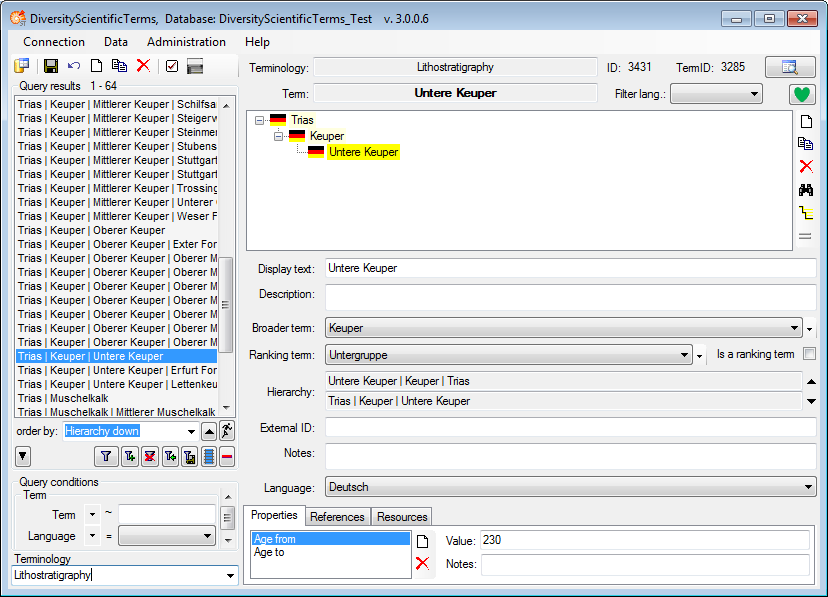
 Term …
Edit data of the Term table.
Term …
Edit data of the Term table. Representation …
Edit data of the TermRepresentation table.
Representation …
Edit data of the TermRepresentation table. Property …
Edit data of the TermProperty table.
Property …
Edit data of the TermProperty table. Reference …
Edit data of the TermReference table.
Reference …
Edit data of the TermReference table. Resource …
Edit data of the TermResource table.
Resource …
Edit data of the TermResource table. Backup database …
Backup of the whole database
Backup database …
Backup of the whole database CSV (bcp)
Export data of the whole database as csv files
CSV (bcp)
Export data of the whole database as csv files Documentation …
Documentation of the tables within the database
Documentation …
Documentation of the tables within the database Logins …
Administration of the logins of the server their permissions in the
databases
Logins …
Administration of the logins of the server their permissions in the
databases Rename database
Rename the current database
Rename database
Rename the current database Database tools …
Creation of log tables, triggers etc. (only for dbo)
Database tools …
Creation of log tables, triggers etc. (only for dbo) Language …
Enabling languages for the
terms.
Language …
Enabling languages for the
terms. Resources directory …
Setting the directory for the
resources.
Resources directory …
Setting the directory for the
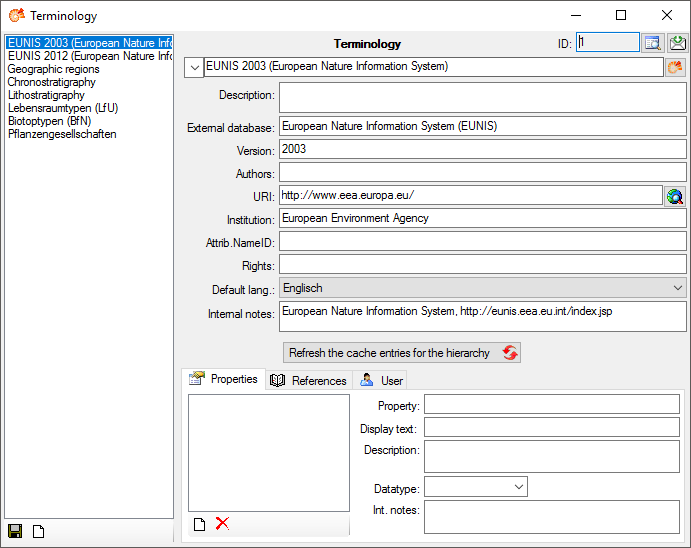
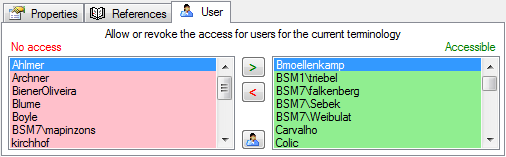
resources. Terminologies …
Administration of the terminologies.
Terminologies …
Administration of the terminologies. Feedback …
Opens a form for sending feedback
Feedback …
Opens a form for sending feedback Feedback history …
Opens a window for browsing former feedback.
Feedback history …
Opens a window for browsing former feedback. Edit feedback …
Opens a window for editing the feedbacks sent to the administrator
(for admins only).
Edit feedback …
Opens a window for editing the feedbacks sent to the administrator
(for admins only). Websites Websites related to DiversityScientificTerms
 Errorlog
Inspect the errorlog of DiversityScientificTerms
Errorlog
Inspect the errorlog of DiversityScientificTerms Update database …
Update the database to the current version
Update database …
Update the database to the current version Update client …
Download the current version of the client
Update client …
Download the current version of the client


 .
.
 .
.
 .
. .
. , Problem
  , Reference


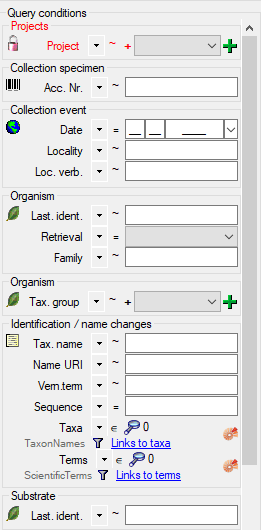
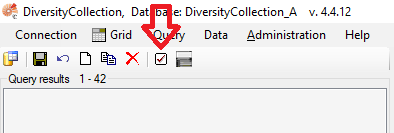
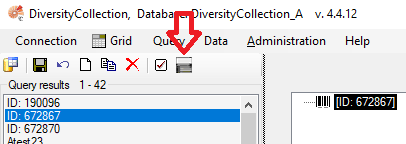
 . To display
several columns in the result list, click on the
. To display
several columns in the result list, click on the  button.
To change the sorting of the added order column click on the
button.
To change the sorting of the added order column click on the

 icon. To make a representation the preferred
representation, simply click on this icon.
icon. To make a representation the preferred
representation, simply click on this icon. set color button. A window will open where
you can either select an available color or define a new one. The color
will e.g. be used as background in a chart. If depending terms should
use a color of the same hue, click on the
set color button. A window will open where
you can either select an available color or define a new one. The color
will e.g. be used as background in a chart. If depending terms should
use a color of the same hue, click on the  button to activate the inheritance for the color. The button will change
to
button to activate the inheritance for the color. The button will change
to
 . See chapter
 button above the query list. A form as
shown below will open where you can enter some basic informations for
the new term.
button above the query list. A form as
shown below will open where you can enter some basic informations for
the new term.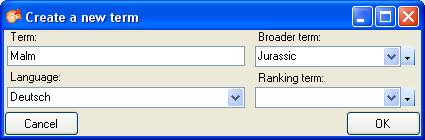
 button besides the hierarchy. This will
create a synonym to the original dataset.
button besides the hierarchy. This will
create a synonym to the original dataset.
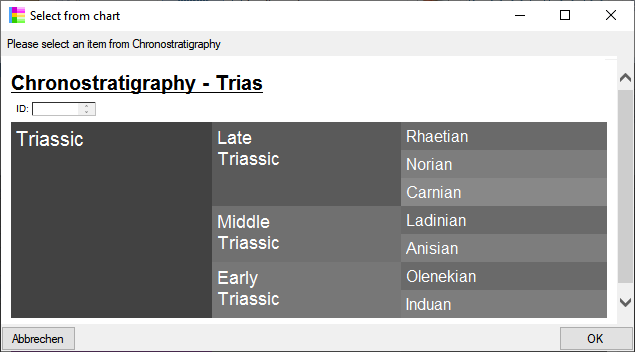
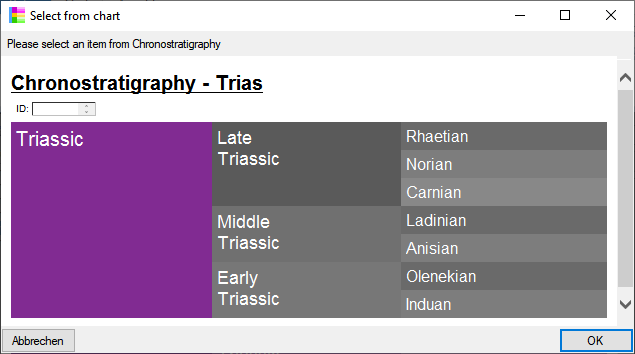
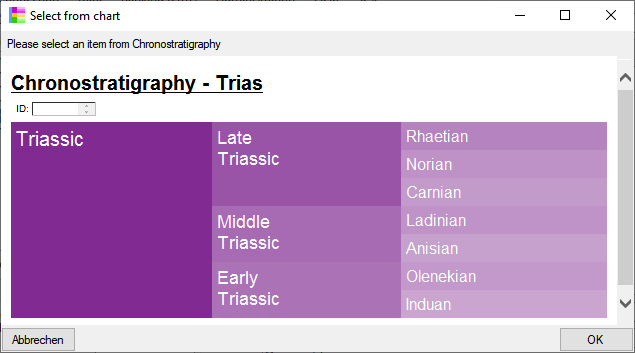
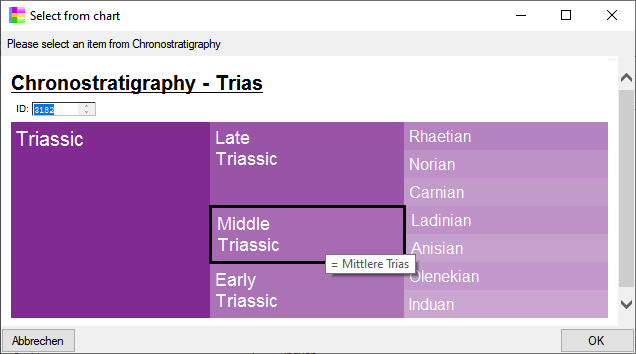
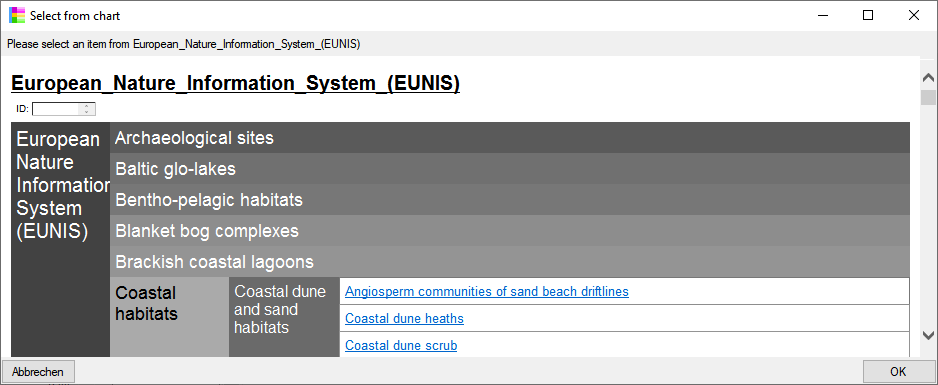
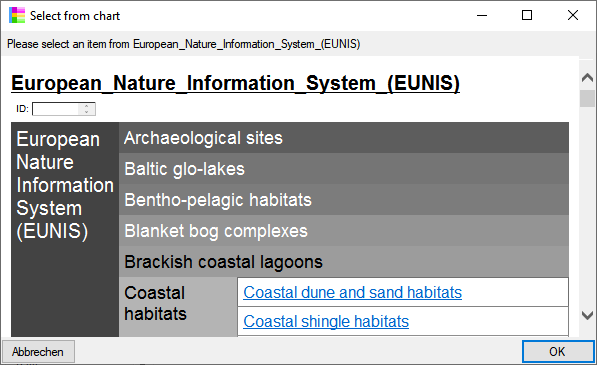
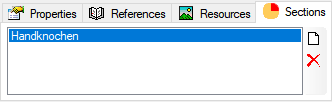
 Chart
from the menu. In case there are sections a window will open where you
choose the data you want to show in the chart. A window as shown below
will open. To test the chart, select an entry and click OK.
Chart
from the menu. In case there are sections a window will open where you
choose the data you want to show in the chart. A window as shown below
will open. To test the chart, select an entry and click OK.  .
. 

 for the chart will be generated in the user directory as
shown below. The file …_ChartSelect.html is the main file. the other
files like e.g. …_ChartSelect_71_76.html are depending files that
contain the items with the parent ID 71. These files will be removed
when you close the chart.
for the chart will be generated in the user directory as
shown below. The file …_ChartSelect.html is the main file. the other
files like e.g. …_ChartSelect_71_76.html are depending files that
contain the items with the parent ID 71. These files will be removed
when you close the chart.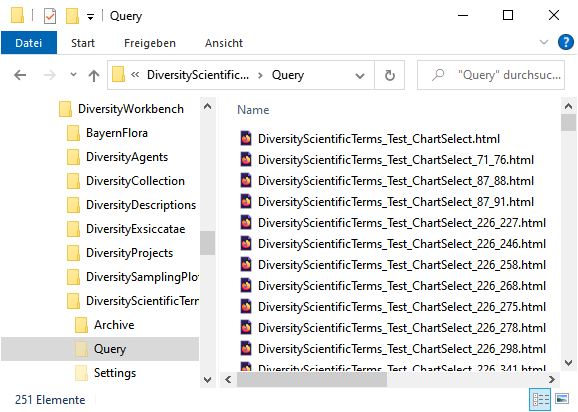

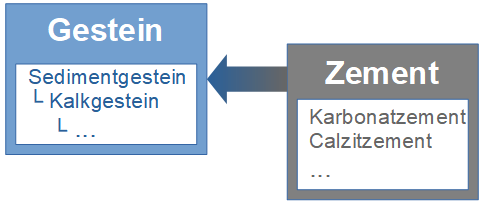
 button. In the window that will open, select
the broader term from the list and click OK. To remove the relation to a
broader term, click on the
button. In the window that will open, select
the broader term from the list and click OK. To remove the relation to a
broader term, click on the  button. The
image below summarizes the options to depict the relations in the
hierarchy.
button. The
image below summarizes the options to depict the relations in the
hierarchy.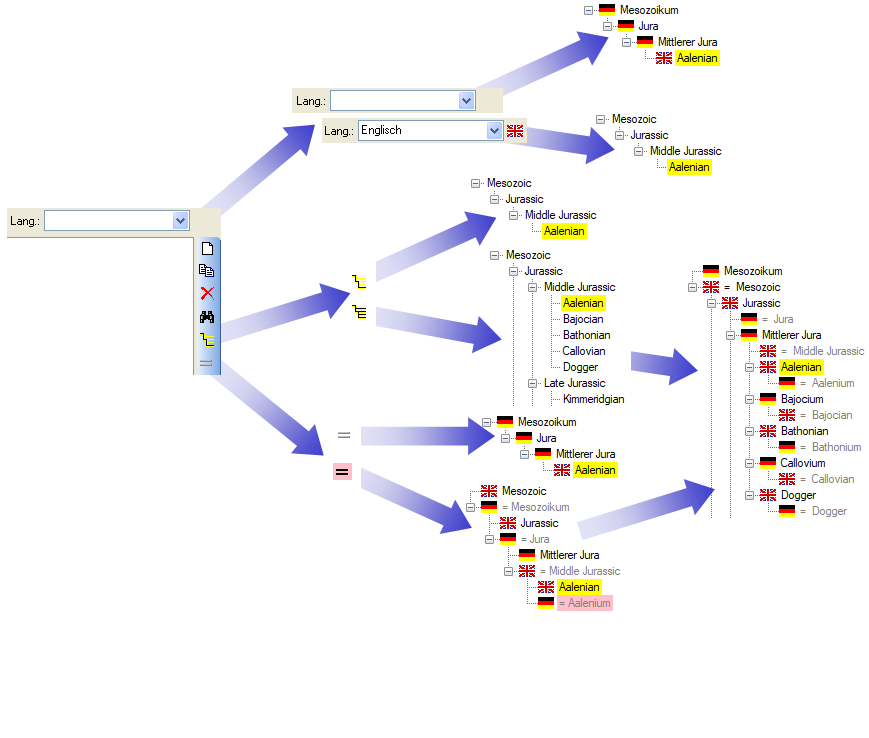
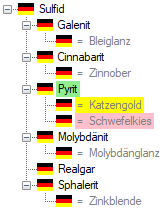
 button. The button will change to
 and the hierarchy will show the synonyms
with the indaction of the language. Synonyms of the current term will
have a pink backgroud.
and the hierarchy will show the synonyms
with the indaction of the language. Synonyms of the current term will
have a pink backgroud.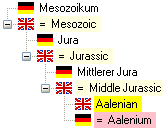
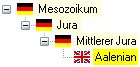
 only one language will be shown in the
hierarchy as shown below.
only one language will be shown in the
hierarchy as shown below.
 button. It will change to


 Language from the menu. In
the window that will appear, you can enanble or disable certain
languages (see below). With a click on the Disable languages that are not used button,
you can disable all languages that are not used for synonyms so far,
which will shorten the list for selection in the main form..
Language from the menu. In
the window that will appear, you can enanble or disable certain
languages (see below). With a click on the Disable languages that are not used button,
you can disable all languages that are not used for synonyms so far,
which will shorten the list for selection in the main form..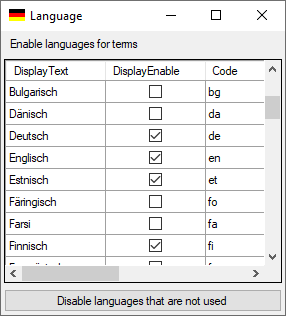


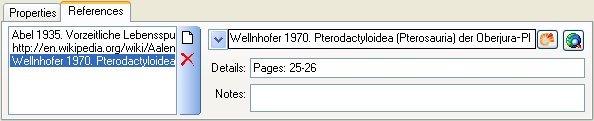
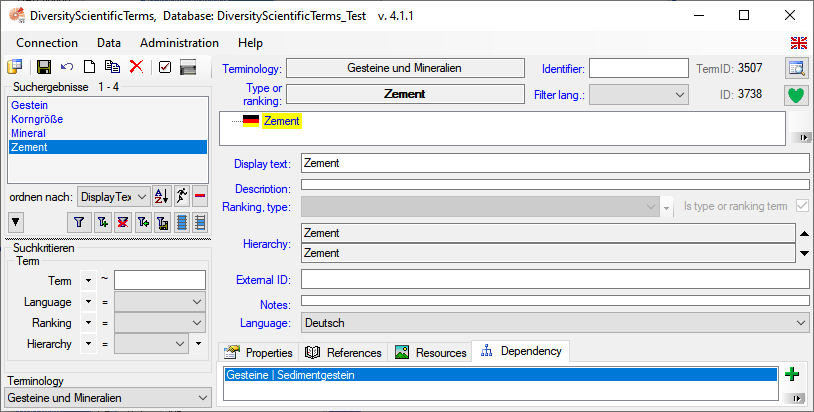
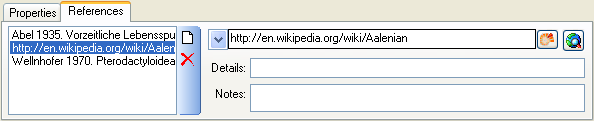
 button to open a window where you can search and select for a reference in e.g. the module DiversityReferences. You need access to DiversityReferences or a corresponding webservice to use this option.
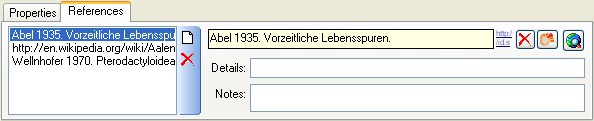
 field. The image will
change to
field. The image will
change to 
 button. A window
as shown below will open.
button. A window
as shown below will open.
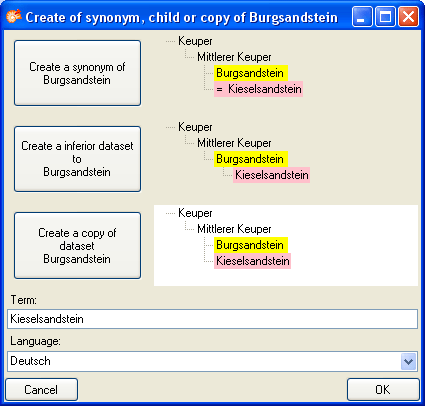
 button. To make a term a synonym to
another term, click on the
button. To make a term a synonym to
another term, click on the 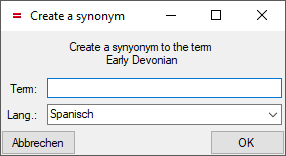

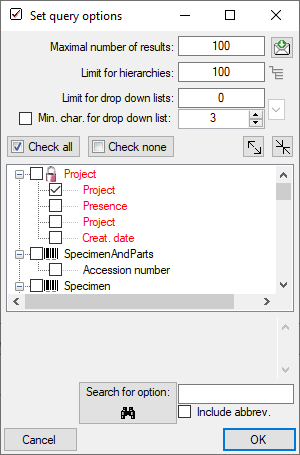
 Set timeout ... from the menu to
increase the default timeout from 5 seconds to a higher value, e.g. for
greater amounts of data.
Set timeout ... from the menu to
increase the default timeout from 5 seconds to a higher value, e.g. for
greater amounts of data.  Insert: Insert the given value at the
beginning of the content
Insert: Insert the given value at the
beginning of the content Append: Append the given value at the end of
the content
Append: Append the given value at the end of
the content Replace: Replace a string in the content
with the given value
Replace: Replace a string in the content
with the given value Clear: Remove the content
 button. The file will be automatically saved in
the client-folder.
button. The file will be automatically saved in
the client-folder.  button. The data
will be exported into the SQLite database DiversityAgentTables.sqlite in
the folder Export in your application directory. If you want to save
previous exports, please rename the SQLite database or copy it to a
different directory.
button. The data
will be exported into the SQLite database DiversityAgentTables.sqlite in
the folder Export in your application directory. If you want to save
previous exports, please rename the SQLite database or copy it to a
different directory. 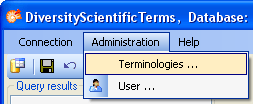
 in DiversityProjects. Click on the

 Record all SQL statements.