Subsections of Editing
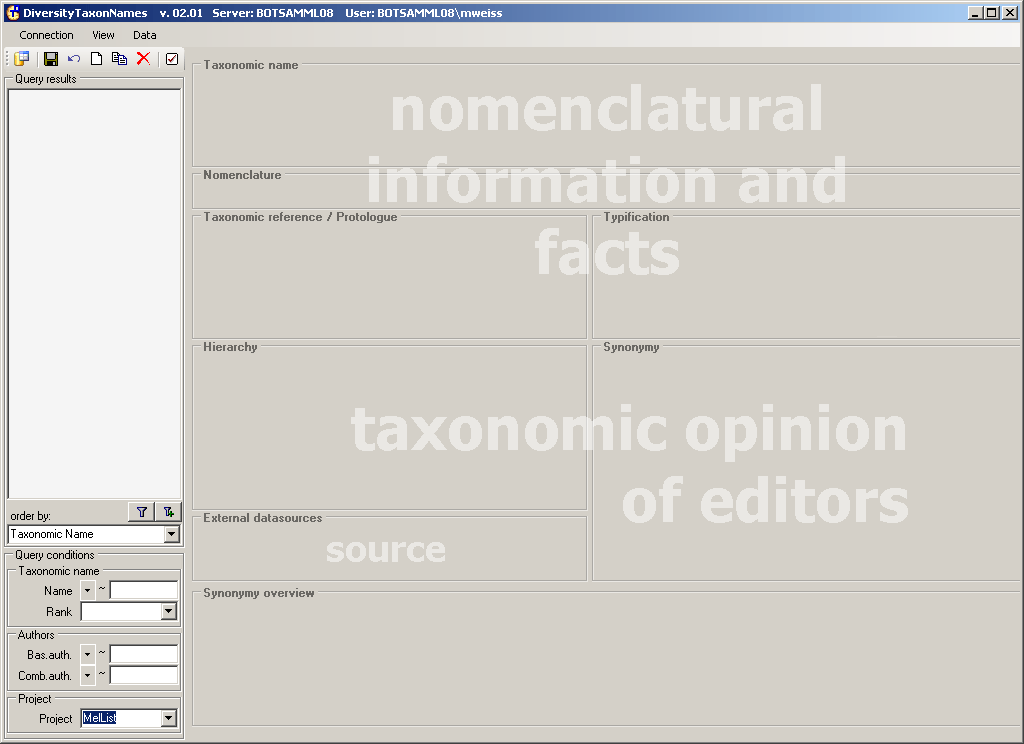
Diversity Taxon Names
External databases
Most names in DiversityTaxonNames were imported from external sources.
These sources are documented in the area External data sources.
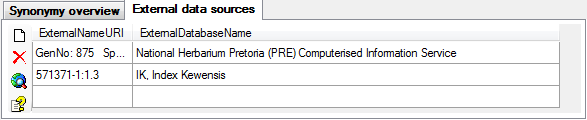
To enter or delete an external datasource, use the  and
and  button button respectively. With the
 button you will get a detailed information about
the external database. For a valid URI you can use the
button you will get a detailed information about
the external database. For a valid URI you can use the
 button to open the corresponding website in a
separate window.
button to open the corresponding website in a
separate window.
To edit the datasources themselve, choose
TaxonNameExternalID and
TaxonNameExternalDatabase
Diversity Taxon Names
Hierarchy
The taxonomy for
the choosen name is depicted in the area Hierarchy. If the taxonomy has
not been specified a button will be visible
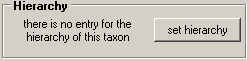
click on it to insert a dataset for the hierarchy of this taxon.
To choose a higher
taxon you first have to specify the taxonomic rank of the choosen
name

and type at least 2
characters of the higher taxon in the ‘Superior taxon:’ field.

Click on the drop
down button to get the list of taxa above
the rank of the name for which you want to set the hierarchy. The
hierarchy will then be shown in the tree view (see below). The taxa below the current taxon will be
displayed in gray.
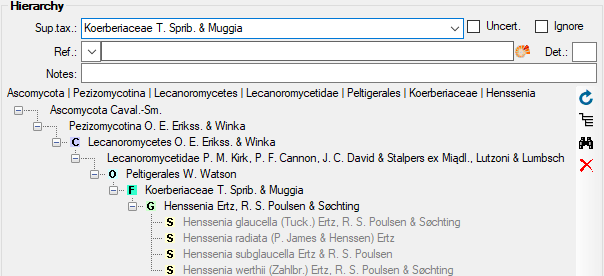
The first line shows
the taxon or taxonomic group superior to the choosen taxon. To directly
access the database entry of a higher taxon, choose this taxon in the
hierarchy tree and click on  . The button
will delete this entry. As an alternative to
delete the entry for the hierarchy, you may set it on Ignore to keep the
information but exclude it from the creation of a hierarchical tree (see chapter Ignoreddata for further details). To get an overview
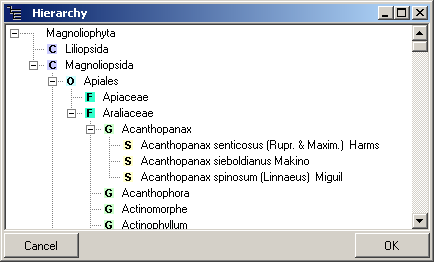
of the whole hierarchy click on the button
. The button
will delete this entry. As an alternative to
delete the entry for the hierarchy, you may set it on Ignore to keep the
information but exclude it from the creation of a hierarchical tree (see chapter Ignoreddata for further details). To get an overview
of the whole hierarchy click on the button  .
You get an overview for the whole taxonomy including the current taxon
as shown below. The line above the hierarchy tree shows the cached value
for the hierarchy. After changes in the hierarchy this cached value may
differ from the actual hierarchy. To refresh it, click on the
.
You get an overview for the whole taxonomy including the current taxon
as shown below. The line above the hierarchy tree shows the cached value
for the hierarchy. After changes in the hierarchy this cached value may
differ from the actual hierarchy. To refresh it, click on the
 button.
In the taxon tree
the main taxonomic groups are indicated with icons (S = species, G =
Genus, F = Family, O = Order, C = Class, K = Kingdom). To change the
position of a taxon within the hierarchy, use the drag & drop function
of the tree.
To enable a search
within the hierarchy, please use the maintenace
function to update the hierachy cache. The hierarchy is stored in one
string, so to search for e.g. all members of e.g. a certain familiy e.g.
Rosaceae, please use the ~ operator and a leading wildcard
in your search string e.g. “% Rosaceae” or “* Rosaceae”.
The information
about the hierarchy is related to opinions of the editors and are
allways restricted to a certain project. The data of the
hierarchy are stored in table
TaxonHierarchy.
Diversity Taxon Names
List view
To see the data in a spreadsheet, choose View →  List view … from the menu. A window will open where all names from the query will be listed.
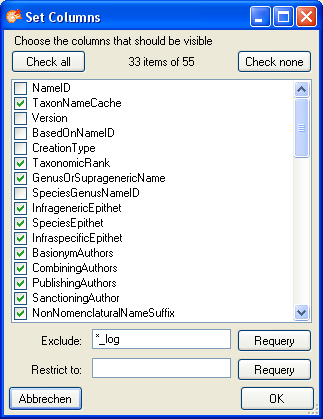
Customize visibility of fields
To change the selection of the visible fields, click on the
 Column visibility button. A window as shown
below will open, where you can change the visibility of the columns.
Column visibility button. A window as shown
below will open, where you can change the visibility of the columns.
Customize sequence
To change the sequence of the columns, just use your mouse to drag the
columns to the position of your choice.
Sorting of the data
To sort the data in the grid just click in the header of the column
which you want to use as sorting column. The sorting sequence will be
kept even if you change values in this column. That means that if you
change a value in the sorting column the changed dataset will be placed
at the new position according to its new value. The sorting of a column
will be indicated with an arrow for the direction of the sorting (up or
down).
Change to data in main form
To change to a name in the main form, click on the , use the
button.
To adapt the width of the columns or the height of the rows either drag
the border with the mouse, double click the border to get the optimal
size for one column or respectively or click on the
 button for an optimal height of the rows or
the
button for an optimal height of the rows or
the  button for an optimal width of the columns.
Exporting data
For an introduction see the video: 
After setting the form according to your preferences, you can export the
data with a click on the  export button. If the data
should be appended in an existing file, change the option for the file
handling from
export button. If the data
should be appended in an existing file, change the option for the file
handling from  (= New file) to
 (= Append). The
  botton opens
the folder containing the exported file.
botton opens
the folder containing the exported file.
Diversity Taxon Names
Projects
Projects with the
DiversityWorkbench are located in the database DiversityProjects. The
access to the data is organized via projects. The projects a user has
access to can be selected in the query options.
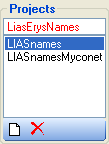
To edit the project list use the project area. Use
the and buttons to add or
delete projects from the list.

If there are
projects, to which you have no access, an additional list will appear,
showing these projects (see below).
The information related to opinions of the editors are allways restricted to a certain
project (see Database.).
Diversity Taxon Names
References
References related to a taxon can be added in the area “References”. Use
the  (add) and the (remove)
buttons to handle the references.
(add) and the (remove)
buttons to handle the references.
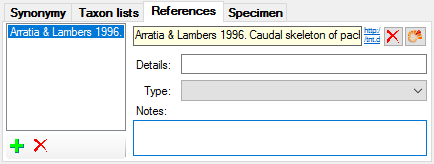
The data of the
references are stored in table
TaxonNameReference.
Diversity Taxon Names
Relations
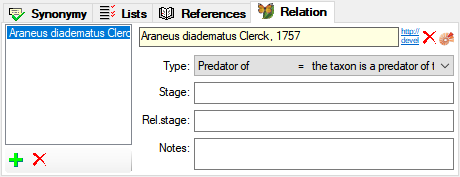
Relations between a taxa can be added in the area  Relation.
You can insert 2 types of relations:
- Ecological interactions
 Taxonomic concept relationships
Ecological interactions
These relations handle interactions between taxa like taxon a is a parasite of taxon b as in the example below.
Taxonomic concept relationships
These relations handle relations between taxonomic concept where e.g. the definition of taxon a only in parts overlaps with the definition of taxon b as in the example below.
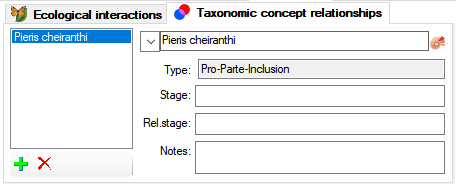
For both options use the (add) button to add a new relation. A window will open where you must choose the type of the relation. The type can not be changed after it has been set. To change the type of the relation you need to delete the entry and add it with the new type. To remove a relation use the (remove)
buttons.
The data of the
relations are stored in table
TaxonRelation.
Diversity Taxon Names
Synonymy
Basionym
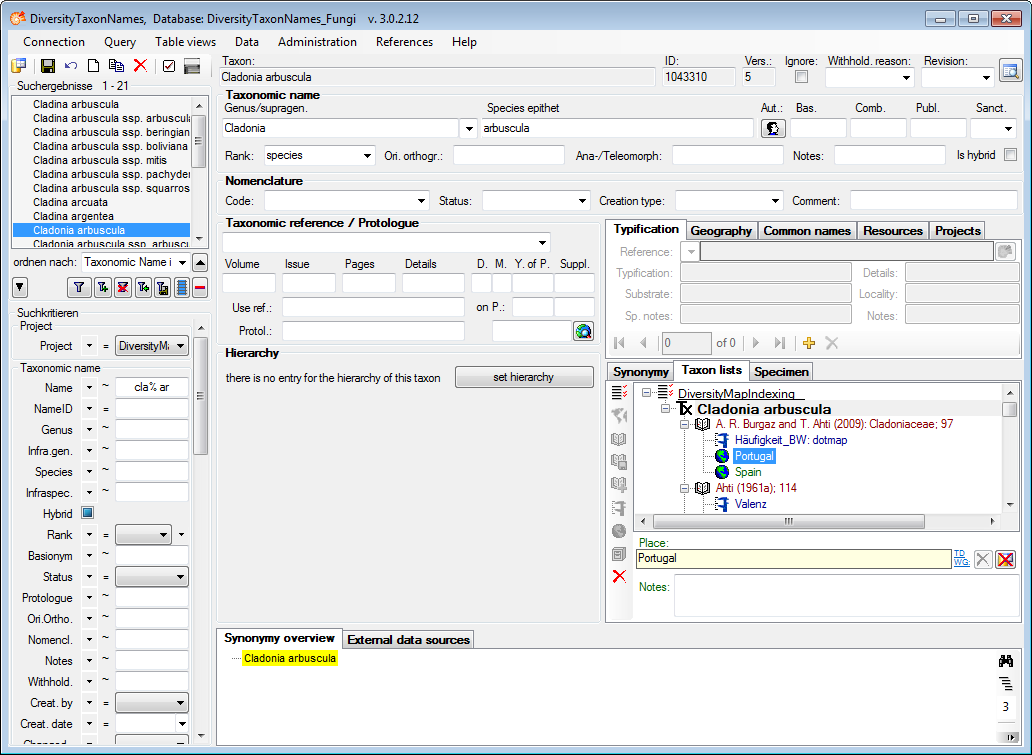
The name on which
the choosen name is based on should be entered in the “Based on:” field.

A name can be
either an accepted name or a synonym to an accepted name. If nothing was
specified so far, two buttons are visible:

choose one of these
to make the choosen name to either an accepted name or a synonym.
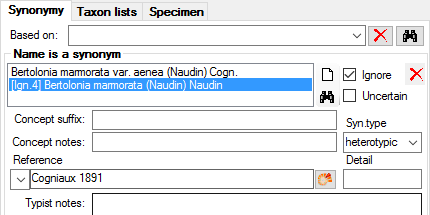
Synonym
If the name is a
synonym, the area for the synonymy will appear as shown in the
images<
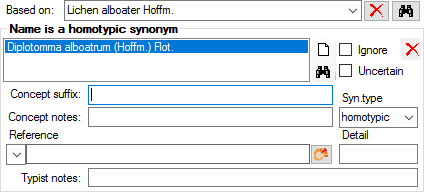
A name in most cases
is synonym to one name but may sometimes be synonym to several names
(e.g. pro parte). If you want to keep information of the synonymy you
can set it to ignore (see chapter Ignored data for
further details).
Delete a synonym
To delete a synonym,
choose it in the list and click on the delete button
.
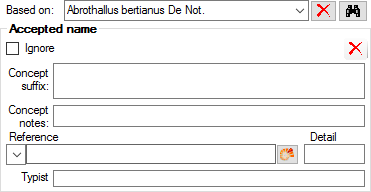
Accepted Name
If the name is
accepted, the form will show data related to accepted names
 You can indicate
accepted names in the search result list (in the menu choose View,
indicate accepted names)
You can indicate
accepted names in the search result list (in the menu choose View,
indicate accepted names)
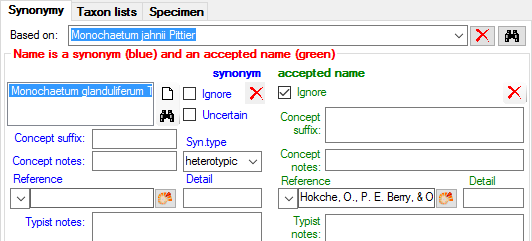
Conflict (Name declared a synonym and a basionym)
If by any chance
(e.g. after import of synonymy relations from a foreign source) a name
happens to be a synonym and an accepted name at the same time this is
regarded as an error and will be shown as in the image below.
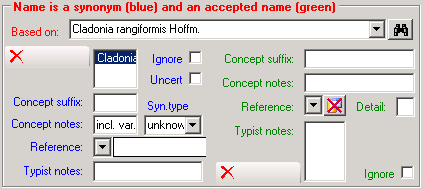
The data for the
synonym are shown on the right side with blue labels, while the data for
the accepted name are shown on the left with green labels. To correct
this error you can either remove or ignore (see chapter Ignoreddata for further details) the assignement as a synonym
or an accepted name.
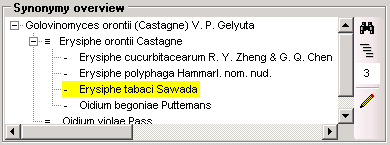
Overview
In the area
Synonymy overview you see the accepted name for the name you chose
and a list of all the synonyms to this name. The sign ≡ in front of a name following the
accepted name means that this and the following names are homotypic
synonyms to the accepted name. Groups of hetereotypic names start with a
= in front of the first entry. If present, the first entry in each
group is the basionym of this group. Names with unclear relation to the
accepted name are preceeded by a “-”. To change to one of the names in
the list, choose it in the list and click on the search button
. The overview can be shown either as a list,
corresponding to lists in publications or as a tree view. Use
the  and
and  button to change between these views. In the tree view the current name
is marked with a yellow background as shown below. The scrutiny of the search can be
adapted by changing the number in the tool bar . As standard it is set on 3, but can be changed to values between 0
(just the current name) to 9. The higher the scrutiny the more
thoroughly the search for synonyms will be performed and the longer it
will take. To speed up the retrieval of the synonymy the results can be
stored in a cache table as explained in the tutorial
.
Use the
button to change between these views. In the tree view the current name
is marked with a yellow background as shown below. The scrutiny of the search can be
adapted by changing the number in the tool bar . As standard it is set on 3, but can be changed to values between 0
(just the current name) to 9. The higher the scrutiny the more
thoroughly the search for synonyms will be performed and the longer it
will take. To speed up the retrieval of the synonymy the results can be
stored in a cache table as explained in the tutorial
.
Use the  save button next to the basionym to update the
synonymy in the cache table for the current name or choose Administation - Refresh
SynonymyListCache from the menu to update the content for all
taxa in the database.
save button next to the basionym to update the
synonymy in the cache table for the current name or choose Administation - Refresh
SynonymyListCache from the menu to update the content for all
taxa in the database.
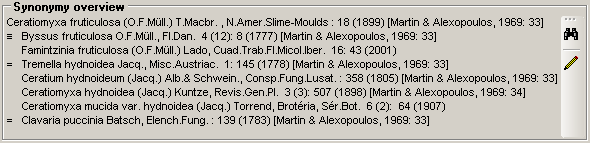
Explanation of the example above:
| Type |
|
Example |
| accepted name |
|
Ceratiomyxa fruticulosa (O.F.Müll) T.Macbr. |
| basionym |
≡ |
Byssus fruticulosa O.F.Müll. |
| homotypic synonym |
|
Famintzinia fruticulosa (O.F.Müll.) Lado |
| heterotypic synonym and basionym |
= |
Tremella hydnoidea Jacq. |
| heterotypic synonym |
|
Ceratium hydnoideum (Jacq.) Alb.& Schwein. |
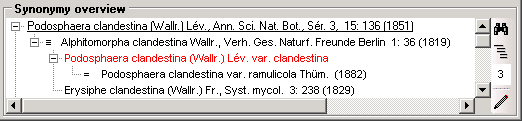
Editor
For a direct editing of synonymy list
click on the button  . The list with the
selected names and the synonymy overview will get a yellow background
(see image).
. The list with the
selected names and the synonymy overview will get a yellow background
(see image).
Now you can add
synonyms to the synonymy list by simply dragging them from the selected
names list on a name in the synonymy tree view. If you drag the name on
the accepted name, it will become a homotypic synonym of the accepted
name. If you drag it on a heterotypic synonym, it will become a
heterotypic synonym of the accepted name and get the same basionym as
the name you dragged it upon. If this name has no basionym, the dragged
name will become a homotypic name of the name you dragged it upon. If
you want to create a new heterotypic synonym or a synonym with unknown
relation to the accepted name, drag the name in the empty space of the
tree view.
If you want to
correct the synonymy you can drag the names within the synonymy overview
either on another name to create a homotypic synonym or into the free
space underneath the names to create a heterotypic synonym to the
accepted name.
To remove a name
from the lists of synonyms, choose it in the tree view and click on the
button.
Isonyms, duplicates and orthographic variants
Some names are a
variant spelled exactly as another name but with deviating citation of
the author(s). These might be a name with wrong citation of the
publishing or recombining author(s) or an isonym sensu ICBN. To change
the type of the synonymy to an isonym choose the taxon and change the
syn. type e.g. to “isonym”. In the synonymy overview list the isonyms,
duplicates etc. are indicated by square brackets “[duplicate: …
]”.
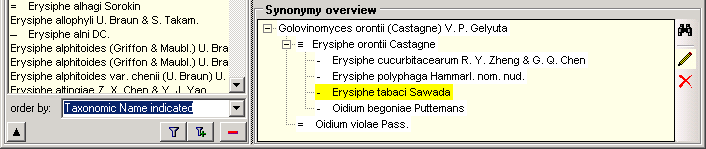
Ignored datasets
If it should happen,
that a dataset that is ignored is included in a synonymy in the form
that another name is referring to this ignored name, the system will not
be able to generate the synonymy properly. To detect ignored datasets in
the synonymy choose “Query → Show ignored data” from the menu (see
chapter Ignored data for further details). Ignored
dataset will than be shown with red letters in the synonymy as shown
below.
The information
about the synonymy is related to opinions of the editors and are allways
restricted to a certain project. The data of the
synonymy are stored in table
TaxonSynonymy. The data of the accepted
names are stored in table
TaxonAcceptedName.
Diversity Taxon Names
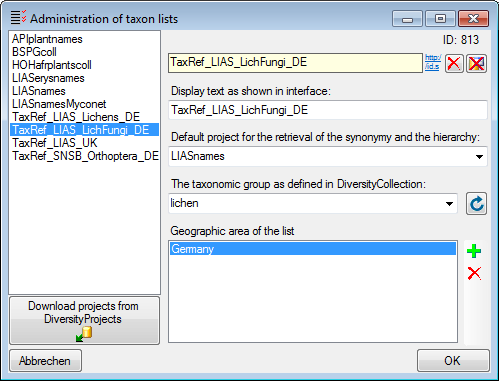
Lists for taxonomic names
With DiversityTaxonNames you can document list for taxonomic names like
e.g. checklists. The taxon lists may refers to a project defined in
DiversityProjects (see Administration - User … in the menu). To
edit the taxon lists choose Administration → Taxon lists … from
the menu. A window as shown below will open, where you can enter, edit
or delete taxon lists. The administrative functions are only available
for administrators.
For the detailed documentation of the Taxon lists please use
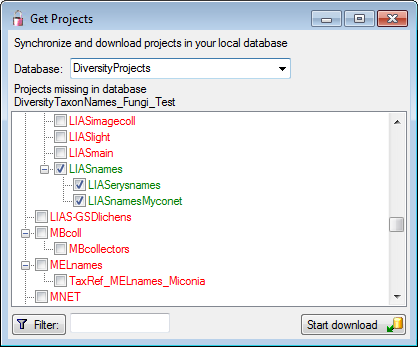
DiversityProjects. To load projects into the list, click on the
Download projects from DiversityProjects  button (see above). A window as shown below will open. If several
Databases for DiversityProjects are available on your server you have to
choose one of these. The projects available in the DiversityProjects
database will be listed as shown below where those already present are
checked and green, while missing
projects are red. Check those
projects you need as lists and click the Start download
button.
button (see above). A window as shown below will open. If several
Databases for DiversityProjects are available on your server you have to
choose one of these. The projects available in the DiversityProjects
database will be listed as shown below where those already present are
checked and green, while missing
projects are red. Check those
projects you need as lists and click the Start download
button.
For access to the related data choose the tab Taxon lists (see
below).
To enter a new list, click on the  button. This
will open a window where you can choose from the available taxon lists.
Choose the list in which you want to include your name and click OK.
button. This
will open a window where you can choose from the available taxon lists.
Choose the list in which you want to include your name and click OK.
Area
The geographical area can be definded for a single name (via
 Distribution) or for the whole taxon list. The
entries refer to the World geographical scheme for recoding plantdistributions. To enter the
geographic area for the whole list, click on the
Distribution) or for the whole taxon list. The
entries refer to the World geographical scheme for recoding plantdistributions. To enter the
geographic area for the whole list, click on the  button. A form will open where you can choose geographical places from
the module DiversityGazetteer. To open the link to the module, click on
the
button. A form will open where you can choose geographical places from
the module DiversityGazetteer. To open the link to the module, click on
the  button and search for the region as described in
the chapter Module related entry.
button and search for the region as described in
the chapter Module related entry.

If you need a certain region not provided in the list, just type the
name of the region and click OK. The new region will be listed directly
underneath the list (see below).

References
For every name in a taxon list, you can enter the references where the
informations for the list are derived from. To add a reference, select
the list for which you want to add a reference and click on the
 button. The entry for the reference will
appear underneath the taxon as shown below. To edit this entry, select
it in the hierarchy and use the contols underneath the tree. You may
link the reference to an external source like DiversityReferences or one
of the provided webservices.
button. The entry for the reference will
appear underneath the taxon as shown below. To edit this entry, select
it in the hierarchy and use the contols underneath the tree. You may
link the reference to an external source like DiversityReferences or one
of the provided webservices.

If you want to transfer the informations of a reference together with
depending  analysis and
distribution entries to another name, select the reference in the tree
und click on the
analysis and
distribution entries to another name, select the reference in the tree
und click on the  button. As a result you
can use the
button. As a result you
can use the  button to insert these
informations at a different place.
button to insert these
informations at a different place.
Analysis
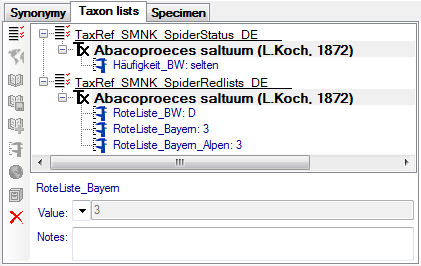
For a name within a list, you can enter an analysis either directly for
the name or a reference linked to this name. Select the name or the
reference in the tree and click on the button to enter a new analysis.
Depending on the definition of the analysis To edit the analysis used
within the database, select it in the tree and use the area below the
the tree. Depending on the definition of the analysis (see above) the
values are either typed or selected from a list.
To prevent a analysis from publication e.g. via the cache database in
DiversityCollection, enter a withholding reason in the corresponding
field  . The sorting in an interface is set via the
sorting. To check the current sorting click on the
. The sorting in an interface is set via the
sorting. To check the current sorting click on the  button.
Distribution
For every entry in a taxon list, you can document the
distribution of a taxon (see below). This
information may be linked to the taxon or a reference (see below).
Choose either the list taxon or the reference in the tree and click on
the button to insert a new distribution. The
entries refer to the World geographical scheme for recoding plantdistributions. A form will open
where you can choose geographical places from the module
DiversityGazetteer. To open the link to the module, click on the
button and search for the region as described in the
chapter Module related entry.
If you need a certain region not provided in the list, just type the
name of the region and click OK.
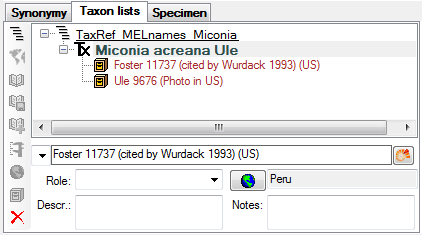
Specimen
For every entry in a taxon list, you can document the collection
specimen linked to this taxonomic name (see below). The entries may be
linked to the module DiversityCollection. To enter a distribution for
the specimen, use the button. A window will open
(see above), where you can select a geographic region as defined in the
World geographical scheme for recoding plant
distributions.
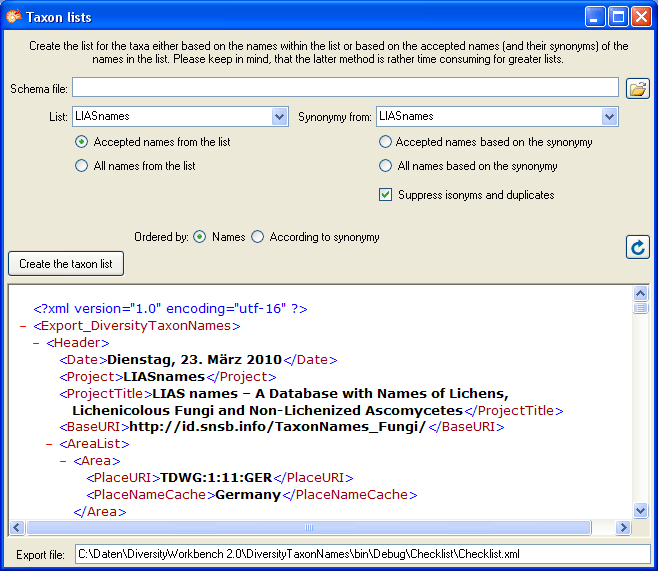
Export
To export the taxon lists resp. checklist, choose Data → Export
taxon list … from the menu. A window as shown below will open. By
default the data will be exported as XML (see below). Choose a schema
file of your choice to convert the XML-output in a HTML document. You
have several options for the export in regard of the names as shown in
the window below. The export may be based on the names in the list and
can be restricted to the accepted names among these (see below - left).
In the second option (see below - right), the accepted names for all
names in the list will be selected and the taxon list will contain only
these names and optionally their synonyms. Regarding the synonyms, if
you want to suppress the export of isonyms and duplicates, use the
according checkbox. For long lists, the second method will be rather
time consuming, as the synonymy must be checked for every single name.
The synonymy for the exort may be derived from any available project.
The path of the exported file (either *.xml or *.html) is shown in the
field Export file at the bottom of the form. The names in the list may
be sorted according to the names or the synonymy where synonyms will be
inserted after their assigned accepted names. The format the XML-export
with a schema file of your choice, choose the schema file and click on
the button.
The tables involved in the storage for the taxon list are documented in
the taxon list tables part.
Subsections of Taxon List
Diversity Taxon Names
Analysis in taxonomic lists
To administrate the analysis categories within the taxon lists choose in the menu.
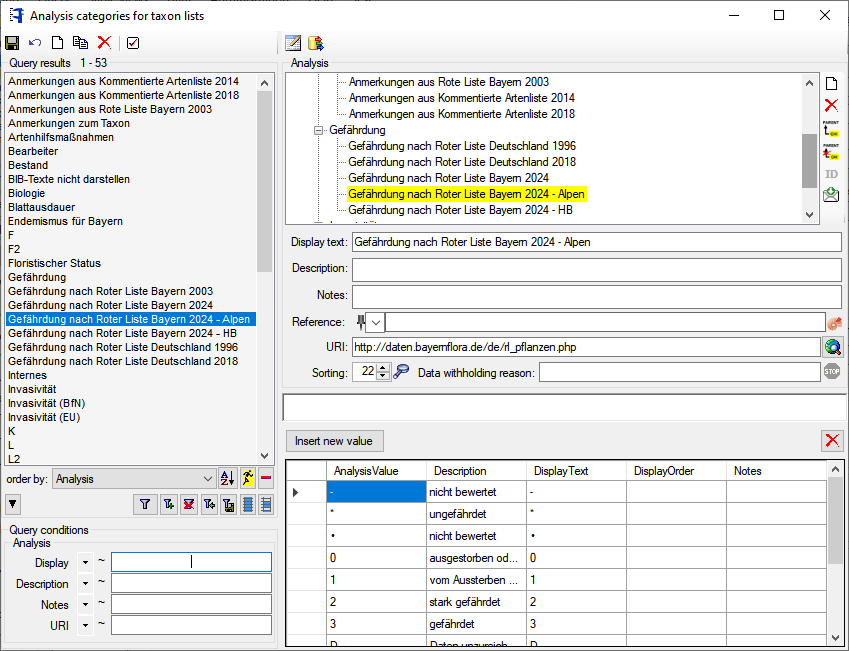
The button  will open a table editor window where you can edit certain parts of the data.
To export the selected analysis use the  button.
To check the sorting of the analysis click on the button. A window will open listing all analysis categories sorted according to the IDs.
The tables involved in the storage for the taxon list are documented in
the taxon list tables.
Diversity Taxon Names
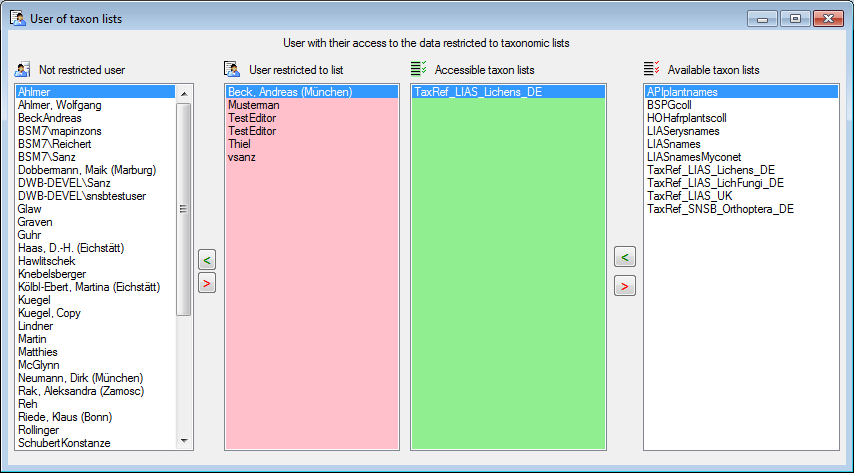
Access restriction to taxonomic lists
If the access of a user should be restricted to names within a taxonomic
list, choose Administration - List user … in the menu. A windows
as shown below will open, where you can add and remove lists thats
should be accessible by a user. The users with no restriction are listed
in the left. To restrict a user to a certain list, choose the user in
the list, the list the user should be
restricted to and click on the button. The lists
a restricted user has access to are listed in the
 list. To add or remove lists, use the < and > buttons.
The tables involved in the storage for the taxon list are documented in
the taxon list tables part.
Diversity Taxon Names
Edit Taxa In List
To edit the taxa in a spreadsheet, choose View →
Edit taxa in list … from the menu. A window
will open where all names from the query will be listed.
Customize visibility of fields
To change the selection of the visible fields, click on the
Column visibility button. A window as shown
below will open, where you can change the visibility of the columns.
Customize sequence
To change the sequence of the columns, just use your mouse to drag the
columns to the position of your choice.
Sorting of the data
To sort the data in the grid just click in the header of the column
which you want to use as sorting column. The sorting sequence will be
kept even if you change values in this column. That means that if you
change a value in the sorting column the changed dataset will be placed
at the new position according to its new value. The sorting of a column
will be indicated with an arrow for the direction of the sorting (up or
down).
Change to data in main form
To change to a name in the main form, click on the , use the
button.
To adapt the width of the columns or the height of the rows either drag
the border with the mouse, double click the border to get the optimal
size for one column or respectively or click on the
button for an optimal height of the rows or
the
button for an optimal width of the columns.
Diversity Taxon Names
Data
To save the changes in a dataset click
on the
button.
To undo the
changes in a dataset click the  undo button. This will
recover the original data unless the changes had been saved or changes
were done in the synonymy.
undo button. This will
recover the original data unless the changes had been saved or changes
were done in the synonymy.
To create a new entry in the database,
click on the
button above the search result listbox. A window will open where you can
add additional projects to the list in which the new name shoul be
included (see below). By default only your current project will be
selected.
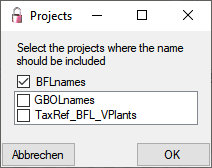
Leave only those projects the new name is
related to. Click OK to create a entry with the name “New Taxon”.
To copy a taxon, choose it from the
list and click on the button
 . As with the
creation of a new dataset you can insert the copy of a name into other
projects (see above).
. As with the
creation of a new dataset you can insert the copy of a name into other
projects (see above).
To delete a dataset click on the
button
.
Diversity Taxon Names
Taxonomic Name
The header shows the name, the ID and the version of the name - these
data can not be edited. If a dataset should be ignored, check the
checkbox “Ignore”. In the last field you can enter a revision level for
the dataset. If you want to inspect the history of a
dataset click on the  button.

Data concering the taxonomic name including the authors
are entered in the corresponding area (see image below).

Depending on the taxonomic rank, the form will show only the fields
available for this rank.
If the genus is linked to an entry in the database, the field for the
genus will change as shown here  and the
program will not allow you to edit the name. To edit the genus of the
name, click the delete button to release the link to
the genus. The list of genera is restricted to the project you selected.
If a hierarchy is availble for the selected genus the hierarchy will be
automatically inserted for the current name.
and the
program will not allow you to edit the name. To edit the genus of the
name, click the delete button to release the link to
the genus. The list of genera is restricted to the project you selected.
If a hierarchy is availble for the selected genus the hierarchy will be
automatically inserted for the current name.
If the name is a hybrid , check the checkbox “Is hybrid”
to get access to the fields for hybridization.
Diversity Taxon Names
Authors
For names according
to an official code (ICBN) the authors of the name should be given.

To edit the authors
using standard abbreviation list click on the  Button. This will open the form for editing the authors.
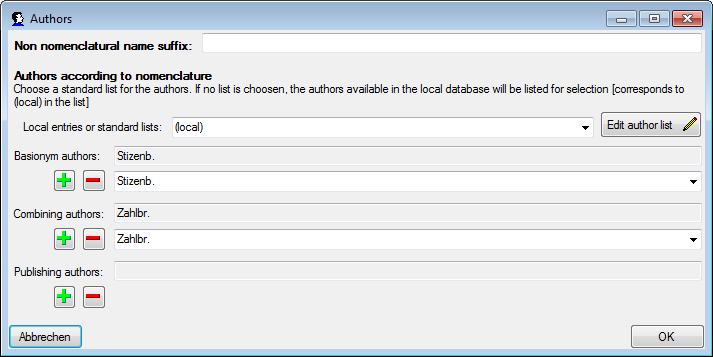
here you add (click
on the add button) and remove (click on the
 button) authors according to the standard
list. You can choose the standards for the abbreviation from the
provided lists.
button) authors according to the standard
list. You can choose the standards for the abbreviation from the
provided lists.
For names not
following an official code authors should not be given. Instead, include
a descriptive phrase in the field Non nomenclatural name
suffix.
To edit the selected
list of the authors click on the Edit author list
button.
Diversity Taxon Names
Nomenclature
DiversityTaxonNames was developed to follow, for the most part, the
International Code of Botanical Names (ICBN). Other codes like the code
for names in zoology have not yet been taken into account. Information
corresponding the nomenclature are entered in the provided fields as
shown below.

Diversity Taxon Names
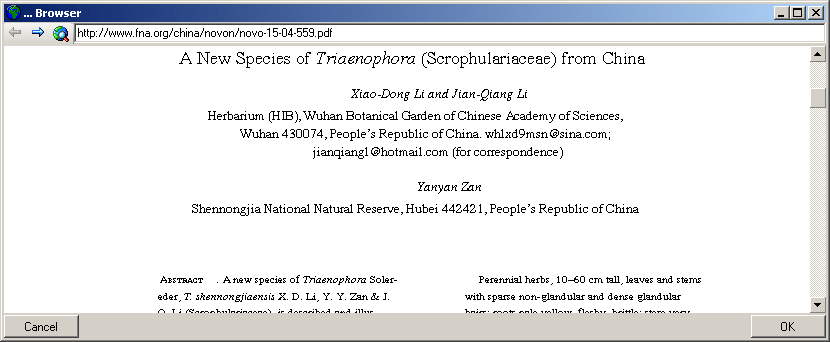
Taxonomic reference and protologue
Details about the protologue are entered in the area Taxonomic reference / Protologue
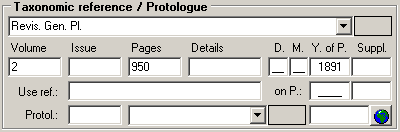
To enter a website for the protologue either enter the link in the field
or click on the button to start a query. This
will open simple browser where you can search the URL for the protologue
as shown below.
Diversity Taxon Names
Typification
Details about the type can be entered in the area “Typification”.
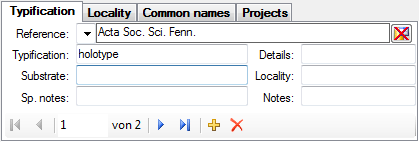
The navigate
through the data use the  ,
,
 ,
,  and
and
 button. To add a new typification use the
button, to delete the current dataset, use the
button.
button. To add a new typification use the
button, to delete the current dataset, use the
button.
Diversity Taxon Names
Hybrids
As for the time being a definite rule for
the creation of a valid taxonomic name on the basis of the parent names
is not available. Therefore the name is build from the genus and all the
rest placed in the field for the epithet. Some examples for hybrids
are:
- Asplenium x alternifolium Wulfen.
- Coeloglossum x Dactylorhiza Coeloglossum viride x Dactylorhiza majalis subsp. praetermissa
- Ononis repens subsp. procurrens x spinosa subsp. spinosa
- Salix (caprea x viminalis) x (purpurea x viminalis)
- Salix alba var. vitellina x babylonica x matsudana
- Symphoricarpos albus var. laevigatus x microphyllus x orbiculatus
As soon as a rule is available the name
can be generated from the parent names that are entered as described
below.
If a taxon is a hybrid, check the checkbox
to open
the part for the entry for the parents of the hybrid. You can determine up to 4 parents for a
hybrid as shown in the figure below

Diversity Taxon Names
Common names
A name can have
several common names. These are entered in the section Common names. To add or delete a common name use the and
buttons.
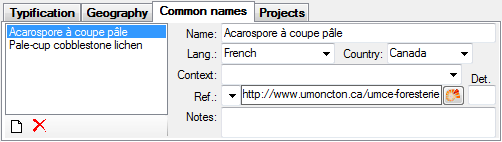
The data of the common names are stored in table
TaxonCommonName.
Diversity Taxon Names
Ignored Data
To remove data from
the creation of the hierarchy, the synonymy etc. on one hand and not to
delete them but to keep the information, use the
 Ignore option. All data set to
Ignore are no longer involved in the normal
queries, but kept to ensure e.g. links from other modules. To display
ignored data, select Query - Show ignored
data in the menu.
Ignore option. All data set to
Ignore are no longer involved in the normal
queries, but kept to ensure e.g. links from other modules. To display
ignored data, select Query - Show ignored
data in the menu.
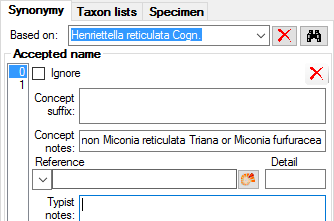
Synonyms
In the example
below, a synonym was set on ignore.
If it should happen,
that a ignored name is included in a synonymy and a name within the
synonymy is referring to this ignored name, the system will not be able
to generate the synonymy properly. Ignored names will than be shown with
red letters in the synonymy overview as shown below.
Accepted names
In the example
below, the entry for an accepted name was set to ignore, now showing
this information side by side with the current setting of the name as a
synonym.
If several entries
for an accepted name exist, a list will appear at the left side as shown
below where to top entry (0) is the valid entry, while all other entries
(> 0) are set to ignore (see below).
Hierarchy
As with the accepted
names, ignored data will be listed as shown below in a list where to top
entry (0) is the valid entry, while all other entries (> 0) are set to
ignore.

Diversity Taxon Names
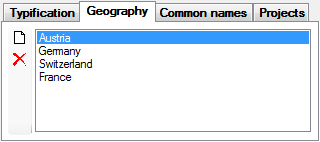
Geography
Details about the type can be entered in the area “Geography”.
The geographical distribution of the type specimen according to the
protologue can be typed in the field Locality of the area
Typification. In the area Geography names according
to a standard can be entered as a list as shown above. To remove an
entry from the list click on the delete button. To add
an entry click on the button. A form will open where
you can choose geographical places from the module DiversityGazetteer.
To open the link to the module, click on the button
and search for the region as described in the chapter Module relatedentry.
The data of the geography are stored in table
TaxonGeography.
Diversity Taxon Names
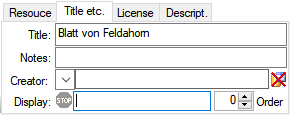
Resources
Resources related to a taxon can be added in the area “Resources”. Use
the (add), (remove) and
(save) buttons to handle the resources.
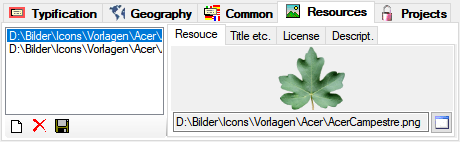
Resources are sorted by their order which can be set in the field shown
below. If a resource should not be published, enter any text in the
field. The title will be shown e.g. in a chart
query in the tooltip of the image.
The data of the
resources are stored in table
TaxonNameResource.