Subsections of Organisms
Diversity Collection
Organisms
(= Identification Units)
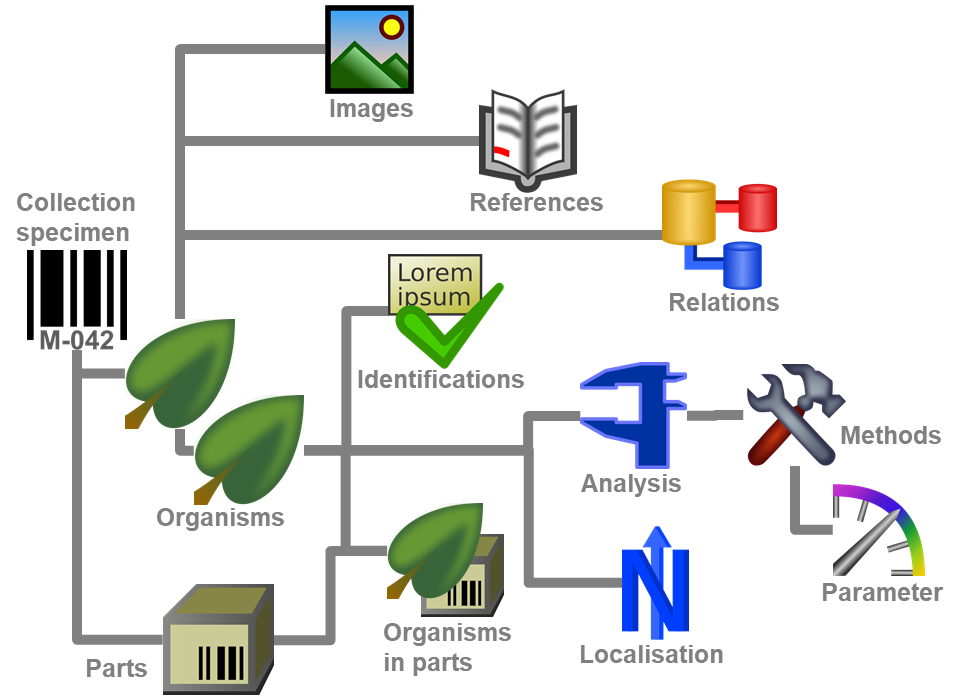
The items or organisms in one CollectionSpecimen are regarded as
IdentificationUnits. One specimen can contain several
IdentificationUnits e.g. an insect (1) feeding on a fungus (2) growing
as a parasite on a plant (3). To add a new organism use the drop-down
menu as shown below to select the taxonomic group to which the new
organism belongs to.
To specify the taxonomic groups that are shown in the drop-down menu
select Administration - Customize display ... from the
menu.
The organisms of the specimen are shown in the tree. To edit the
relations between the organisms simply drag and drop. In case of a
shortcut in the hierarchy you will be asked to select the start of the
hierarchy as described in the video:
 .
The name of the organism under which the specimen is stored in the
collection is [underlined]. To
delete an organism select it in the tree and click on the
.
The name of the organism under which the specimen is stored in the
collection is [underlined]. To
delete an organism select it in the tree and click on the  delete button.
To enter details about one of the organisms like e.g. gender or life
stage, select it in the tree. The fields for the details of this
organism will be displayed in the right area of the window as shown
below.
If the Identification unit is e.g. not a complete organism you can enter
a description for this IdentificationUnit. Either type you description
or choose one of the predefined descriptions via combobox or hierarchy:
Use the combobox to select a description as found for the same taxonomic
group in the database or use the hierarchy-selector  to select a predefined description. An additional description can be
entered for an IdentificationUnit within part of a
CollectionSpecimen.
to select a predefined description. An additional description can be
entered for an IdentificationUnit within part of a
CollectionSpecimen.
Taxonomic hierarchy - family and order
The entries for the family and the order of the taxon are either set
when linking to a taxonomic database or set manually when no link to a
taxonomic database exists.

If no link to a taxonomic database exists you may enter the family and
the order after clicking on the  edit button. To transfer
these entries to other specimens with the same genus use the maintenance
functions as described under Maintenance - family andorder.
edit button. To transfer
these entries to other specimens with the same genus use the maintenance
functions as described under Maintenance - family andorder.
Parts of units
If a unit contains parts which have to be documented, you can do this by
setting the relation to the substrate to "Part of".

In the tree the background of a part will be grey as shown below for the
unit-tree und the tree depicting the storage of a sample. The name of
the part will correspond to the identifier set for this part. The icon
will correspond to the description of the part provided you choose one
of the preset options contained in the drop-down list. You may of course
enter any description for the unit. A unit that is part of another unit
can not get an identification. Identifications are restricted to the
main unit.
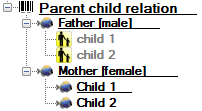
Parent-child relations
If a unit is a genetic child of a parent, choose "Child of" as
type of the relation. If there are 2 parents like mother and father that
you want to document, click on the  button next to
the relation type. A window will open where you can choose among the
organisms (= units) in your sample. The second parent will be indicated
with the symbol in the tree (see below).
button next to
the relation type. A window will open where you can choose among the
organisms (= units) in your sample. The second parent will be indicated
with the symbol in the tree (see below).
For details about exsiccatal series and
analysis see the related topics. You can sort your
IdentificationUnits e.g. for display on a label with the displayorder button. Each IdentificationUnit can have
several identifications.
With the template you can define  and
copy
and
copy  predefined values into the data (see
chapter Template).
predefined values into the data (see
chapter Template).
If there are images which are related to the
current organism, the button for the restriction of the images will be
enabled (  →
→  ). Click on
it to restrict the images to this organism. The button will get a red
background to
remind you about the restriction and in the image list a button
). Click on
it to restrict the images to this organism. The button will get a red
background to
remind you about the restriction and in the image list a button
 will appear that enables you to show all
images.
will appear that enables you to show all
images.
Non biological units
Non biological units like  soil,
soil,
 rock or
  mineral do not have
biology related characters like family or sex. These are therefore not
displayed for these groups.
mineral do not have
biology related characters like family or sex. These are therefore not
displayed for these groups.
The data for the organisms and non biological units are stored in the
table IdentificationUnit.
Diversity Collection
Taxonomic Group
The organisms and corresponding objects stored in the database are
organized in taxonomic groups to facilitate the recognition in multi
organism samples and to enable a specific design for the
analysis where e.g. plants differ in recorded
measurements from mammals. The taxonomic groups are roughly orientated
on the taxonomy but are not meant to replace the
taxonomy for which there are other possibilities
for entry. The list of taxonomic groups visible for the creation of new
entries may be restricted as described in the chapter about the
customization.
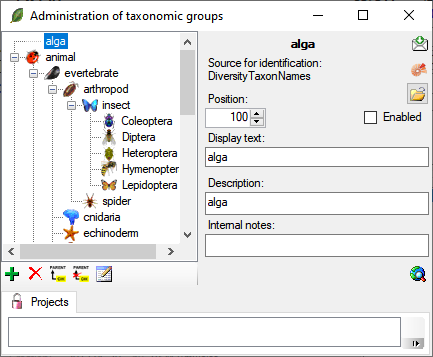
To administrate the taxonomic groups, choose Administration -
Taxonomic groups... from the menu. A window as shown below will
open.

To add resp. remove a taxonomic group use the  resp. the delete button. To set the superior taxonomic group use
the
resp. the delete button. To set the superior taxonomic group use
the  button. With the
  open button you can set a symbol for the taxonomic
group. Please keep in mind, that this will be converted into a 16 x 16
size icon. In the lower part of the window, you can add and edit
translations for display texts, abbreviations etc. for all contexts
available.
open button you can set a symbol for the taxonomic
group. Please keep in mind, that this will be converted into a 16 x 16
size icon. In the lower part of the window, you can add and edit
translations for display texts, abbreviations etc. for all contexts
available.
If a taxonomic group has been disabled it will not appear in the lists for the user and will be displayed without an image in with grey text color in the tree (see below). After reenabling a group you have to reopen the form to see the icon for the group.
At the base of the window, the projects that are restricted to an entry
are listed (see
).
To administrate the projects that should restrict the available
taxonomic groups, choose Administration - Enumerations - Project -
Taxonomic group... from the menu. A window as shown below will open.
If a project is restricted, the client settings will be ignored (see
chapter Customize).
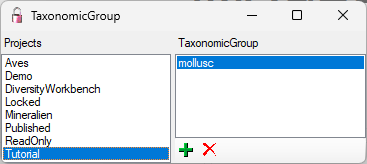
To add resp. remove a material category for a project use the resp. button.
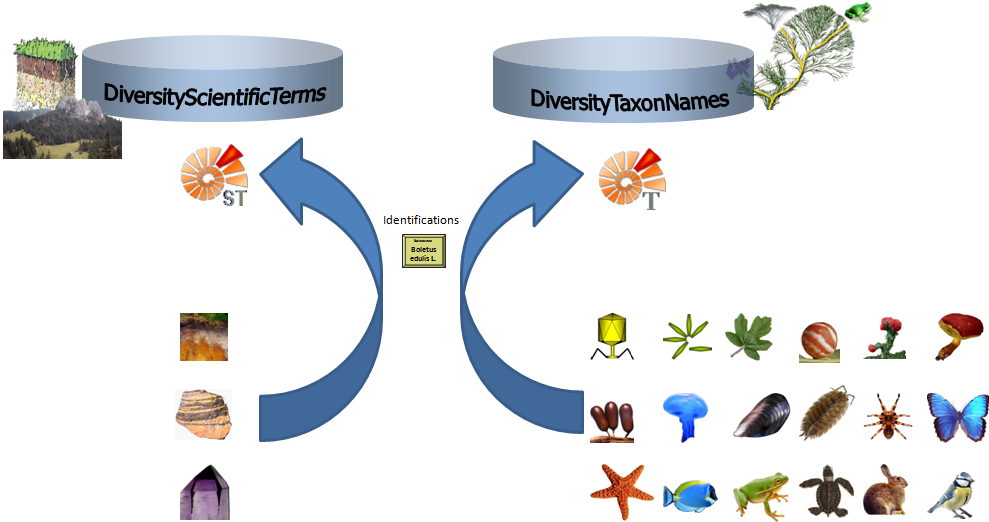
The non-biological taxonomic groups like soil,
rock or mineral will for an
identification not be linked to DiversityTaxonNames but to
DiversityScientificTerms (see image below and the short tutorial
 ).
If you add a new taxonomic group anything outside the predefined groups
animal, alga, bacterium, bryophyte, fungus, gall, lichen, myxomycete,
plant or virus will be regarded as non-biological. The sources for
direct access using the
).
If you add a new taxonomic group anything outside the predefined groups
animal, alga, bacterium, bryophyte, fungus, gall, lichen, myxomycete,
plant or virus will be regarded as non-biological. The sources for
direct access using the  buttons are linked to the
taxonomic groups (see Settings).
buttons are linked to the
taxonomic groups (see Settings).
Diversity Collection
Retrieval Type
The ways the data about organisms and corresponding objects stored in
the database are retrieved are documented as retrieval type.
To administrate the retrieval types, choose Administration -
 Retrieval types... from the menu. A
window as shown below will open.
Retrieval types... from the menu. A
window as shown below will open.
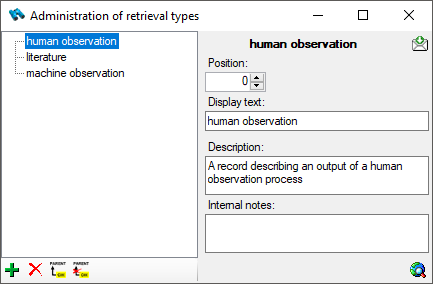
To add resp. remove a retrieval type use the resp. the delete button. To set the superior type use the button.
Diversity Collection
Analysis
The organisms in a specimen can be analysed by analysis types defined in
the database. In the tree the analysis entries are symbolized with an
 icon. Only the types of analysis that were
assigned to the group of the organism can be selected. An analysis
always refers to an organism and may also refer to a part of a specimen.
An analysis that refers to a part of a specimen will be shown in the
tree for the parts as shown in the examples below.
icon. Only the types of analysis that were
assigned to the group of the organism can be selected. An analysis
always refers to an organism and may also refer to a part of a specimen.
An analysis that refers to a part of a specimen will be shown in the
tree for the parts as shown in the examples below.

To show or hide the analysis items in the tree use the button in the left panel. This button has 3
states. In the default state the analysis
entries will be shown as above. If you click a
second time it will change to the hierarchy mode
 and the entries will appear as shown
in the tree below. The last state
and the entries will appear as shown
in the tree below. The last state  will hide
the entries.
will hide
the entries.
To insert a new analysis to an organism select the organism in the upper
tree. Then select the type of the analysis from the drop down list as
shown below.
To delete an analysis, select it in the tree and use the delete button in the panel on the left. To edit the
details of an analysis, select it in the tree and enter data into the
fields as shown below. To enter or inspect an URI given for a single
analysis, click on the  button.
If an analysis refers to a part of the specimen, you can document this
by choosing the respective part from the list (see field Part
above). The analysis will then be shown in the tree for the parts of the
specimen as well. Alternatively you may directly choose the organism in
the part tree and create the analysis for this part of the organism in
the part tree. If you used any tools defined in the toolsection, you can include the usage of these tools.
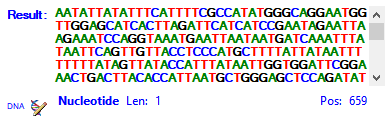
In case the measurement unit of the analysis set to DNA (see below)
...
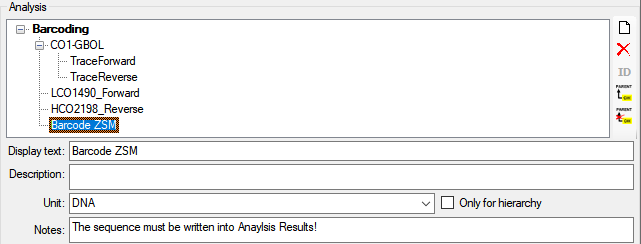
... the Result is edited as shown below.
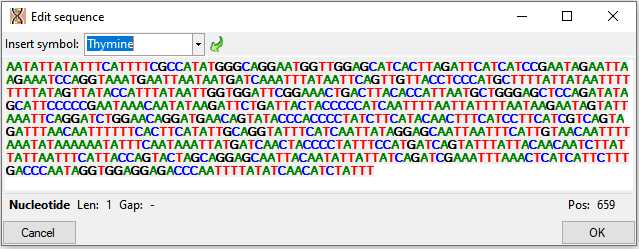
A click on the  button opens a separate window
(see below) with additional options for editing the sequence.
button opens a separate window
(see below) with additional options for editing the sequence.
Administration
If you require further information about an analysis click on the button. A window for the analysis
administration will open. If you have the proper rights you can edit the
analysis types used in your collection as shown below. This window is
also accessible via the menu entry Administration - Analysis...
For the import and export of data it is sometimes necessary to know the
IDs of the analysis types. To see the IDs, click on the [
ID] button to display them as shown
in the image below.
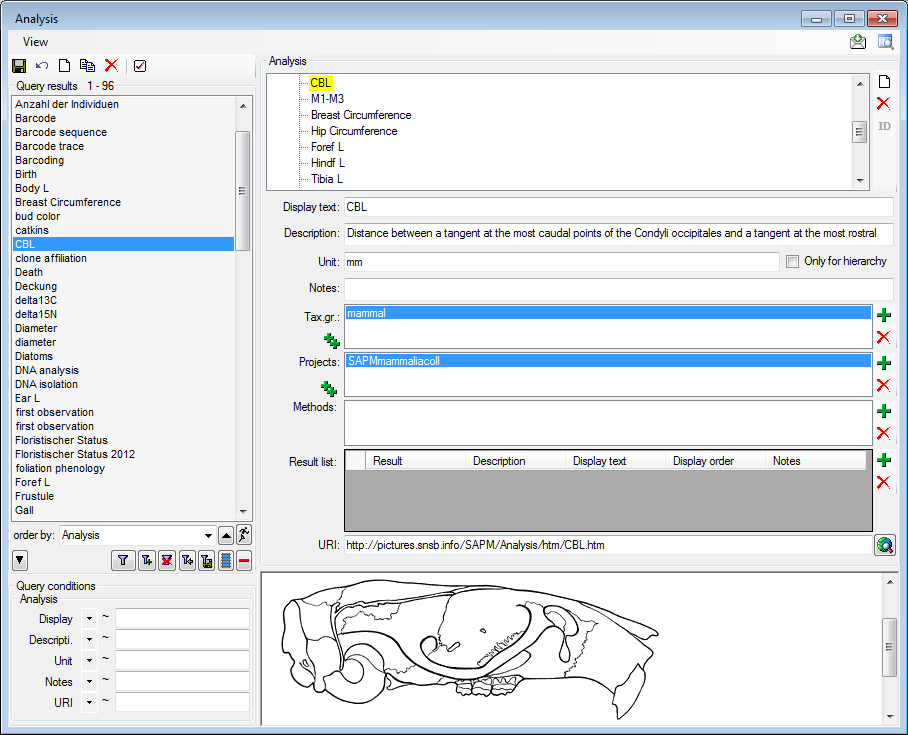
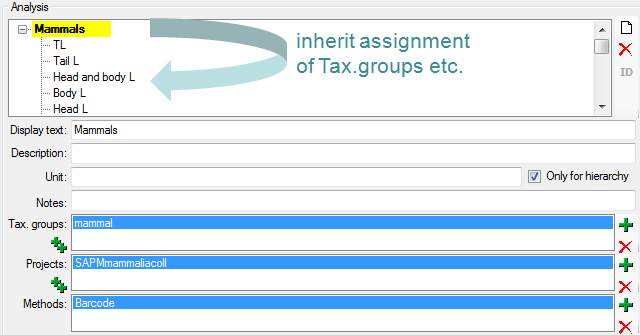
The types of an analysis are restricted by the taxonomic group of
the organism or object to be analysed and from the projects. You may
edit the list of taxonomic groups resp. projects, which
can use a certain analysis, using the and the delete button. To add all used taxonomic groups resp.
projects, you can use the  buttons. For details
about handling data see the data section. If you add a
taxonomic group or a project to an analysis, all children of this
analysis will be available for these taxonomic groups resp. projects as
well (see image below). Thus, in the example above it is sufficient to
enter the taxonomic group and the project in the analysis Mammals to
have access to all analysis within this superior analysis as shown in
the tree. The different types of analysis are organized in a hierarchy.
To organize. Some of the entries may only serve for structuring purposes
(e.g. Mammals as shown above) and should not be used to document the
analysis of the specimen. To ensure this, check the checkbox [Only
hierarchy].
buttons. For details
about handling data see the data section. If you add a
taxonomic group or a project to an analysis, all children of this
analysis will be available for these taxonomic groups resp. projects as
well (see image below). Thus, in the example above it is sufficient to
enter the taxonomic group and the project in the analysis Mammals to
have access to all analysis within this superior analysis as shown in
the tree. The different types of analysis are organized in a hierarchy.
To organize. Some of the entries may only serve for structuring purposes
(e.g. Mammals as shown above) and should not be used to document the
analysis of the specimen. To ensure this, check the checkbox [Only
hierarchy].
There are 3 states for result lists in the main form. (1) No result list
will be generated if a measurement unit is defined, for example if you
specify "mm" as the measurement unit. (2) If no measurement unit is
defined, the program will collect all values given so far and present
these values as a list. (3) Some types of analysis need categorized
values. Enter these values together with their description in the
Result list as shown below using the  and
buttons respectively. To show values different
from the entries in the Result column change the entries in the
Display text column.
and
buttons respectively. To show values different
from the entries in the Result column change the entries in the
Display text column.
If you want to access or inspect an URI given for an analysis type,
click on the button. The URI related to the
analysis will then be displayed in the window below.
Methods
Besides of a plain text description of the analysis, you may insert
methods as defined in the chapter Methods. Use the and buttons to add or remove
methods from the list (see below). The added methods will be marked with
sequential number (see Mark.: ... ) to allow several methods of the
same type.
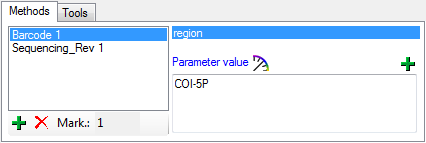
Every method may have several parameters  that
will automatically be available to take your values. If the definitions
of the parameters have been changed, you may add missing parameters with
the add button. A window as shown below will open where
you can select the missing parameters you want to add.
that
will automatically be available to take your values. If the definitions
of the parameters have been changed, you may add missing parameters with
the add button. A window as shown below will open where
you can select the missing parameters you want to add.

History
To view the history of a dataset, click on the
 button. A window
with the history will open. For more details see the section
History.
button. A window
with the history will open. For more details see the section
History.
Diversity Collection
Geography of organisms
The geographical position of organisms (using WGS84)
can be recorded along with the date, for example, to document migration patterns or the
distribution of an organism. In the tree, the geographical entries are
symbolised by an  icon, as shown below.
To display the corresponding map, activate Maps and
click the button. To edit an existing
geographical entry, use the GIS editor. If
you are adding a new geographical position and existing entries are already shown on the map,
remove them from the map before inserting the new location.
Diversity Collection
Identification
Each organism or unit may have been identified several times. The
identifications are listed in the tree under the organism as shown in
the image below. To create a new identification choose the organism from
the tree and click on the  identification icon. The last
identification will always be taken as the valid one and set at the top
of the list. To insert an older identification at the base of the list
click on the
identification icon. The last
identification will always be taken as the valid one and set at the top
of the list. To insert an older identification at the base of the list
click on the  identification to base icon.
To hide / show the identifications in the tree click on the identification icon on the right panel next to the tree.
To enter a confirmation of an identification choose it in the tree and
then click on the  confirmation button. To move an
identification to the end or the start of the list use the
confirmation button. To move an
identification to the end or the start of the list use the  identification down or
 identification up button respectively. To delete an
identification select it in the tree and click the delete button. To enter details for an identification
choose it in the tree. You can then enter the details in the form
opening on the right side of the tree as shown below.
identification up button respectively. To delete an
identification select it in the tree and click the delete button. To enter details for an identification
choose it in the tree. You can then enter the details in the form
opening on the right side of the tree as shown below.

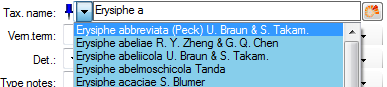
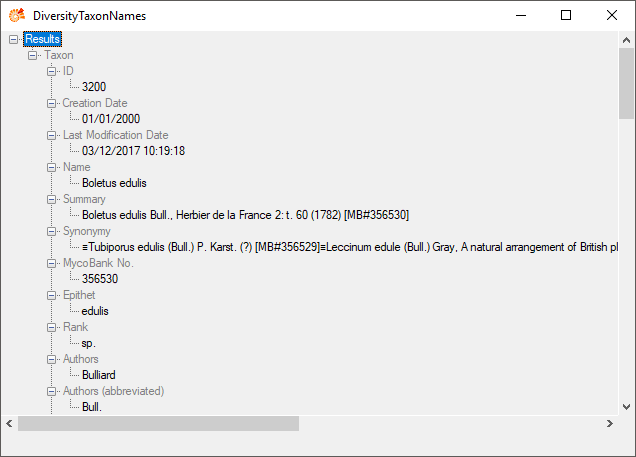
The taxonomic name of an organism can be selected from either the names
already available in DiversityCollection or from the module
DiversityTaxonNames. To choose from the local names type the
beginning of the name and click on the drop-down button
to get a list of available names. You can use
wildcards according to SQL.
To select a taxonomic name from an external database click on the  module button. A
window will open where you can search for a
taxonomic name. For taxonomic names provided by the module
DiversityTaxonNames you can use a shortcut. Click on the
module button. A
window will open where you can search for a
taxonomic name. For taxonomic names provided by the module
DiversityTaxonNames you can use a shortcut. Click on the  pin button to set the source in the window that will
open. After the source is set, the pin and drop-down
box will change their colors as shown below to indicate that the
taxonomic names are not longer derived from the content in
DiversityCollection but from the selected DiversityTaxonNames database.
pin button to set the source in the window that will
open. After the source is set, the pin and drop-down
box will change their colors as shown below to indicate that the
taxonomic names are not longer derived from the content in
DiversityCollection but from the selected DiversityTaxonNames database.
The links will be set separate for every taxonomic group and may be
changed at any time with a click on the pin button. To
release the link to the remote database, click on
the pin button and than select Cancel in the window
where you select the database. The pin will change to
gray and the data will again be derived from the local values in DiversityCollection.
For identifications linked to a DiversityTaxonNames database you may
activate the Show accepted names option. Accepted
names will then be shown with a green color while for synonyms the
accepted name will be displayed above the current name (see below).

In the database the data for the identification is stored in the table
Identification.
Subsections of Identification
Diversity Collection
Identification
Additional identifier
upcoming
Available in upcoming version
For biological objects you may add an additional person or group responsible for the identifiaction.
Click on the  Add a new identifier button. The new entry will be shown in the tree.
Diversity Collection
Identification
Sources
Diversity Workbench
The source for names for biological taxa is the module DiversityTaxonNames
Webservices
As an alternative to DiversityTaxonNames you may use several Webservices
Catalogue of life
DiversityWorkbench provides the possibility to link your data to an
external webservice. The webservice provided by the  Catalogue of Life is possible through the
module DiversityTaxonNames. To establish a connection to this external
webservice click on the DWB button. A
window will open where you may choose this webservice (see below).
Catalogue of Life is possible through the
module DiversityTaxonNames. To establish a connection to this external
webservice click on the DWB button. A
window will open where you may choose this webservice (see below).
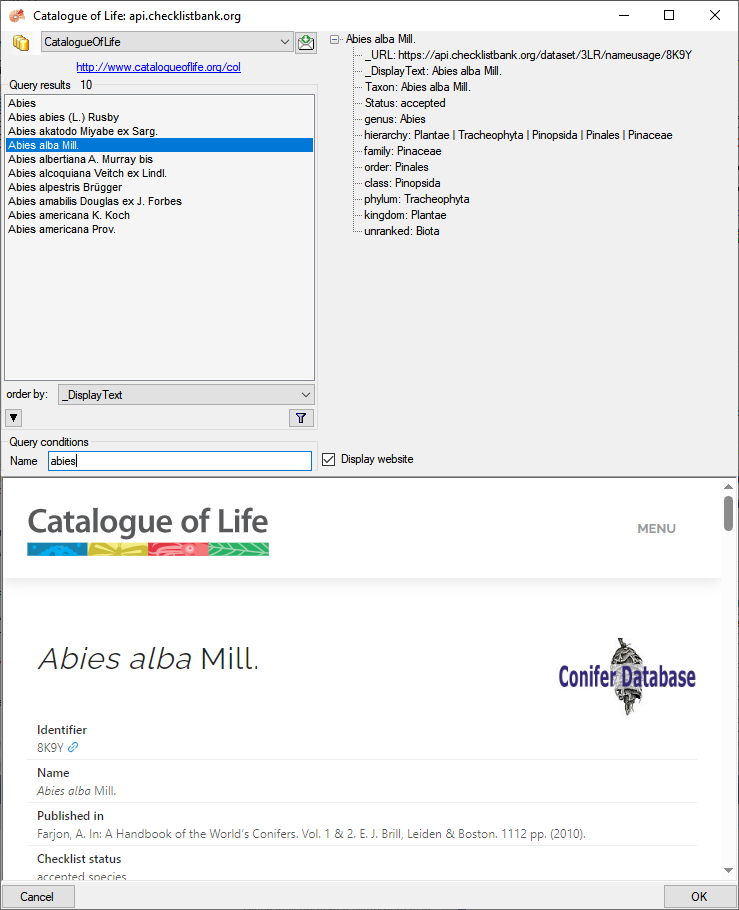
In the field Name in Query conditions enter your search string and
click on the  filter button to start the query. In the
list of the left upper part the results of the query will be listed. In
the right part of the window additional information is shown as provided
by the webservice.
To include the link from the webservice into your
database choose one of the entries in the list and click OK. The entry
will change as shown below.
filter button to start the query. In the
list of the left upper part the results of the query will be listed. In
the right part of the window additional information is shown as provided
by the webservice.
To include the link from the webservice into your
database choose one of the entries in the list and click OK. The entry
will change as shown below.

If you double-click on the link
area, a window will open providing you with the
retrieval information of the webservice (e.g.:https://api.checklistbank.org/dataset/3LR/nameusage/8K9Y).

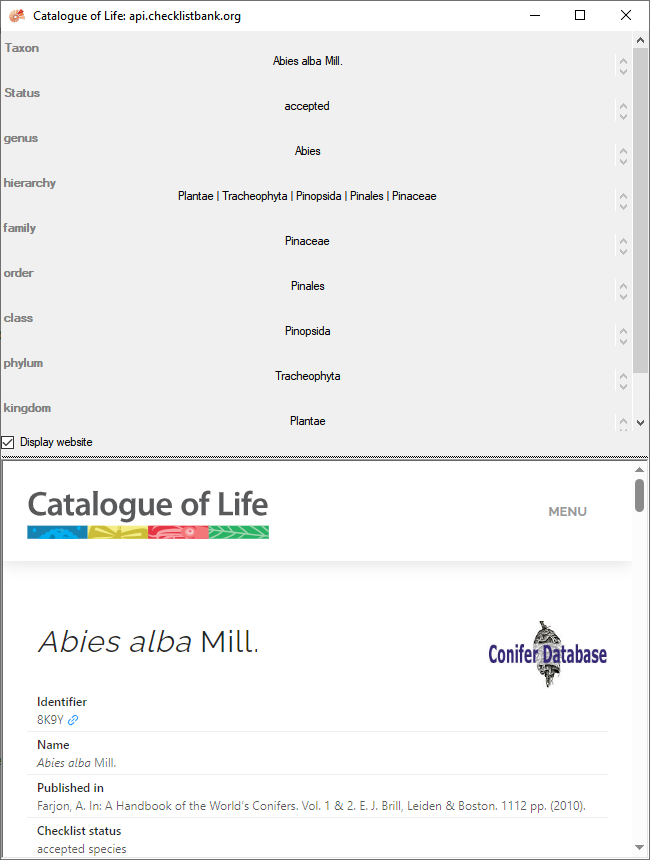
To receive the information related to an entry as provided by the
webservice click on the  button. A
window will open as shown below where information on the webservice is
listed in the upper part. If available, additional information provided
on a corresponding website will be shown in the lower part.
button. A
window will open as shown below where information on the webservice is
listed in the upper part. If available, additional information provided
on a corresponding website will be shown in the lower part.
If you wish to remove the link to the webservice, click on the
button. This will only remove the relation to the
webservice, not the cached name.
Index Fungorum
Some modules within the DiversityWorkbench provide the possibility to
link your data to an external webservice. For example
DiversityTaxonNames gives you access to the taxonomic names of  Index
Fungorum. To establish a connection to this webservice, click on the
button. A window will open where you
may choose Index Fungorum from the database list (see below).
Index
Fungorum. To establish a connection to this webservice, click on the
button. A window will open where you
may choose Index Fungorum from the database list (see below).
Enter the query restriction for the name in the Name field in Query
conditions. The maximum number of records you receive may be set in the
max. results field  (choose a low
number, if you have a slow connection to the internet). Click on the
search button to start the query. In the list in
the left upper part the results of the query will be listed. In the
right part of the window additional information is shown as provided by
the webservice. For certain entries buttons will appear, as e.g. shown
above for the basionym and the current name of a scientific name. Click
on these buttons, if you wish to change to one of these related data
sets from the webservice. If available, the information provided on the
corresponding website is shown in the lower part. To include the link
from the webservice into your database choose one of the entries and
click OK. The entry will change as shown below.
(choose a low
number, if you have a slow connection to the internet). Click on the
search button to start the query. In the list in
the left upper part the results of the query will be listed. In the
right part of the window additional information is shown as provided by
the webservice. For certain entries buttons will appear, as e.g. shown
above for the basionym and the current name of a scientific name. Click
on these buttons, if you wish to change to one of these related data
sets from the webservice. If available, the information provided on the
corresponding website is shown in the lower part. To include the link
from the webservice into your database choose one of the entries and
click OK. The entry will change as shown below.

If you double-click on the link area
 , a window will open providing you with the retrieval
information of the webservice.
, a window will open providing you with the retrieval
information of the webservice.
To receive the entire information related to this entry as provided by
the webservice click on the DWB button. A window will
open as shown below where information on the webservice is listed. If
available, the lower part will show the corresponding information of a
website.
If you wish to remove the link to the webservice, click on the
button. This will only remove the relation to
the webservice, not the cached name.
Mycobank
Some modules within the DiversityWorkbench provide the possibility to
link your data to an external webservice. For example
DiversityTaxonNames gives you access to the taxonomic names of Mycobank.
To establish a connection to this webservice, click on the
button. A window will open where you
may choose Mycobank from the database list (see below).
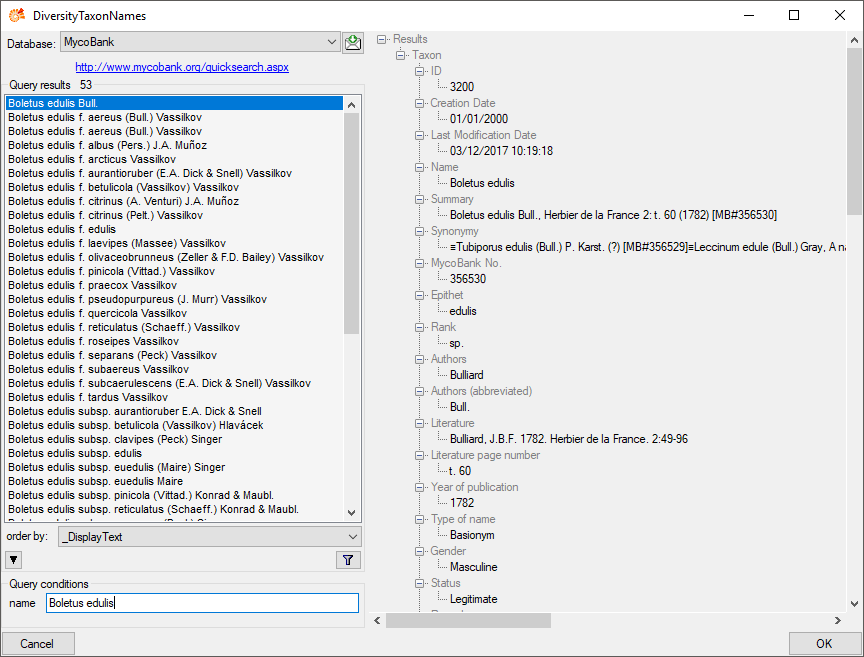
Enter the query restriction for the name in the Name field in Query
conditions. Click on the search button to start
the query. In the list in the left upper part the results of the query
will be listed. In the right part of the window additional information
is shown as provided by the webservice. To include the link from the
webservice into your database choose one of the entries and click OK.
The entry will change as shown below.
If you double-click on the link area
 , a window will open providing you with the retrieval
information of the webservice.
, a window will open providing you with the retrieval
information of the webservice.

To receive the entire information related to this entry as provided by
the webservice click on the DWB button. A
window will open as shown below where information on the webservice is
listed.
If you wish to remove the link to the webservice, click on the
button. This will only remove the relation to the
webservice, not the cached name.
Pan-European Species directories Infrastructure
Some modules within the DiversityWorkbench provide the possibility to
link your data to an external webservice. For example
DiversityTaxonNames gives you access to the taxonomic names of the  Pan-European Species directories Infrastructure (PESI). To establish a
connection to this webservice, click on the
button. A window will open where you
can choose PESI from the database list (see below).
Pan-European Species directories Infrastructure (PESI). To establish a
connection to this webservice, click on the
button. A window will open where you
can choose PESI from the database list (see below).
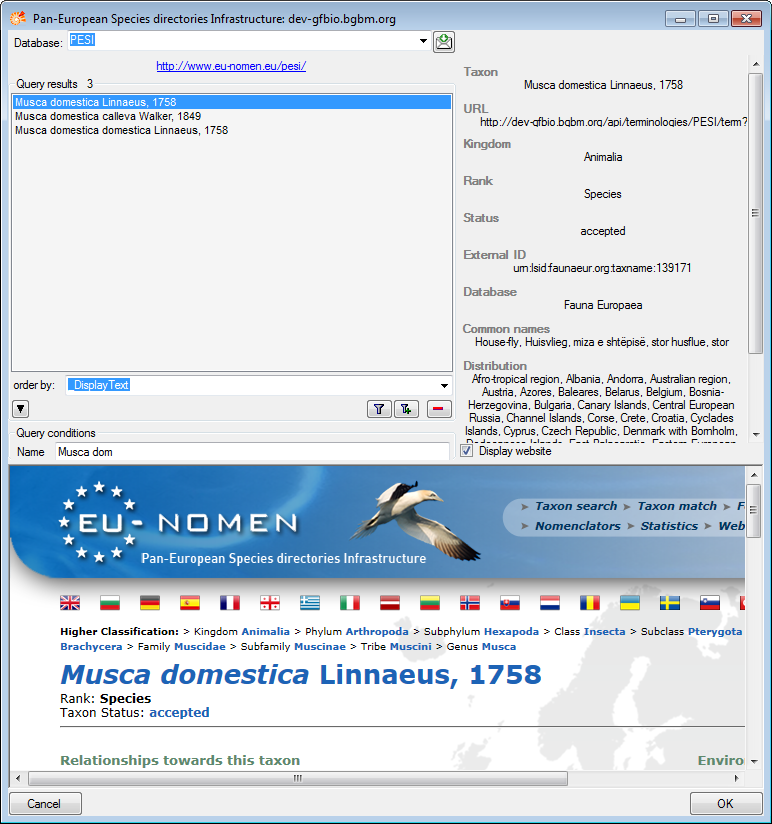
Enter the query restriction for the name in the Name field in Query
conditions. Click on the search button to start
the query. In the list in the left upper part the results of the query
will be listed. On the right part of the window additional information
is shown as provided by the webservice. If available, the information
provided on the corresponding website is shown in the lower part. To
include the link from the webservice into your database choose one of
the entries and click OK. The entry will change as shown below.
If you double-click on the link area
, a window will open providing you with the retrieval
information of the webservice.

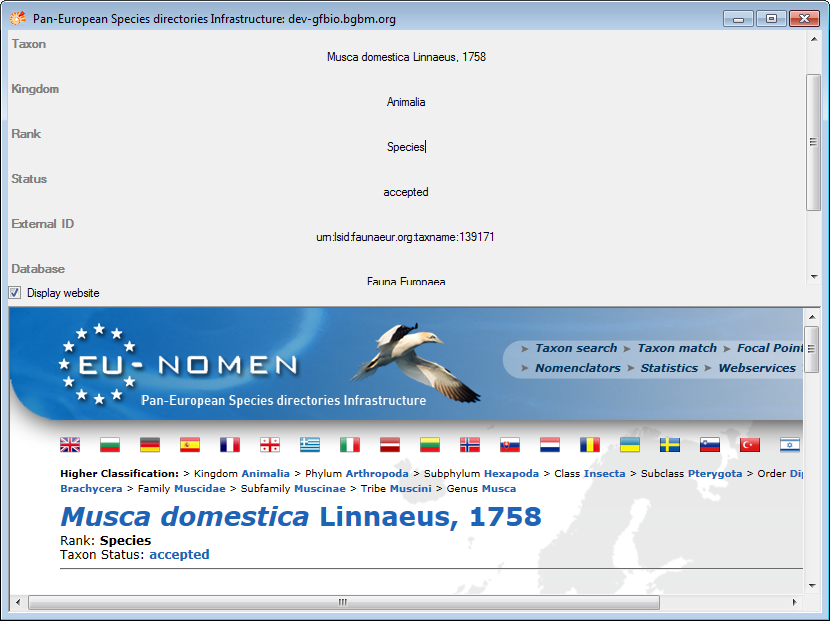
To receive the entire information related to this entry as provided by
the webservice click on the DWB button. A
window will open as shown below where information on the webservice is
listed. If available, the lower part will show the corresponding
information of a website.
If you wish to remove the link to the webservice, click on the
button. This will only remove the relation to the
webservice, not the cached name.
Diversity Collection
Identification
Non biological units
Non biological units like soil,
rock or mineral do not have
biology related information like a qualifier or a type status. These are
therefore not displayed for these groups. Furthermore the source for the
names is not DiversityTaxonNames but DiversityScientificTerms (see a
short tutorial
,
).
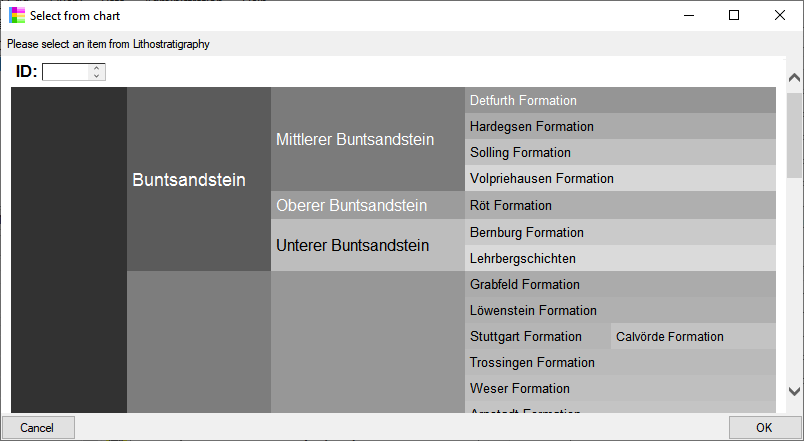
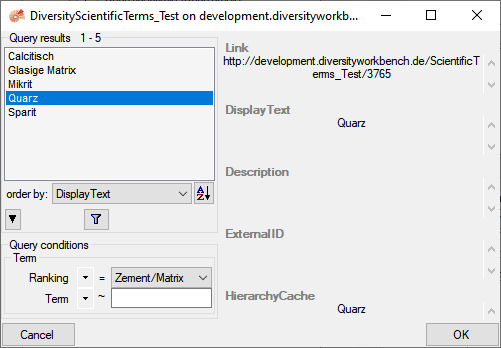
If the source for a non biological unit is set to a
DiversityScientificTerms database (see above ) a
 chart button will appear. With a click on this button
you can select the term from a chart as shown below.
chart button will appear. With a click on this button
you can select the term from a chart as shown below.
In the database the data for the identification is stored in the table
Identification.
Diversity Collection
Identification
Sources for non biological objects
Diversity Workbench
The source for names for non taxonomic objects is the module DiversityScientificNames
Diversity Collection
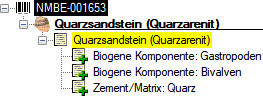
Supplementary (dependent) identification
For an identification of a non biological unit with the source
DiveristyScientificTerms you may add a supplementary identification
 . The availability of this option
depends on the first identification. For example a geological sample
with the identification "Basanit" may get supplementary
identifications like "Glasige Matrix" of the type "Zement/Matrix"
and "Porphyrisch" of the type "Relative Korngrösse". The available
supplementary types are defined in the module DiversityScientificTerms.
For further information about dependencies among terms please consult
the manual of DiversityScientificTerms.
. The availability of this option
depends on the first identification. For example a geological sample
with the identification "Basanit" may get supplementary
identifications like "Glasige Matrix" of the type "Zement/Matrix"
and "Porphyrisch" of the type "Relative Korngrösse". The available
supplementary types are defined in the module DiversityScientificTerms.
For further information about dependencies among terms please consult
the manual of DiversityScientificTerms.
To insert a supplementary identification related to
DiversityScientificTerms click on the
button. A window as shown below will open with the database set
according to the main identification and the available term restricted
to those as defined as dependent to the selected type of the main
identification as defined in the DiversityScientificTerms database.
The type of the supplemental name is included in front of the
supplementary name as shown below and a type can be given several times
to indicate ranges or distinct items.
Diversity Collection
Taxon List
Tutorial:
To see the list of organisms within a Specimen
 , CollectionEvent
 , EventSeries
 or SamplingPlot
 click on the
  button which
will appear, if you select one of the corresponding items in the tree
(see below).
button which
will appear, if you select one of the corresponding items in the tree
(see below).

A window will open as shown below where you can gather additional
information stored in the module DiversityTaxonNames. You may include
the sex and the sum of the number of units as stored in table
IdenticationUnit or the number based on the organisms in the list.
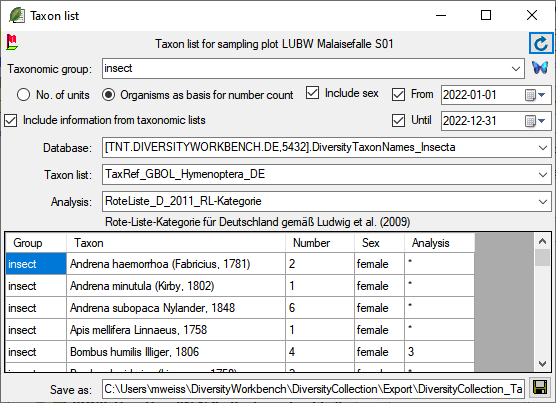
To retrieve information stored in the module DiversityTaxonNames for
names which are linked to this module select the taxonomic group of the
organism. Then select the option Include information from taxonomic lists. A combobox will appear where you may select the taxonomic
database. Next, select the project in the combobox and finally the
analysis. After all options are selected, click the  button to
refresh the data. With the From and Until option you can
restrict the result depending on the collection date. To export the
results in a tab-separated list use the
button to
refresh the data. With the From and Until option you can
restrict the result depending on the collection date. To export the
results in a tab-separated list use the  save button.