Subsections of Synchronizing
Maintenance
Gazetteer
Maintenance - Gazetteer
To synchronize the entries derived from the module DiversityGazetteer
choose Administration → Maintenance from the menu. A window will
open as shown below. On the tab page  Gazetteer
select the database containing the gazetteer data and the project for
which the entries should be synchronized. There are 2 parts for the
synchronization: The Place and the Coordinates. Select one of
these parts for synchronization. To start the query click on the Check
for differences
Gazetteer
select the database containing the gazetteer data and the project for
which the entries should be synchronized. There are 2 parts for the
synchronization: The Place and the Coordinates. Select one of
these parts for synchronization. To start the query click on the Check
for differences  button.
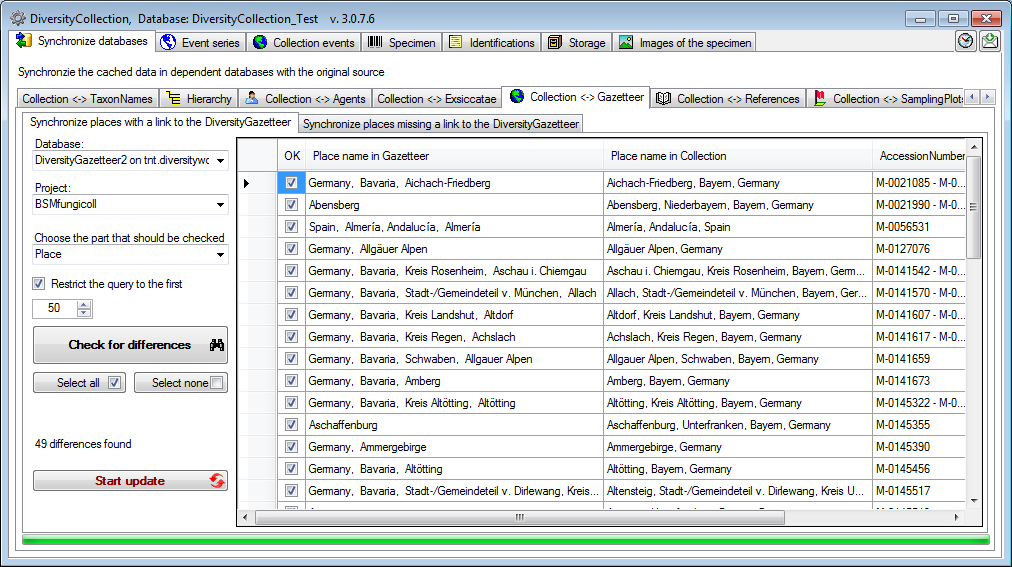
The form will list all detected differences. To update the database
click on the Start update  button.
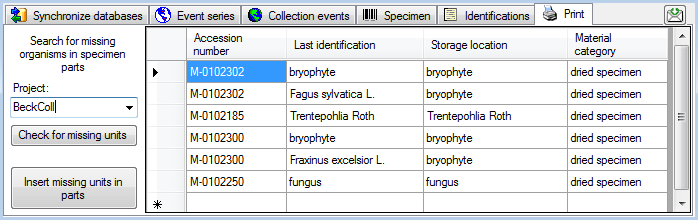
Maintenance - Gazetteer: Adding links
To set links to the DiversityGazetteer for places which are not linked
so far choose the second tab under Collection <→ Gazetteer for
synchronization of places missing a connection to the
DiversityGazetteer. Choose the database and the project and click on the
Start query button. The results will be listed
as shown below.
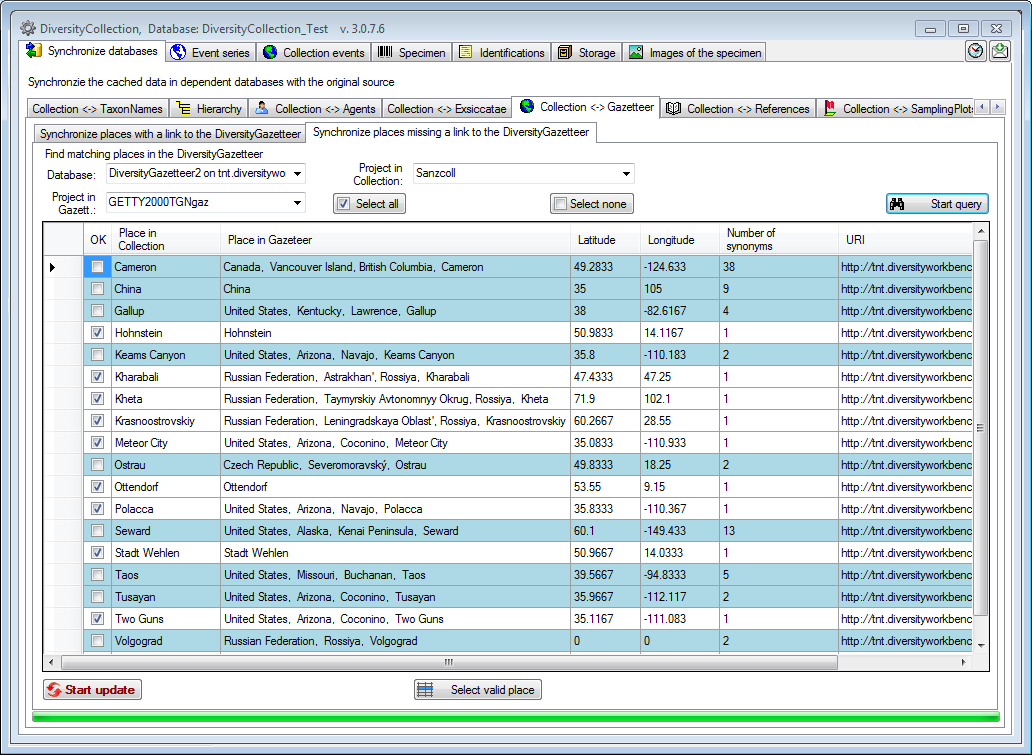
Many places have identical names in different regions. Names where
several results were found are marked in blue. To choose the correct
name among the list of results, click on the  Select valid place button and select the correct name from the list
as shown below.
Select valid place button and select the correct name from the list
as shown below.
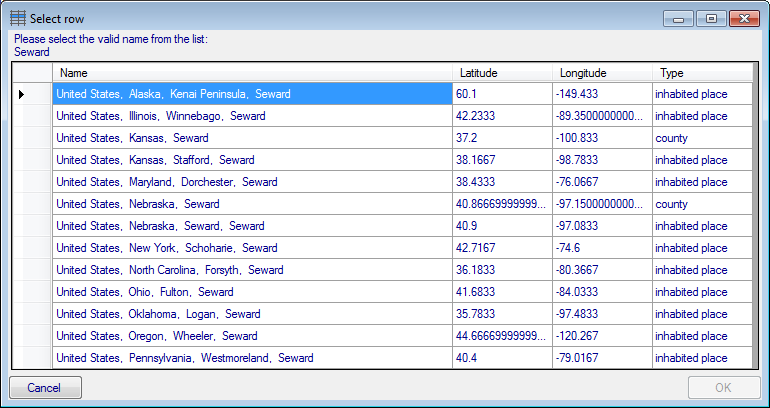
Finally, click on the Start update button to
enter the results in the database.
Maintenance - Identification
Taxonomic names
Taxonomic names may be linked to an external source. To synchronize the
entries for the taxonomic names derived from the module
DiversityTaxonNames choose Administration → Maintenance… from
the menu. A window will open as shown below. Choose the tab
TaxonNames. There are two ways to synchronize taxonomic names. You
may either Synchronize taxonomic names based on the link via an URI
for entries where the link to a taxonomic database is already
established or you may Synchronize taxonomic names missing a
connection where no link is established and you can query for
identical names in one of the databases.
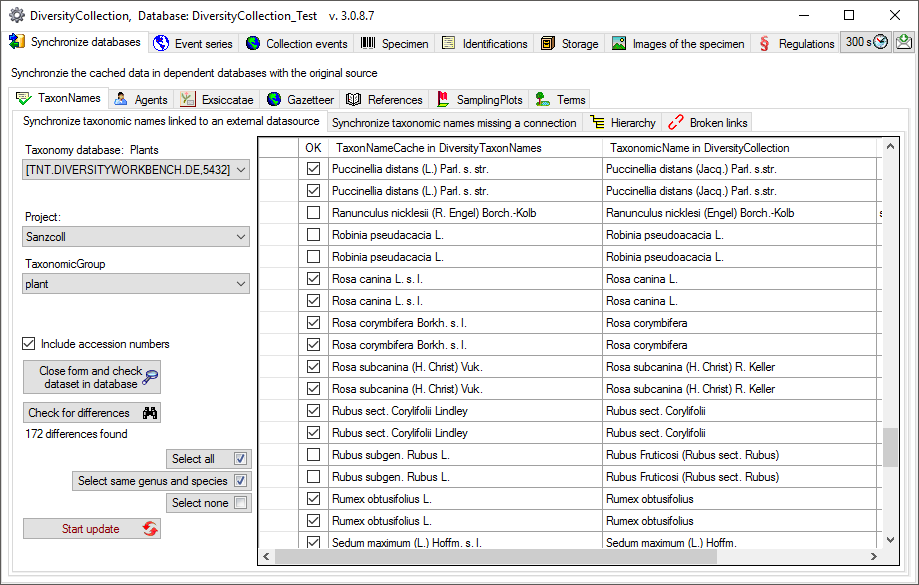
Synchronize taxonomic names based on the link via an URI
The taxonomic names are stored in the field TaxonomicName in the table
Identification. Select a
taxonomic database and a project and taxonomic group which should be
synchronized. Start the query with a click on the Check for
differences button.
If the taxonomic information has been imported into the
 cache database, you
may use the data from there to speed up the synchronization.
cache database, you
may use the data from there to speed up the synchronization.
The form will list all differences found. With the Select same genus and species  button you can restrict the
selected entries to those where the genus and species are identical in
the source and the entry in collection. The other buttons will either
select all or no entry
button you can restrict the
selected entries to those where the genus and species are identical in
the source and the entry in collection. The other buttons will either
select all or no entry  .
.
To update the database click on the Start
update button. If you wish to have a more
detailed look on your data, you need to check the Include accession number checkbox before starting the query. A button Close form and check dataset in database will appear which will
take you back to a single data set in the database.
Synchronize taxonomic names missing a connection
Select a taxonomic database and a project within this database, a
project in the collection database and a taxonomic group to search for
identical names. Start the query with a click on the Check for identical names button. You have several options to search for fitting
names:
Compare whole name
Search for an exact match. With the option
Excl. auth. you can extend the search for names where the authors are
missing in the identifications.
Compare first parts
Search for names fitting in first parts of the name as shown below. If
the names do not match exactly, you may either update the name (
 Update similar name) in the
collection database or import the name from the DiversityTaxonNames as a
new identification ( Insert as new
name** - see options in the window depicted below).
Update similar name) in the
collection database or import the name from the DiversityTaxonNames as a
new identification ( Insert as new
name** - see options in the window depicted below).
If you choose the option Restrict to last
identification, the former identifications of an organism will be
ignored.
If you choose the option Include fuzzy search, the program will try to find names with up to 3 differences.
The search with this option is rather time consuming and should only be
used for a small number of datasets.
In the result list only matching names will be checked (column OK). The
other results will be marked indicating the difference.
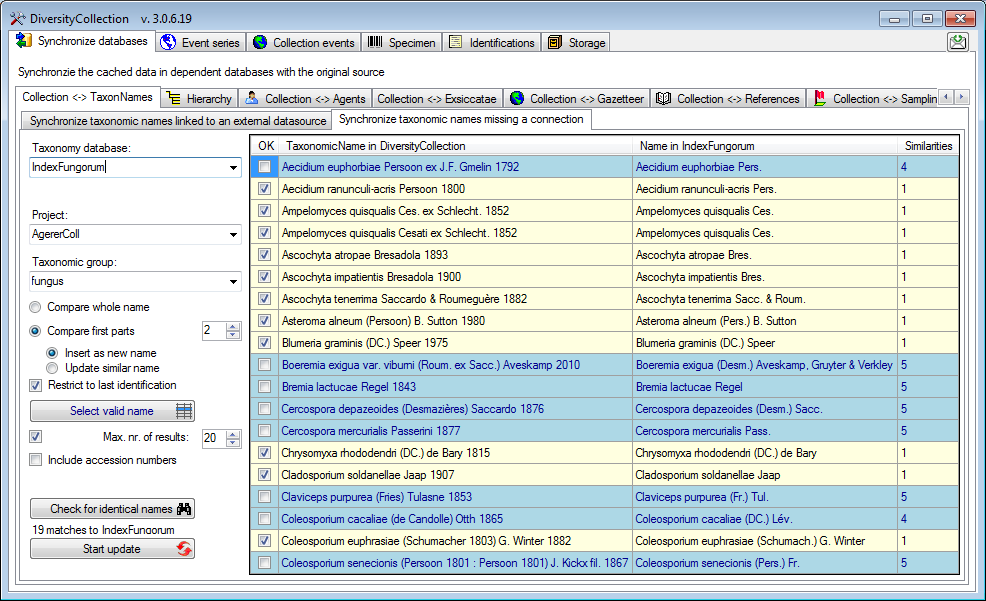
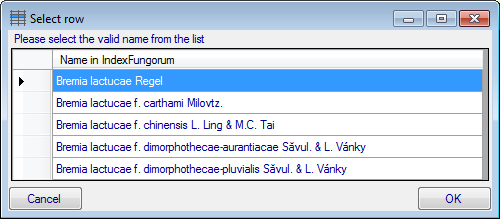
If several similar names were found, these lines will be
marked with a blue background. To select one of the similar names click
on the Select valid name button. A window
will open as shown below listing all similar names found in Index
Fungorum. Select one name and click OK to use it.
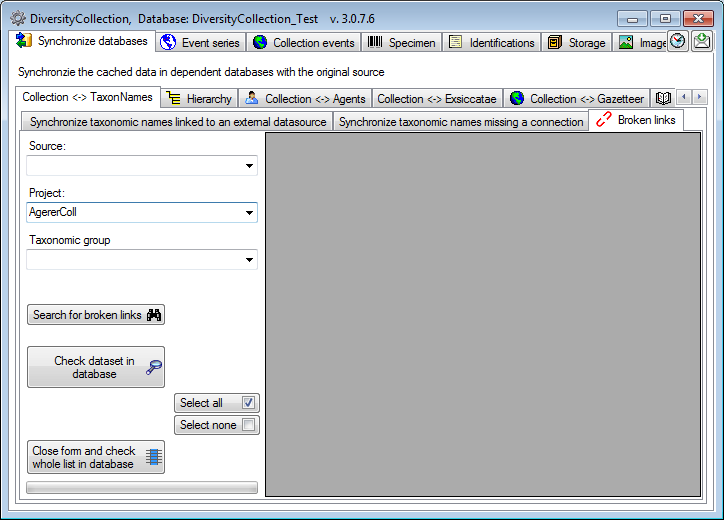
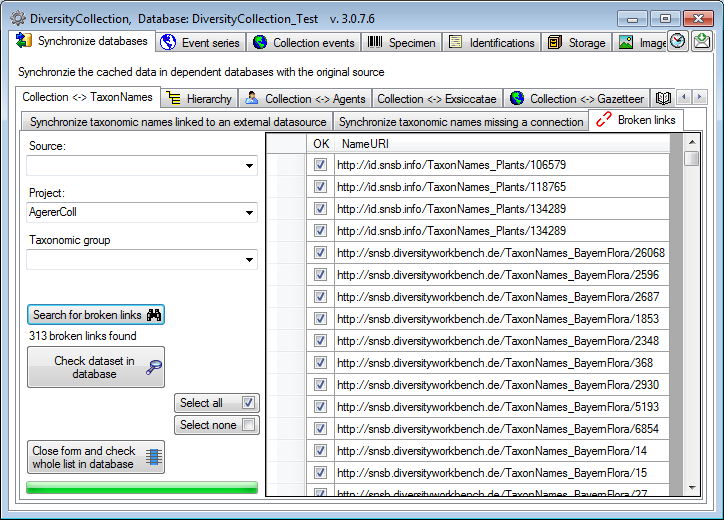
Search for broken links
If for any reason links to webservices or modules are broken  , e.g. when a webservice changes its address, you can search for these (see below).
Please make sure, that you are connected with all
source databases used for the taxa. Otherwise connections to these
sources would be assumed as broken. Choose the Project, for which
you want to search for broken links and optional restrict the search on
a Source and a Taxonomic group. Click on the
button to start the search.
, e.g. when a webservice changes its address, you can search for these (see below).
Please make sure, that you are connected with all
source databases used for the taxa. Otherwise connections to these
sources would be assumed as broken. Choose the Project, for which
you want to search for broken links and optional restrict the search on
a Source and a Taxonomic group. Click on the
button to start the search.
The broken links will be listed as shown below. With the Check dataset
in database  you can
inspect a single dataset. With the Select all
and Select none
buttons you can select
resp. deselect all datasets and show the selected datasets with the
Close form and check whole list in the database
you can
inspect a single dataset. With the Select all
and Select none
buttons you can select
resp. deselect all datasets and show the selected datasets with the
Close form and check whole list in the database
 button in the main
window.
button in the main
window.
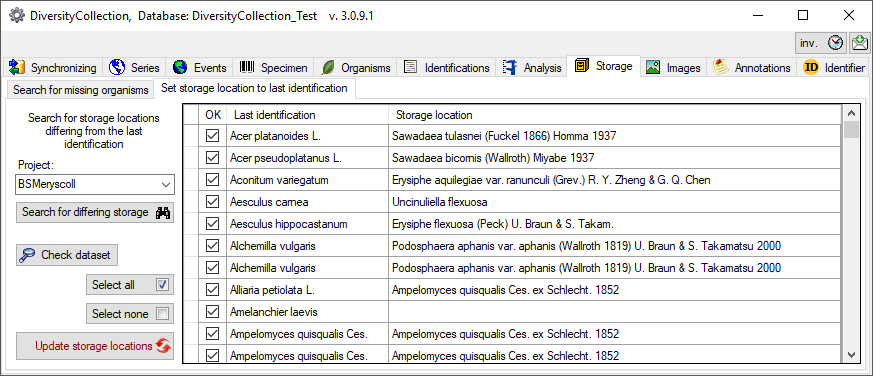
Update the display text for organisms according to last identification
If for any reason the displayed text for an organism does not correspond
to the last identification, this can be fixed under the Synchronize
last identification tab. Just click on the Search
for organisms where the displayed text does not correspond to the last
identification
button to list the deviating display text and then on the Update the displayed text for
organisms according to the last identification
button to synchronize the displayed text with the
last identification.

Subsections of Identification
Maintenance
Family and order
To synchronize the entries for the family, order and hierarchy of taxa
derived from the module DiversityTaxonNames choose Administration →
Maintenance from the menu. A window will open as shown below. To
synchronize the higher taxonomic entries for entries linked to the
module DiversityTaxonNames choose the tab  Hierarchy. These entries are stored in the fields FamilyCache,OrderCache and HierarchyCache in the table
IdentificationUnit.
Hierarchy. These entries are stored in the fields FamilyCache,OrderCache and HierarchyCache in the table
IdentificationUnit.
Select a taxonomic database, a project and a taxonomic group and then
choose whether you wish to synchronize the family, order or hierarchy.
If you wish to inspect single data sets you need to check the Include
accession number checkbox. Then click on the Check for differences
button to start the query.
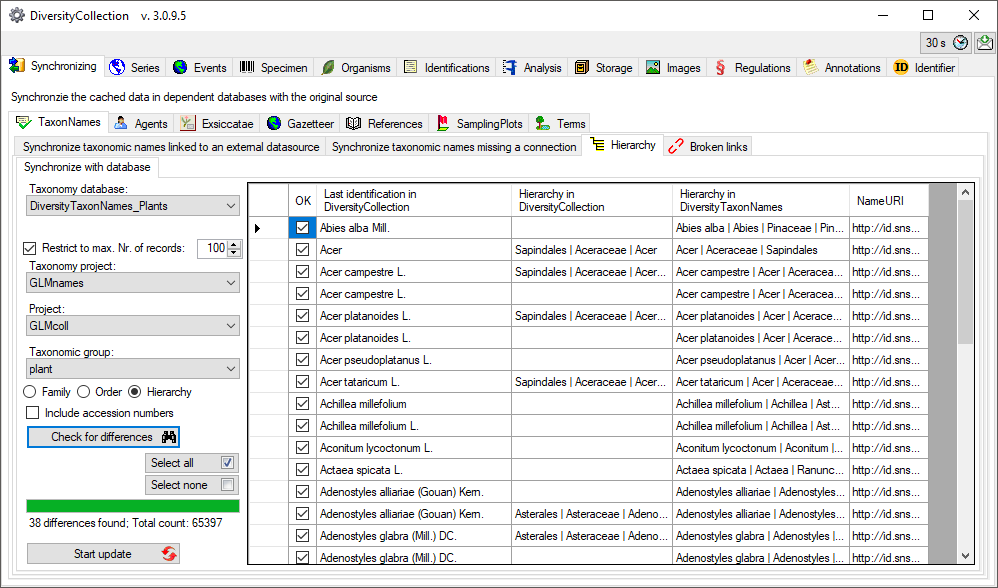
The form will list all differences found as shown above. To update the
database click on the Start update
button.
Maintenance
Renaming identifications
If you wish to add updated taxonomic names for specimen in the database,
you can use the bulk insert function. Choose the project, the taxonomic
group and the taxonomic name for which the new identification should be
added. As shown in the window below you may enter additional information
about this identification. By default the Only last identification option is checked to prevent you from searching in
older identifications. If you uncheck this option, the program will
search for any identification, irrespective whether it is the last or an
older identification.
If you wish to check single data sets check the Include accession numbers option.
A new button will appear
which will enable you to close the window and turn to a specimen
selected in the table.
To search for names click on the Test button. The found names
will be listed in the table as shown below. To insert the new
identification click the Start insert button.
Maintenance
Accepted Names
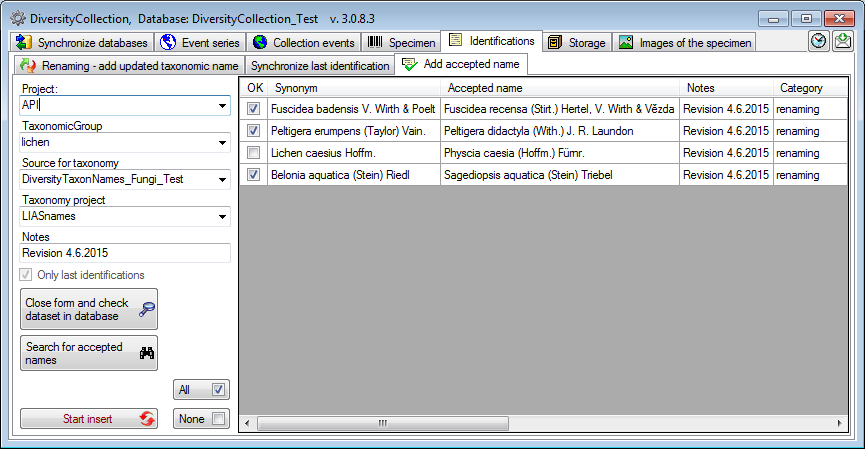
If you wish to add  accepted taxonomic
names for specimen in the database were the synonyms are used, you can
use the insert function for accepted names. Choose the project, the
taxonomic group for which the new identification should be added as well
as the source for the taxonomic names and the projects within the
taxonomic source from which the new identifications should be taken. As
shown in the window below you may enter additional information in the
notes field.
accepted taxonomic
names for specimen in the database were the synonyms are used, you can
use the insert function for accepted names. Choose the project, the
taxonomic group for which the new identification should be added as well
as the source for the taxonomic names and the projects within the
taxonomic source from which the new identifications should be taken. As
shown in the window below you may enter additional information in the
notes field.
Click on the Search for accepted names button
to find the accepted names that may be inserted. If you wish to check
single data set, select this dataset in the grid and click on the Close
form and check dataset in database button.
If some of the names should not be added, deselect them as shown for the
3. name in the example below. To select or deselect all names you can
use the All resp. None
buttons. To insert the selected names, click on
the Start insert
button.
Maintenance
Identification Terms
Vernacular terms may be linked to an external source. To synchronize the
entries for the terms derived from the module DiversityScientificTerms
choose Administration → Maintenance… from the menu. A window
will open as shown below. In the Synchronize databases tab choose
the tab Identification terms. There are two ways to synchronize
scientific terms. You may either Synchronize terms based on the link
via an URI for entries where the link to a scientific terms database
is already established or you may Synchronize terms missing a
connection where no link is established and you can query for
identical terms in one of the databases.
Synchronize terms based on the link via an URI
The terms are stored in the field VernacularTerm in the table
Identification. Select a
database containing scientific terms, a project and the group which
should be synchronized. Finally you have to decide which part should be
synchronized, either the term or the hierarchy where the hierarchy is
available in two variants (upwards or downwards). Start the query with a
click on the Check for differences button.
The form will list all differences found. The other buttons will either
select all or no entry .
To update the database click on the Start
update button. If you wish to have a more
detailed look on your data, you need to check the Include accession
number checkbox before starting the query. A button Close form and
check dataset in database will appear which will
take you back to a single data set in the database.
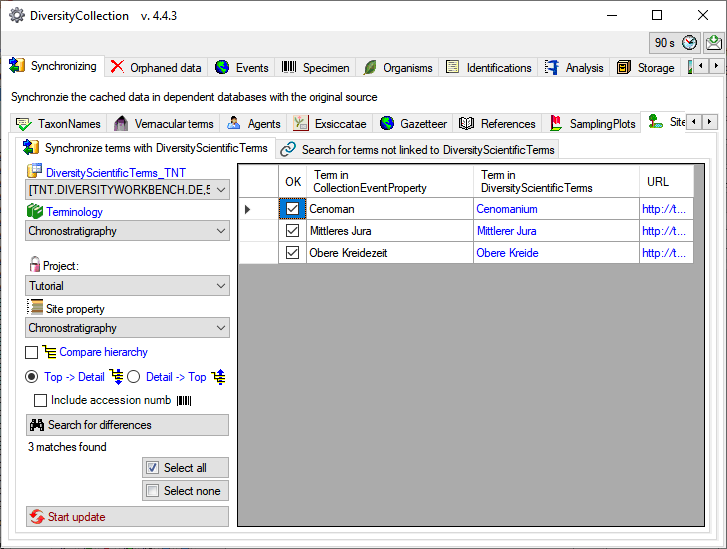
Synchronize terms missing a connection
Select a database containing scientific terms from the list and a
terminology within this database, a project in the collection database
and a group to search for identical terms. For the hierarchy you can
choose between the hierarchy from the term upwards to superior terms
resp. the hierarchy from the top term to the selected term. Start the
query with a click on the Check for identical terms button.
In the result list only terms with a single match will be checked
(column OK).
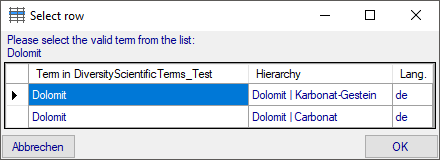
If several similar terms were found, these lines will be
marked with a blue background. To select one of the similar terms click
on the Select valid term button. A window
will open as shown below listing all similar terms found. Select one
term and click OK to use it.
Maintenance
Scientific Terms
To synchronize the entries with the module ScientificTerms choose
Administration →  Database →
 Maintenance from the menu. A window will
open as shown below. On the tab page
Maintenance from the menu. A window will
open as shown below. On the tab page  Synchonizing, you can synchronize the content in DiversityCollection
with the linked resources or search for new links via text.
Synchonizing, you can synchronize the content in DiversityCollection
with the linked resources or search for new links via text.
To synchonize the content for linked data
select the database, the project, the table and the target for
which the entries should be synchronized. There are 2 targets for the
synchronization: The term itself and the hierarchy. There are 3 tables
which may contain links to DiversityScientificTerms:
 Vernacular
terms,
Vernacular
terms,
 Site
properties and
Site
properties and
 Part
descriptions).
Part
descriptions).
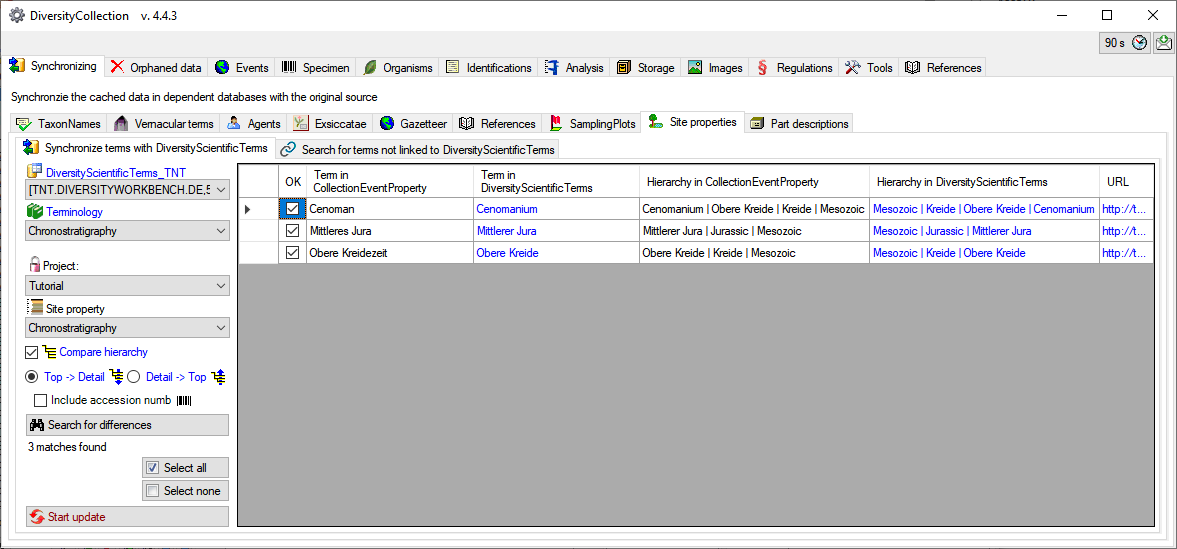
To synchronize linked data start the query
click on the Search for differences button.
Terms with differing content will be listed as shown below.
To include the hierarchy in the comparision, check the
Compare hierarchy
option as well if the hierarchy derived from DiversityScientificTerms should be from
the option Top→ Detail
 or Detail → Top
 . As shown below 2 more columns will be
included, containing the hierarchies in DiversityCollection and DiversityScientificTerms.
. As shown below 2 more columns will be
included, containing the hierarchies in DiversityCollection and DiversityScientificTerms.
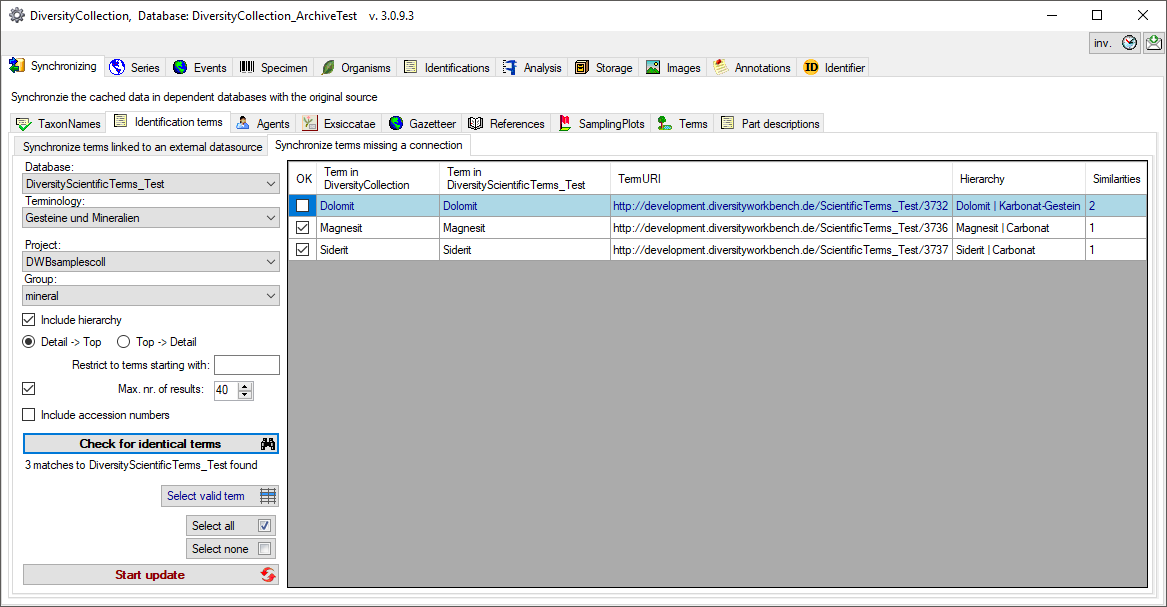
To establish new connections  for terms
corresponding to terms in DiversityScientificTerms (see below)
click on the Search for identical terms button.
All matching terms will be listed.
for terms
corresponding to terms in DiversityScientificTerms (see below)
click on the Search for identical terms button.
All matching terms will be listed.
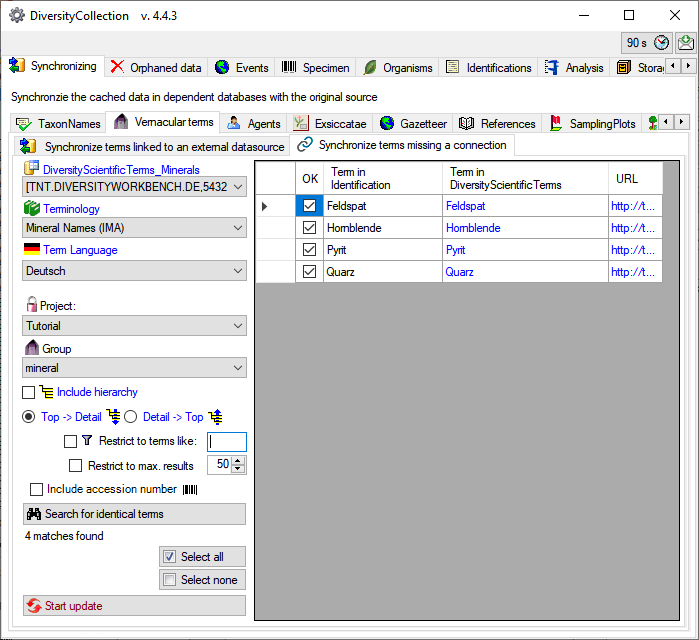
As with the query for linked data, you may include the hierarchy. In
addition there are two options to restrict the search:
 Restrict to terms like
… and Restrict to max. results … . The
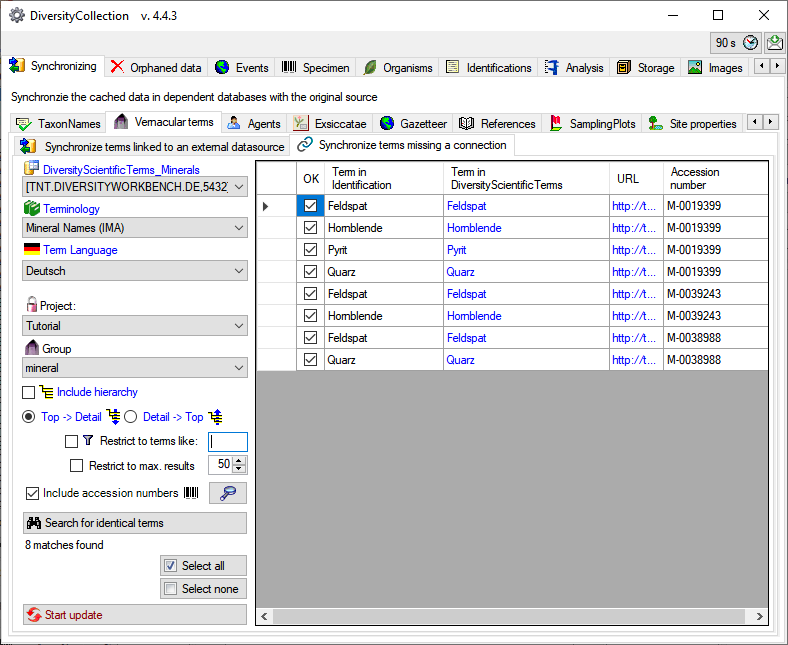
option Include accession number
Restrict to terms like
… and Restrict to max. results … . The
option Include accession number
 will split the data according to the specimen
as shown below. With this option set, you can inspect the content of
single specimen in the list using the button (see
below).
will split the data according to the specimen
as shown below. With this option set, you can inspect the content of
single specimen in the list using the button (see
below).
In the result list you can select the data that should be included in
the update in the first column (OK ) by
de/selection of single lines or with the buttons
Select all resp. Select
none. To update the database click on the Start update button.
Maintenance
Agents
Synchronize via URI
To synchronize the names of collectors, determinators etc. which are
linked to the module DiversityAgents choose Administration -
Maintenance from the menu. A window will open as shown below. On the
tab page Collection <→ Agents select the project for which the
agents should be synchronized. There are 9 tables which may contain
links to DiversityAgents:
Collection,
CollectionAgent,
CollectionEventLocalisation,
CollectionEventProperty,
CollectionSpecimen,
CollectionSpecimenProcessing,
Identification,
IdentificationUnitAnalysis
and Transaction. Choose one of
these tables for the synchronization. Then start the query with a click
on the  button. The type name is written
as defined by the default display type in the module DiversityAgents -
for more information please see the documentation on DiversityAgents.
button. The type name is written
as defined by the default display type in the module DiversityAgents -
for more information please see the documentation on DiversityAgents.
The form will list all differences found. To update the database click
on the  button. If you wish to have a more
detailed look on one of the data sets in the list, you need to check the
“Include accession number” checkbox before starting the query. A button
will appear which will take you back to a
single data set in the database.
button. If you wish to have a more
detailed look on one of the data sets in the list, you need to check the
“Include accession number” checkbox before starting the query. A button
will appear which will take you back to a
single data set in the database.
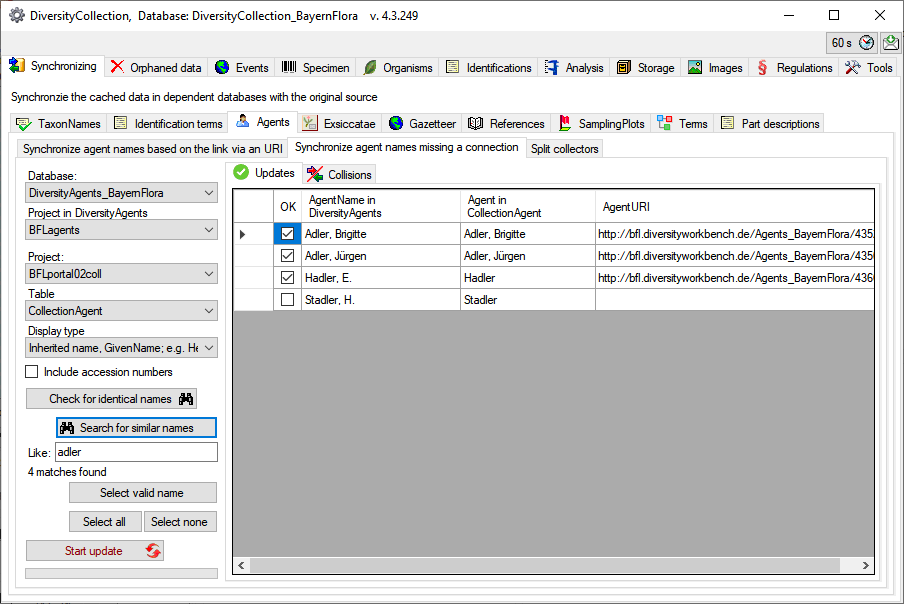
Search for possible links
You can either update the cached names for entries which are linked to
DiversityAgents as described above or you can search for possible links
based on the names as shown below. In addition to the options described
above you may choose the display type for the query to find any possible
match as names may be written like “Hertel, H.”, “H. Hertel” etc. 

Next to a search for identical names you can search for similar names.
Enter a search string in the
Like field and click on the Search for
similar names button. The deteted datasets will be listed as
shown below. For those dataset where there are more than 1 possible link
in the DiversityAgents database you have to choose the correct link with
a click on the Select valid
names button.
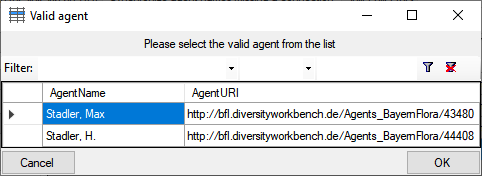
For those dataset where there are more than 1 possible link in the
DiversityAgents database you have to choose the correct link with a
click on the Select valid
names button. A window as shown below will open, where you can
select the valid name. Click on the button to
show details of an agent.
The dataset where the update collides with existing data will be listed
in the tab. Use the
Check selected
dataset button to inspect these data (see below).

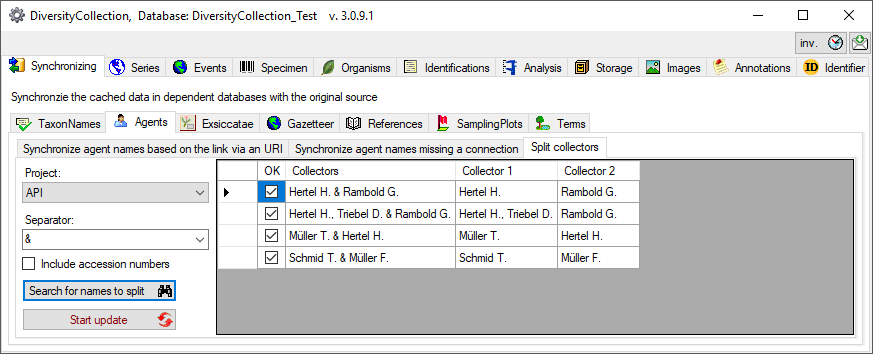
Splitting collectors
If the collectors had been written in one field with separators like &
you can split these to create a separate entry for every collector (see
below). Choose the project, enter the separator or select one of the
predefined separators and click on the Search for
names to split button. The result will be shown as in the example
below. Click on the Start
update button to split the collectors. If several separators had
been used you have to do the splitting for every single separator.
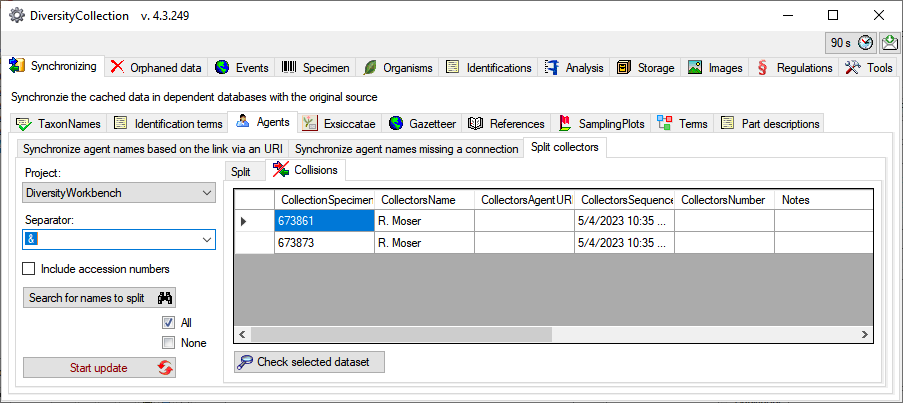
The dataset where the split collides with existing data will be listed
in the tab. Use the
Check selected
dataset button to inspect these data.
Maintenance
Synchronize
Site properties
Linked to DST
To synchronize the entries derived from the module DiversityScientificTerms
choose → from the menu. On the tab page - - .
Select the database containing the data, the  terminology, the
  project and the site property for which the entries should be synchronized.
Options:
- Compare hierarchy:
Click on the button to start the query.
To select or deselect the data that should be updated you can use the buttons
With the button you can synchronize the selected datasets
via Text
To search for data that are not linked to the module DiversityScientificTerms
choose → from the menu. On the tab page - - .
Select the containing the data, the , the  language, the project and the
  site property for which the entries should be synchronized.
Options:
- Include hierarchy:
Click on the button to start the query.
To select or deselect the data that should be updated you can use the buttons
With the button you can synchronize the selected datasets
Maintenance
Exsiccatae
To synchronize the abbreviations of the exsiccatal series titles which
are linked to the module DiversityExsiccatae choose Administration →
Maintenance… from the menu. A window will open as shown below. On
the tab page Collection <→ Exsiccatae select the project for
which the titles should be synchronized. The title is stored in the
field ExsiccataAbbreviation in the table
CollectionSpecimen. Select
the project which should be synchronized and start the query by clicking
on the button.
The form will list all differences found. To update the database click
on the button. If you wish to have a more
detailed look at your data, you need to check the “Include accession
number” checkbox before starting the query. A button
will appear which will take you back to a
single data set in the database.
Maintenance
Sampling Plots
To synchronize the entries derived from the module
DiversitySamplingPlots choose Administration → Maintenance from
the menu. A window will open as shown below. On the tab page
Collection → SamplingPlots select the project for which the
entries should be synchronized. There are 2 targets for the
synchronization: The plot identifier (as stored in the field Location1), the Geography and
the cached coordinates in table
CollectionEventLocalisation.
Select the project, one of targets for the synchronization and the
DiversitySamplingPlots database. To start the query click on the
button.
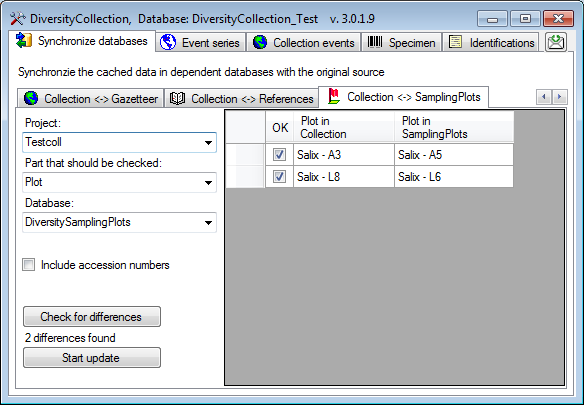
The form will list all differences found. With the first column (OK) you
may deselect certain entries which you do not wish to change. To update
the database click on the button. If you wish
to have a more detailed look on your data, you need to check the
Include accession number checkbox before starting the query. A
button will appear which will take you back
to a single data set in the database.
Maintenance
References
To synchronize the titles of the references which are linked to the
module DiversityReferences choose Administration → Maintenance
from the menu. A window will open as shown below. On the tab page
Collection <→ References select the project for which the
reference titles should be synchronized. With the first option you can
Search for differences in the reference.
There are 3 tables which may contain links to DiversityReferences:
CollectionEvent,
CollectionSpecimen and
Identification. Choose one of
these tables for synchronization. Start the query with a click on the
Check for differences 
The form will list all differences found. To update the data click on
the Start update
button.
As a second option you can Search for
references with the same title as found in the module
DiversityReferences (see below).
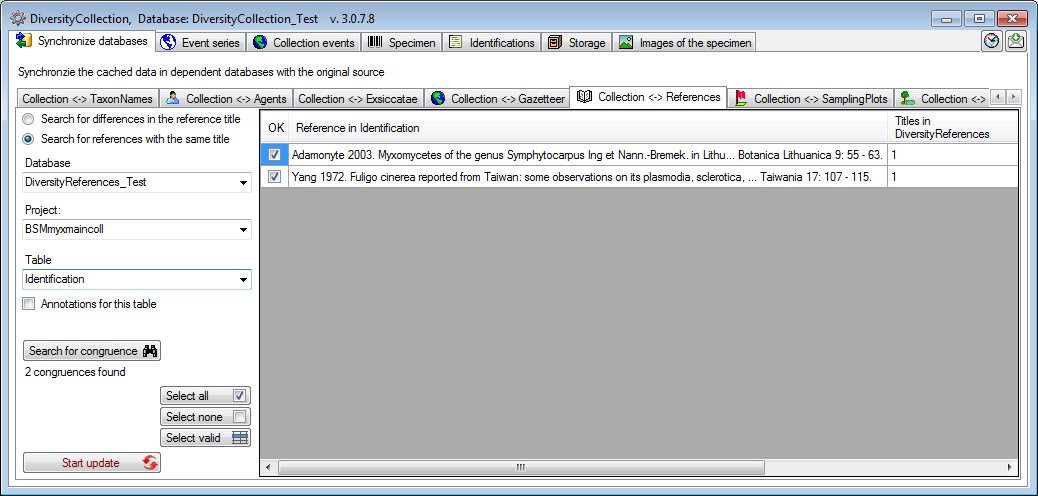
If there is more than 1 reference matching the entry in
DiversityCollection, select the line and click on the Select valid
button to choose the correct reference.
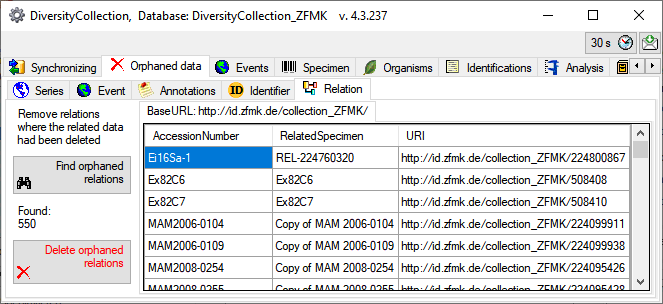
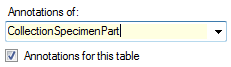
Next to the references in the tables mentioned above, you can perform
the same checks for references stored in the table
Annotation related to the tables
CollectionEvent,
CollectionSpecimen,
CollectionSpecimenPart
and IdentificationUnit. To
use this option, check Annotations for this
table and select the table that should be checked (see below)
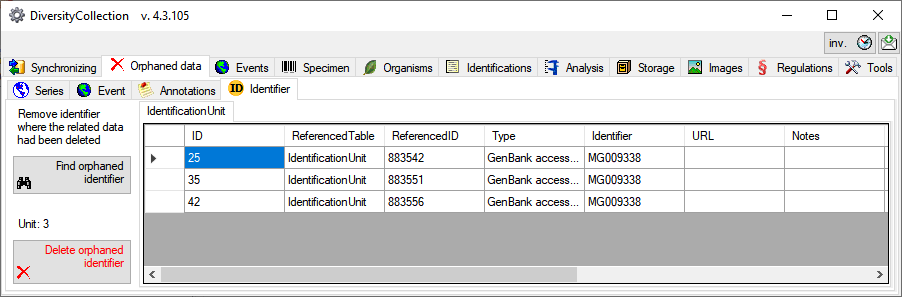
Diversity Collection
Maintenance Event & series
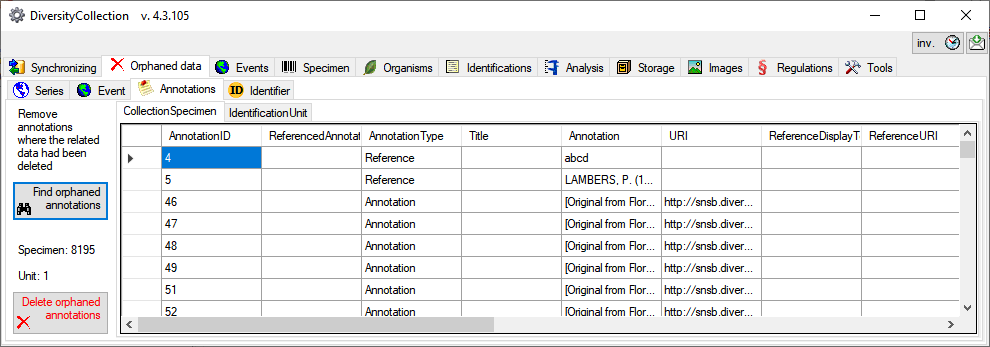
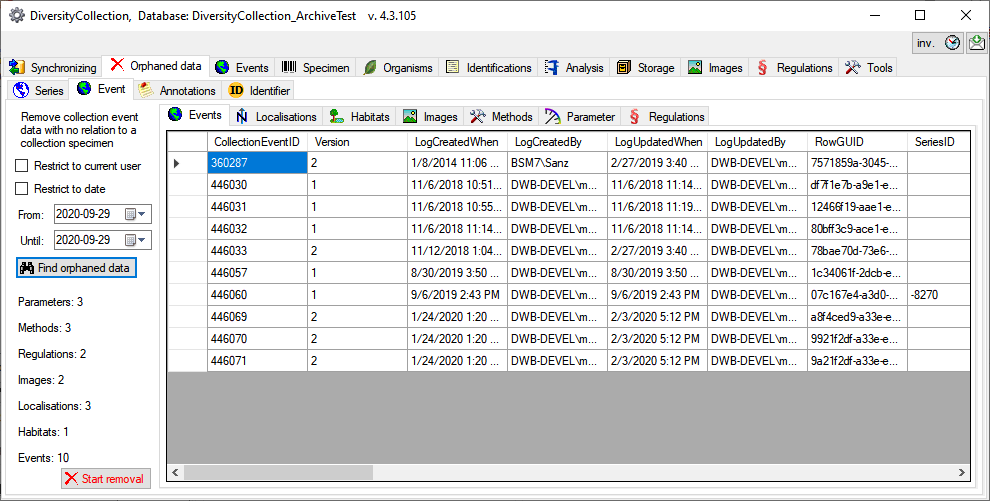
CollectionEvents - orphaned events
Provided you have the proper rights you can remove orphaned data sets in
the tables CollectionEvent and CollectionEventSeries. To delete events
which are not linked to any data in the database use the tab page
 Orphaned data - Event.
These unrelated data sets may e.g. be derived from specimens that were
transferred to another CollectionEvent. Click on the
Find orphaned data button to list all
events which are not related to a specimen. The found CollectionEvents
and their dependend data will be listed as shown below. Click on the
Start
removal button to delete the data.
Orphaned data - Event.
These unrelated data sets may e.g. be derived from specimens that were
transferred to another CollectionEvent. Click on the
Find orphaned data button to list all
events which are not related to a specimen. The found CollectionEvents
and their dependend data will be listed as shown below. Click on the
Start
removal button to delete the data.
Country, Place and Altitude via GeoNames
If your data sets contain WGS84 Coordinates, you can use the webservice
www.geonames.org to insert or update the
country, the place or the altitude of your collection sites. Choose the
tab  Set place and country, the project you
wish to update and an optional upper limit of the data sets (recommended
for slow connections). Click the Query GeoNames button to start the
query. According to the selected option (only if missing / when
different / for all entries) the retrieved data will be marked with
colors as shown in the images below.
Set place and country, the project you
wish to update and an optional upper limit of the data sets (recommended
for slow connections). Click the Query GeoNames button to start the
query. According to the selected option (only if missing / when
different / for all entries) the retrieved data will be marked with
colors as shown in the images below.
|
|
| White |
The data set will be inserted or changed |
| Red |
An error occured |
| Grey |
According to the selected option this data set will not be inserted or changed |
| Yellow |
The data set has been deselected and will not be inserted or changed |
| Green |
The data set has been inserted or changed |
In the first column you can deselect a data set for the update. To
inspect a single data set from the list select it and click on the
Close window and check data set button. To
update the data set click on the Set countries button.
As for countries, the places will be listed as shown below.
To insert or update the selected data sets click the Insert places
button.
The image above shows the data for the altitude. After the update all
updated data sets will be marked green (see below).

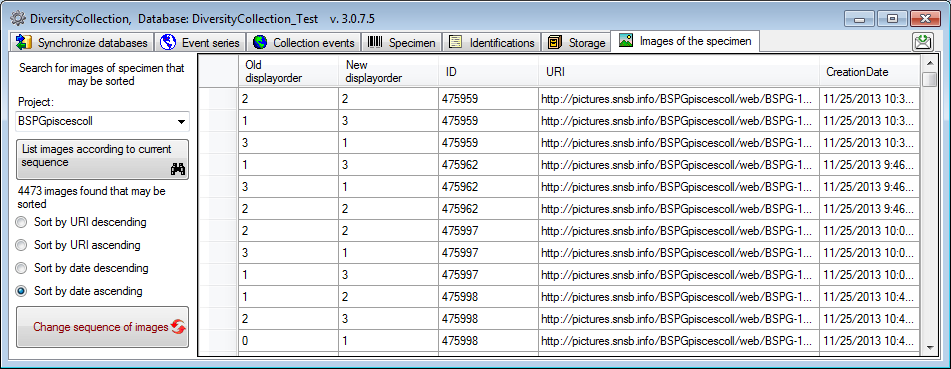
Sampling plots
If your data contains references to sampling plot coordinates, you can
update the locality description according to the name of the sampling
plot (see image below). Click on the Start search button to find
links to SamplingPlots where the locality description does not
correspond to the name of the sampling plot. You can restrict the search
to missing locality descriptions and attach the name of the sampling
plot to the existing entry in the locality description. Use the Start
update button to set the locality description according to your
settings and the differences found.

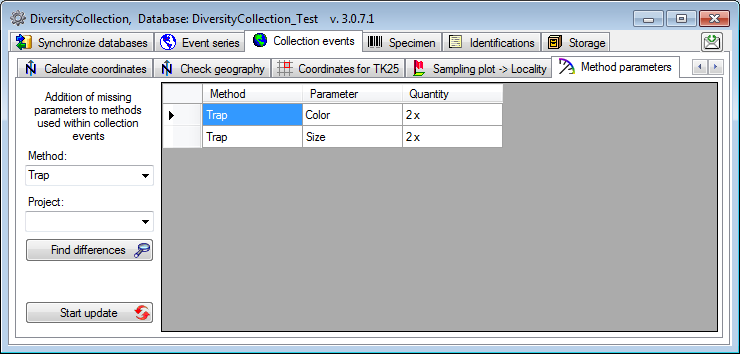
Method parameters
If your events contain methods where parameters for these methods had
been added afterwards, you can add these missing parameters. You may
restrict the search for missing parameters to certain methods and
projects (see image below). Click on the Find differences
button to search for missing parameters and on the
Start update button to add them to the methods
used in the events.
If your data contain or needs coordinates, please see the corresponding
chapter on adding and calculatingcoordinates.
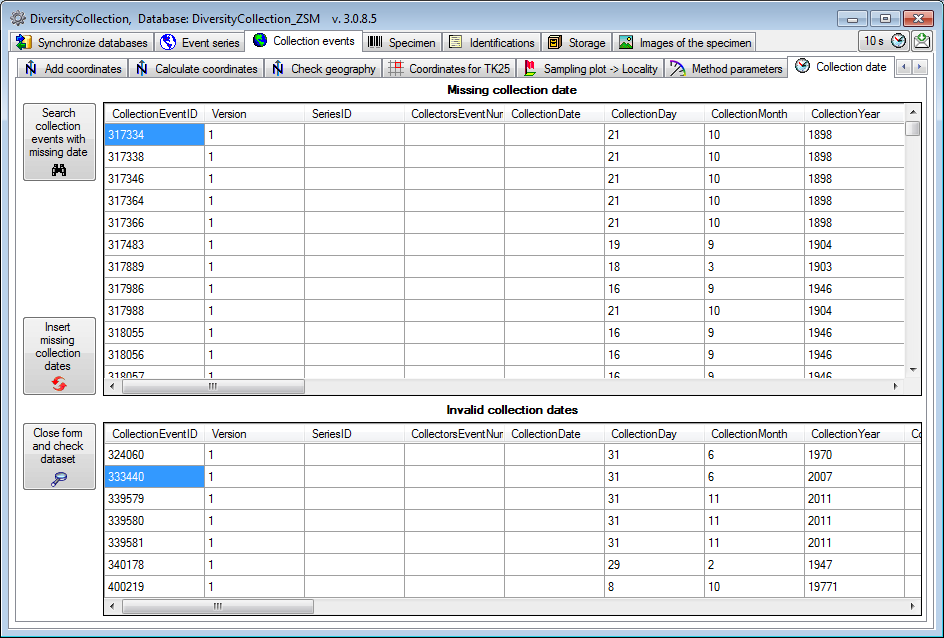
Collection date
If your events contain missing or invalid collection dates you may
search for these in the  Collection date section
(see below). Use the button to search for these
datasets. In the upper part of the window datasets with complete parts
for a valid date but missing dates are listed. These can be updated with
a click on the button. In the lower part of the
window you find data with date parts that would result in an invalid
date. Click in one of the lines and then on the
button to close the window and inspect and fix the listed data.
Collection date section
(see below). Use the button to search for these
datasets. In the upper part of the window datasets with complete parts
for a valid date but missing dates are listed. These can be updated with
a click on the button. In the lower part of the
window you find data with date parts that would result in an invalid
date. Click in one of the lines and then on the
button to close the window and inspect and fix the listed data.
Subsections of Event & Series..
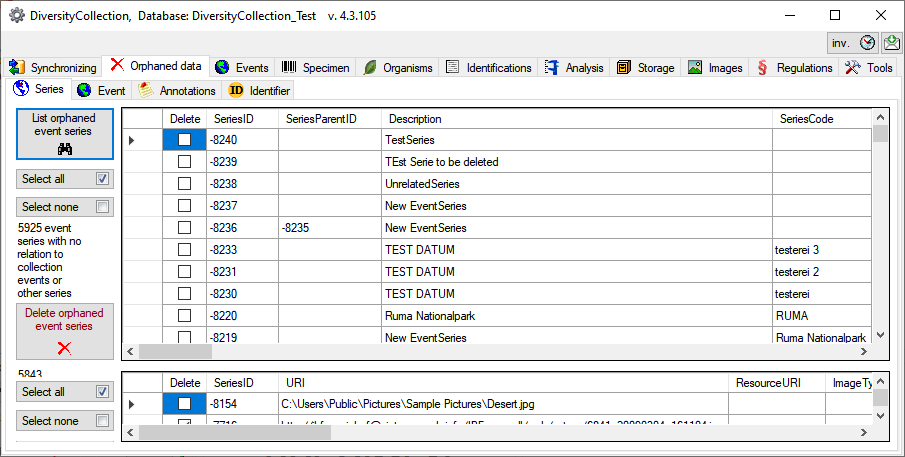
Maintenance
Event Series
To delete CollectionEventSeries with no relation to CollectionEvents or
other event series choose the tab page Orphaned data -  Series. Click the List
orphaned event series button to list these series. The detected data
will be listed as shown below. In case there are orphaned images these
must be deleted first (see below). Click on the
Delete orphaned event images and and
the Delete orphaned event series
button to delete the data.
Series. Click the List
orphaned event series button to list these series. The detected data
will be listed as shown below. In case there are orphaned images these
must be deleted first (see below). Click on the
Delete orphaned event images and and
the Delete orphaned event series
button to delete the data.
Diversity Collection
Maintenance
Event Coordinates
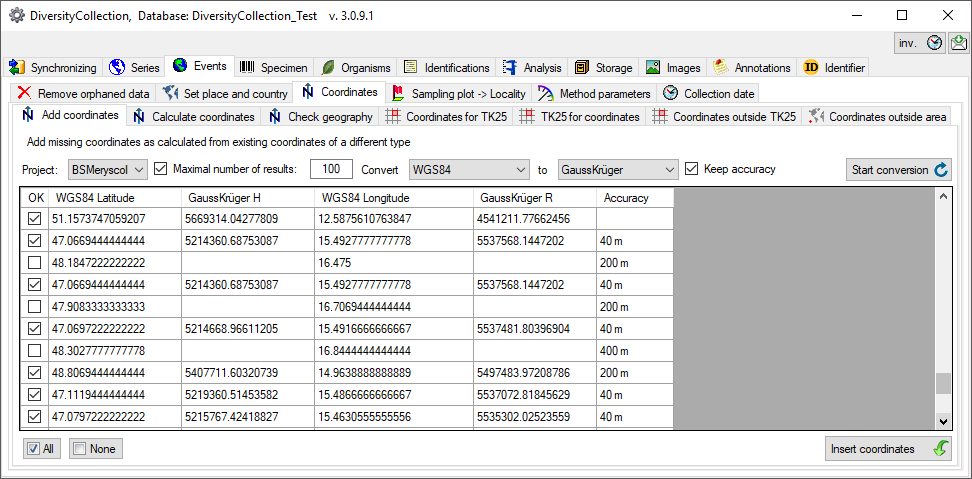
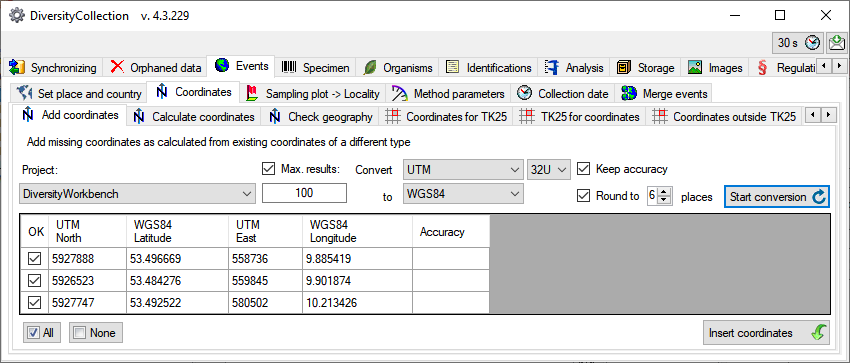
Add Coordinates
If your data contain coordinates you can add additional coordinates in a
different system for those dataset, where entries of the additional
coordinate system are missing. E.g. you can add WGS84 coordinates on the
basis of Gauss Krueger coordinates. In the  Add coordinates tab choose the project you want to update and an
optional upper limit of the datasets. Then select the source coordinates
and the coordinate system these should be converted into. Click on the
Start conversion
Add coordinates tab choose the project you want to update and an
optional upper limit of the datasets. Then select the source coordinates
and the coordinate system these should be converted into. Click on the
Start conversion  button to start the
conversion. If a conversion is not possible, the fields for the target
system will be empty as shown below. The option
Keep accuracy ensures that the accuracy if present in the original
data will be copied into the new generated coordinates. Click the
Insert coordinates
button to start the
conversion. If a conversion is not possible, the fields for the target
system will be empty as shown below. The option
Keep accuracy ensures that the accuracy if present in the original
data will be copied into the new generated coordinates. Click the
Insert coordinates  button to insert the new
coordinates into you datasets.
button to insert the new
coordinates into you datasets.
Add WGS84 Coordinates for UTM
For adding WGS84 coordinates on the basis of existing  UTM entries, you
may have to specify the grid zone if this is missing in the data. By
default the resulting WGS84 coordinates are rounded to 6 places
corresponding to an accuracy of 1 m. In case you want to avoid the
rounding of the calculated values, uncheck the
Round to option (see below). By default the accuracy of the original
data is kept. If you uncheck the Keep
accuracy option the software will calculate an approximate value
according to the given data.
UTM entries, you
may have to specify the grid zone if this is missing in the data. By
default the resulting WGS84 coordinates are rounded to 6 places
corresponding to an accuracy of 1 m. In case you want to avoid the
rounding of the calculated values, uncheck the
Round to option (see below). By default the accuracy of the original
data is kept. If you uncheck the Keep
accuracy option the software will calculate an approximate value
according to the given data.
Check the video for an overview regarding UTM:
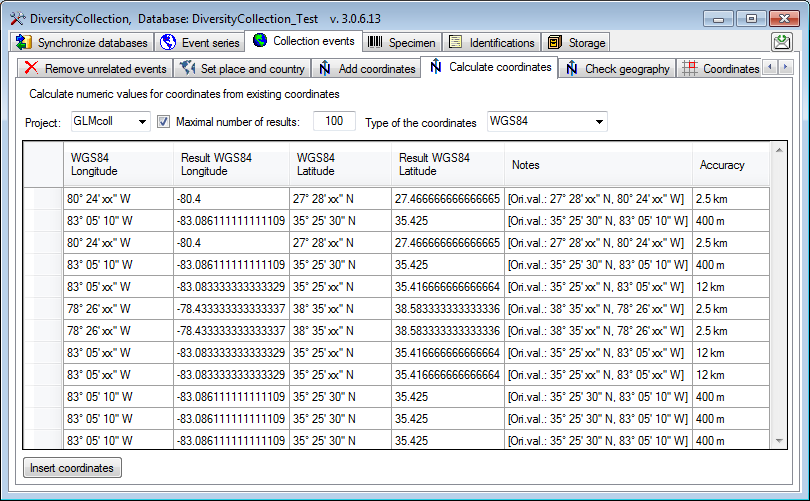
Calculate Coordinates
If your data contain coordinates e.g. written as non numeric entries
like 59°21’W 10°12’S you can try to calculate numeric values from these
entries (see below). Select the project, the maximal number that should
be parsed and the type (currently only WGS84). Then start the conversion
with a click on the start calculation
button. Click the
Insert
coordinates button to insert the new coordinates into your
datasets.
Check Coordinates
If your data contain coordinates these may be inconsistent between the 3
places the coordinates are stored. To fix these inconsistencies use the
functions showed in the image below and a short tutorial
.
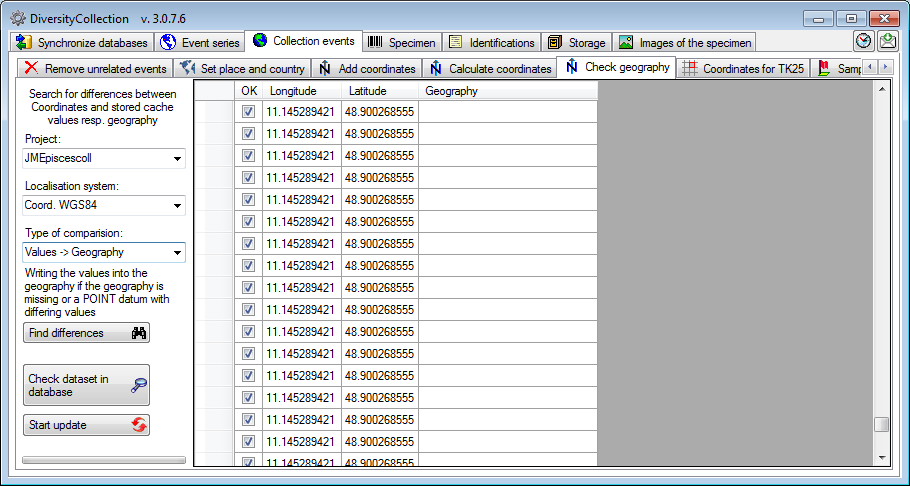
For comparision of the cache values you may try to use numeric values as base for the comparision.
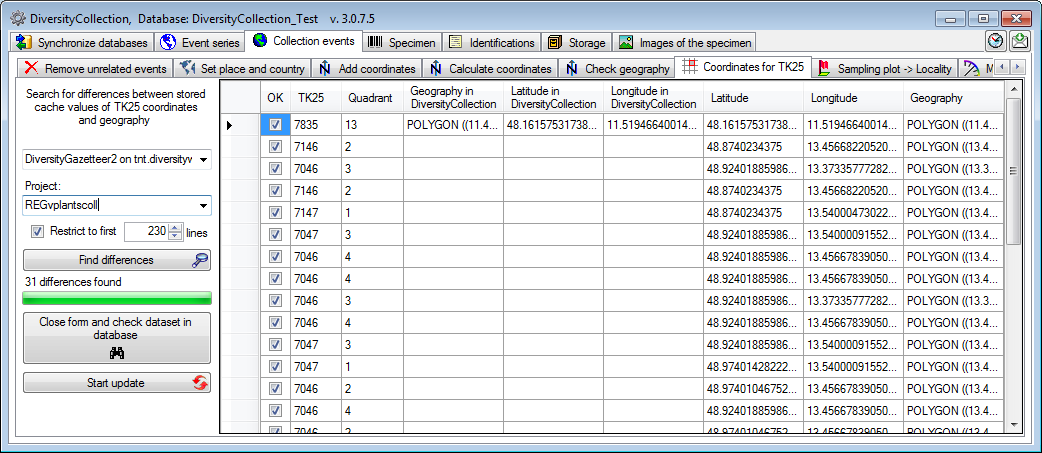
Add Coordinates for TK25 entries
If your data contain TK25 (= MTB) entries you can try to retrieve the
coordinates and geography for these entries from data in the module
DiversityGazetteer (see below). If the source database is located on a
different server, select the source from the list (for adding source
databases see chapter Connections). As the retrieval
of the geographical data is rather time consuming, you may restrict the
number datasets tested. Choose a project and click on the Find
differences button to search for coordinates.
Click the Start update button to update the
TK25 entries with the found coordinates.
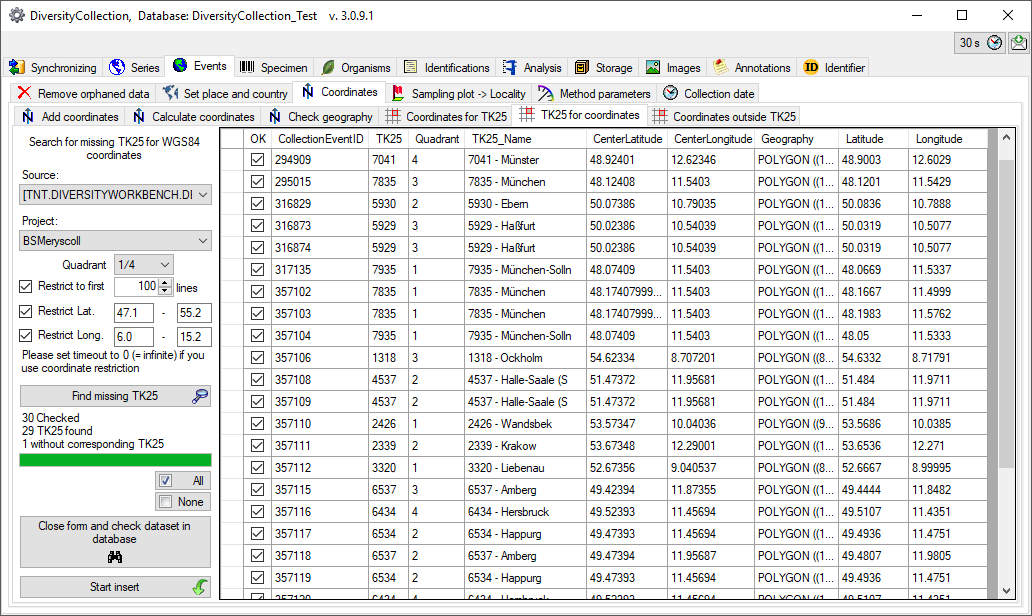
Add TK25 entries for WGS84 coordinates
If your data contain WGS84 coordinates you can try to retrieve TK25 (=
MTB) entries for these entries from data in the module
DiversityGazetteer (see below). Select the source for the geographical
information. If the source database is located on a different server and
not connected via a linked server, select the source
from the list (for adding source databases see chapter
Connections). As the retrieval of the geographical
data is rather time consuming, you may restrict the number datasets
tested. By default the range for the search is restricted (Lat.: 47.1 -
55.2 and Long.: 6.0 - 15.2) to avoid the inclusion of coordinates where
no TK25 information is expected. Choose a project and click on the
Find missing TK25 button to search for
coordinates. If you want to check a single dataset in the main form,
mark this dataset and click on the button Close form and check dataset
in database . Click the Start insert
button to insert the TK25 entries for the found
coordinates.
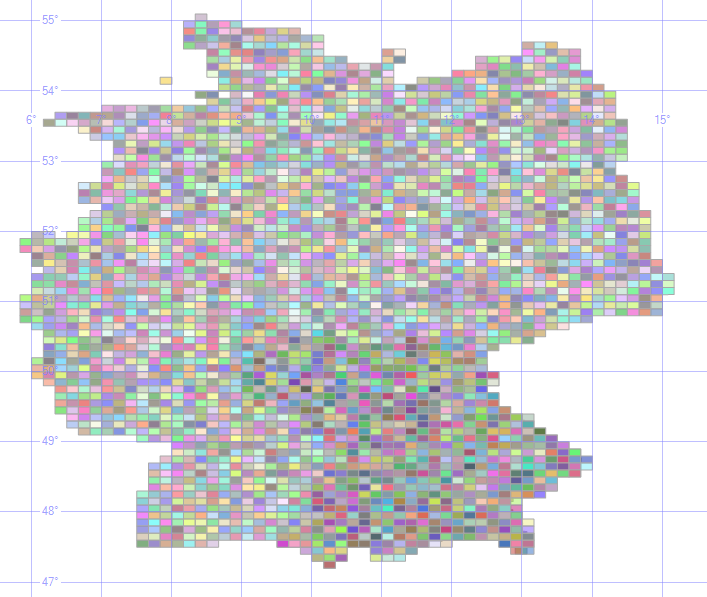
A precondition for the above described handling of the TK25 datasets is
the availablity of the corresponding data in the Gazetteer database. The
current range is shown in the image below.
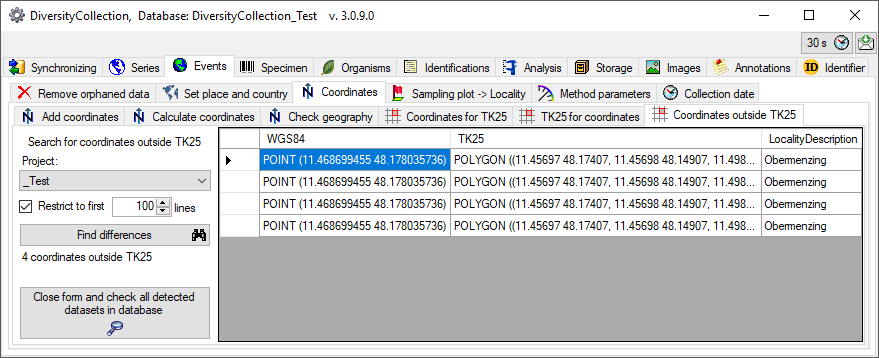
Coordinates outside TK25
If your data contain WGS84 coordinates outside TK25 (= MTB) entries
these can be detected in the Coordinates ouside TK25 part. Choose the
project and click on the Find differences
button. All entries with coordinates outside a TK25 entry for the same
event will be listed (see below). Click on the Close form and check
all detected datasets in main form button to
close the form and list the detected datasets in the main form.
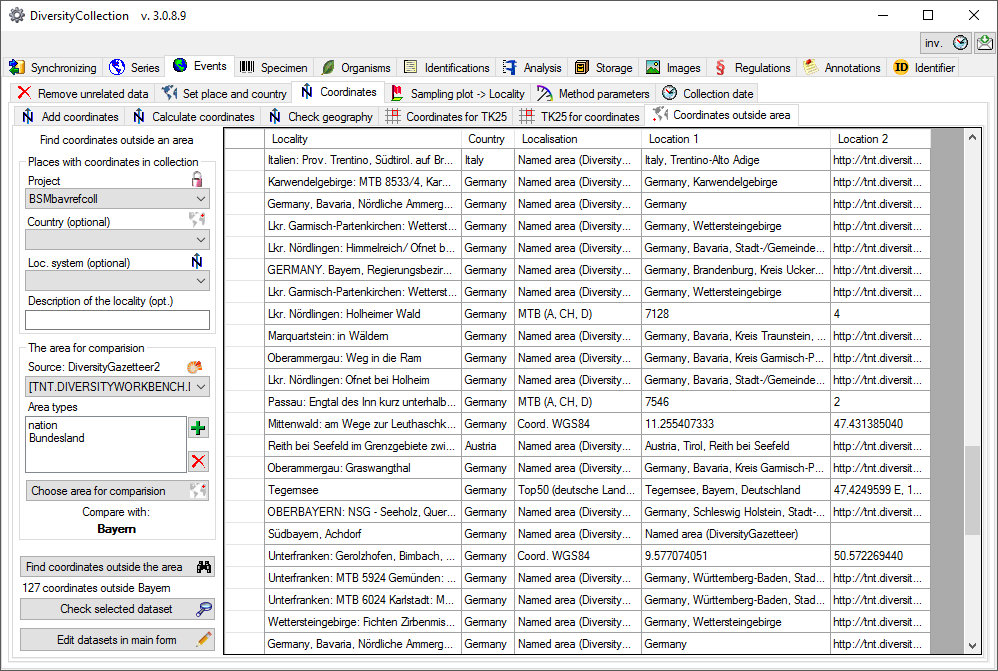
Find coordinates outside an area
If your data contain coordinates these may be positioned  outside an area
e.g. due to swapping latitude and longitude. You can detect these errors
by comparing all coordinates within a project with an area as provided
by DiversityGazetteer. In the maintenance form choose
Events -
Coordinates - Coordinates outside area. You
may restrict the search with the country, the
localisation sytem and the description of
the locality (please use wildcards like %). The areas
for comparison are provided by DiversityGazetteer. Choose one of the
sources for areas. With the
outside an area
e.g. due to swapping latitude and longitude. You can detect these errors
by comparing all coordinates within a project with an area as provided
by DiversityGazetteer. In the maintenance form choose
Events -
Coordinates - Coordinates outside area. You
may restrict the search with the country, the
localisation sytem and the description of
the locality (please use wildcards like %). The areas
for comparison are provided by DiversityGazetteer. Choose one of the
sources for areas. With the  and
buttons you can edit the list of area types from
which the area is selected. Click on the Choose area for comparison
button to select the area the coordinates
should be compared with. A window will open where you can select among
the areas provided by the DiversityGazetteer database you selected as a
source. Finally click on the Find coordinates outside the area
button. All corresponding localisations will be
listed as shown in the image below. To inspect a single dataset, select
it in the list and click on the Check selected dataset
button. To edit the data in the main form, click on
the Edit datasets in main form
and
buttons you can edit the list of area types from
which the area is selected. Click on the Choose area for comparison
button to select the area the coordinates
should be compared with. A window will open where you can select among
the areas provided by the DiversityGazetteer database you selected as a
source. Finally click on the Find coordinates outside the area
button. All corresponding localisations will be
listed as shown in the image below. To inspect a single dataset, select
it in the list and click on the Check selected dataset
button. To edit the data in the main form, click on
the Edit datasets in main form  button. If you
mark some datasets in the list, the selection in the main form will be
restricted to these. Otherwise all datasets from the list will be shown.
For an introduction see a short tutorial
.
button. If you
mark some datasets in the list, the selection in the main form will be
restricted to these. Otherwise all datasets from the list will be shown.
For an introduction see a short tutorial
.
Maintenance
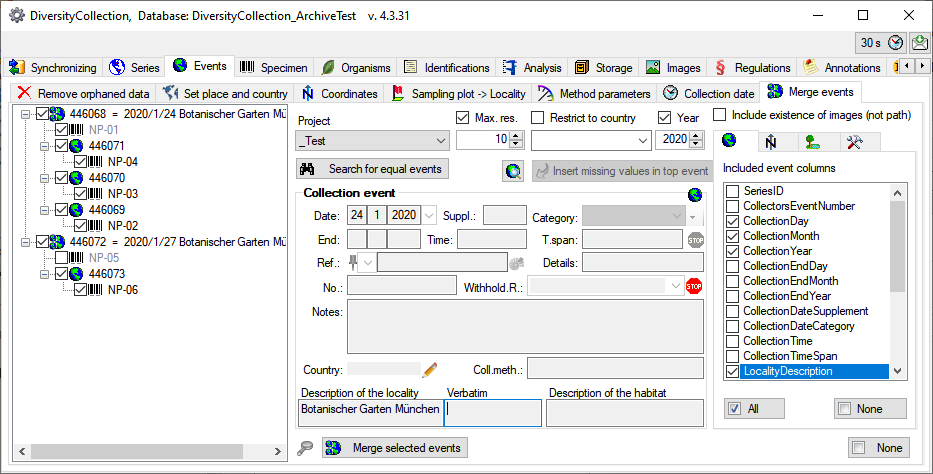
Event Merge
Searching
If collection events with equal data should be merged, select the tab
Events -  Merge
events as shown below. You may choose a project, a year, a country and
the maximal number of results to restrict the search. By default all
columns of the table CollectionEvent and
additional information from the tables
CollectionEventLocalisation and
CollectionEventProperty as well as the exisitence of
Merge
events as shown below. You may choose a project, a year, a country and
the maximal number of results to restrict the search. By default all
columns of the table CollectionEvent and
additional information from the tables
CollectionEventLocalisation and
CollectionEventProperty as well as the exisitence of
 methods and images are included. To find
similar events with different entries in certain parts, you can deselect
those parts where there is no match in the data. To start the query
select a project and click on the Search for equal
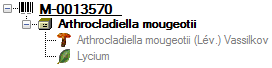
events button. In the tree on the left, the result of the query
will be displayed (see below). The events are sorted by their ID with
the lowest values as top events of the
groups.
methods and images are included. To find
similar events with different entries in certain parts, you can deselect
those parts where there is no match in the data. To start the query
select a project and click on the Search for equal
events button. In the tree on the left, the result of the query
will be displayed (see below). The events are sorted by their ID with
the lowest values as top events of the
groups.
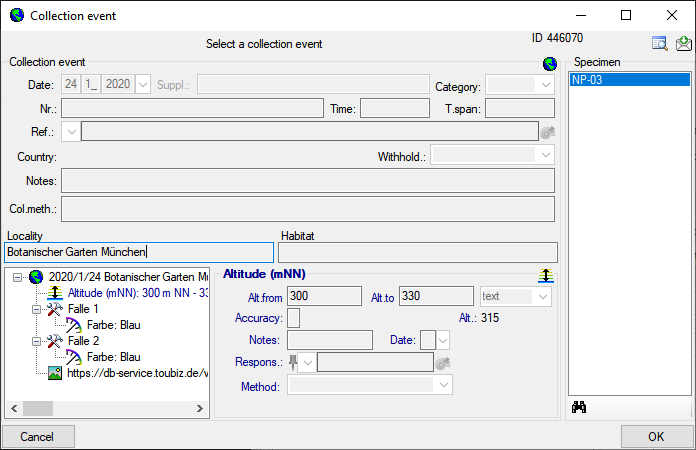
Details
Click on an event to see the details  for the event. For a complete
inspection of the data of an event, click on any
event node in the
tree and then on the button to open a
separate window showing the details for the event including depending
data (see below). You may open as many of these inspection windows as
needed. The content will be displayed according to the time of display.
For inspection of the top event you therefore have to close and reopen
the window after a transfer of missing data as described below.
for the event. For a complete
inspection of the data of an event, click on any
event node in the
tree and then on the button to open a
separate window showing the details for the event including depending
data (see below). You may open as many of these inspection windows as
needed. The content will be displayed according to the time of display.
For inspection of the top event you therefore have to close and reopen
the window after a transfer of missing data as described below.
Merge event data
The target of the merge is always the top
node of a group. To transfer missing data from events linked to the top
event, select a depending event and click on
the  insert missing values in top event button. This will copy all
missing data of the selected event in the top event. Finally select
those events that should be merged and click on the merge
selected events button.
insert missing values in top event button. This will copy all
missing data of the selected event in the top event. Finally select
those events that should be merged and click on the merge
selected events button.
Maintenance
Accession number duplicates
The database will warn but not prevent you from entering an accession
number several times e.g. via an import. In the main form a duplicateaccession number is indicated with a red background. To
check for duplicate accession numbers choose Administration -
Maintenance from the menu. In the window that will open, choose the
tab page Specimen as shown below. You can
restrict the query to a project or leave the project empty in order to
compare with all the available projects. For a restriction to certain
numbers you may enter a filter (using wildcards, see
below). To start the query click on the Check for duplicates
button.
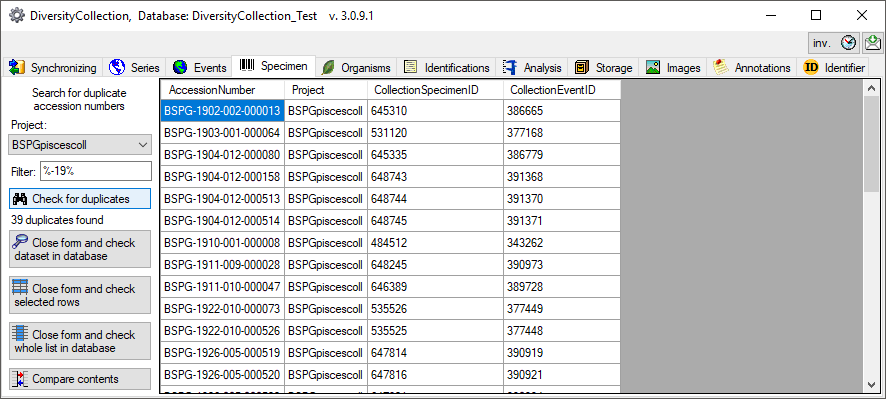
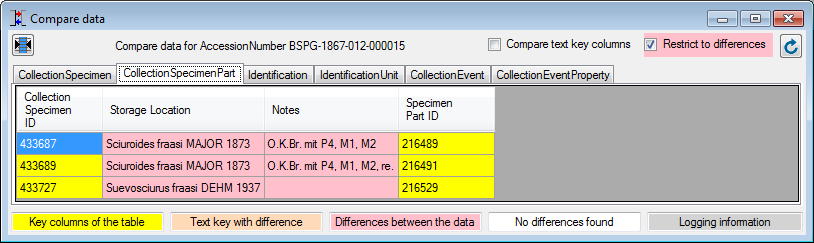
The form will list all duplicates found as shown above. To switch to a
data set in the database select it in the table and click on the Close
form and check dataset in database button. To see
only the selected rows, click on the Close form and check selected rows
 . To list all duplicates in the main form
click on the Close form and check whole list in database
. To compare the contents of duplicates,
select the duplicate in the list and click on the
. To list all duplicates in the main form
click on the Close form and check whole list in database
. To compare the contents of duplicates,
select the duplicate in the list and click on the
 button. A window as shown below will open.
All tables containing the data of the duplicates will be shown.
button. A window as shown below will open.
All tables containing the data of the duplicates will be shown.
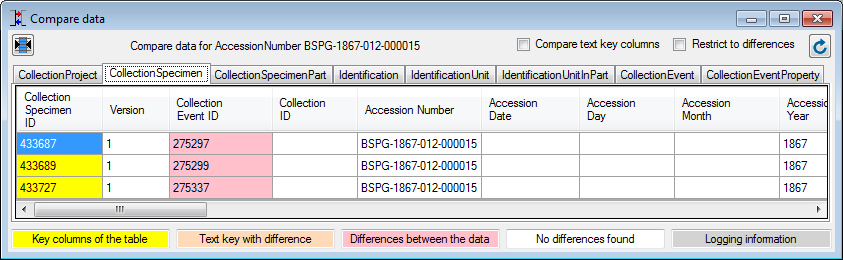
Use the  button to optimize the width of the
columns. The columns in the tables are marked with different colors as
shown in the image above. For the comparison of the data key columns
will be ignored unless you choose the option Compare text key
columns. To restrict the displayed tables and columns to those with
differences, choose the Restrict to differences option (see below).
In the window for comparing the data, editing is not possible, but you
can open another client and edit the duplicated data. To show changes in
the data performed e.g. in a second client, click on the
button to optimize the width of the
columns. The columns in the tables are marked with different colors as
shown in the image above. For the comparison of the data key columns
will be ignored unless you choose the option Compare text key
columns. To restrict the displayed tables and columns to those with
differences, choose the Restrict to differences option (see below).
In the window for comparing the data, editing is not possible, but you
can open another client and edit the duplicated data. To show changes in
the data performed e.g. in a second client, click on the
 button.
Maintenance
Administration of Regulations
To insert regulations like the Nagoya protocol choose Administration
→ Maintenance from the menu. A window will open as shown below. On
the tab page  Regulations select the
project and the country for which the regulations should be entered.
Select the collection and/or accession date where the search for the
data should be started. A click on the Search for events
button will start the
search and list all detected data as shown below.
Regulations select the
project and the country for which the regulations should be entered.
Select the collection and/or accession date where the search for the
data should be started. A click on the Search for events
button will start the
search and list all detected data as shown below.
If the data should be withheld from publication e.g. via the cache
database, enter the corresponding withholding reason
 . These withholding reasons will only be inserted if
the specimens are not already withheld for other reasons.
. These withholding reasons will only be inserted if
the specimens are not already withheld for other reasons.
Click on the button to find
the regulation that should be inserted.
With the Start entry of the
regulations button the withholding
reasons and regulations will be inserted.
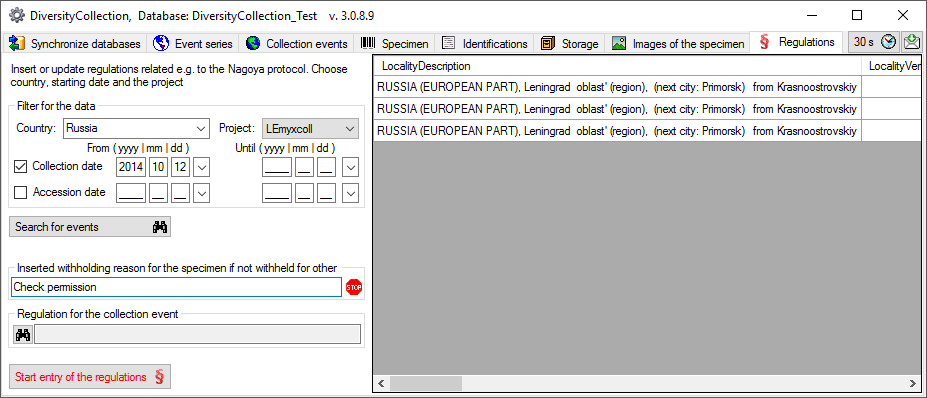
The regulations will be inserted as shown below.

 people, exsiccatal
series, geographical
names and
people, exsiccatal
series, geographical
names and  references. Further functions provided by
maintenance are a search for
references. Further functions provided by
maintenance are a search for  duplicate
accession numbers, the insert of updated
taxonomic names, the removal
duplicate
accession numbers, the insert of updated
taxonomic names, the removal
 .
.