Generate Document
Generate document
This tool is used to generate a structured documentation of database
contents. To use this tool, start a query and choose Data →
 Generate Document … from the menu.
The entries of the query result will be passed to the form and depending
on the query type (description, descriptor or project) different output
options will be provided.
Generate Document … from the menu.
The entries of the query result will be passed to the form and depending
on the query type (description, descriptor or project) different output
options will be provided.
For details check the following pages:
 Generate a
description data document
Generate a
description data document
 Generate a descriptor
data document
Generate a descriptor
data document
 Generate a project data document
Translations and wording
In most of the forms for document generation a control for adjusting the
Export language as shown below is included. The drop down box always
offers an item “(default)” and language codes for all
translation languages available in the database. If
you select the default value, the original labels, details a.s.o. is
used in the generated document. If you select a specific language code,
the corresponding tranlated values are exported. If no tranlation is
stored in the database for a specific value, the original value is used
instead.
If you select the option Use wording, for descriptions, descriptors
and categorical states the values of the fields “wording” are exported
instead of the names. For summary data additionally the values “wording
before” and “wording after”, which may be specified for each descriptor,
are inserted before and after the values. If no wording is specified,
the original name is used.
Subsections of Generate Document
Generate Descriptions
Generate a description data document
This tool is used to generate a structured documentation of description
data stored in the database. To use this tool, start a query for
descriptions and choose Data ->
 Generate document … from the menu.
A window with will open as shown below.
Generate document … from the menu.
A window with will open as shown below.
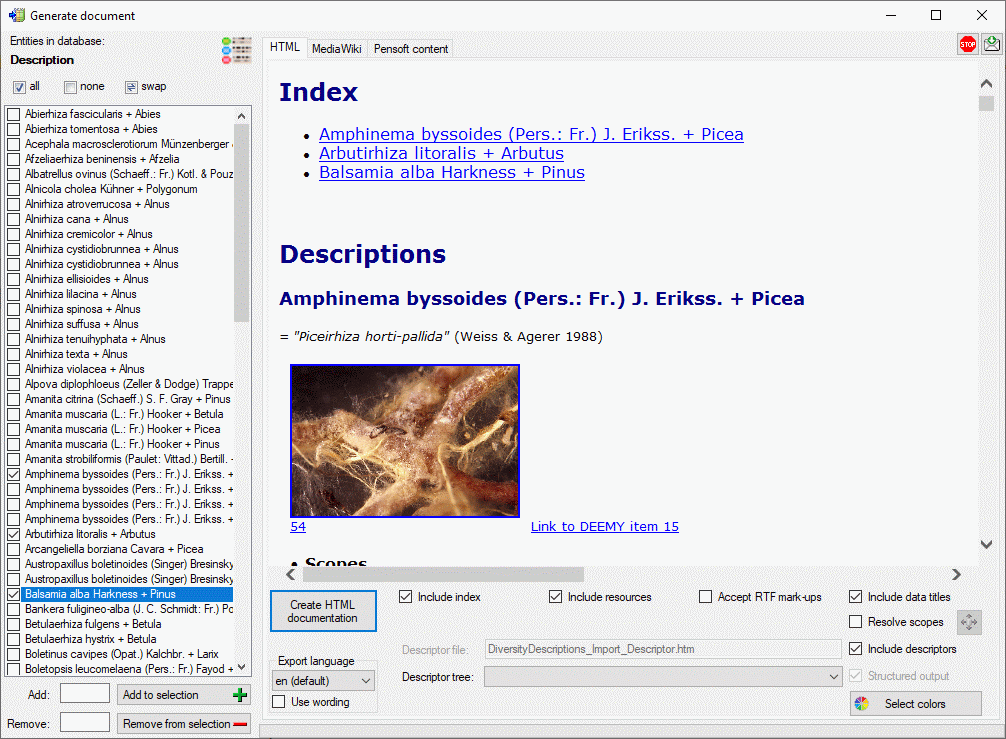
You may select all entries by clicking the  all button, deselect all entries by clicking the
 none button or toggle your selection by
clicking the
none button or toggle your selection by
clicking the  swap button. Choose among
the provided options and click on the button Create … documentation to
create a document in one of the available formats.
swap button. Choose among
the provided options and click on the button Create … documentation to
create a document in one of the available formats.
By default no descriptions will be exported that include any descriptor
with data status “Data withheld”. This is indicated by the
 button in the upper right corner of the window. You
may click on this button to include those descriptions. The button will
change to
button in the upper right corner of the window. You
may click on this button to include those descriptions. The button will
change to  and only the marked descriptor
summary data will be excluded from the document.
and only the marked descriptor
summary data will be excluded from the document.
HTML
If you create a HTML documentation, a local file named <Database
name>_Description.htm is generated in the application directory,
that might be copied and edited for own purposes. If you select option
Include descriptors, the used descriptors are included at the end of
the documents and links to that empedded descriptors are set in the
description section. Otherwise the links are set to the entries
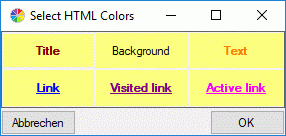
specified in the Descriptor file: text box. By clicking button
 Select colors you may open a dialog window
where you can select the colors of different elements (see window
below).
Select colors you may open a dialog window
where you can select the colors of different elements (see window
below).
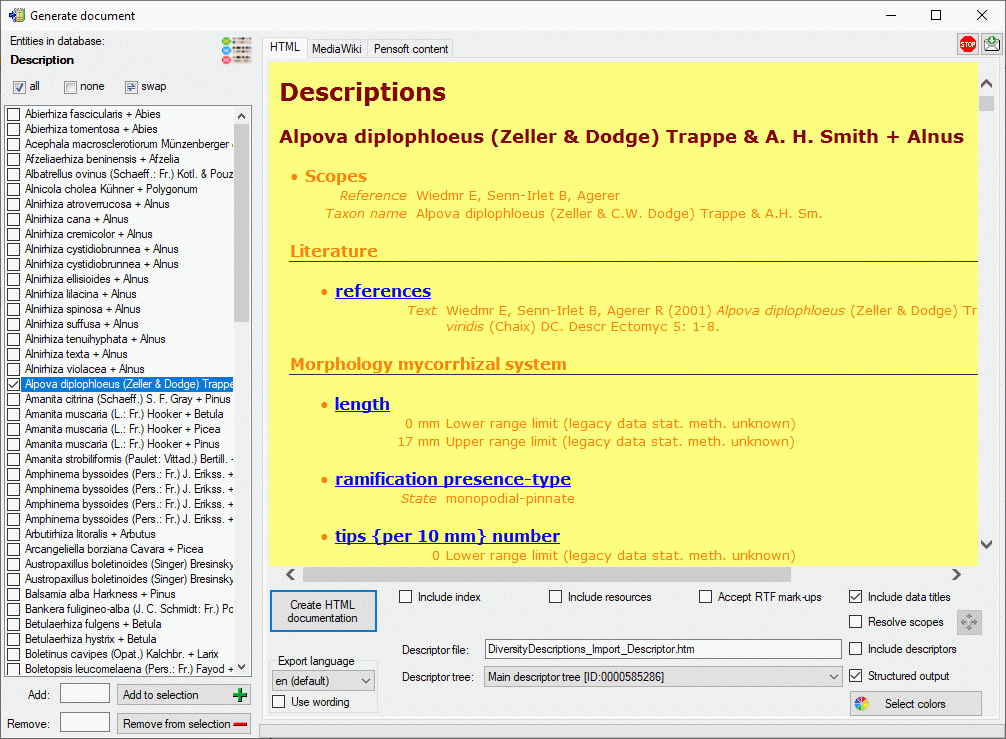
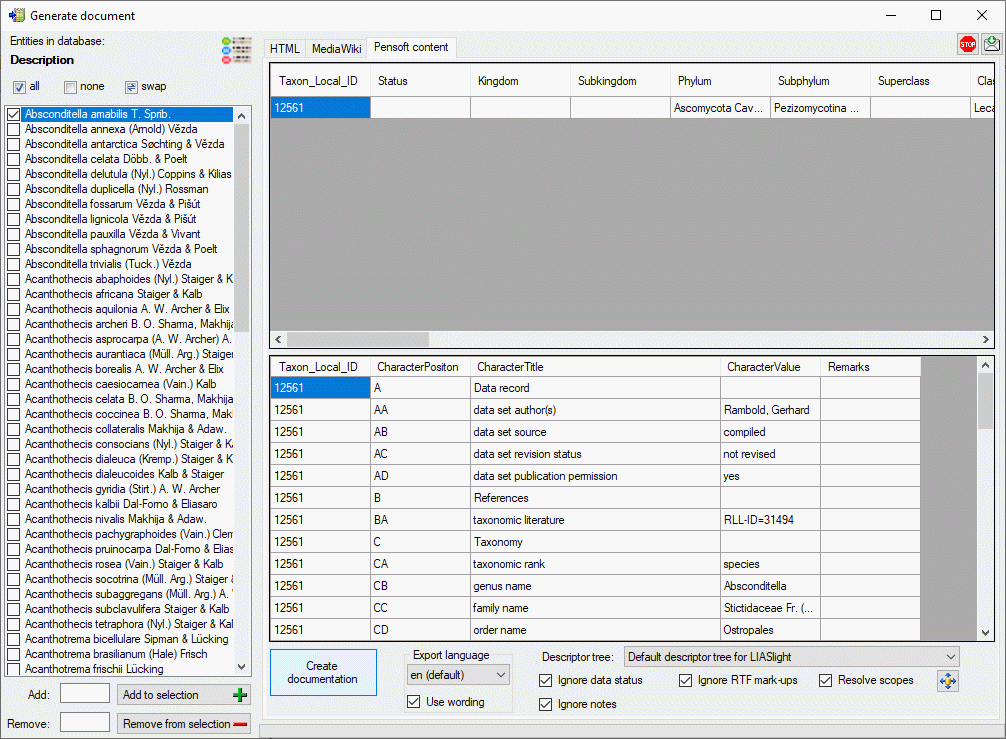
If all descriptions in the selection box belong to the same project and
a descriptor tree is defined, the Descriptor tree: drop-down list is
shown in the options (see image below left). If a descriptor tree is
selected and the Structured output keeps activated, the description
data are arranged according the selected descriptor trees. Additionally
leading descriptor name parts are omitted, if they are contained in the
descriptor tree hierachy. Therefore “literature references” becomes to
“references” contained in node “Literature” as shown below. If the
selected descriptor tree contains only a subset of descriptors, only
this subset will be displayed in the output.
If the Structured output option is deactivated, all descriptors will
be included in the output in the standard sequence order. Leading name
parts will be reduced if they are already contained in the tree
hierarchy as described in the Editing the description - Continuous viewtab section. With check box
Include data titles the output of the titles “State”, “Text” and
“Sequence” in the descriptor data can be controlled. If you select
Resolve scopes, for each scope that is linked to a database entry a
table with the foreighn database values will be inserted. To check and
adjust the module connections click on button
 .
.
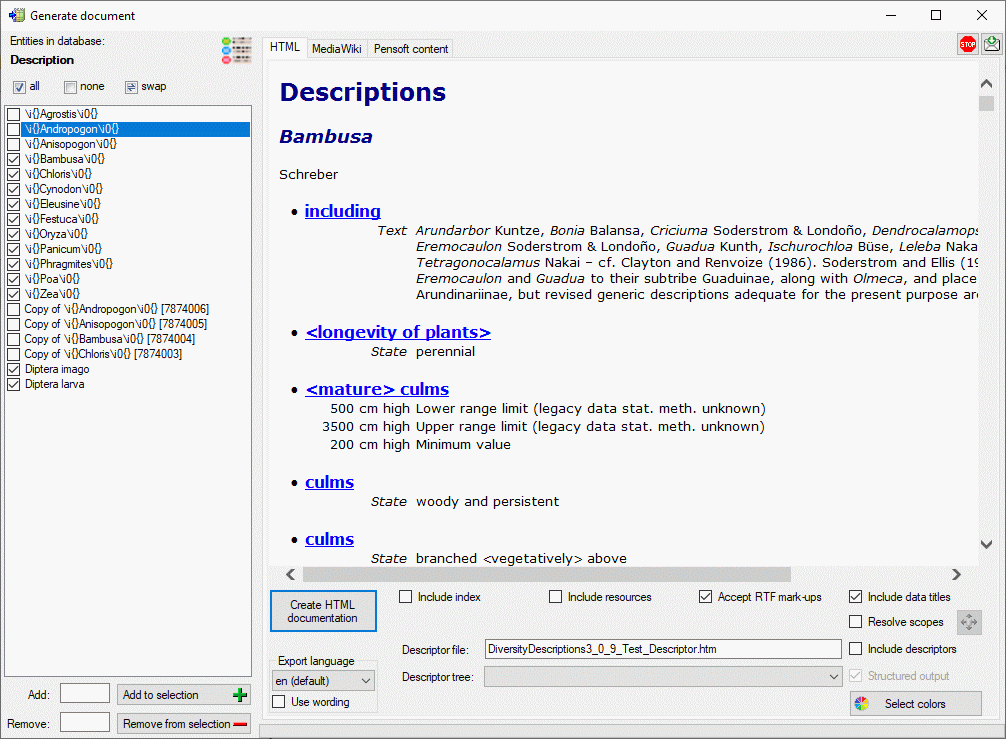
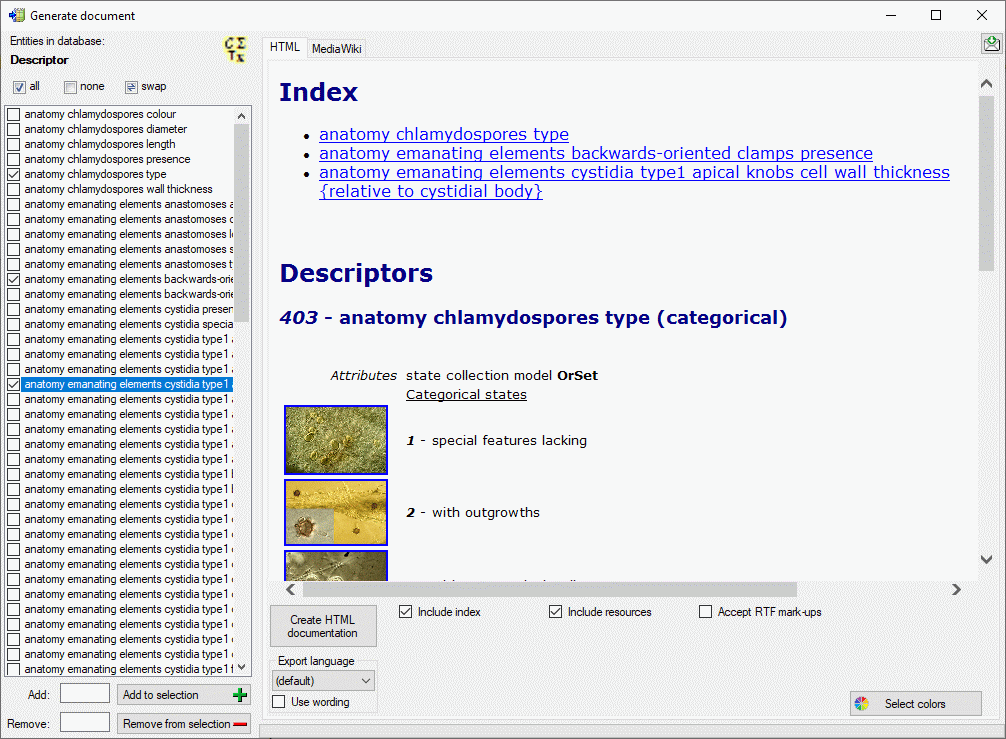
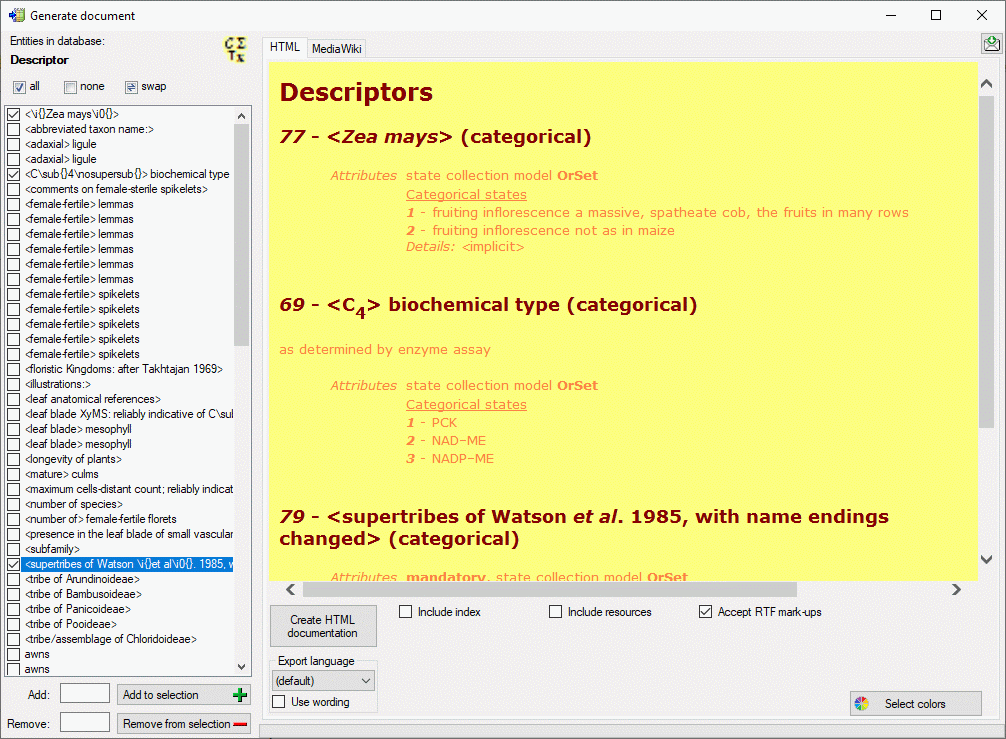
If in the datasets RTF-like formatting tags like \i or \sub{}
are included, use option Accept RTF mark-ups as shown in the picture
below.
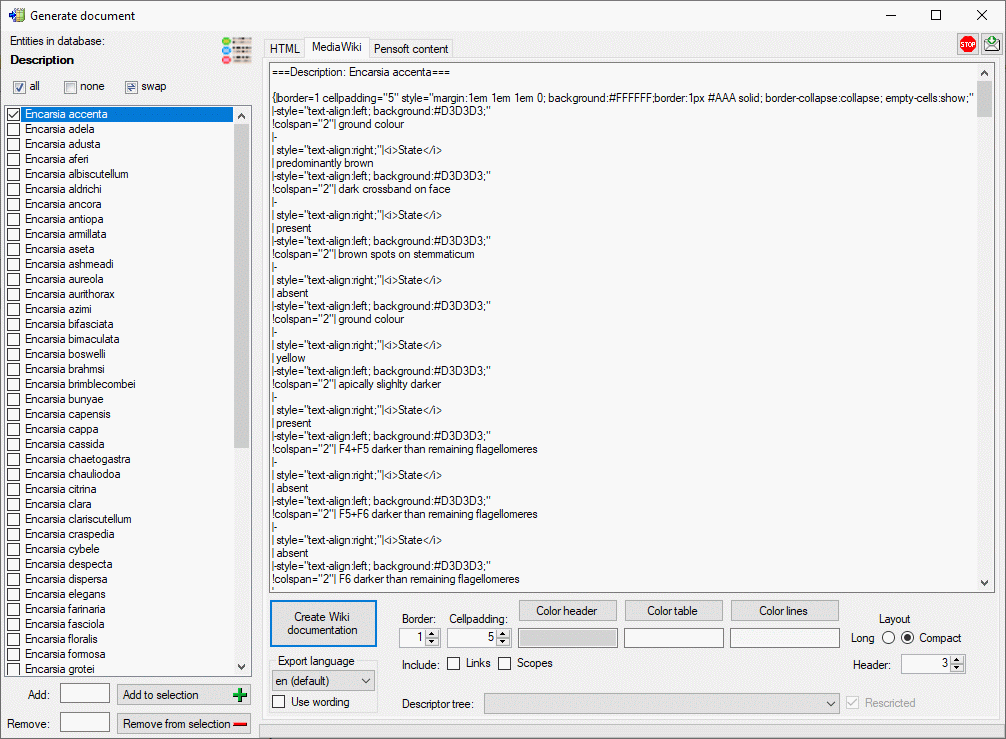
If you create a MediaWiki documentation, you may copy the generated text
from the output window and insert it in the MediaWiki page. With the
Layout option you may determine if all data shall be included in a
large table or if several tables with additional header lines shall be
generated (see image below).
If all descriptions in the selection box belong to the same project and
a descriptor tree is defined, the Descriptor tree: drop-down list is
shown in the options (see image below left). If a descriptor tree is
selected and the Restricted option is activated, the description
data are restricted to the descriptors contained in the selected
descriptor tree.
If the Restriced option is deactivated, all descriptor data will be
included in the output in the standard sequence order. Only name parts
of the descriptor tree hierarchy will be included in the descriptor
names as described in the Editing the description - Descriptor viewtab section.
Pensoft content
If you like to publish description data in some online media, e.g. the
Pensoft “Biodiversity Data Journal”, the description data are expected
in a dedicated Microsoft Excel format. A template fille as shown below,
that includes several tables, is available. DiversityDescriptions allows
generating tabulator separated files for tables “Taxa” and
“SpeciesDescriptionMatrix” of that template.
If all descriptions in the selection box belong to the same project and
a descriptor tree is defined, the Descriptor tree: drop-down list is
shown in the options (see image below). If a descriptor tree is
selected, the description data are arranged with heading according the
selected descriptor trees. Additionally leading descriptor name parts
are omitted, if they are contained in the descriptor tree hierachy.
When Ignore data status ist selected, it will not be included in the
“CharacterValue” column. Option Ignore RTF mark-ups will remove
RTF-like formatting tags like \i or \sub{}. If option Ignore
notes is de-selected, notes will be inserted in the “Remarks” column
of the “SpeciesDescriptionMatrix”.
If you select Resolve scopes and a scope entry for a taxon name is
linked to an entry in DiversityTaxonNames, the corresponding fields of
the “Taxa” table will be filled with that data. To check and adjust the
module connections click on button
. If scope data for a geographic area is
available, it will be inserted in the “Distribution” column of the
“Taxa” table.
The results are stored in local files named <Database
name>_Taxa.txt and <Database
name>_SpeciesDescriptionMatrix.txt.
Generate Descriptors
Generate a descriptor data document
This tool is used to generate a structured documentation of descriptors
stored in the database. To use this tool, start a query for descriptors
and choose Data ->  Generate
Document … from the menu. A window will open as shown below.
Generate
Document … from the menu. A window will open as shown below.
You may select all entries by clicking the
all button, deselect all entries by clicking the
none button or toggle your selection by
clicking the swap button. Choose among
the provided options and click on the button Create … documentation to
create a document in one of the available formats.
HTML
If you create a HTML documentation, a local file named <Database
name>_Descriptor.htm is generated in the application directory, that
might be copied and edited for own purposes. By clicking button
Select colors you may open a dialog window
where you can select the colors of different elements (see window
below).
If in the datasets RTF-like formatting tags like \i or \sub{}
are included, use option Accept RTF mark-ups as shown in the picture
below.
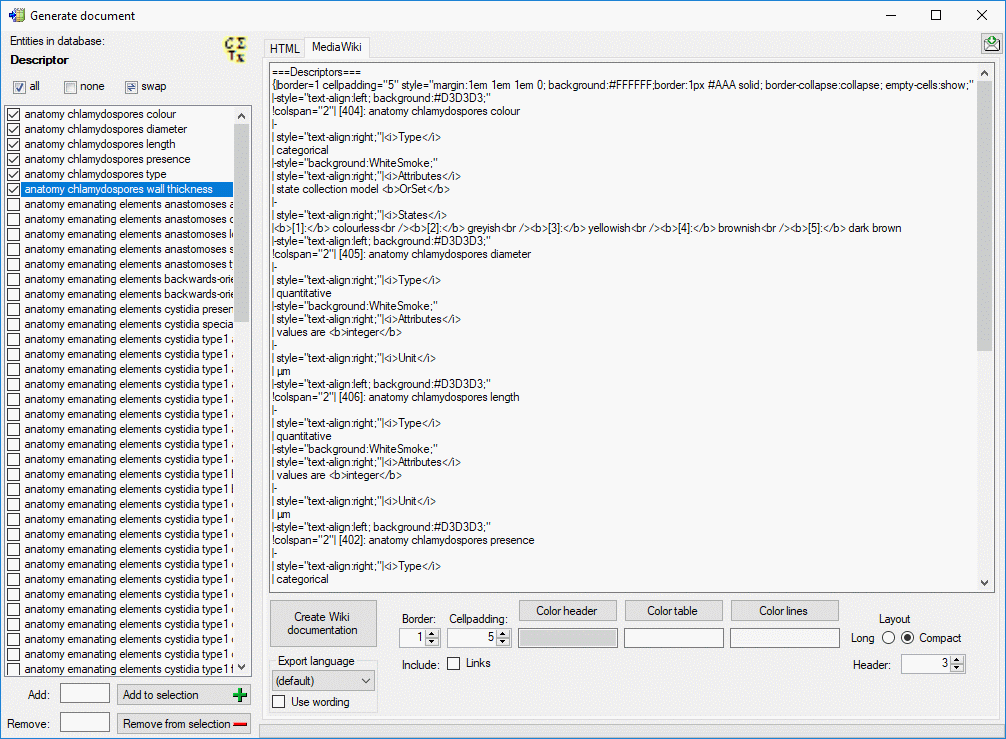
If you create a MediaWiki documentation, you may copy the generated text
from the output window and insert it in the MediaWiki page. With the
Layout option you may determine if all data shall be included in a
large table or if several tables with additional header lines shall be
generated (see image below).
Generate Projects
Generate a project data document
This tool is used to generate a structured documentation of project
related data stored in the database. To use this tool, start a query for
projects and choose Data ->
Generate Document … from the menu. A
window will open as shown below.
You may select all entries by clicking the
all button, deselect all entries by clicking the
none button or toggle your selection by
clicking the swap button. Choose among
the provided options and click on the button Create … documentation to
create a document in one of the available formats.
HTML
If you create a HTML documentation, a local file named <Database
name>_Project.htm is generated in the application directory, that
might be copied and edited for own purposes. By clicking button
Select colors you may open a dialog window
where you can select the colors of different elements (see window
below).
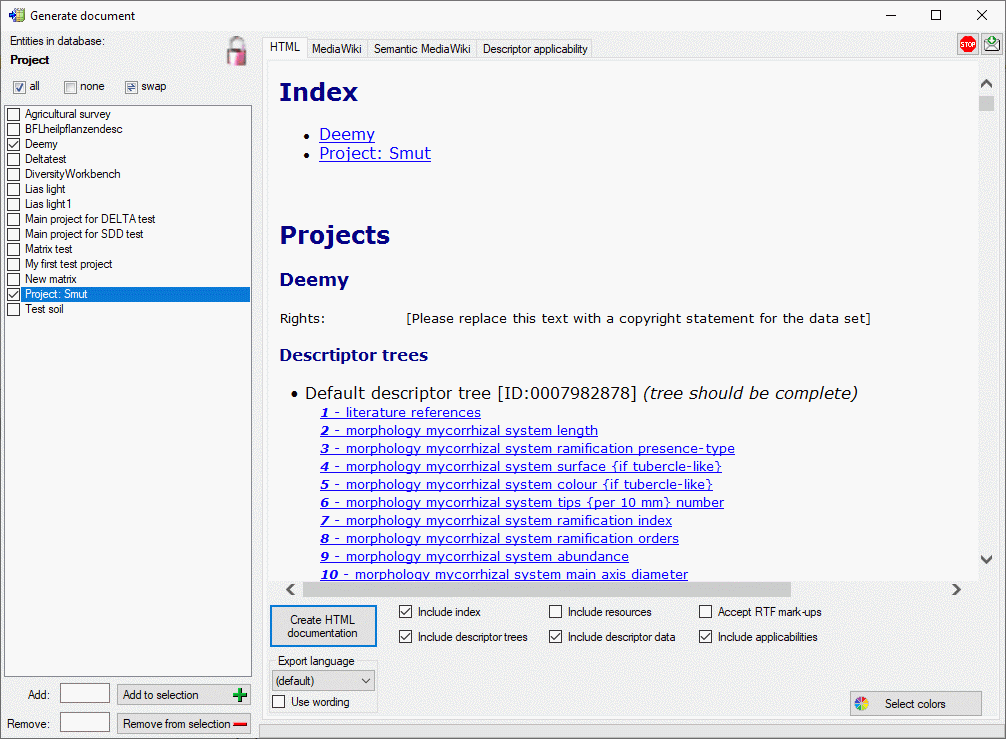
You have the choice to output additional information besides the basic
project data by selection the options Include descriptor trees,
Include descriptor data or Include applicabilities (see window
below).
If you create a MediaWiki documentation, you may copy the generated text
from the output window and insert it in the MediaWiki page. With the
Layout option you may determine if all data shall be included in a
large table or if several tables with additional header lines shall be
generated (see image below).
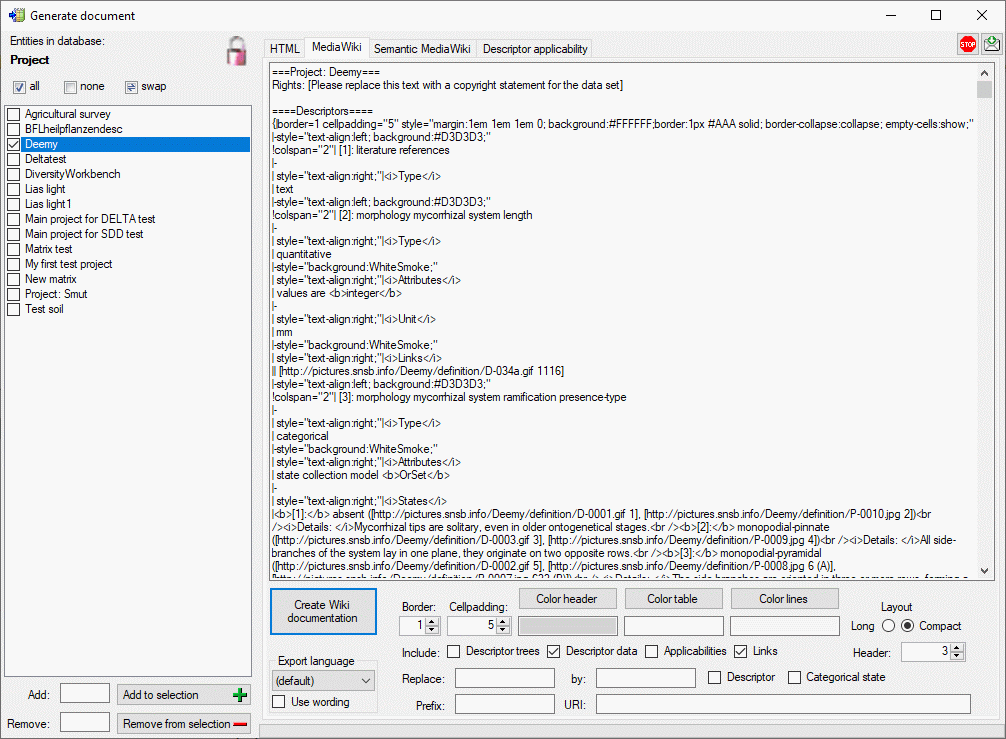
If you specify values in text fields Replace: and by: you can
perform text replacements for Descriptor or Categorical state
names in the generated output. By specifying a Prefix: for a
Semantic MediaWiki (see next section) you can generate lokal links to
this kind of Wiki pages. Additionally, you may insert the absolute link
adresses by entering the base Wiki address in the URI: filed.
If you create a Semantic MediaWiki documentation, the descriptors,
categorical states, descriptor trees and descriptor applicability
information are generated in a format that fits to terminology platforms
as used e.g by TDWG. In this
scheme the most important entities are “Concept” and “Collection”. Each
“Concept” represents a single descriptor or categorical state value,
which is shown on an own page. Each “Collection” represents a single
descriptor tree or descriptor tree node, which is shown on an own page.
The pages are named according the schema <prefix>:<entity label>
[(<number>)], where the <number> parts may be optional, depending
on the Naming: setting (see image below):
- If Opt. order (Optional order) is selected the <number> part is
omitted if the name is unambigious. Otherwise it starts with 1 for the
first duplicate and is increased for each subsequent one to avoid
duplicate page names.
- If Order is selected the <number> starts with 1 and is increased
for each subsequent duplicate to guarantee unambigious page names.
- If Entity ID is selected the <number> contains the database
internal ID of each entry to guarantee unambigious page names.
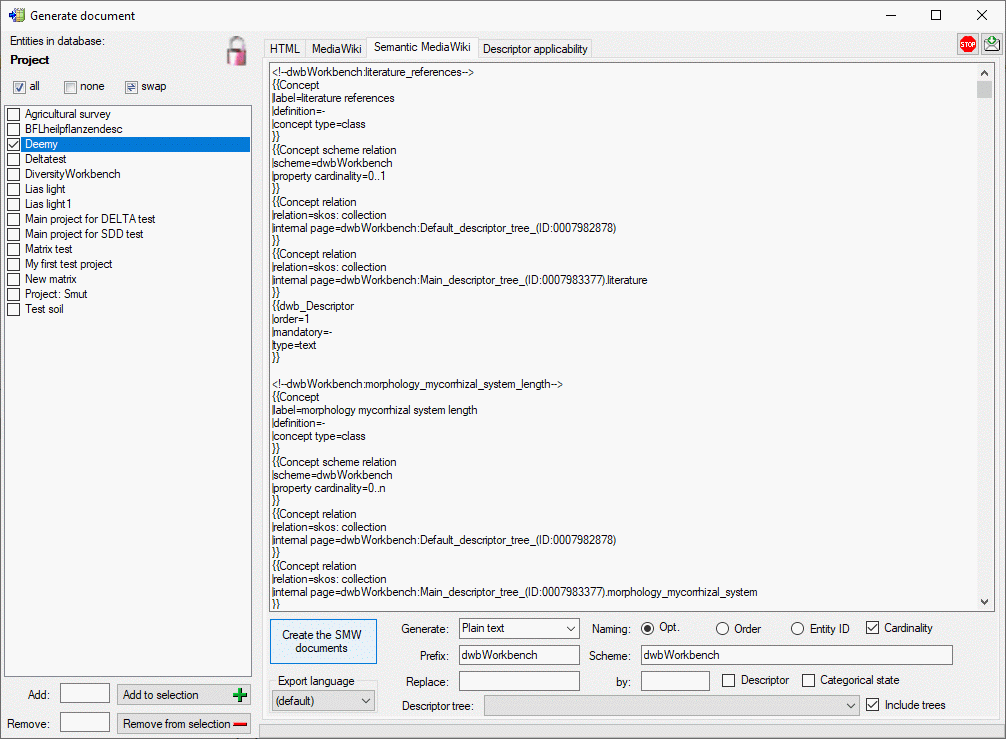
The Cardinality option includes information about multiple occurance
and the mandatory property in the descriptor concepts. By selecting the
Include trees option the descriptor trees and the tree structure
will be included as collections where subordinated tree nodes are
represented by concatenated node names, e.g. <prefix>:<Tree
name>.<Node 1 name>.<Node 2 name>. If you specify values in text
fields Replace: and by: you can perform text replacements for
Descriptor or Categorical state names in the generated output.
If Generate: XML for Wiki import is selected, the output is
generated in an XML format that may be imported to a semantic media
wiki. To show all generated data, the two templates “dwb_Descriptor” and
“dwb_CategoricalState” must be inserted in the wiki.
If Generate: XSD/XML document is selected, an XML schema (XSD) is
generated in the main window. If schema generation was ended without
problems, a selection list will be shown where description items for the
XML document may be selected. For the selected descriptions an XML
document structured according the XSD will be shown in a separate
window. By default no descriptions will be exported that include any
descriptor with data status “Data withheld”. This is indicated by the
button in the upper right corner of the window. You
may click on this button to include those descriptions. The button will
change to and only the marked descriptor
summary data will be excluded from the document.
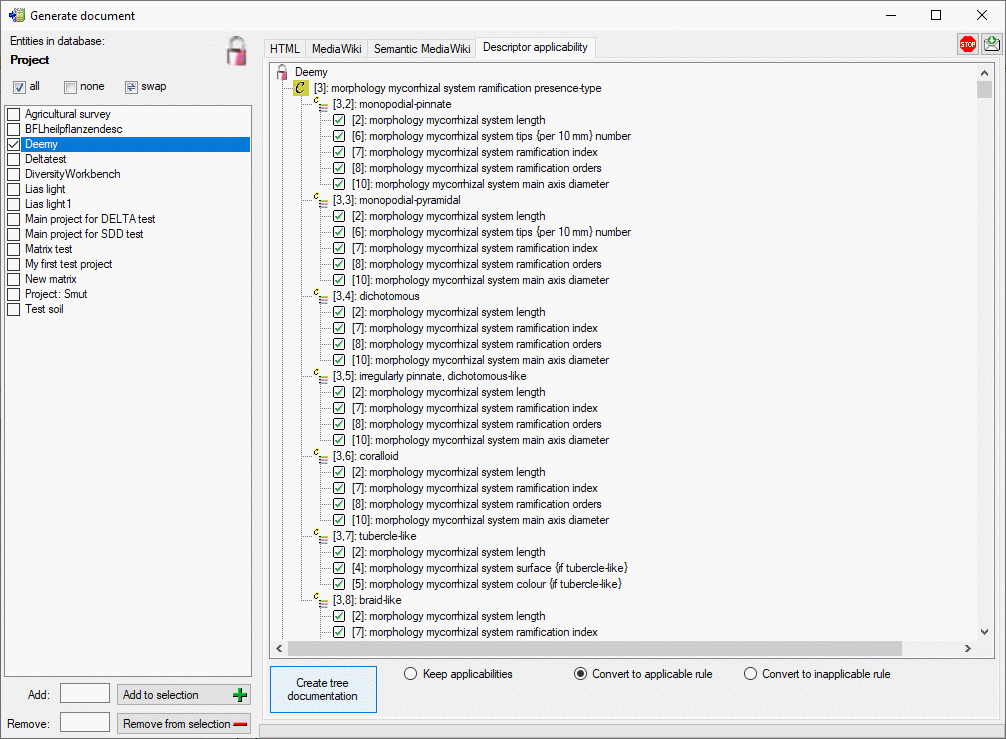
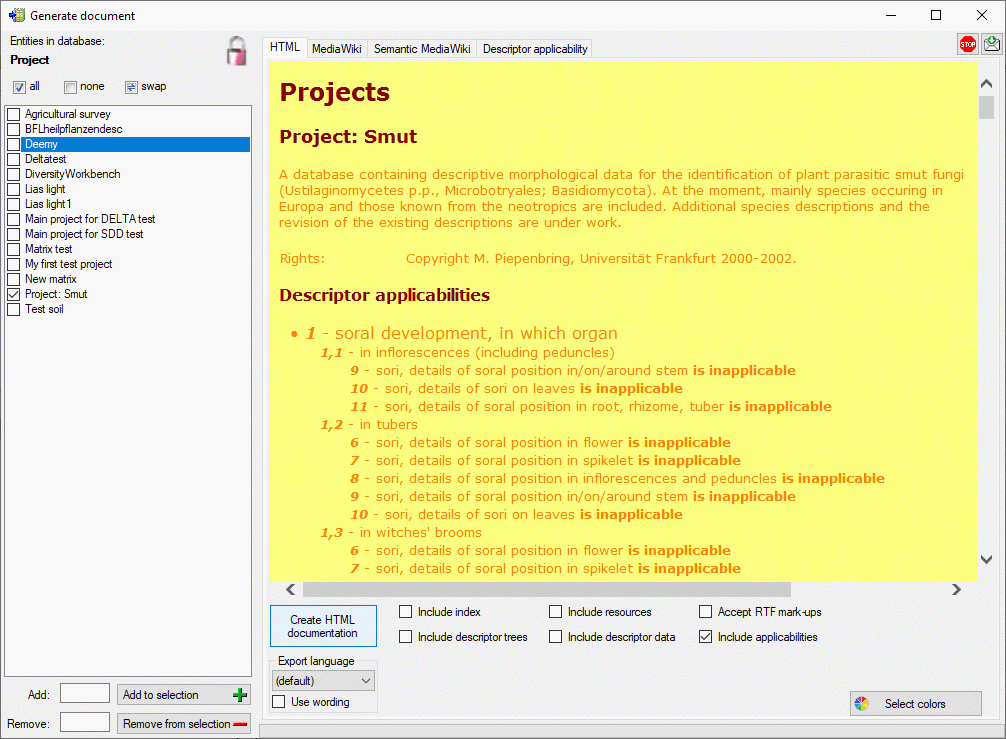
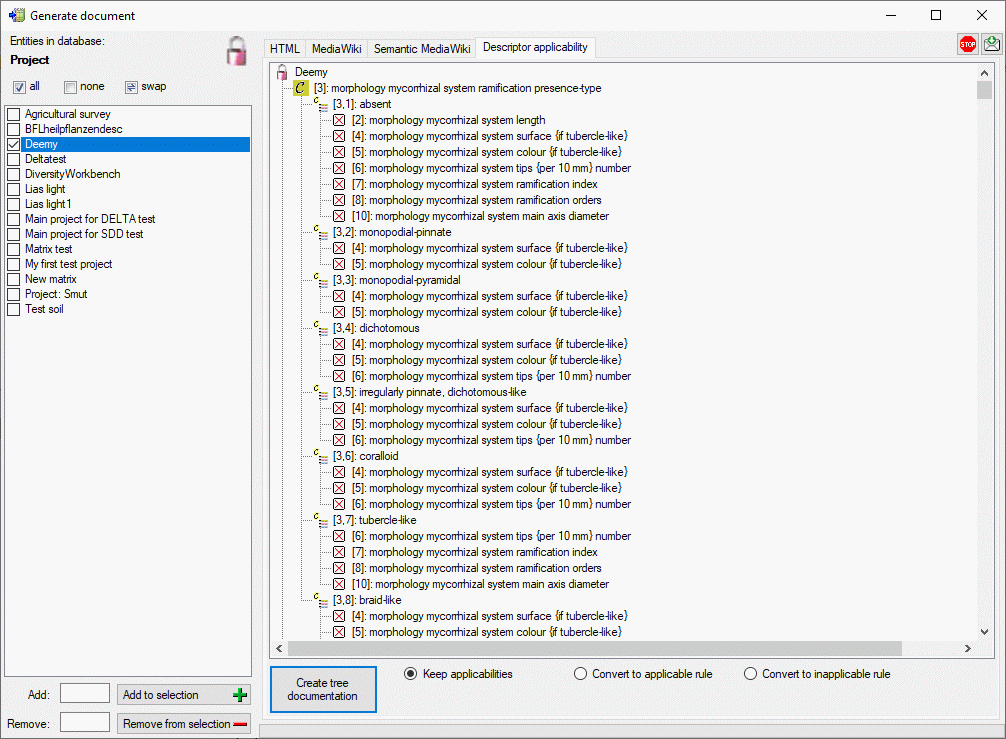
Descriptor applicability
The descriptor applicability tree shows the selected projects
 and as subordinated nodes the categorical
descriptors
and as subordinated nodes the categorical
descriptors  that control the applicability of
dependent descriptors. Contained in the controlling descriptor are their
categorical states
that control the applicability of
dependent descriptors. Contained in the controlling descriptor are their
categorical states  and the dependent
descriptors with the applicability rule “applicable-if”
and the dependent
descriptors with the applicability rule “applicable-if”
 or “inapplicable-if”
  .
The descriptor names are prefixed with their sequence number in square
brackets, the states with the descriptor’s sequence number and their
own.
.
The descriptor names are prefixed with their sequence number in square
brackets, the states with the descriptor’s sequence number and their
own.
If you create a applicability tree documentation, two local
tabulator-separated text files are generated. The first file named
<Database name>_ApplicabilityNodes.txt contains the node list
with columns “Id”, “Label” and “Modularity class” (“Project”,
“Descriptor” or “State”). The second file named <Database
name>_ApplicabilityEdges.txt contains the edges list with columns
“Source”, “Target” and “Label” (“Includes” for project-descriptor
relations, “Contains” for descriptor-state relations or “Applicable”
rsp. “Inapplicable” for state-descriptor relations). You may import
those files to a graphic program like “Gephi” to visualize the
descriptor applicabilities.
By selecting the option Convert to applicable rule or Convert to
inapplicable rule the applicability settings stored in the database
can be converted to the required complatible format (see image below).