Diversity Taxon Names
Import List
To import taxonomic
names, choose Data →  Import taxonomic names
… from the menu. A window as shown below will open. Choose the
encoding of your datasource, that means if your datasource was encoded
with ASCII or a unicode format. To ensure a correct import of special
signs please provide resp. convert your data in one of the available
formats. You must choose a Project, in which your data should be
imported. You may choose a Taxon list and a Datasource and if
the names should be imported as accepted.
Import taxonomic names
… from the menu. A window as shown below will open. Choose the
encoding of your datasource, that means if your datasource was encoded
with ASCII or a unicode format. To ensure a correct import of special
signs please provide resp. convert your data in one of the available
formats. You must choose a Project, in which your data should be
imported. You may choose a Taxon list and a Datasource and if
the names should be imported as accepted.
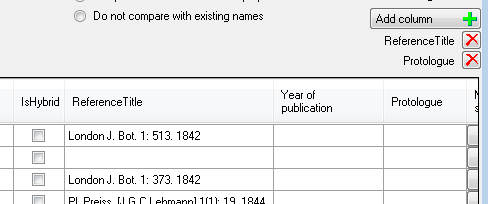
If there are
additional columns in the source file (separated by tab) you may add
these unsing the Add column  button (see below)
in the sequence as found in the source file. The additional columns will
be included in the analysis of the data as shown below. To remove a
column use the
button (see below)
in the sequence as found in the source file. The additional columns will
be included in the analysis of the data as shown below. To remove a
column use the  delete button.
To start the
analysis of the data, just click on the  open button to
open the source file. If you want to re-analyse a file with new
settings, click on the
open button to
open the source file. If you want to re-analyse a file with new
settings, click on the  button. To send a
feedback, use the
button. To send a
feedback, use the  button. If the names
should be linked to higher taxa, check the Link taxa to genera if
present option. The names can be compared with existing names within
the current project or the whole database. If you compare the names with
the whole database, you can insert a link for the current project for
identical names that are missing in the project.
button. If the names
should be linked to higher taxa, check the Link taxa to genera if
present option. The names can be compared with existing names within
the current project or the whole database. If you compare the names with
the whole database, you can insert a link for the current project for
identical names that are missing in the project.

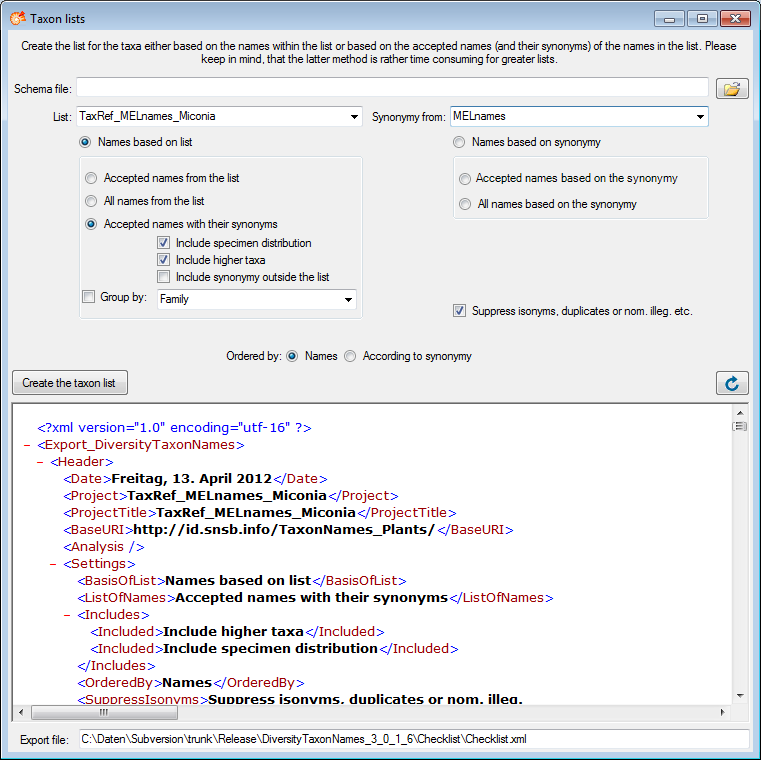
Your names will be
listed as shown in the image above. If an error (e.g. special signs
converted with the wrong encoding)

or a similar
name

or an identical name

is found these will
be marked as shown above and the names of your list will not be imported
unless you check the according field (second column - Import name). If
you changed one of the options, click on the Requery button to see
the result.
To start the import,
click on the according button Start
import.
Diversity Taxon Names
Wizard
Import wizard for tab separated lists
With this import routine, you can import data from text files (as
tab-separated lists) into the database. Choose Data → ImportWizard
 and then the type of data that should be
imported, e.g.
and then the type of data that should be
imported, e.g.  Import Taxa … from the
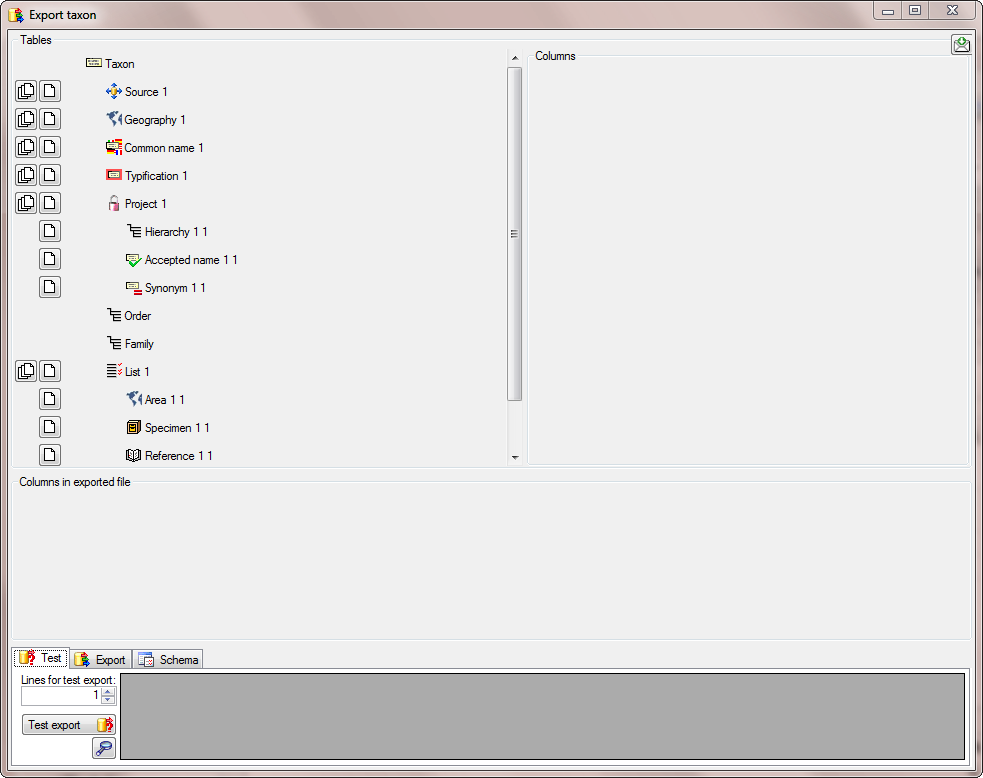
menu. A window as shown below will open that will lead you through the
import of the data. The window is separated in 3 areas. On the left
side, you see a list of possible data related import steps according to
the type of data you choosed for the import. On the right side you see
the list of currently selected import steps. In the middle part the
details of the selected import steps are shown.
Import Taxa … from the
menu. A window as shown below will open that will lead you through the
import of the data. The window is separated in 3 areas. On the left
side, you see a list of possible data related import steps according to
the type of data you choosed for the import. On the right side you see
the list of currently selected import steps. In the middle part the
details of the selected import steps are shown.
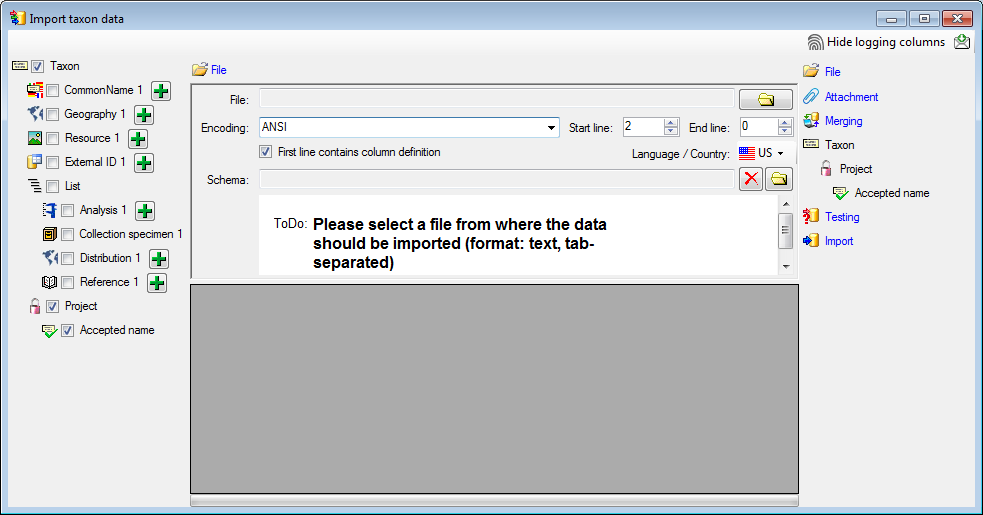
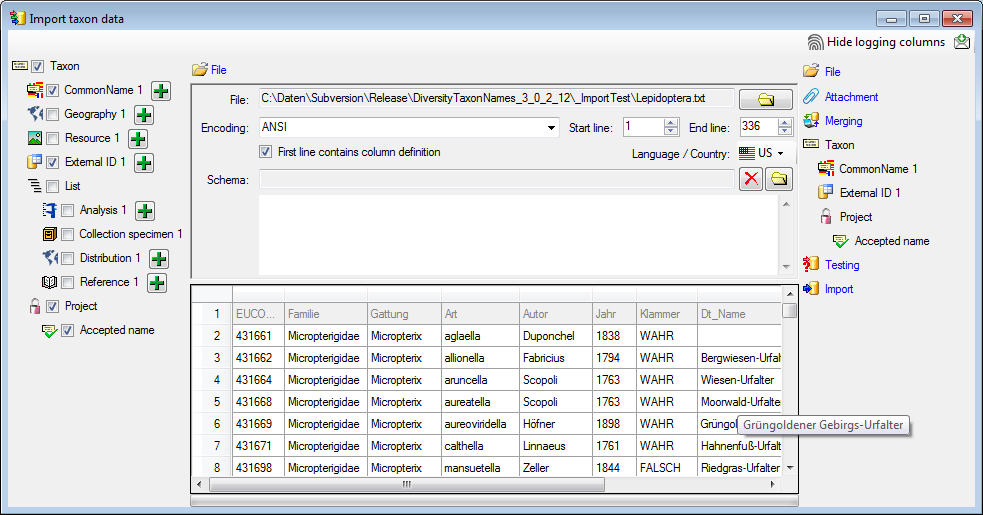
Choosing the File
As a first step, choose the File from where the data
should be imported. The currently supported format is tab-separated text. Then choose the Encoding
of the file, e.g. Unicode. The Start line and End line will
automatically be set according to your data. You may change these to
restrict the data lines that should be imported. The not imported
parts in the file are indicated as shown below with a gray
background. If the  First line contains the
column definition this line will not be imported as well. If your data
contains e.g. date information where notations differ between countries
(e.g. 31.4.2013 - 4.31.2013), choose the Language / Country to
ensure a correct interpretation of your data. Finally you can select a
prepared Schema (see chapter Schema below) for the import.
First line contains the
column definition this line will not be imported as well. If your data
contains e.g. date information where notations differ between countries
(e.g. 31.4.2013 - 4.31.2013), choose the Language / Country to
ensure a correct interpretation of your data. Finally you can select a
prepared Schema (see chapter Schema below) for the import.
Choosing the data ranges
In the selection list on the left side of the window (see below) all
possible import steps for the data are listed according to the type of
data you want to import.

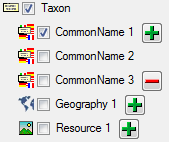
The import of certain tables can be paralleled. To add parallels click
on the add button (see below). To remove parallels, use
the  button. Only selected ranges will appear in
the list of the steps on the right (see below).
button. Only selected ranges will appear in
the list of the steps on the right (see below).
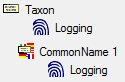
To import informations of logging columns like who created and changed
the data, click on  button in the header line.
This will include a additional substeps for every step containing the
logging columns (see below). If you do not import these data, they will
be automatically filled by default values like the current time and
user.
button in the header line.
This will include a additional substeps for every step containing the
logging columns (see below). If you do not import these data, they will
be automatically filled by default values like the current time and
user.
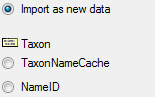
Attaching data
You can either import your data as new data or
 Attach them to data in the database. Select the import step
Attachment from the list. All tables that are selected and
contain columns at which you can attach data are listed (see below).
Either choose the first option
Attach them to data in the database. Select the import step
Attachment from the list. All tables that are selected and
contain columns at which you can attach data are listed (see below).
Either choose the first option  Import as
new data or one of the columns the attachment columns offered like
SeriesCode in the table Series in the example below.
Import as
new data or one of the columns the attachment columns offered like
SeriesCode in the table Series in the example below.
If you select a column for attachment, this column will be marked with a
blue background (see below and chapter Table data).

Merging data
You can either import your data as new data or
 Merge them with data in the database. Select the import step
Merge from the list. For every table you can choose between
Merge them with data in the database. Select the import step
Merge from the list. For every table you can choose between
 Insert,
  Merge,
  Update and
Attach (see below).
Update and
Attach (see below).
The Insert option will import the data
from the file independent of existing data in the database.
The Merge option will compare the data
from the file with those in the database according to the
 Key columns (see below). If no matching data are
found in the database, the data from the file will be imported,
otherwise the data will be updated..
Key columns (see below). If no matching data are
found in the database, the data from the file will be imported,
otherwise the data will be updated..
The Update option will compare the data
from the file with those in the database according to the
Key columns. Only matching data found in the
database will be updated.
The Attach option will compare the data from
the file with those in the database according to the
Key columns. The found data will not be changed, but used as a
reference data in depending tables.

Table data
To set the source for the columns in the file, select the step of a
table listed underneath the Merge step. All
columns available for importing data will be listed in the central part
of the window. In the example shown below, the first column is used to
attach the new data to data in the database.
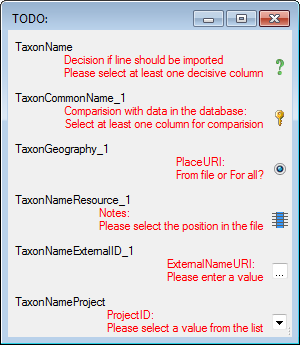
A reminder in the header line will show you what actions are still
needed to import the data into the table:
- Please select at least one column = No
column has been selected so far.
- Please select at least one decisive column
 =
If data will be imported depends on the content of decisive colums, so
at least one must be selected.
=
If data will be imported depends on the content of decisive colums, so
at least one must be selected.
- Please select the position in the file
 =
The position in the file must be given if the data for a column should
be taken from the file.
=
The position in the file must be given if the data for a column should
be taken from the file.
- Please select at least one column for comparision
= For all merge types other than insert columns for comparision with
data in the database are needed.
- From file or For all = For every you have
to decide whether the data are taken from the file or a value is
entered for all
- Please select a value from the list
 = You have
to select a value from the provided list
= You have
to select a value from the provided list
- Please enter a value
 = You have to enter a
value used for all datasets
= You have to enter a
value used for all datasets
The handling of the columns in described in the chapter
columns.
Testing
To test if all requirements for the import are met use the
 Testing step. You can use a certain line in
the file for you test and then click on the Test data in line:
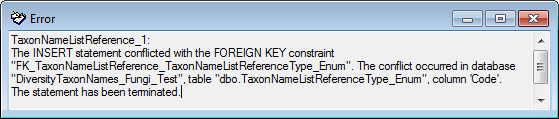
button. If there are still unmet requirements, these will be listed in a
window as shown below.
Testing step. You can use a certain line in
the file for you test and then click on the Test data in line:
button. If there are still unmet requirements, these will be listed in a
window as shown below.
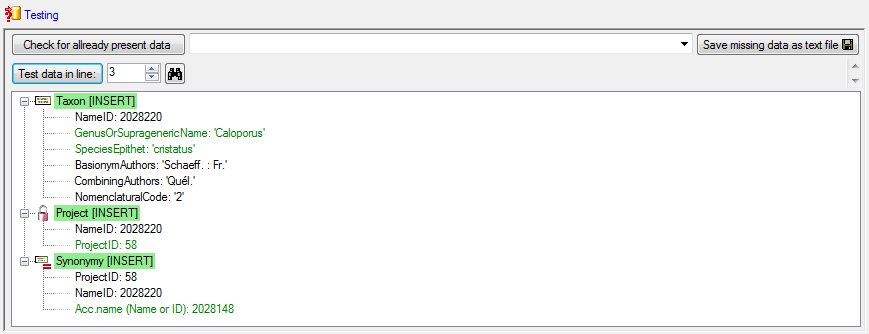
If finally all requirements are met, the testing function will try to
write the data into the database and display any errors that occurred as
shown below. All datasets marked with a red background, produced some
error.
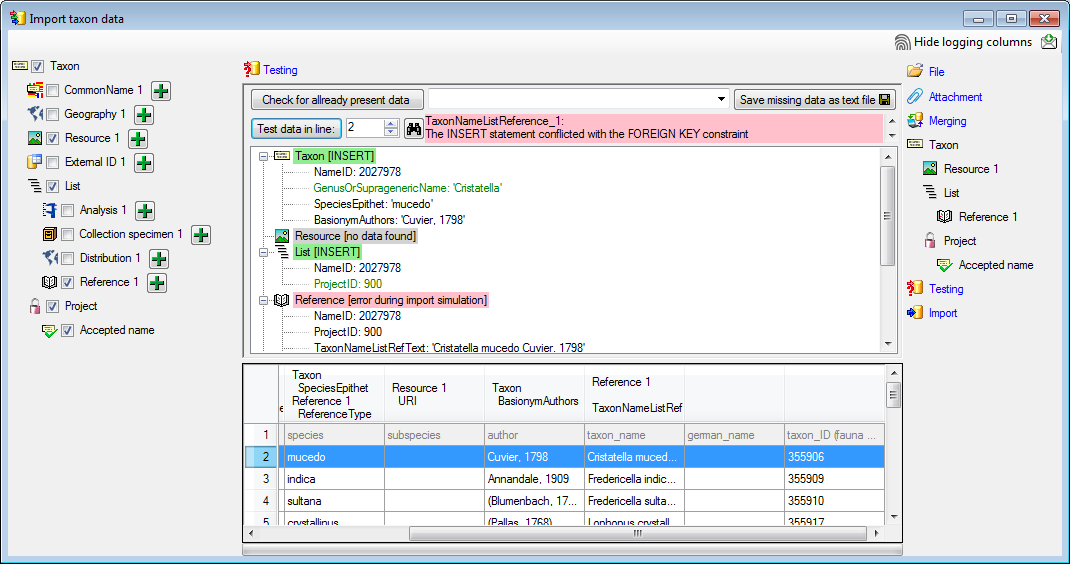
To see the list of all errors, double click in the error list window in the header
line (see below).
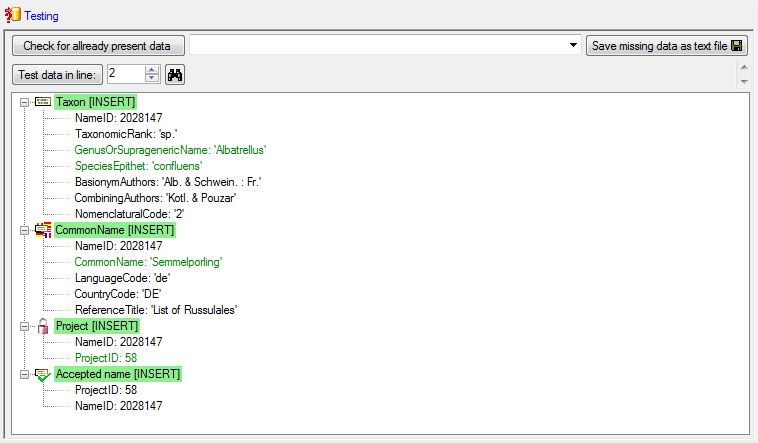
If finally no errors are left, your data are ready for import. The
colors in the table nodes in the tree indicate the handling of the
datasets: INSERT, MERGE, UPDATE, No difference. Attach, No data. The colors of the
table colums indicate whether a colum is decisive , a key column
or an attachment column
.
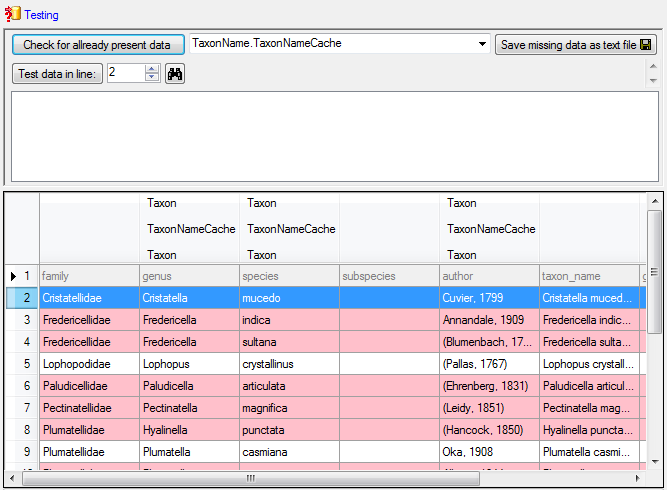
If you suspect, that the import file contains data allready present in
the database, you may test this an extract only the missing lines in a
new file. Choose the attachment column (see chapter Attaching data) and
click on the button Check for allready present data. The data
allready present in the database will be marked red (see below). Click
on the button Save missing data a text file  to
store the data not present in the database in a new file for the import.
Please keep in mind, that this comparision will be performed without any transformations of the data, that
means the data in the file must match exactly those in the database.
to
store the data not present in the database in a new file for the import.
Please keep in mind, that this comparision will be performed without any transformations of the data, that
means the data in the file must match exactly those in the database.
Import
With the last step you can finally start to import the data into the
database. If you want to repeat the import with the same settings and
data of the same structure, you can save a schema of the current
settings (see below).
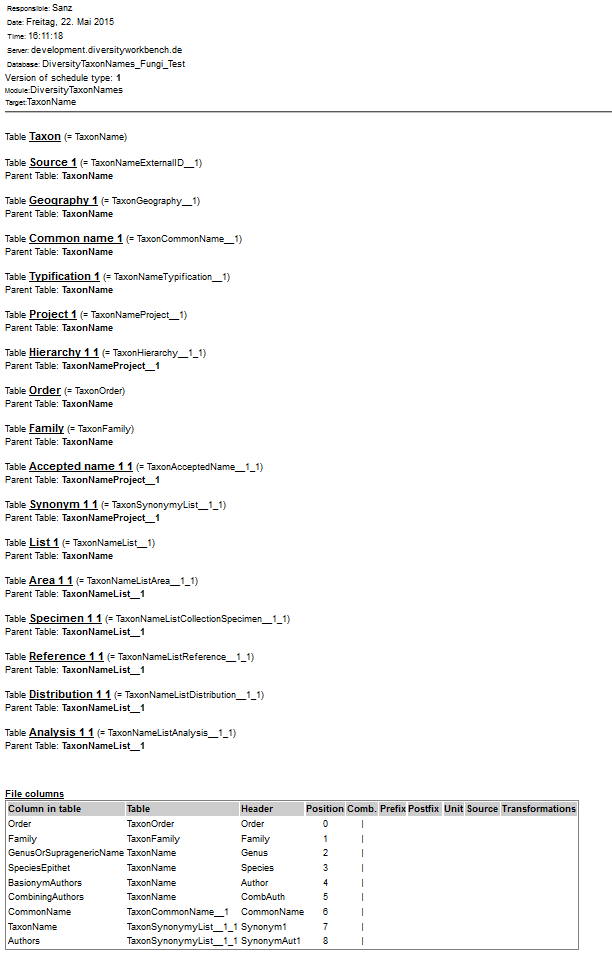
|
|
|
|
| Schedule for import of tab-separated text files into DiversityTaxonNames |
|
|
|
| Target within DiversityTaxonNames: TaxonName |
|
|
|
| Schedule version: |
1 |
Database version: |
02.05.14 |
| Lines: |
3 - 5 |
First line contains column definition: |
? |
| Encoding: |
ANSI |
Language: |
US |
Tables
TaxonName
(TaxonName)
Merge handling: Merge
| Column in table |
? |
Key |
Copy |
Pre |
Post |
File pos. |
Transformations |
Value |
Source |
Table |
| NameID |
|
|
|
|
|
|
|
2027929 |
Interface |
|
| TaxonomicRank |
|
|
|
|
|
|
|
fam. |
Interface |
|
| GenusOrSupragenericName |
? |
? |
|
|
|
0 |
|
|
File |
|
| NomenclaturalCode |
|
|
|
|
|
|
|
3 |
Interface |
|
TaxonNameProject
(TaxonNameProject)
Parent: Merge
| Column in table |
? |
Key |
Copy |
Pre |
Post |
File pos. |
Transformations |
Value |
Source |
Table |
| NameID |
|
|
|
|
|
|
|
|
ParentTable |
|
| ProjectID |
? |
? |
|
|
|
|
|
58 |
Interface |
|
TaxonAcceptedName_1
(TaxonAcceptedName)
Parent: TaxonNameProject
Merge handling: Insert
| Column in table |
? |
Key |
Copy |
Pre |
Post |
File pos. |
Transformations |
Value |
Source |
Table |
| ProjectID |
|
|
|
|
|
|
|
|
ParentTable |
|
| NameID |
|
|
|
|
|
|
|
|
ParentTable |
|
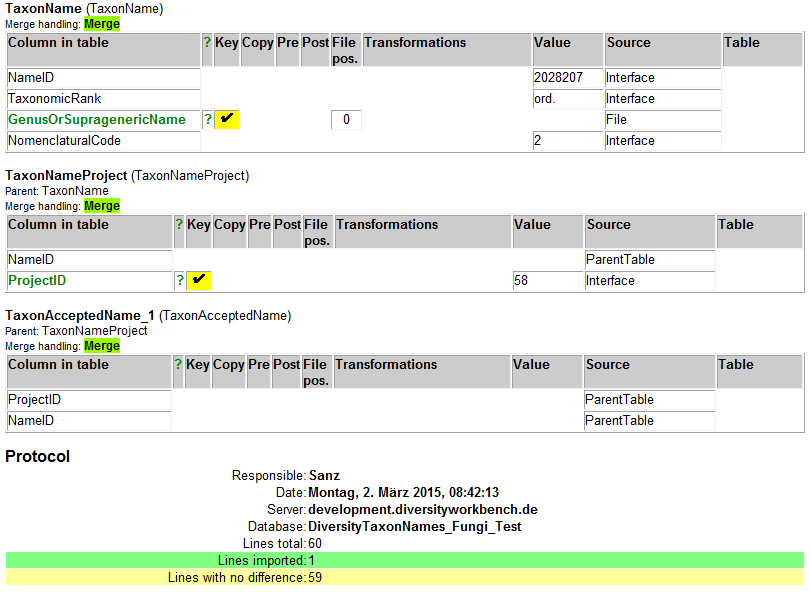
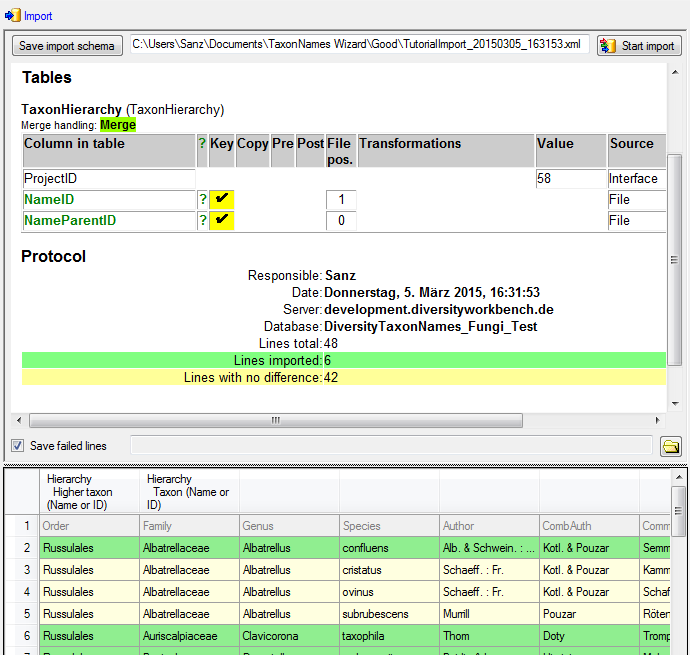
Lines that could not be imported will be marked with a red background
while imported lines are marked green (see below).
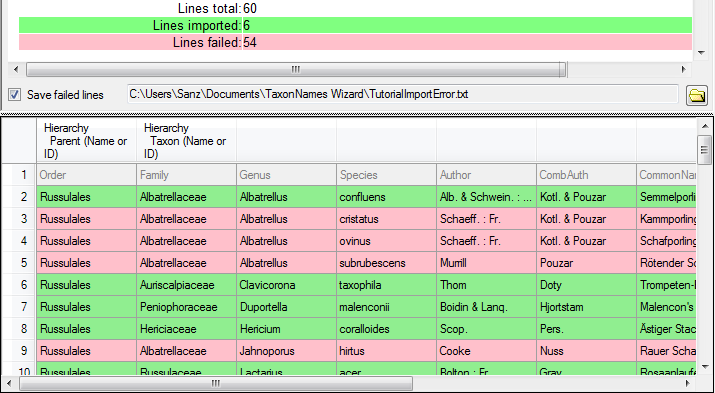
If you want to save lines that produce errors during the import in a
separate file, use the Save failed lines option. The protocol of the
import will contain all settings acording to the used schema and an
overview containing the number of inserted, updated, unchanged and
failed lines (see below).
Subsections of Wizard
Diversity Taxon Names
Import Wizard Tutorial
This tutorial demostrates the import of a small file into the database.
The example file is included in the software. At the end of this
tutorial you will have imported several datasets and practiced most of
the possibilities provided by the import wizard. The import is done in
several steps to demonstrate the functionality of the wizard. Please
keep in mind, that this tutorial will only work as shown, if the names
contained in the file are not already present in the database.
Step1 - Import of the taxa
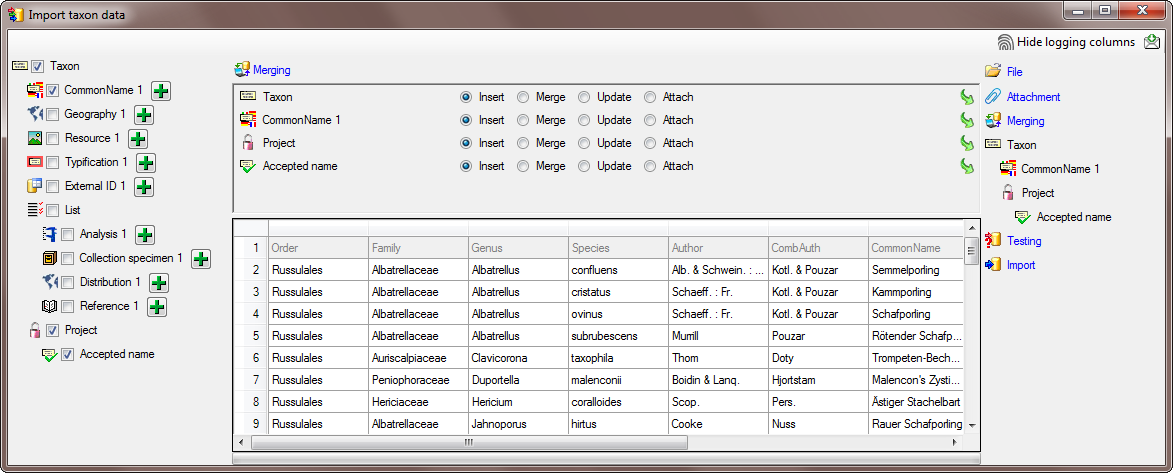
Choose Data → Import Wizard →
import Taxa … from the menu. A window as
shown here below will open. Click on the
button to open the file ImportTutorial.txt
shipped with this application. In addition to the preselected steps,
select the step  Common names to import the
common name contained in the file. In the
Merging step leave all tables as Insert (see below).
Common names to import the
common name contained in the file. In the
Merging step leave all tables as Insert (see below).
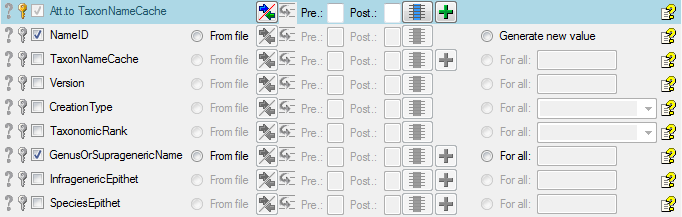
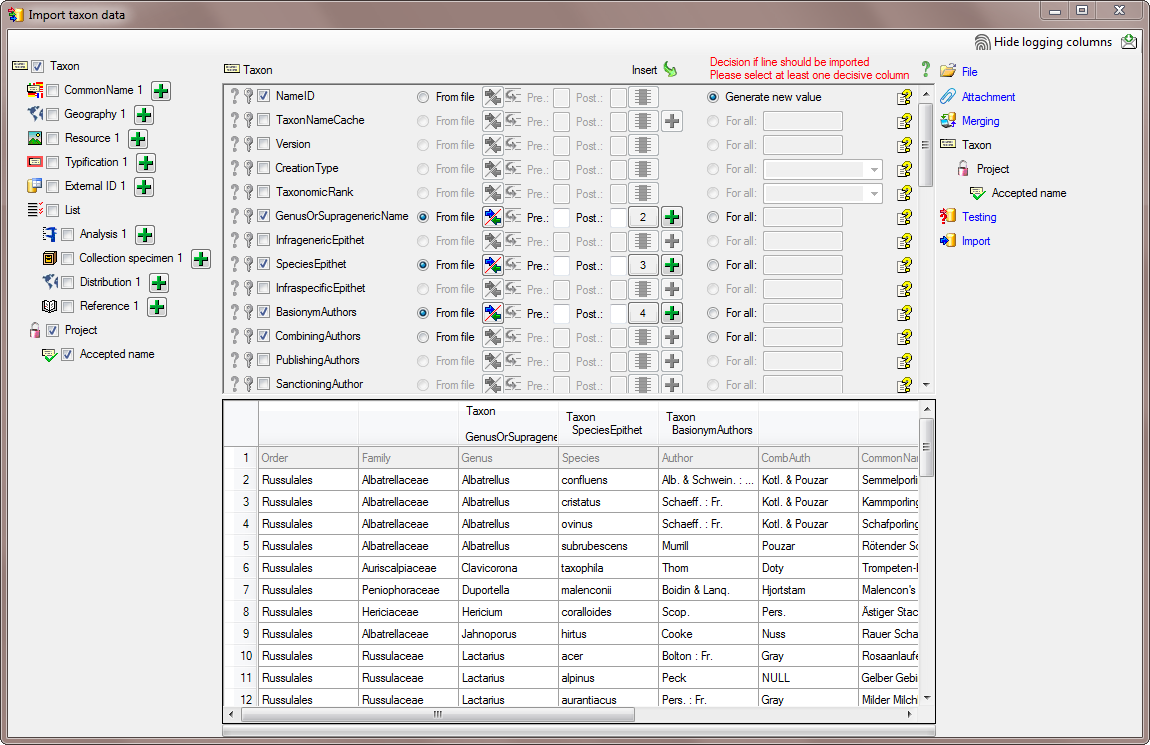
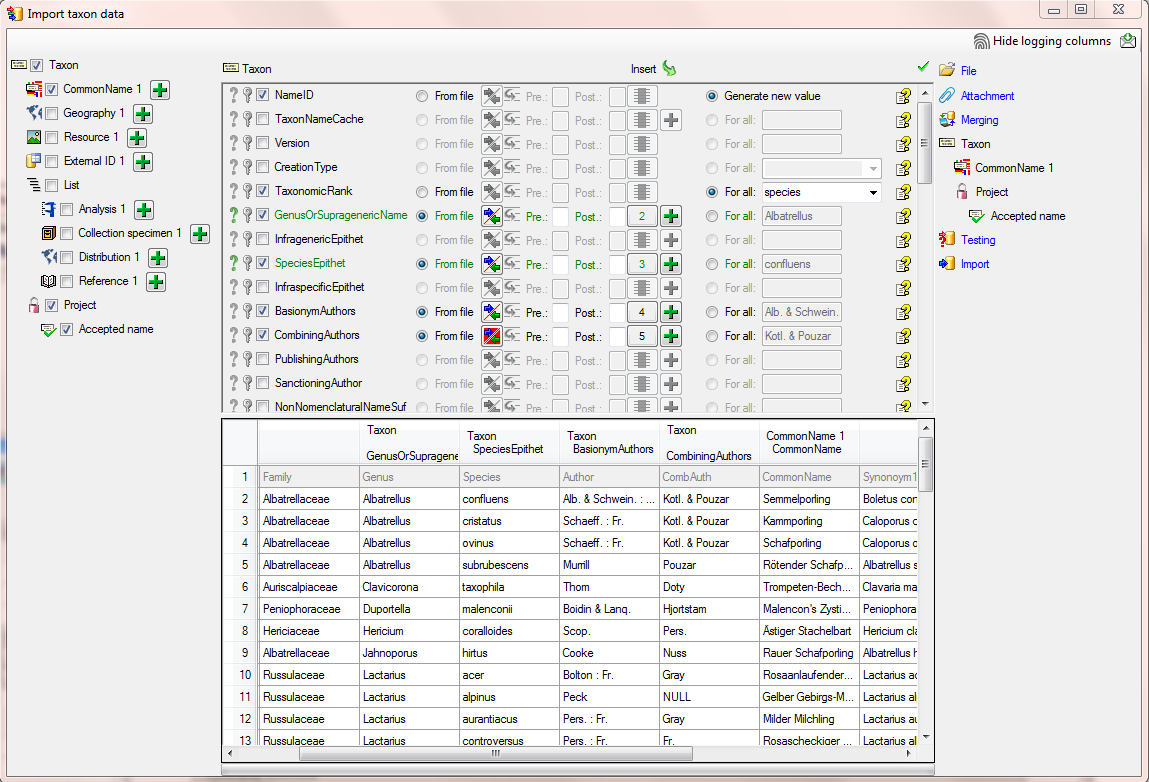
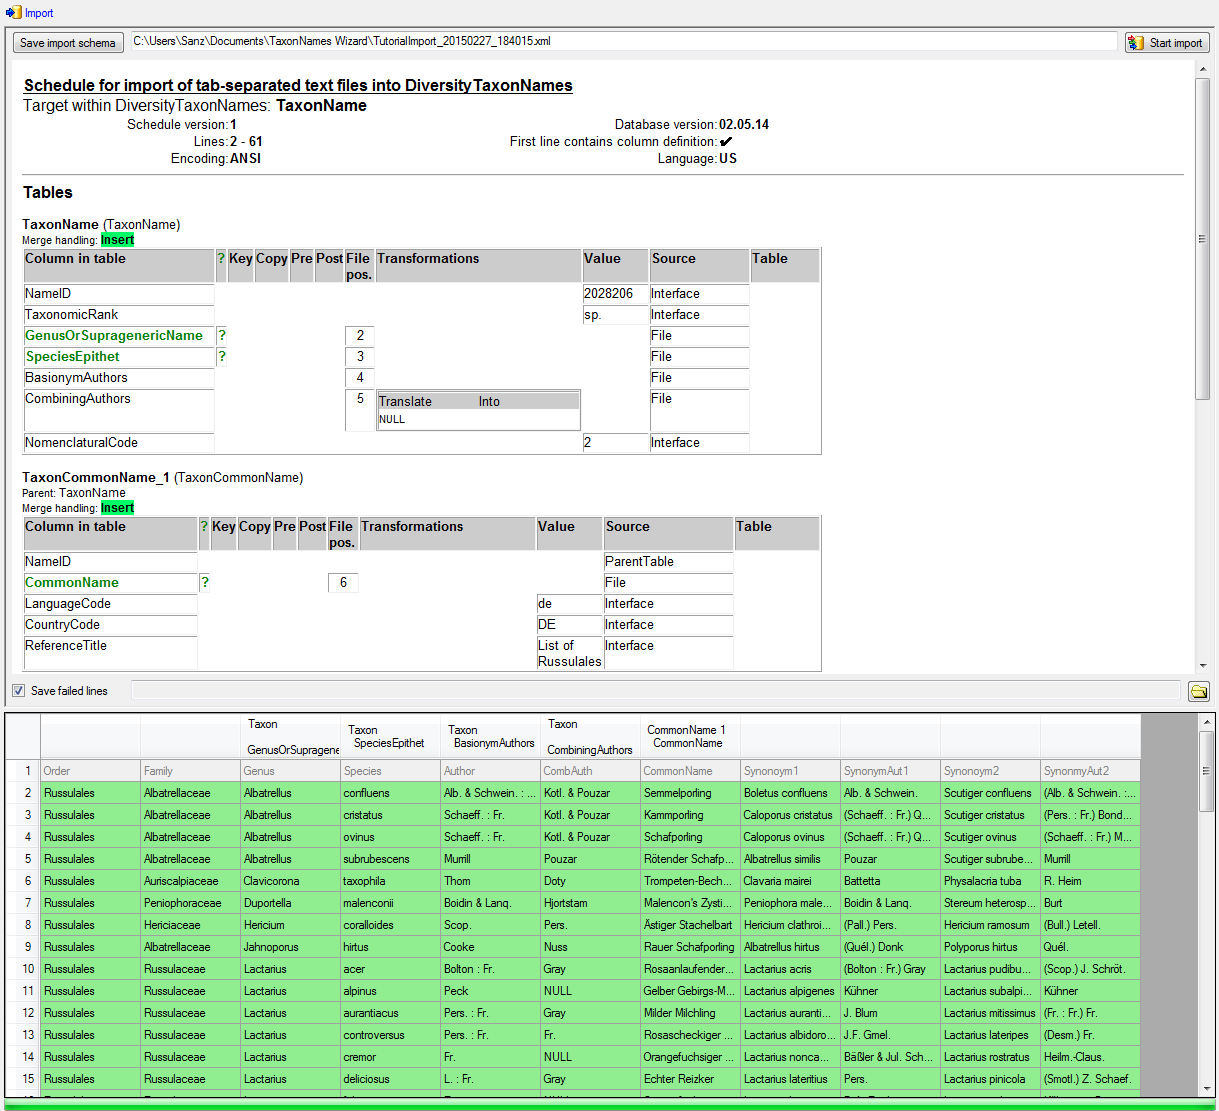
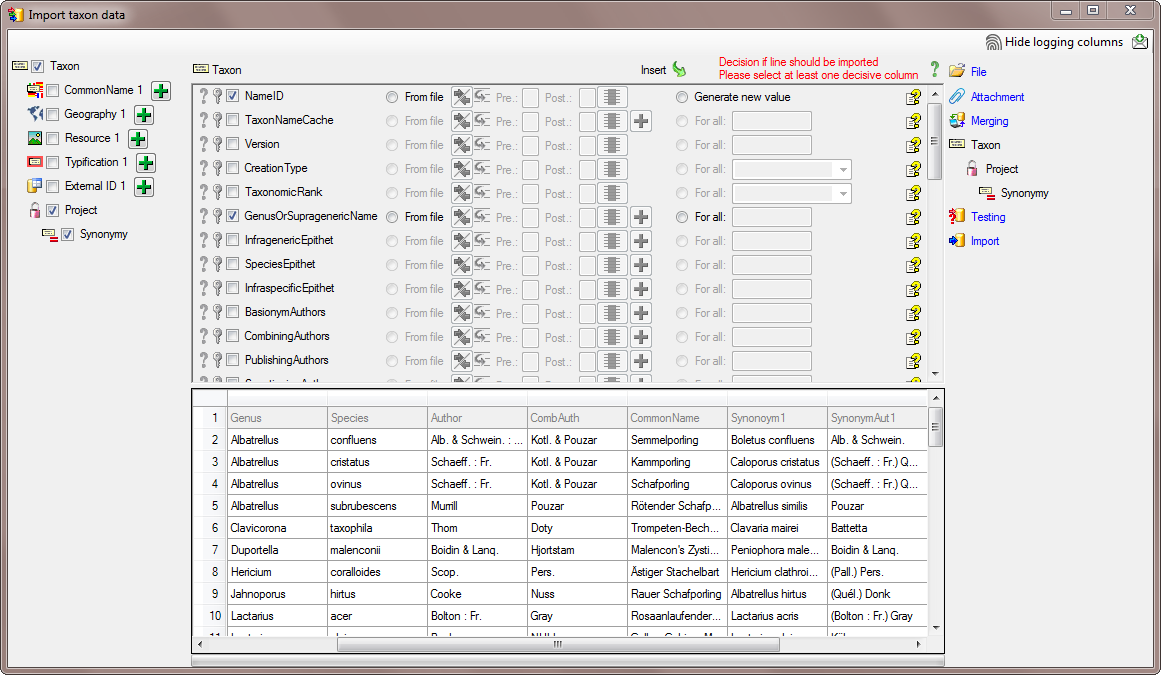
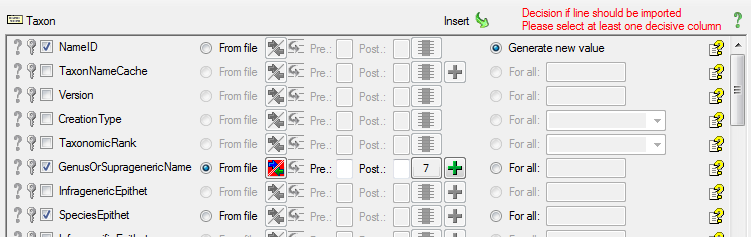
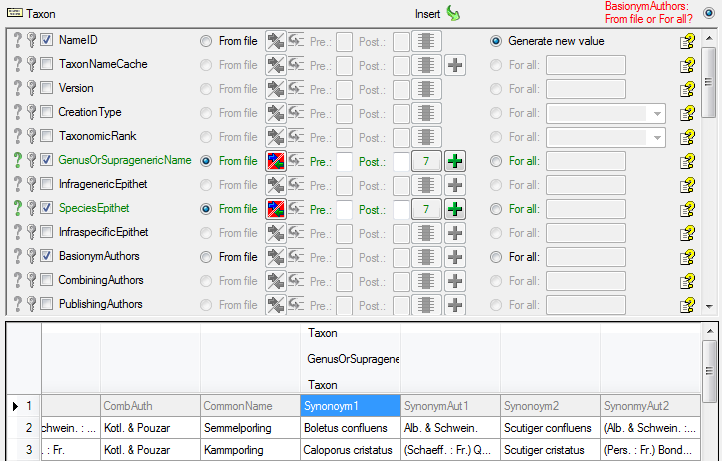
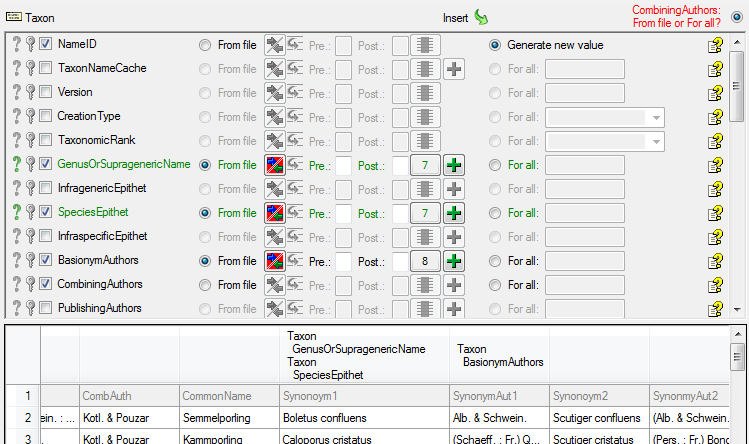
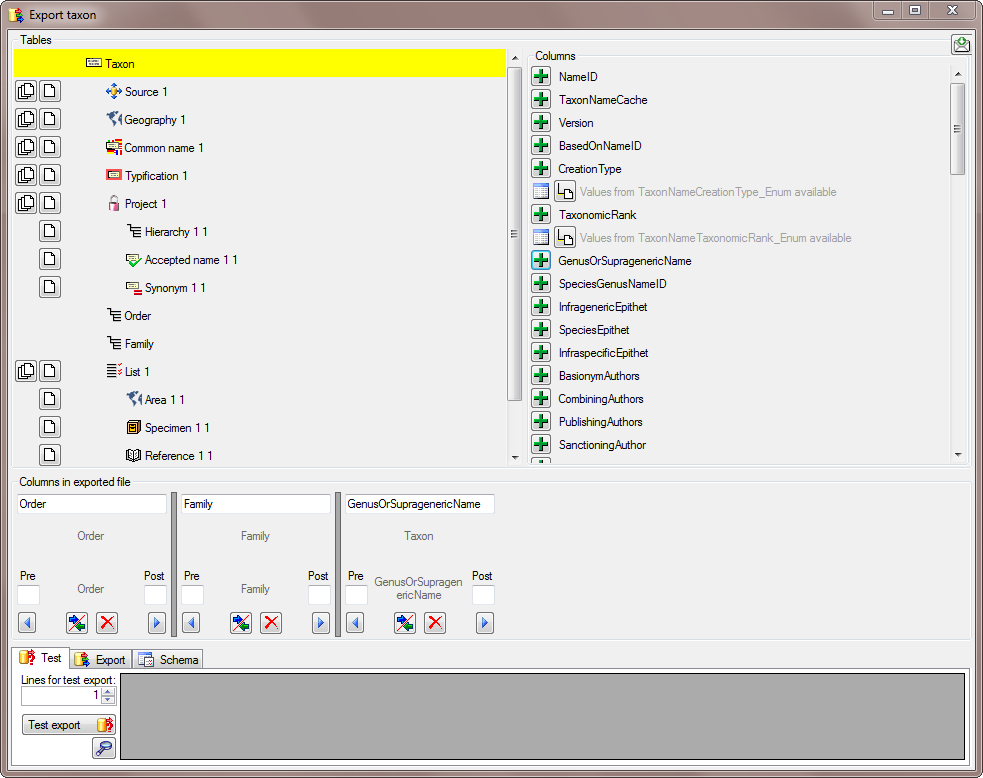
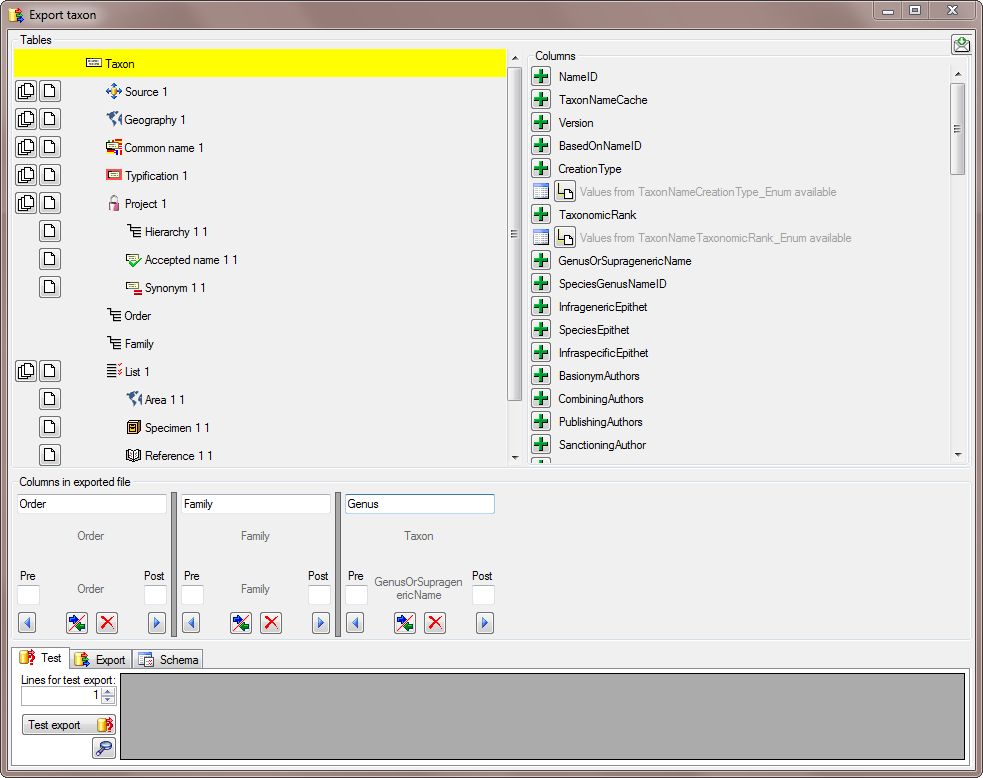
In the Taxon step, set the first
column NameID to
Generate new value. Then select the additional columns as shown below.
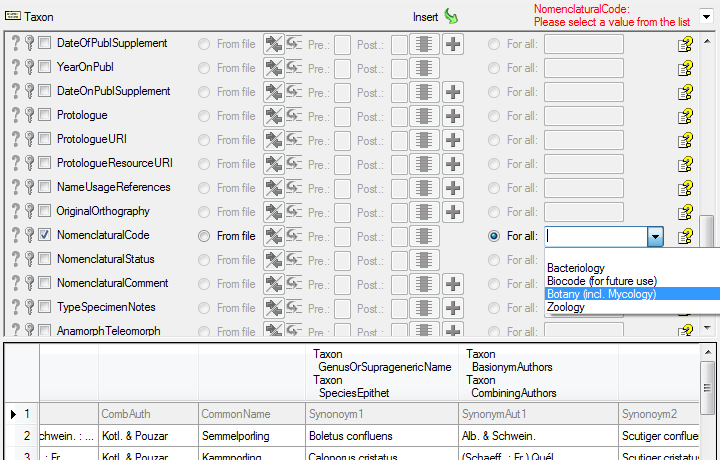
For the column TaxonomicRank choose
For all and select species from the list.
For the column NomenclaturalCode choose
For all and select Botany (incl. Mycology)
from the list. All columns besides NameID,
NomenclaturalCode and TaxonomicRank are set on
From file and the colums are set as shown in
the image below.
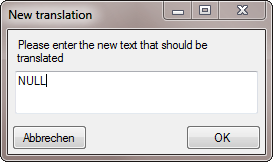
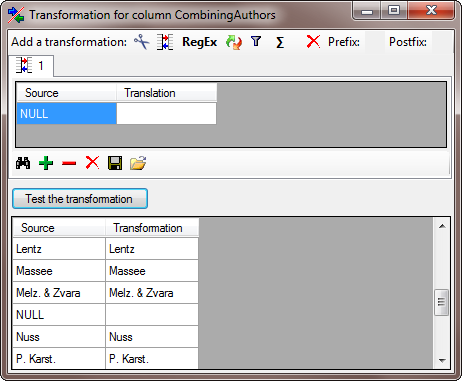
The column CombiningAuthors needs a
transformation. To add this, click on
the  button. Enter a translation as shown below
where the value NULL is translated to nothing.
button. Enter a translation as shown below
where the value NULL is translated to nothing.

Select a translation transformation (click on the
 button) and press the
button to enter a translation (see below).
button) and press the
button to enter a translation (see below).
Press Test the transformation to visualize how the data would be
imported (see below).
To allow the import of this table, choose the 2 columns GenusOrSupragenericName and SpeciesEpithet as Decisive columns (see below).
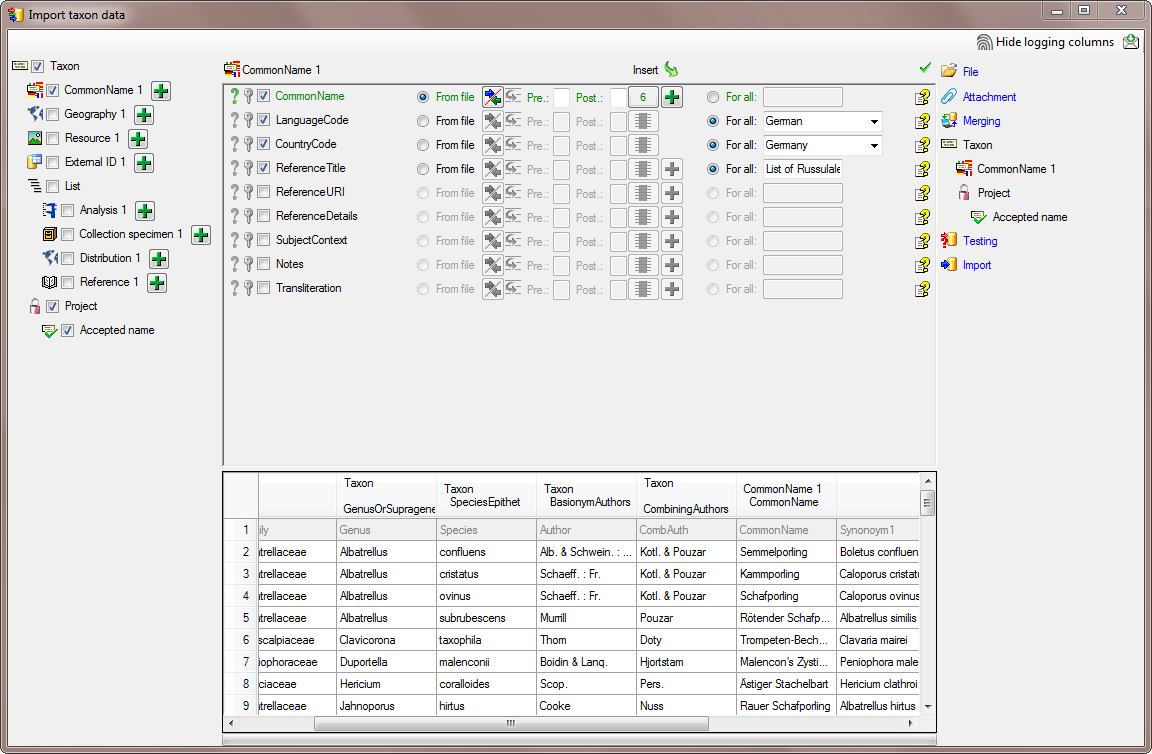
In the step Common name choose the
column CommonName as
Decisive column and
From file (column 6) for and For all for the
other 3 columns as shown in the image below.
In the step  Project select
For all and the project DiversityWorkbench
from the list and select this column as
Decisive column.
Project select
For all and the project DiversityWorkbench
from the list and select this column as
Decisive column.
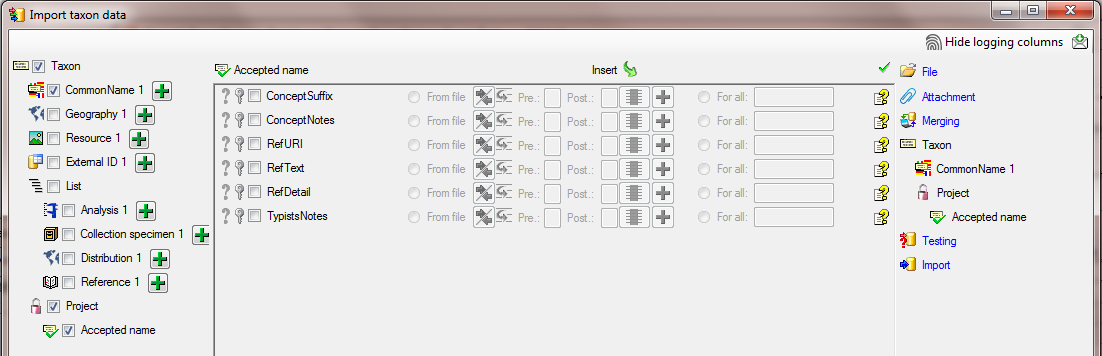
In the step  Accepted name no further
action is needed.
Accepted name no further
action is needed.
In the step Testing check if you missed
any settings described above. A test should return a result as shown
below.
Finally Import the taxa. If no errors occur,
the import should return a result as shown below.
Subsections of Tutorial
Diversity Taxon Names
Import Wizard Tutorial
Hierarchy
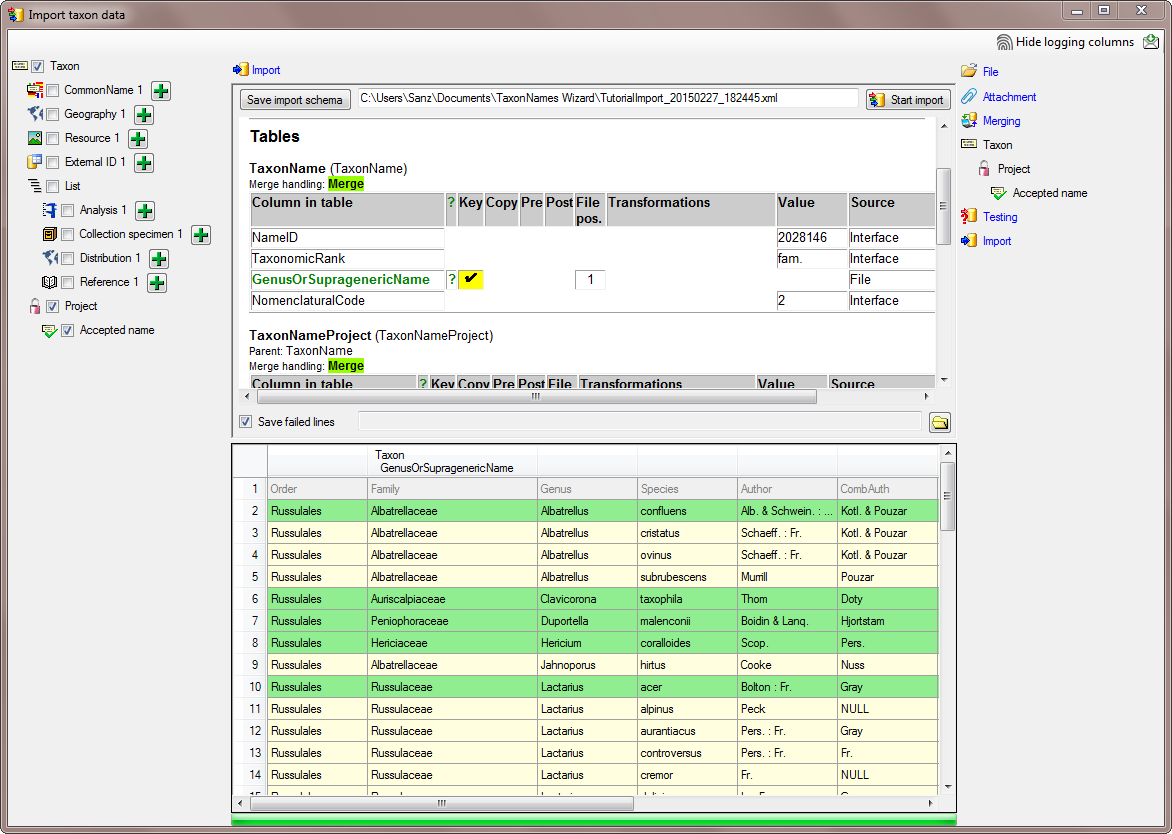
Step2 - Import of the higher taxa - family
To import the hierarchy, the higher taxa must be imported first. Choose
the same file as in the first step for the import. The data for the
higher taxa are not unique in the file. Therefore in the
Merging step, choose
Merge for all tables (see below).

In the Taxon step, set the first
column NameID to
Generate new value. Then select the column
TaxonomicRank and choose For all and
select family from the list. Finally select the column
GenusOrSupragenericName, set it as Decisive columns, set it on
From file and the column 1 as source (see
below).

In the step Project select
For all and the project DiversityWorkbench
from the list and select this column as
Decisive column.
In the step Accepted name no futher
action is needed.
Finally Import the
taxa. If no errors occur, the import should return a result as shown
below. Only the green lines are imported. The yellow lines are found
identical to the already imported data and are therefore not imported.
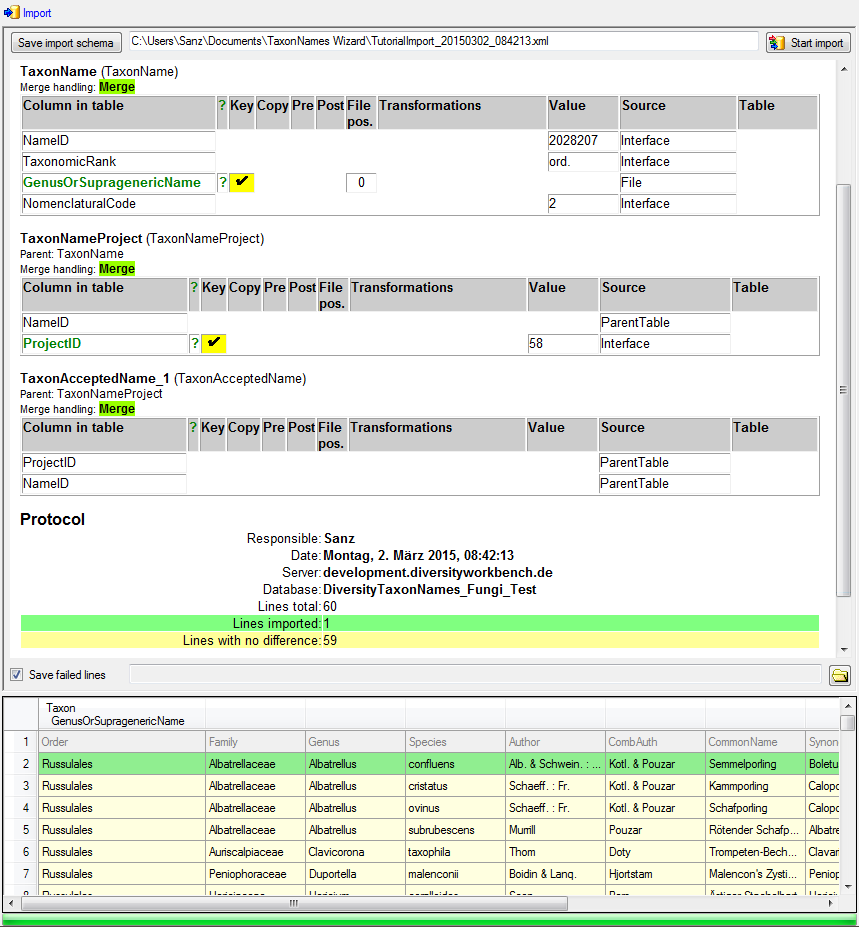
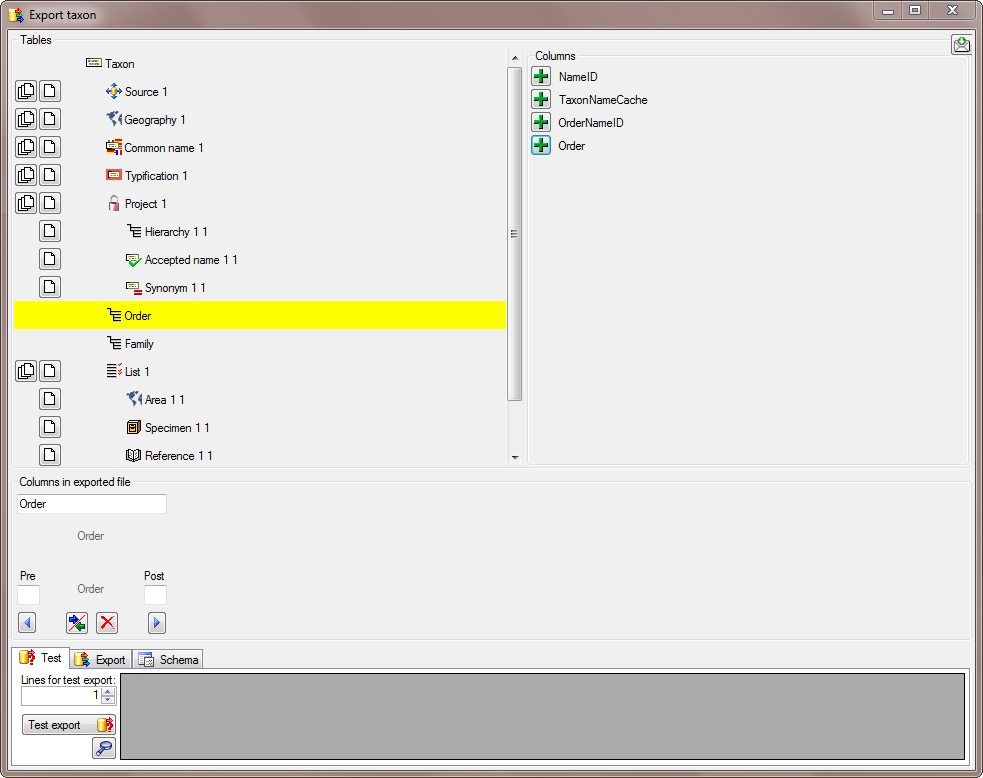
Step3 - Import of the higher taxa - order
Next we Import the
order. Follow the steps as described for the family above with the
difference that now for TaxonomicRank we
select order from the list and choose column
0 as source for the column GenusOrSupragenericName taxa. If no errors
occur, the import should return a result as shown below. Only the green
lines are imported. The yellow lines are found identical to the already
imported data and are therefore not imported (see below).
Diversity Taxon Names
Import Wizard Tutorial
Species & Family
Step 4 - Import of the hierachycal relation between species and families
To import the hierarchical relation between the taxa choose Data →
Import Wizard →  Import Hierarchy … from the menu. For every hierarchical rank, you
have to import the relations between the taxa. We start with the
relations from the species to the family (the genus as intermediate rank
between species and family is omitted in this example).
Import Hierarchy … from the menu. For every hierarchical rank, you
have to import the relations between the taxa. We start with the
relations from the species to the family (the genus as intermediate rank
between species and family is omitted in this example).
As described in the previous steps, open the file ImportTutorial.txt
shipped with this application. In the Merging
step leave the table on Insert (see
below).
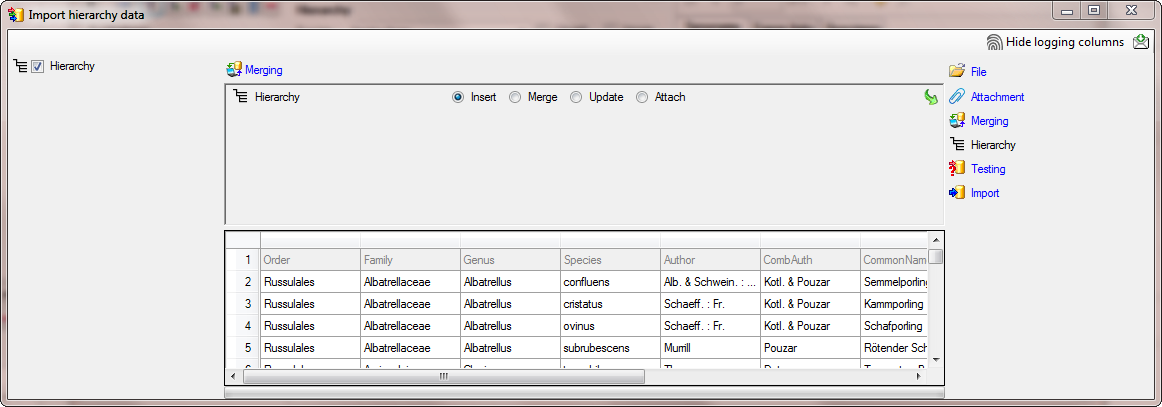
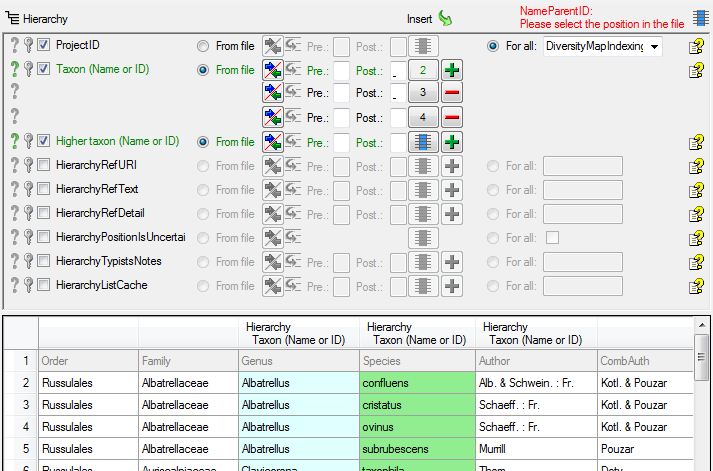
In the Hierachy step, select the
columns Taxon (Name or ID) and Higher taxon (Name or ID) as
Decisive
columns (see below).

For the column ProjectID, select
For all as shown below and select the
project of your choice from the list (e.g. DiversityWorkbench if
available).

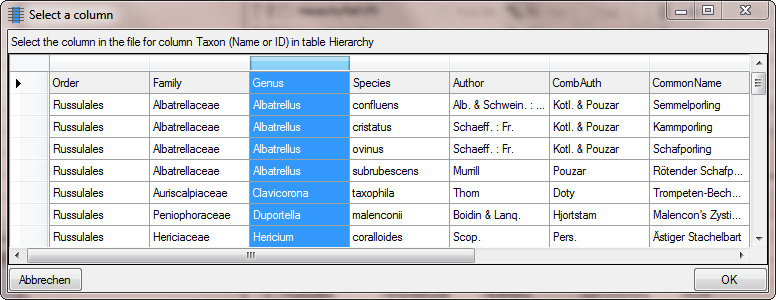
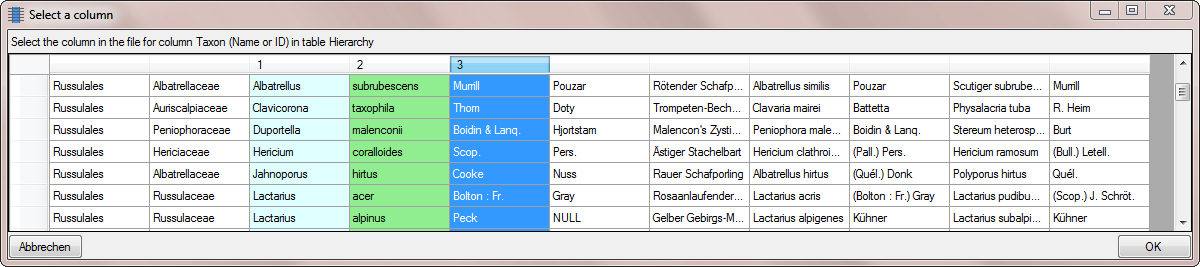
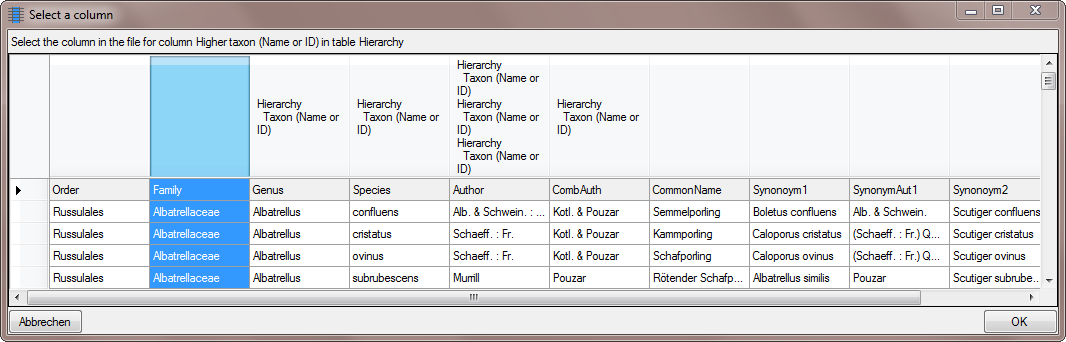
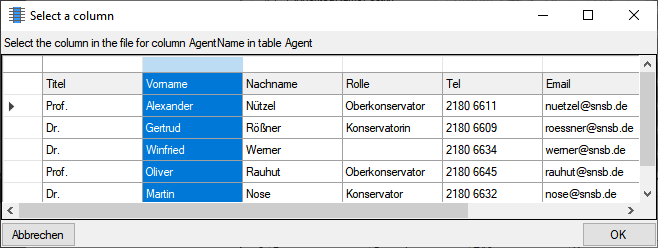
As the file does not contain the IDs of the name, we let the program
determine the ID on basis of the name. To enable the program to detect
the ID we need to provide the whole name from the data in the file. We
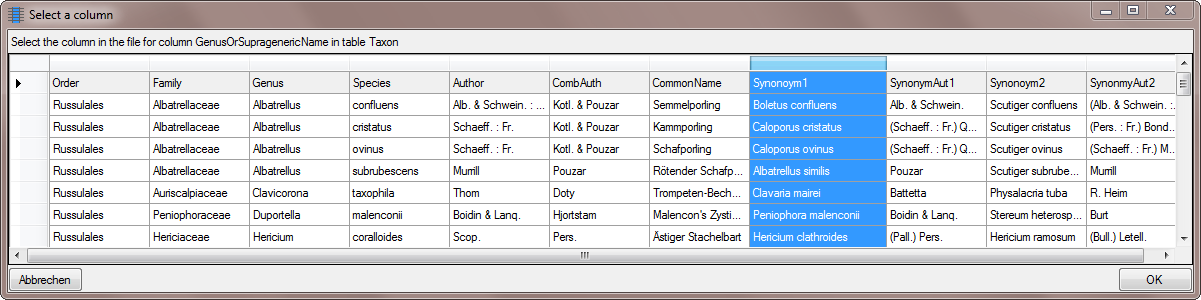
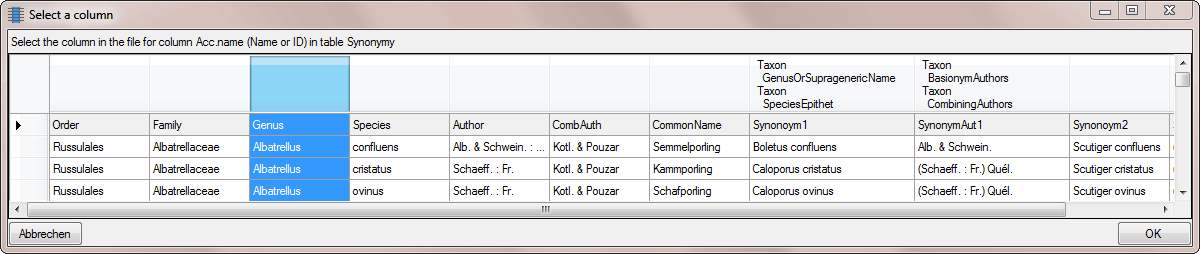
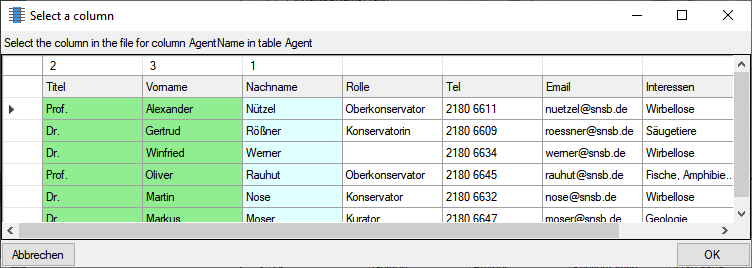
start with the column Taxon (Name or ID). As
first step, click on the button to set the
source for the genus, the first part of the taxonomic name. A window as
shown below will open. Mark the column as shown below an click on the
OK button.
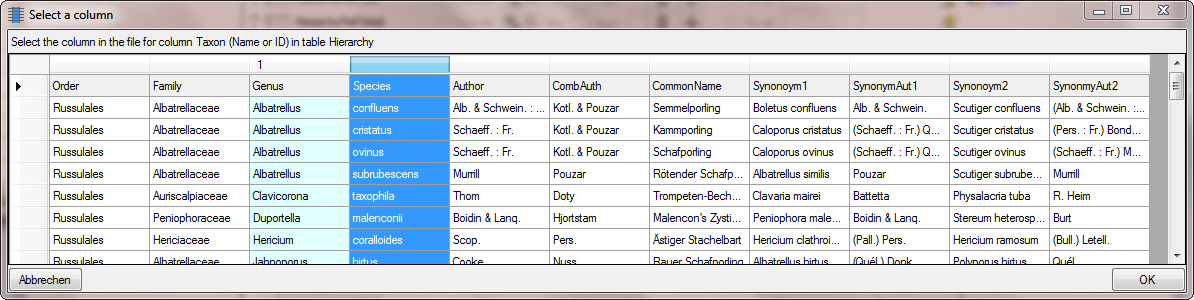
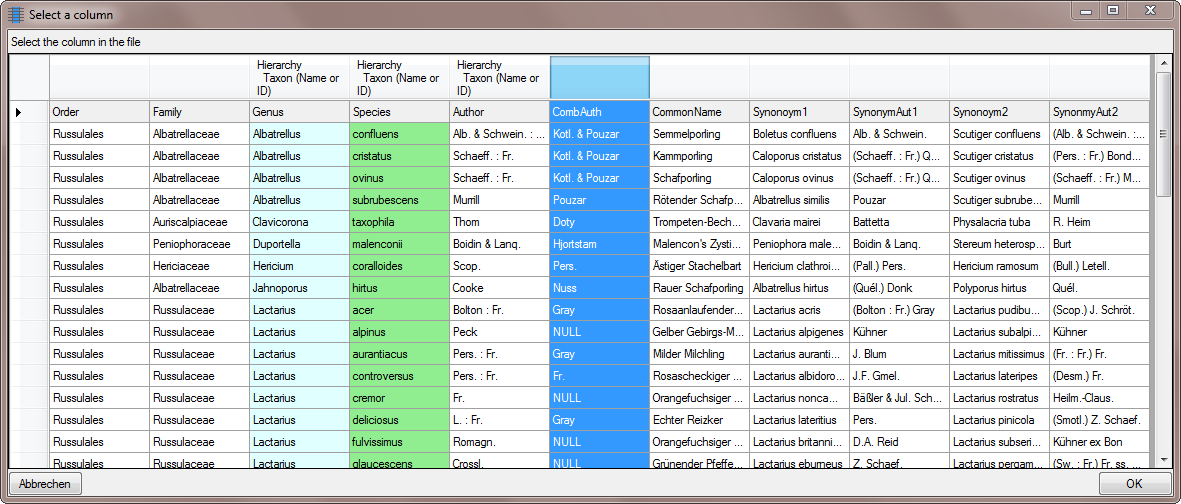
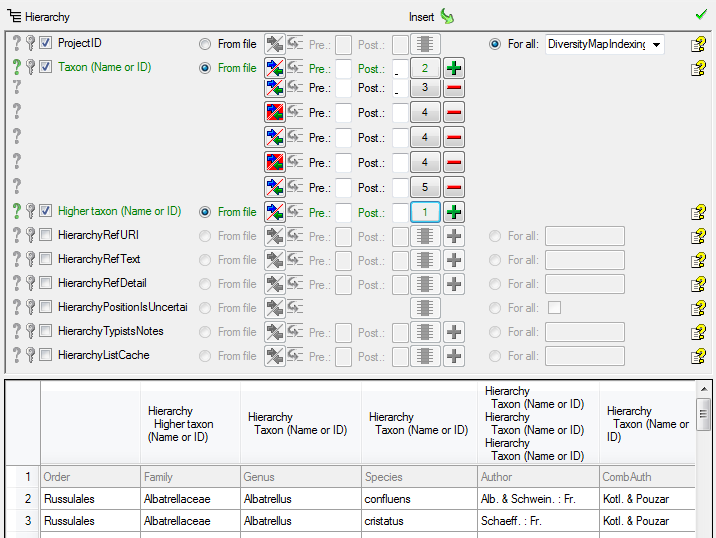
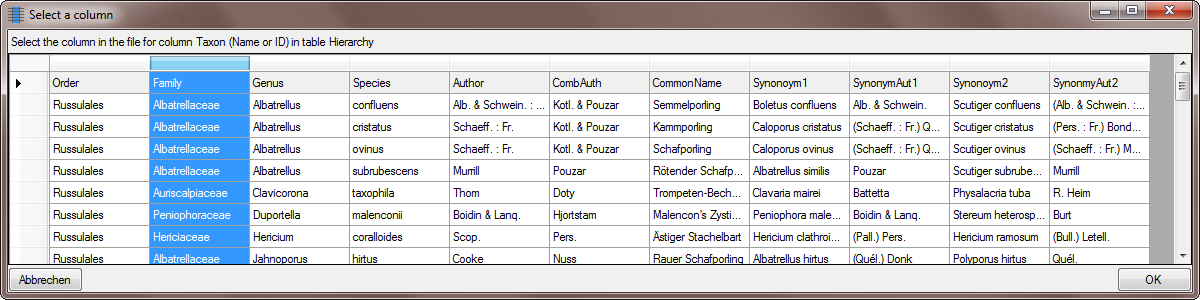
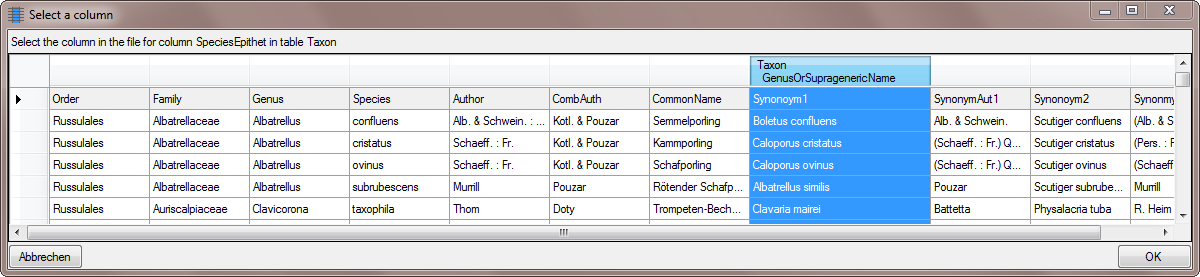
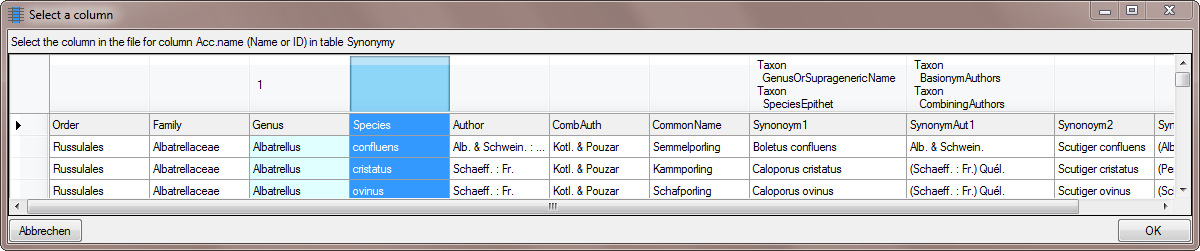
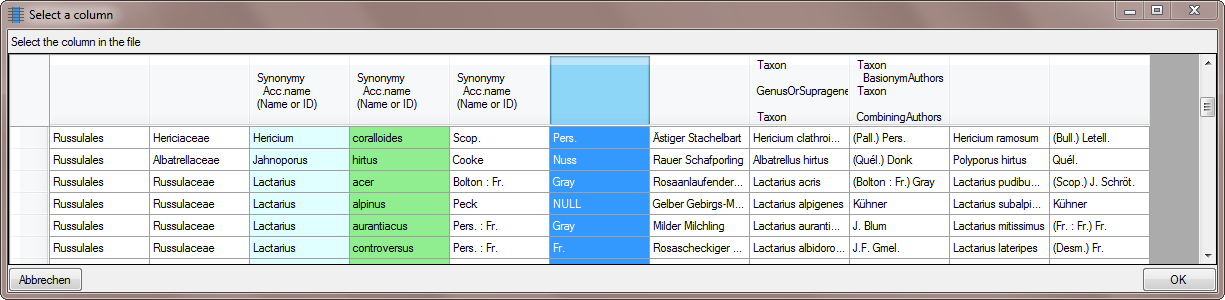
Next we need the species epithet as second part of the names. Click on
the add button to add another column. A window as shown
below will open where where the previous selected column for the Genus
is marked with 1. We select the column containing the species epithet
(see below) and click OK.
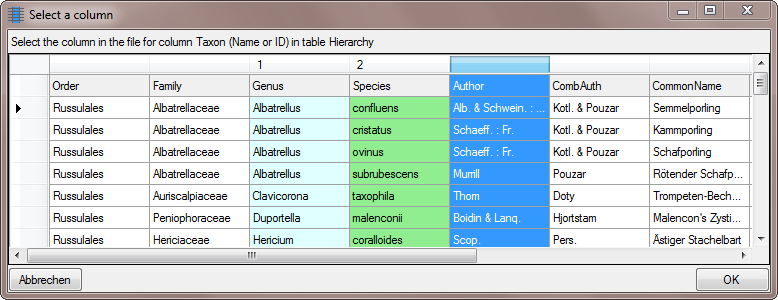
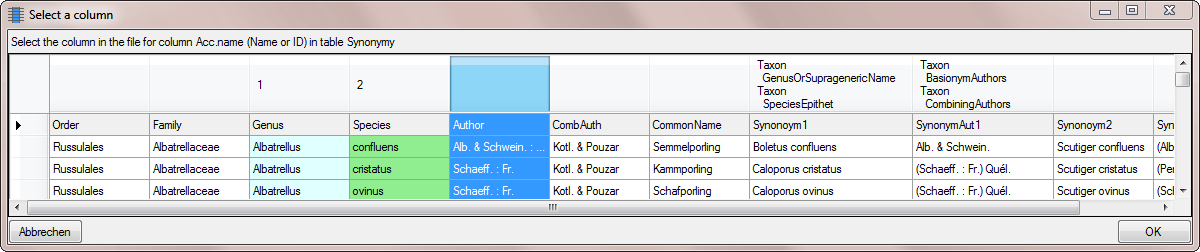
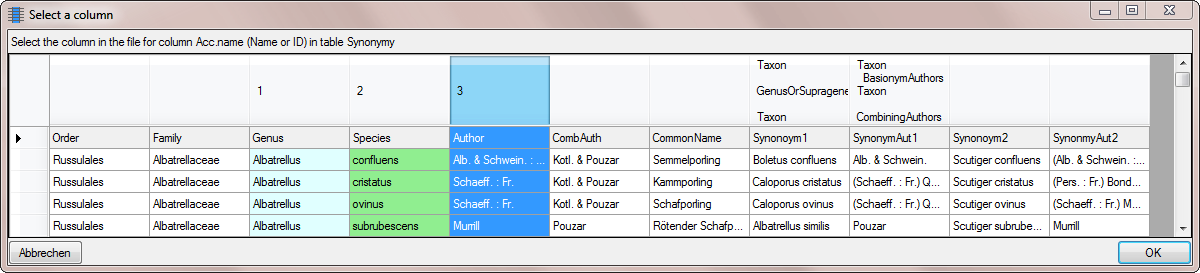
Now we need the authors as last part of the names. Again click on the
button to add a column and select the source as
shown below.
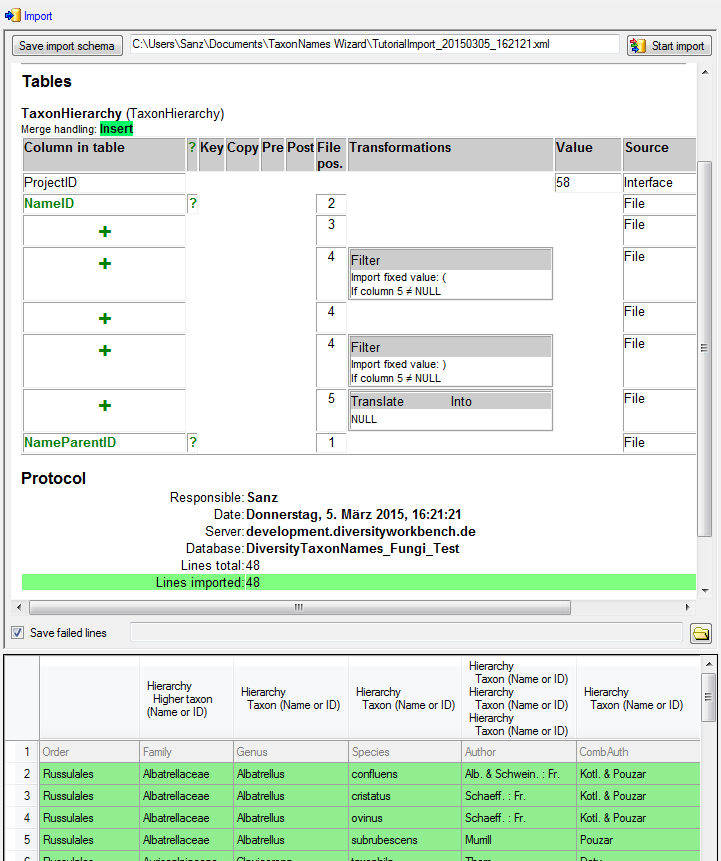
As shown below, enter a space in the Postfix for the first 2 columns.
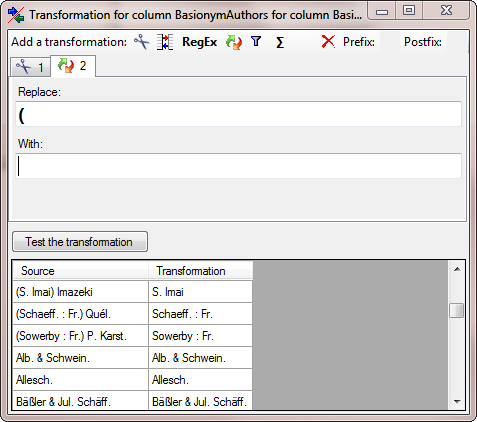
If combining authors do exist for a name, the authors of the basionym
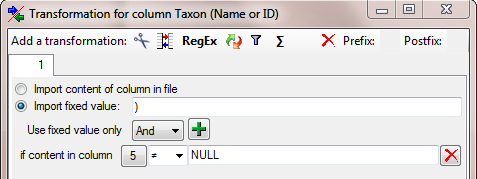
are set in brackets. To ensure the correct build-up of the name, we need
to add a transformation. Click on the button to
enter the a  filter as shown below where an
opening bracket ( is inserted in dependence of the content of the
column of the combining authors.
filter as shown below where an
opening bracket ( is inserted in dependence of the content of the
column of the combining authors.
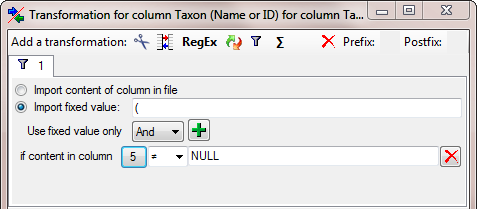
To set the column for the filter, click on the
button and choose the column containing the
combining authors as shown below.
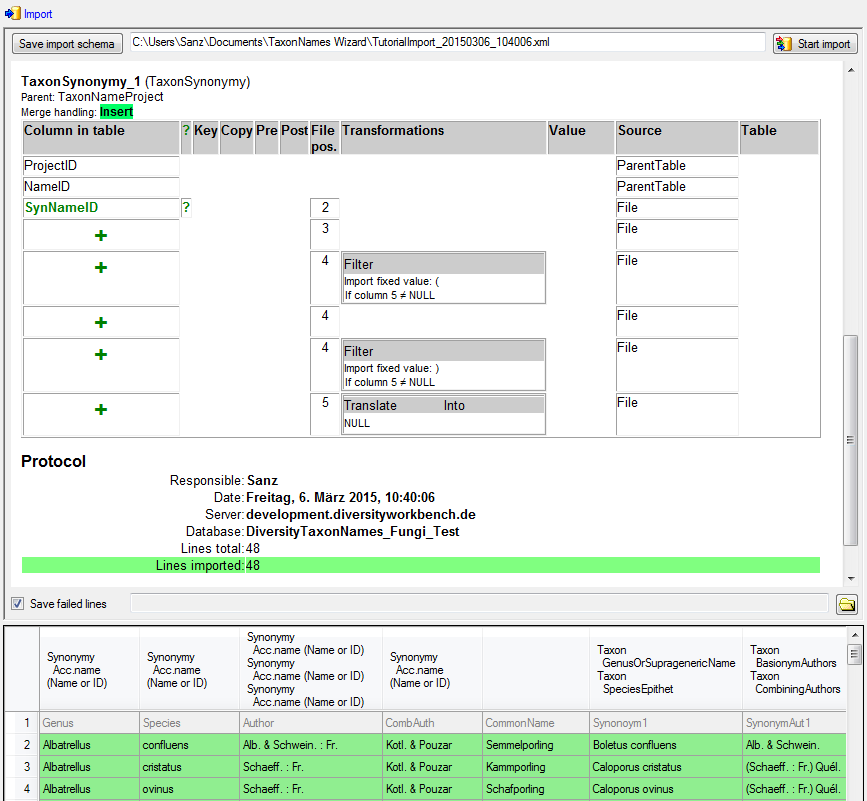
The final Transformation should look like shown below.
After adding the optional opening bracket we add the authors of the
basionym. Click on the add button and select the column
as shown below.
As final step for the authors of the basionym we need the optional
closing bracket. Click on the add button and select the
column as shown above. For the new colum enter another
filter transformation as
shown below. To set the column for the filter, click on the
button as described for the opening bracket.
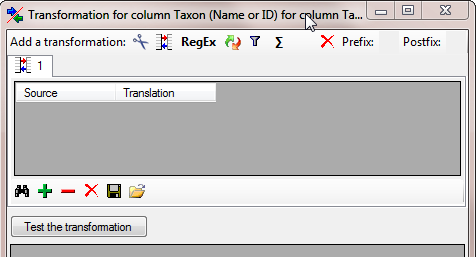
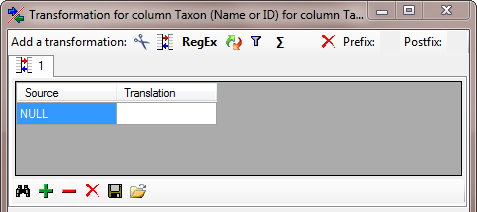
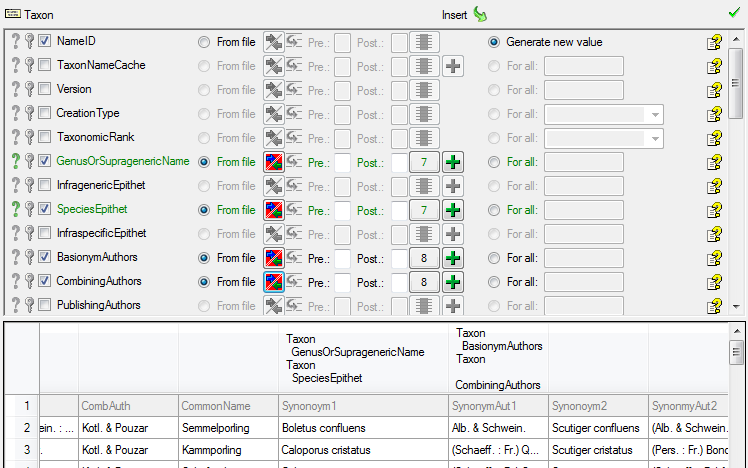
Finally we need the combining authors, provided they do exist. Click on
the add button and select the column containing the
combining authors. As these are missing for some names we have to add a
transformation where the content NULL is
translated into nothing. Click on the button to
add a transformation and in the window that will open, click on the
button to add a translation (see below).
To add a value that should be translated, click on the
button and type NULL into the window as shown below.
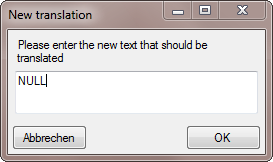
The final transformation should look like shown in the image below.
The final build-up for the Taxon should look like in the image below.
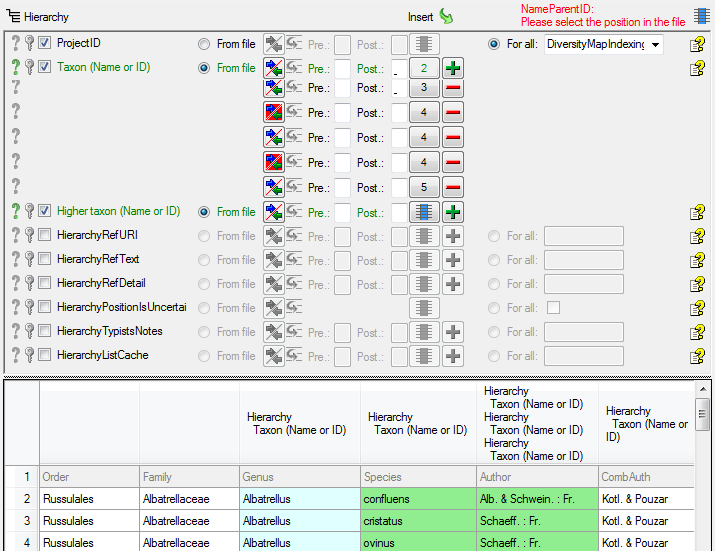
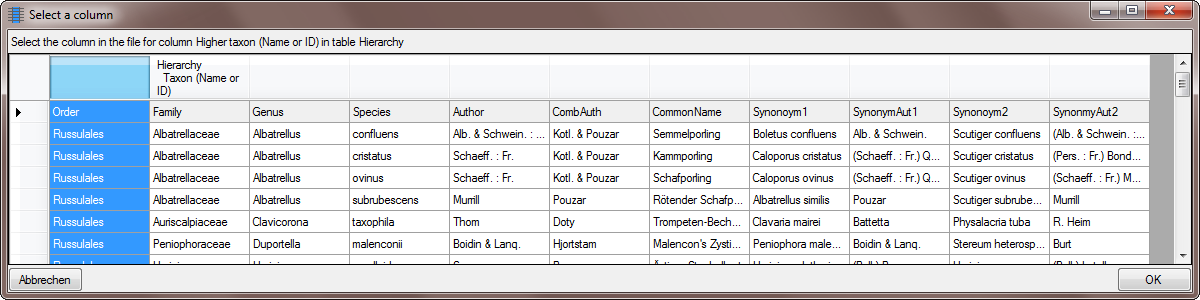
Now we enter the higher taxon, in this example the family. Click on the
button and choose the column containing the
family as shown below.
Now the Hierarchy step is finished and
should look like shown below.
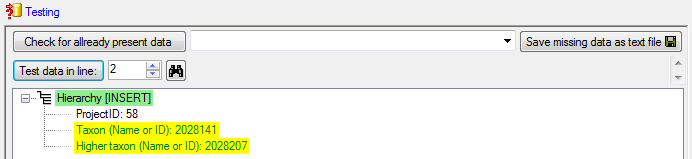
In the Testing
steps use the test for a check if you missed any settings described
above. The result of the test should appear like shown below.

Finally Import the
data according to your settings. The result of the import should appear
like shown below.
Diversity Taxon Names
Import Wizard Tutorial
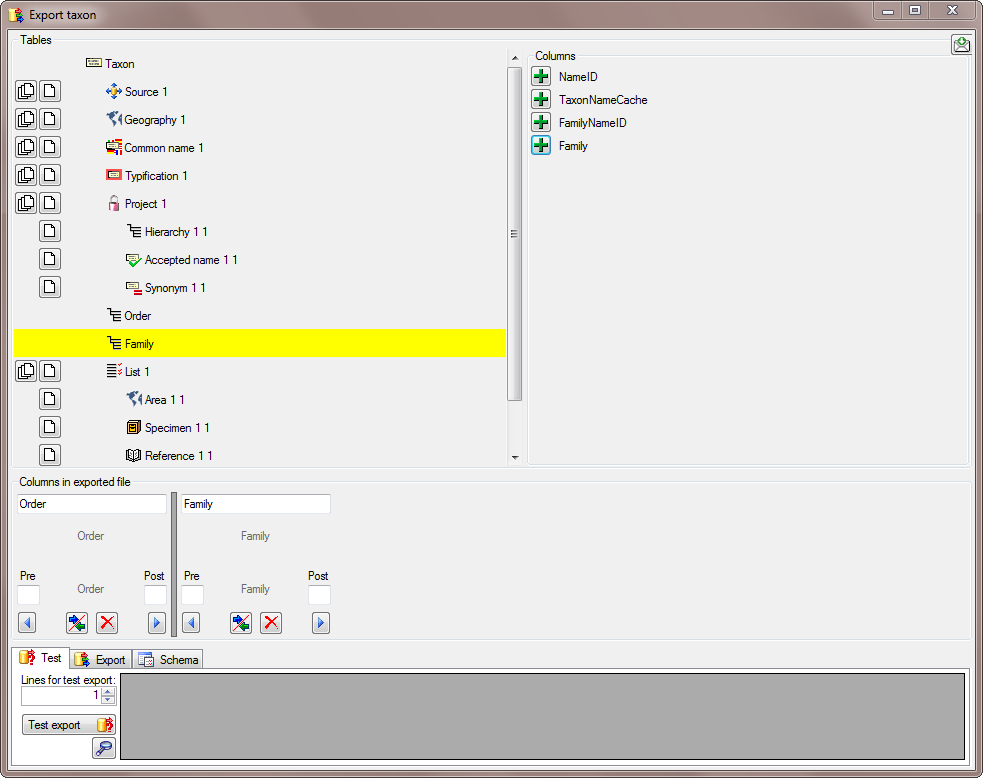
Family & Order
Step 5 - Import of the hierachycal relation between families and the order
After the relations between the species and the families are imported we
proceed with the hierarchical relation between families and the order.
Choose Data → Import Wizard →
Import Hierarchy … from the menu.
As described in the previous steps, open the file ImportTutorial.txt
shipped with this application. In the Merging
step set the table on Merge (see below).

As described in the previous step, select the project of your choice and
set the columns Taxon and Higher Taxon to From
file.

Click on the button to select the source for
the family (see below).
… and the orders as shown below.
Additionally you must select these columns as Key
columns, used to compare the data from the file with the content in
the database (see below).

A final test before importing the data turns positive (see below).
Now we are ready to import the relation into the database. For every
family this relation will be imported only once (see below).
As a last step, search for the highest taxon “Russulales” in the
hierarchy in the main from and click on the button set hierarchy
(see below) .
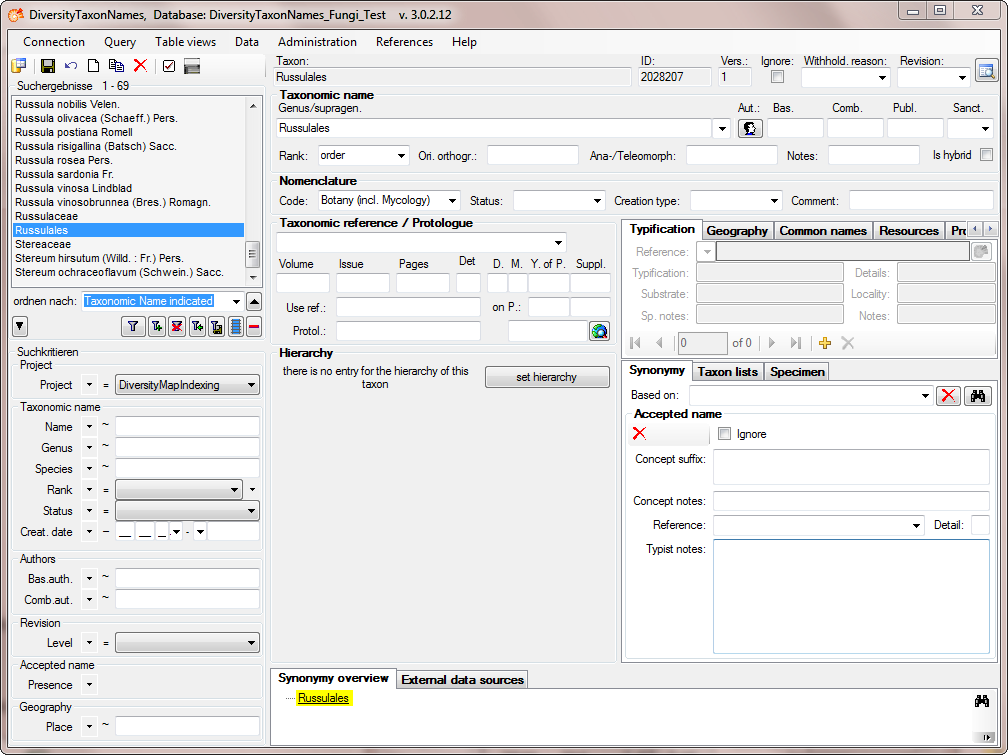
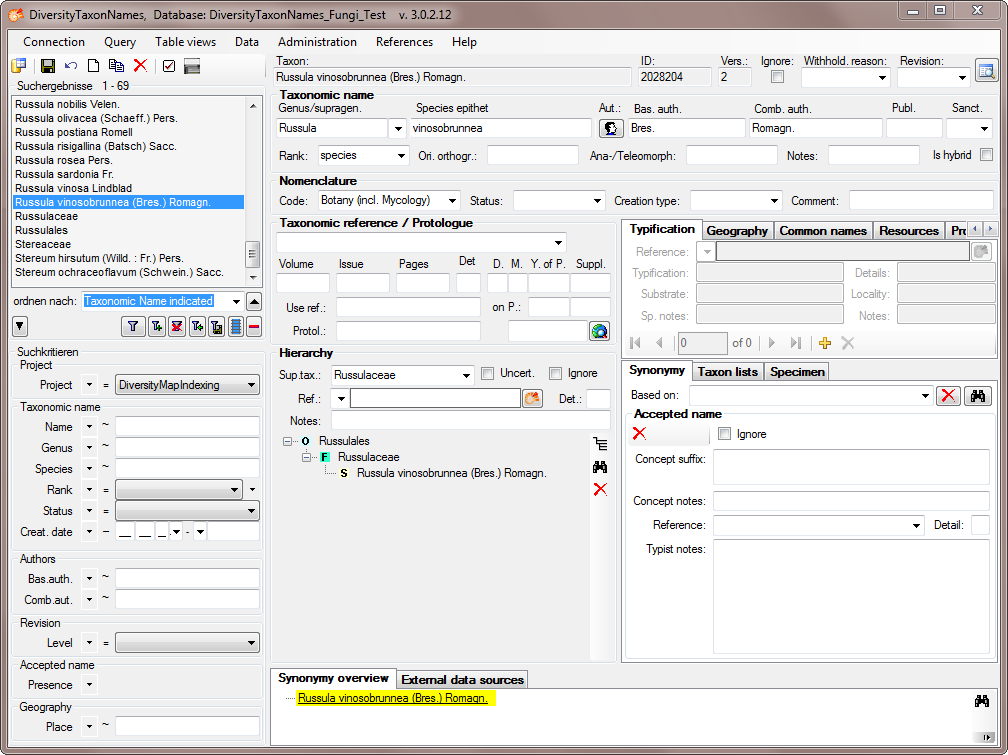
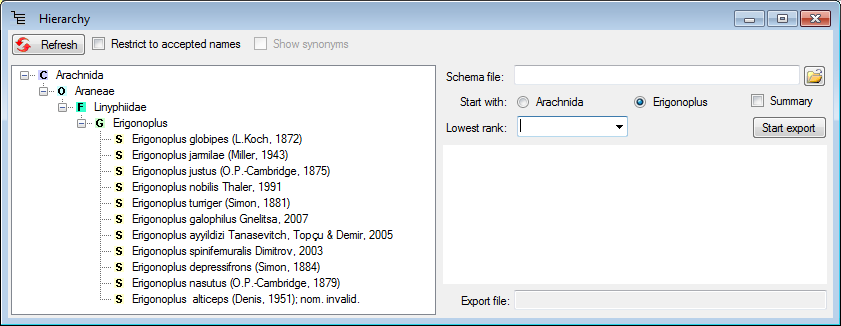
After the hierarchy for the Russulales is set, all imported name will
show the complete hierarchy as shown in the example below.
Diversity Taxon Names
Import Wizard Tutorial
Synonyms
Step 6 - Import of the synonyms
To import the synonyms, choose Data → Import
Wizard →  import Synonyms … from the
menu. A window as shown below will open.
import Synonyms … from the
menu. A window as shown below will open.
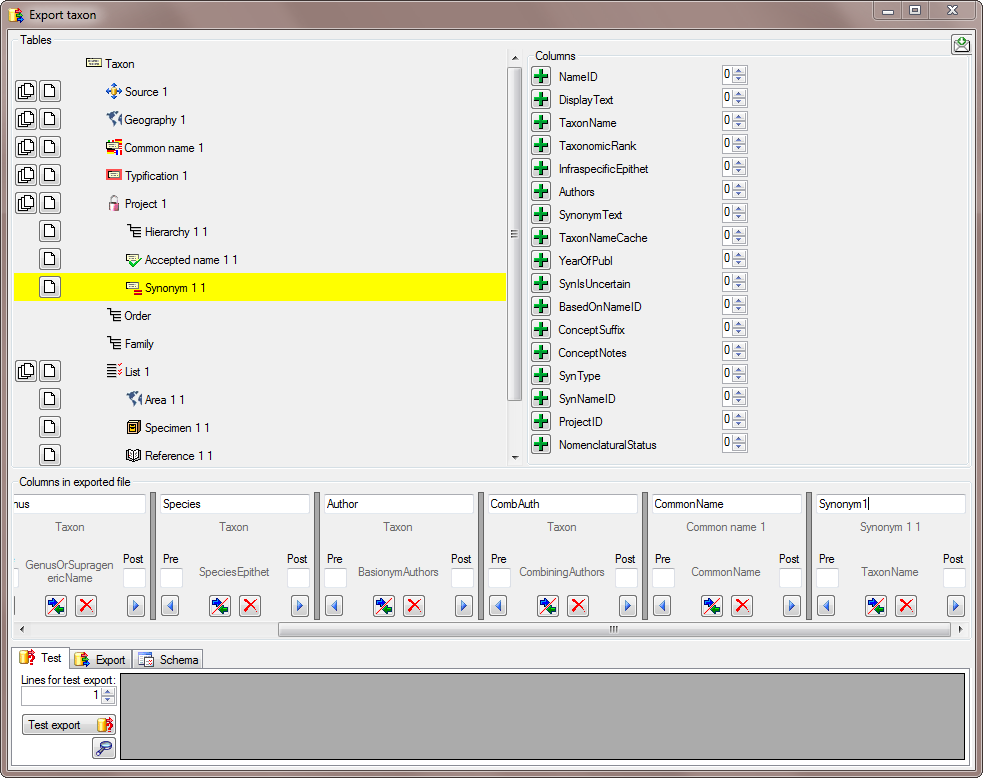
In the Taxon step choose
From file for the Genus and select the colums
Synonym1 as shown below.
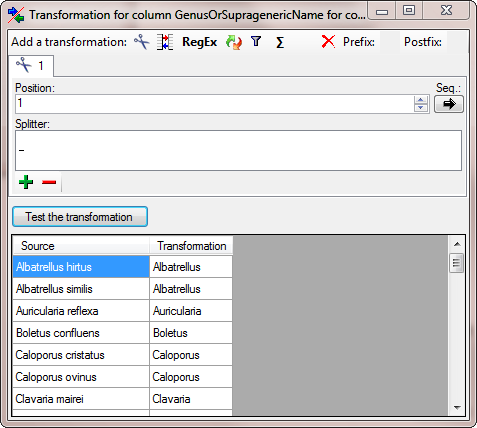
To get only the genus from the name in the source, add a transformation
for the column. Click on the button and in the
window as shown below add a  cutting transformation.
Enter a space as Splitter. A Test of the transformation should produce
the result as shown below.
cutting transformation.
Enter a space as Splitter. A Test of the transformation should produce
the result as shown below.
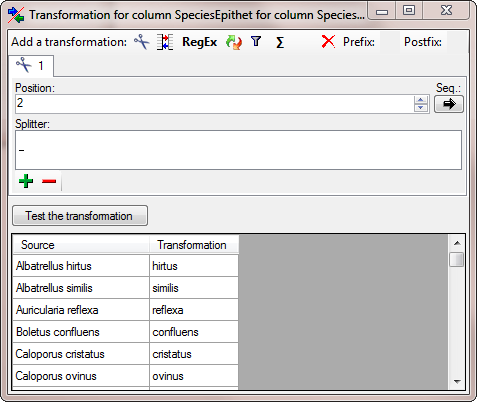
Next select the SpeciesEpithet and again
From file (see below).
Select the same column as for the genus (see below).
… and as for the genus add a cutting
transformation with a space as splitter but this time set the
Position to 2 (see below).
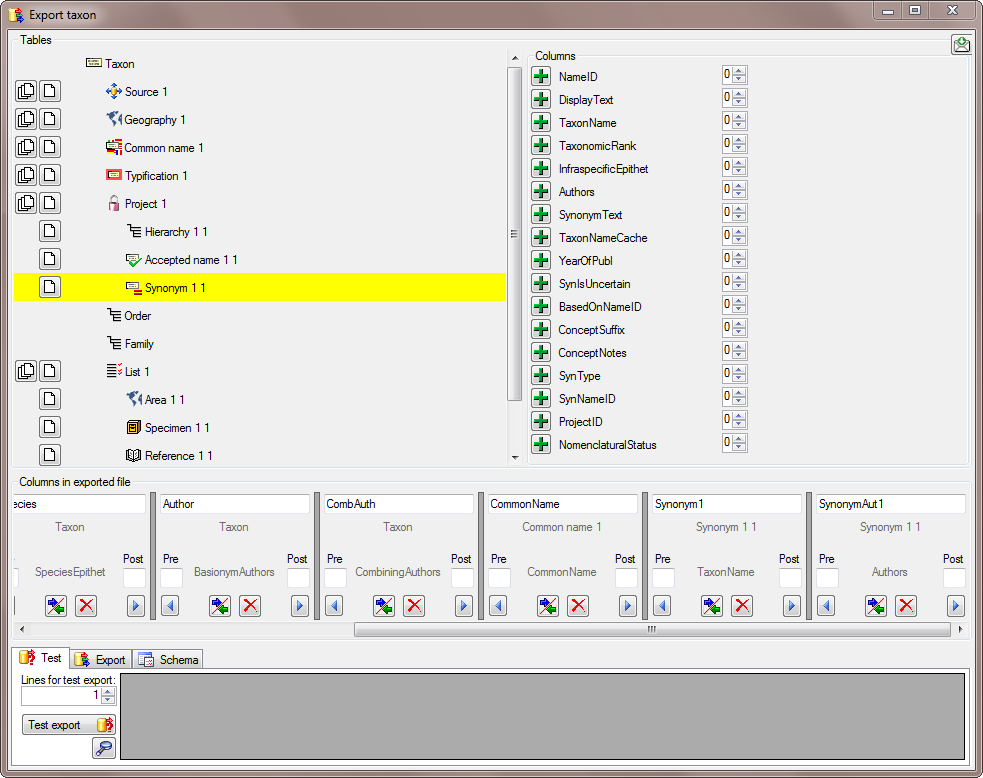
Choose the columns for the genus and the epithet as
Decisive columns (see below). Next we turn to the authors of the
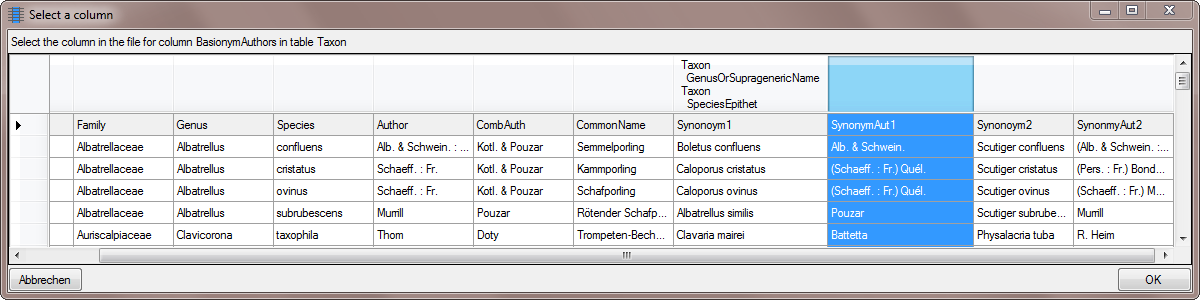
synonym. Select the From file for BasionymAuthors …
And choose the SynonymAut1 Column as shown
below.
To cut out the basionym authors we add a cut
transformation as shown below. Enter ) as splitter.
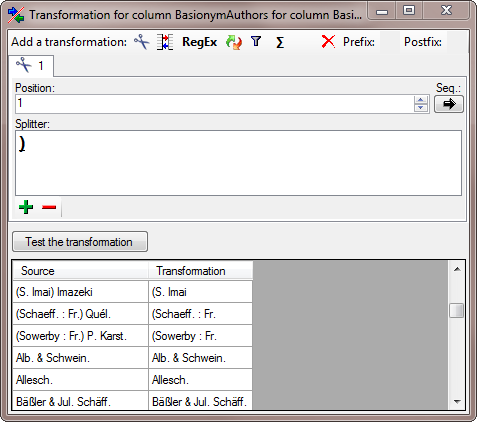
Next we add a  Replace transformation to get
rid of the leeding bracket (see below).
Replace transformation to get
rid of the leeding bracket (see below).
Now we turn to the combining authors …
Again we add a cut transformation with ) as
Splitter, but 2 as Position (see below).
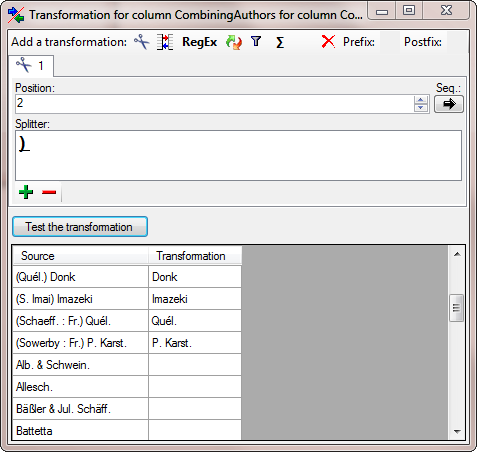
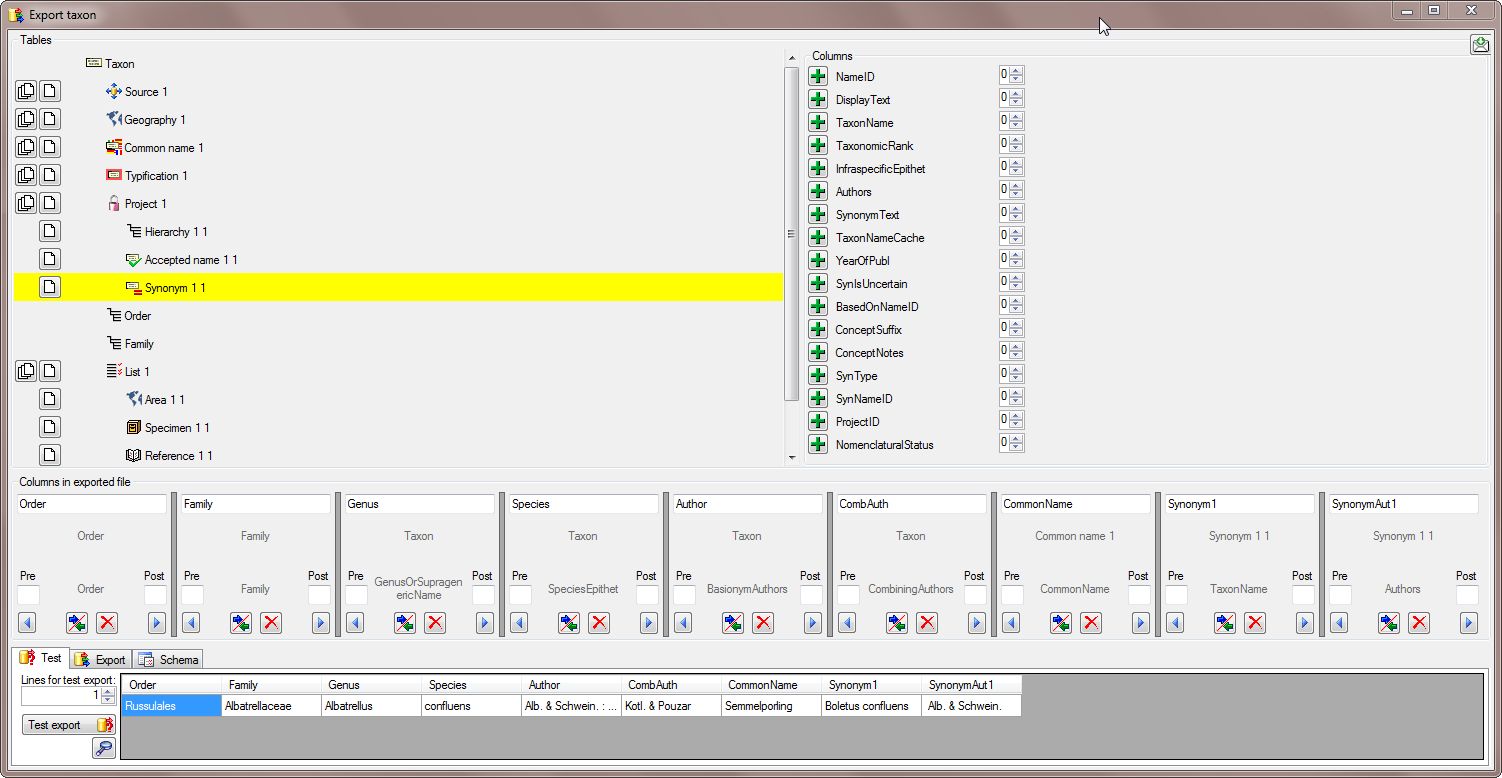
The window now should look like below.
As a last entry in the taxon step we choose Botany for the Nomenclatural Code (see below).
In the Project step select
For all, choose the project where you
want to import the data and set this column as
Decisive column.

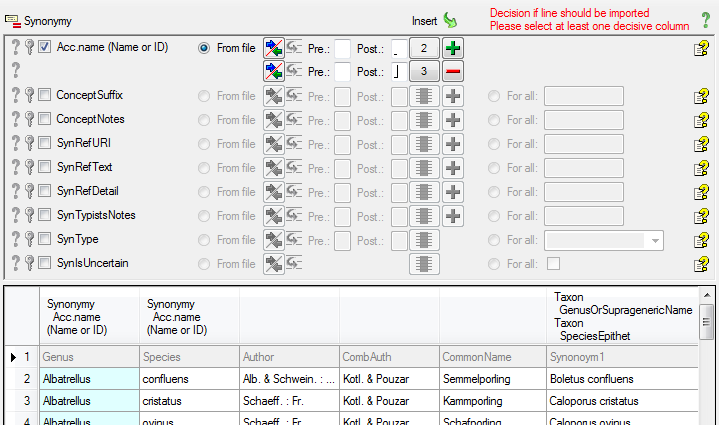
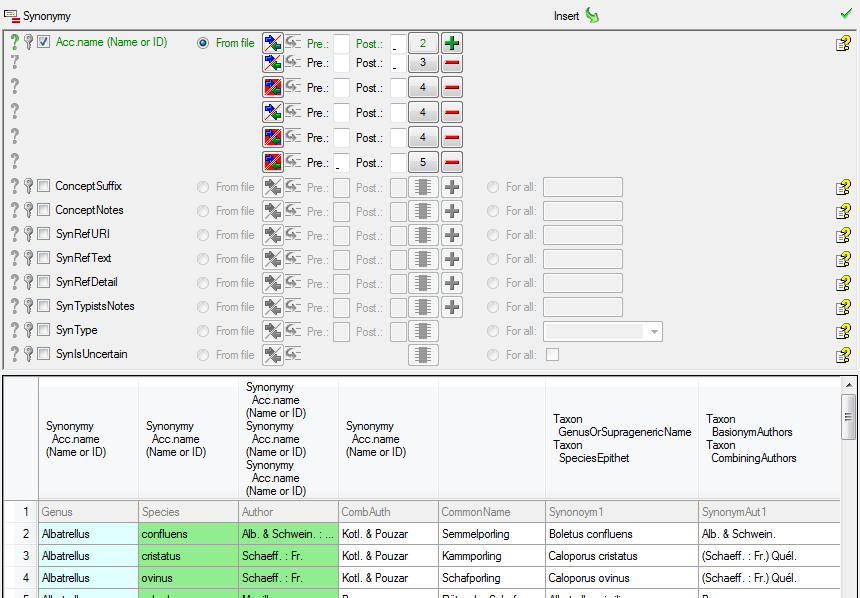
In the Synonymy step select
From file for the accepted name. Now we
must combine the accepted name from the entries in the file to match the
entry in the database.

Select the Genus column for the first part
of the accepted name (see below).
Click on the add button to add another column and choose
the Species column as shown below as source.
For both columns enter a space into the Postfix (see below).
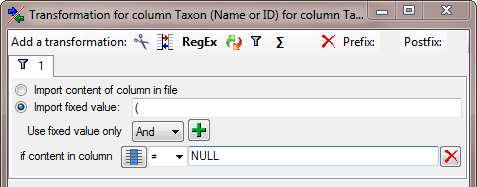
Next we add the authors. For the basionym authors we need to add
brackets if combining authors do exist. Select the Author column …
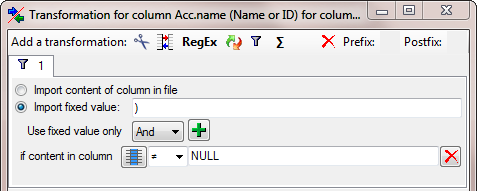
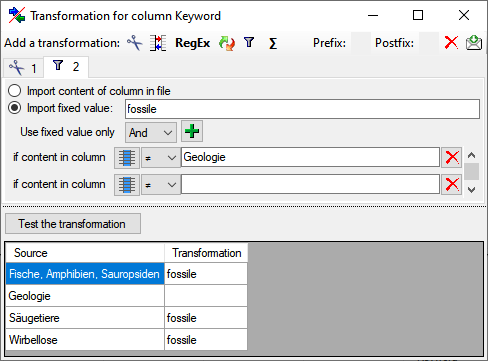
… and add a filter transformation (see below).
Here we choose Import fixed value and
enter ( as a value. As condition we choose that the colum of the
combining autors should not contain the string NULL.
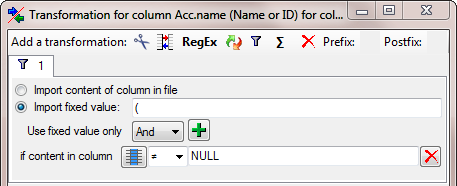
To complete this transformation click on the
button and select the column containing the combining authors (see
below).
To add the basionym authors themselves, click on the button and choose
the corresponding source as shown below.
Next we need the closing bracket for the basionym authors. As before we
click on the button and for the new entered columns we add a
filter transformation as shown below. Enter )
as fixed value and as before select that the source for the combining
authors should be unequal to NULL.
Finally we get the values for the combining authors. Add another column
and select the corresponding column in the source (see below).

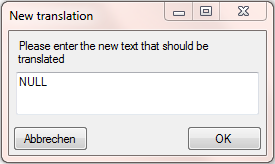
To remove the NULL value, we add a translation transformation. As only
string that should be translated, we click on the button and enter NULL
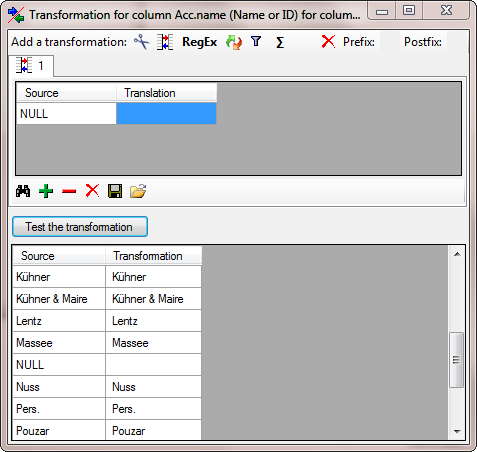
(see below).
Now the translation should look like below.
As final action in the Synonym step we
choose the column for the Acc.name as Decisive column (see below).
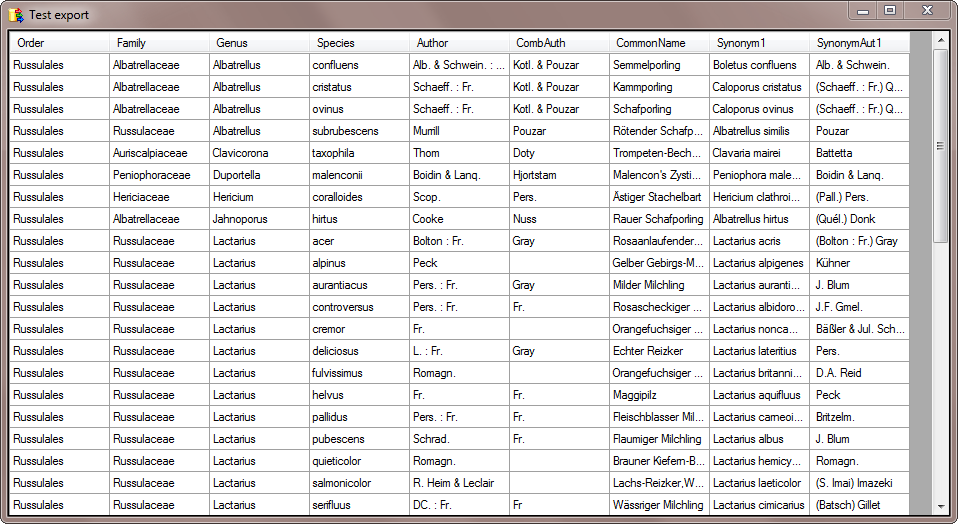
A final Testing will detect any missed
settings.
After the final test is passed, we can Import
the data as shown below. The schema will automatically be created and is
available for subsequent imports.
Diversity Taxon Names
Columns
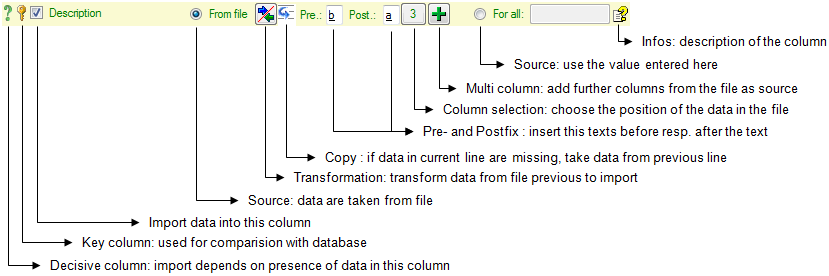
If the content of a file should be imported into a certain column of a
table, mark it with the checkbox.
Decisive columns
The import depends on the data found in the file where certain columns
can be selected as decisive. Only those lines will be imported where
data are found in any of these
decisive columns. To mark a column as
decisive, click on the
icon at the beginning of the line (see below).

In the example shown below, the file column Organims
2 was marked as decisive. Therefore only the
two lines containing content in
this column will be imported.

Key columns
For the options Merge,
Update and
Attach the import compares the data from the file with those already
present in the database. This comparison is done via key columns.
To make a column a key column, click on the icon at
the beginning of the line. You can define as many key columns as you
need to ensure a valid comparison of the data.
Source
The data imported into the database can either be taken
 From file or the same value that you
enter into the window or select from a list can be used
For all datasets. If you choose the
From file option, a window as shown below will pop up. Just click in
the column where the data for the column should be taken from and click
OK (see below).
From file or the same value that you
enter into the window or select from a list can be used
For all datasets. If you choose the
From file option, a window as shown below will pop up. Just click in
the column where the data for the column should be taken from and click
OK (see below).
If you choose the For all option, you
can either enter text, select a value from a list or use a
checkbox for YES or NO.
The data imported may be transformed e.g. to adapt them to a format
demanded by the database. For further details please see the chapter
Transformation.
Copy
If data in the source file are missing in subsequent lines as shown
below,

you can use the  Copy line option to fill in
missing data as shown below where the blue
values are copied into empty fields during the
import. Click on the button to ensure that
missing values are filled in from previous lines.
Copy line option to fill in
missing data as shown below where the blue
values are copied into empty fields during the
import. Click on the button to ensure that
missing values are filled in from previous lines.

Prefix and Postfix
In addition to the transformation of the values from the file, you may
add a pre- and a postfix. These will be added after the transformation
of the text. Double-click in the field to see or edit the content. The
pre- and a postfix values will only be used, if the file
contains data for the current position.
Column selection
If for any reason, a column that should take its content from the
imported file misses the position of the file or you want to change the
position click on the button. In case a
position is present, this button will show the number of the column. A
window as shown below will pop up where you can select and change the
position in the file.
Multi column
The content of a column can be composed from the content of several
columns in the file. To add additional file columns, click on the
button. A window as shown below will pop up, showing
you the column selected so far, where the sequence is indicated in the
header line. The first column is
marked with a blue background while the added
columns are marked with a green
background (see below).
To remove an added column, use the button (see
below).

The  button opens a window displaying the
information about the column. For certain datatypes additional options
are included (see Pre- and Postfix).
button opens a window displaying the
information about the column. For certain datatypes additional options
are included (see Pre- and Postfix).
Diversity Taxon Names
The data imported may be transformed e.g. to adapt them to a format
demanded by the database. A short introduction is provided in a video
 .
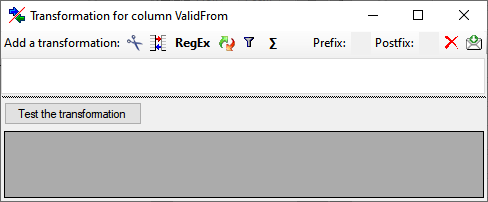
Click on the button to open a window as shown
below.
.
Click on the button to open a window as shown
below.
Here you can enter 4 types of transformation that should be applied to
your data. Cut out parts,
Translate contents from the file, RegEx
apply regular expressions or Replace text in the
data from the file. All transformations will be applied in the sequence
they had been entered. Finally, if a prefix and/or a postfix are
defined, these will be added after the transformation. To remove a
transformation, select it and click on the
button.
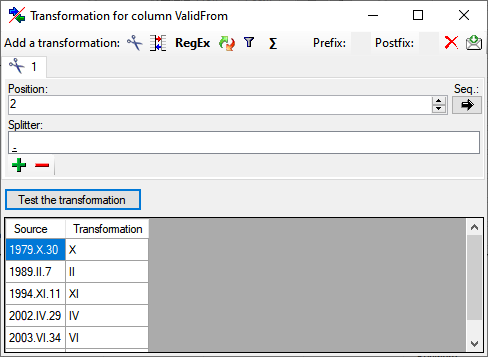
Cut
With the cut transformation you can restrict the
data taken from the file to a part of the text in the file. This is done
by splitters and the position after splitting. In the example below, the
month of a date should be extracted from the information. To achieve
this, the splitter '.' is added and than the position set to 2. You
can change the direction of the sequence with the button
 Seq starting at the first position and
 starting at the last position. Click on
the button Test the transformation to see the result of your
transformation.
starting at the last position. Click on
the button Test the transformation to see the result of your
transformation.
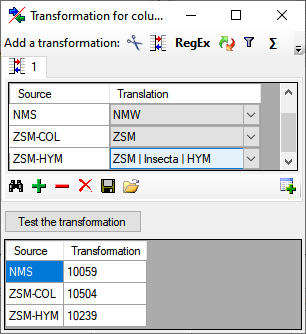
Translate
The translate transformation translates
values from the file into values entered by the user. In the example
above, the values of the month cut out from the date string should be
translated from roman into numeric notation. To do this click on the
button to add a translation transformation
(see below). To list all different values present in the data, click on
the  button. A list as shown below will be created.
You may as well use the and
buttons to add or remove values from the list or the
button to clear the list. Then enter the
translations as shown below.
button. A list as shown below will be created.
You may as well use the and
buttons to add or remove values from the list or the
button to clear the list. Then enter the
translations as shown below.

For columns with a lookup table as source, you can select the values from the source that will then be translated into e.g. the key of the source as shown in the example below
Use the save button to
save entries and the Test the transformation button to see the
result.
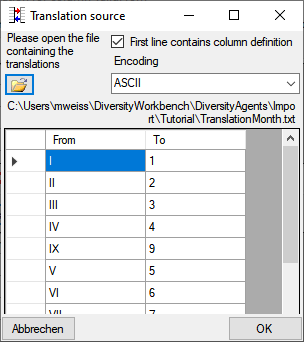
To load a predefined list for the transformation use the
button. A window as shown below will open.
Choose the encoding of the data in your translation source, if the first
line contains the column definition and click on
the open button to open a file. Click OK to use
the values from the file for the translation.
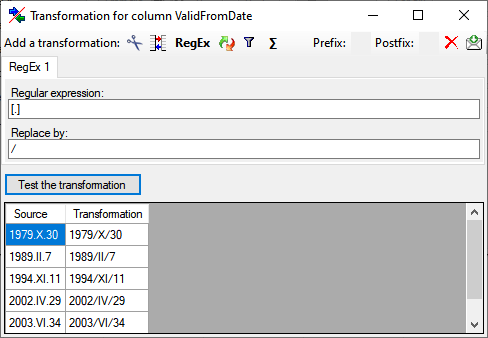
Regular expression
The RegEx transformation using regular expressions will transform the values
according to the entered Regular expression and Replace by
vales. For more details please see documentations about regular
expressions.
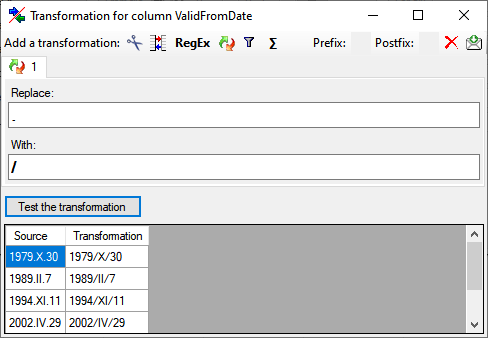
Replacement
The replacement transformation replaces any text in the data by a text
specified by the user. In the example shown below, the text "." is
replaced by "-".
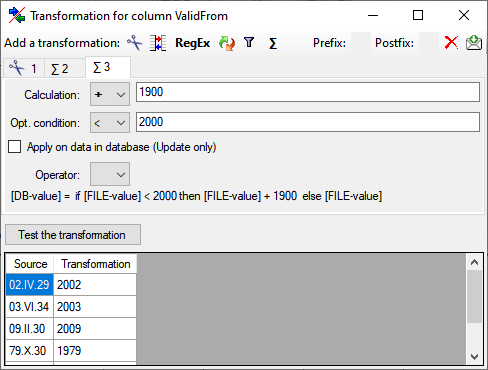
Calculation
The Σ calculation transformation performs a calculation on numeric value,
dependent on an optional condition. In the example below, 2 calculations
were applied to convert 2-digit values into 4 digit years.
Filter
The filter transformation compares the values from the file with a value
entered by the user. As a result you can either
Import content of column in file
or Import a fixed value. To select
another column that should be compared, click on the
button and choose a column from the file in
the window that will open. If the column that should be compared is not
the column of the transformation, the number of the column will be shown
instead of the symbol. To add further filter
conditions use the add button. For the combination of
the conditions you can choose among AND and OR.

 Exportwizard,
  Archive and
  Replication are available in most of the modules.
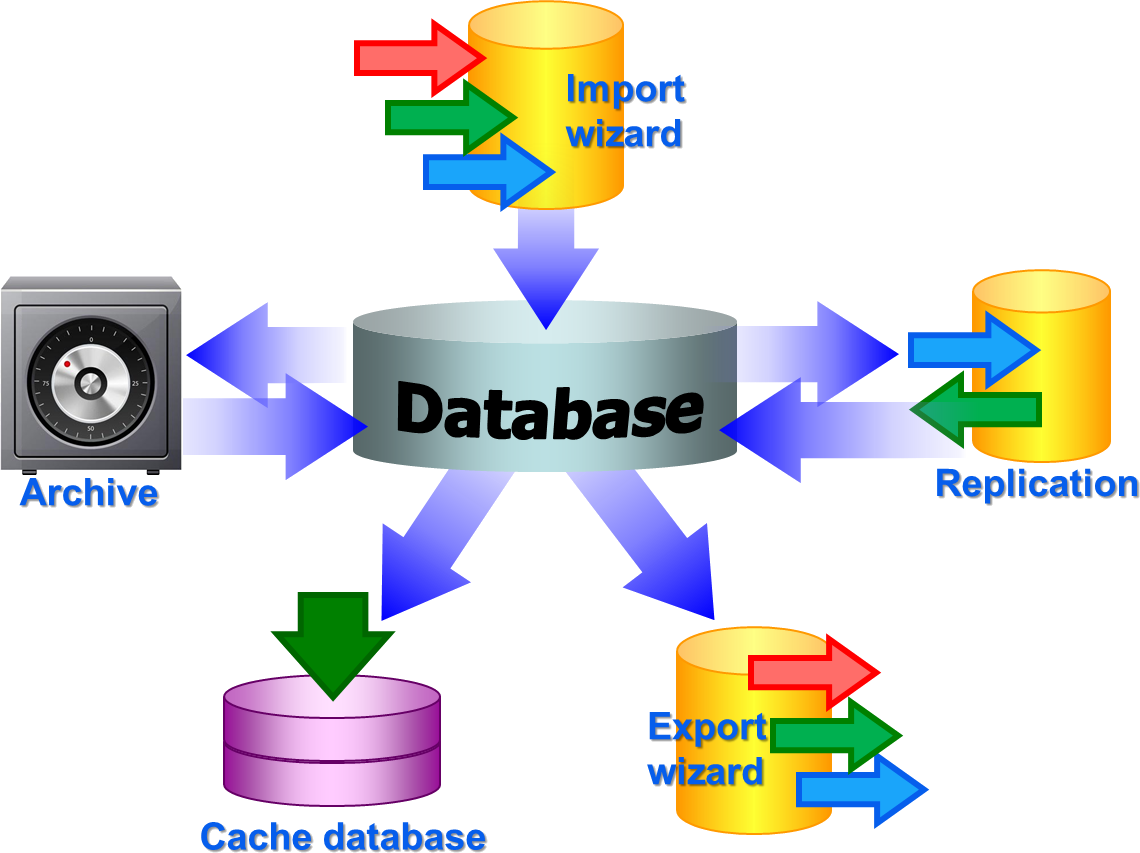
 . From
there they are transferred into a Postgres
database
. From
there they are transferred into a Postgres
database  containing a package for conversion into
ABCD. Finally the
containing a package for conversion into
ABCD. Finally the BioCASE tool for mapping the
data is used to provide the data for GBIF.
BioCASE tool for mapping the
data is used to provide the data for GBIF.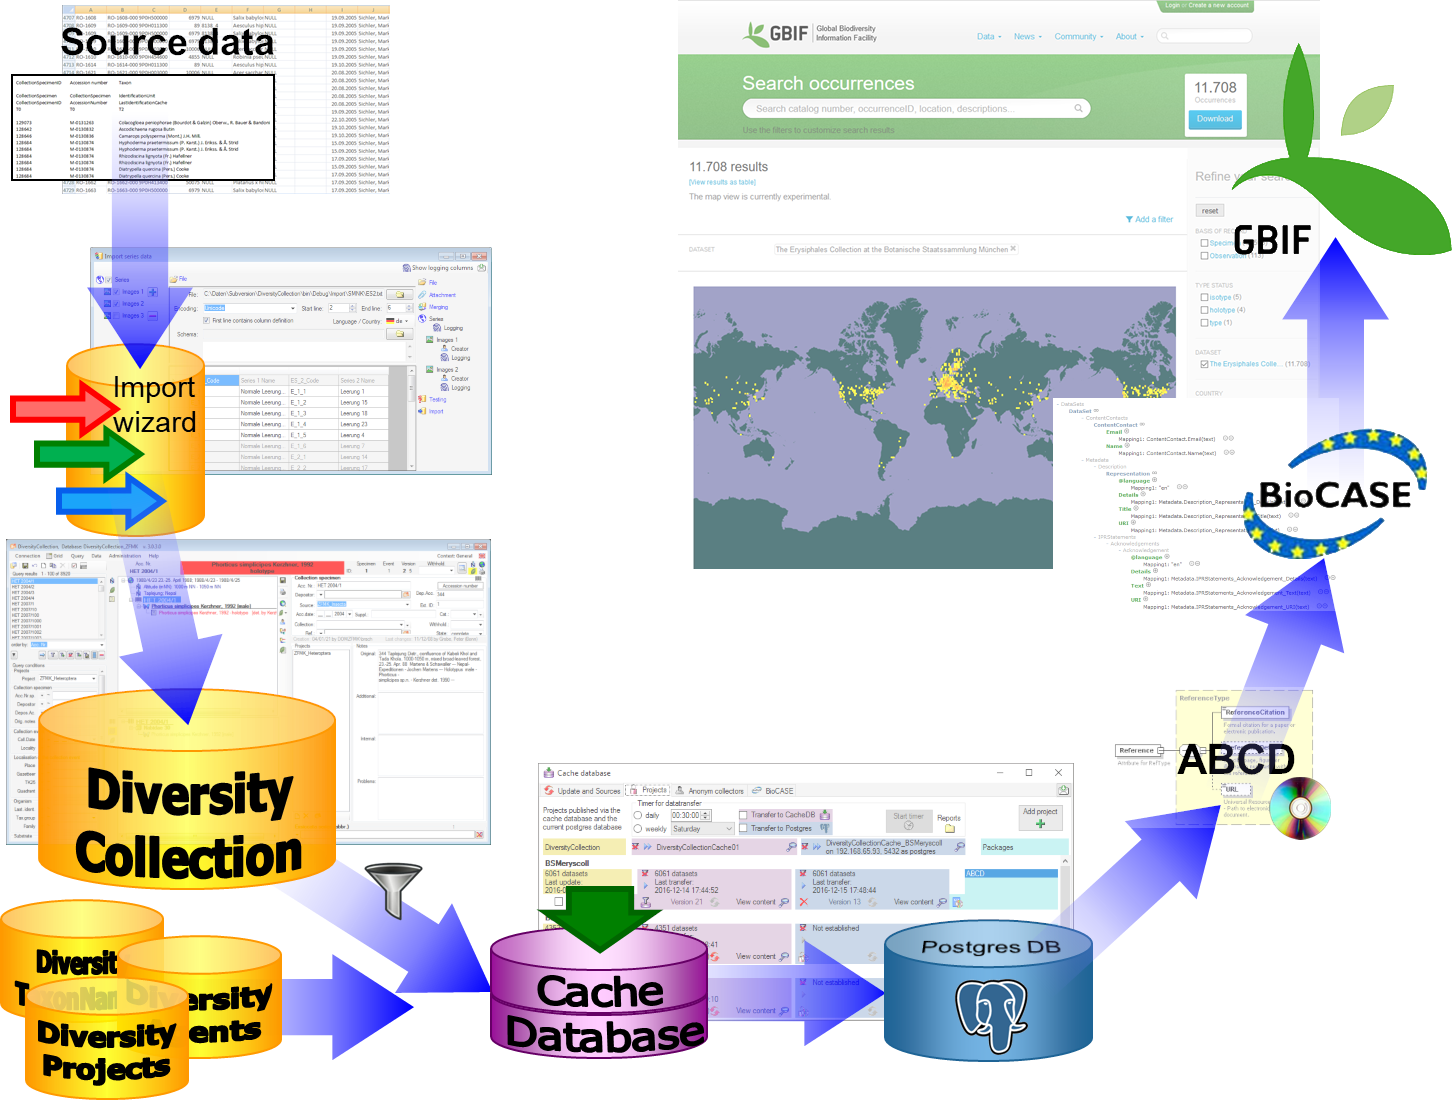
 Create archive... from the menu. A window as shown below will open.
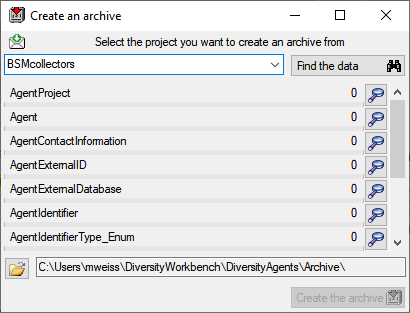
 buttons to see the data). To create the archive,
click on the Create the archive
buttons to see the data). To create the archive,
click on the Create the archive  option as described in the tutorial:
  Reset
database... from the menu. A window as shown below will open listing
all tables and the number of data within these tables. Click on the
Reset database
Reset
database... from the menu. A window as shown below will open listing
all tables and the number of data within these tables. Click on the
Reset database 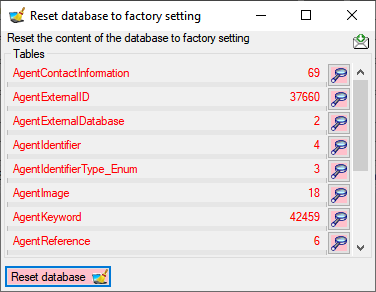
 Restore archive... from the menu. A
window as shown below will open listing the tables in the database. To
restore an archive click on the Choose archive directory
Restore archive... from the menu. A
window as shown below will open listing the tables in the database. To
restore an archive click on the Choose archive directory
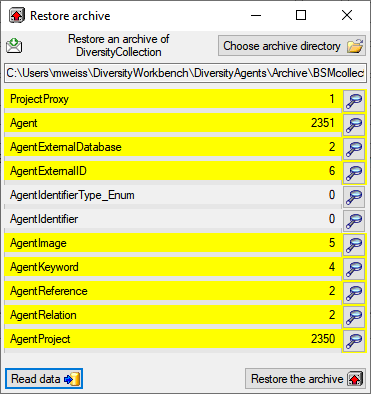
 button. If you select the
  option, the import will ask you for a stop in case of an error.
 option as described in the tutorial:
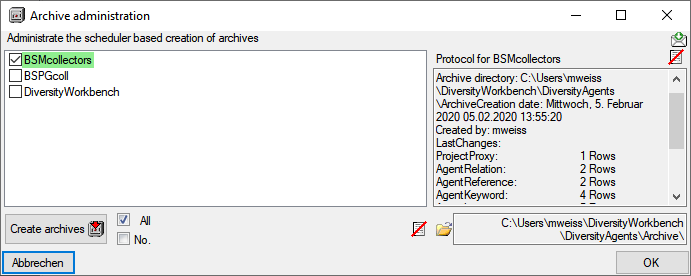
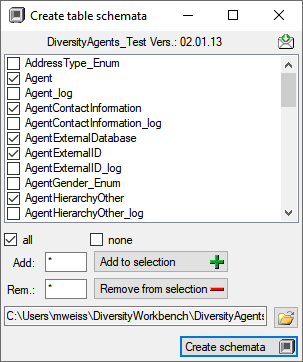
 none buttons resp. the Add to
selection
none buttons resp. the Add to
selection  button
to create the schemata for the selected tables in the predefined
directory.
the
button
to create the schemata for the selected tables in the predefined
directory.
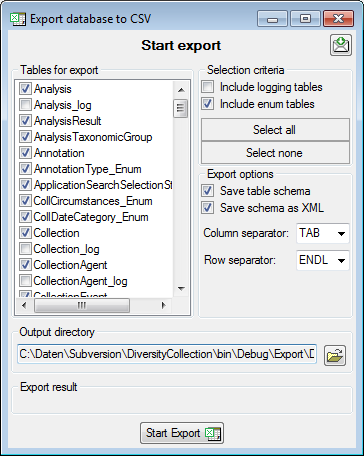
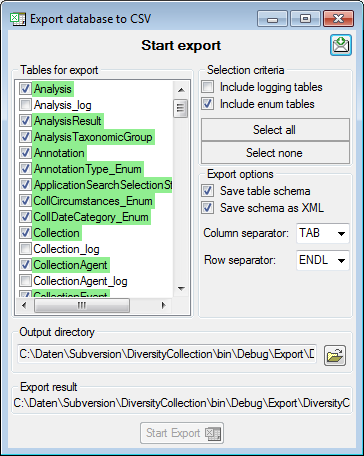
the  Export →
  CSV(bcp)
... from the menu. A window will open as shown below, where you can
select the tables that should be exported. Click on the Start Export
button to export your data. If you choose the option as shown below 2
files will be created for every table. The first file (*.csv) contains
the data while the second file (*.xml) contains the structure of the
table.
CSV(bcp)
... from the menu. A window will open as shown below, where you can
select the tables that should be exported. Click on the Start Export
button to export your data. If you choose the option as shown below 2
files will be created for every table. The first file (*.csv) contains
the data while the second file (*.xml) contains the structure of the
table.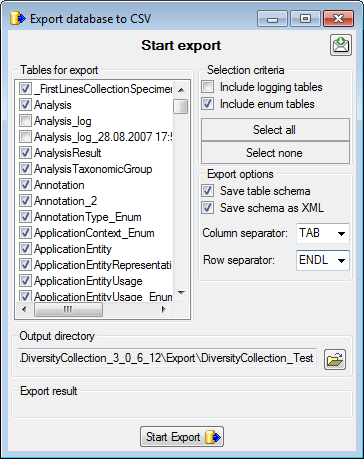
 Backup database from the menu. This
will create a SQL-Server backup on the server where the database is
located. Ensure that there is enough space on the server.
Backup database from the menu. This
will create a SQL-Server backup on the server where the database is
located. Ensure that there is enough space on the server.
 Replicator or Administrator.
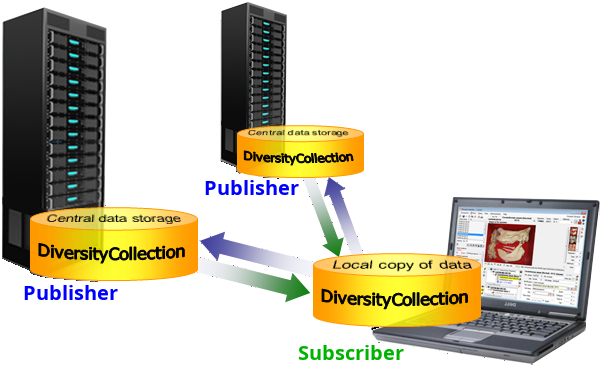
 Add Publisher from the menu. A window will
open where you choose the publisher. After the publisher is set, you
may transfer data between your local database (subscriber) and the
publisher. This function is only available for administrators.
Add Publisher from the menu. A window will
open where you choose the publisher. After the publisher is set, you
may transfer data between your local database (subscriber) and the
publisher. This function is only available for administrators. Remove from the menu (where [Publisher]
is the name of the publishing database on the publishing server). This
function is only available for administrators.
Remove from the menu (where [Publisher]
is the name of the publishing database on the publishing server). This
function is only available for administrators.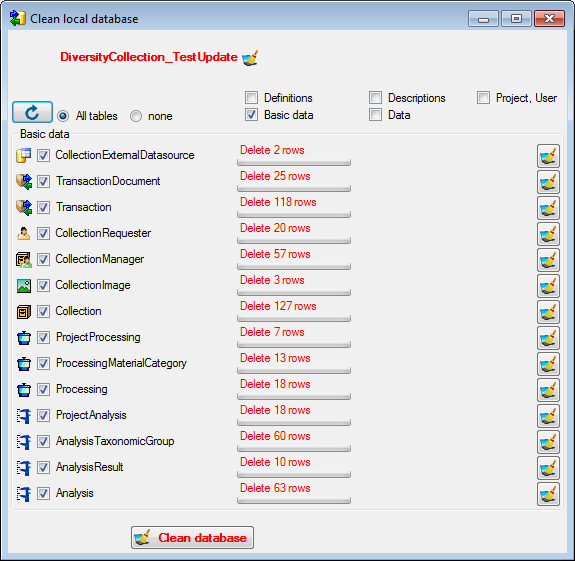
 Download from the menu (where [Publisher]
is the name of the publishing database on the publishing server). A form
will open as shown below. Choose the project of the data and the data
ranges (see above) which you wish to download. Click on the
Download from the menu (where [Publisher]
is the name of the publishing database on the publishing server). A form
will open as shown below. Choose the project of the data and the data
ranges (see above) which you wish to download. Click on the 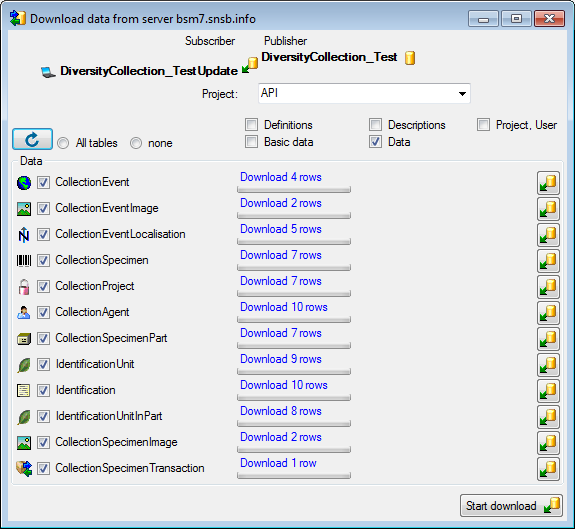
 .
.

 To fix problems that may interfere with the replication you find some
tools under the menu Data →
To fix problems that may interfere with the replication you find some
tools under the menu Data →
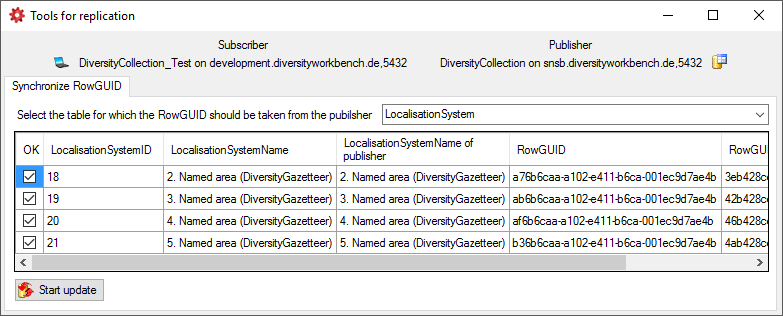
 Start update button to synchronize the
RowGUIDs.
Start update button to synchronize the
RowGUIDs.


 button. If you can not solve a conflict, use
the Ignore conflict
button. If you can not solve a conflict, use
the Ignore conflict
 or Stop conflict resolution
 buttons respectively.

 There are the following ways to add tables:
 Several parallel tables according to
selected data
Several parallel tables according to
selected data Dependent table
 or
descending
or
descending  .
. or a module resp. webservice
 . Click on the
  resp.
resp.  on the left side of the column that will change to
  for fused columns. To remove a file column, use the
  This filter in contrast to the filter above strictly applies to the row
according to the sequence of the data. For an explanation see a short
tutorial
This filter in contrast to the filter above strictly applies to the row
according to the sequence of the data. For an explanation see a short
tutorial
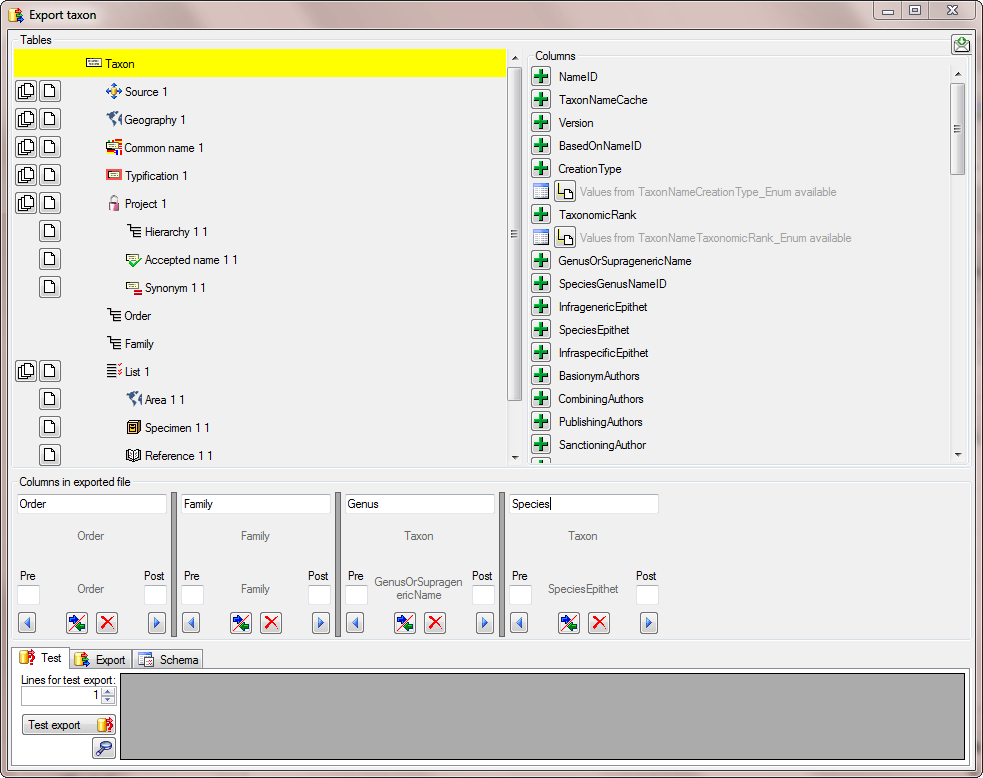
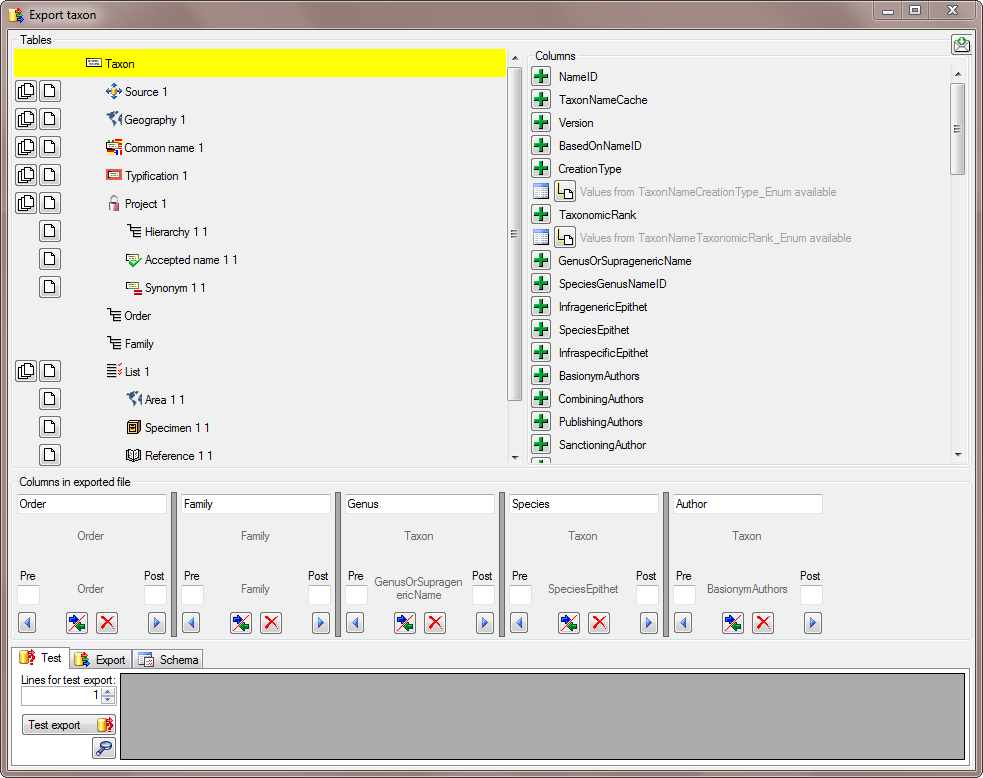
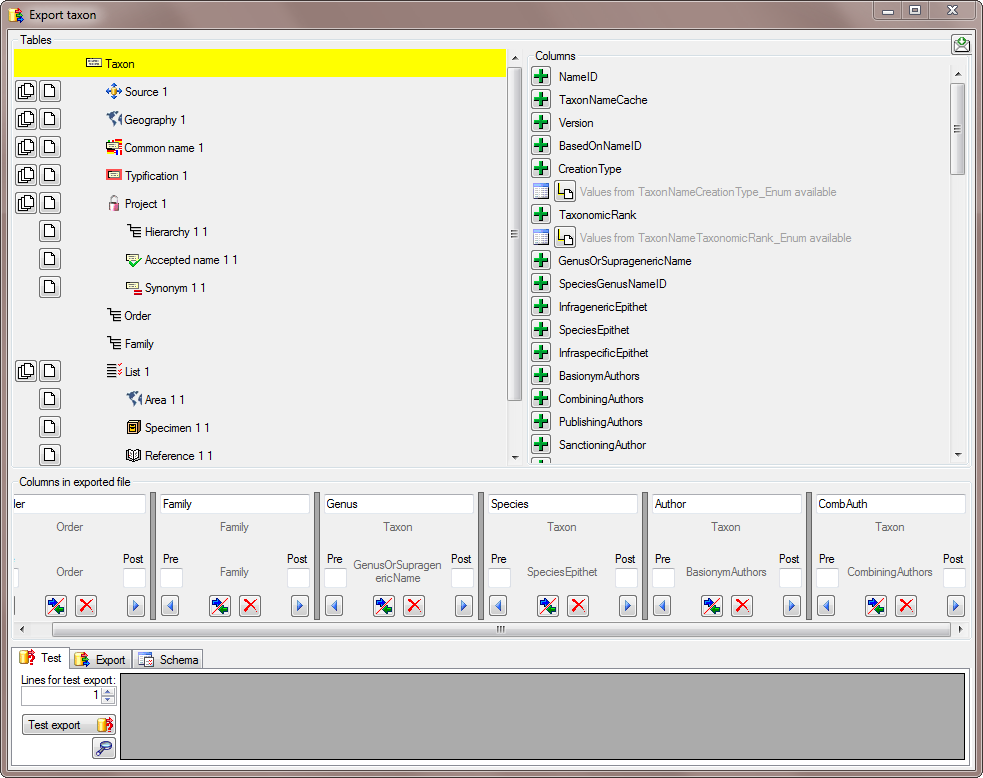
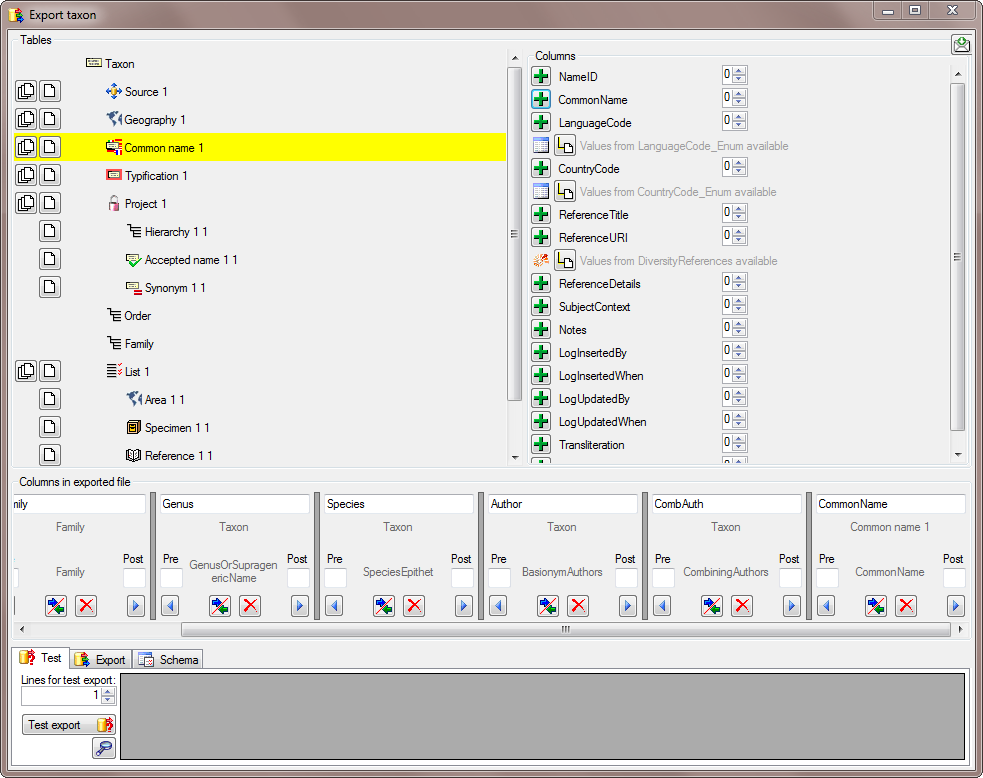
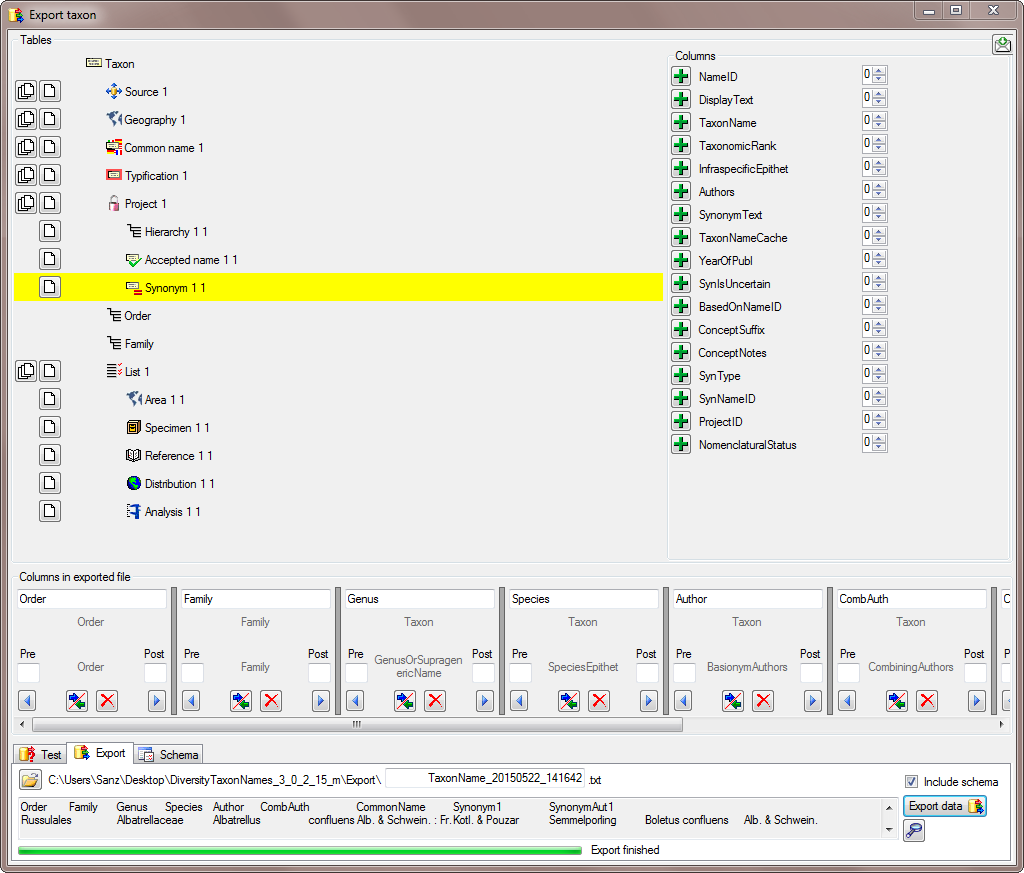
 To test the export choose the
  To export your data into a
  To handle the settings of your export, choose the
 undo button. To save the current
schema click on the
undo button. To save the current
schema click on the  First line contains column definition. Click OK to use the values
from the file for the translation.
First line contains column definition. Click OK to use the values
from the file for the translation.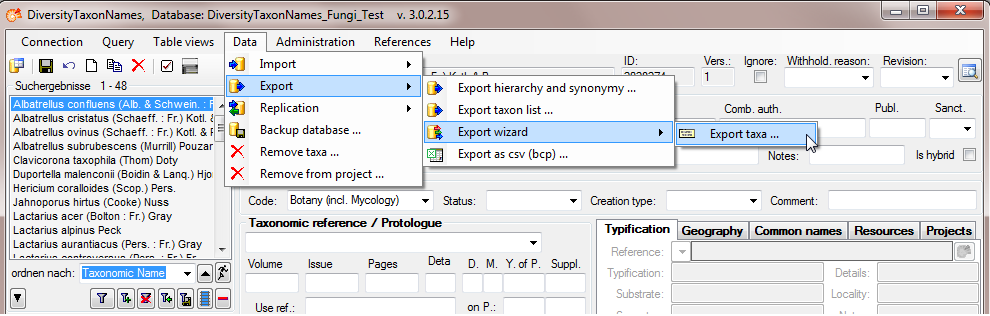
 Order from the list as shown
below.
Order from the list as shown
below.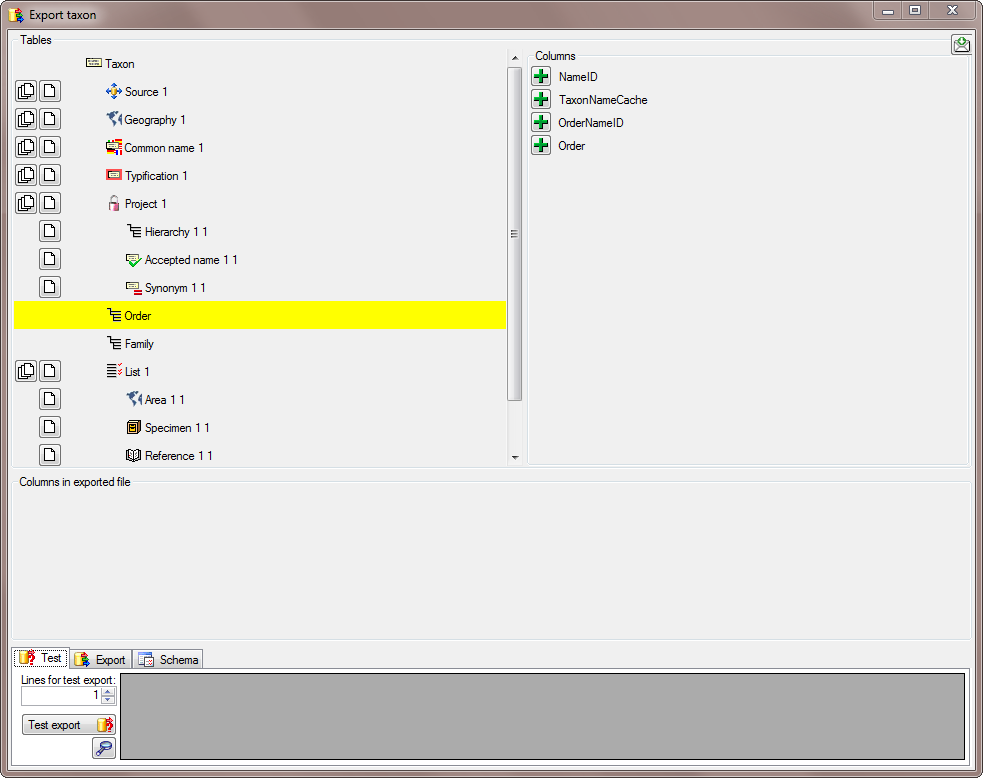
 button besides the hierarchy.
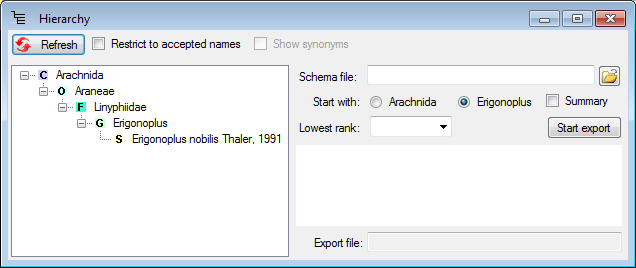
 button (see
below).
button (see
below).
