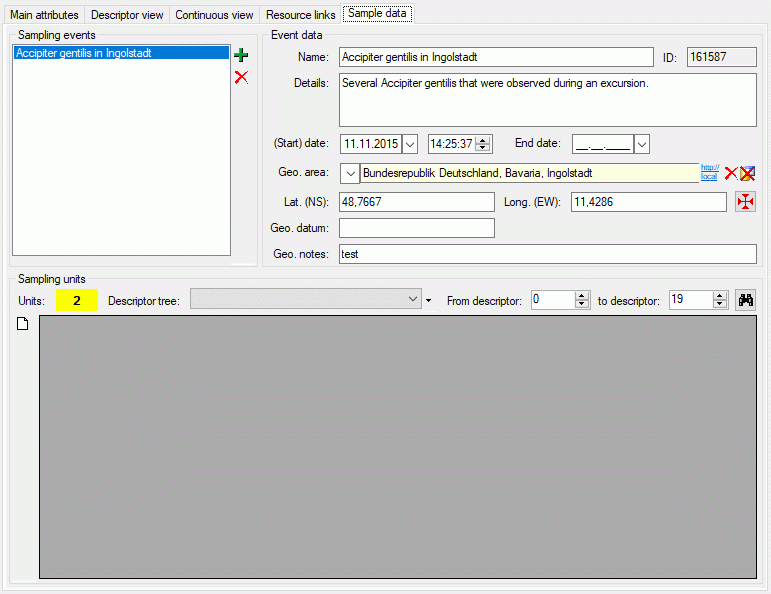

The sample data tab allows assigment and inspection of
sampling events and associated sampling units for the description. In the upper
left Sampling events part of the tab there is a list of the sampling
events stored for the description. By selecting a sampling event entry the Event
data are shown in the upper right part of the tab. Here you may edit
the event name, a detailled description, the date and time rsp. a date and time
span and geographic data. To insert a new sampling event click on the
 button in the Sampling events section, to delete the selected sampling
event and all stored sampling unit data press the
 button (see image above).
The geographic area may be linked to an entry of a DiversityGazetteers
database (see section Module related entry).
If latitiude and longituede have not yet been entered, the coordinates of the selected
DiversityGazetteers entry will be inserted. By pressing the
 button a window to select the coordinates by Google maps will be opened. Field
Geo. datum allows entering short text concerning the geodetic datum.
If coordinates are entered using Google maps a remark that WGS84 coordinates are
used will be inserted.
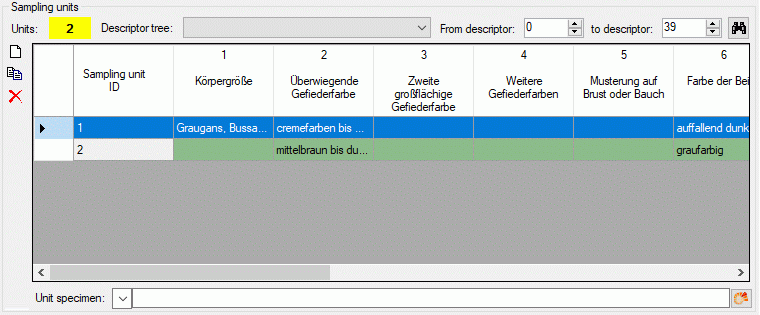
For each sampling events one or several Sampling units may be entered. A sampling unit represents a tuple of values that belong together, e.g. because they represent a single specimen. For each descriptor, which is represented by the table column, a value may be entered in a sampling unit, which builds a single table line. The background colour of each table column indicates the type of sample data: categorical, quantitative, text or sequence . If the number of sampling units is displayed in field Units of the Sampling units section in the lower part of the tab. If sampling units are present, the number is displayed with yellow background (see image below).
To view the unit data, select a Descriptor tree
and choose the descriptor sequence range (From descriptor ...
to descriptor) to restrict the number of columns displayed in the unit
table. Finally press button
 and the sampling untis will be displayed (see image below). If you prefer to display
the present sampling units automatically whenever you select a sampling event, click
on the number behind Units. The background changes from yellow to
red to indicate this mode. When you select a cell
and resources are available for the selected descriptor column, the button
 will be shown. You may click it to view the descriptor resources.
To insert a new sampling unit press button
![]() . By clicking on the free space at the beginning
of a table line you mark the whole sampling unit (see picture below). Now you have
the additional options to delete the unit by pressing button
. By clicking on the free space at the beginning
of a table line you mark the whole sampling unit (see picture below). Now you have
the additional options to delete the unit by pressing button
 or to copy the data to a new sampling unit by pressing the
 button. Keep in mind that all unit data will be copied, even if
you do not see all descriptor columns due to the display restrictions.

When you select the Sampling unit ID
cell you may enter a collection specimen in the Unit specimen control
below the units table. By clicking the
 button (see section Module related entry) you
can link it to an entry in a DiversityCollection database. If the sampling unit
is linked to a database entry in DiversityCollection, the text of the Unit
specimen: control is shown with light yellow
background. You may view the linked data by clicking the
 button or double clicking the Sampling unit ID cell.
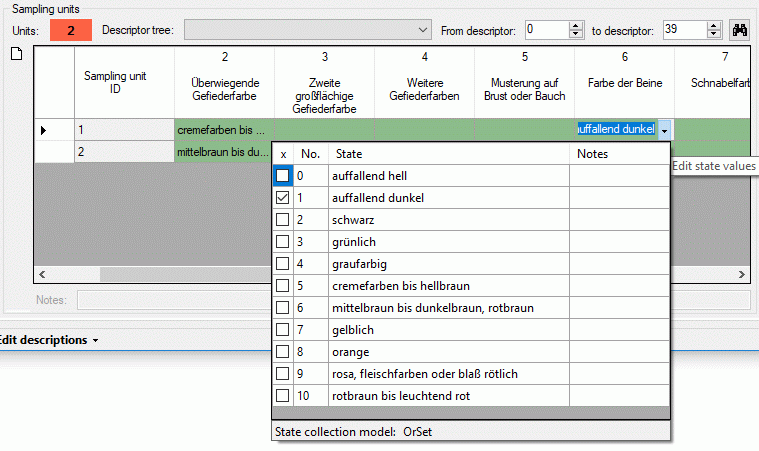
To modify categorical sampling data enter the table cell
and press the
 button within the cell. A control will be opened where you can select the categorical
states and enter notes or modifier values (if defined) for each single state (see
image below).

For all other sampling data the value can be entered directly
in the table cell. Notes for the selected table cell are entered in the Notes:
text box directly below the units table. For categorical, text and molecular sequence
sample data a separate edit window can be opened by double-clicking the table cell.
For molecular sequence data the tool strip buttons
 (import) and
 (export) allow import and export from rsp. to dedicated file formats as described
in sections Import sequence data
and Export sequence data.
Continue with: