Diversity Collection
Specimens
Main sectors
The image below gives you an overview of the main sectors related to the collectiom specimen.
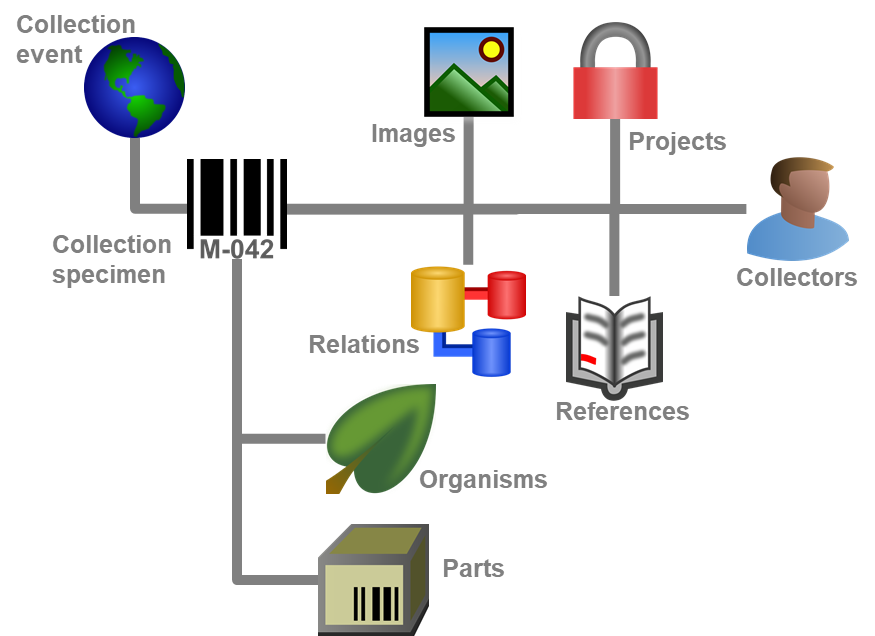
Specimens are the entities stored in a collection. For handling the data
use the appropriate buttons (new specimen  , copy
 , delete
 ). See the
Data section for further details. Directly attached to the
specimen is the data about accession,
label, exsiccatae, notes,
reference and the
availability. A specimen may be composed of
several units. Any problems concerning the
specimen should be entered into the problems field.
). See the
Data section for further details. Directly attached to the
specimen is the data about accession,
label, exsiccatae, notes,
reference and the
availability. A specimen may be composed of
several units. Any problems concerning the
specimen should be entered into the problems field.
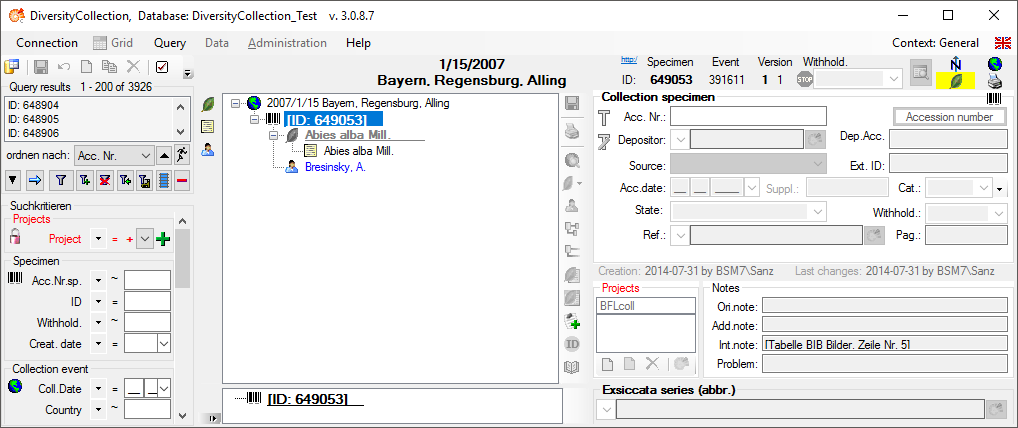
The header of the main window shows some important parameters for the
selected specimen. On the left side the accession number is shown.
In the center you find the last identification of
the main IdentificationUnit according to the
display order. The [http:/] link shows
the public address of the selected item. Click on it to see the public
available values. The next field shows the internal IDs (field
CollectionSpecimenID in table
CollectionSpecimen and
CollectionEventID in table
CollectionEvent) and the
Versions for the specimen and the CollectionEvent. For details about
the version of a data set see the Version topic.
The availability of a specimen can be changed
by entering an appropriate reason in the field Withholding reason.

If the specimen is a type, the header will show the type state and the
identification connected with the type (see below).

To inspect the history of a specimen click on the  button. For further details see the
History section.
button. For further details see the
History section.
Top area
In the header menu you can determine what is shown in the upper part of
the window. Choose on of the options:  will show
the printing area,
will show
the printing area,  images for the
specimen,
images for the
specimen,  the images for the collection
event and
the images for the collection
event and  the images of the collection event
series.
the images of the collection event
series.  will show the maps. To hide the
upper part, select
will show the maps. To hide the
upper part, select  Hide.
Hide.
The tiny buttons in the upper right corner provide a shortcut to the
image displays and indicate the existence of images by a yellow
background  .
.
The data are stored in the table
CollectionSpecimen .
Subsections of Specimen
Diversity Collection
Data handling
The controls for handling data sets in the database are located in the
left upper part of the window as shown in the image below. A
step-by-step introduction for the creation of new data sets is provided
in the Tutorial.
 To SAVE the
changes in a data set click on the save button. If you
select another data set from the list of results, the current changes
will be saved automatically.
To SAVE the
changes in a data set click on the save button. If you
select another data set from the list of results, the current changes
will be saved automatically. To UNDO the changes in a data set, click on
the undo button. This will recover the original data
unless the changes have been saved or changes were done in certain
tables or hierarchies were the data must be stored to display the
hierarchy.
To UNDO the changes in a data set, click on
the undo button. This will recover the original data
unless the changes have been saved or changes were done in certain
tables or hierarchies were the data must be stored to display the
hierarchy.- To create a NEW entry in the database click
on the button. This will create a new record of a
specimen and show it in the list of results.
- To COPY the data of a specimen record choose
it from the list and click on the button. For
further details, see the chapter Copy specimen.
- - To DELETE a data set you must have the
proper rights (e.g. be a member of the group Administator). Select the
dataset you want to delete it in the list and click on the delete button.
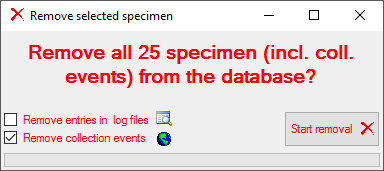
To delete all selected specimen choose Data -
Remove specimen... from the menu. A window as shown below will open
where you can choose if the data from the log
and the collection events  should be included in
the removal.
should be included in
the removal.
Diversity Collection
Copy specimen
For an introduction see a short tutorial
 .
To copy specimen click on the button. A window will
open where you can choose several options for your copies.
.
To copy specimen click on the button. A window will
open where you can choose several options for your copies.
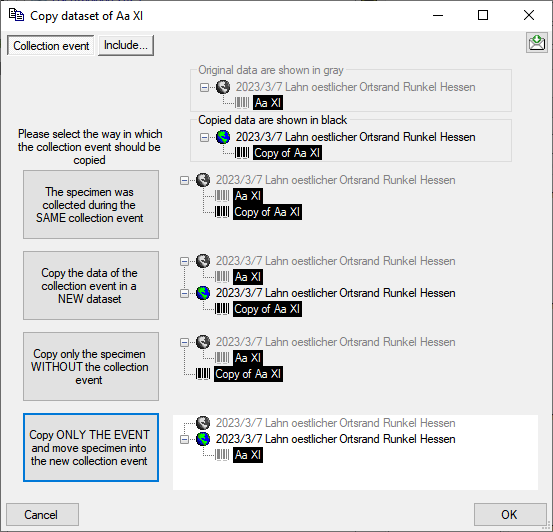
In the first tab choose in which way the CollectionEvent - if
present - for the new data sets should be created (see image below). In
the first option the new specimen will be located in the same collection
event as the original dataset. In the second option a new collection
event copied from the original will be created while in the last option
the data in the collection event will be ignored altogether.
In the Accession number tab you can search for or enter the
accession number you wish to use for your new data set (see below).
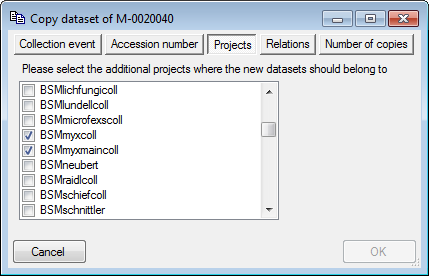
In the Projects tab you can add additional projects for you new
datasets (see below).
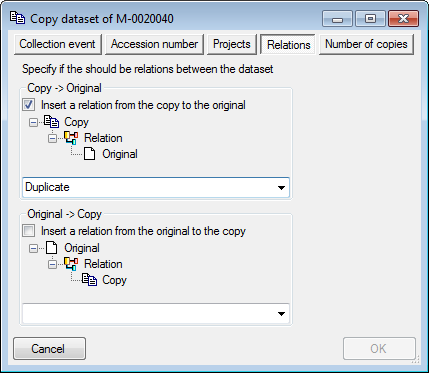
In the Relations tab you can add relations between the original
dataset and the copy in either direction (see below).
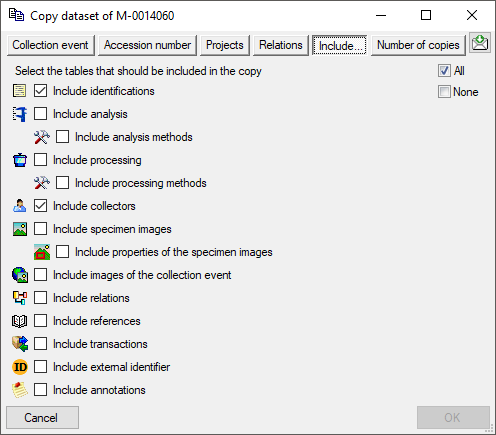
In the Include... tab you can choose the ranges of data that should
be included in the copy (see below). Click on the  All or
  None buttons to
select all resp. none of the tables.
None buttons to
select all resp. none of the tables.
In the Number of copies tab you can specify the number of copies. If
you checked Create an accession number for the new data set, the
program will list all accession numbers which will be created (see
below). After you changed the number of copies, click on the  button to refresh the list.
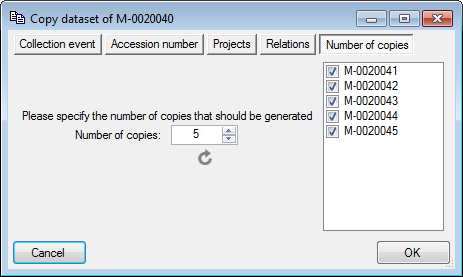
If you do not wish to create new accession numbers for the copies the
list will not be shown (see below).

Copy event
If only the event data should be copied and a selected specimen should
be transferred into the new event you can choose the last option (see
below). This option is only available for events containing several
specimen.
Diversity Collection
Tree for the specimen
The upper tree in the window provides an overview for all the data
linked with the specimen. With the buttons in the left panel you may
hide or show certain nodes in the tree. If for example you do not wish
to see the collectors, simply click on the  button
and they will be hidden in the tree. The button will change to a grey
version
button
and they will be hidden in the tree. The button will change to a grey
version  and the background will turn
yellow to show that there is hidden data of the collectors.
and the background will turn
yellow to show that there is hidden data of the collectors.
If the CollectionEvent is part of a CollectionEventSeries, a drop-down
button will appear where you may select between 3 states:
 = show the parent EventSeries
 = show the entire hierarchy of the EventSeries
- = hide the EventSeries
- = hide the EventSeries
If the CollectionEvent is linked to a SamplingPlot, a drop-down button
will appear where you may select between 3 states:
 = show the parent SamplingPlots
 = show the entire hierarchy of the SamplingPlots
 = hide the SamplingPlots
- = hide the SamplingPlots
If both options are available, you may choose between the
CollectionEventSeries or the SamplingPlot hierarchy. If the entire
hierarchy for the EventSeries or the SamplingPlots is displayed, the
items not included in the current data set will be displayed with gray
icons, e.g.  . To change to one of these use the
  button. For the
Events, the EventSeries, the Plots and the Specimen the
button. For the
Events, the EventSeries, the Plots and the Specimen the  button will appear which will give you access to a taxon list
of the selected item.
button will appear which will give you access to a taxon list
of the selected item.

The panel on the right side of the tree is used for editing the data,
for example the
button will insert a new collector. For further details see the special
sections. For data with [Read
only] access these panels are
disabled except the button for adding annotations
 .
.
Diversity Collection
Display order
Tutorial:
The display order defines the sequence in which the units within this
specimen will appear on e.g. a label. The first unit will
be printed in the header of the label, others are included in the text
below. You can change the display order by using
the 
 buttons. If a unit
should not appear on the label, transfer it to the hide list using
the
buttons. If a unit
should not appear on the label, transfer it to the hide list using
the  button. The
  button returns it to the list to be shown on a label. The first unit can
not be transferred to the hide list.
button returns it to the list to be shown on a label. The first unit can
not be transferred to the hide list.
The upper section shows the display orders of the units within the whole
specimen. The lower section shows the display orders in a specimen part.
If you print a label without reference to a part, the display order for
the entire specimen as in the upper section will be used. This part is
also accessible if you click on the button in the
right panel of the upper tree, which will appear if you e.g. select the
specimen.
If you print a label with reference to a part, the display order for the
part as in the lower section will be used. This area will be shown when
you select a specimen part in the lower tree. In addition to the display
order you can specify whether an organism is present in a selected part
of a specimen. With the
button you can
transfer all organisms into the part.
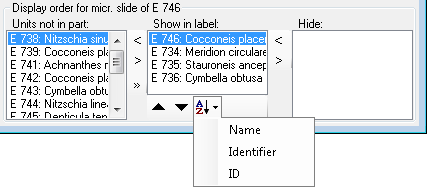
To change the sequence of the parts according to e.g. the name instead
of setting all entries one by one, you may choose among the options
shown in the image below (Name, Identifier, ID).
Diversity Collection
Accession
The accession of a specimen in a collection is documented with its
accession number and the date of the accession if available.
If the specimen was received from another collection, this may be
documented with the name of the depositor and the number in the original
collection (Dep.Nr).
If the current project (= as selected in the query list) contains a
duplicate of the accession number, a button will
appear. This gives you the opportunity to switch to the specimen with
the duplicate accession number.

If a new specimen is entered you can use the  button to search for the next free accession number. A window will open
as shown below, where you can begin the search. The search will start
with the number you provide as a starting point.
button to search for the next free accession number. A window will open
as shown below, where you can begin the search. The search will start
with the number you provide as a starting point.
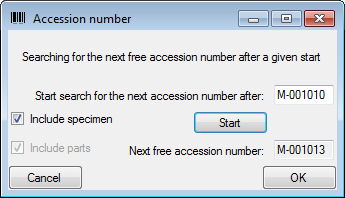
The system will try to find the next free number based on the accession
numbers available in the database. As accession numbers can be assigned
to a specimen as well as a part of a specimen, you have the option to
include accession numbers in both places in the query. Click OK to use
the recommended number for the specimen.
Data concerning the accession and deposition are stored in the table
CollectionSpecimen.
Diversity Collection
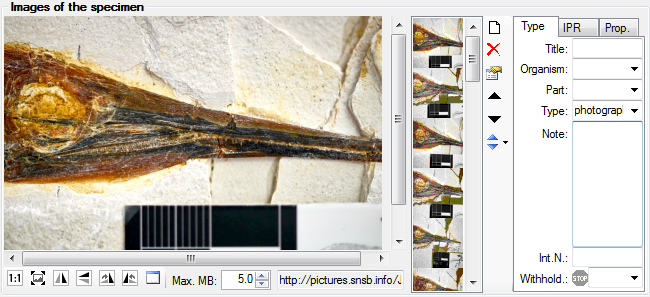
Specimen image
To see the specimen images select the specimen image
in the header menu. Each specimen may be
documented with several images. The images are stored as their path,
either locally or provided by a server. To enter a new image click on
the button. For more details see the section
Images.
To delete an image select it from the list and click on the delete button (see below).
To change the sequence of the images, use the
resp. buttons to change the position of the
selected image. To adapt the sequence of the whole list, you can select
one of the options offered when you click on the
 button: Ordering ascending resp. descending
by the name (= URI) or the creation date of the images. For a short
introduction see the tutorial
.
button: Ordering ascending resp. descending
by the name (= URI) or the creation date of the images. For a short
introduction see the tutorial
.
With the button  you can
change to a new chromium based browser for the display of images.
you can
change to a new chromium based browser for the display of images.
To change the image sequence for a whole project, use the functionality
within maintenance maintenance.
To document the relation of an image to an organism or a part of
the specimen choose the corresponding entries from the drop-down lists
Organisms: and/or Part:.
To restrict the displayed images to either images which are related to a
certain part or a certain organism within the specimen, choose e.g. the
organism in the tree. If the selected organism is related to any image
the  button
(see below) will change to
button
(see below) will change to  .
.

Click on the button to restrict the images
displayed in the list to those, which are related to e.g. the selected
organism. The button will receive a red background
to remind you of
the restriction. Next to the image list a button
 will appear which enables you to show all
images again.
will appear which enables you to show all
images again.
The data is stored in the table
CollectionSpecimenImage.
Diversity Collection
Projects
|
Setting of projects |
Effect on specimen within Projects |
 |
Full access to all projects |
User can edit data |
 |
Any project read only |
User can read data |
 |
Any project locked |
No user can edit data |
 |
No access to project |
User cannot see data |
Every CollectionSpecimen may be assigned to any number of projects. To
assign a specimen to a project click on the button.
To add a project where you have no access to, use the button. To remove a specimen from a project
select the project from the list and click on the
button.
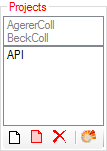
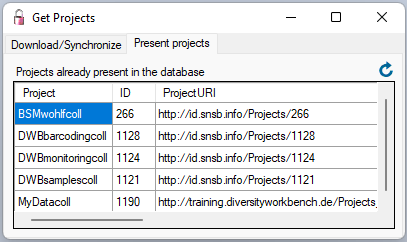
If there are projects, to which you have [no
access] to, these will be
listed in a separate list at the top as shown below.
Projects, to which you have Read only access will be listed
in a separate list at the top as shown below.
Data from Read only projects can be seen but not edited. Only Annotations
 can be added (see image below).
To transfer all selected specimen into an additional project choose
Data →  Transfer →
To project... from the menu. A window
will open where you can select the project to which the specimen should
be added.
Transfer →
To project... from the menu. A window
will open where you can select the project to which the specimen should
be added.
To remove all selected specimen from an additional project choose Data
→ Remove from project... from the menu. A
window will open where you can select the project from which the
specimen should be removed. The last project in which a specimen is
placed can not be removed.
The data are stored in the table
CollectionProject.
Details of the projects within the DiversityWorkbench are stored in the
database DiversityProjects. To access further information on a project
click on the  DWB button. To edit details
in projects you require the application DiversityProjects.exe in
your application directory and access to the database DiversityProjects.
To synchronize the projects listed in DiversityProjects you may use the
synchronize function in the useradministration window as shown below. If
DiversityProjects is not available, you may create a new project by
clicking the project button. If DiversityProjects is
available, use the synchronize function
DWB button. To edit details
in projects you require the application DiversityProjects.exe in
your application directory and access to the database DiversityProjects.
To synchronize the projects listed in DiversityProjects you may use the
synchronize function in the useradministration window as shown below. If
DiversityProjects is not available, you may create a new project by
clicking the project button. If DiversityProjects is
available, use the synchronize function
 .
.
To import new projects from the DiversityProjects, select
Administration - Projects from the
menu. A window as below will open where the available projects are
restricted to the type "Collection"
 . (Short introduction:
)
. (Short introduction:
)
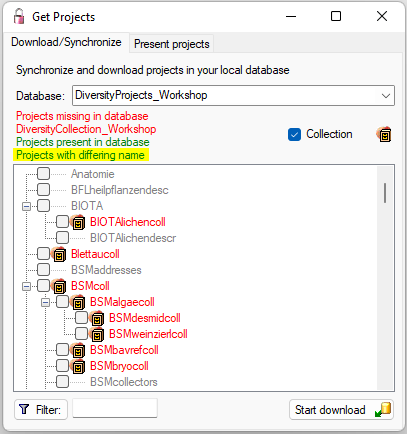
To select a project of a different type or missing type, deselect the
restriction (see below).

The present project list details about the projects available in
DiversityCollection.
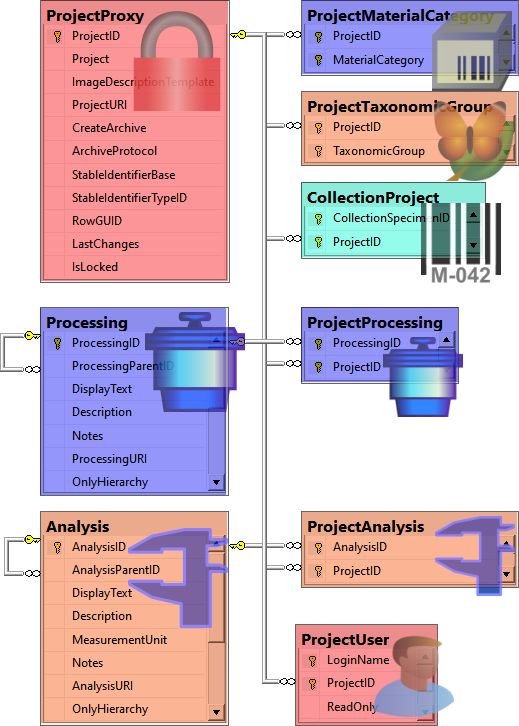
the diagram below shows all tables with direct relations to the project
tables. For more details see the sections Analysis,
Processing and Image
description.
Diversity Collection
Notes and problems
To enter notes or problems connected with the specimen select it in the
hierarchy. The data form will open the corresponding fields. The
Original notes are the notes found on the label of the specimen,
made by the original collector or from a later revision. Additional
notes are those made by the editor of the specimen record, e. g.
doubtful identification or locality.
In the Problems area enter the description of a problem which
occurred during data editing. Typically these entries should be deleted
after help has been obtained. Do not enter scientific problems here. Use
Additional notes for such permanent problems!
The data is stored in the table
CollectionSpecimen.
For notes on data created by users with no permission for editing see
the chapter Annotation.


