Edit Project
Dependencies
Descriptor applicability
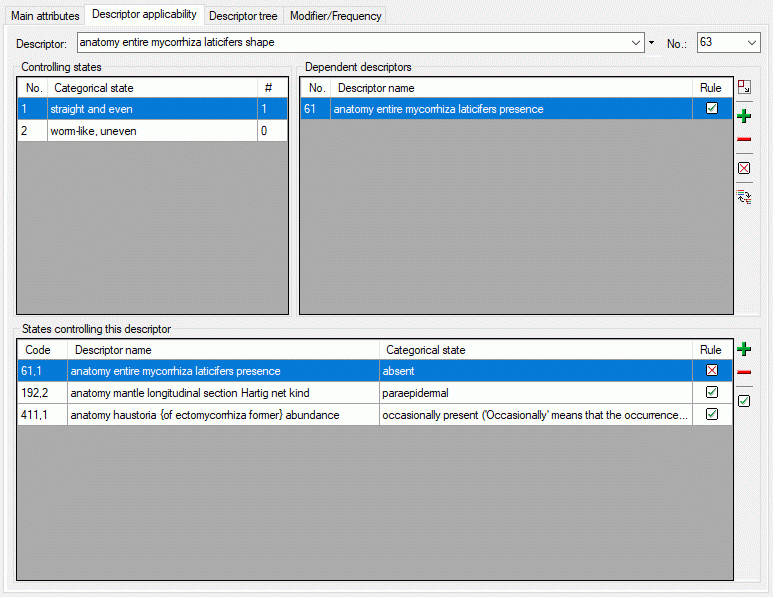
The Descriptor applicability tab serves the administration of
dependencies between categorical states and dependent descriptors. First
a descriptor has to be selected either by its name in the alphabetically
ordered drop down list or its sequence number (“No.”) in the first line
of the descriptor dependencies tab. If for the selected project a
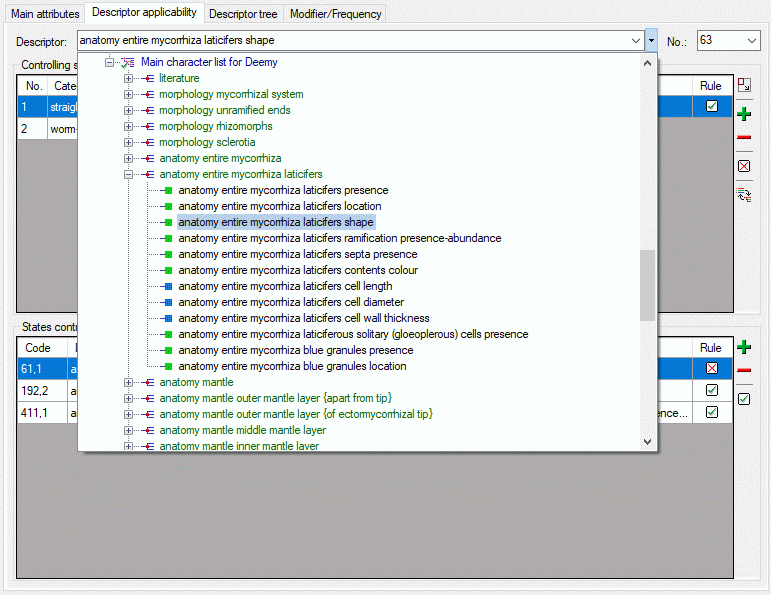
descriptor tree is present, the  button allows
selecting the descriptor form the descriptor tree (see picture below).
The table Controlling states in the upper left part of the tab shows
the categorical states if a categorical descriptor has been selected.
When you have adusted the restrichted descriptor view, visible by the
button  in the toolbar of the Dependent
descriptor section, only the actually set dependent descriptors are
displayed here. You can switch to an alternate Full descriptorview as described below. For each categorical state
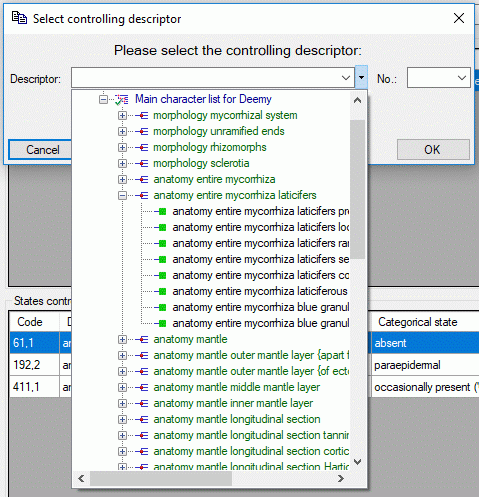
Dependent descriptors can be inserted by pressing the
 button. A dialog window opens to select the
descriptor either by its name, sequence number or using the descriptor
tree (see picture below).
In column “Rule” the symbol  indicates that the
dependent descriptor is inapplicable if the controlling state is present
in a description. The symbol
  indicates that the
controlling state must be present in a description if the controlled
descriptor shall be applicable. The rule can be toggled by clicking the
symbol in the table or by pressing the corresponding button
(
 rsp.
rsp.  ) at the right. To
remove a dependent descriptor select it and press the
 button.
In the lower part of the tab you find the States controlling this
descriptor. You may double-click on the item to select navigate to it
for editing. Alternatively you may edit the controlling descriptor
states using the control buttons of the tool strip at the right. By
double-clicking an entry in Dependent descriptors or in States
controlling this descriptor you may navigate forwards and backwards in
the chain of dependent descriptors.
If you want to get an overview of all the project’s descriptor
dependencies or want to delete all dependencies, take a look at the
Applicability tree section below.
Calculation of the descriptor applicability
To decide if a descriptor is applicable in a description, the following
conditions are evaluated:
- Inapplicable-if rule: If only controlling states are present in a
description, these make the controlled descriptor inapplicable. The
character remains applicable if either no state at all, or any
non-controlling states are present.
- Applicable-if rule: If any controlling state is present in a
description, these make the controlled descriptor applicable. It is
inapplicable if only non-controlling states are present.
- Special condition 1: If the controlling descriptor is inapplicable
(through another applicability rule, or through an explicit “Not
applicable” data status value), the controlled descriptor is always
inapplicable as well.
- Special condition 2: If no data for the controlling descriptor are
present in a description (data completely missing or only status is
“Missing data” or “Not to be recorded”), the controlled descriptor
always remains applicable.
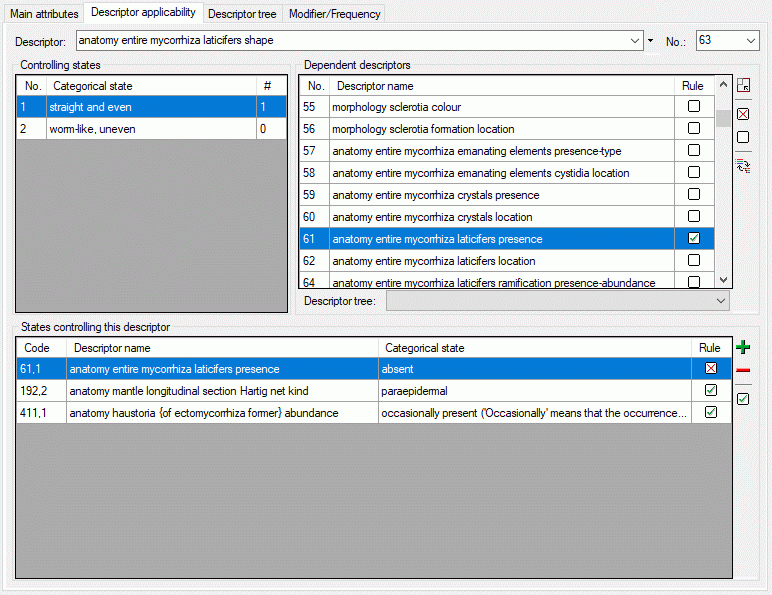
Full descriptor view
By clicking the button  in the toolbar of the
Dependent descriptor section, you can chenge to the full descriptor
view (see image below). In section Dependent descriptors all
available project descriptors are shown. You may set a dependency by
selecting the descriptor and clicking the button
  rsp.
rsp.  . To remove the dependency, click on button
 . Alternatively you may click on they symbol in
the table column “Rule” to change the values in the sequence
 →
→  ->
->
 .
.
If you select a values for the Descriptor tree, the descriptor list
is restricted to the values included in that descriptor tree. Please be
aware that existing dependencies might be hidden by such a selection!
You can return to the restricted descriptor view by clicking on button
 .
.
Applicability tree
Instead of the States controlling this descriptor you may display a
complete overview of the descriptor applicability rules by pressing the
 button in the Dependent descriptors
section (see image below). By double-clicking an item in the
Applicability tree you can open it for editing.
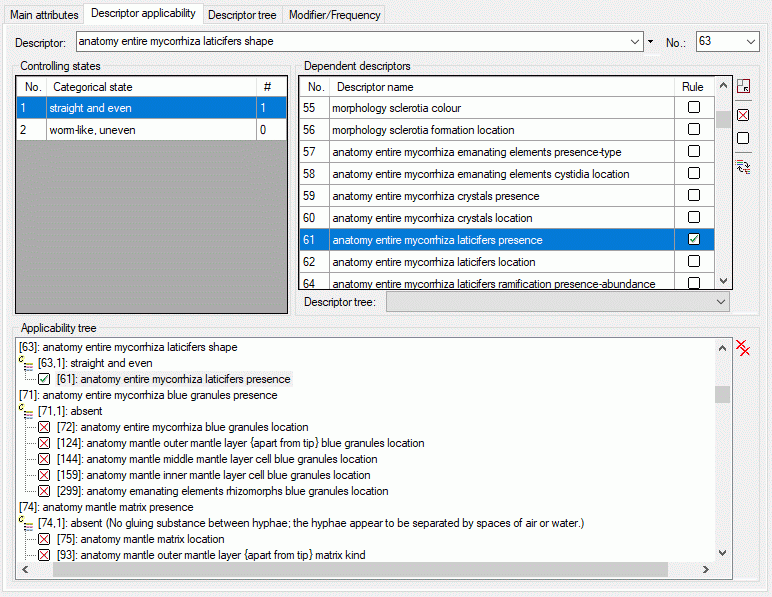
By pressing the  button in the Applicability
tree section you can delete all dependencies shown in the tree.
Continue with::
Edit Project
Modifier / Frequency
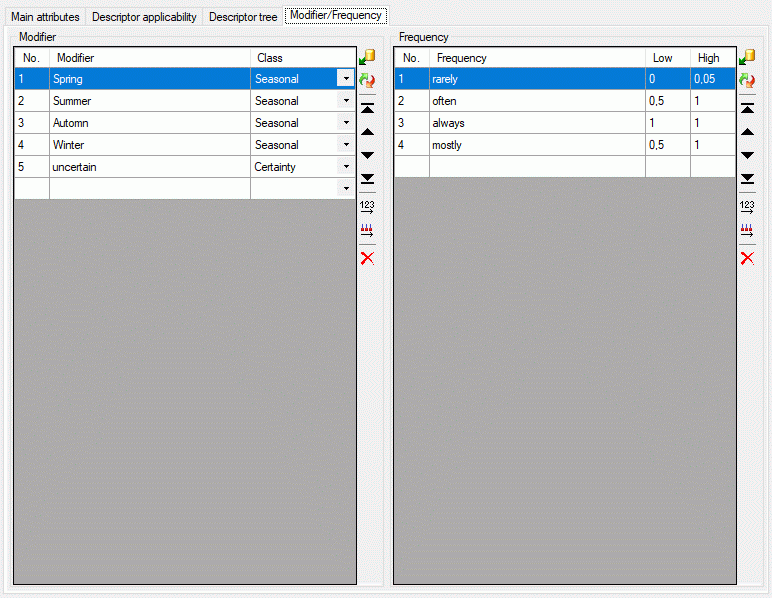
The Modifier/Frequency tab allows definition of modifier and
frequency values. The sequence number column (“No.”) determines the
display sequence in selection lists. You may order the entries by
clicking on a column header. With the arrow buttons (
 ) you can move the selected entries up or down
within the table, clicking button
  or
or
 shifts the selected entries to the top
respective bottom of the table. After ordering the entries click button
 to renumber the table entries (starting with “1”
for the first table entry) and make the changes effective. After
pressing button
  column “Use” shows the number
of references in the database for each modifier rsp. frequency value.
To enter a new modifier or frequency value, select the empty line on the
end of the table and click on the “Modifier” rsp. “Frequency” field to
enter the new values. After entering the new entry name automatically a
new value for “No.” is initialized. To delete an entry, select the entry
and press the  tool strip button, the Delete key or remove the value in the sequence
number column (“No.”).
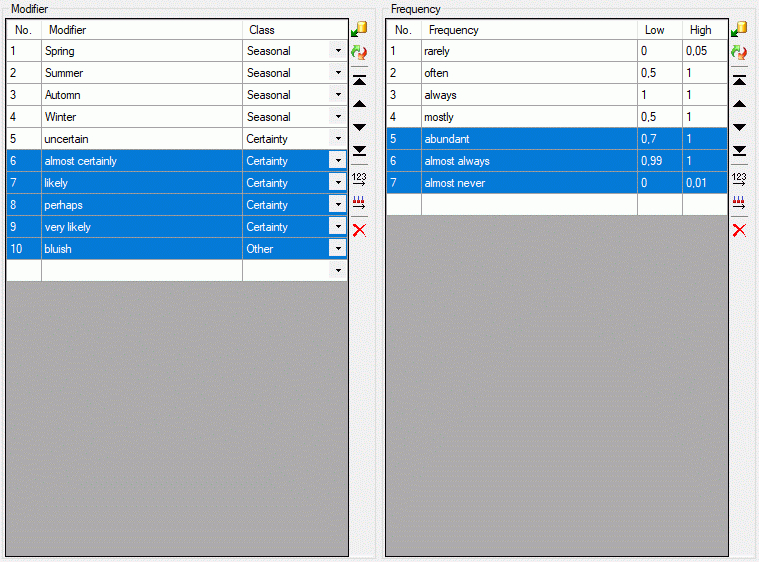
There is a number of predefined modifier and frequency values commonly
used. These values can be accessed by pressing
the  button, which opens one of the windows shown
below.
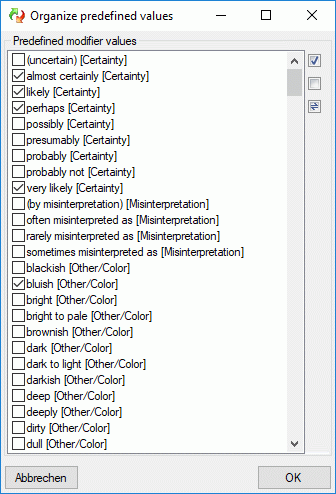
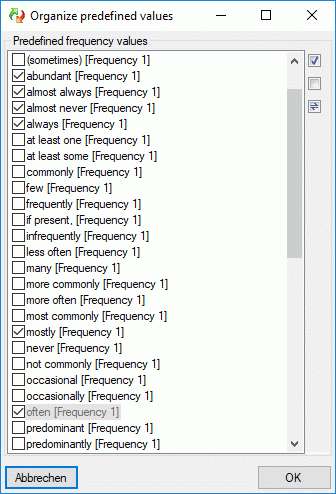
By checking of uncecking the values, they can easily be inserted or
deleted from the modifier rsp. frequency list. Values that are already
used in the database are marked by a grey
text colour. When these values are marked to be removed from the list,
you will be asked for each single value if it really shall be deleted
after pressing OK. New values are inserted at the end of the list
(see below).
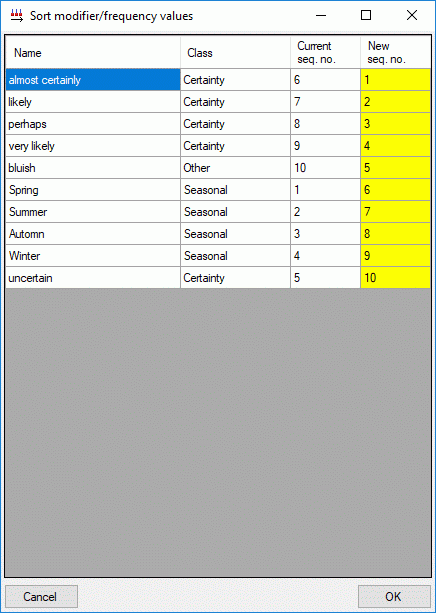
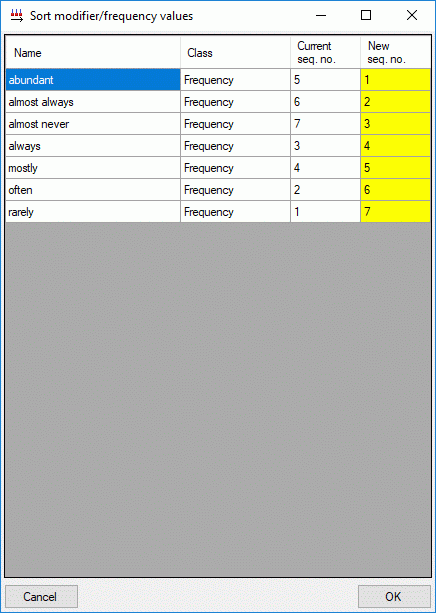
You may order the modifier and frequency values according the sequence
of the predefined values by pressing the  button, which opens one of the windows shown below. Values that are not
in the predefined lists will be shifted to the end of the list.
Continue with:
Edit Project
Move or copy descriptor trees
Using the context menue, you may move or copy parts of a descriptor tree
to other branches. Please note that for the move and copy operations the
selected project, marked by its background
colour in the descriptor tree, is assumed as the target project.
You may copy descriptor trees or parts of projects with read-only access
to your selected project. The move operation is certainly not possible
in those cases. Note that by the copy operations only the tree
structures will be copied, associated recommended statistical measures,
modifiers and frequencies will not be copied! The move operations
preserve those adjustments.
Remark: If you want to move or copy element from an other than the
selected project, activate the “Show all projects” option by clicking
the button  in the tool strip. The icon
background will be changed to red color to
indicate that this option is active.
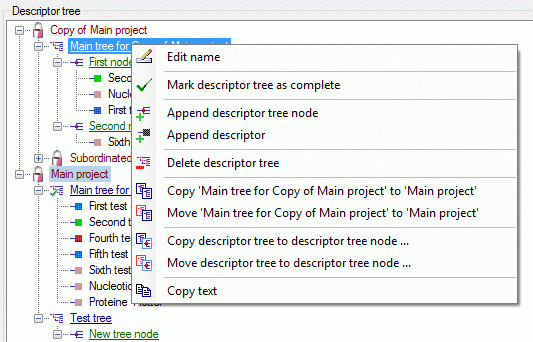
1. Move or copy a descriptor tree
Right click on the descriptor tree you want to move/copy. A context menu
opens, that offers the options  Copy ‘<tree
name>’ to ‘<project name>’ rsp.
  Move
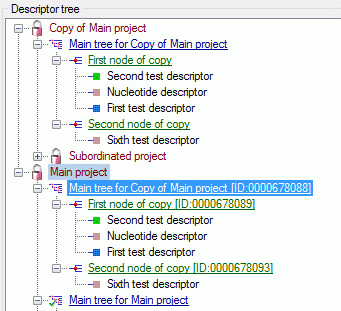
‘<tree name>’ to ‘project name’ (see picture below left). If you
selected “Move”, the descriptor tree is removed from the original
project and appended to your selected project. If you selected “Copy”, a
copy of the tree will be appended to the selected project. In this case
numeric IDs are appended to generate unique tree and tree node names
(see picture below right). The copy function can be used to generate a
clone of a descriptor tree in the selected project.
Additionally you may copy the contents of a descriptor tree to a
descriptor tree node by clicking selecting the option
 Copy descriptor tree to descriptor tree
node … rsp.
  Move descriptor tree to
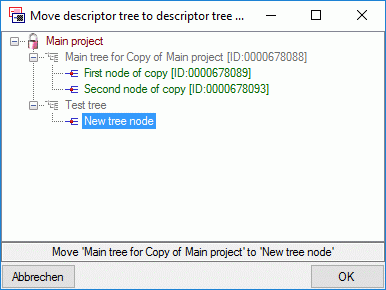
descriptor tree node … (see picture above left). A separate window
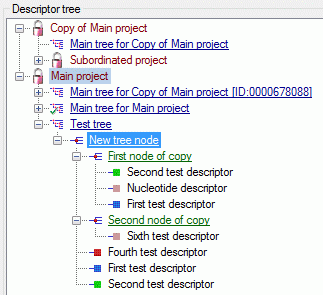
opens to select the target node (see picture below left). Find the move
result in the right picture below. Since the tree has been moved, the
tree node names have not been changed. One duplicate descriptor has not
been moved to the target node.
2. Move or copy a descriptor tree node
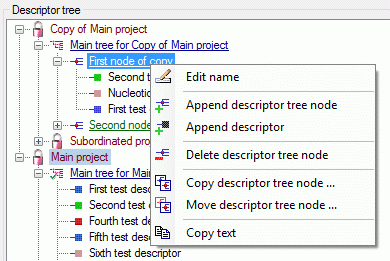
Right click on the descriptor tree node you want to move/copy. A context
menu opens, that offers the options  Copy
descriptor tree node … rsp.
  Move
descriptor tree node … (see picture below left). After selecting one
of there items a dialog windows opens where you may select the target
descriptor tree or descriptor tree node (see picture below right).
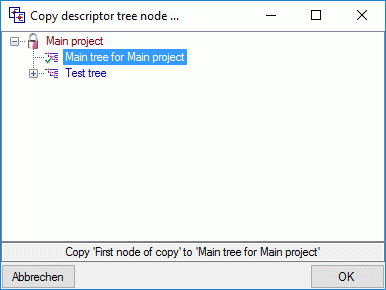
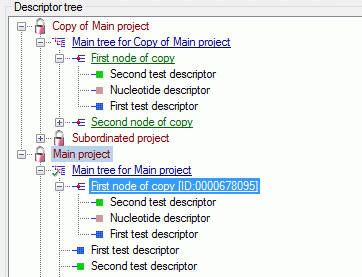
If you selected “Move”, the descriptor tree node is removed from the
original position and appended to the selected tree position. If you
selected “Copy”, a copy of the tree node will be appended to the
selected tree position. In this case numeric IDs are appended to
generate unique tree node names (see picture below). The copy function
can also be used to generate a clone of a descriptor tree node in the
selected project.
3. Move or copy a descriptor
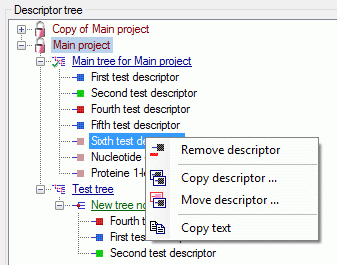
Right click on the descriptor you want to move/copy. A context menu
opens, that offers the options  Copy
descriptor … rsp.
  Move descriptor
… (see picture below left). After selecting one of there items a
dialog windows opens where you may select the target descriptor tree or
descriptor tree node (see picture below right).
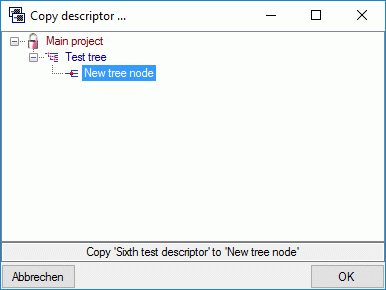
If you selected “Move”, the descriptor is removed from the original
position and appended to the selected tree position. If you selected
“Copy”, a new descriptor node will be appended to the selected tree
position (see picture below).
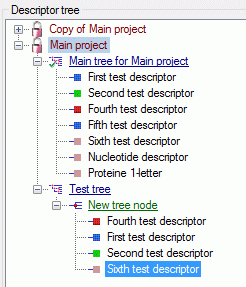
Continue with:
Edit Project
Descriptor tree
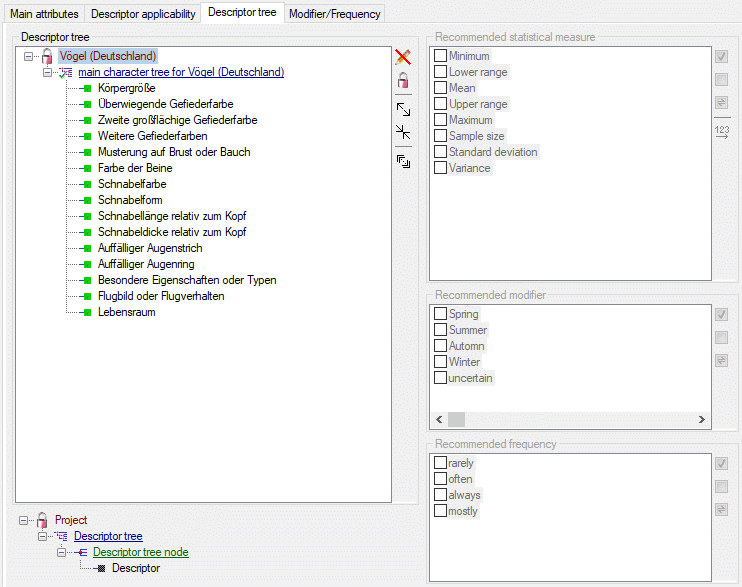
The Descriptor tree tab provides the possibility for a structured
assignment of the descriptors to the projects. The Descriptor tree
consists of three node types, which show the administered projects, descriptor
trees, descriptor tree nodes
and descriptors. The tree parts’ colours are shown in the example at
the bottom. By pressing the  button on the tool
strip at the right side the example may be hidden. The buttons displayed
on the too strip will change depending on the selected entry.
By default only the selected project. its subordinated projects and
their descriptor trees are displayed. You may select the “Show all
projects” option by clicking the button  in the
tool strip to show alle projects. To indicate that this option is
active, the icon background will be changed to red color (see images below). Be aware that this
option might slow down data loading.
The descriptor trees support three main functions:
- Assignment of descriptors to a certain project
- Selection of recommended Frequency/Modifier values and
Statistical measures for a certain descriptor
- Structured arragement of the descriptors, e.g. for hierarchical
selection lists and definition of descriptor subsets for description
editing and export
Descriptor trees are the root of a tree
and may only be appended at a project. To insert a new descriptor tree
select a project and press  , to delete it select
the descriptor tree and press
  . Descriptor tree
nodes may be appended at a descriptor tree or another
descriptor tree node. To insert a new descriptor tree node, select the
parent and press
  , to remove it select the
descriptor tree node and press
  .
Descriptors may be appended to a descriptor tree or a descriptor
tree node. To append a descriptor select the parent and press
 , to remove it select the descriptor and press
 . All these functions can alternatively be
accessed by the context menu by a right click on the entry. The
descriptor type is indicated by different icons. Categorical descriptors
are marked as
  , quantitative descriptors as
 , text descriptors as
  and sequence descriptors as
  .
.
You may change the name of a Descriptor
tree or a Descriptor tree node
in three different ways:
- Select the tree element (single click) and then click once on it.
- Select the tree element (single click) and click on button
 in the tool bar on the right.
- Right-click the tree element and select item
 Edit name from the context menu.
You may edit the name of the selected node within the tree. The Descriptor tree must be globally unique. The
Descriptor tree node names must be
unique with respect to their tree position, i.e. all nodes with the same
parent within a descriptor tree must have distinguished names.
If projects and their associated descriptor trees cannot be changed,
because the project has been set to “read-only” state, these parts are
displayed with grey text color (see
project “Schmetterlinge” in picture above).
When a new descriptor tree or descriptor tree node is inserted it gets a
numeric name, which may be changed by clicking on the node or selecting
 from the context menu. Take care that the names
of the discriptor trees must be unambiguous within the whole database!
The names of the descriptor tree nodes must only be unambiguous within
one parent.
If no descriptor tree is installed for a certain project, all
descriptors, modifier/frequency values and statistical measures will be
usable in the project’s descriptions. Anyway, if you export data or
generate documents an do not have an appropriate descriptor tree, you
might have missing data! If a project contains several descriptor trees,
the available descriptors are the superset of the descriptors assigned
to all contained trees.
Editing the project descriptor assignemnts for a tree node
When you use button  to append a descriptor to a
tree node, you will be offered all accessible descriptors in the
database. In many cases, when you have already assigned all required
descriptors to the project, you may wish to build some additional
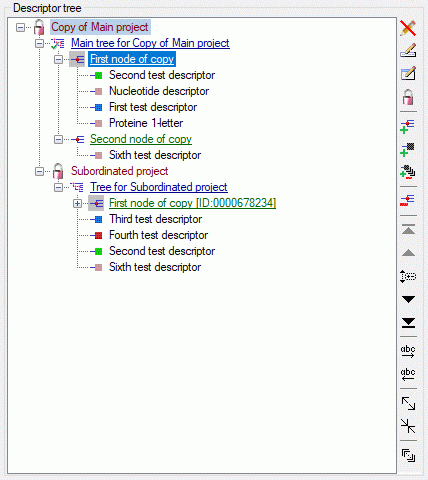
structured descriptor trees. If you select a descriptor tree or a
descriptor tree node, the button
  is shown
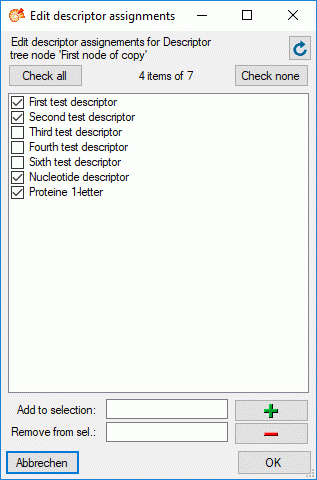
(see image below left). After clicking this button you will get a
selection list with all descriptors assigned to the project. Descriptors
that are included in the tree node are selected in the list (see image
below right). You may easily change the selection and click “OK” to make
the changes effective.
Sorting of descriptor tree elements
By pressing the  button you can expand the tree
view to display all elements, by pressing
  the
tree will be collapsed to descriptor tree level. With the arrow buttons
(
 rsp.
rsp.

 ) you can move descriptors or descriptor tree
nodes up or down rsp. to the top or the bottom. An additional ordering
option is to select the descriptor tree node you want to move and click
the
  button. The button’s back color changes to
red and you may now select the new position
in the tree. If you select a descriptor tree or a descriptor tree node,
you may arrange the contained descriptors in alphabedical order by
clicking the buttons
  (ascending) or
 (descending).
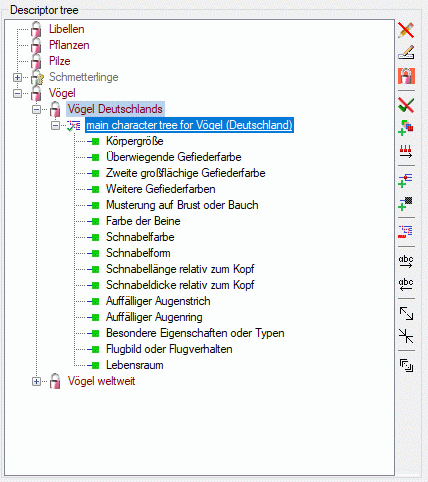
A descriptor tree may be marked as “tree complete” to indicate that this
tree shall contain all descriptors for the project. This is done by
selecting the descriptor tree node and clicking the button
 . To indicate that the tree is marked as complete the
tree icon changes to
  (see picture
below).
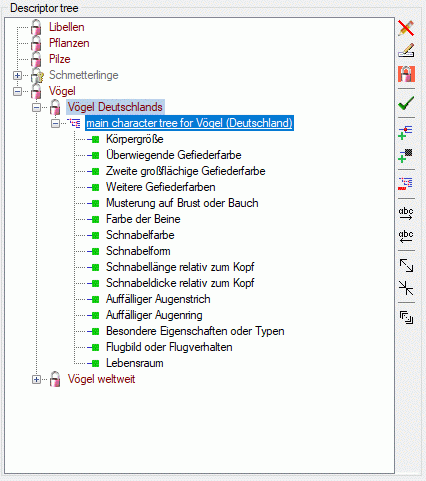
The “tree complete” flag may be removed by clicking the button
 and the tree icon will be changed back to
 (see picture below).
If a descriptor tree is marked as “tree complete”, it can be used to
take over the sorting of the descriptor nodes to the sequence number of
the descriptors. But you must be aware that the descriptor’s sequence
number (field “No.” in “Edit descriptor” main panel) is not project or
tree dependent, i.e. that this operations will have influence on the
dispolay sequence of all descriptions using these descriptors. Click on
button  (see picture above) to open the
descriptor sorting window below.
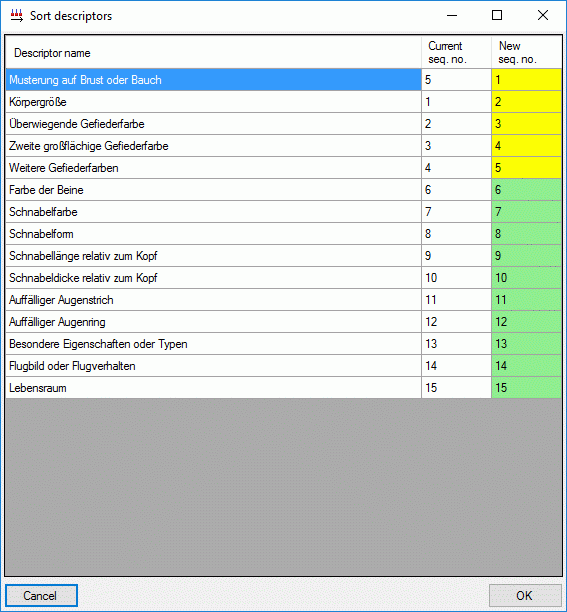
The first column shows the descriptor names as sorted in the descriptor
tree, the second column shows the current sequence number int the
database and the last column shows the new sequence number. If the
sequence number stays unchanged, the new sequence number is displayed
with green background, otherewise with yellow background. You may click on a new sequence
number and change its value manually. By clicking on the table headers,
you may sort the table display according descriptor names, old or new
sequence numbers. If a descriptor may not be changed, because it is
assigned to a project where the user has no write access, the whole line
is displayed with grey backgound and cannot
be changed. Finally click on OK to accept or Cancel to reject
the changes.
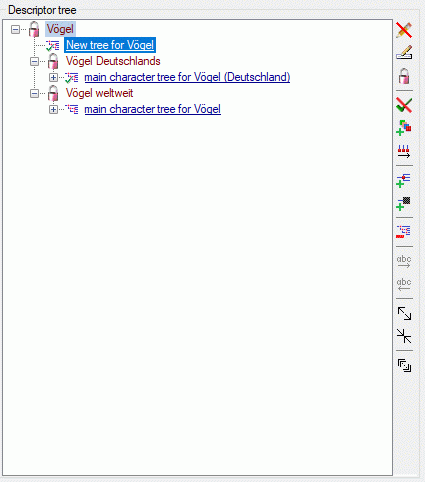
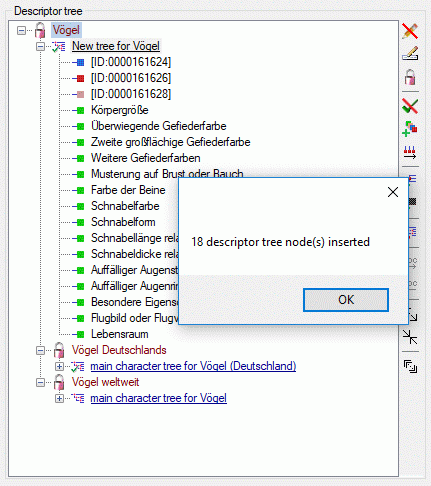
An additional option available for complete trees is to copy missing
descriptors with button . The descriptors available for a certain
project include all descriptors assigned to all descriptor trees of the
project and its sub-projects. In our example a new descriptor tree has
been assigned to the upmost project (see image below left). After
clicking the  button all valid descriptors are
inserted to the descriptor tree (see image below right).
Descriptor tree node details
For Descriptor tree nodes you may enter
an abbreviation a details text and assign resource data. Select the
Descriptor tree node (single click) and
click on button  in the tool bar on the right.
Alternatively you may right-click the Descriptor
tree node and select
  Edit
details from the context menu. An edit window as shown below will be
opened.
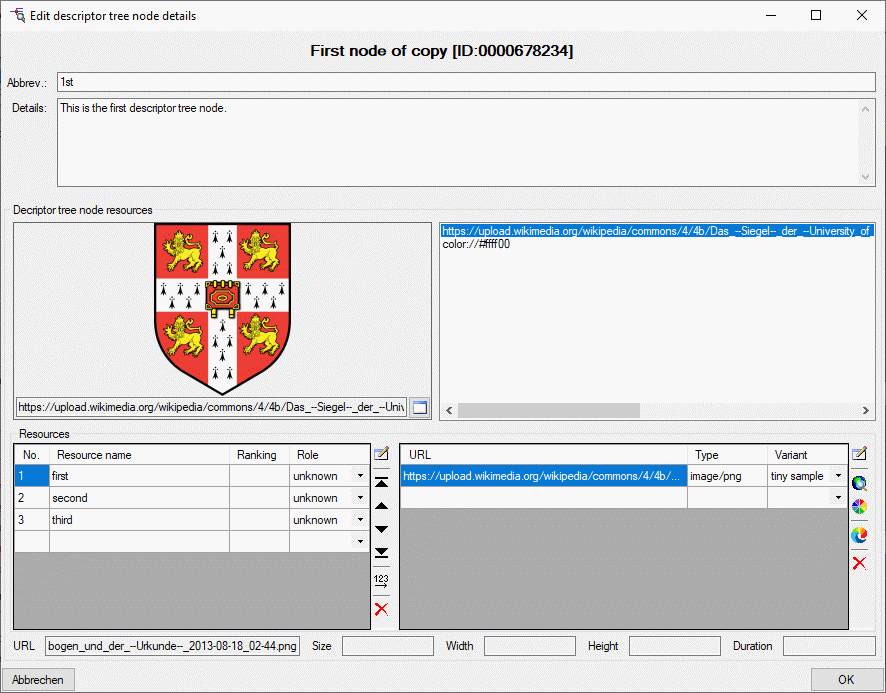
If resources are assigned to a Descriptor tree
node, its symbol is shown with grey background in the descriptor tree. You may
view the resources by right-clicking it and selecting
 View resources from the context menu.
Recommended statistical measures, modifiers and frequency values
Click on  in the tool bar to close the edit window
in the right part of the tab or on
  to reopen it.
In the edit window you can select recommended modifier/frequency values
and statistical measures. The recommended values can be administered for
a selected descriptor or for a selected descriptor tree node. In the
latter case selected values are inherited by all subordinate nodes,
which will be indicated by the background
colour if a subordinate node is selected in the descriptor tree.
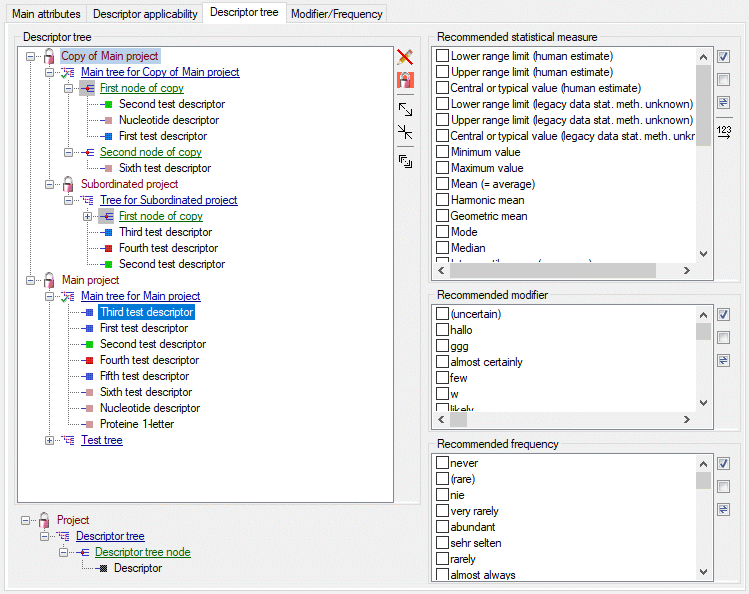
To define the available modifier and frequency values and their display
sequence, refer to the Modifier/Frequency
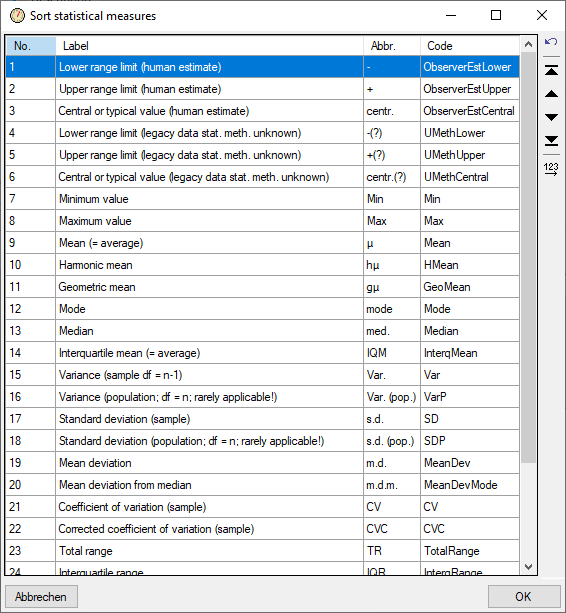
tab. The statistical measure values are predefined, nevertheless their
display sequence may be modified using the  button
(see image above). A form as shown below will appear. With the arrow
buttons (
button
(see image above). A form as shown below will appear. With the arrow
buttons (
 ) you can move the
selected entries up or down within the table, clicking button
 or
or  shifts the
selected entries to the top respective bottom of the table. After
ordering the entries click button
  to renumber the
table entries (starting with “1” for the first table entry) and make the
changes effective.
The picture below shows an example for a descriptor where the
recommended statistical measures Mini mum value, Maximum value
and Mean are inherited by the superior node.

For the contained descriptor only additional values may be selected, but
the inherited values cannot be de-selected.

Continue with:


 button behind the project name (see image
below). By clicking the


 . If you need language codes that are not included
in the list, click the
![]() ). The Parent
project adjustment has an influence on the available descriptors,
recommended modifier and frequency values and recommended statistical
measures, because these adjustments are inherited by the subordinate
project. If for a project in the Parent project tree no write access
is possible, this is indicated by grey text
colour and symbol
). The Parent
project adjustment has an influence on the available descriptors,
recommended modifier and frequency values and recommended statistical
measures, because these adjustments are inherited by the subordinate
project. If for a project in the Parent project tree no write access
is possible, this is indicated by grey text
colour and symbol  . The missing write rights
for a parent project has no influence on accessability of the actually
selected project, except that the parent project adjustment cannot be
changed.
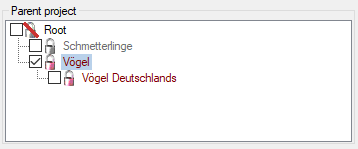

 and projects wihout any access rights as


 you may link the current project to the
selected DiversityProjects entry.
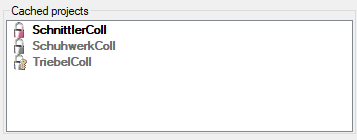
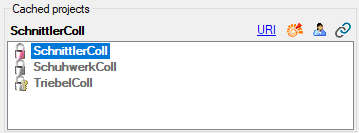


 Edit scope name or by clicking
at the name.
 Set sex status.
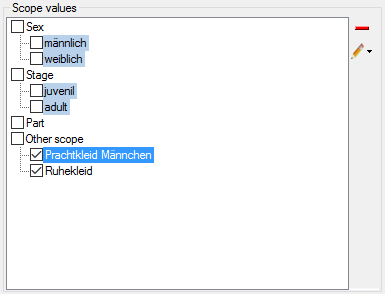
For the other scope types you may enter a details text by pressing the


 button. To make a value available for the project, the check box must be
checked. If the selected project has a parent and a value has already
been checked in the parent project, this is indicated by the background colour (see image below).


 button allows
selecting the descriptor form the descriptor tree (see picture below).
 in the toolbar of the Dependent
descriptor section, only the actually set dependent descriptors are
displayed here. You can switch to an alternate
 indicates that the
dependent descriptor is inapplicable if the controlling state is present
in a description. The symbol
  indicates that the
controlling state must be present in a description if the controlled
descriptor shall be applicable. The rule can be toggled by clicking the
symbol in the table or by pressing the corresponding button
(
 .
.
 button in the Applicability
tree section you can delete all dependencies shown in the tree.

 ) you can move the selected entries up or down
within the table, clicking button
  to renumber the table entries (starting with “1”
for the first table entry) and make the changes effective. After
pressing button
  column “Use” shows the number
of references in the database for each modifier rsp. frequency value.
 tool strip button, the
  button, which opens one of the windows shown
below.


 Move
‘<tree name>’ to ‘project name’ (see picture below left). If you
selected “Move”, the descriptor tree is removed from the original
project and appended to your selected project. If you selected “Copy”, a
copy of the tree will be appended to the selected project. In this case
numeric IDs are appended to generate unique tree and tree node names
(see picture below right). The copy function can be used to generate a
clone of a descriptor tree in the selected project.

 Copy descriptor tree to descriptor tree
node … rsp.
  Move descriptor tree to
descriptor tree node … (see picture above left). A separate window
opens to select the target node (see picture below left). Find the move
result in the right picture below. Since the tree has been moved, the
tree node names have not been changed. One duplicate descriptor has not
been moved to the target node.

 Copy
descriptor tree node … rsp.
  Move
descriptor tree node … (see picture below left). After selecting one
of there items a dialog windows opens where you may select the target
descriptor tree or descriptor tree node (see picture below right).


 Copy
descriptor … rsp.
  Move descriptor
… (see picture below left). After selecting one of there items a
dialog windows opens where you may select the target descriptor tree or
descriptor tree node (see picture below right).


 button on the tool
strip at the right side the example may be hidden. The buttons displayed
on the too strip will change depending on the selected entry.
 .
.  , to remove it select the
descriptor tree node and press
  .
Descriptors may be appended to a descriptor tree or a descriptor
tree node. To append a descriptor select the parent and press
 , to remove it select the descriptor and press
 . All these functions can alternatively be
accessed by the context menu by a right click on the entry. The
descriptor type is indicated by different icons. Categorical descriptors
are marked as
  , quantitative descriptors as
 , text descriptors as
  and sequence descriptors as
  .
. in the tool bar on the right.
 is shown
(see image below left). After clicking this button you will get a
selection list with all descriptors assigned to the project. Descriptors
that are included in the tree node are selected in the list (see image
below right). You may easily change the selection and click “OK” to make
the changes effective.

 button you can expand the tree
view to display all elements, by pressing
  the
tree will be collapsed to descriptor tree level. With the arrow buttons
(
 button. The button’s back color changes to
 (ascending) or
 (descending).
 . To indicate that the tree is marked as complete the
tree icon changes to
  (see picture
below).
 and the tree icon will be changed back to
 (see picture below).

 button all valid descriptors are
inserted to the descriptor tree (see image below right).


 View resources from the context menu.
  in the tool bar to close the edit window
in the right part of the tab or on


