Subsections of Tutorial
Tutorial Categorical Descriptor
Tutorial - Enter categorical descriptors
To create a new categorical descriptor, select edit mode descriptors
from menu Edit->Descriptors. Now click on the  button in the upper left panel (see point 1 in
image below).
button in the upper left panel (see point 1 in
image below).

The new descriptor is created with a numeric name. Change it to “Leaf
length” (see point 2 in image above) and set the sequence number to
“3” (see points 3 in image above). Now switch to the main tab and
check that the descriptor type is “Categorical” (see points 4 and
5 in image above). Finally save the descriptor (see point 6 in
image above) and the descriptor name will be updated in the header and
the query panel at the left side of the window.
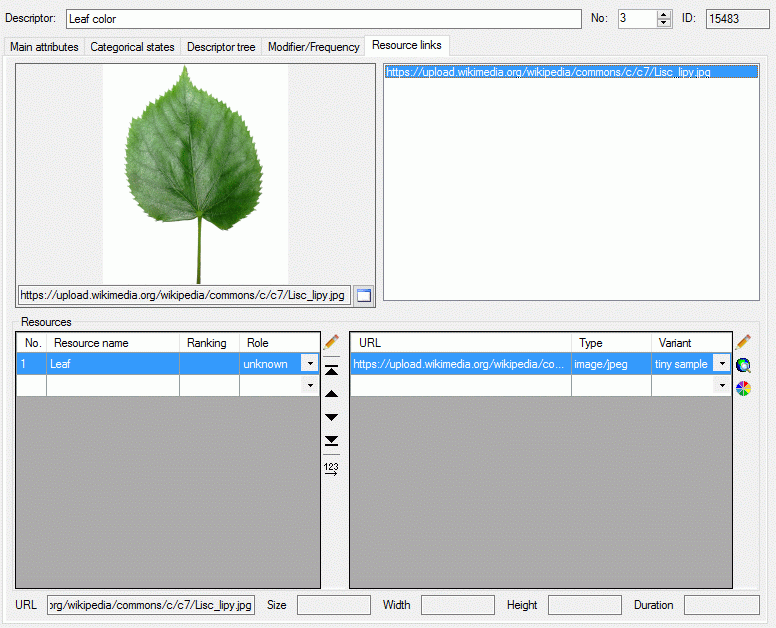
As for the other descriptors we want to attach a resource link to our
new categorical descriptor, that symbolizes the descriptor’s duty (see
image below, a link to
Wikipedia
was used).
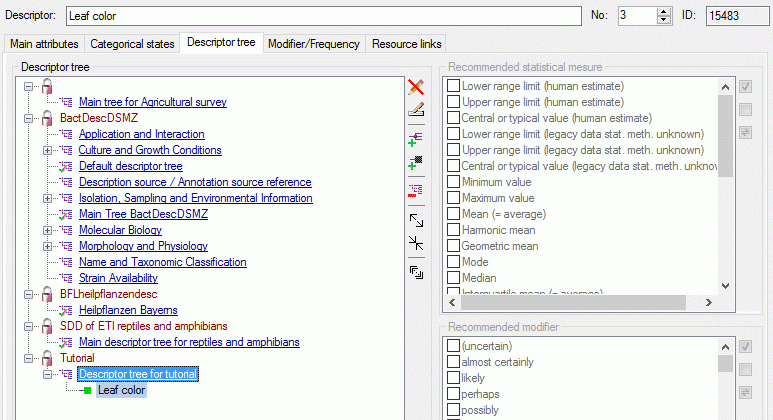
Certainly the categorical descriptor shall be attached to the
“Descriptor tree for tutorial” that was created in the last step. In the
descriptor tree tab select “Descriptor tree for tutorial” and click
button  at the right tool bar (see image below).
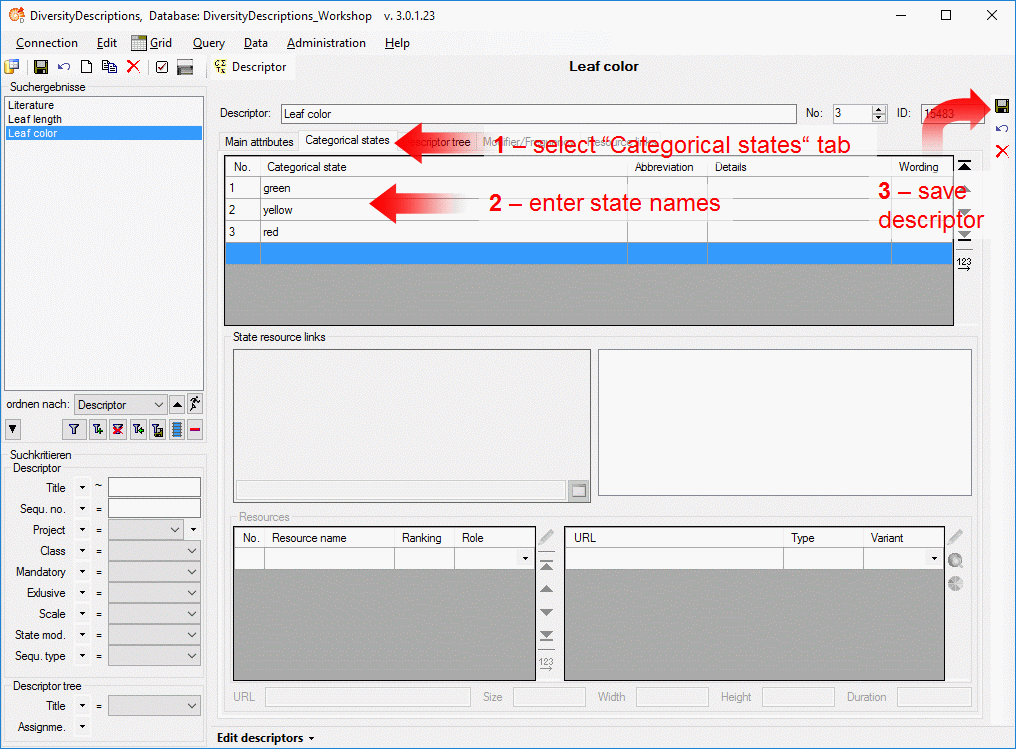
For categorical descriptors we have to define categorical states, which
define the possible character values. Select the “Categorical states”
tab (see point 1 in image below) and enter the three categorical
state names “green”, “yellow” and “red” in the table (see points 2
in image below). Finally save the descriptor (see point 3 in image
below).
For each categorical state resources may be assigned. Therefore select
the categorical state where you want to enter the resources (see point
1 in image below) and enter a resource name (see points 2 in
image below). In this case we do not assign an URL to a picture but
attach color values. Therefore click the color button
 in the task bar and select a color value (see
points 3 to 5 in image below). Finally save the descriptor (see
point 6 in image below).
in the task bar and select a color value (see
points 3 to 5 in image below). Finally save the descriptor (see
point 6 in image below).

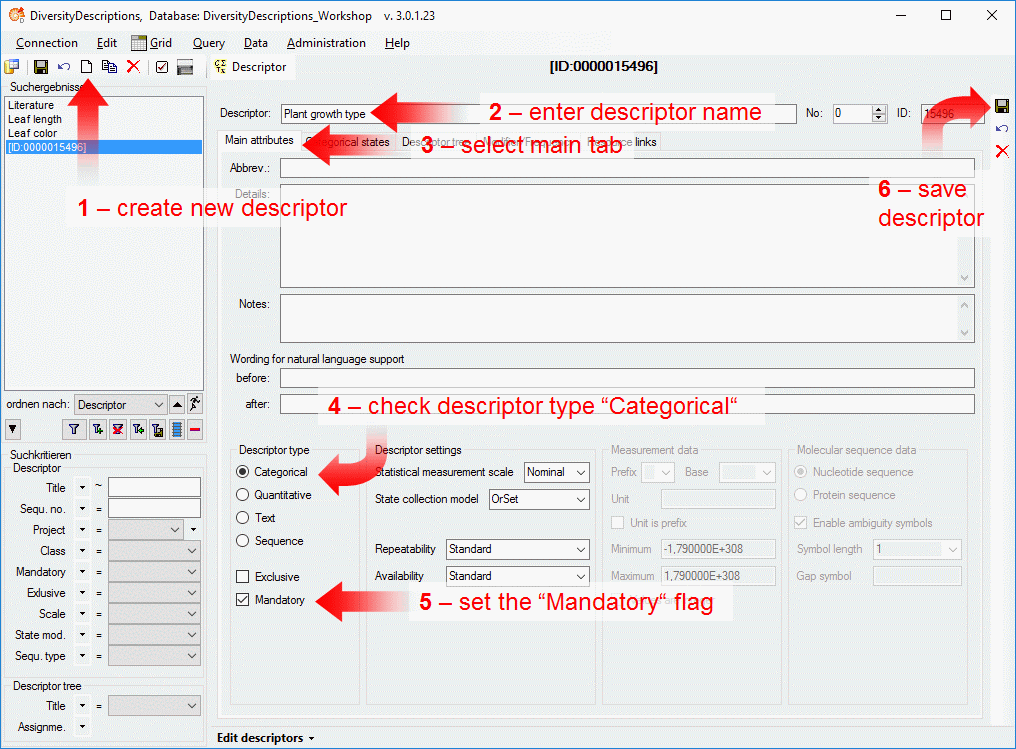
For our tutorial we need a second each categorical descriptor. Create
the categorical descriptor “Plant growth type” (see points 1 to
4 in image below). This descriptor shall always be used in the
descriptions, therefor mark it as mandatory (see point 5 in image
below). Finally save the descriptor (see point 6 in image below).
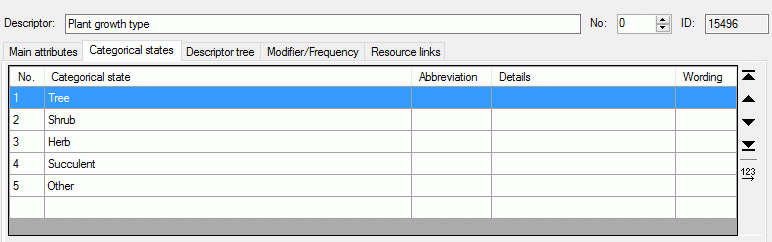
For descriptor “Plant growth type” enter the categorical states “Tree”,
“Shrub”, “Herb”, “Succulent” and “Other” (see image below).
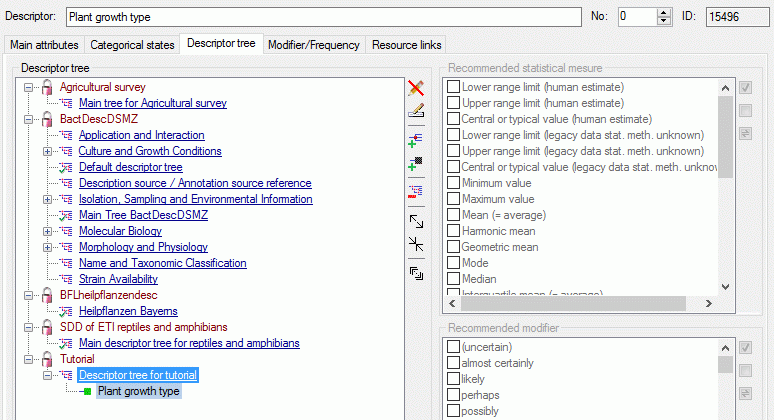
Finally append descriptor “Plant growth type” to the descriptor tree for
tutorial (see image below).
A more detailled description of all editing options can be found in the
Edit descriptors section of this manual.
This tutorial is continued in the sections listed below.
Tutorial Descriptions
Tutorial - Enter description data
Now that we have entered several descriptors and categorical states we
have defined a “terminology” to enter descriptive data. To create a new
description, select edit mode descriptions from menu
Edit->Descriptions. Now click on the
button in the upper left panel (see point 1 in
image below). If you are asked for the project, select “Tutorial”.
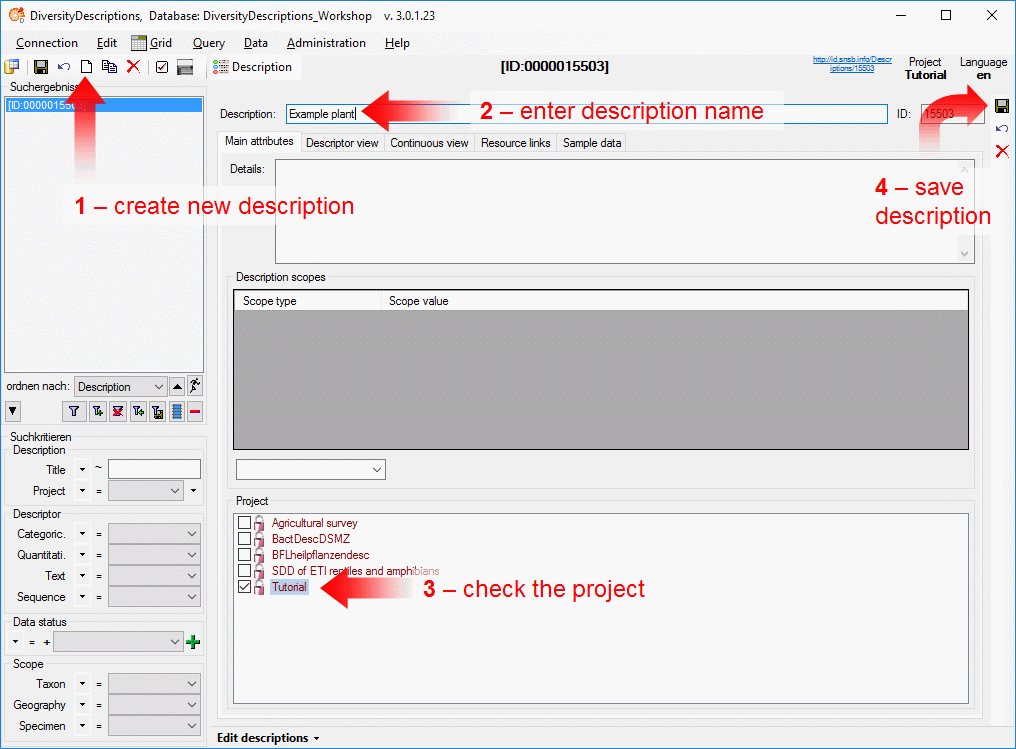
The new description is created with a numeric name. Change it to
“Example plant” (see point 2 in image above) and check that project
“Tutorial” is assigned to the new description (see points 3 in image
above). Finally save the description (see point 4 in image above)
and the description name will be updated in the header and the query
panel at the left side of the window.
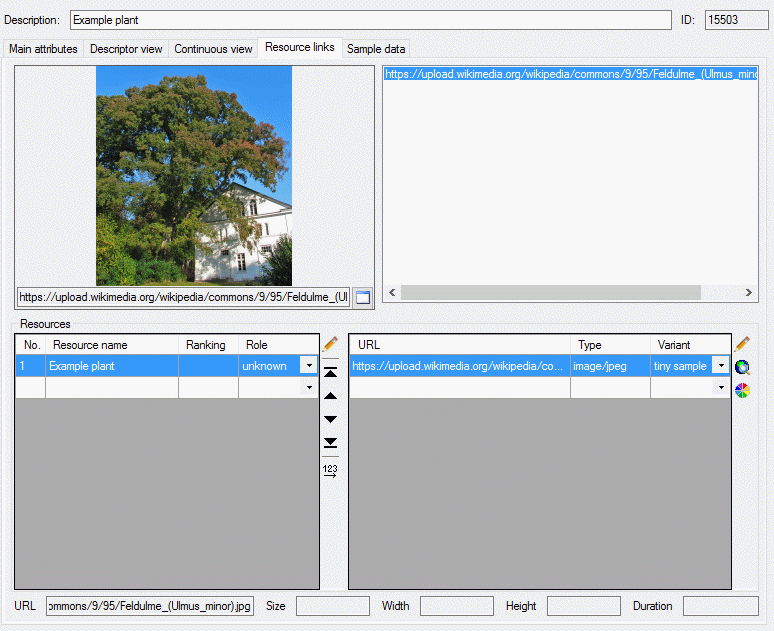
Enter resources for the description
As described for the descriptors, for each description resources may be
assigned. Therefore click on the “Resource links” tab, which looks
exactly the same as described in chapter “Enter a textdescriptor” (see image below, a link to
Wikipedia
was used).
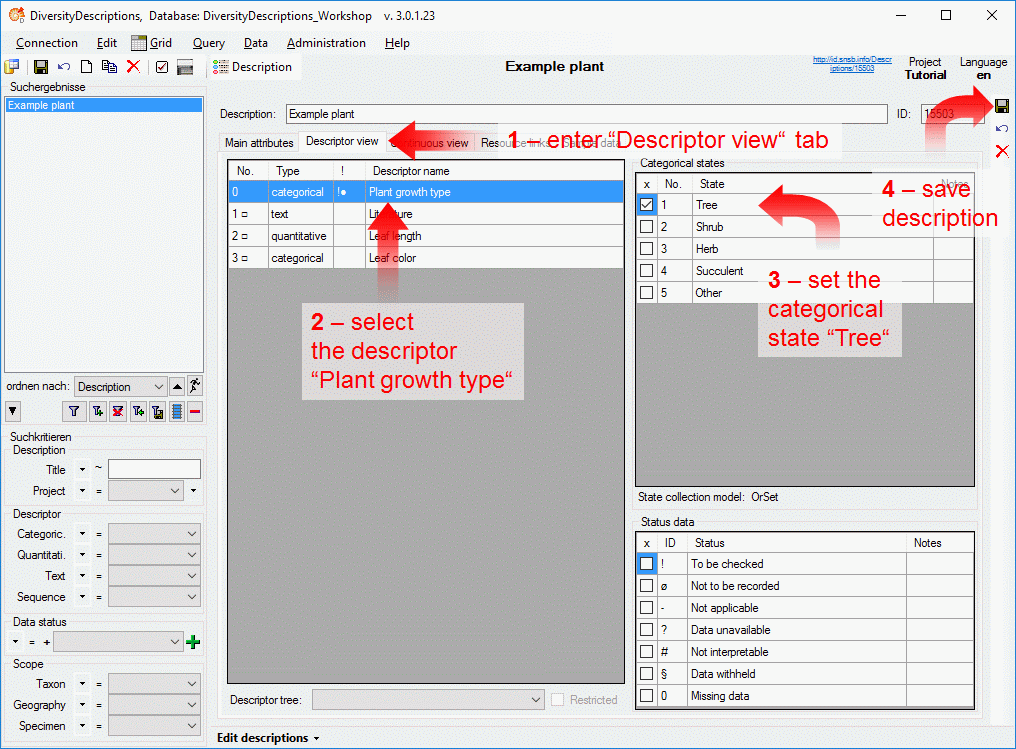
Enter descriptive data
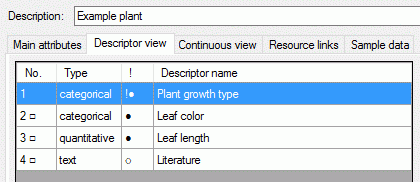
Now let’s start entering the descriptive data. Open the “Descriptor
view” tab (see point 1 in image below). In the left part of the
window there is a list of the desriptors. Select descriptor “Plant
growth type” (see point 2 in image below) and on the right side the
associated categorical states are diplayed. Click on the square in
columne “x” besides the state “Tree” to set the check mark (see point
3 in image below). Finally save the description (see point 4 in
image above).
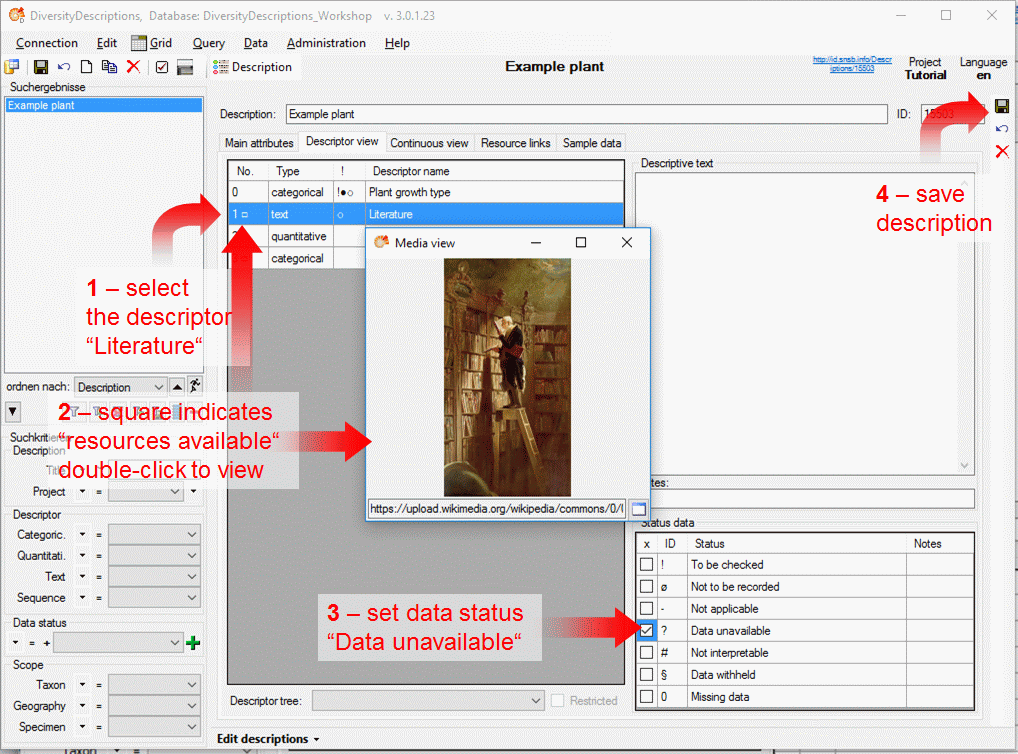
Next select the descriptor “Literature” tab (see point 1 in image
below). In principle you could enter a text in the right area
“Descriptive text”, but for this example two other things shall be
demonstrated. In the first column of the descriptor list the sequence
number (“Nr.”) is displayed. A small square behind the number indicates
that resources have been attached to the descriptor (see point 2 -
upper arrow - in image below). You can view the attached resources by a
double-click on the sequence number (see point 2 - right arrow - in
image below). In some cases you do not have data available for a certain
descriptor but you want to express that data should be entered.
Therefore you can sen one or more “Status data” values in the right
lower part of the window (see point 3 in image below). Finally save
the descriptor (see point 4 in image below).
For each categorical state resources may be assigned. Therefore select
the categorical state where you want to enter the resources (see point
1 in image below) and enter a resource name (see points 2 in
image below). In this case we do not assign an URL to a picture but
attach color values. Therefore click the button in the “…” column and
select a color value (see points 3 and 4 in image below).
Finally save the descriptor (see point 5 in image below).

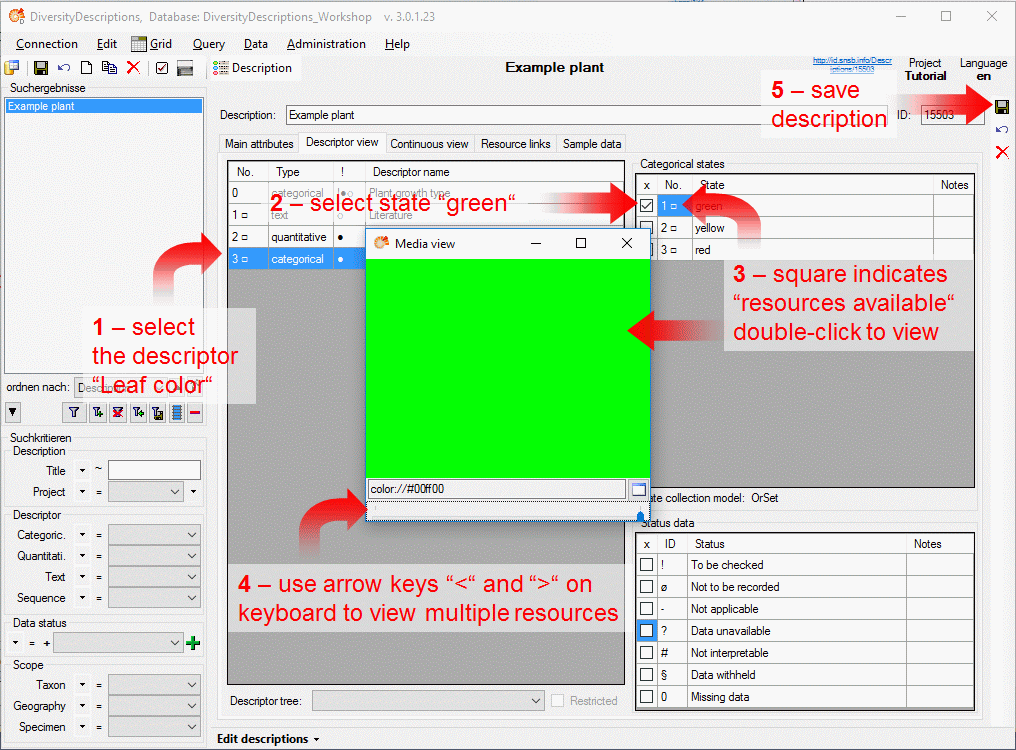
The last descriptor not yet used is “Leaf color”. Select it from the
descriptor list an chek the categorical state “gree” (see points 1
and 2 in image below). The square in column “Nr.” of the
“Categorical states” indicates that resources are attached. Double-click
it to view the resources (see point 3 in image below). Since we
attached three different colors for that categorical state, you may
scroll through the different resources by using the “right” and “left”
arrow key on the keyboard (see point 4 in image below). Finally save
the descriptor (see point 5 in image below).
An alternate description data view
If you have defined many descriptors and one specific description
references only a small amount of the descriptors, the “Descriptor view”
might be quite confusing. In this case an alternate representation, the
“Continuous view” might be helpful (see image below). Here only the
descriptors that have been referenced in the description data are shown
and the values (categorical states, statistical measures or plain text
data) are attached at the descriptors. Additionally some extra
information is color coded, e.g. “Plant type” is displayed in light red text because it is a mandatory
descriptor. For details check the Editdescriptions section of this manual.

Enter description scope
As last step in this section the insert of “Description scopes” shall be
demonstrated. In our example we want to enter a taxon name and link it
to a taxon name service in the internet.
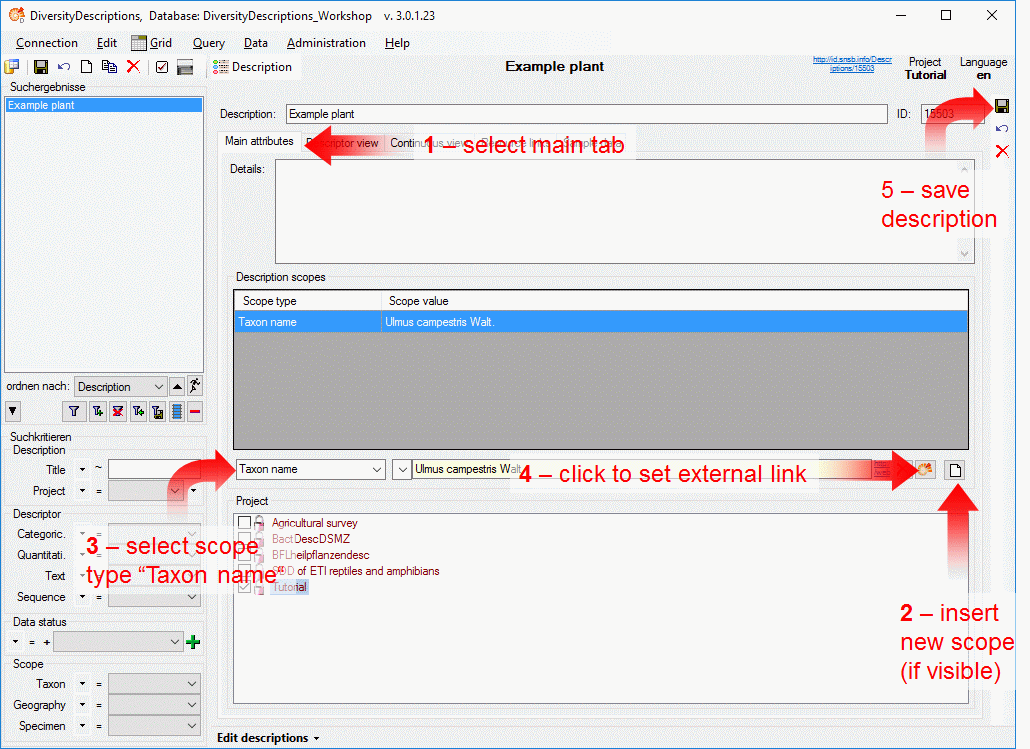
First select the “Main attributes” tab and click button
if visible (see points 1 and 2 in image
above). When you now select the scope type “Taxon name” (see point 3
in image above) you could enter a taxon name, e.g. “Ulmus campestris”,
in the text box that appears right from the scope type. But we want to
create a link to the internet service “Catalogue Of Life”, therefore
press button  . Now a separate window
opens (see image below). Select “CatalogueOfLife” as database (see point
1 in image below). Enter the search string “ulmus camp” in the query
field and start a search (see points 2 and 3 in image below).
When you select a search reult (see point 4 in image below), you can
watch the stored data in the lower part of the window. Finally click
“OK” to store the link (see point 5 in image below).
. Now a separate window
opens (see image below). Select “CatalogueOfLife” as database (see point
1 in image below). Enter the search string “ulmus camp” in the query
field and start a search (see points 2 and 3 in image below).
When you select a search reult (see point 4 in image below), you can
watch the stored data in the lower part of the window. Finally click
“OK” to store the link (see point 5 in image below).
For scope type “Taxon name” links to three different internet services
may be set. If you use the DiversityWorkbench module
DiversityTaxonNames, you can build an own taxon database and link
entries to descriptions. Other scoe types that allow linking to
DiversityWorkbench modules are “Geographic area” (DiversityGazzeteers),
“Reference” (DiversityReferences), “Specimen” (DiversityCollection) and
“Observation” (DiversityCollection also). Additionally there are the
scope types “Sex”, “Stage”, “Part” and “Other scope”, which have certain
values defined in the Edit projects section. Remember
that in step Create a new project we inserted
the sex values “Male” and “Female” and assigned them for the tutorial
project. Try to insert the scope value “Female” for the example
description!
A more detailled description of all editing options can be found in the
Edit descriptions section of this manual.
This tutorial is continued in the sections listed below.
Tutorial Descriptor Dependencies
Tutorial - Enter descriptor dependencies
In our final tutorial step we take a short look on the descriptor
applicability rules. In out example we have two descriptors dealing with
leaf properties, “Leaf color” and “Leaf length”. If you have chosen the
categorical state “Cactus” for the descriptor “Plant growth type”, it
usually does not make sense specifying leaf properties. You can enter
such kind of descriptor dependencies in a formal way.
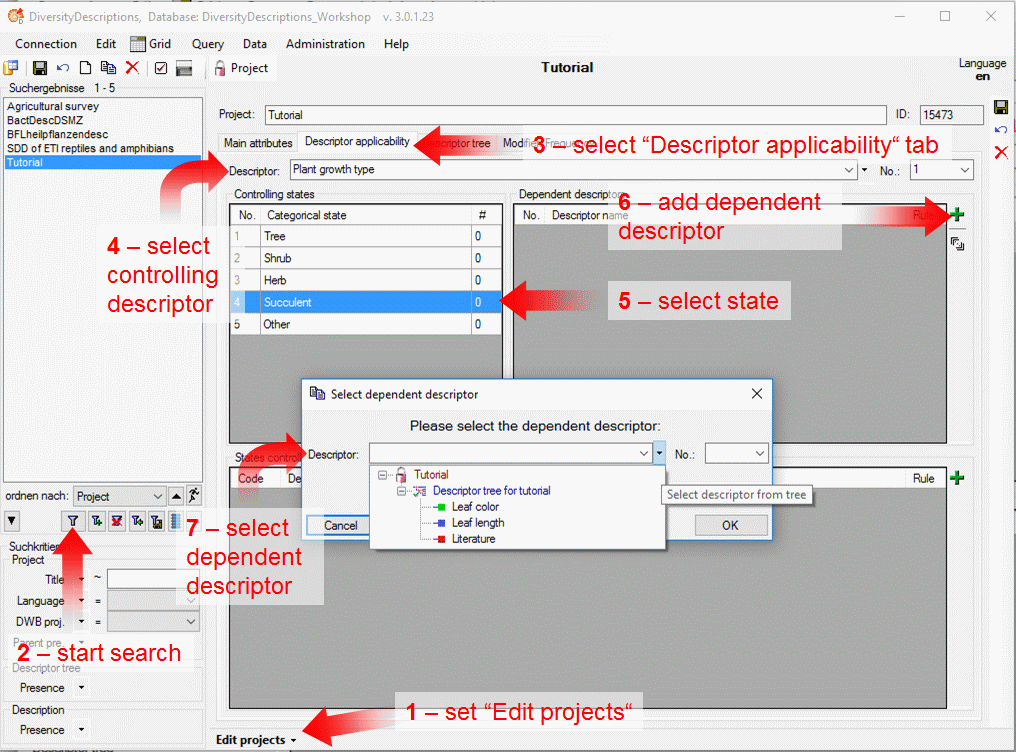
Select edit mode projects from menu Edit->Projects , search for
project “Tutorial” and open the “Descriptor applicabilities” tab (see
points 1 to 3 in image above). Select the controlling descriptor
“Plant type” (see point 4 in image above) and in the section
“Controlling states” a list of the descriptor’s categorical states is
displayed. Select the controlling state “Succulent” (see point 5 in
image above) and then click on button  to enter the
first controlled descriptor (see point 6 in image above). This opens
a selection window where you select descriptor “Leaf color” (see point
7 in image above). Repeat the last step to insert descriptor “Leaf
length” as second controlled descriptor.
to enter the
first controlled descriptor (see point 6 in image above). This opens
a selection window where you select descriptor “Leaf color” (see point
7 in image above). Repeat the last step to insert descriptor “Leaf
length” as second controlled descriptor.
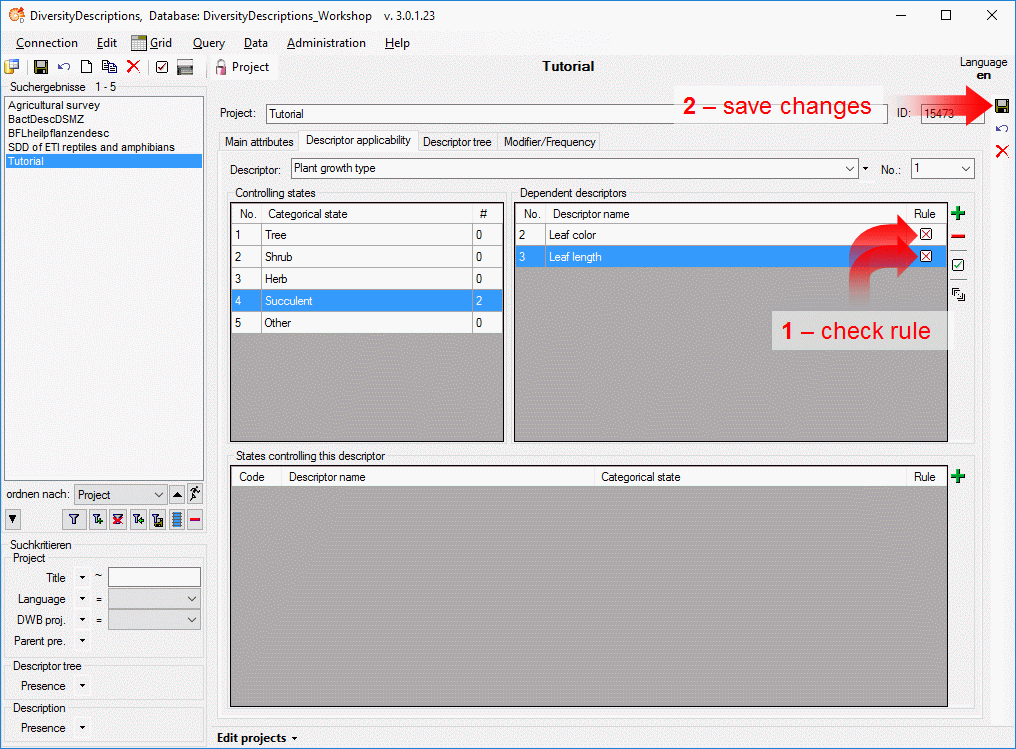
After that check that for the two dependent descriptors the
applicability rule “inapplicable” is set (see point 1 in image
below). Finally save all changes (see point 2 in image below).
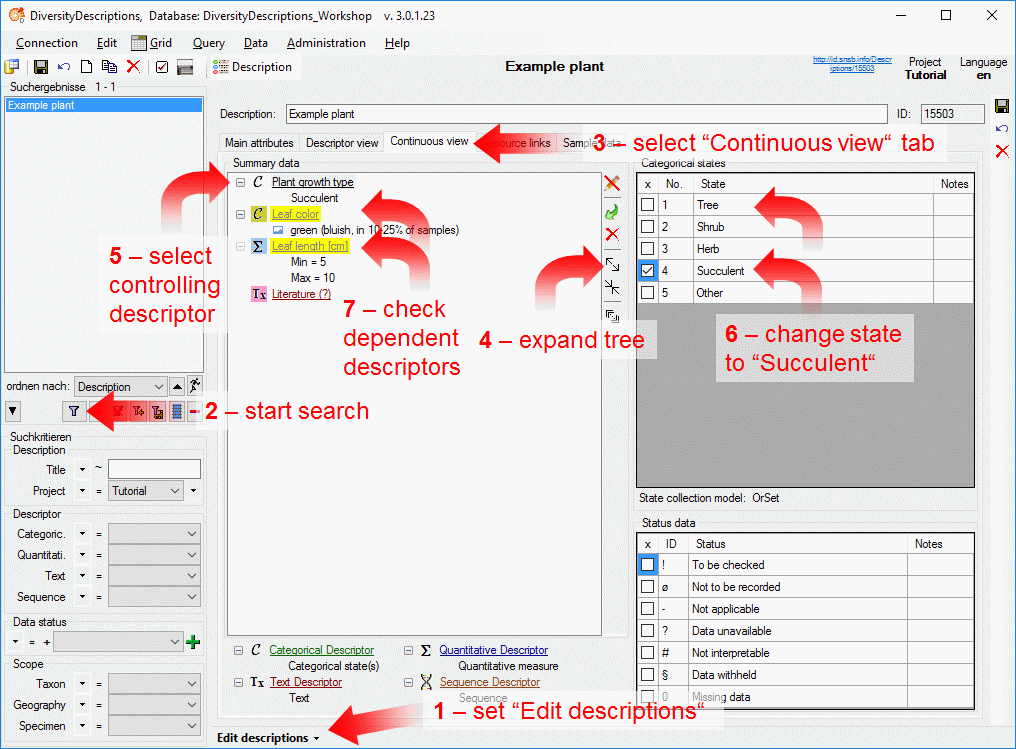
To try out the applicability rules, select edit mode descriptions and
search for the example plant (see points 1 and 2 in image
below). Open the “Descriptor view” tab, expand the tree and select
descriptor “Plant growth type” (see points 3 to 5 in image
below). Click on button  to show the “Categorial
states”. Deselect state “Tree” and select state “Succulent” instead (see
point 6 in image below). In the “Summary data” section the text
color of the descriptors “Leaf color” and “Leaf length” changes to grey to indicate that the descriptor is not
applicable. Since for that descriptors values have been specified, the
backround color is changed to yellow to
indicate that the applicability rules are broken (see point 7 in
image below).
to show the “Categorial
states”. Deselect state “Tree” and select state “Succulent” instead (see
point 6 in image below). In the “Summary data” section the text
color of the descriptors “Leaf color” and “Leaf length” changes to grey to indicate that the descriptor is not
applicable. Since for that descriptors values have been specified, the
backround color is changed to yellow to
indicate that the applicability rules are broken (see point 7 in
image below).
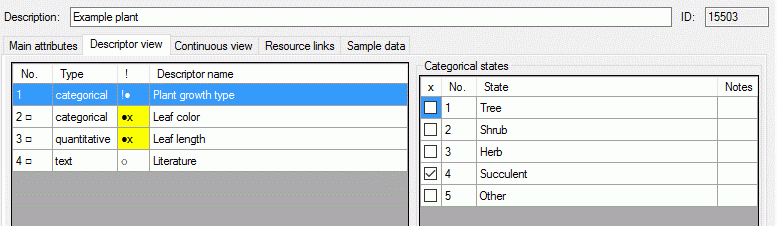
In the “Descriptor view” tab the “descriptor inapplicable” property is
indicated by an “x” in column “!” of the descriptor list (see image
below).
Tutorial Html
Tutorial - Generate an HTML document
Now that we have entered our first description data and learned how to
find them in the database, we want to share that data. Search for the
description of the example plant as described in the previous tutorial
step (see image below).
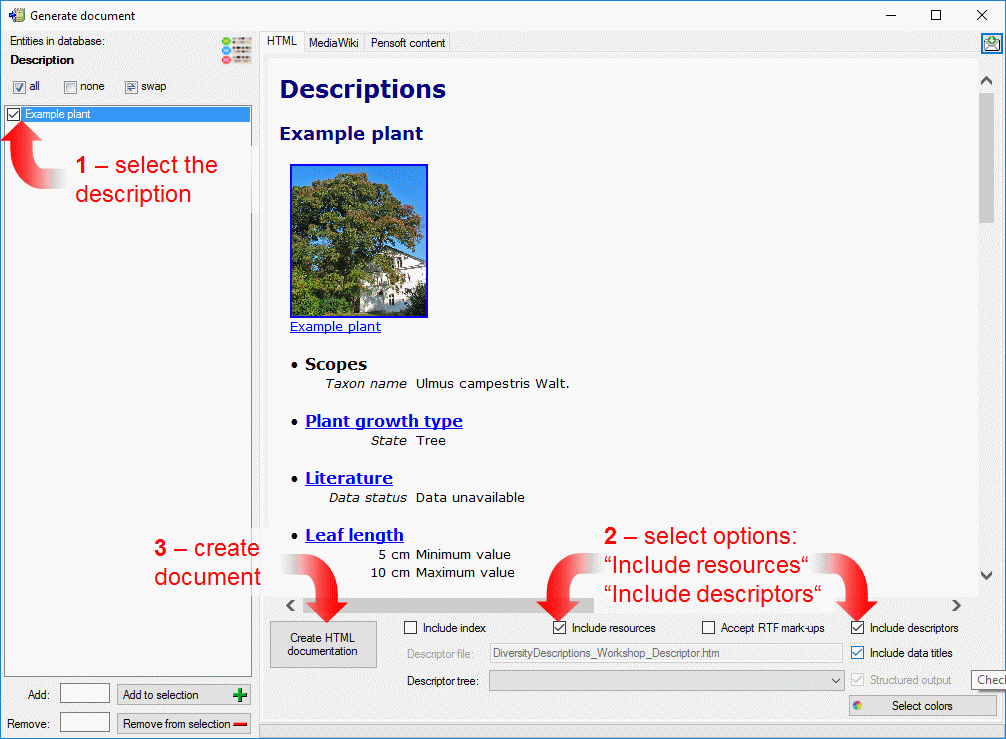
From the menu choose Data →
 Generate document … and a window
will open as shown below. Select the “Example plant” (see point 1 in
image below). Then set the options Include resources to show the
images we have assigned and Include descriptors to generate the
descriptor definitions in the same document (see point 2 in image
below). Finally click on button Create HTML documentation and the
data will be shown in the HTML window (see point 3 in image below).
If you scroll down or click on a descriptor name in the description data
you will find the descriptor data. In the working directory of Diversity
Descriptions a HTML file has been generated that might be used to
publish your data.
Generate document … and a window
will open as shown below. Select the “Example plant” (see point 1 in
image below). Then set the options Include resources to show the
images we have assigned and Include descriptors to generate the
descriptor definitions in the same document (see point 2 in image
below). Finally click on button Create HTML documentation and the
data will be shown in the HTML window (see point 3 in image below).
If you scroll down or click on a descriptor name in the description data
you will find the descriptor data. In the working directory of Diversity
Descriptions a HTML file has been generated that might be used to
publish your data.
This tutorial is continued in the sections listed below.
Tutorial Modifiers
Tutorial - Assign modifiers
Modifiers may be used in the description data for an additional
characterization of categorical or quantitative descriptor data. There
are five different modifier categories: Certainty, Seasonal,
Diurnal, Misinterpretation and Other. An additional modifier
class, Frequency is only applicable for categorical descriptors.
Although you are allowed to define own modifier values, there is a large
number of commonly used predefined modifier and frequency values, which
should be preferred. We now want to insert those predefined values into
the database.
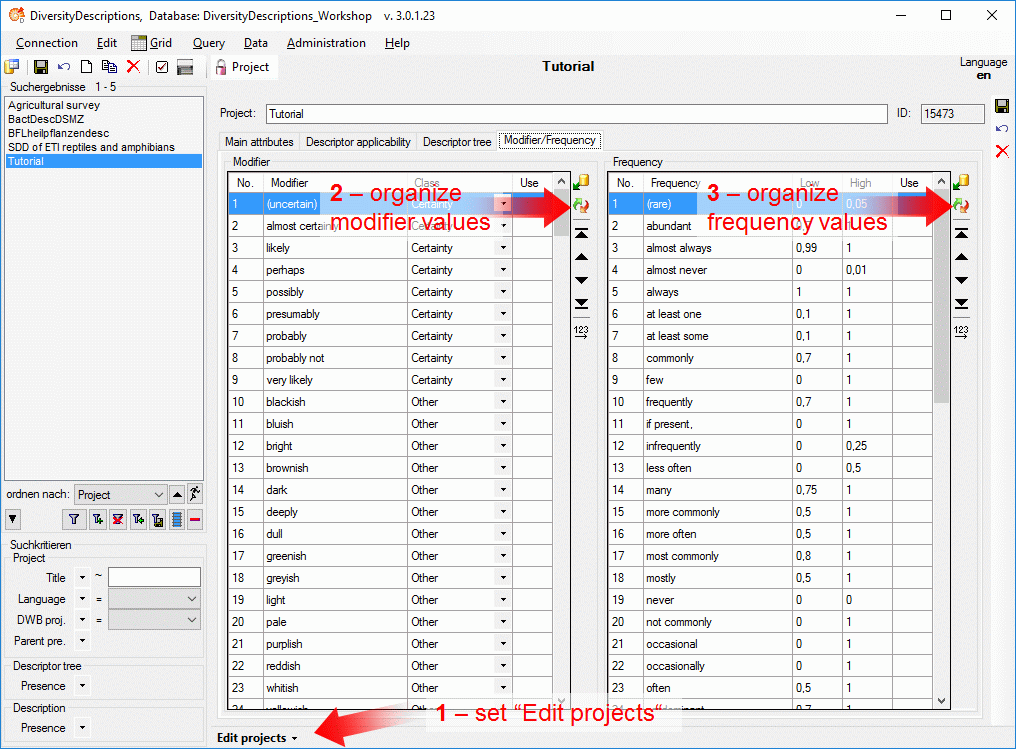
Select edit mode projects from menu Edit->Projects and open the
“Modifier/Frequency” tab (see point 1 in image above). The modifier
and frequency tables should both be empty. A click on button
 in the modifier section (see point 2 in
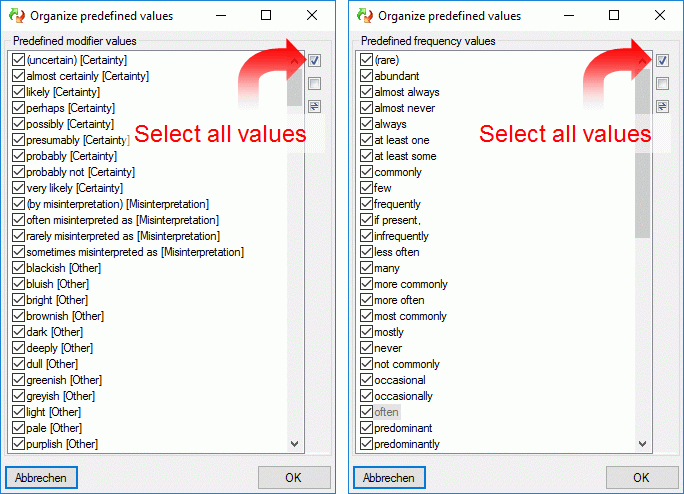
image above) opens a window with the predefined values (see impage below
left). Click on button
in the modifier section (see point 2 in
image above) opens a window with the predefined values (see impage below
left). Click on button  selects all values from
the list. Click “OK” and all modifier values are now inserted in the
modifier table. Proceed in the same way with the frequency values (see
point 3 in image above and image below right). The values are now
available for all projects in the database.
selects all values from
the list. Click “OK” and all modifier values are now inserted in the
modifier table. Proceed in the same way with the frequency values (see
point 3 in image above and image below right). The values are now
available for all projects in the database.
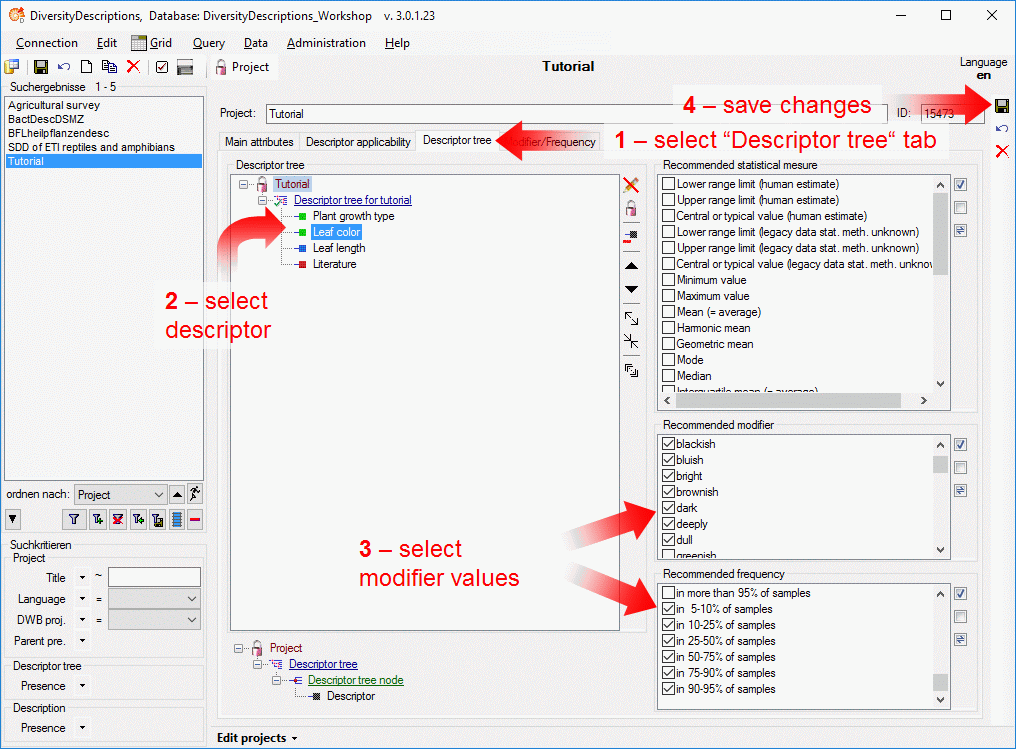
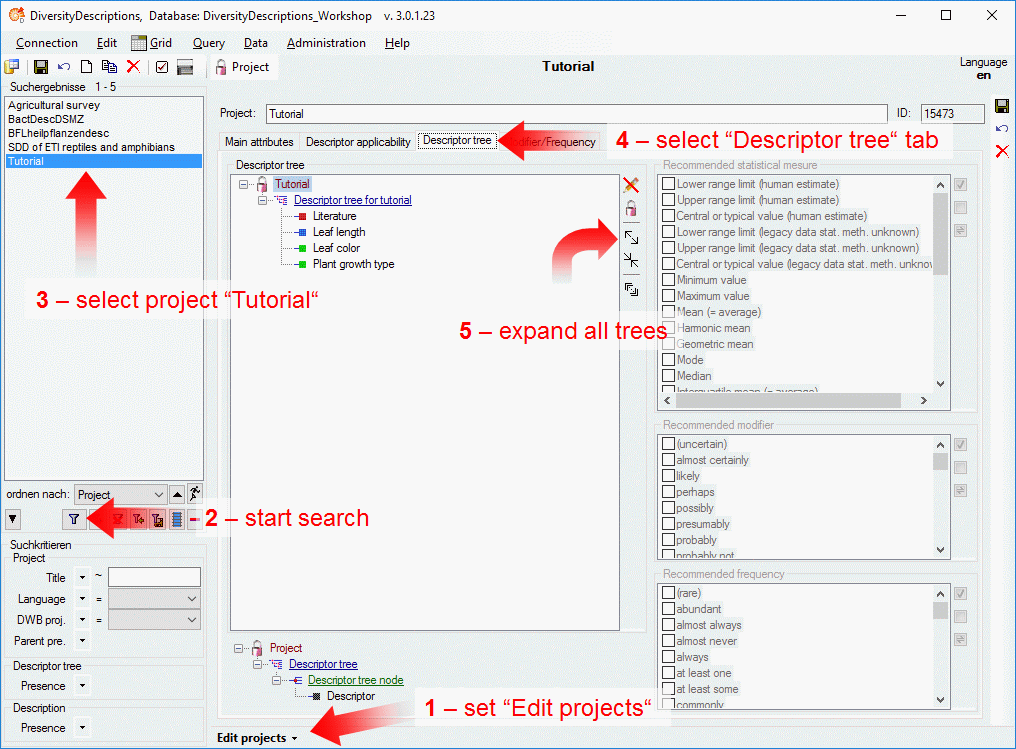
To use certain modifiers in the descriptive data, the allowed values
must be assigned to certain descriptors. This is done int the descriptor
tree in almost the same way as the assignment of statistical measures to
quantitative descriptors. Select
the “Descriptor tree” tab (see point 1 in image below) and click
button to dispay the recommended values. Then
select descriptor “Leaf color” and select some modifier and frequency
values (see point 3 in image below). Finally save all changes (see
point 4 in image below).
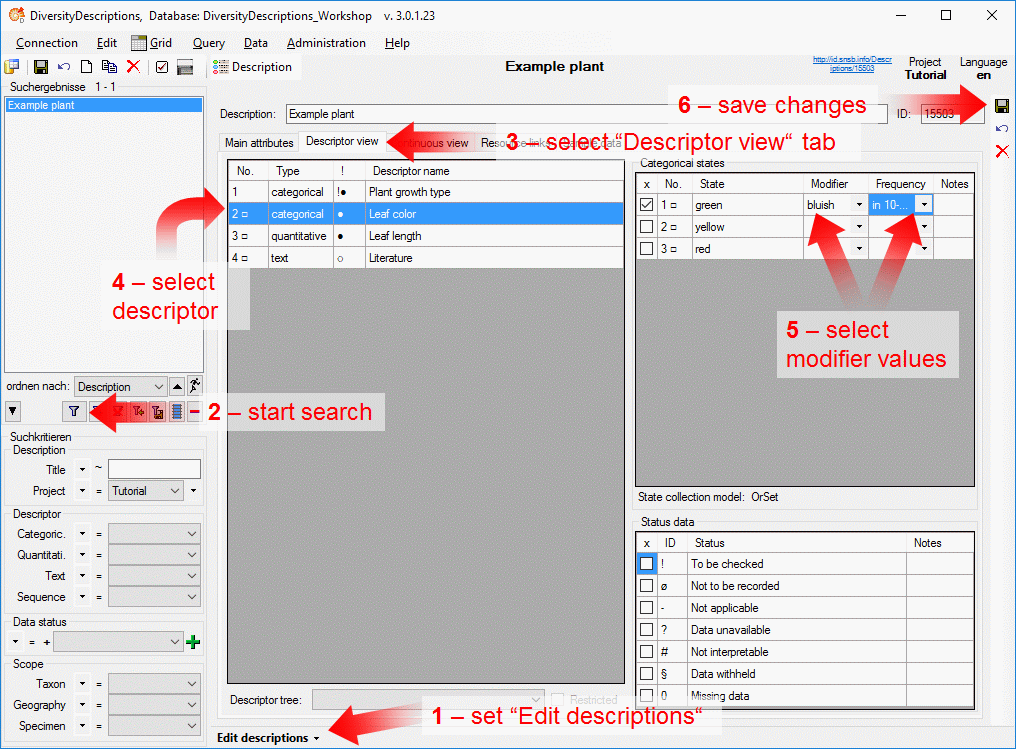
Now let’s try out the modifiers in our example description. Select edit
mode descriptions and search for the example plant (see points 1 and
2 in image below). Open the “Descriptor view” tab and select
descriptor “Leaf color” (see points 3 and 4 in image below). In
the “Categorial states” section you can now find two additional columns
“Modifier” and “Frequence” where you may select from the values you
assigned in the previeous step (see point 5 in image below). Finally
save all changes (see point 6 in image below).
This tutorial is continued in the section listed below. ow.
Tutorial New Project
Tutorial - Create a new project
To create a new project, select edit mode projects from menu
Edit->Projects. Now click on the
button in the upper left panel and confirm with “Yes”
(see point 1 in image below).
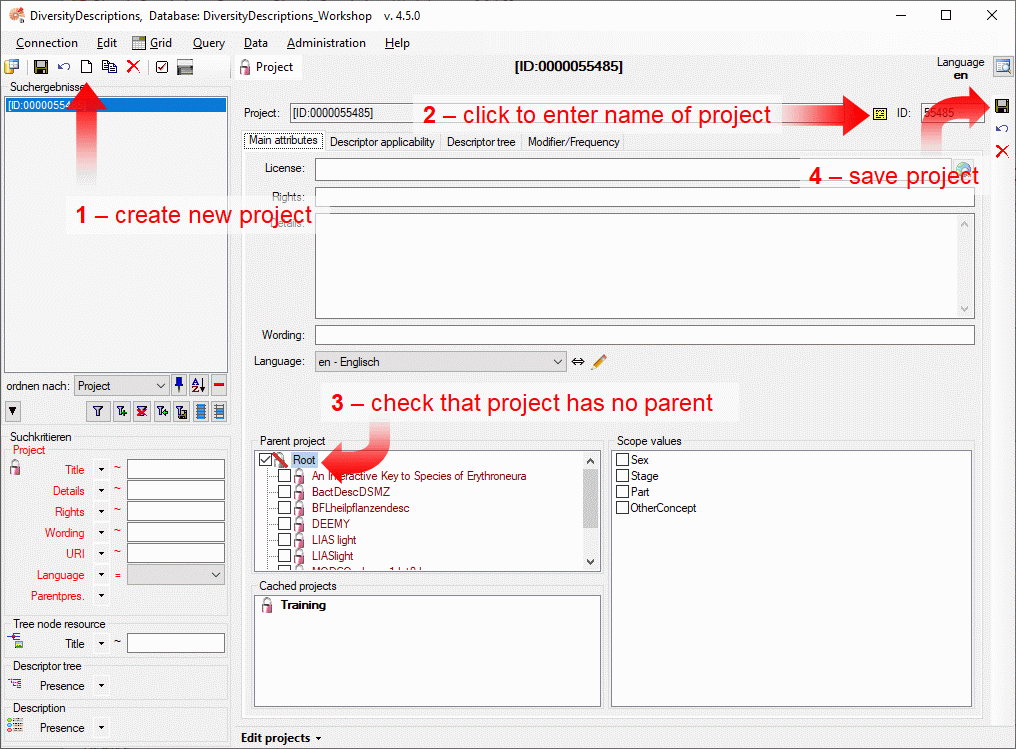
The new project is created with a numeric name. Click on button to
change it to “Tutorial” (see point 2 in image above). Then check
that no other project is selected as a parent of the new one (see point
3 in image above). Finally save the project (see point 5 in
image above) and the project name will be updated in the header and the
query panel at the left side of the window (see image below).
If you like, you may now enter additional project data like a detailled
project descripition (“Details”), a copyright text (“Rights”), the
address of a license text in the internet (“License” - button
 opens a browser window to navigate to the license
page) and you may select the project’s lanuage (see point 1 in image
below).
opens a browser window to navigate to the license
page) and you may select the project’s lanuage (see point 1 in image
below).
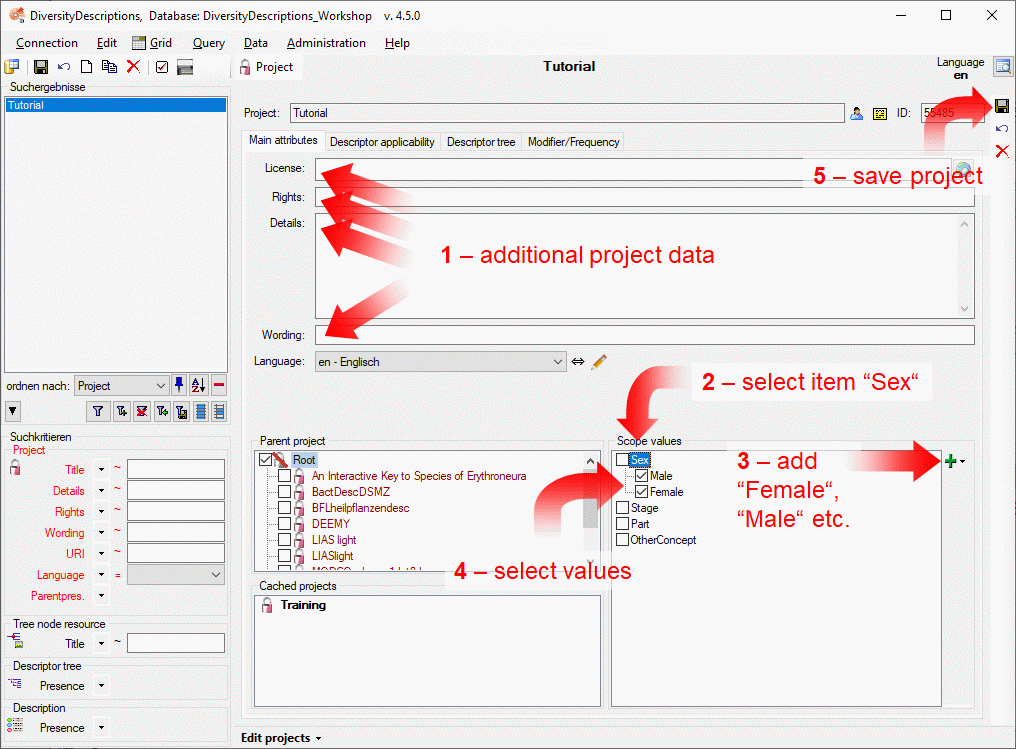
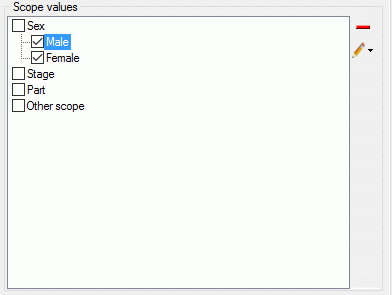
If you want to use scope values for sex in your descriptive data, select
the scope category “Sex” (see point 2 in image above). Now the “Add”
button is enabled. When you click on the button (see
point 3 in the image above) a drop-down menu offers predefined sex
values. Select “Male”, then again click on the “Add” button
and select value “Female”. The two values are now
appended to item “sex”. To make them available for the tutorial project
click on the boxes before the values to set them checked (see point
4 in image above). If you click on one of the scope values,
additional options are available in the task bar at the right (see image
below). Finally save the project (see point 5 in image above)
For the other scope categories no predefined values exit. When you click
the “ Add” button, values with a numeric name will be
appended that can be renamed by clicking on button
“ Edit” and selecting menu item
“ Edit scope name”.
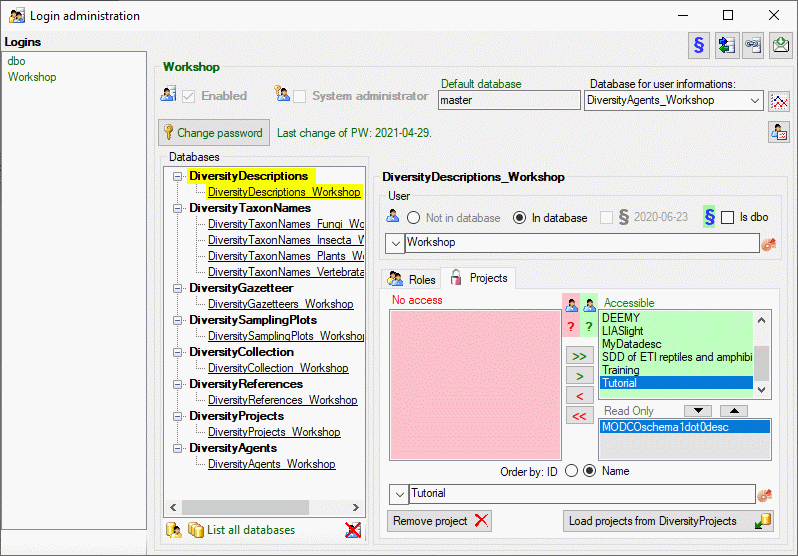
When you create a new project, your user account automatically gets
access rights for that project. If you are “Administrator” - which is
the case for user “Workshop” in the training database, you may take a
look to the login administration from menu
Administration->Database …->Logins …. Select the entry
“Workshop” from Login, then click on the database
“DiversityDescriptions_Base” and open the Projects tab in the login
administration (see below). You find the new project “Tutorial” in the
Accessible projects list.
If you are working with a private database installation and are logged
in with the same Windows accout that has been used for installation of
the Microsof SQL-Server, you are the “database owner” (dbo), which has
the highest database access rights. In this case select entry “dbo” from
Logins. As “dbo” you can administrate access rights of any user and
create or delete logins.
A more detailled description of all editing options can be found in the
Edit projects section of this manual.
This tutorial is continued in the sections listed below.
Tutorial Quantitative Descriptor
Tutorial - Enter a quantitative descriptor
To create a new quantitative descriptor, select edit mode descriptors
from menu Edit->Descriptors. Now click on the
button in the upper left panel (see point 1 in
image below).
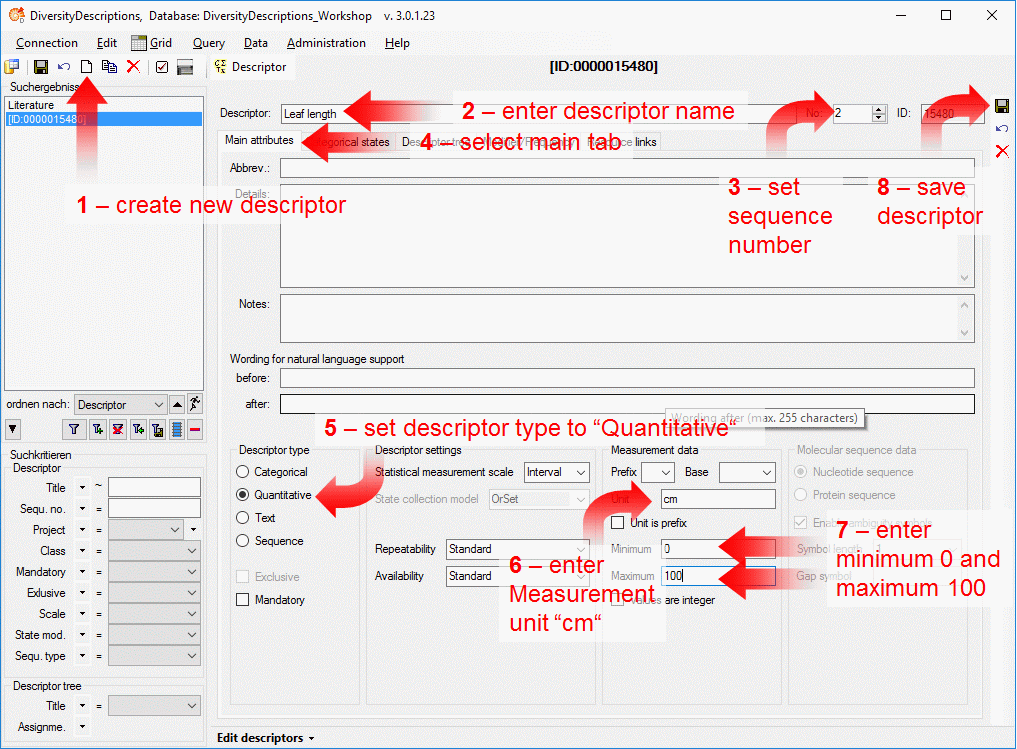
The new descriptor is created with a numeric name. Change it to “Leaf
length” (see point 2 in image above) and set the sequence number to
“2” (see points 3 in image above). Now switch to the main tab and
set the descriptor type to “Quantitative” (see points 4 and 5 in
image above). For the quantitative descriptor we enter the measurement
unit “cm”, a minimum and a maximum value (see points 6 and 7 in
image above). Finally save the descriptor (see point 8 in image
above) and the descriptor name will be updated in the header and the
query panel at the left side of the window.
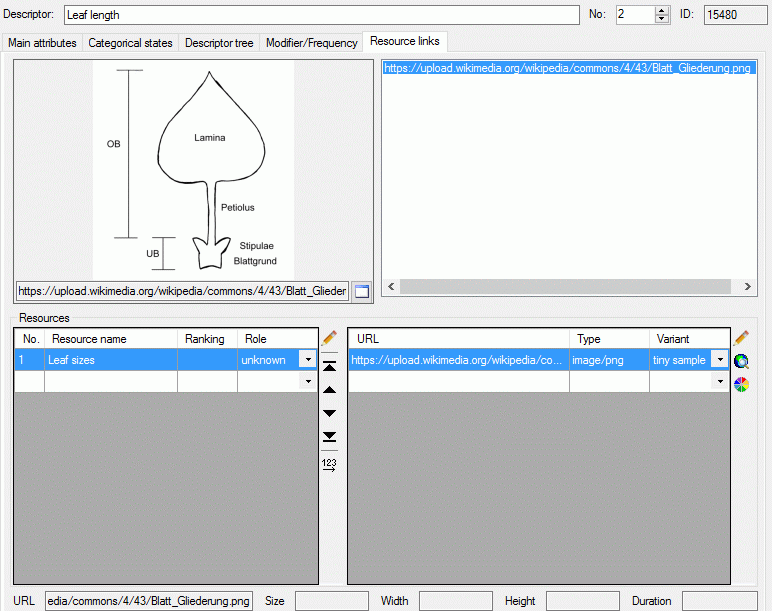
As for the text descriptor we want to attach a resource link to our new
quantitative descriptor, that symbolizes the descriptor’s duty (see
image below, a link to
Wikipedia
was used).
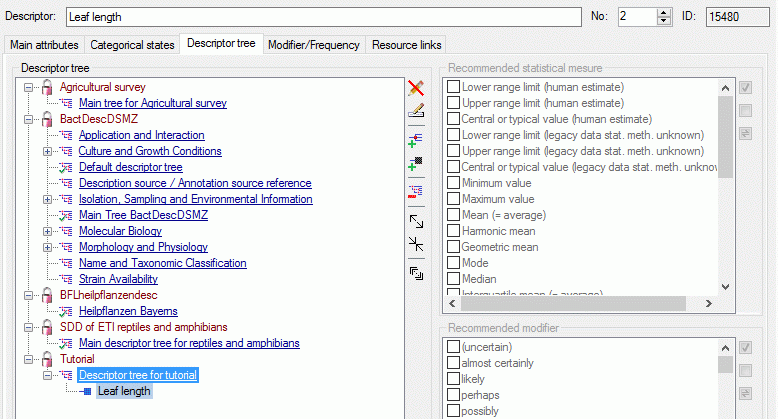
Certainly the quantitative descriptor shall be attached to the
“Descriptor tree for tutorial” that was created in the last step. In the
descriptor tree tab select “Descriptor tree for tutorial” and click
button tab select “Descriptor tree for tutorial” and click button
at the right tool bar (see image below).
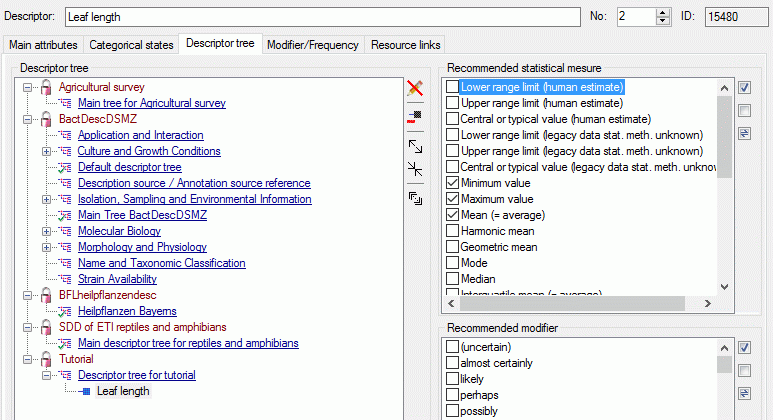
For quantitative descriptors a number of statistical measures are
defined, for which values can be entered in the descriptive data. In the
descriptor tree fo each descriptor of descriptor tree node may be
specified, which values shall be used in the descriptive data. A click
on button opens the recommended statistical
measures on the right side of the window (see image below). Select the
quantitative descriptor in the descriptor tree and then check the
statistical measures “Minimum value”, “Maximum value” and “Mean” (see
image below).
A more detailled description of all editing options can be found in the
Edit descriptors section of this manual.
This tutorial is continued in the sections listed below.
Tutorial Query
Tutorial - Searching the database
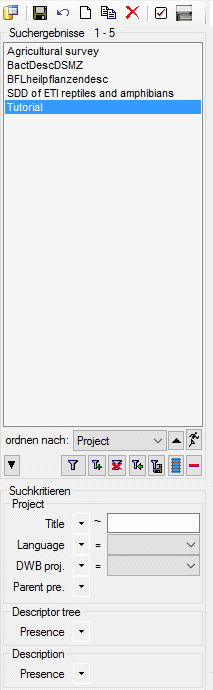
To search for data in the database use the query sector in the left part
of the window. Depending on the actually chosen edit mode -
Descriptions, Descriptors or Projects - the query searches
for descriptions, descriptors or (local) drojects. The query conditions
are changed depending on the edit mode, too (see images below).
To select the query conditions click on the  button in the top panel. A window will open as shown below.
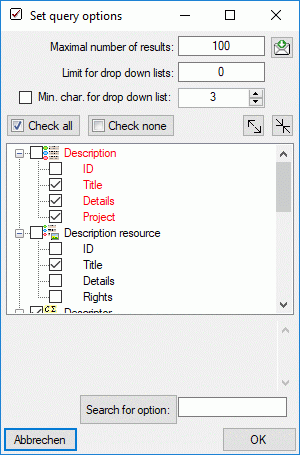
With the Maximum number of results you may limit the package size
which should be retrieved from the server. For a slow connection to the
database server choose a low value (e.g. 100 as set by default).
The Limit for drop-down lists restricts the maximum number of
drop-down lists which should be created. For a slow connection to the
database server choose a low value. The default is set to 0 which means
no drop-down lists will be created.
Click on the Check none button to clear the previous selection or
click Check all to select all conditions. Alternatively you may
display or hide each single query condition by checking or unchecking
the entry in the list.
After all query conditions are set, click on the  button to start the query. In the result list you should find the
description, descriptors or project created in this tutorial. To save
your current query click on the
button to start the query. In the result list you should find the
description, descriptors or project created in this tutorial. To save
your current query click on the  button on the
right of the
button on the
right of the  button. A window will open as
shown below. For more details see the section Savequery.
button. A window will open as
shown below. For more details see the section Savequery.
When you enter new descripors to the databas it may happen that you
forgot to assign it to descriptor tree. That means, those desriptor
cannot be used for entering description data. Another action that may
generate such orphaned descriptors is to delete a project. With that
action implicitely the associated descriptions and descriptor trees will
be removed from the database, but the descriptors will not be deleted,
because they might be assigned to a different descriptor tree (and
project).
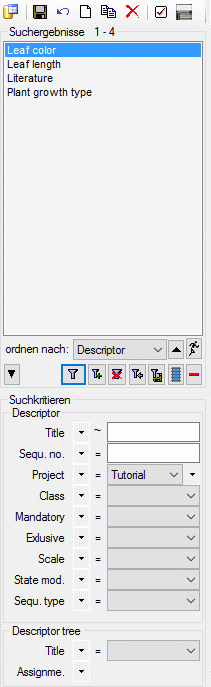
To find and delete orphaned descriptors, set mode “Edit descriptors”
(see point 1 in image below). Then set query condition “Descriptor
tree - Assignment” to “missing” (see point 2 in image below) and
start the search (see point 3 in image below). If you want to
deleted the found descriptors, you can select them in the resulg list
(multiple selection is possible) and click button  to delete them.
This tutorial is continued in the sections listed below.
Tutorial Sort Descriptors
Tutorial - Sort the descriptors
In the tutorial steps when we created a new descriptor, we usually set
the field “Nr.” (sequence number), which determines the sequence the
descriptors are displayed in several lists, e.g. when you enter
description data. If you like to change that display sequence, it is
quite uncomfortable, to go through all descriptors and change the
sequence numbers manually, but there is a much more comfortable way.
Select edit mode projects from menu Edit->Projects or from the
bottom control (see point 1 in image below). Now click on the
button to find the project “Tutorial” (see points
2 and 3 in image below). Open the “Descriptor tree” tab and
expand the trees (see points 4 and 5 in image below).
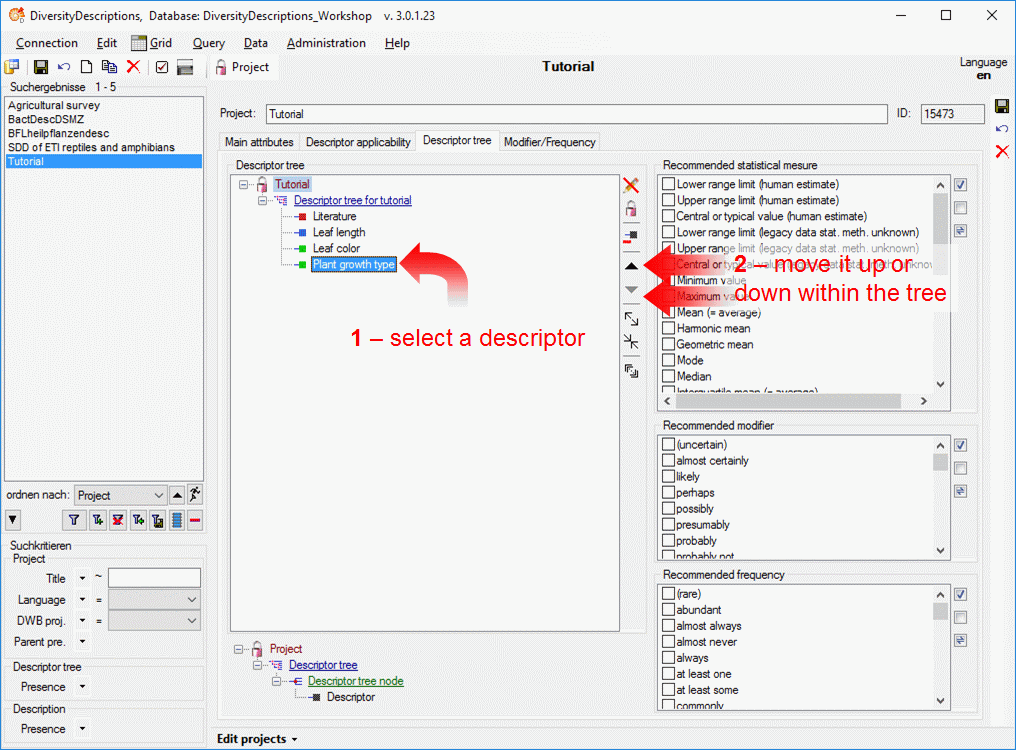
The “Descriptor tree” tab in the “Edit projects” mode looks almost like
that one in the “Edit descriptors” mode. But there are some important
differences. If you are in the “Edit descriptor” mode, only the actually
selected descriptor will be displayed in the tree. In the “Edit
projects” mode all descriptors are diplayed! Therefore the descriptors
may now be shifted up and down to change the order (see points 1 and
2 in image below).
Now select the “Descriptor tree for tutorial” and click button
 (see image below left). With this action you indicate
that this descriptor tree should be complete, i.e. it contains all
descriptors for the project. Now the additional button
(see image below left). With this action you indicate
that this descriptor tree should be complete, i.e. it contains all
descriptors for the project. Now the additional button
 is displayed that allows to take over of the
descriptor tree order to the descriptor’s sequence numbers (see image
below right).
is displayed that allows to take over of the
descriptor tree order to the descriptor’s sequence numbers (see image
below right).
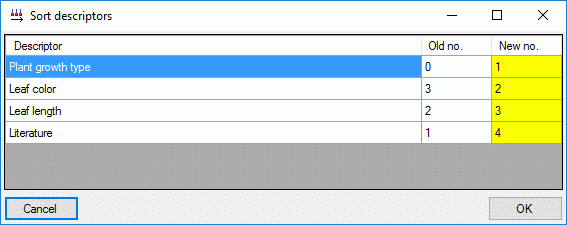
When you click on button a window opens that
displays the changed sequence numbers of the descriptors (see imabe
above). After confirming the changes with “OK” the new order will be
effective in the descriptor list of the “Edit descriptions” (see image
below).
This tutorial is continued in the sections listed below.
Tutorial Text Descriptor
Tutorial - Enter a text descriptor
To create a new text descriptor, select edit mode descriptors from menu
Edit->Descriptors. Now click on the
button in the upper left panel (see point 1 in
image below).
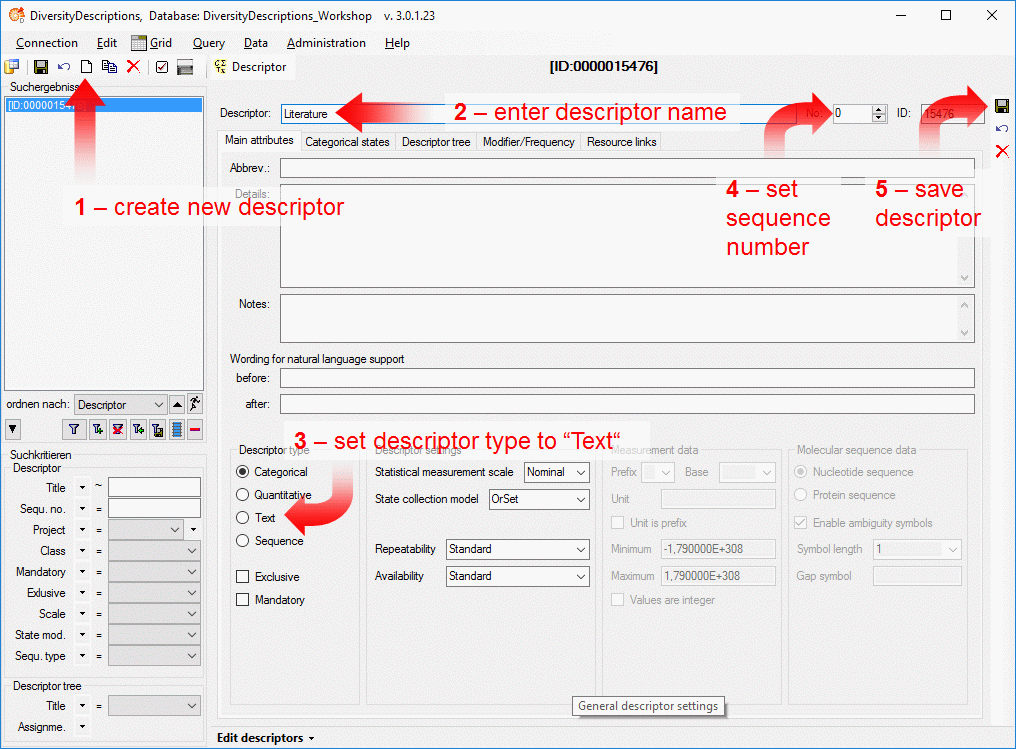
The new descriptor is created with a numeric name. Change it to
“Literature” (see point 2 in image above), because this descriptor
shall allow insert of literature references or citations as free form
text into the description data. Then set the descriptor type to “Text”
(see points 3 in image above) and set the sequence number to “1”
(see points 4 in image above). Finally save the descriptor (see
point 5 in image above) and the descriptor name will be updated in
the header and the query panel at the left side of the window.
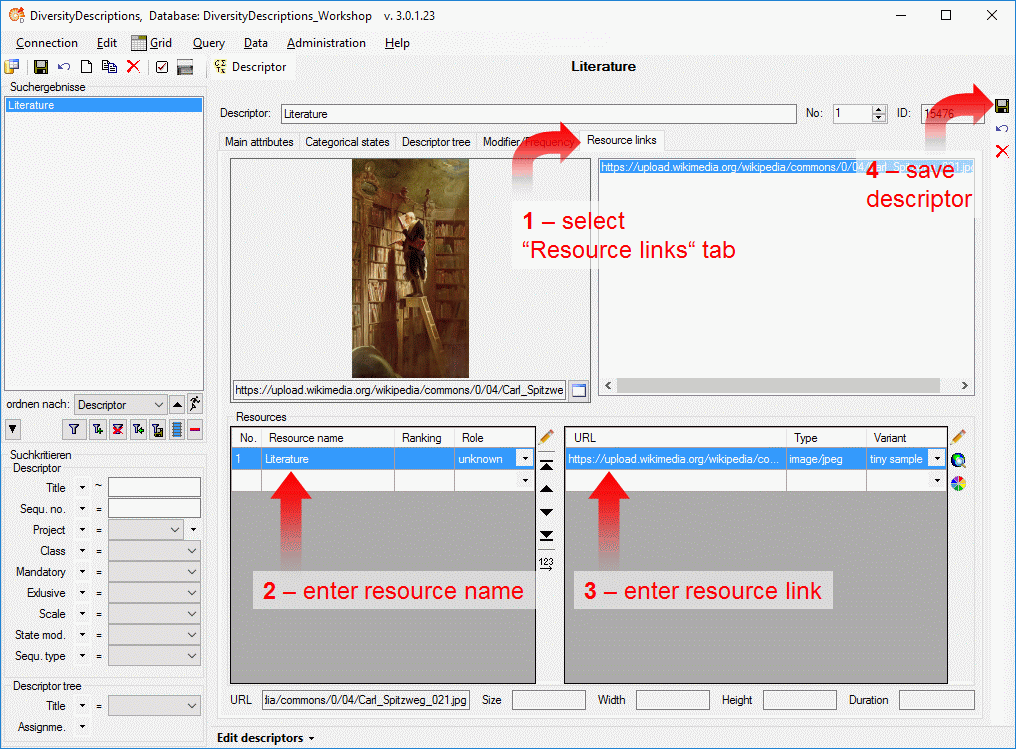
If you like, you may now enter additional descriptor data like a
detailled project descripition (“Details”) or “Notes”. But we want to
attach a resource link to our new text descriptor, that symbolizes the
descriptor’s duty. Therefore select the “Resource links” tab (see point
1 in image below) and enter the resource name “Literature” (see
point 2 in image below). Now you can enter the URL of a picture that
is reachable in the internet (see point 3 in image below, a link to
Wikipedia
was used). Alternatively you may double-click on the “URL” field to open
a browser window, where you can navigate to the picture location.
Finally, don’t forget to save your changes (see point 4 in image
below).
Until now the descriptor is not assigned to any project, i.e. it cannot
be used for entering descriptive data. Assignment of descriptors to
projects is done by using “descriptor trees”. This allows on the one
hand a thematical grouping of the descriptors, on the other hand the
descriptors may be appended to several trees simultaniously. I.e.
descriptors my be used in several distinct projects.
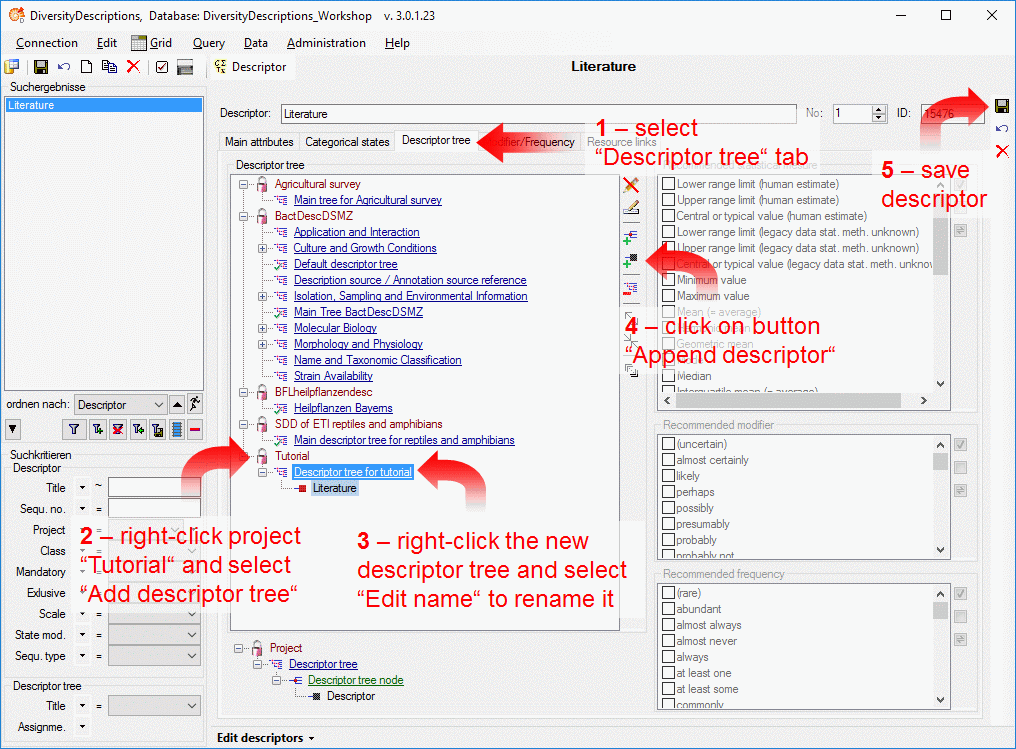
Since no descriptor tree has been created yet, select the “Descriptor
tree” tab (see point 1 in image below), right-click the project
“Tutorial” and select context menu entry “Add descriptor tree” (see
point 2 in image below). A new descriptor tree is appended to the
project “Tutorial” with a numeric name. Right-click the descriptor tree
and select “Edit name” from the context menu to change the name to
“Descriptor tree for tutorial” (see point 3 in image below). To
append the actual descriptor to the tree, click button
at the right tool bar (see point 4 in image
below). In the “Descriptor tree” tab most functions are alternatively
accessible by the tool bar at the right or by the context menu that
opens when you right-click a tree node. Finally, don’t forget to save
your changes (see point 5 in image below).
A more detailled description of all editing options can be found in the
Edit descriptors section of this manual.
This tutorial is continued in the sections listed below.

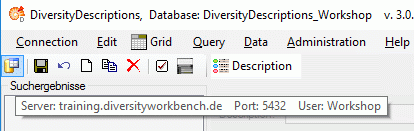
 button or choose
Connection → Database… from the menu. A window will open where
you may enter your account information and choose the database (see
image below, for further information see databaseaccess).
button or choose
Connection → Database… from the menu. A window will open where
you may enter your account information and choose the database (see
image below, for further information see databaseaccess).
 symbol in the right upper corner, you are now
connected to the database. The tooltip of the
symbol in the right upper corner, you are now
connected to the database. The tooltip of the