The items or organisms in one CollectionSpecimen are regarded as IdentificationUnits. One specimen can contain several IdentificationUnits e.g. an insect (1) feeding on a fungus (2) growing as a parasite on a plant (3). To add a new organism use the drop-down menu as shown below to select the taxonomic group to which the new organism belongs to.
To specify the taxonomic groups that are shown in the drop-down menu select Administration - Customize display ... from the menu.
The organisms of the
specimen are shown in the
tree. To edit the relations between the organisms simply
drag and drop. In case of a shortcut in the hierarchy you will be asked to
select the start of the hierarchy as described in the video:
 .
The name of the organism under which the specimen is stored
in the collection is
underlined.
To
delete an organism select it in the
tree and click on the
.
The name of the organism under which the specimen is stored
in the collection is
underlined.
To
delete an organism select it in the
tree and click on the  button.
To enter details about one of the organisms like e.g. gender or life stage, select it in the tree. The fields for the details of this organism will be displayed in the right area of the window as shown below.
If the Identification unit is e.g. not a complete
organism you can enter a description for this
IdentificationUnit. Either type you description or choose one of the predefined descriptions
via combobox or hierarchy: Use the
combobox to select a description as found for the same taxonomic
group in
the database or use the hierarchy-selector
 to select a predefined description. An additional
description can be entered for an IdentificationUnit within part of a
CollectionSpecimen.
to select a predefined description. An additional
description can be entered for an IdentificationUnit within part of a
CollectionSpecimen.
The entries for the family and the order of the taxon are either set when linking to a taxonomic database or set manually when no link to a taxonomic database exists.

If no link to a taxonomic
database exists you may
enter the family and the order after clicking on the
 button. To transfer these entries to other specimens with
the same genus use the
maintenance functions as described under
Maintenance - family
and order.
button. To transfer these entries to other specimens with
the same genus use the
maintenance functions as described under
Maintenance - family
and order.
If a unit contains parts which have to be documented, you can do this by setting the relation to the substrate to "Part of".

In the tree the background of a part will be grey as shown below for the unit-tree und the tree depicting the storage of a sample. The name of the part will correspond to the identifier set for this part. The icon will correspond to the description of the part provided you choose one of the preset options contained in the drop-down list. You may of course enter any description for the unit. A unit that is part of another unit can not get an identification. Identifications are restricted to the main unit.
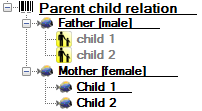
If a unit is a genetic child of a parent, choose "Child of" as type of the
relation. If there are 2 parents
like mother and father that you want to document, click on the
 button next to the relation type. A window will open where you
can choose among
the organisms (= units) in your sample. The second parent will
be indicated with
the
symbol in the tree (see below).
button next to the relation type. A window will open where you
can choose among
the organisms (= units) in your sample. The second parent will
be indicated with
the
symbol in the tree (see below).
For details about exsiccatal series and analysis see the related topics. You can sort your IdentificationUnits e.g. for display on a label with the display order button. Each IdentificationUnit can have several identifications.
With the template you can define
 and copy
 predefined values into the data (see chapter Template).
If there are images which are related to the current
organism, the button for the restriction of the images will be
enabled (
 →
→
 ). Click on it to restrict the
images to this
organism. The button will get a red background
to remind you about the restriction and in the image list a
button
). Click on it to restrict the
images to this
organism. The button will get a red background
to remind you about the restriction and in the image list a
button
 will appear that enables you to show all images.
Non biological units like
 soil,
soil,
 rock or
 mineral do not have biology related characters
like family or sex. These are therefore not displayed for these groups.
mineral do not have biology related characters
like family or sex. These are therefore not displayed for these groups.
The data for the organisms and non biological units are stored in the table IdentificationUnit.