Parts of the specimen
A specimen can
contain several parts which
may be stored in several collections. These parts may represent
different material categories,
e.g. herbarium sheets, microscopic slides etc. The parts are
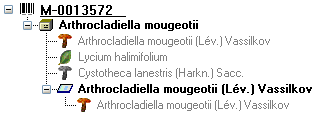
shown in the part tree
under the main tree. This tree depicts the parts either in
accordance to their relation
to each other in the specimen tree (click on the
 icon in the panel on the left) - see first image below - or in
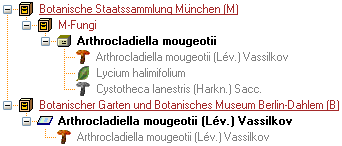
relation to the collections
where the parts are stored (click on the
icon in the panel on the left) - see first image below - or in
relation to the collections
where the parts are stored (click on the
 icon in the panel on the left) - see second image below. Here
the two parts of the
specimen are located in two collections. To add a new part use
the drop-down field
icon in the panel on the left) - see second image below. Here
the two parts of the
specimen are located in two collections. To add a new part use
the drop-down field
 in the panel on the right of the tree and choose the material
category of the new
part. The material categories which appear in this list can be
customized.
You can set the a default collection
for new parts. If the default collection
is not set, you will be asked to name the collection of the new
part. If the part
is derived from another part, select this in the tree before
creating the new part.
The new part will then be added as a child of the old part. You
can later edit these relations
by drag & drop. If you wish to create a copy of a part, use
the
in the panel on the right of the tree and choose the material
category of the new
part. The material categories which appear in this list can be
customized.
You can set the a default collection
for new parts. If the default collection
is not set, you will be asked to name the collection of the new
part. If the part
is derived from another part, select this in the tree before
creating the new part.
The new part will then be added as a child of the old part. You
can later edit these relations
by drag & drop. If you wish to create a copy of a part, use
the
 button in the panel on the right side of the tree.
To insert parts when the tree is hidden use the
button in the panel on the right side of the tree.
To insert parts when the tree is hidden use the
 button and follow the
upcoming dialogs.
As another option you can transfer all specimens in the result
list of a query via the
menu Data -
button and follow the
upcoming dialogs.
As another option you can transfer all specimens in the result
list of a query via the
menu Data -
 Transfer -
To collection ... into a
collection. Please keep in mind that next to adding part
existing part will be transferred to the selected collection as
well.
Transfer -
To collection ... into a
collection. Please keep in mind that next to adding part
existing part will be transferred to the selected collection as
well.

To see the whole content of a collection, click on
the
 button. All specimens within the
collections will be listed as shown below with e.g. their accession number,
accession number of the part, storage
location, collection date and/or locality as set in Customize
.
button. All specimens within the
collections will be listed as shown below with e.g. their accession number,
accession number of the part, storage
location, collection date and/or locality as set in Customize
.
If an organism is present in
a part of the specimen,
it will be shown in the tree. To edit its presence select
the specimen part in the tree and
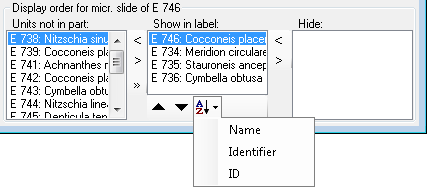
edit the Display order as shown below.

In the example above, all
organisms are present
in the specimen. However, the fungus Cystotheca
lanestris was chosen not to appear on
the label and was transferred to the Hide
list. This is symbolized by a grey icon
 in the tree. You may enter a description for an organism as a whole
or for the organism within a certain part. The slide,
symbolized by the
in the tree. You may enter a description for an organism as a whole
or for the organism within a certain part. The slide,
symbolized by the
 icon, was created from the sample. Thus, in the specimen
tree it is shown as a child
of the specimen symbolized by the
icon. Concerning the organisms only the fungus
Arthrocladiella is found on the
slide. Thus, in the tree it is the only organism shown as
child of the slide. In the display order
the two other organisms appear in the Units not in
part
list (see below).
icon, was created from the sample. Thus, in the specimen
tree it is shown as a child
of the specimen symbolized by the
icon. Concerning the organisms only the fungus
Arthrocladiella is found on the
slide. Thus, in the tree it is the only organism shown as
child of the slide. In the display order
the two other organisms appear in the Units not in
part
list (see below).

To move the organisms
between the lists use
the > and < buttons.
In the list Show in
label you may change the sequence of the organisms
with the
 and
and
 buttons in the panel at the base of the list. The organism
at the top will
be the one taken as the main organism, e.g. for printing a
label.
buttons in the panel at the base of the list. The organism
at the top will
be the one taken as the main organism, e.g. for printing a
label.
To see changes of the stock of the part click on
the button
 . A window will open listing all previous
volumns together unit, the date and the responsible user.
. A window will open listing all previous
volumns together unit, the date and the responsible user.
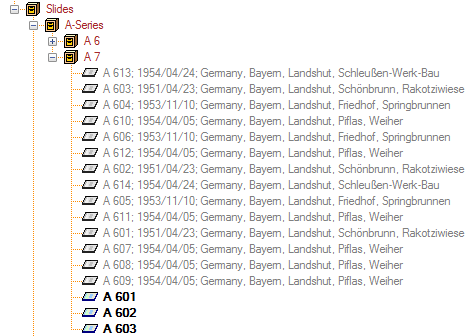
To change the sequence of the parts according to
e.g. the name instead of setting all entries one by one, you may choose among
the options shown in the image below (Name, Identifier, ID).
To edit the details of a part select it in the tree to open
the fields
as shown below.
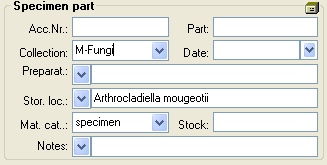
The
identifier, e.g. the taxonomic name
under which the specimen can be found
in the collection is entered in the
field Storage location.
You can search for this entry in the
query.
With the template you can define
 and copy
 predefined values into the data (see chapter Template).
To search for
a free accession number use the
 button (see chapter Accession).
To enter the storage location you may
use the drop-down button
button (see chapter Accession).
To enter the storage location you may
use the drop-down button
 to select from e.g. the identifications within the specimen. The source for the list
can be specified under
Administration - Customize display ... (see below).
to select from e.g. the identifications within the specimen. The source for the list
can be specified under
Administration - Customize display ... (see below).

The drop-down button
for the Notes will provide you with a list of all
entries in this field, filtered with your entry
in the text field. You may use wildcards like "%" or "_"
(see Wildcards).
In the
collection tree, the specimens are shown with
their dependence upon each other based on their location
in Collections.
To get information about
a collection simply select it in the tree. If you have the
required rights, you may use the
button to open the administration of the collections.
This form is accessible
under the menu entry Administration -
Collections... as
well.
The material category of a specimen
part is indicated by the icon in the hierarchy.
Here some
examples:
 bones: bones or skeleton from vertebrates
 cultures: living cultures of organisms
 drawing: original line or color drawing
 herbarium sheets: capsules or sheets as stored in a
botanical collection
herbarium sheets: capsules or sheets as stored in a
botanical collection
 icons: icons, images etc. stored in a botanical
collection
icons: icons, images etc. stored in a botanical
collection
 micr. slide: glass plate with sections of specimen for
microscopic studies
micr. slide: glass plate with sections of specimen for
microscopic studies
 specimen: specimen stored in a collection
Specimens
can be included in a
transaction. Every stored
part of a specimen may be
treated with several processings.
If there are images
which are related to the current part, the button for the
restriction of the images will be enabled (
 →
→
 ). Click on it to restrict the
images to this part. The button will receive
a red background
to remind you of the restriction and in the image list a button
). Click on it to restrict the
images to this part. The button will receive
a red background
to remind you of the restriction and in the image list a button
 will appear which enables you to show all images.
To edit the
parts of the specimens in a table
see the chapter Grid for
parts, use the
 Table editor for the
Part table or the
Part sheet from the
Table editor for the
Part table or the
Part sheet from the
 Spreadsheets .
The data is stored in the
table
CollectionSpecimenPart.