These chapters provide best practice instructions for the software. Every chapter sets the focus on certain aspects for handling the data, e.g. how to store data for drawer digitization.
Beispiel einer Nasssammlung mit zahlreichen Objekten in einem Gefäß
Subsections of Best practice
Best practice
Artefact collection
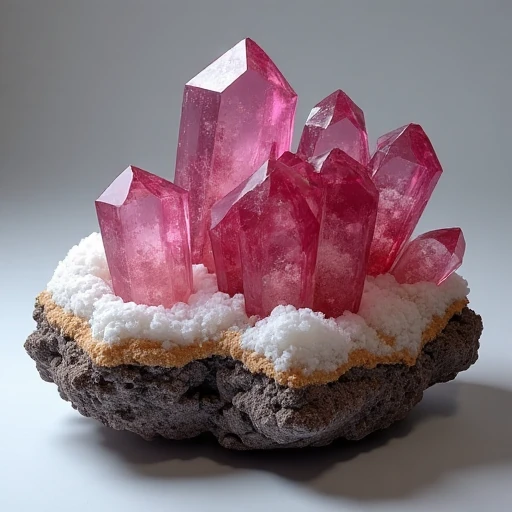
Unter Artefakt wird in der DWB ein künstlich erstelltes Objekt verstanden, zum Beispiel ein Kunstwerk, ein Werkzeug, eine Nachbildung eines Knochens. Denkbar ist auch ein Objekt, das teils aus natürlichen und teils aus künstlichen Objekten besteht wie z.B. ein Skelett beim dem fehlende Teile durch künstlich angefertigte Knochen ergänzt wurden.
Am Beispiel einer Sammlung mit Modellen von Organen oder prähistorischen Werkzeugen:
Details zur Erstellung und zum Material des Artefakts werden in → Processing verwaltet.
Die für die Hersellung verwendetet Werkzeuge und Maschinen werden in → Methods & Parameter verwaltet.
Details zum Erwerb, Kaufpreis etc. des Artefakts werden in → Transaction verwaltet.
Discovery of the artefact of the artefact are handled in the → CollectionEvent
Discoverers of the artefact are handled in the → CollectionAgent
Related terminologies
If the artefact is related to a biological organism the taxonomy is handled in → DiversityTaxonNames
Other aspects of the artefact, e.g. the cultural period or the systematic of a molded bone can relate to terms in → DiversityScientificTerms
Related terminologies
Auch für die Modelle sollten, sofern anwendbar, die verwendenden Namen mit den entsprechenden Quellen in DiversityTaxonNames beziehungsweise DiversityScientificTerms verknüpft werden. Ein Beispiel wäre ein Abguss eines Knochens wobei sich das Taxon auf DiversityTaxonNames bezieht und der Knochen selbst auf einen Begriff in DiversityScientificTerms bezieht. Die Einordnung eines Kunstwerks, e.g. Barock kann ebenfalls über DiversityScientificTerms erfolgen.
Herstellung
Die Herstellung und das Material des Abgusses werden in Processing dokumentiert. Die verwendeten Werkzeuge wie z.B. der verwendete 3-D Drucker werden in Methods & Parameter festgehalten.
Fundkontext
Handelt es sich um ein Objekt das an einem bestimmten Ort aufgefunden wurde, so kann der Ort und sofern relevant der geologische Kontext über das Sammelereignis (Event) charakterisiert werden.
Beispiel 3D-Reproduktion von Knochen
s. auch das video:
Vorbereitungen
Es empfielt sich allgemeine Angaben zu den Replikaten und für deren Erstellung verwendete Werkzeuge vor dem Eintrag des ersten Replikats zu erfassen. Diese können dann für die Erfassung der Daten des Replikats bzw. dessen Herstellung verwendet werden.
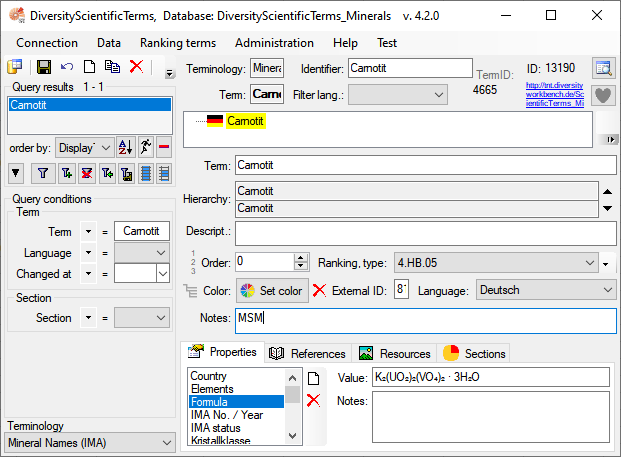
Eintrag in DiversityScientificTerms
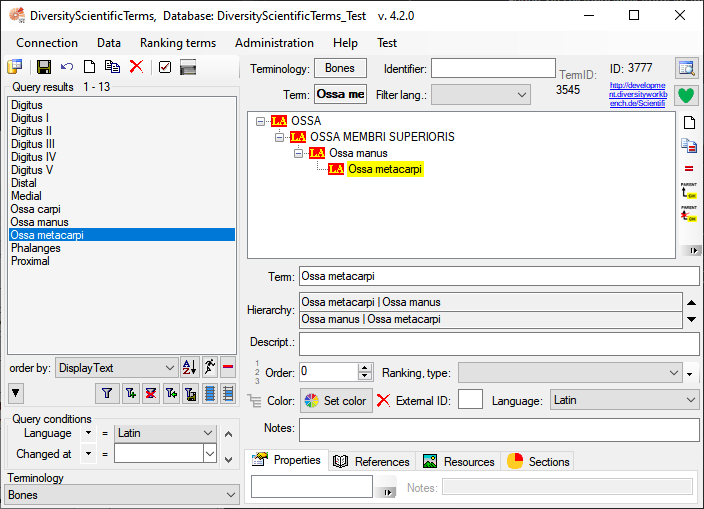
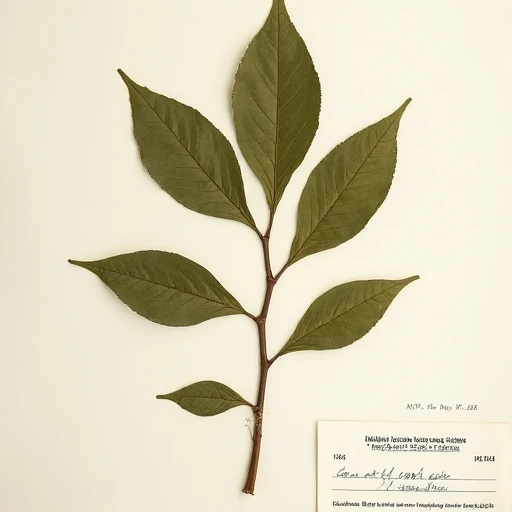
In diesem Beispiel werden Repliate von Knochen erstellt. Dazu sollte man zur Vorbereitung im Modul DiversityScientificTerms die genaue Beschreibung der reproduzierten Knochen sowie deren Einordnung innerhalb eines Skeletts erfassen (s. Abbildung unten).
Eintrag in DiversityTaxonNames
Analog zu den Eintragungen in DiversityScientificTerms kann man für das Taxon selbst eine der Online-Quellen wie e.g. den Catalogue of Life verwenden. Alternativ dazu werden die Taxa im Modul DiversityTaxonNames erfasst.
Methods
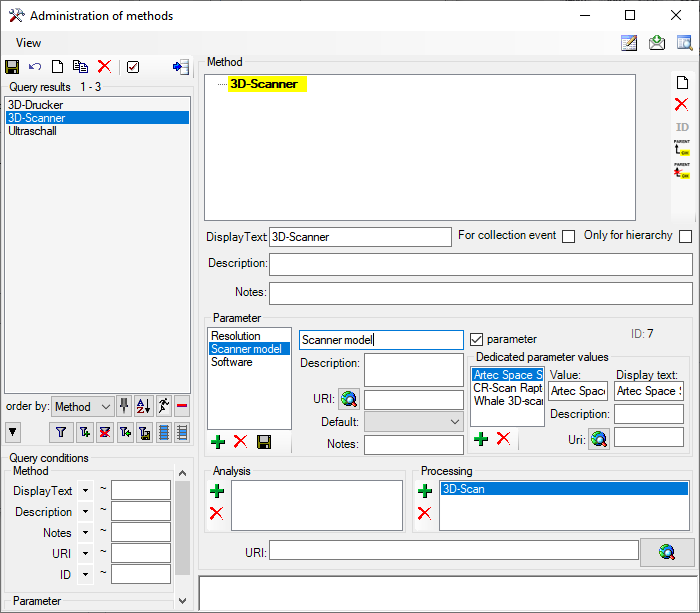
Im Modul DiversityCollection werden zur Vorbereitung die verwendeten Werkzeuge und deren Parameter definiert. Diese können dann für die Erfassung der 3D-Daten und den 3D-Druck verwendet werden. Dazu werden unter Adminstration → Methods z.B. ein “3D-Scanner” als neue Methode hinzugefügt sowie die zugehörigen Parameter angelegt (s. unten).
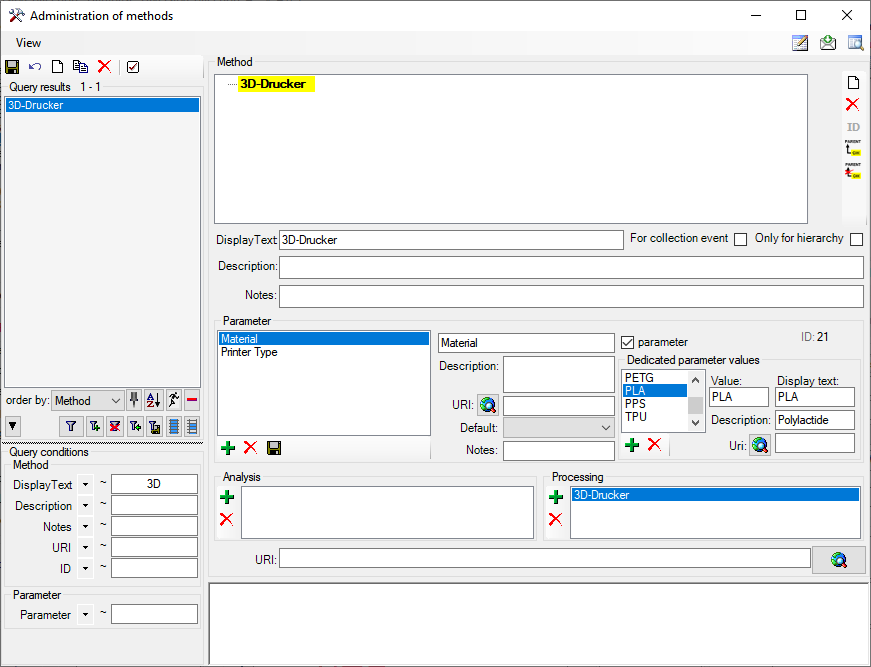
Analog dazu werden für die Erfassung des 3D-Drucks Methoden für dessen Erstellung angelegt, e.g. die verwendeten Drucker und deren Parameter. Im Beispiel unten wurden der Typ des Druckers und mögliche verwendete Materialien als Parameter angelegt.
Processing
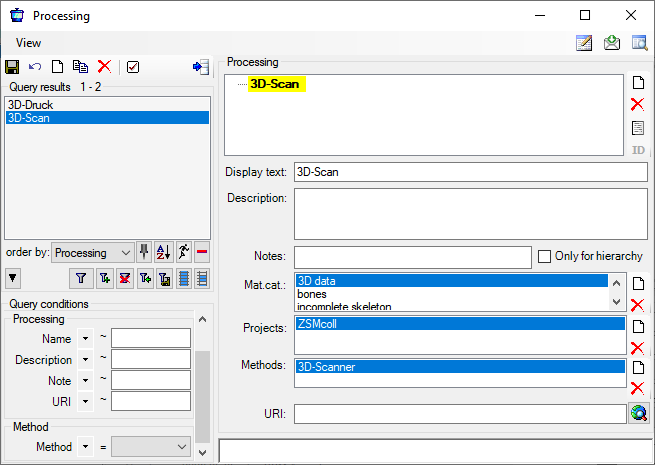
Unter Administration → Processing werden Processings für den 3D-Scan angelegt. Dann werden die Verknüpfungen für die Methoden (3D-Scanner), das Material (u.a. 3D data) sowie die Projekte in denen selbige Verwendung finden eingetragen.
Analog dazu werden die Daten für den 3D-Druck angelegt (Materialkategorie → synthetic specimen, Methods → 3D-Drucker).
Damit sind die Vorbereitungen abgeschlossen. Diese müssen im Idealfall nur einmalig angelegt werden und können dann für den Eintrag der Daten der Replikate genutzt werden.
Eintrag der Daten des Replikats
Nach dem die allgemeinen Prozesse und Methoden defniert wurden kann schliesslich das Objekt selbst in der Sammlung angelegt werden.
Zunächst wird das Taxon (hier Pan paniscus) selbst eingetragen. Die taxonomische Gruppe für den Knochen ist in diesem Beispiel mammal und für die Bestimmung wird hier auf den entsprechenden Eintrag in Catalogue of Life verwiesen.
Als Nächstes wird nun ein Teil eines Skeletts mit einem 3D-Scanner erfasst und danach mit einem 3D-Drucker repliziert.
3D-Daten
Zunächst werden als Grundlage für den Druck die Daten via 3D-Scan erfasst. Hier kommen nun die zuvor definierten Processings und Methoden zur Anwendung. Die Details zum verwendeten Scanner werden über Processing mit Ergänzung durch Methods und Parameter erfasst (s. unten).
Replikat
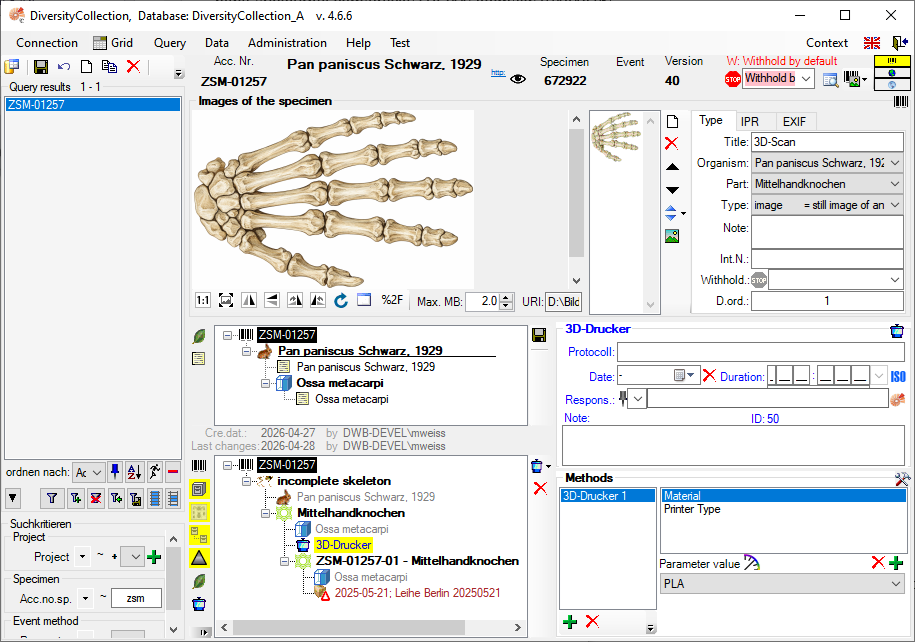
Mit den erfassten 3D-Daten kann dann der Druck mit einem 3D-Drucker erfolgen. Für das neu erstellte Replikat wird wieder ein Part angelegt mit der Material Category synthetic specimen um es von den echten Knochen zu unterscheiden. Um zu dokumentieren wie der 3D Druck erzeugt wurde und z.B. welches Material dafür verwednet wurde werden wieder Processing mit Ergänzung durch Methods und Parameter verwendet (s. Abb. unten).
Werden mehrere Replikate des Teils angefertigt, kann dies als Zahl unter Stock vermerkt werden.
Beschreibungen des Teils können mit optionalen Verweisen auf DiversityScientificTerms eingetragen werden (s. Abb. unten)
Müssen für eines mit den gleichen Druckparamtern erzeugten Replikate zusätzliche Daten eingegeben werden, wie e.g. eine Ausleihe, so kann dieses unterhalb des Haupteintrags explizit eingetragen werden. Zum Anlegen eines Replikats kann die Kopierfunktion für Teile verwendet werden. Im Beispiel oben wurde ein Replikat separat erfasst um die Ausleihe für dieses Replikat zu dokumentieren.
Übersicht
Die Übersicht unten veranschaulicht unabhängig von obigem Beispiel allgemein die Bereiche für Artefakte.
Ein Beispiel wäre eine Sammlung von Knochen, Mineralien oder ein Insektenkasten mit genadelten Insekten. Dabei ändert sich die Position der einzelnen Objekte innerhalb des Containers nicht. So liegt beispielsweise jeder Knochen in einem separaten Gefäß in der Schublade. Damit kann der Zustand des Containers mit allen darin befindlichen Objekten erfasst werden (s. Kapitel Sammlungsplan). Die Position der Objekte kann anhand einer Abbildung erfasst werden. Sollte sich eine Position ändern wird der neue Zustand mittels einer neuen Abbildung erfasst. Der vorherige Zustand bleibt als Backup erhalten.
---
title: Collection in containers
---
graph TD;
    Container(Container) -->| capture image for a plan | CollectionPlan[Plan of container]
    CollectionPlan --> | record position of objects | Objects
    Container --> | contains objects | Objects
    Container -->  Rearrange{Rearrange<br/>objects}
    Rearrange --> | new plan of container | CollectionPlan
    Rearrange --> | backup for previous plan | CollectionImage
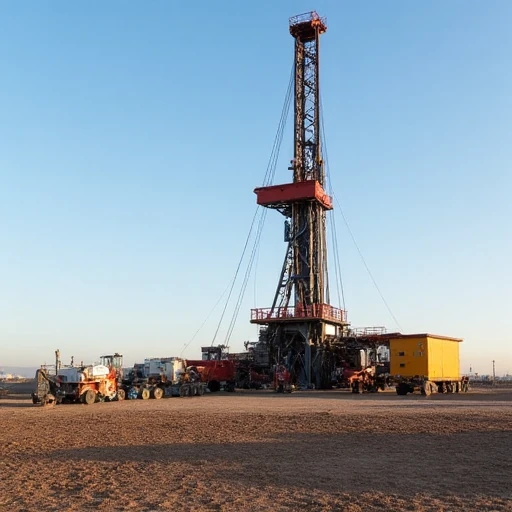
Eine Sammlung von Bohrkernen von e.g. Gesteinen, Eis oder Bäumen
Namen mit Verweis auf die Datenbank ScientificTerms oder TaxonNames.
Analysen zur Charakterisierungen einzelner Schichten mit e.g. Mineralen
Fundstellen wie Steinbrüche, Bergwerke, Gletscher, Waldparzellen etc. in SamplingPlots
Für Mineralien und Gesteine kann man zunächst im Modul DiversityScientificTerms die Namen erfassen. Für die Gesteine kann man wie im Kapitel Dependency beschrieben auch abhängige Terminologien erfassen. Diese lassen sich dann als abhängige Bestimmungen wie im Kapitel Supplementary identification verwenden.
Bohrung
Informationen zur Sammlung, zur Bohrfirma etc. werden in DiversityAgents gespeichert
Die Informationen zu den Fundorten lassen sich entweder in DiversityCollection und/oder in DiversitySamplingPlots erfassen.
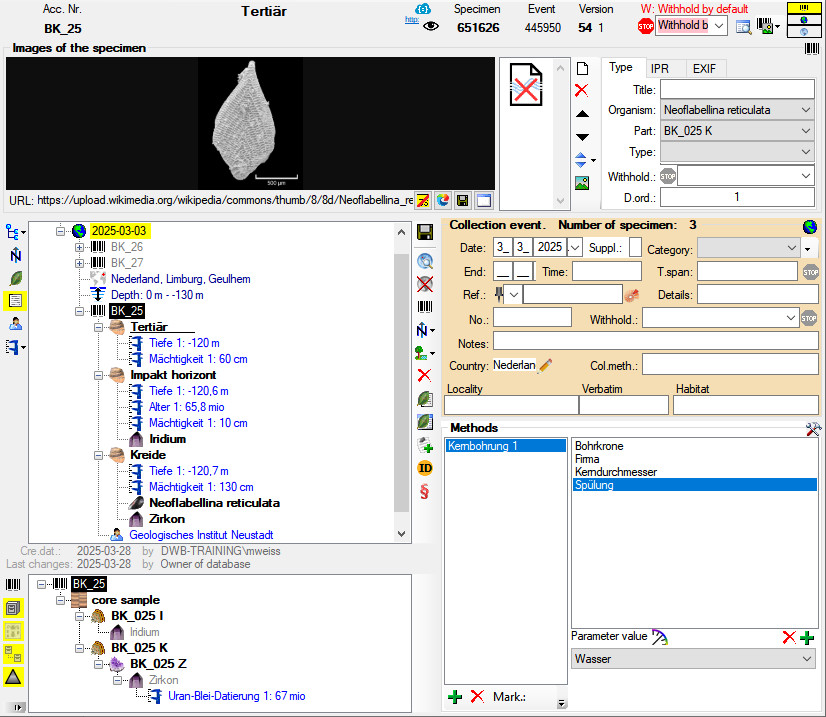
Die unterschiedlichen Schichten innerhalb des Bohrkerns werden als Teilsample des Bohrkerns erfasst. Dabei kann ein Unit in mehreren Teilsamples vorhanden sein.
Tertiär || Kreide
In dem Beispiel unten wurden 3 Bohrkerne einer Bohrung erfasst. Einer der Bohrkerne enthält die KT-Grenze (s. Abb. links). Nur für diesen Bohrkern sind die Details dargestellt. (Bestimmungen sind ausgeblendet)
Einordnung in Datenbank
CollectionEvent: Bohrung mit Zeit (von - bis), …
CollectionEventLocalisation:
Ort
Koordinaten
Gesamttiefe
…
CollectionEventMethod:
Spülung
Bohrkrone
…
CollectionSpecimen: Bohrkern
…
CollectionSpecimen: Bohrkern
CollectionAgent: Institut, …
IdentificationUnit: Abschnitt (e.g. Kreide)
IdentificationUnitAnalysis: Analysen
Tiefe
Alter
…
IdentificationUnit: Mineral
Collection: Sammlung, Lagerung, …
CollectionSpecimenPart: Bohrkern
CollectionSpecimenPart: Probe
IdentificationUnitInPart: Mineral
IdentificationUnitAnalysis: Analysen
Datierung
…
CollectionSpecimenProcessing:
Säureaufschluss
CollectionSpecimenProcessingMethod:
Konzentration
…
IdentificationUnit: Fossil
CollectionSpecimenPartDescription: Stratigraphie
Transaction: Bohrung
TransactionAgent: Firma
TransactionPayment: Kosten der Bohrung
TransactionDocument: Vertragsdokumente zur Bohrung
Verweis auf das zugehörige Taxon (s. Kapitel Bestimmung)
Angabe über Art und Ort der Lagerung (s. Kapitel Sammlung)
Methodik und Ergebnisse von Sequenzierungen (s. Kapitel Prozessierung)
Verweis auf internationale Register (s. Kapitel Beziehungen)
Die Objekte von denen DNA extrahiert wird werden gekennzeichnet (e.g. Label an einem Fisch aus einem Gefäß mit mehreren Exemplaren). Die DNA-Probe wird als abhängig vom entsprechenden Objekt in der Datenbank eingetragen. Methodik etc. werden mit dem Eintrag für die DNA verknüpft. Teilproben aus der DNA-Probe werden als abhängige Datensätz der DNA-Probe eingetragen.
graph TD;
    Sample[Sample e.g.<br/>Taxon,<br/>soil,<br/>waterbody]
    DNA[Mastersample of DNA]
    Analysis[PCR analysis]
    Methods[Methods used for PCR]
    DnaSubsample[Subsample of DNA]

    Sample -->| Extraction of DNA | DNA
    DNA --> | removal of subsample | DnaSubsample
    DNA --> | Analysing DNA | Analysis
    Methods --> Analysis
    Analysis --> Taxa
Typisches Beispiel: eine Institution, verschiedene Abteilungen und deren Mitarbeiter wobei einzelne Mitarbeiter mehreren Abteilungen zugeordnet sein können.
The Loan Transactions section of DiversityCollection provides a solution for managing and documenting all aspects of loaned objects. This feature enables you to handle every stage of the loan process.
Within the Loan Transactions, you can:
Create and manage new loans.
Use customisable letter templates, including loan slips, reminders, dunning letters, acknowledgements of receipt and more.
Record and track forwarded items.
Manage returns and document any damage for future reference.
Generate statistics to analyse loan activity.
Involved Modules of the DiversityWorkbench framework are:
For further information, see the chapter Loan in the module DiversityCollection.
Prerequisites
DiversityAgents: The institution/lender and the borrowing institution must both be managed in DiversityAgents and must have address information stored there. The address information is used for creating letters, etc. For information on creating a new institution or person in DiversityAgents, see the chapter Add a new Instituition/Agent of the DiversityAgents module. For information on adding an institution’s address information, see the chapter Contact Data.
DiversityCollection: Unlike other data, user authorisations for loans are not only managed via projects but also via assignment to collections. A prerequisite for processing loans is having the role of CollectionManager or Administrator. This means the user handling the loans must have the role CollectionManager or Administrator for the collection whose objects are being loaned. In addition to the authorization for the collection, the user must also have authorization for the project to which the items to be borrowed belong.
For more information on rights management in DiversityCollection see the
chapter Rights management.
For more information on handling collections in DiversityCollection, see the Collection chapter.
Create a new loan
To open the loan management window, select Transaction Management → Transaction… from the Administration menu in the main window (see screenshot below).
A new window will open. Here, you can manage all the different types of transactions.
To add a new loan, click on the button with the white sheet (see point 1 in the screenshot).
A first dialogue window will appear, in which you will have to select the administrating collection that contains the requested objects (see point 2 in the screenshot).
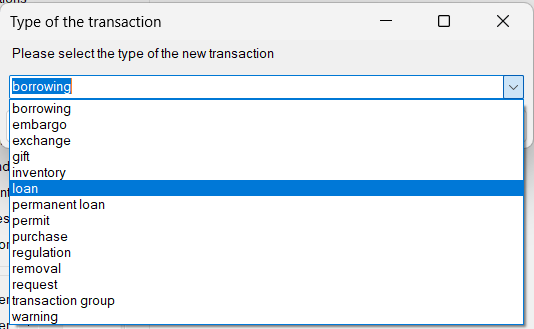
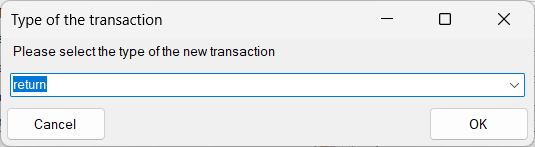
Another dialogue box will appear asking you to select the type of transaction. In our case, this is “Loan” (see image below).
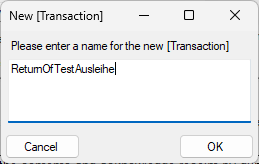
In the next dialogue box, enter the name of the transaction. In our example it is “TestAusleihe”.
The new loan transaction is created.
There are some required fields. The first two are pre-filled after creation (see points 1 and 2 in the image below).
Next, you need to enter the “From” and “To” institutions. The “From” field refers to the institution/agent from which the objects are borrowed. The “To” field refers to the receiving institution. These fields are linked to the DiversityAgents module to retrieve the address information for letters.
To do so, click the “Ammonite” button next to the fields (see step 3).
A query window for DiversityAgents will open. There, you can search for institutions/agents. Confirm your selection by clicking OK.
You can see the linked “From” and “To” fields (see point 1 and 2 in the image below).
Next, enter a start and end date for the loan (see point 3 in the image below). The loan period can be extended if necessary, either within predefined ranges using the ▿ button or by manually setting the date.
Don’t forget to save your entries. Click the Save button (see point 4 in the image below).
Next, we will add the requested object to the loan and create a cover letter.
Generate a loan slip
To enter the requested objects and create a cover letter, switch to the “Sending” tab (see image below).
To add the accession numbers, you can either scan the barcode or enter the accession numbers manually.
To scan, right-click the red field (see step 1) and then scan the barcode . The accession number of your object will be added automatically to the red list.
If you do not have a barcode scanner, you can manually enter and select the accession number of your object in the field below (see step 2).
The objects selected for loan are displayed in the red list.
To create a cover letter listing all requested objects, you must first select a schema. To do this, click the folder button (see point 4 in the image above). A few predefined XSLT schemas are provided with the DiversityCollection software; however, you may also create your own. In this example, Sending.xslt was selected.
To create and preview the cover letter, click the preview button (see point 5 in the image above).
You will be asked if you want to save the cover letter. You can access saved documents at any time via the “ Saved Documents” tab.
A preview of the cover letter is shown. To print it, click on the printer button (see image below).
Record the returns of the loans
Once the loan has been partially or fully returned, the accession numbers and their barcodes are scanned and added to the list of returned receipts. In addition, a letter confirming receipt of the returned items is issued.
Create a return transaction
To enter a return, create a new object in the transaction tree. To do this, select the transaction for which the return is being made (see point 1 in the image below).
Click the “New” button (see point 2 in the image below).
A dialogue will open. Select “return” from the drop-down menu.
In the next dialogue, enter a name for the return transaction.
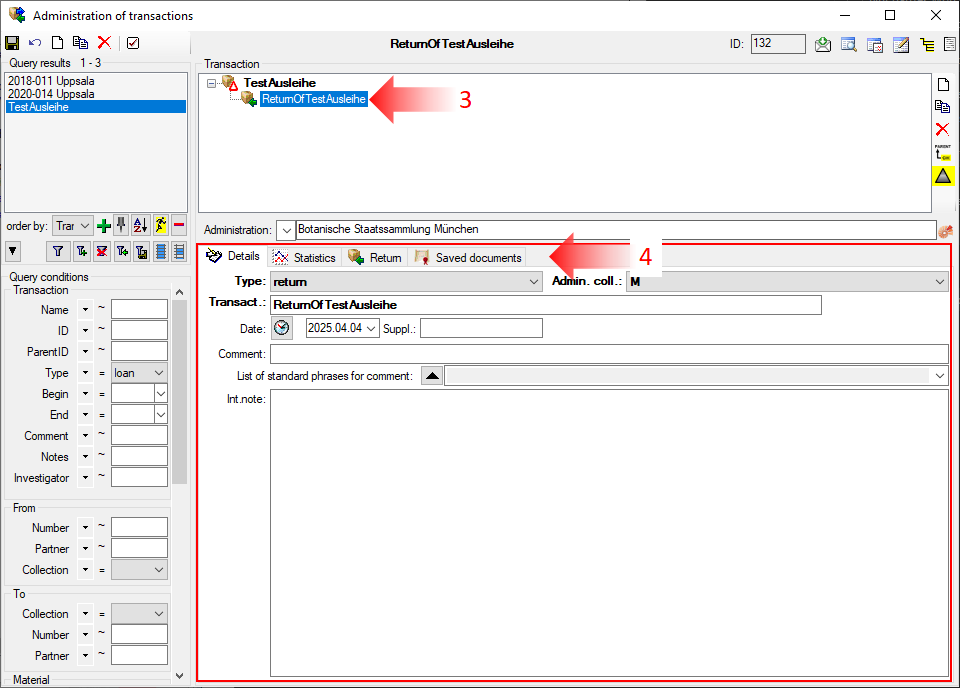
Then click on the newly created return transaction in the tree (see point 3 in the image below). At the bottom, you will see the tabs for entering your return (see point 4 in the image below).
Add returned objects to the list
To add the returned accession numbers, you can either scan the barcode or move the accession numbers manually.
To add the returned accession numbers to the return transaction list, switch to the ‘Return’ tab (see point 1 in the image below).
To manually move the accession numbers, select the returned items in the red field. Then move them to the green ‘Return List’ by clicking the down arrow button (see point 2 and 3 in the image below).
If you are using a barcode scanner, click in the red field below the green loan list (see point 3 in the image below) and scan your barcodes.
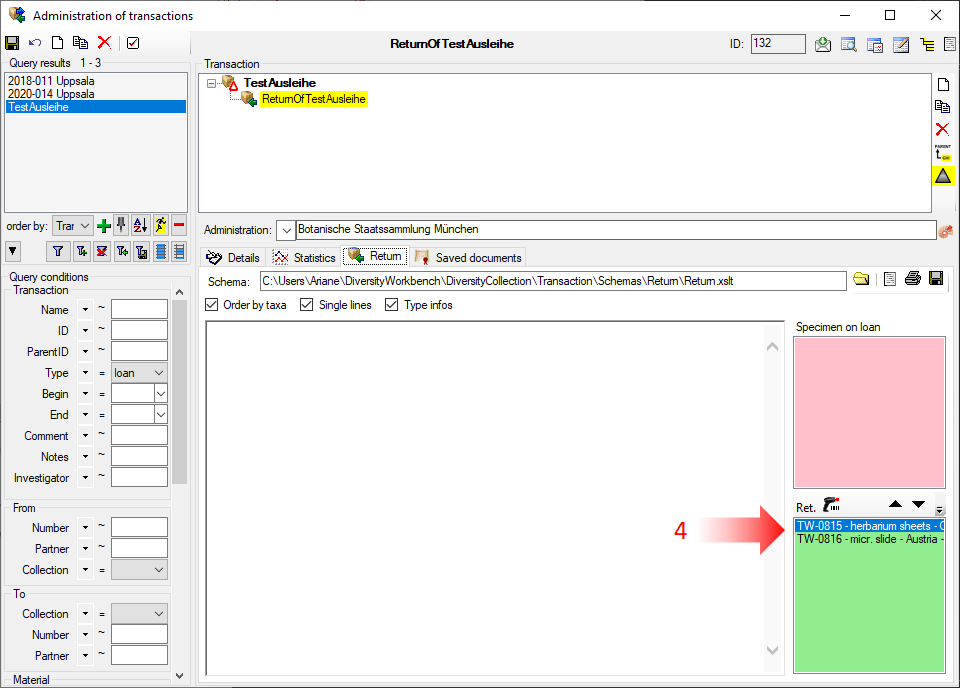
The returned accession numbers will appear in the green ‘Return List’ field (see image below).
Create an acknowledgement of receipt
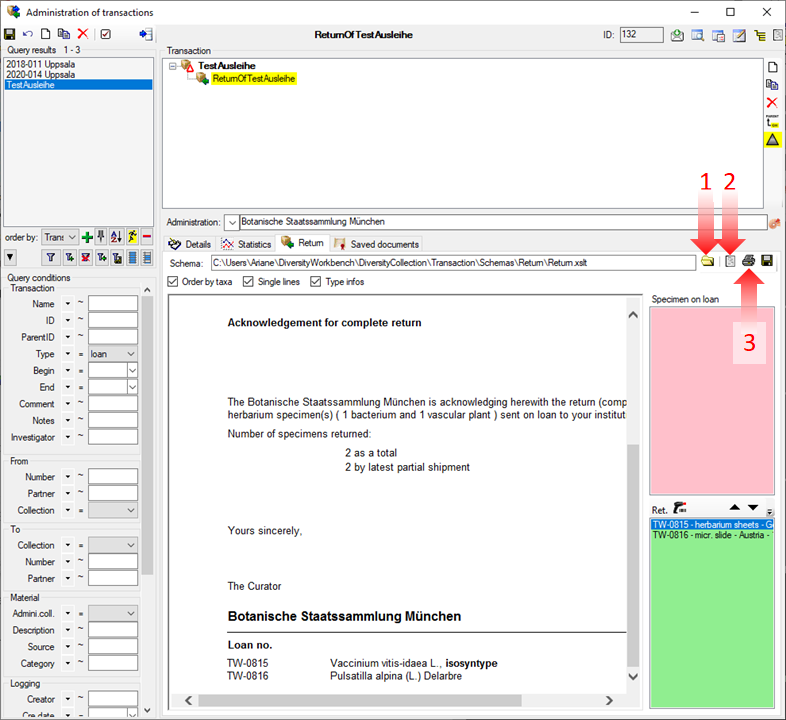
To create an acknowledgement of receipt listing all returned objects, you must first select a schema. To do this, click the folder button (see point 1 in the image below). The DiversityCollection software provides a few predefined XSLT schemas; however, you may also create your own. In this example, Return.xslt was selected.
To generate and preview the acknowledgements of receipt, click on the preview button (see point 2 in the image below).
You will be asked whether you want to save the acknowledgement. Saved documents can be accessed at any time via the “ Saved Documents” tab.
A preview of the acknowledgement of receipt will be displayed. To print it, click the printer button (see point 3 in the image below).
Create reminders and dunning letters
Create a reminder for the acknowledgement of receipt
After a loan has been sent, you can create a letter requesting confirmation of receipt.
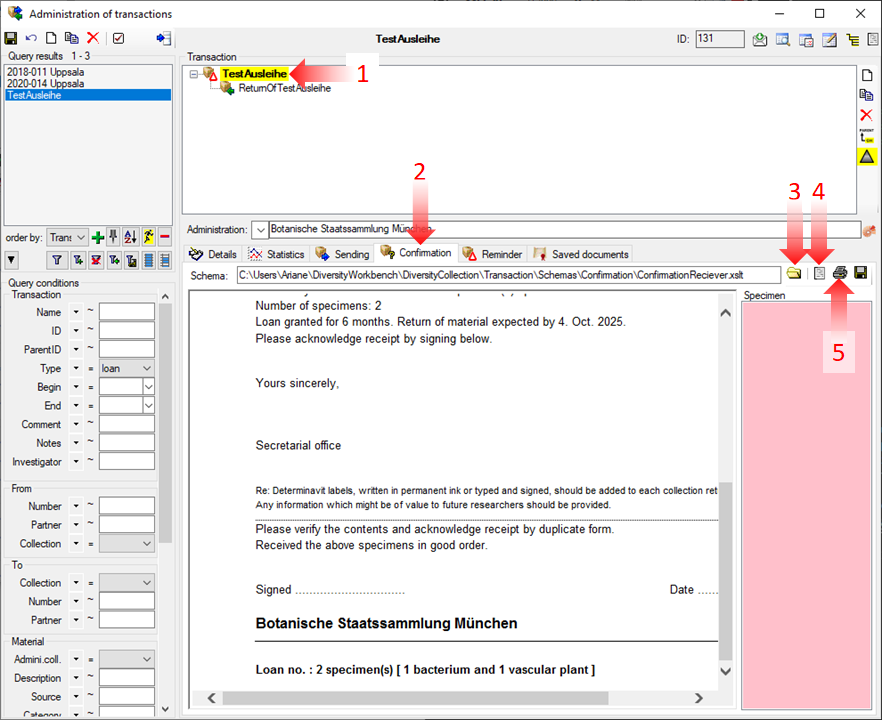
To create a confirmation letter listing all borrowed items, first select the transaction for which the confirmation letter is being made (see point 1 in the image below).
Switch to the Confirmation tab (see point 2 in the image below).
To create a confirmation letter, you must first select a schema. To do this, click the folder button (see point 3 in the image below). The DiversityCollection software provides several predefined XSLT schemas; however, you may also create your own. In this example, ConfirmationReceiver.xslt was selected.
To generate and preview the confirmation letter, click the preview button (see point 4 in the image below).
You will be asked whether you want to save the confirmation letter. Saved documents can be accessed at any time via the “ Saved Documents” tab.
A preview of the confirmation letter will be displayed. To print it, click the printer button (see point 5 in the image below).
Create a dunning letter
After the loan has expired, you can generate a reminder letter.
To create a reminder letter listing all borrowed items, first select the transaction for which the reminder letter is being made.
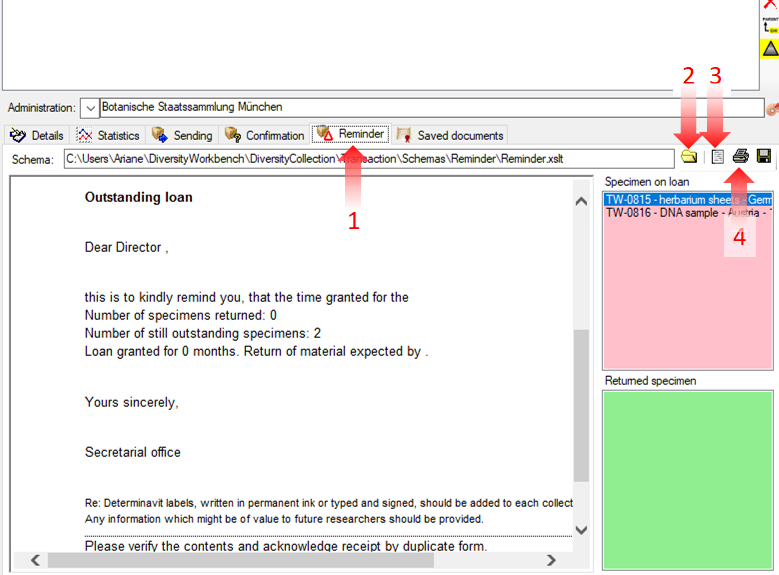
Switch to the Reminder tab (see point 1 in the image below).
To create a reminder letter, you must first select a schema. Click the folder button (see point 2 in the image below). The DiversityCollection software provides several predefined XSLT schemas; however, you may also create your own. In this example, ConfirmationReceiver.xslt was selected.
To generate and preview the letter, click the preview button (see point 3 in the image below).
You will be asked whether you want to save the reminder letter. Saved documents can be accessed at any time via the “ Saved Documents” tab.
A preview of the reminder letter will be displayed. To print it, click the printer button (see point 4 in the image below).
Document and manage forwarding
If the borrower requests forwarding, this can be entered into the database, and a letter of approval can be generated.
Create a forwarding transaction
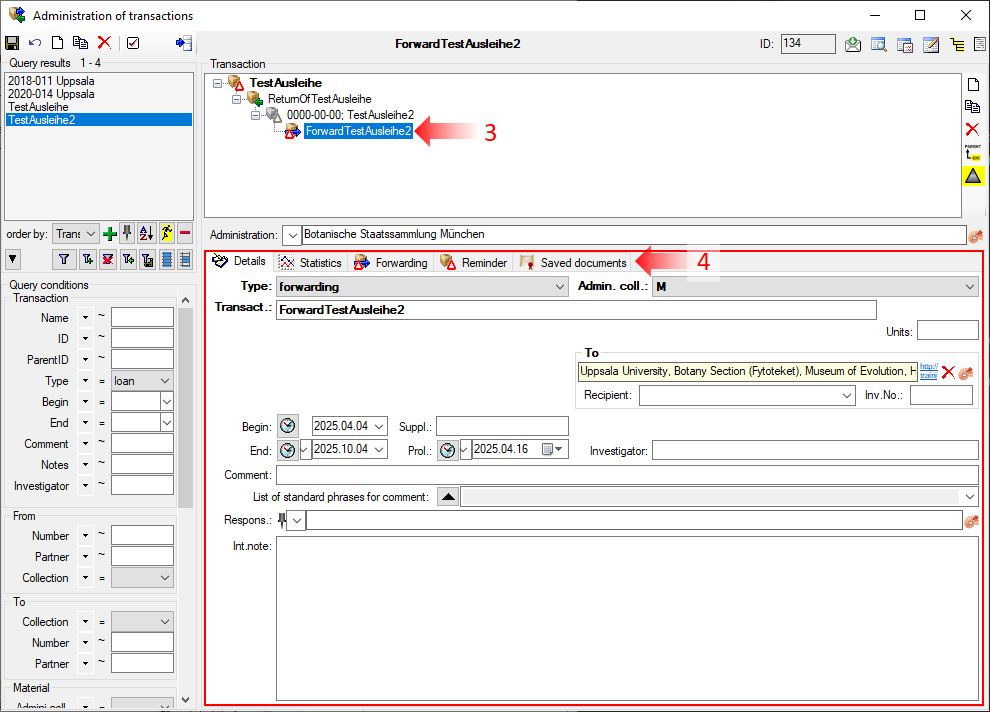
To record a forwarding, create a new object in the transaction tree. To do this, select the transaction for which the forwarding is being made (see point 1 in the image below).
Click the “New” button (see point 2 in the image below).
A dialogue window will open. Select “Forwarding” from the drop-down menu.
In the next dialogue, enter a name for the forwarding transaction.
Then click on the newly created forwarding transaction in the tree (see point 3 in the image below). The tabs for entering the forwarding will appear at the bottom of the window (see point 4 in the image below).
Add forwarding objects to the list
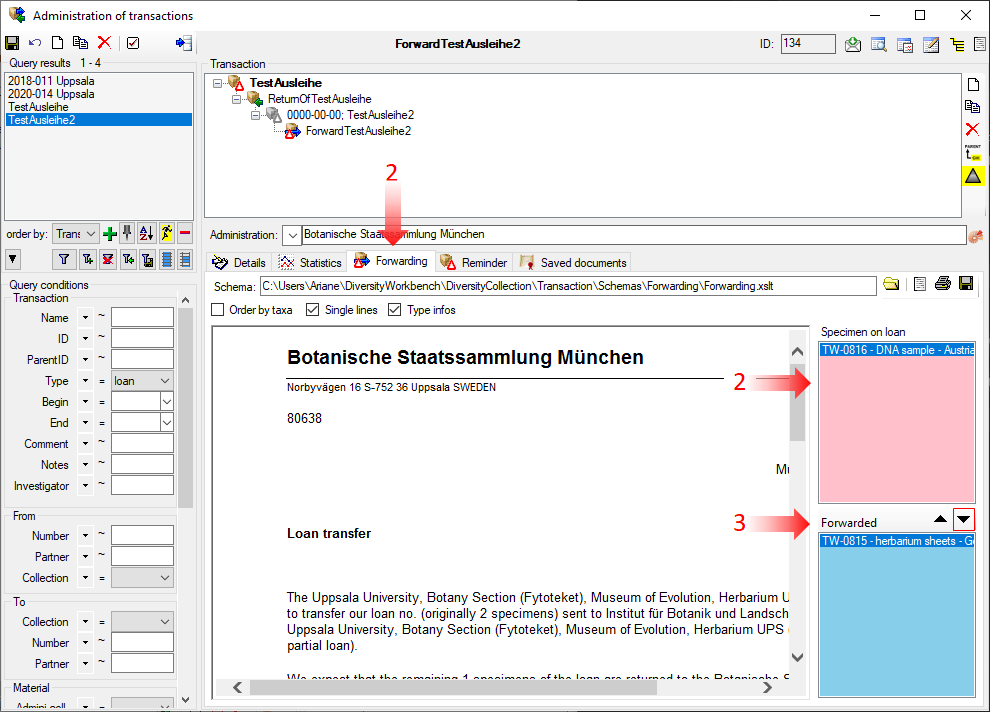
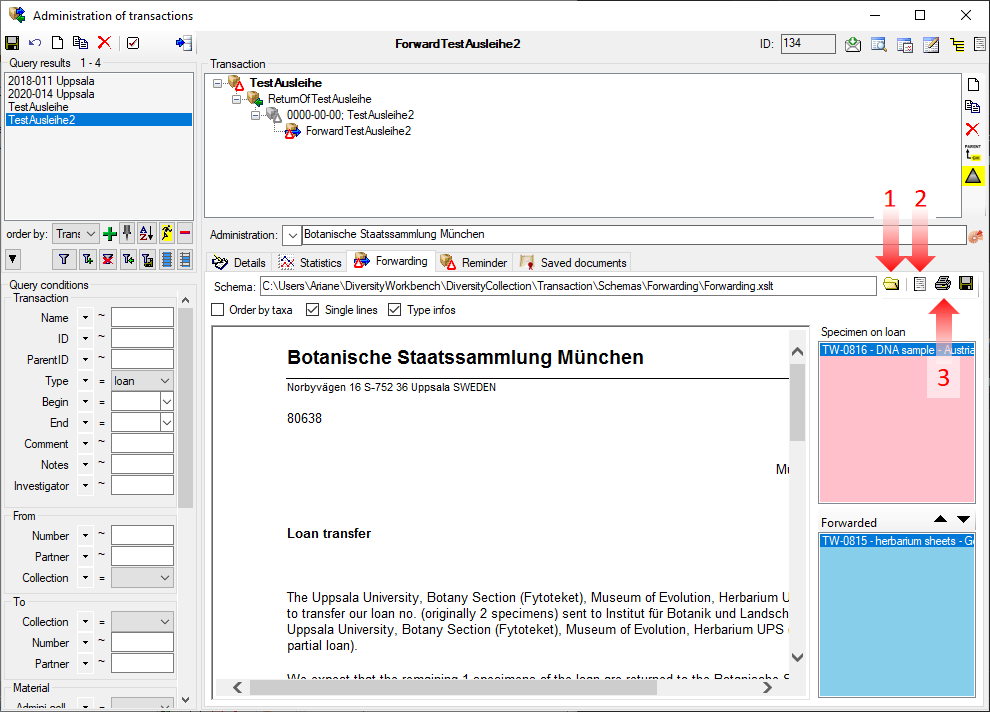
To add the forwarding accession numbers to the forwarding transaction list, switch to the ‘Forwarding’ tab (see point 1 in the image below).
To move the accession numbers, select the items you want to forward in the red field. Then move them to the blue ‘Forward List’ by clicking the down arrow button (see point 2 and 3 in the image below).
The forwarded accession numbers will appear in the blue ‘Forward List’ field (see image below).
Create a confirmation for Forwarding
To create a confirmation for forwarding, which lists all forwarded objects, you must first select a schema. To do this, click the folder button (see point 1 in the image below). The DiversityCollection software provides several predefined XSLT schemas; however, you may also create your own. In this example, Forwarding.xslt was selected.
To generate and preview the confirmation, click the preview button (see point 2 in the image below).
You will be asked whether you want to save the confirmation letter. Saved documents can be accessed at any time via the “ Saved Documents” tab.
A preview of the confirmation will be displayed. To print it, click on the printer button (see point 3 in the image below).
Eine Sammlung von Mineralien, Gesteinen etc. kann in der Diversity Workbench verwaltet werden. Hierzu möchte man eine einheitliche Namensgebung der Objekte forcieren um z.B. Tippfehler in den Namen zu minimieren. Zudem sollten die genauen Charakterisierungen der Objekte in der Datenbank abgelegt werden und Fundorte präzise beschrieben werden.
Hierzu verwendet man das Modul DiversityCollection unter der Verwendung der Diversity Workbench Module DiversityScientificTerms und optional DiversitySamplingPlots:
Zunächst sollte man im Modul DiversityScientificTerms die Namen der Mineralien und Gesteine erfassen.
Für die Gesteine kann man wie im Kapitel Dependency beschrieben auch abhängige Terminologien erfassen. Diese lassen sich dann als abhängige Bestimmungen wie im Kapitel Supplementary identification verwenden.
Die Informationen zu den Fundorten lassen sich entweder in DiversityCollection und/oder in DiversitySamplingPlots erfassen.
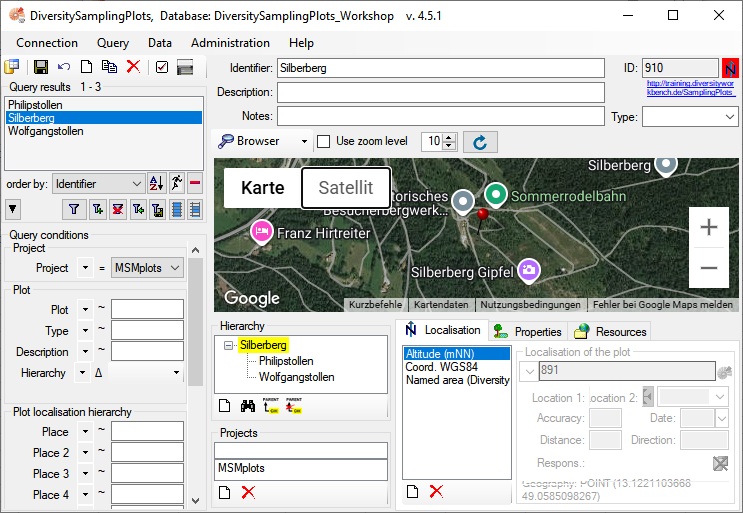
Alternativ kann die Erfassung auch direkt im Modul DiversityCollection erfolgen oder über einen in DiversitySamplingPlots verlinkten Webservice.
Dies ist beispielhaft in der folgenden Abbildung für den Silberberg und 2 dort befindliche Stollen gezeigt.
Die hier erfassten Daten stehen dann im Modul DiversityCollection für die Bestimmung des Fundorts bereit.
Die Erfassung des Fundorts kann auch direkt in DiversityCollection erfolgen, muss dann aber für jeden Datensatz neu erfolgen. Bei der Erfassung in DiversitySamplingPlots brauchen Daten einer bestimmen Lokalität wie Koordinaten, Geologie etc. nur einmal eingegeben werden. Falls eine Lokalität mehrfach beprobt wird, oder man sich auf bereits über einen Webservice bereitgestellte Daten beziehen will empfielt sich die Alternative mit DiversitySamplingPlots.
Erfassung der Proben
Die Erfassung der Proben sowie der Mineralien erfolgt im Modul DiversityCollection .
Sammlung
Sammlung
Als erstes wird die Sammlung in der die Proben lagern wie in Kapitel Collection beschrieben eingegeben. Hier kann man den Ort der Lagerung bis zum letzen Fach in einer hierarchischen Struktur aufbauen. Für die Lagerungsorte lassen sich auch Etiketten erzeugen die e.g. einen Bar- oder QR-Code enthalten. Darüber kann man dann sehr einfach mittels eines Scanners die Verbindung zur Datenbank herstellen.
Dabei kann man unter verschiedenen Typen für eine Sammlung wählen. Ein paar Beispiele:
Institut
Abteilung
Gebäude
Raum
…
Hierbei können 2 Hierarchien verwaltet werden. Die administrative Hierarchie ist der Normalfall der sich in der Regel am Inhalt der Sammlung orientiert. Ein Beispiel wäre folgender Aufbau:
Geologische Sammlung
Gesteine
Magamtite
Metamorphite
Sedimentgesteine
Meteorite
Mineralien
Optional gibt es noch die Möglichkeit unabhängig davon eine Hierarchie der Örtlichkeiten zu verwalten wie in Kapitel Location beschrieben, sollte diese von der administrativen Hierarchie abweichen, also die administrativen Sammlungen nicht mit den Örtlichkeiten übereinstimmen. Ein Beispiel wäre folgender Aufbau für die Örtlichkeiten:
Geologische Sammlung
Hauptgebäude
Raum 24
Regal 37
Fach 654
…
…
Raum 25
…
Aussenlager
…
Ein einzelner Eintrag ist dabei immer einem Eintrag in der administrativen Hierarchie zugeordnet, e.g.
In diesem Fall befinden sich also 2 Objekte aus 2 unterschiedlichen administrativen Sammlungen in der gleichen Lokalität. Sollte sich die administrative und örtliche Organisation der Sammlung nicht unterschieden, kann man auf die separate Eintragung der Lokalität verzichten und alles in der administrativen Hierarchie erfassen.
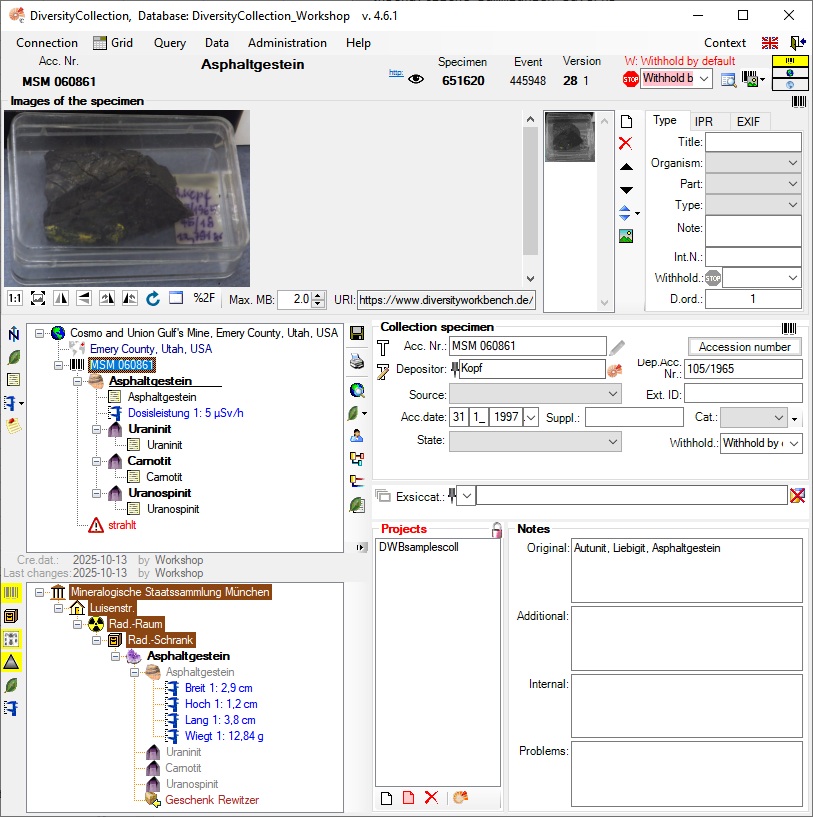
Proben
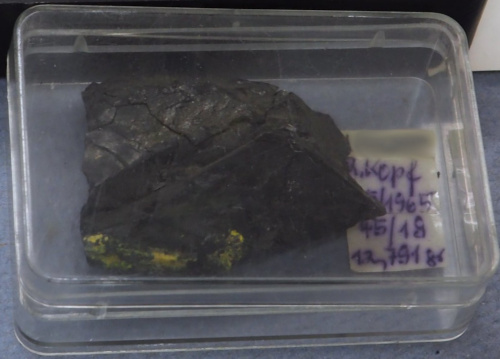
Asphaltgestein
Dann werden die Proben erfasst. Diese sollten eine innerhalb der Sammlung eindeutige Kennung bzw. Belegnummer erhalten. Hierfür können ebenfalls Etiketten mit Codes erzeugt werden.
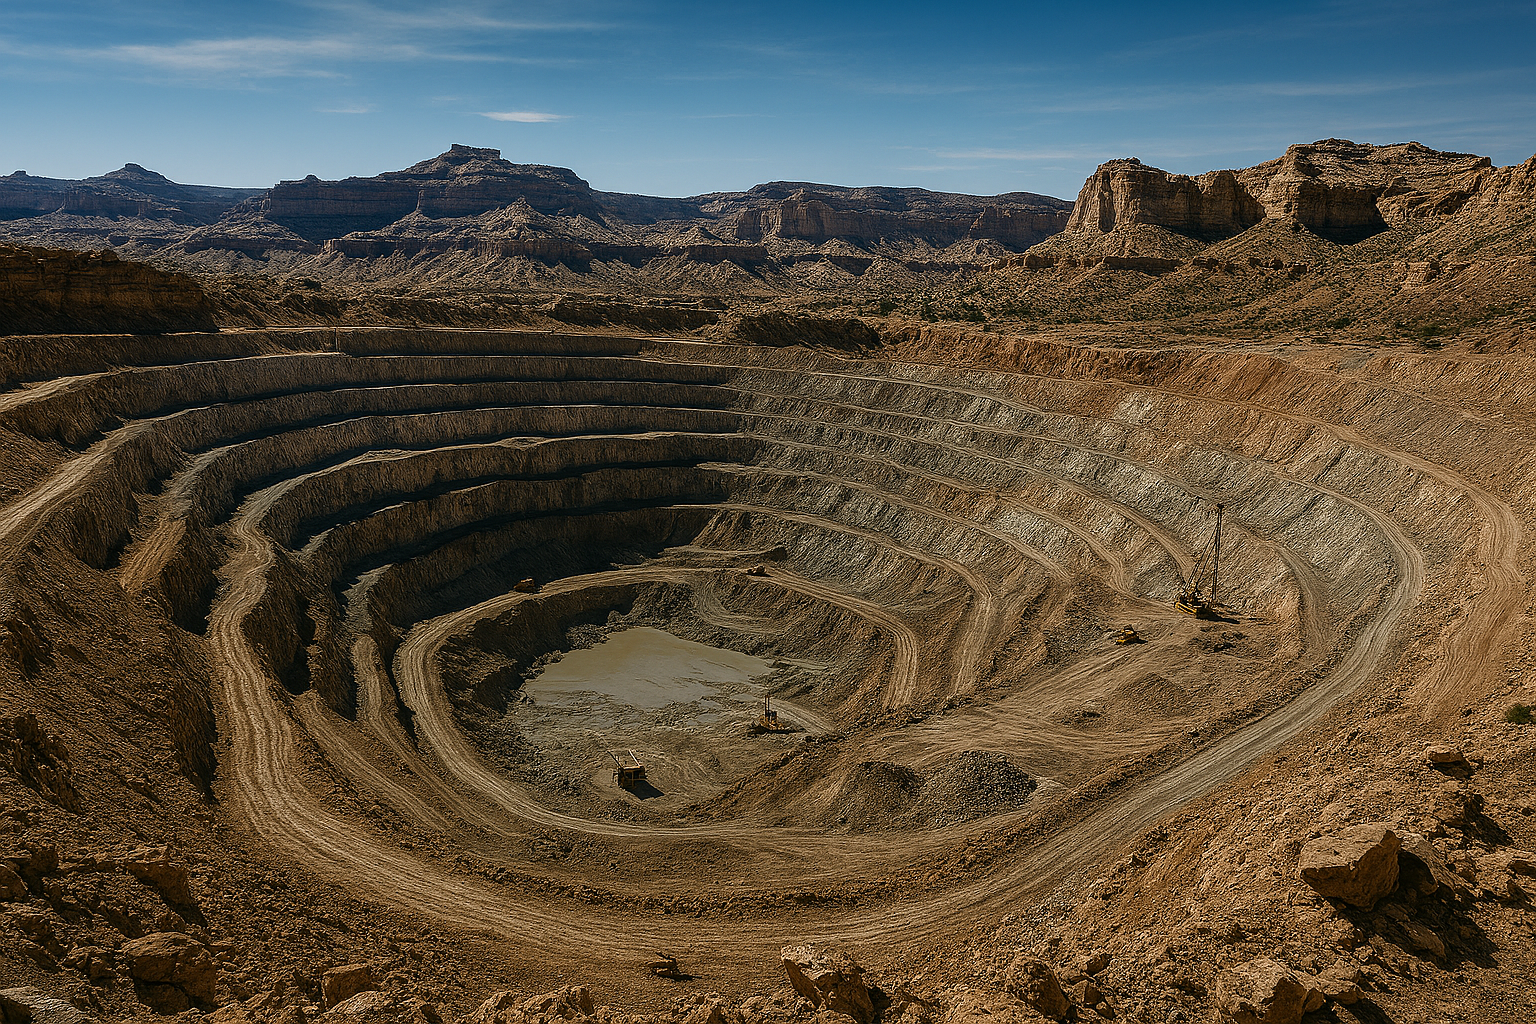
Text-Beschreibung des Fundorts, e.g.: Cosmo and Union Gulf’s Mine, Emery County, Utah, USA
Text-Beschreibung des Habitats, e.g.: Gebankte Malmkalke
Zeitpunkt der Aufsammlung
…
Der Ort der Aufsammlung kann neben einer reinen Beschreibung mit weiteren Informationen versehen werden. Es stehen mehrere Optionen zur genaueren Verortung des Fundorts zur Verfügung,
Sollte der Fundort im Rahmen einer Expedition aufgesucht worden sein, kann man auch diese und deren Verlauf sowie Bilder und weitere Details dazu erfassen
Sofern bekannt kann jeder an der Aufsammlung der Probe beteiligte erfasst werden. Weitere Informationen zu den Sammlern können in DiversityAgents hinterlegt werfen.
CollectionAgent= An Fund beteiligte Personen und Institutionen
Die Zusammensetzung der Probe mit dem Gestein und allen darauf gefundenen Mineralien wird wie unten beispielhaft gezeigt erfasst. Die Namen der einzenlen Bestandteile können entweder als Text eingegeben werden oder mit Eintraegen im Modul DiversityScientificTerms verknüpft werden. Aus diesem Modul stehen dann weitere Informationen zu den jeweiligen Einträgen zur Verfügung.
Um die Lagerung der Probe zu erfassen wird die Probe einer Sammlung die e.g. einem spezifischen Fach zugeordnet. Die weiteren Informationen ergeben sich dann aus der Hierarchie der Sammlung wie oben dargestellt.
Die genaue Herkunft der Probe, deren Kosten beim Erwerb, Rechung und sonstige Dokumente sowie beteiligte Person etc. können im Bereich Transactions erfasst werden.
Pflanzen oder Tiere werden im Freiland kartiert. Dabei werden in der Regel keine Objekte gesammelt sondern lediglich das Vorhandensein an einen bestimmten Ort zur Zeit der Erfassung dokumentiert. Dies kann beispielsweise anhand von vorbereiteten Listen geschehen. Hierbei wird auch das Fehlen von Arten erfasst.
Werden einzelne Objekten zu Absicherung der Bestimmung gesammelt so werden diese in einer Sammlung aufgenommen.
Bei Kartierung von Biotopen können diese auf DiversitySamplingPlots oder DiversityGazetteer verweisen.
In der Datenbank werden für die nicht gesammelten Arten für einen Sammelpunkt ein zentrales Specimen ohne Daten angelegt. Für gesammelte Objekte wird jeweils ein Specimen mit Verweis auf das gleiche Sammelereignis angelegt.
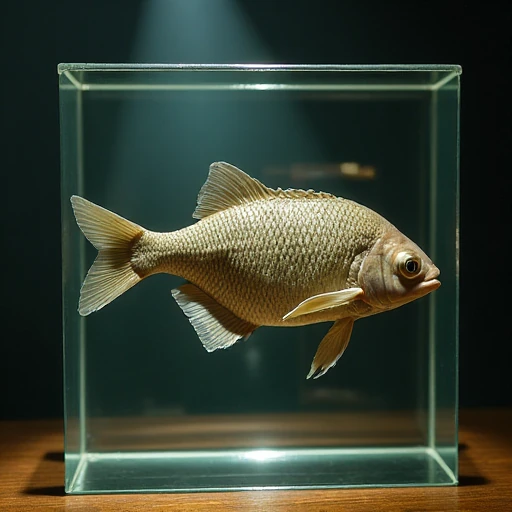
Beispiel analog der Sammlung an der ZSM mit einem oder mehreren Fischen in einem Gefäß. Hinweis auf Entnahme einzelner Proben, Markierung der beprobten Objekte, Angaben zur Flüssigkeit etc.


 mammal und für die Bestimmung wird hier auf den entsprechenden Eintrag in
  Catalogue of Life verwiesen.
 Parameter erfasst (s. unten).
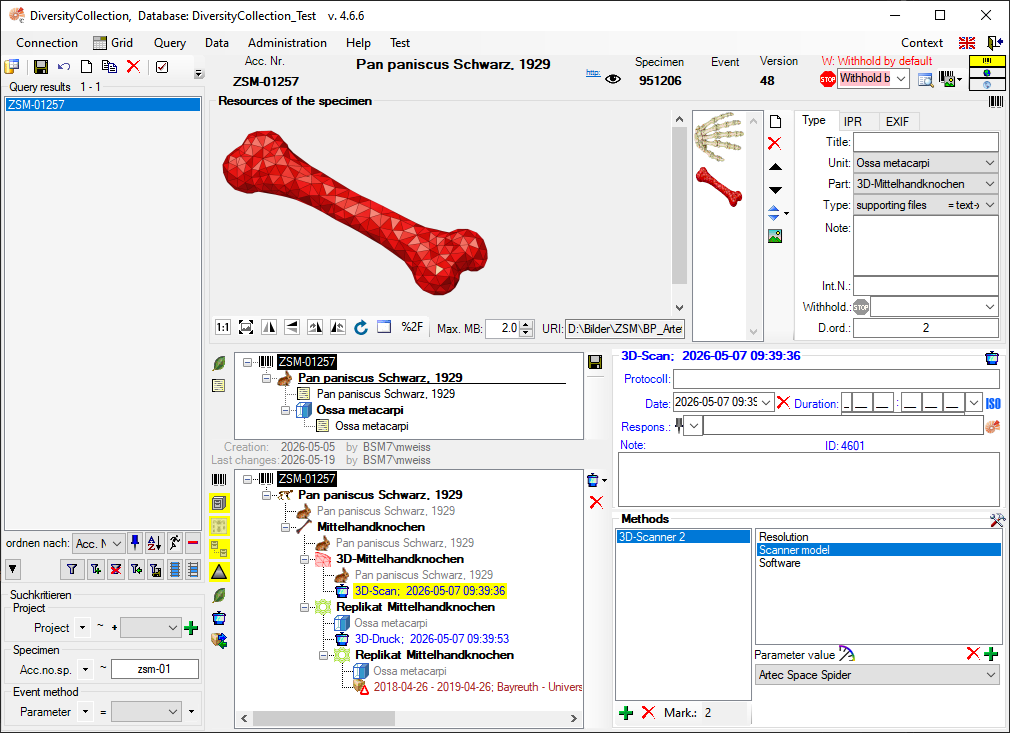
 Stock vermerkt werden.
Beschreibungen des Teils können mit optionalen Verweisen auf
Stock vermerkt werden.
Beschreibungen des Teils können mit optionalen Verweisen auf 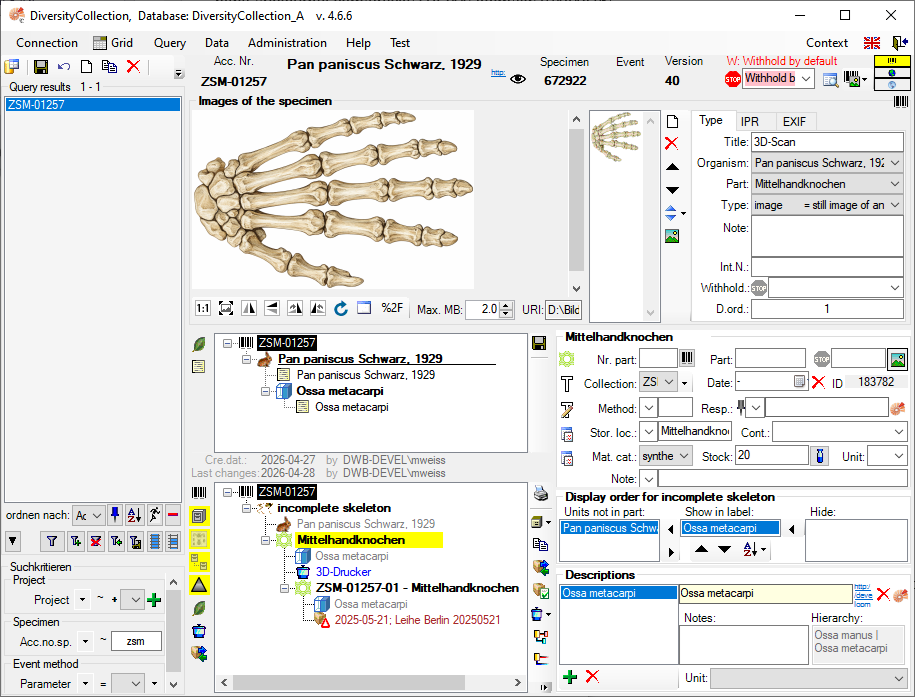
 Kopierfunktion für Teile verwendet werden. Im Beispiel oben wurde ein Replikat separat erfasst um die


 CollectionEventLocalisation:
 Ort
Ort Gesamttiefe
 CollectionSpecimen: Bohrkern
 IdentificationUnit: Abschnitt (e.g. Kreide)
 IdentificationUnitAnalysis: Analysen
 CollectionSpecimenPart: Probe
 IdentificationUnit: Fossil
 CollectionSpecimenPartDescription: Stratigraphie
 TransactionPayment: Kosten der Bohrung
 TransactionDocument: Vertragsdokumente zur Bohrung


 (see point
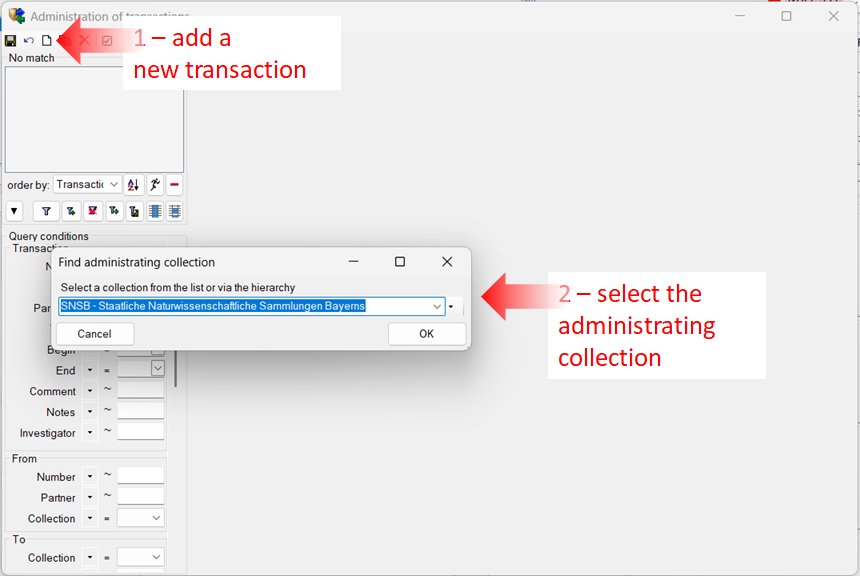

 next to the fields (see step
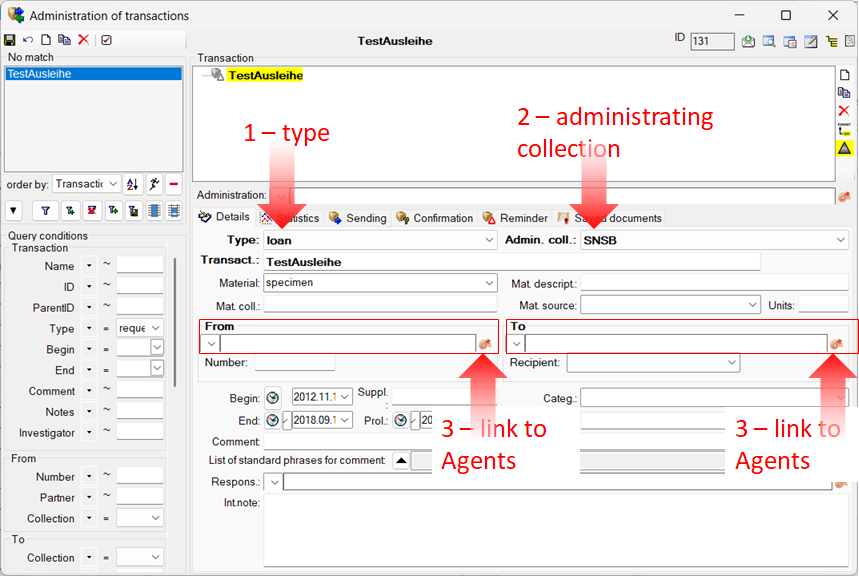

 (see point
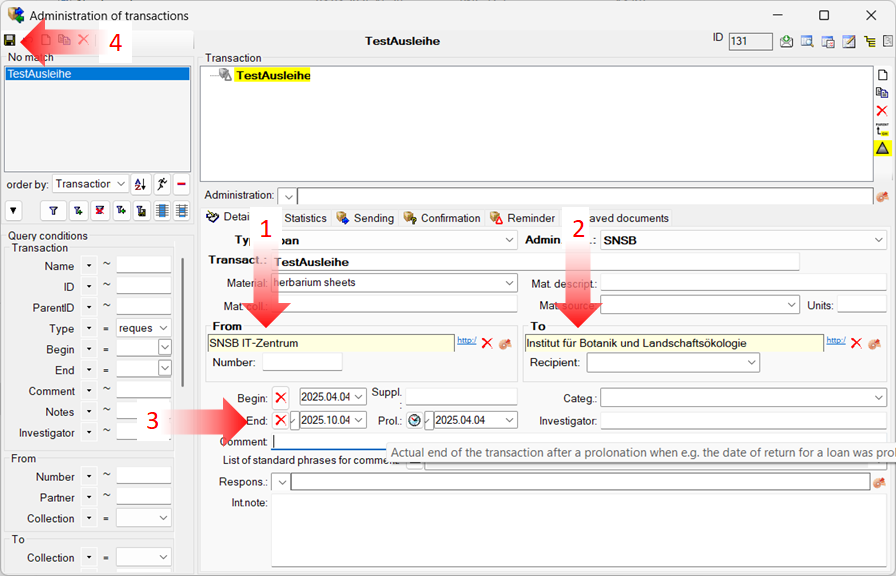
 . The accession number of your object will be added automatically to the red list.
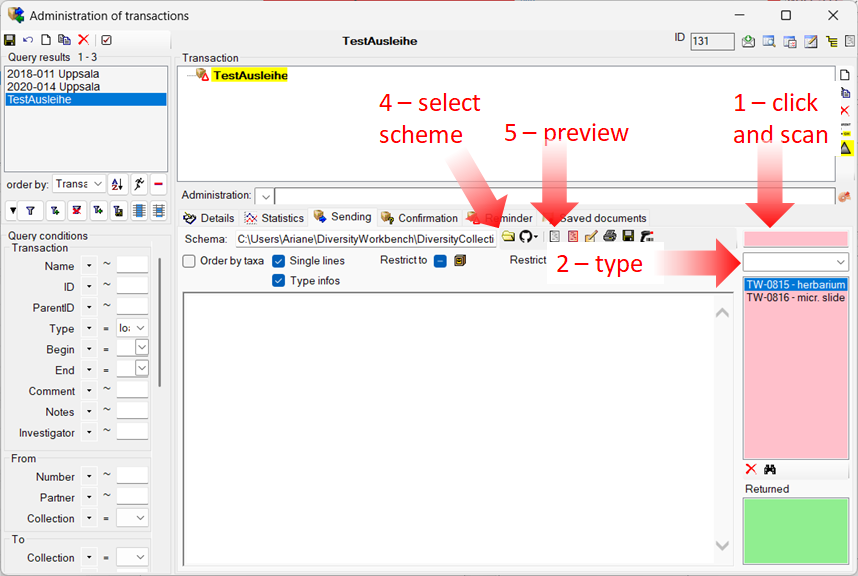
 (see point
  (see image below).
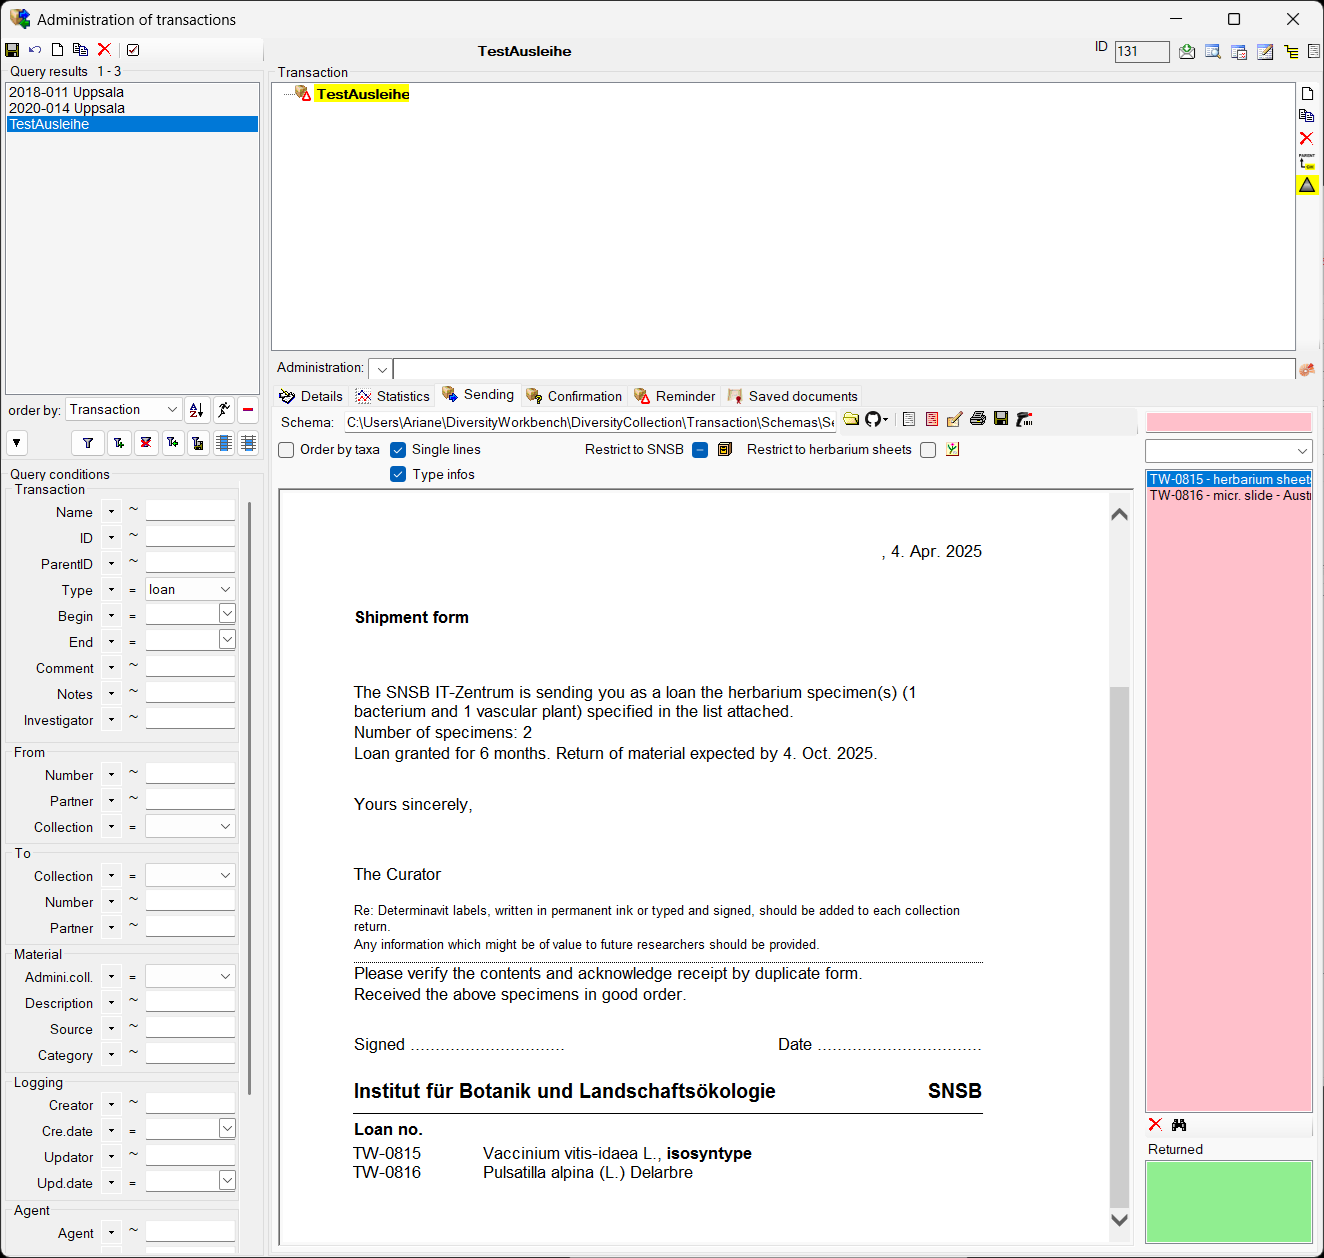

 (see point
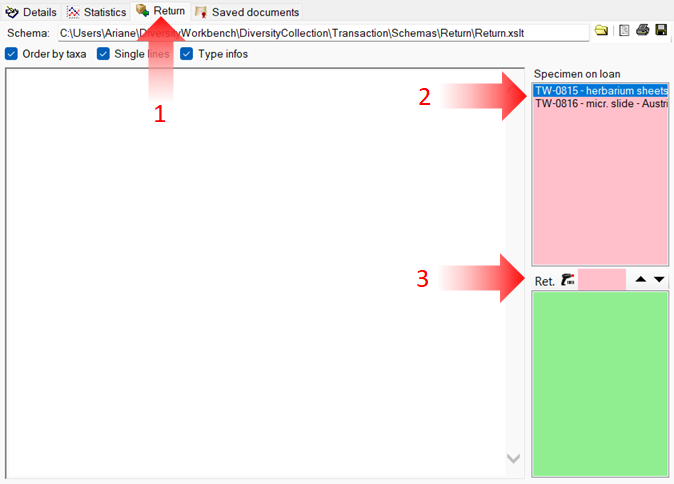


 Problem: strahlt
 Gestein
 Mineral

 Rad.-Schrank
 Raum -
  Adresse


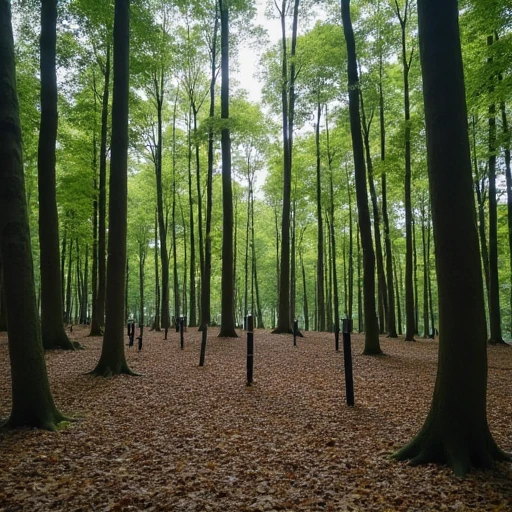
 Probeflächen mit Fallen die regelmäßig kontrolliert werden