Subsections of Tutorial
Diversity Collection
Tutorial
Creation
Tutorial - Creating a new dataset
At the beginning of this tutorial, we will create a first dataset step-by-step.
A short introductory video (in German) is also available:  .
.
Add a new dataset
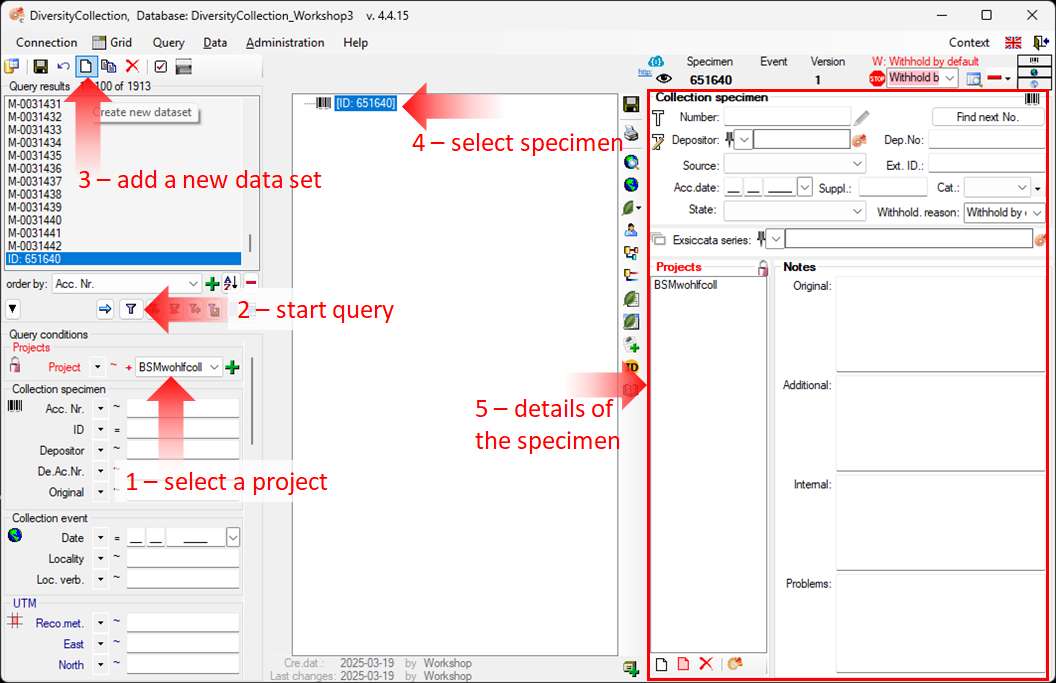
-
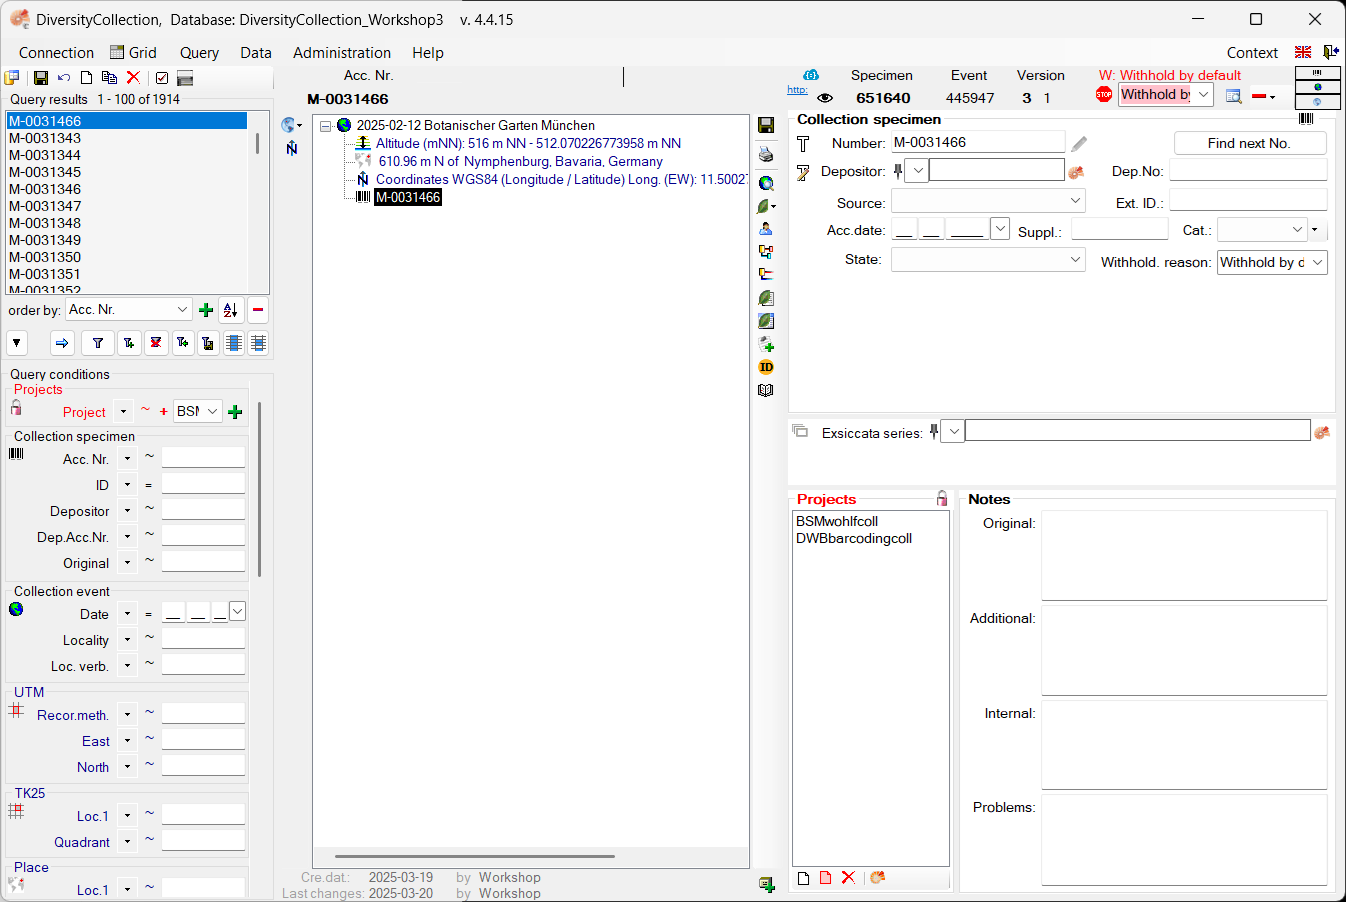
Each record must be linked to a project. Therefore, the first step is to select a project  within the query conditions (see point 1 in the image above), and then start the query (see point 2). If no project has been selected, the program will remind you to choose one.
-
To enter a new dataset, click the button  in the top left corner (see point 3).
-
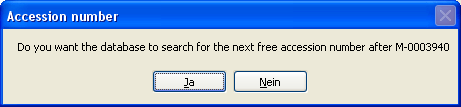
If accession numbers are available in the database, the software will ask whether you want to use the next available number (see chapter Accession for more information). Click “OK” to search for the next available accession number, starting with your current number.
-
The new entry will appear in the Query results list on the left. Select it to view the specimen tree structure on the right (see point 4 in the image above). All details and input fields will be displayed in the right part of the window (see point 5).
NOTE: If you haven’t specified an accession number, the entry will appear as shown above. Otherwise, the assigned accession number will be displayed.
Enter data for the specimen
-
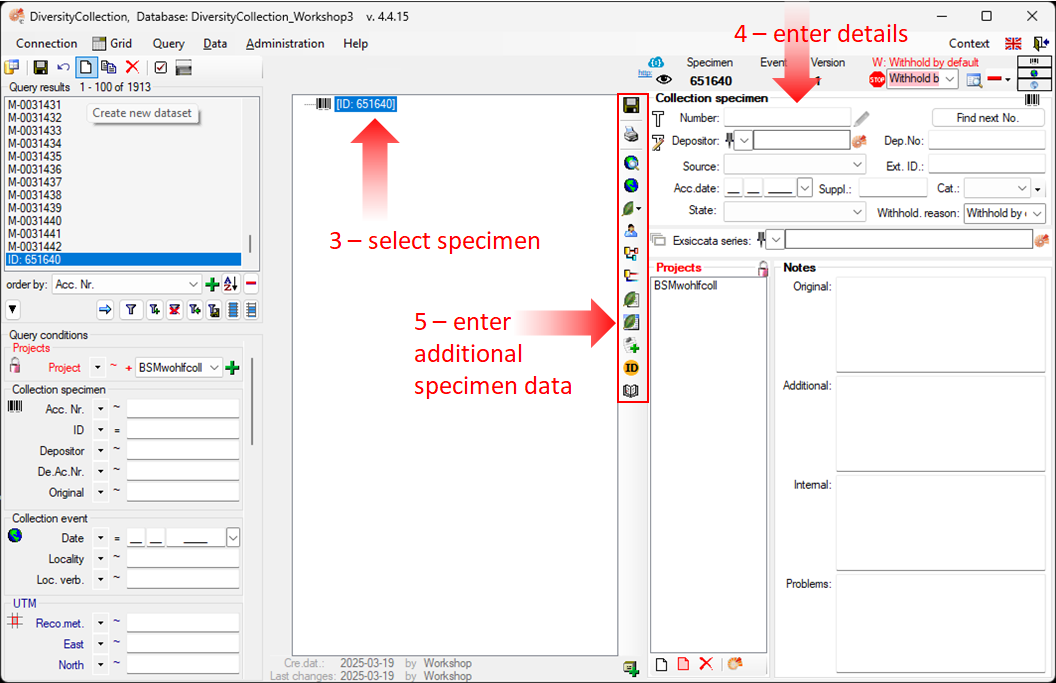
To enter your data for the specimen, click on the corresponding entry in the upper part of the tree (see point 3 in the image below).
-
This opens the input fields in the right-hand section, where you can enter the details (see point 4).
-
In the middle section of the form, several buttons will appear that let you add more information about the specimen (see point 5). These options are explained in the following chapters of this tutorial.
More detailed information
For more information on specimen trees see the
chapter Specimen tree. If you want to define parts of your specimen, see the Storage chapter.
For more information on the query results, see the chapter Specimen list and an overview of the menu bar, visit the Data Handling chapter.
Next chapters
This tutorial continues in the sections listed below.
Diversity Collection
Tutorial
Event
Tutorial - CollectionEvent
Specimens stored in a collection are gathered during a CollectionEvent. A CollectionEvent contains, for example, information about the geographic locality, habitat, and collection date. For more detailed information about CollectionEvents, see the chapter CollectionEvent.
Add a collection event
- To add a collection event to your specimen, select the specimen in the tree (within the image below the blue marked ID:651640).
- Click on the button
 to add a new CollectionEvent (see point 1 in the screenshot below).
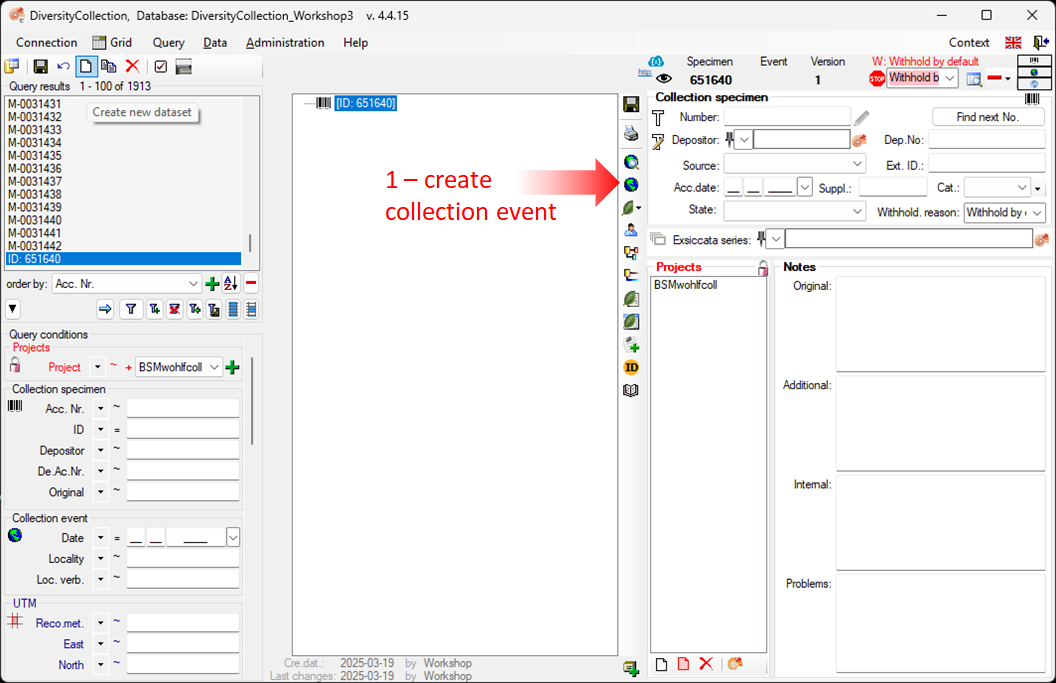
- This will add a CollectionEvent entry to the upper tree, as shown below.
- Select this entry in the tree (see point 2 in the image below) to open the CollectionEvent fields.
Enter data to the collection event
- Select the collection event entry in the tree (see point 2 in the image below) to open the CollectionEvent fields.
- Enter the date (see point 3 in the image below) of the CollectionEvent. Clicking the dropdown button (see image below) will open a calendar where you can select the date.
- Enter the description of the locality (see point 4 in the image below).
- To save the previous data, click on the button
 (see point 5 in the image below).
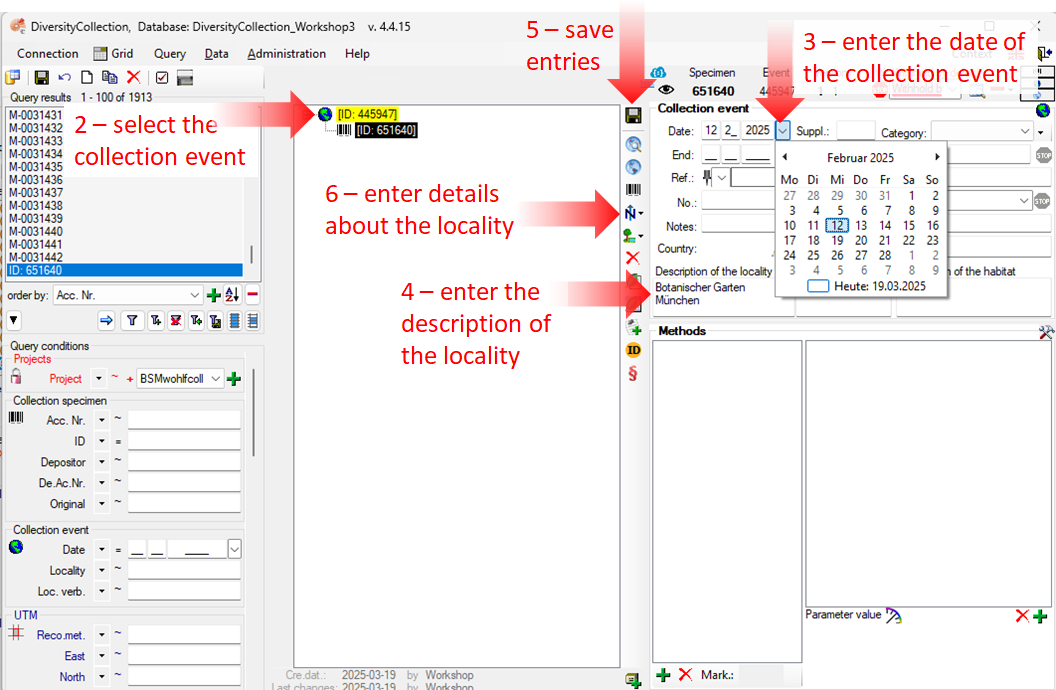
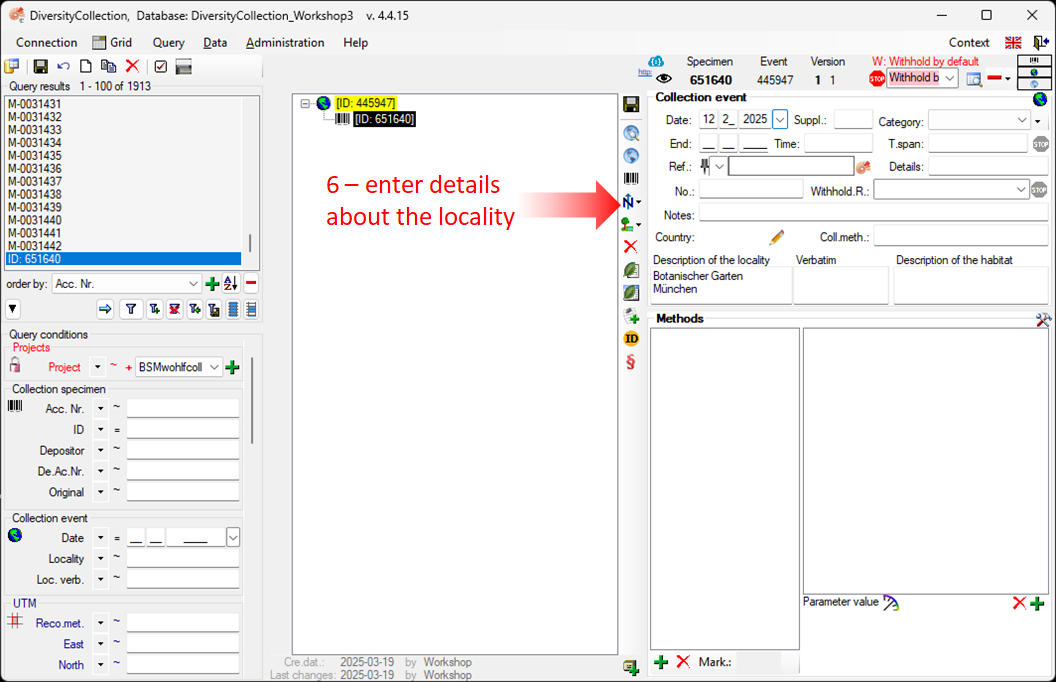
- You now have the option to enter further information about the location, such as coordinates, named places, etc., by clicking on the
 button (see
point 6 in the image above).
button (see
point 6 in the image above).
Next chapters
This tutorial continues in the sections listed below.
Diversity Collection
Tutorial
Localisation
You can add additional location information to your CollectionEvent, such as coordinates, named places, and more.
In this tutorial, we will look at the three main options: WGS84 coordinates, NamedArea (DiversityGazetteer) and Altitude (mNN).
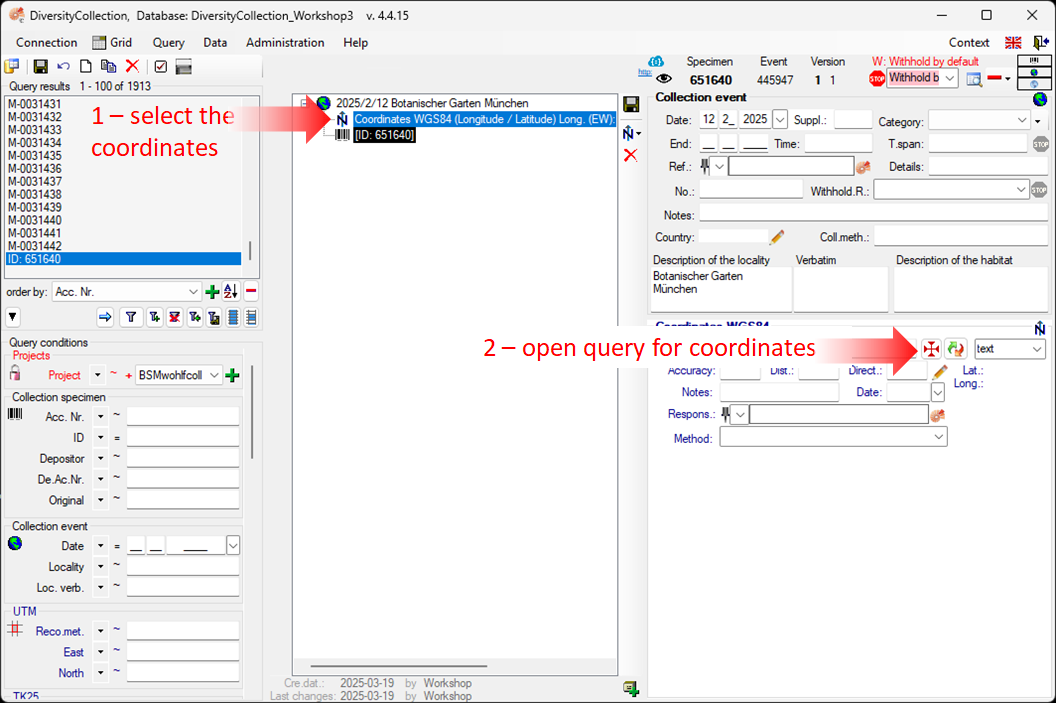
- Click on the button button (see point 6 in the image below).
- Select an option from the list (see image below).
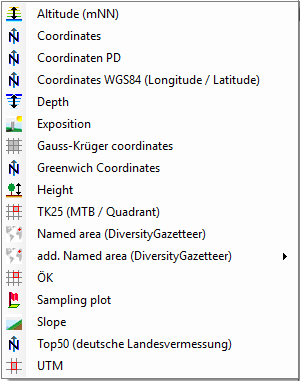
The three main options are:
New Coordinates WGS84
Using Google Maps, you can add the exact coordinates of the location.
-
Click the button (see
point 6 in the image above)
-
Select Coordinates WGS84 (Longitude / Latitude) – Google
Maps uses the WGS84 coordinate system.
-
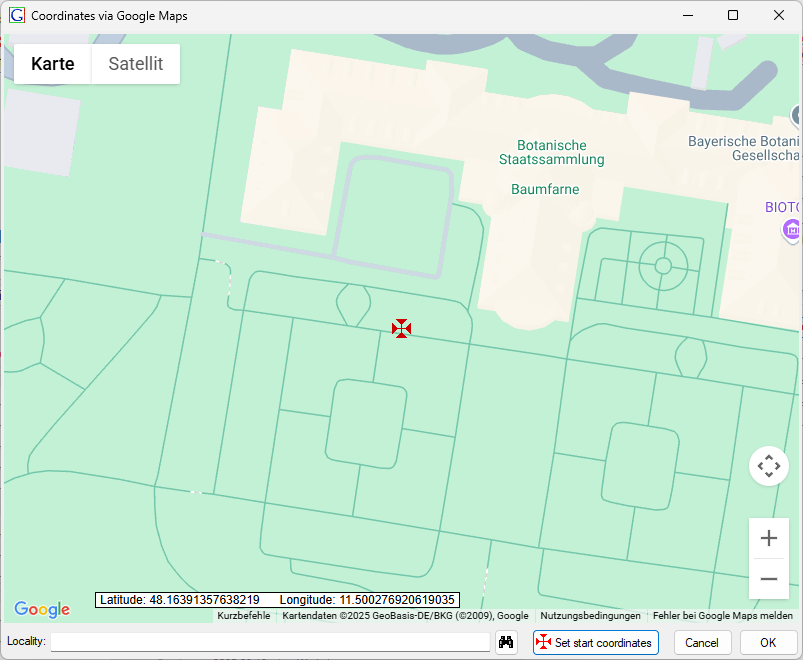
This will add a new entry to the tree view. Select it
(see point 1 in the image below) to open the details for that entry.
-
Next, click the button  (see point 2 in the image below).
-
A window will open (see figure below) where you can set the coordinates
simply by dragging the map with the mouse. The coordinates correspond to the center of the map, symbolised by the
. Click on the OK button to save the
coordinates.
-
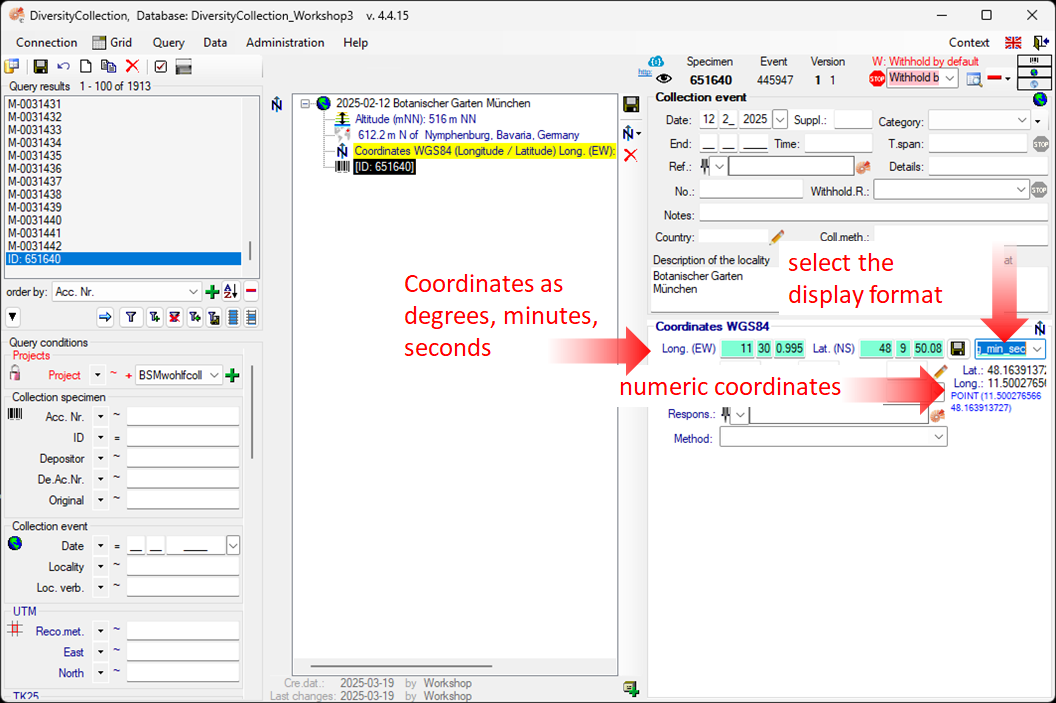
In the main window, the coordinates are stored in two locations – see the screenshot below.
In the upper section, you can adjust the values and select a different display format, such as the commonly used format with degrees, minutes, and seconds.
To apply any changes, edit the values and click the save button. At the same time, the numeric values are saved in fields that cannot be edited by the user (see below).
New Named Area (Diversity Gazetteer)
-
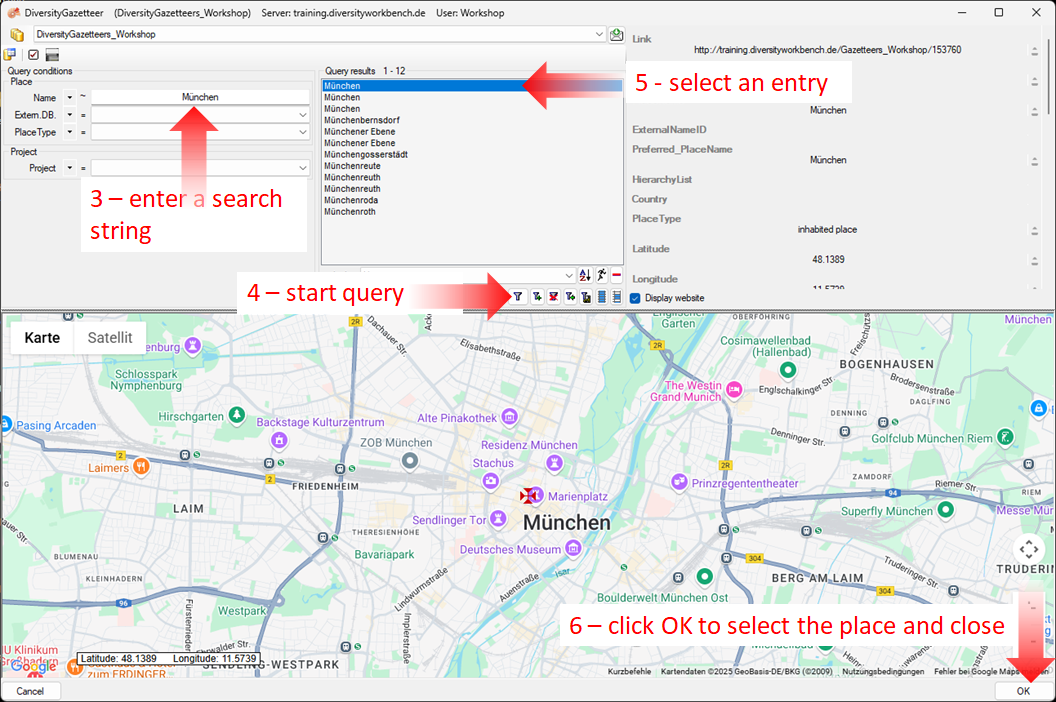
To enter a place name via the Diversity Gazetteer, select “New Named Place (Diversity Gazetteer)” from the list.
-
An entry will be added to the overview tree in the center of the window, as shown below.
-
Select this entry to open its detail fields (see item 1 in the image below).
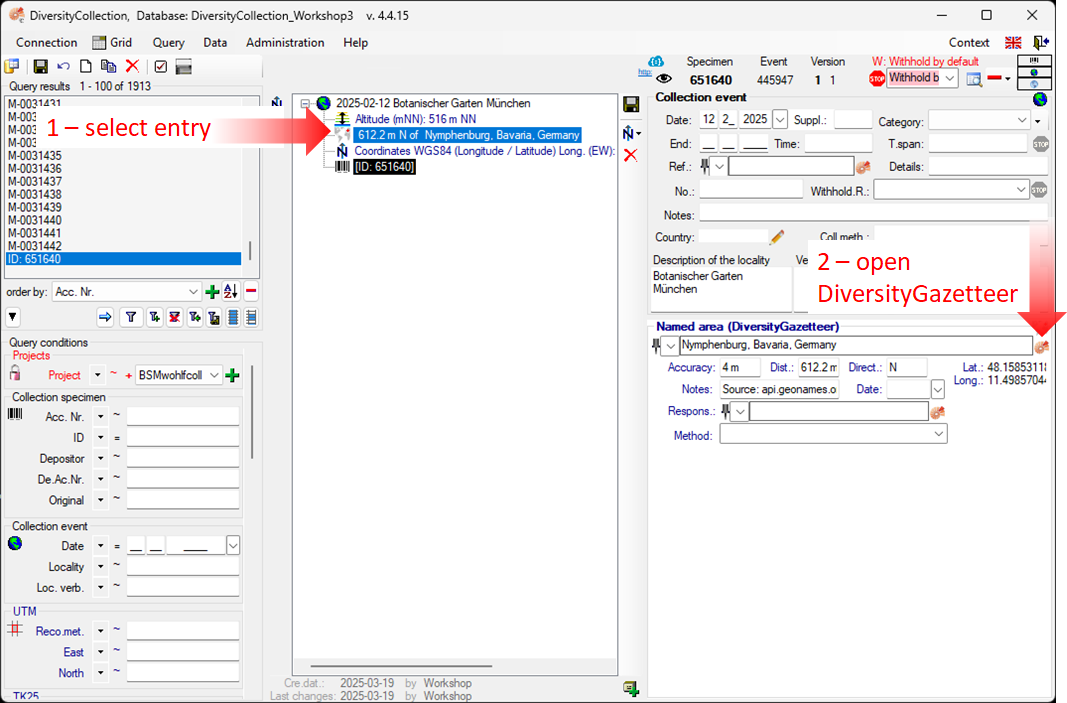
-
To connect to the DiversityGazetteer, click the
button  (see point 2 in the image above).
-
A window will open, as shown below.
-
Enter a search string - for example, the name of the city you are looking for (see point 3 in the image below)
-
Start the query by clicking the button  (see point 4
in the image below).
(see point 4
in the image below).
-
The query results are listed in the center of the form. Select one of the results.
To help you choose the correct entry, the details for the selected location are displayed on the right side of the list.
A map with the corresponding coordinates is shown at the bottom. After selecting the correct entry (see point 5 in the image above),
click OK to return to the main window (see point 6 in the image above).
-
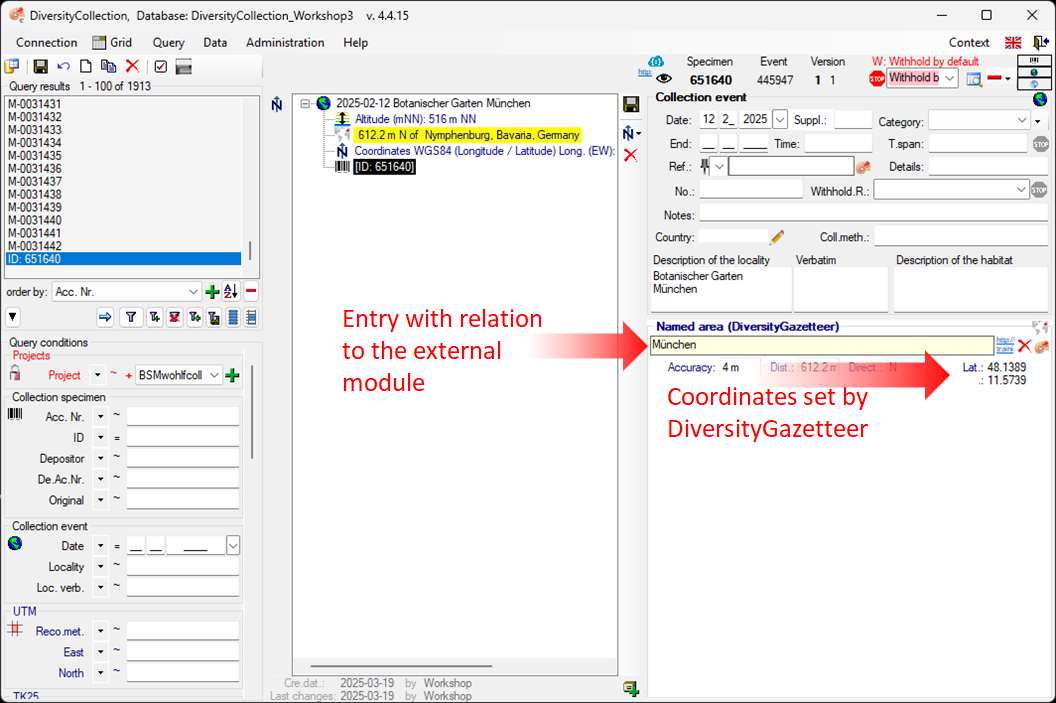
As shown below, the data retrieved from the gazetteer is displayed in different panels.
In addition to the location name, the DiversityGazetteer also displays the coordinates and country, as shown below.
-
The input field where you entered the place name is now locked to prevent changes (see image below).
Next to the location field, you will find a link to  the external module.
Click it for more details.
the external module.
Click it for more details.

-
If you wish to remove the connection to the external module, click the
 button. This will retain all entered data (country,
place, coordinates) but remove the link to the DiversityGazetteer.
button. This will retain all entered data (country,
place, coordinates) but remove the link to the DiversityGazetteer.
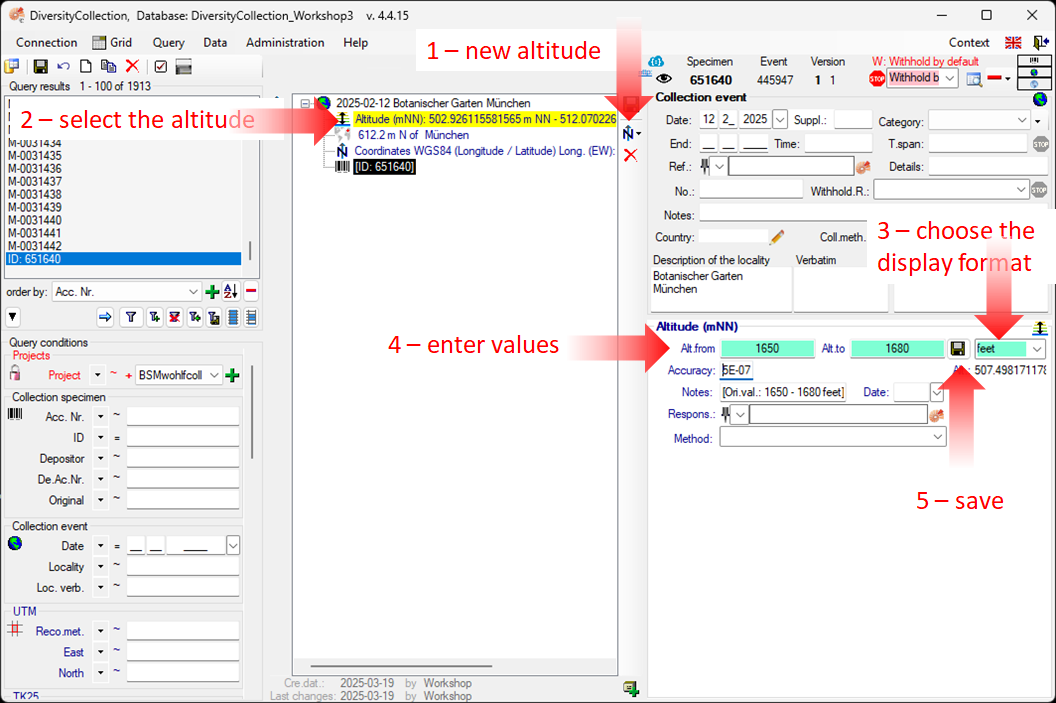
New Altitude (mNN)
The last information we provide about the location is the altitude.
-
Click the button (see point 6 of the first image on this page)
-
Select New Altitude (mNN) (see point 1 in the image below).
-
Select the new entry in the overview to open the data fields (see point
2 in the image below).
-
Suppose you only have altitude values in feet - change the display format to feet (see point 3 in the
image below). Enter your values (see point 4 in the image below) and
click the save button (see point 5 in the image
below) to save your entries. Your values will now be automatically converted to meters,
which is the internal format used by DiversityCollection. If you switch the display format back to meters,
you will see the result. The program calculates an average value for altitude and accuracy in meters, based on the precision of your original input (see below).
The original values you entered are saved in the Notes field.
Next chapters
This tutorial continues in the sections listed below.
Diversity Collection
Tutorial
Event Series
If you need a hierarchical order of your CollectionEvents, or if you want to organise several CollectionEvents, for example, to document expeditions, you can do so using a CollectionEventSeries. For more detailed information about CollectionEventSeries, see the
section CollectionEventSeries.
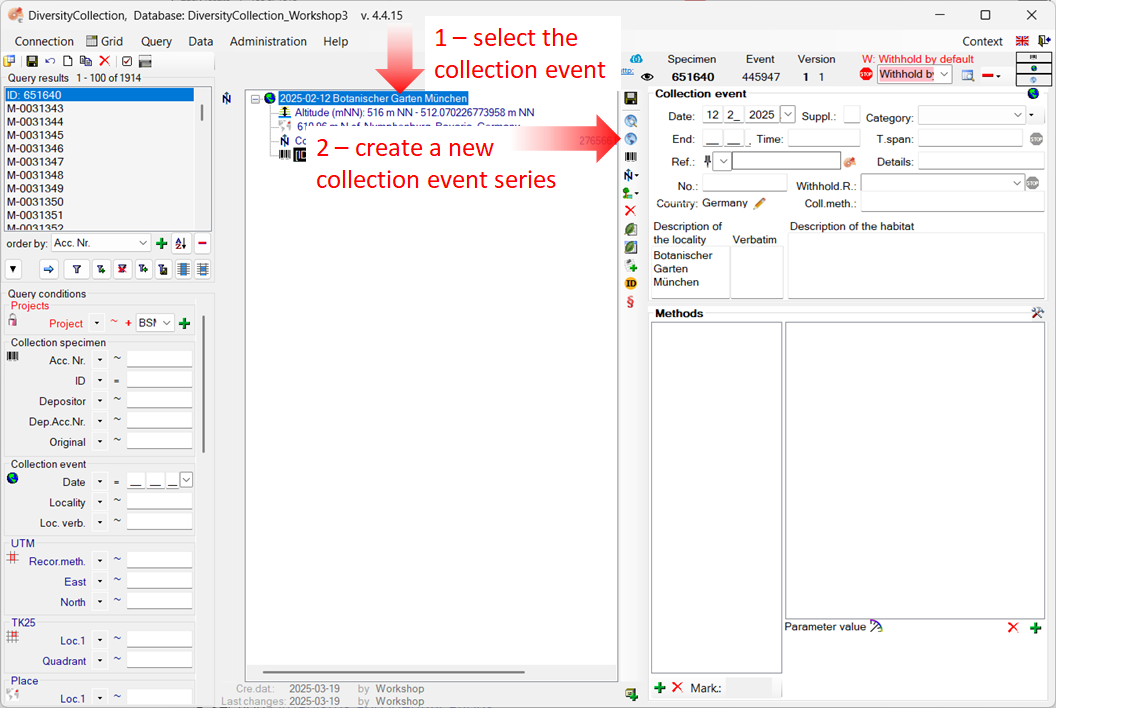
Create a new EventSeries
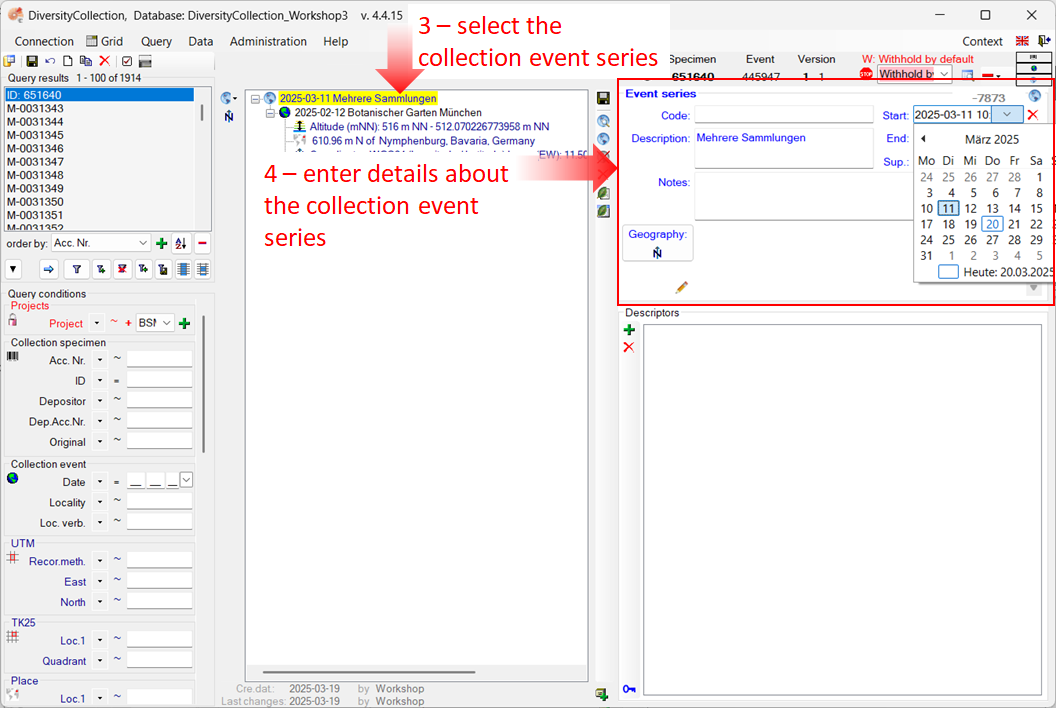
- To create a new EventSeries, select the relevant
CollectionEvent in the specimen tree (see point 1 in the image below).
- Click the Add a new event series
 button (see point 2 in the screenshot below), and save your changes by clicking the save button.
-
The entry for the new EventSeries appears in the tree view (see point
3 in the image below).
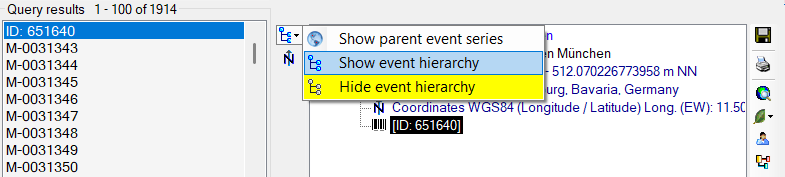
- If the new EventSeries does not appear in the tree view, click the Show parent event series button located to the right of the tree view.
-
Select the CollectionEventSeries entry in the tree view to enter the details for this EventSeries (see point 4 in the image
below).
-
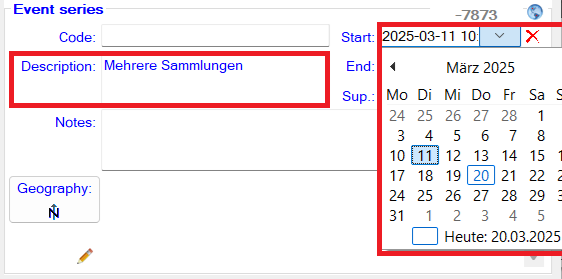
To enter the date of the CollectionEventSeries, click the dropdown button to open a calendar and select the date.
-
Next, enter the description of the location (see image below).
-
To save the data entered so far, click the save button.
Create hierarchies of CollectionEvents and CollectionEventSeries
Events and event series can be organised hierarchically.
Create a new CollectionEventSeries hierarchy
To create a hierarchy for your CollectionEvents and CollectionEventSeries, select the existing EventSeries in the tree (see step 3 in the image above).
- Before adding a new EventSeries, change the tree view mode. Click the button in the top left corner next to the tree view and select Show event hierarchy.
- Select the EventSeries in the tree. In our example Mehrere Sammlungen.
- Add a second EventSeries New EventSeries and proceed analogously as described above in the chapter Create a new EventSeries.
- Finally, drag the relevant CollectionEvent to its position within the hierarchy of
the CollectionEventSeries entries. In our example, the event 12.02.2025 Botanical Garden Munich is dragged under the event series “New Event Series”.

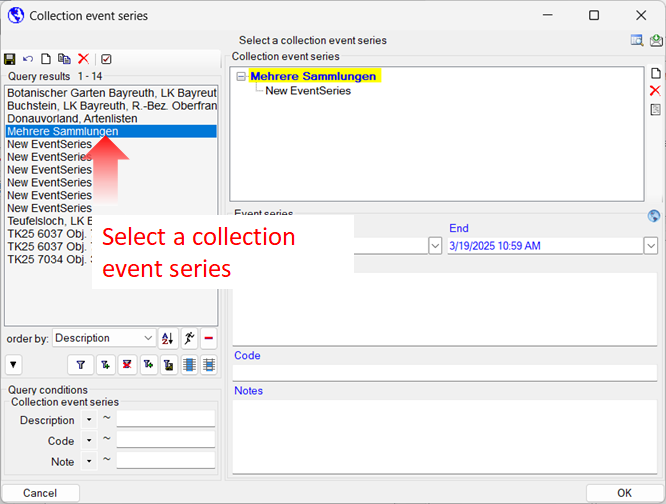
Add a CollectionEvent to an existing CollectionEventSeries
You can also add a CollectionEvent to an existing CollectionEventSeries.
-
Select the CollectionEvent in the tree view.
-
Click on the button  .
.
-
The Collection event series window will open. Click on the filter button to search for all available CollectionEventSeries.
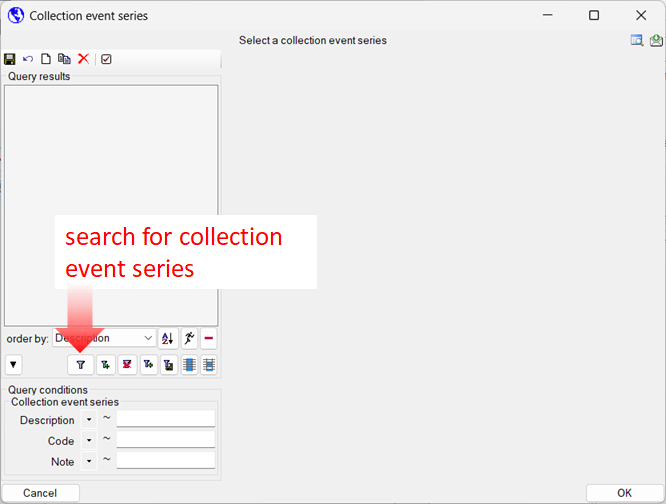
-
Select the CollectionEventSeries to which you want to assign the event, then click OK.
Next chapters
This tutorial continues in the sections listed below.
Diversity Collection
Tutorial
Specimen
Specimens are the entities stored in a collection. For more detailed information about CollectionSpecimen see the
section CollectionSpecimen.
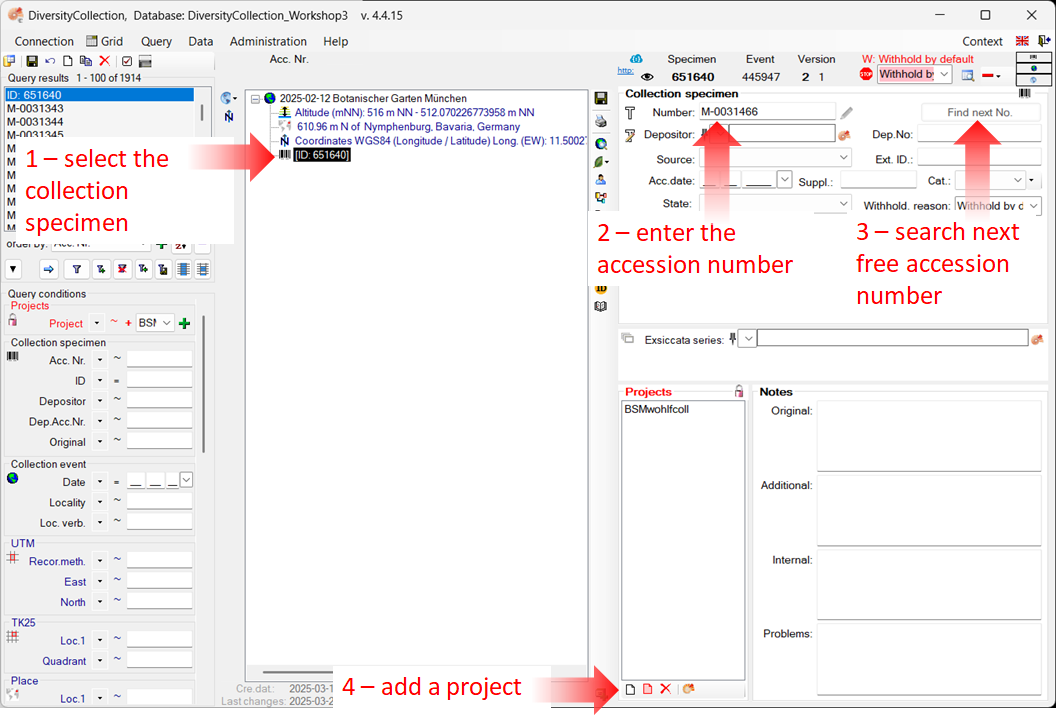
Assign an accession number
-
To set the accession number for the CollectionSpecimen select it in the
overview (see point 1 in the image above)
-
Next enter the accession number (see point 2 in the image above).
OR
-
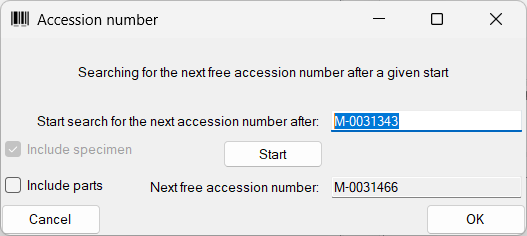
Search for the next available accession number, click the corresponding
button as shown above (see point 3 in the image above).
A window will open as shown below. Start the search for an available accession number. If
the query was successful, click OK to add the new accession
number to your data record.
Assign projects
Each dataset must be linked to at least one project. But you can assign as many projects as you want.
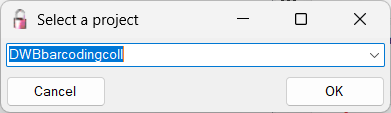
- To add another project to access your data, click the button in the project list (see point 4 in the image above).
- This opens a dialog where you can select a project from those defined in DiversityCollection (see image below). The project will then be added to the list of projects for this specimen.
Next chapters
This tutorial continues in the sections listed below.
Diversity Collection
Tutorial
Collector
Collectors
Collectors are the people or groups responsible for gathering specimens. In the DiversityWorkbench framework, collectors are
managed in the module
DiversityAgents. There may be
multiple collectors for a single specimen. For more detailed information about Collectors, see the
chapter Collectors.
Add collectors to a specimen
You can add and link existing collector(s) from the DiversityAgents module, or add new collector(s) without linking.
Add a Collector with link to DiversityAgents
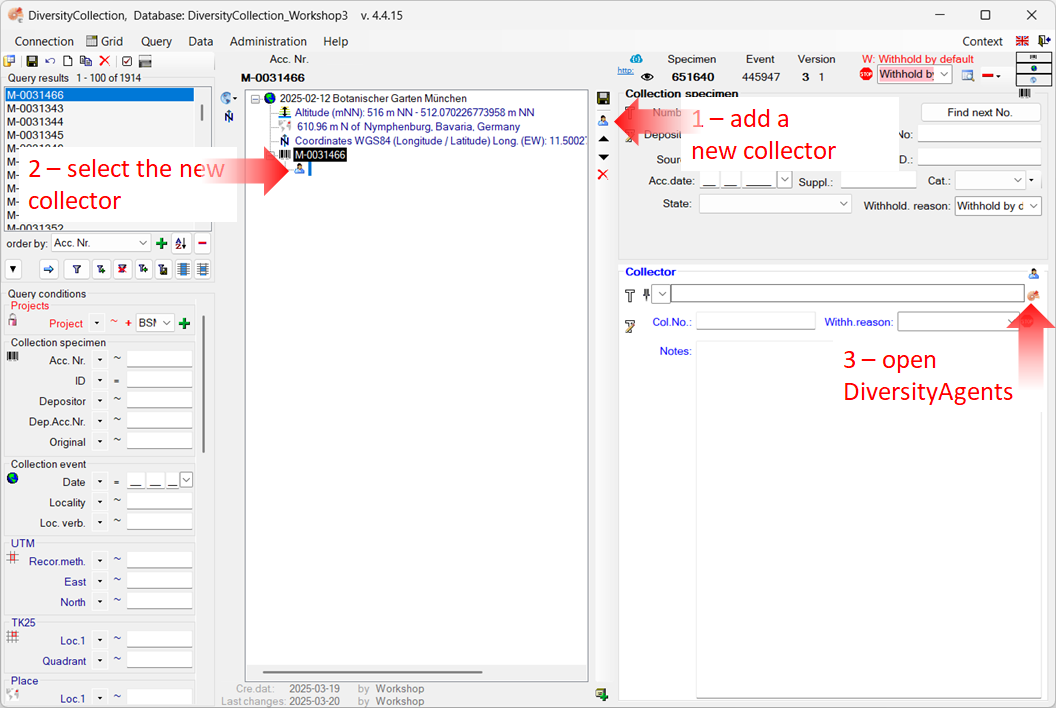
- Select the specimen in the tree.
- Click the
 button to add a new collector (see point 1 in the image below).
- Select the collector entry in the overview (see point 2).
- Click the
button to open the interface of the DiversityAgents
module (see point 3).
- A window for DiversityAgents will open.
- Enter your search criteria (see point
1 in the image below), then click the filter button to
start the query (see point 2).
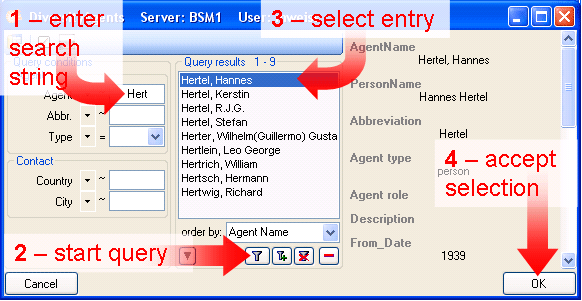
- Select the appropriate entry from the result (see point 3 in the image
above) and click the OK button (see point 4) to
link the name in DiversityCollection.
Add a Collector without a link to DiversityAgents
- To insert a collector, click the button (see point 1 in the image below).
- Select the New collector 2 (see point 2 in the image below).
- Begin typing the name in the name field (see point 3 in the image below). All matching entries already stored in the database will be listed as you type. You can either select a matching name from the list or enter a new name if it does not appear.
- If the collector has a field number, enter it in the appropriate field (see point 4 in the image below).
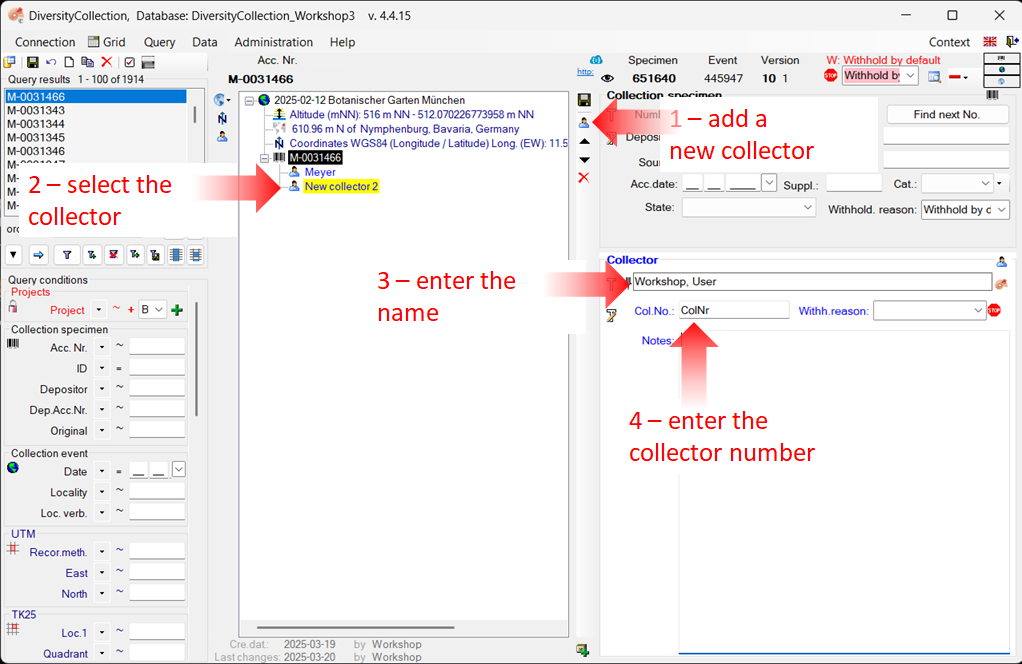
- Finally, save your changes.

Next chapters
This tutorial continues in the sections listed below.
Diversity Collection
Tutorial
Relation
In DivesityCollection, you have the ability to define and manage connections between data. Specifically, the module supports two types of relations:
-
Internal Relations: These are connections to specimens that already reside within DiversityCollection.
-
External Relations: These are connections to specimens that are not managed within DiversityCollection.
For further information on relations, see the chapter Relation.
1. Internal relations
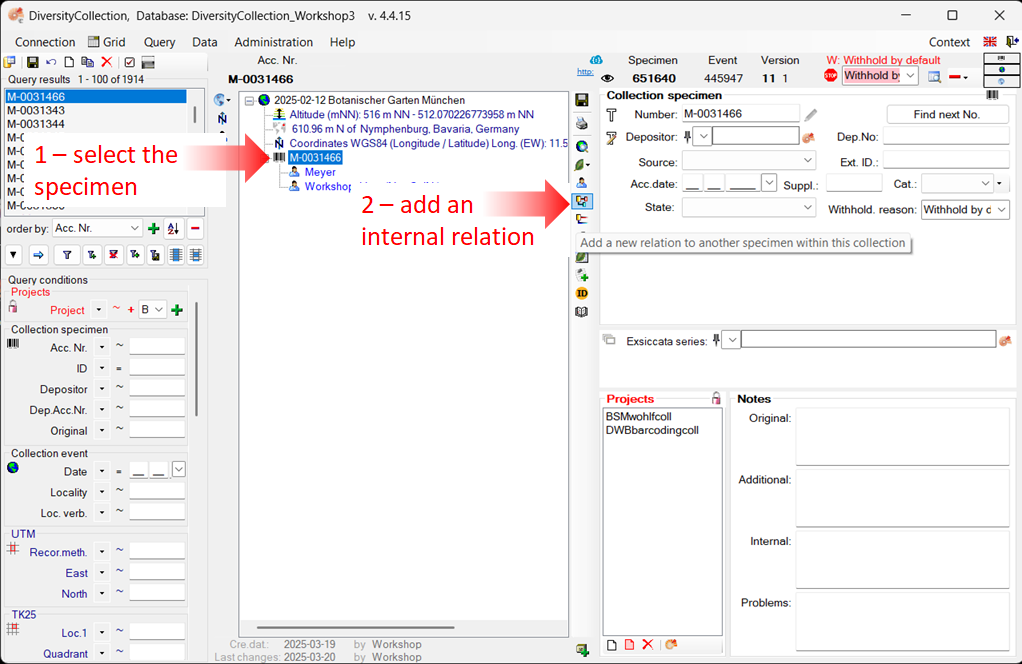
- To enter a relation to a specimen in DiverisityCollection, select the
specimen in the tree (see point 1 in the image below)
- Click on the button
 (see point 2 in the image below).
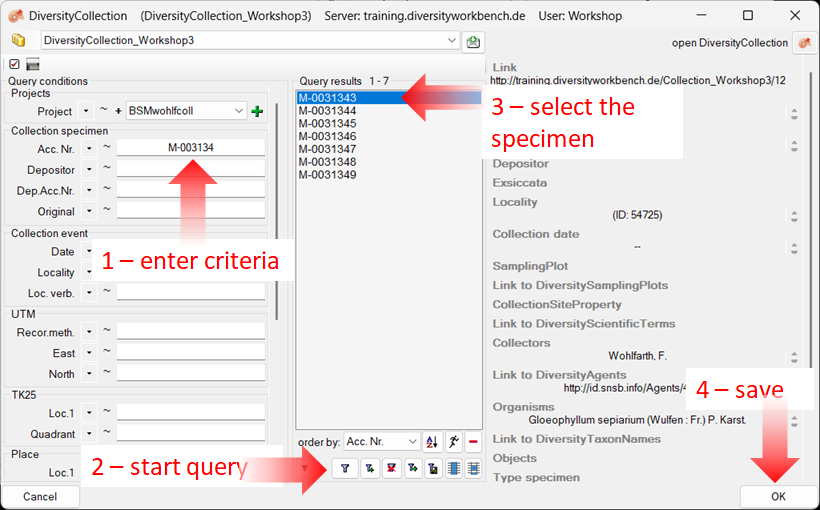
- A window will open where you can search for the related specimen.
- In the window, enter your search criteria (see point 1 in the image below)
- Start the query (see point 2 in the image below).
- Select the related specimen from the result list (see point 3 in the image below)
- Click OK (see point 4 in the image below) to insert the relation.
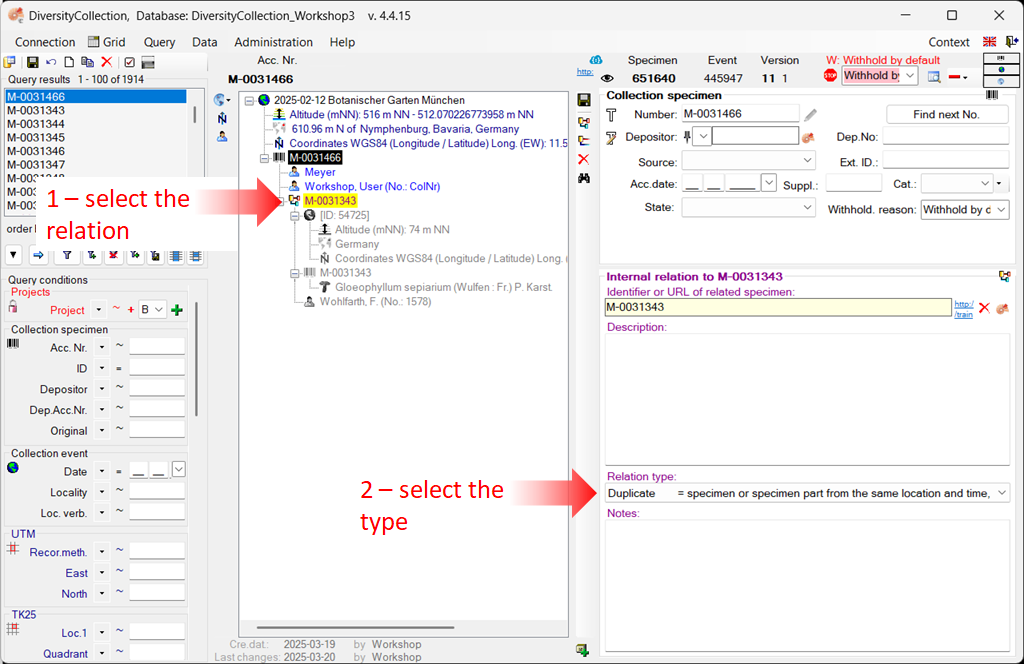
- Select the relation entry (see point 1 in
the image below) to display the detail fields.
- Enter the type of relation (see point 2 in the image below).
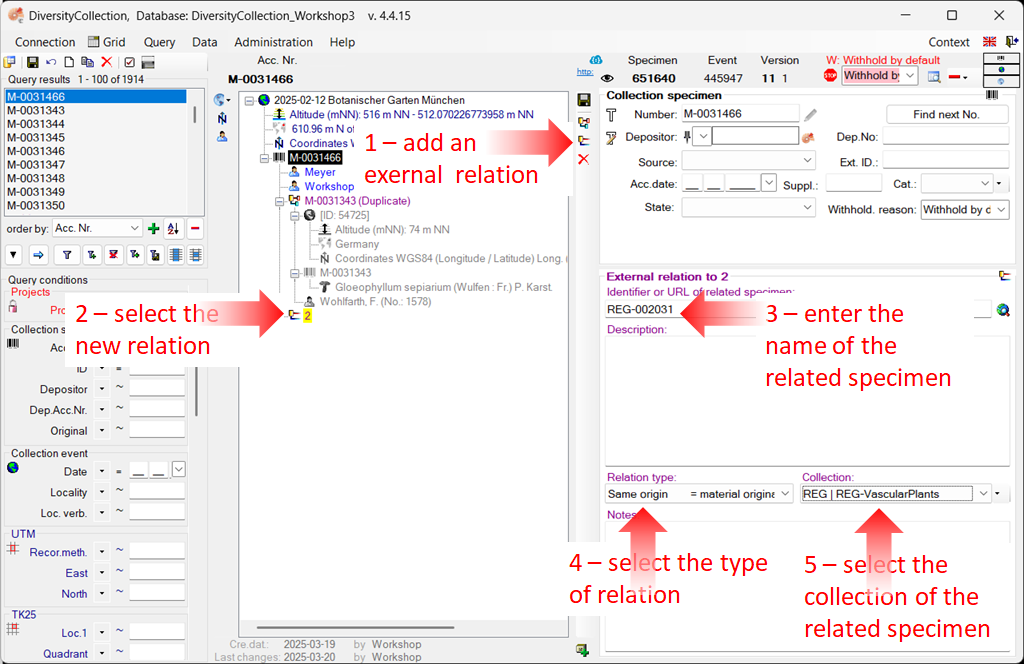
2. External relations
- To enter a relation to a specimen from a foreign collection, create a relation (see point 1 in the image below)
- Select it in the tree view (see point 2 in the image below).
- Enter the name of the specimen (see point 3 in the image below).
- Select the type of relation (see point 4 in the image below).
- If a dataset exists for the collection, you can select it
from the list (see step 5 in the image above). (Otherwise, you must first
add the collection to the list. For more information, see the chapter Collection)
Next chapters
This tutorial continues in the sections listed below.
Diversity Collection
Tutorial
Organisms
(= Identification Units)
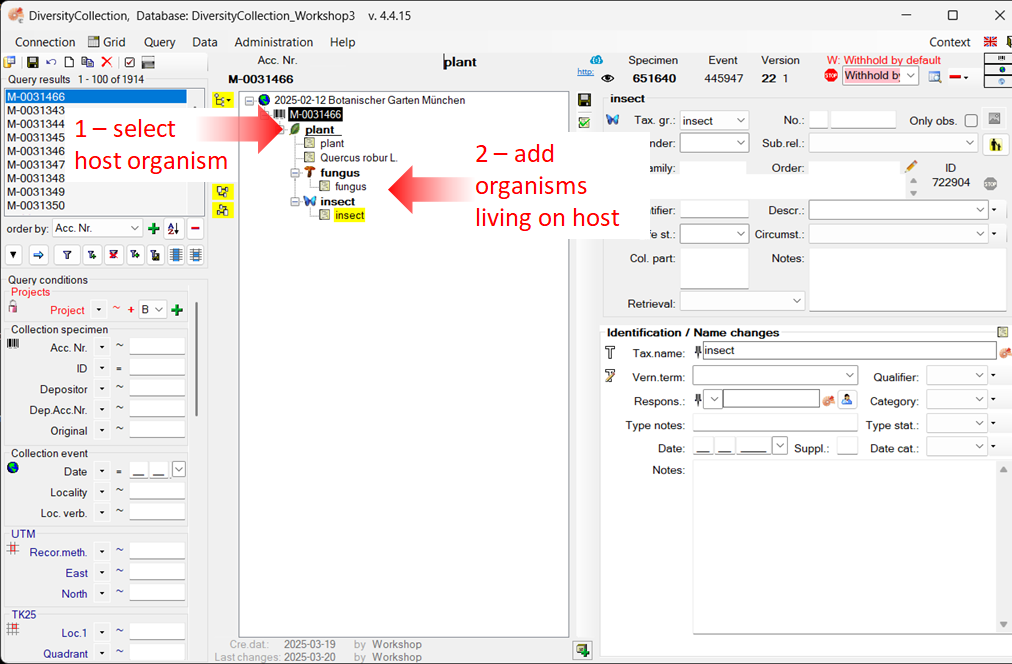
The organisms or items in a CollectionSpecimen are referred to as
IdentificationUnits. A specimen may contain multiple
IdentificationUnits, for example, an insect (1) feeding on a fungus (2) growing
parasitically on a plant (3). For more detailed information about Organisms (=IdentificationUnits), see the
chapter Organisms.
Presets
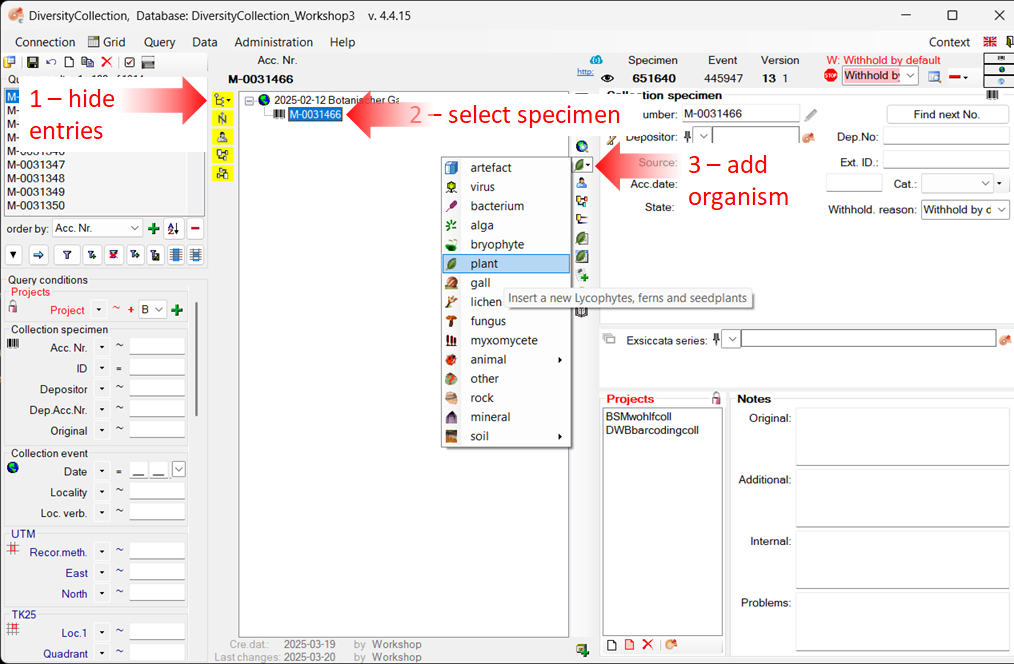
To focus on the specimen and its organisms,
hide all other entries in the tree by clicking the corresponding buttons on the left-hand side of the specimen tree.
A yellow background on a button indicates that the respective information is currently hidden (see point 1 in the image below).
Add a new organism
You can add any number of organisms to a specimen. Organism types are selected from a list. To add a new organism, follow the steps below:
- Select the specimen entry in the tree (see point 2 in the image below).
- Then select the appropriate organism from the list — in this example, a plant
 .
.
-
This will insert an entry for the organism ( ) along with an identification (  )
beneath the specimen entry (
)
beneath the specimen entry (  ) (see the image
below).
) (see the image
below).
-
To view or enter the details of the organism, select the organism entry in the tree
(see points 1 and 2 in the image below).
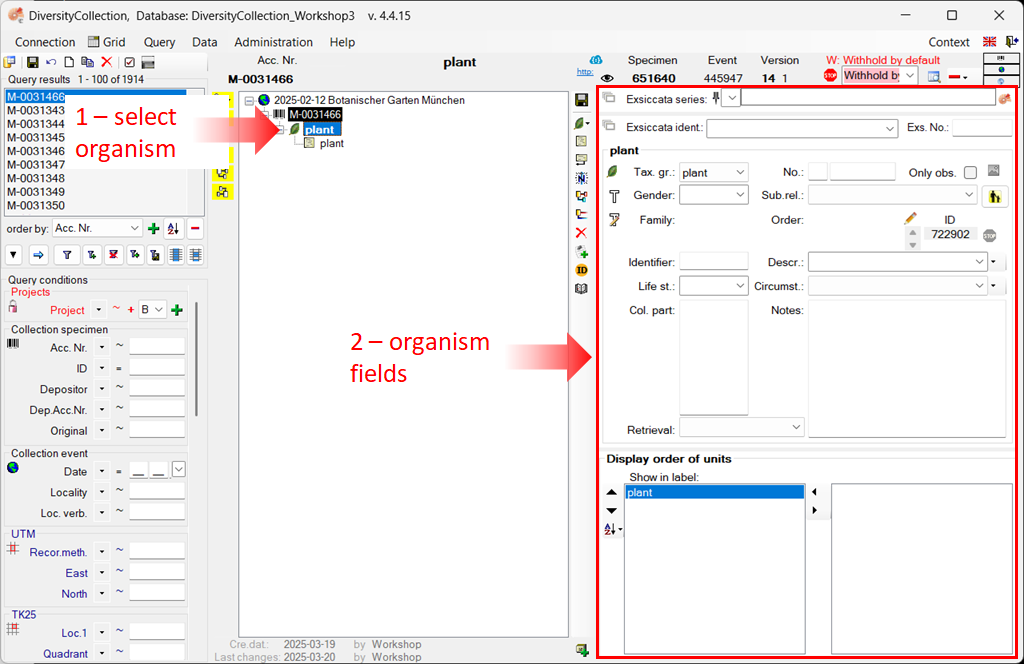
- To view or enter the details of the identification entry, such as taxon name, etc., select the identification entry in the tree
(see points 1 and 2 in the image below), and then follow the next section Add details to the identification.
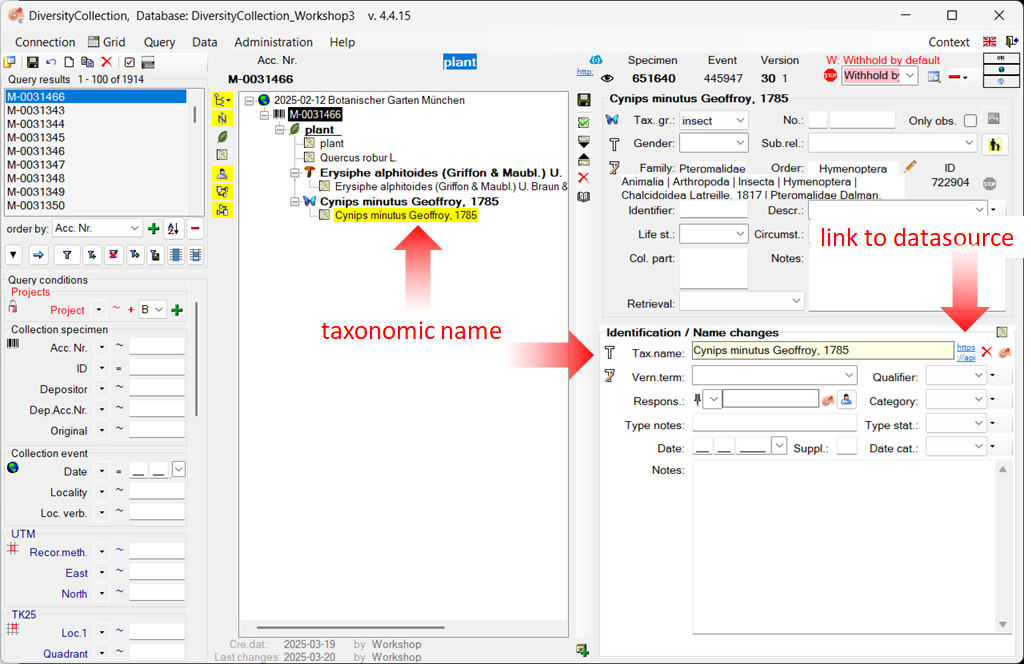
Add details to the identification
To view the information for the identification, select the identification entry in the tree view (see point 1 in the image above). The fields for the identification will appear on the right-hand side of the tree view (see point 2 in the image above).
You can enter taxonomic names in different ways:
-
Enter the taxonomic name without linking it.
-
Link the taxonomic name to a module, such as DiversityTaxonNames, or to a web service.
All options are demonstrated below using examples.
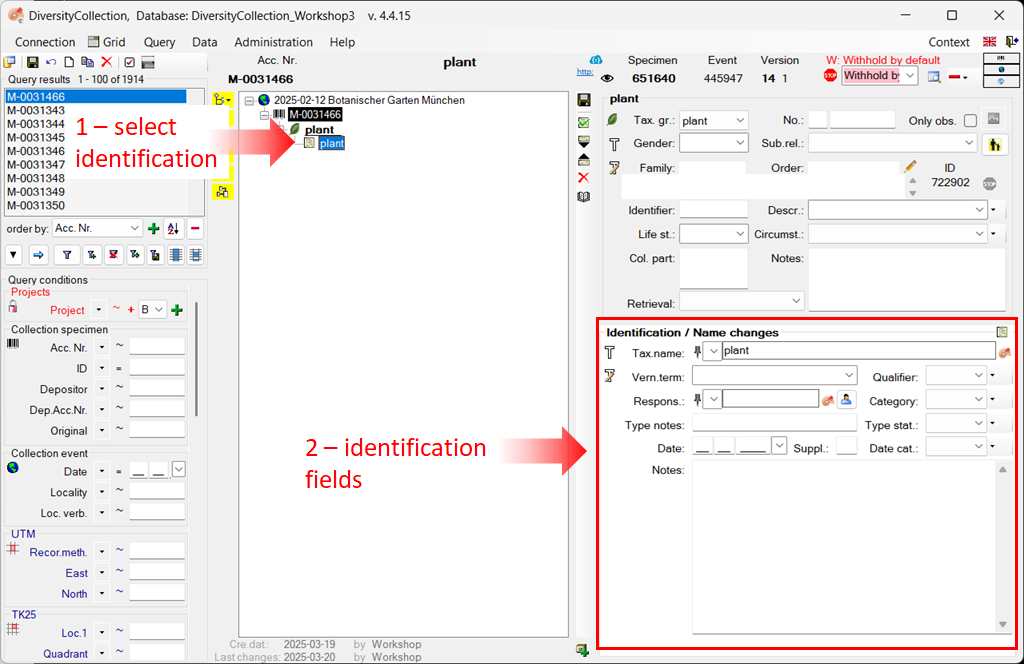
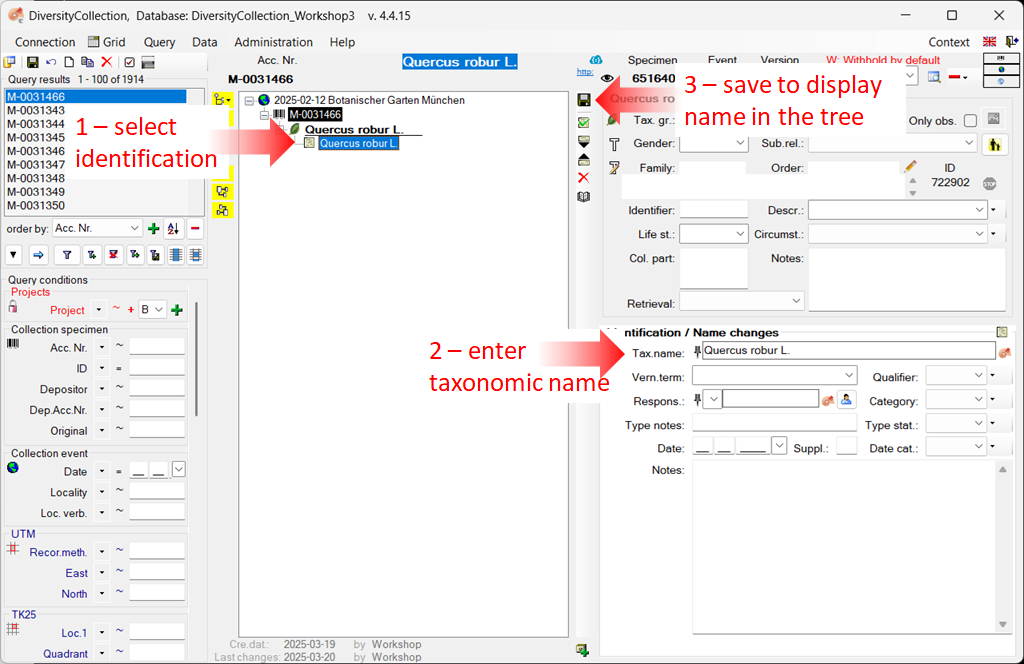
Enter a taxonomic name without linking
In the first example, we will enter a taxonomic name for the plant without linking it.
- Select the identification entry in the tree (see point
1 in the image below).
- In the identification area of the main window, enter a taxonomic name by simply typing it into the Tax. name field (see point 2 in the image
below).
- To save the dataset and display the taxonomic name in the tree,
click the save button (see point 3 in the image
below).
Enter a taxonomic name and link it to DiversityTaxonName
In this second example, we link a taxonomic name to the DiversityTaxonName module.
Information about remote modules and web services
For more information about linking to remote modules, see the chapter Remote Query.
Please note: To demonstrate the various possibilities, we previously added two more organisms — a fungus and an insect — to our specimen example. Instructions for this can be found in the chapter Enter more organisms to a specimen.
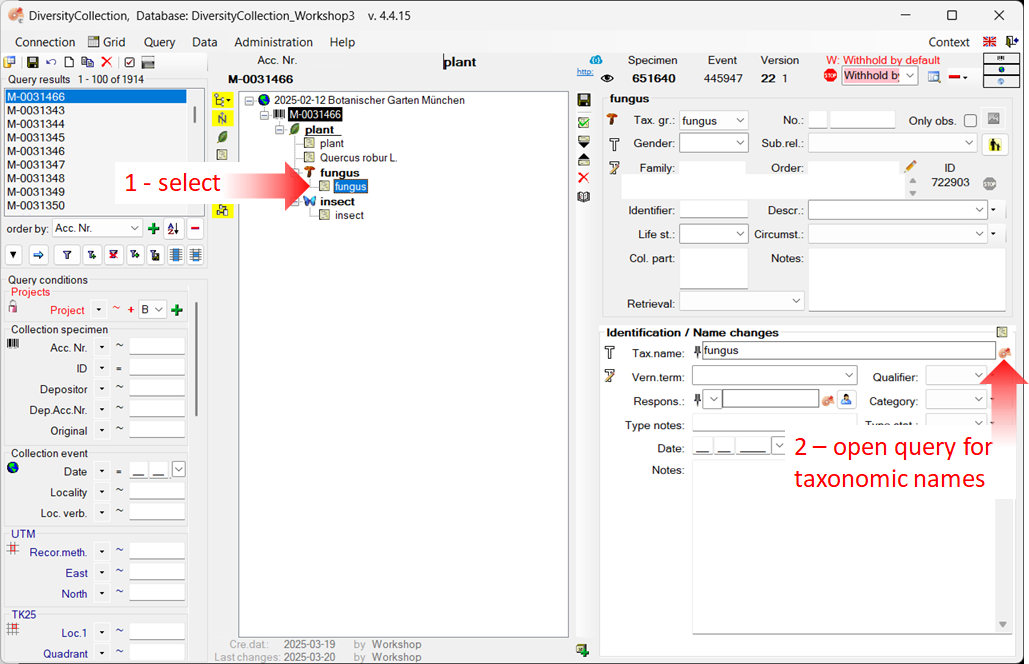
In this example, we will add a linked taxonomic name to the fungus:
- Select the identification entry of the fungus in the tree (see point 1 in the image below).
- In the identification area of the main window, click the button
to open the window for the remote modules (see point 2 in the image
below).
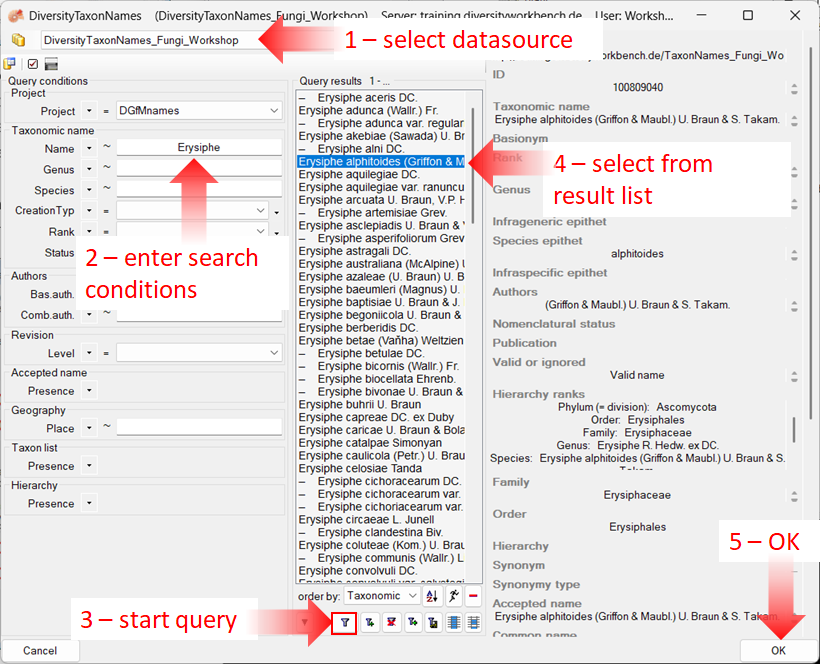
In the newly opened window, you must first select the database or the web service to which you want to link.
- Select the database DiversityTaxonNames_Fungi (see point 1 in the image
below).
- Enter the search conditions, e.g. the beginning of the
taxonomic name (see point 2 in the image below).
- Start the query (see point 3 in the image below).
- From the result list, select the taxonomic name (see point 4 in the image below).
- Click OK (see point 5 in the image below) to transfer the selected name
to the main form.
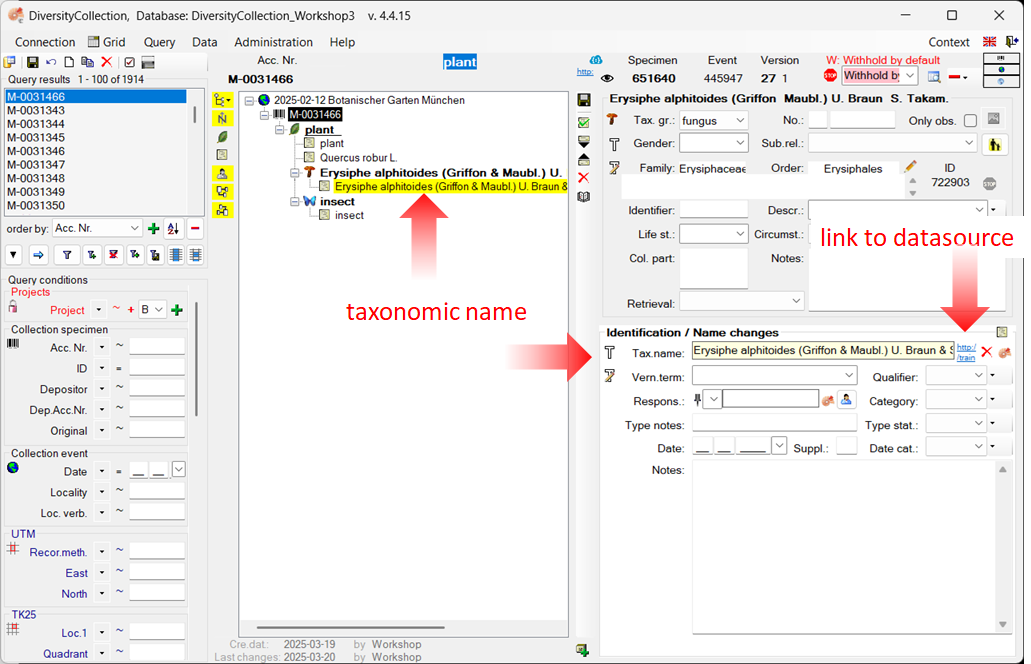
- To save the dataset and display the taxonomic name in the tree,
click the save button.
The name of the selected taxon is inserted into the “Taxonomic name” field, along with a link to the data source (see image below).
The taxonomic name cannot be edited directly while it is linked to a data source (highlighted in yellow).
To remove the link, click the button . To view the details of the linked name in the data source, click the button .
Enter a taxonomic name and link it to a web service
In this third example, we will link a taxonomic name to the Catalogue Of Life web service.
Information about remote modules and web services
For more information about linking to remote modules, see the chapter Remote Query.
Please note: To demonstrate the various possibilities, we previously added two more organisms — a fungus and an insect — to our specimen example. Instructions for this can be found in the chapter Enter more organisms to a specimen.
In this example, we will add a linked taxonomic name to the insect:
- Select the identification entry of the insect in the tree (see point 1 in the image below).
- In the identification area of the main window, click the button
to open the window for the remote modules (see point 2 in the image
below).
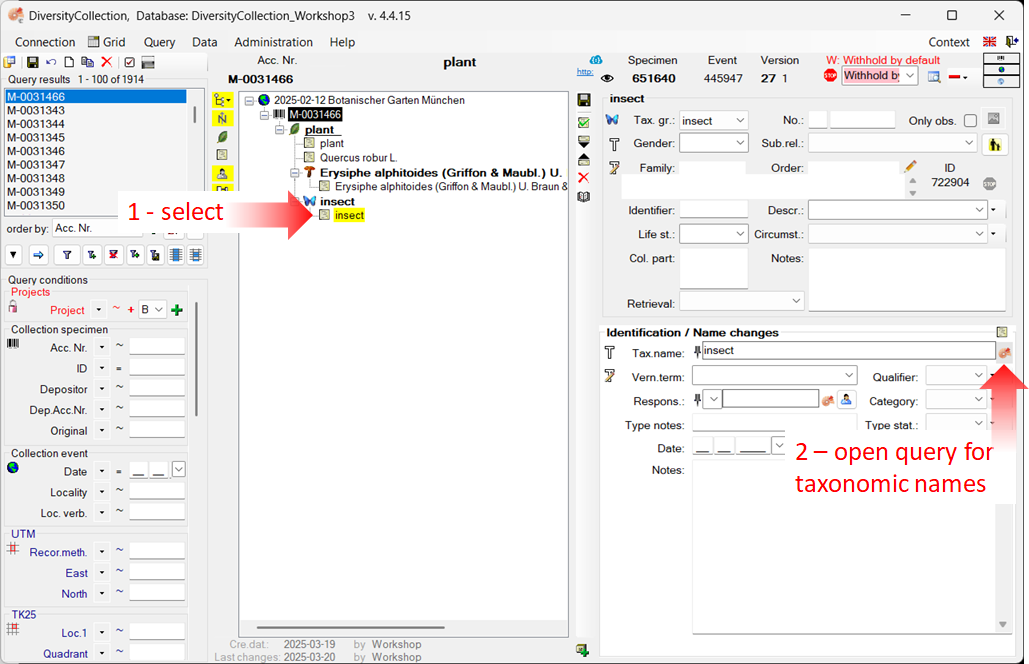
In the newly opened window, you must first select the database or web service to which you want to link.
- Select the web service CatalogueOfLife (see point 1 in the image
below).
- Enter the beginning of the
taxonomic name (see point 2 in the image below).
- Start the query (see point 3 in the image below).
- From the result list, select the desired taxonomic name (see point 4 in the image below).
- Click OK (see point 5 in the image below) to transfer the selected name
to the main form.
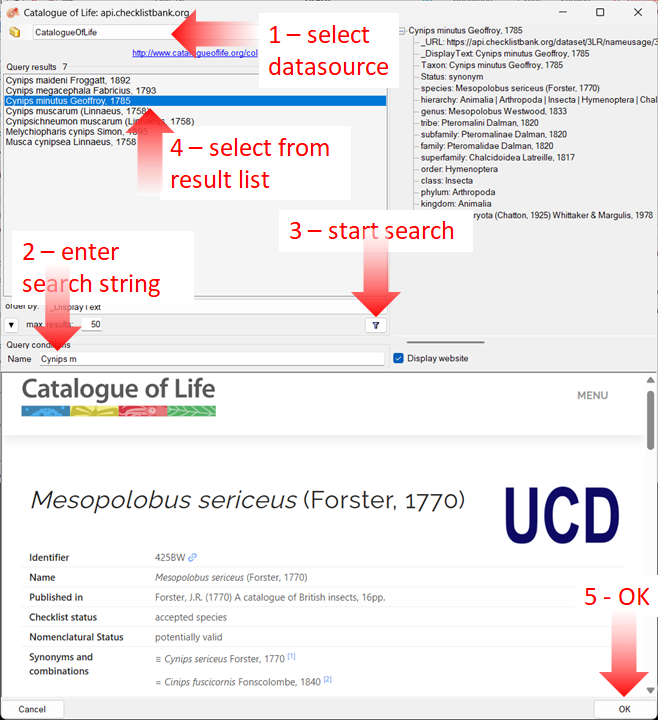
The name of the selected taxon will be inserted into the “Taxonomic Name” field, along with a link to the data source (see image below).
The taxonomic name cannot be edited directly while it is linked to a data source (yellow background). To remove the link, click the button . To view the details of the linked name as stored in the data source, click the button .
Enter more organisms to a specimen
To enter additional organisms living on the plant (see point 2 in the image
below), select the plant in the tree (see point 1 in the image below)
and create new organisms as described above in the section Add a new organism .
Enter an additional identification for an organism
To enter an additional identification for an organism, select the organism in the tree (see
point 4 in the image below), and click the button (see point 5 in the image below).
This will insert a dataset for an additional identification of the organism beneath the organism entry, as shown below.
Next chapters
This tutorial continues in the sections listed below.
Diversity Collection
Tutorial
Storage tree (= specimen parts tree)
A specimen may consist of multiple parts, which can be housed in different collections. These parts may represent different material categories, such as herbarium sheets, microscopic slides, etc.
For more detailed information about “Specimen Parts”, see the
chapter Parts of the specimen.
There is also a German-language video available for this chapter .
View the storage tree
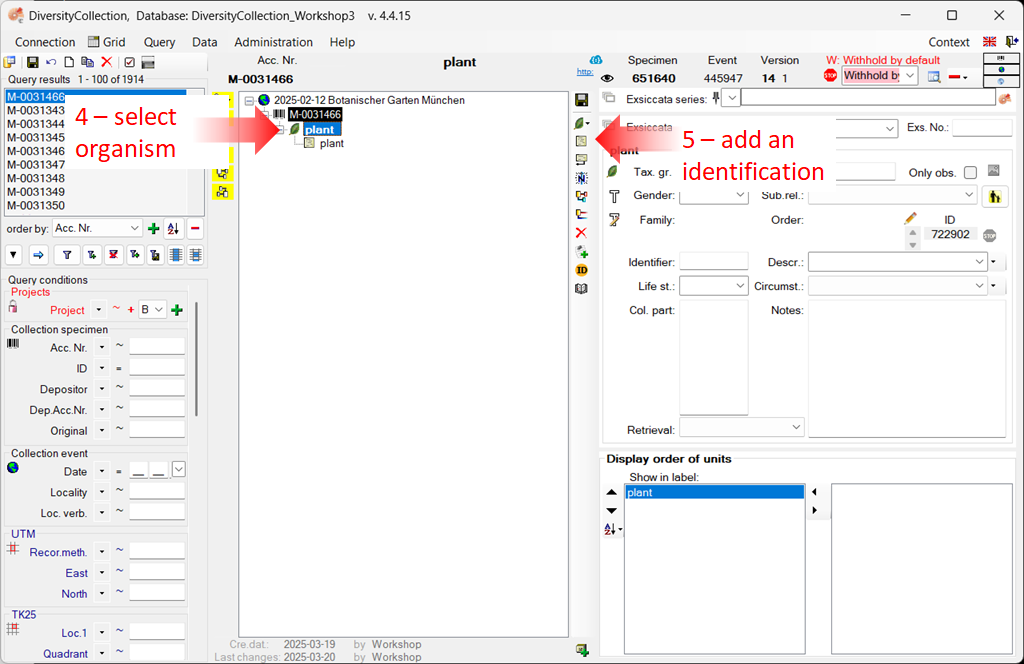
The parts of the specimen are displayed in the storage tree, located below the main specimen tree.
-
To display this tree, click the button
 located beneath the specimen tree (see point 1 in the image below).
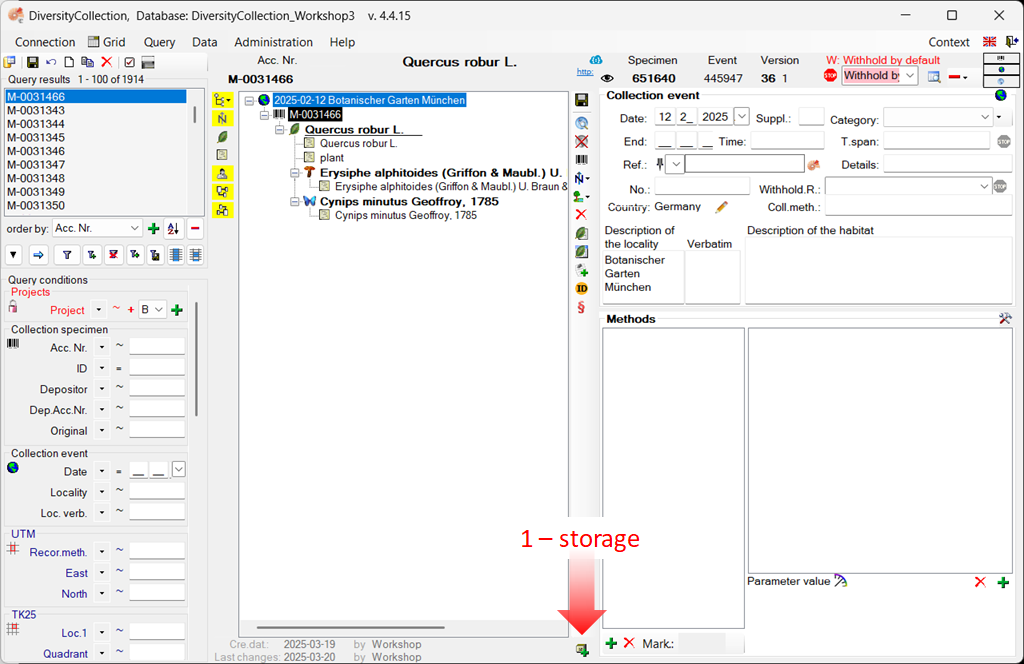
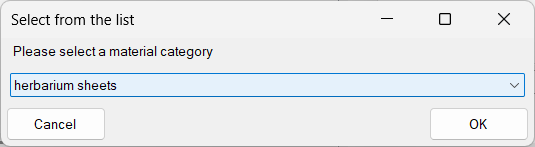
-
A window will open in which you must select the material category of the part
you want to insert (see the image below). Select “herbarium
sheets” from the list.
-
Another dialogue window will then open, where you must enter the collection in which your samples are stored (see the image below).
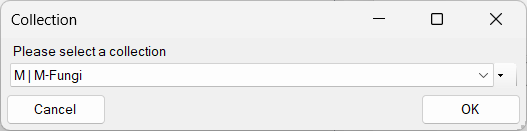
-
Select the collection from the list or hierarchy and click “OK” to close the dialogue.
The lower tree now disyplays the selected material category along with all associated organisms (see all organisms in the image below).
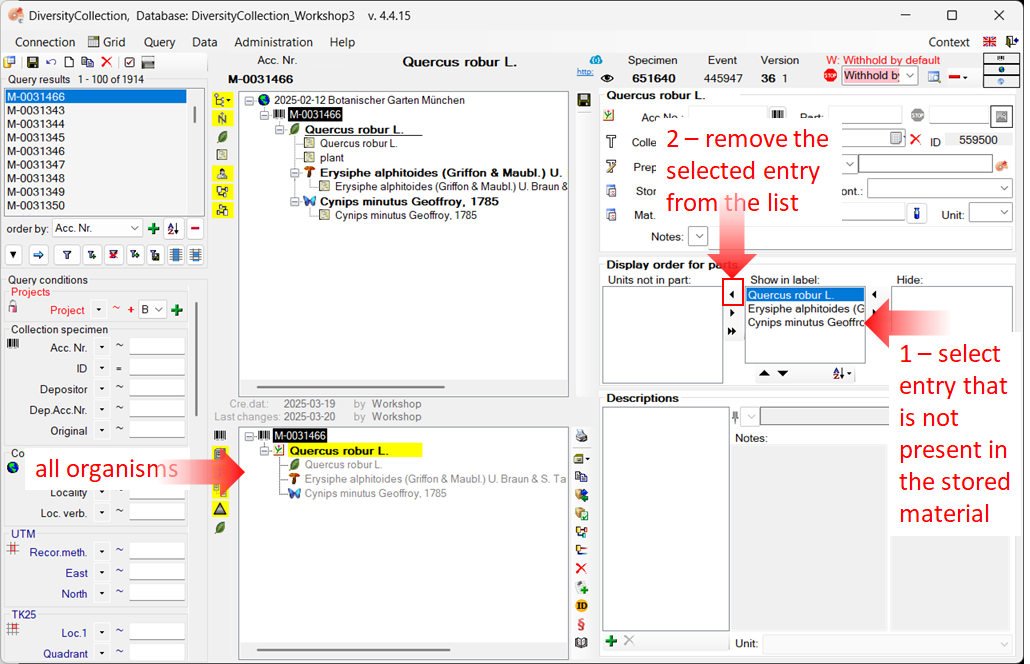
Edit the storage tree
Assume that the insect is not physically present in the specimen, but was only observed during sampling, for example.
To document this, move the insect entry from the Show in label list to the Units not in part list.
- Select the entry (see point 1 in the image
above)
- Click the < button to remove it from the label display (see point 2 in the image above).
The result is shown below.

Switch to the location tree view
To view the exact location within the collection, click the button  on the left side of the tree.
The tree view will change as shown below, listing all collections and subcollections along with the parts of the item.
on the left side of the tree.
The tree view will change as shown below, listing all collections and subcollections along with the parts of the item.
Print a label for a stored part
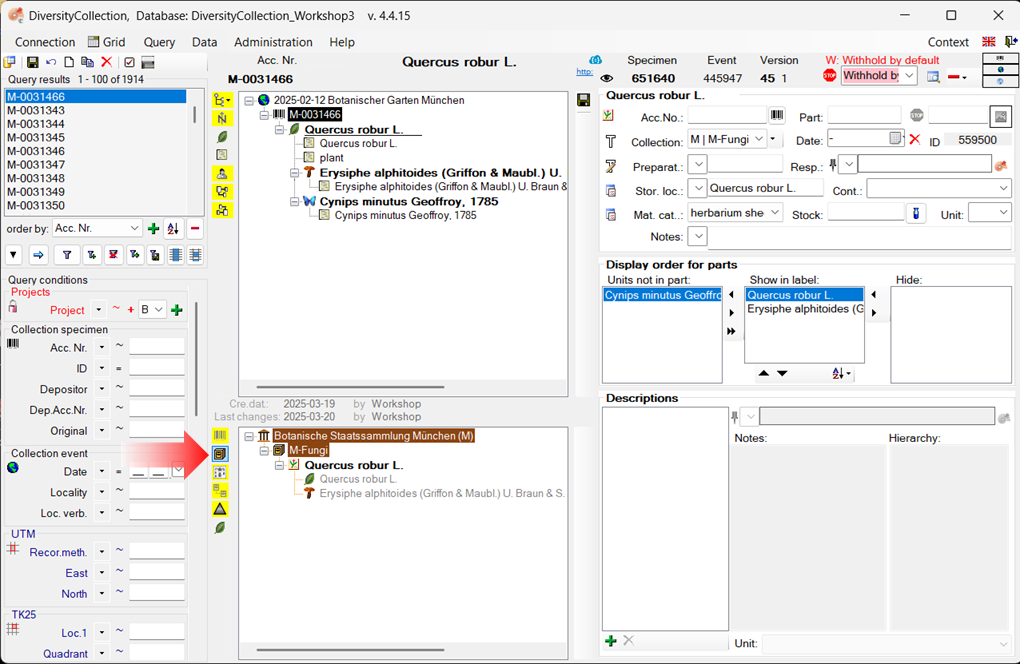
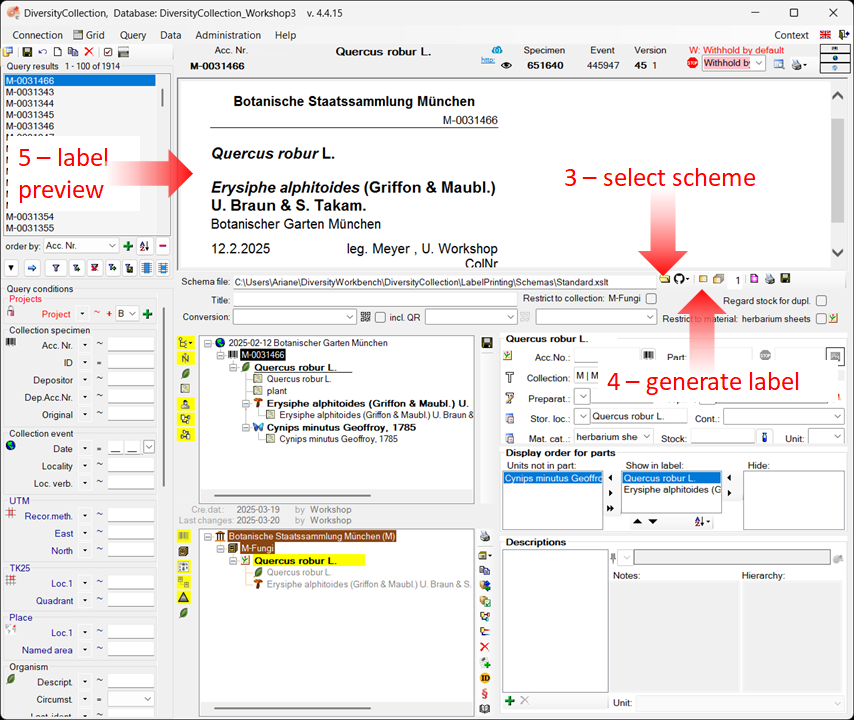
You can print a label for a stored part of the specimen. To do this, open the “Print and Label” view.
-
Select the part in the tree (see point 1 in the image below).
-
To open the “Print and Label” area, click the dropdown menu in the upper-right corner of the header and select  Printing (see point 2 in the image below).
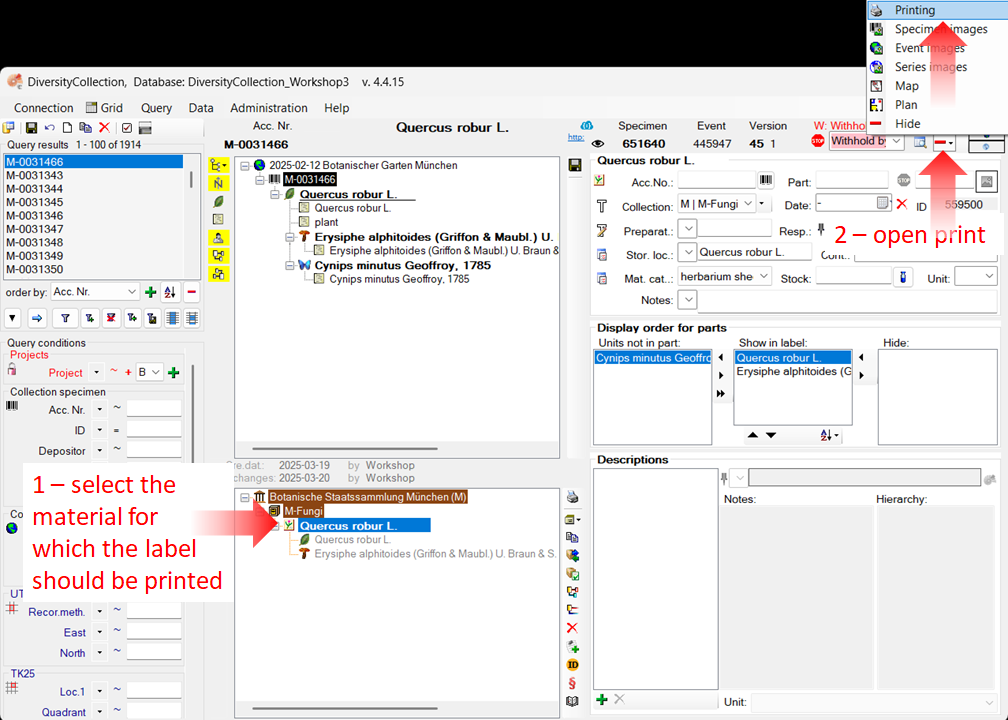
-
The “Print and Label” view will now be displayed (see the image below).
-
Click the button  (see point 3) to select a schema file (e.g. Standard.xslt).
-
Then click the button to generate a preview of the label (see point 4).
Next
This tutorial continues in the sections listed below.
Diversity Collection
Tutorial
Query
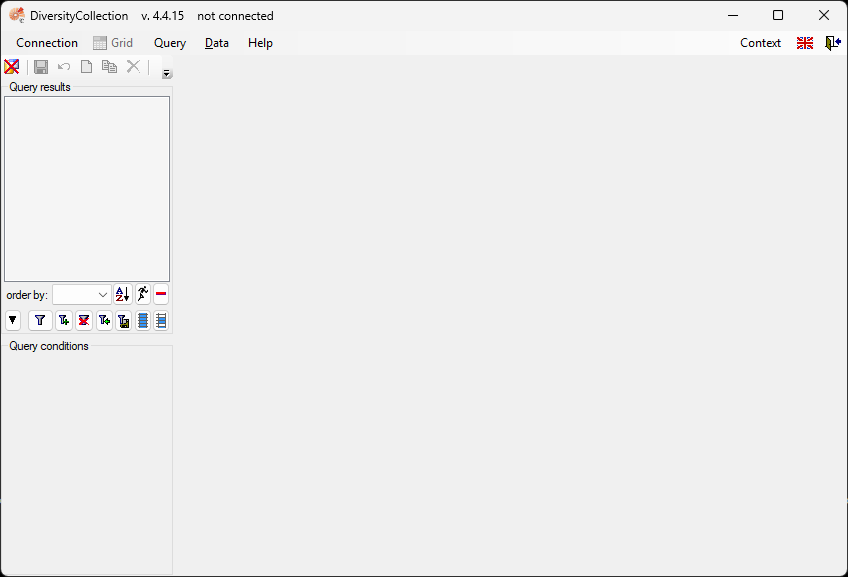
To search for data in the database, use the query area in the left-hand panel (see the image below).
You can query almost any field in the database. Additionally, you can customise the view and specify the query options according to your needs.
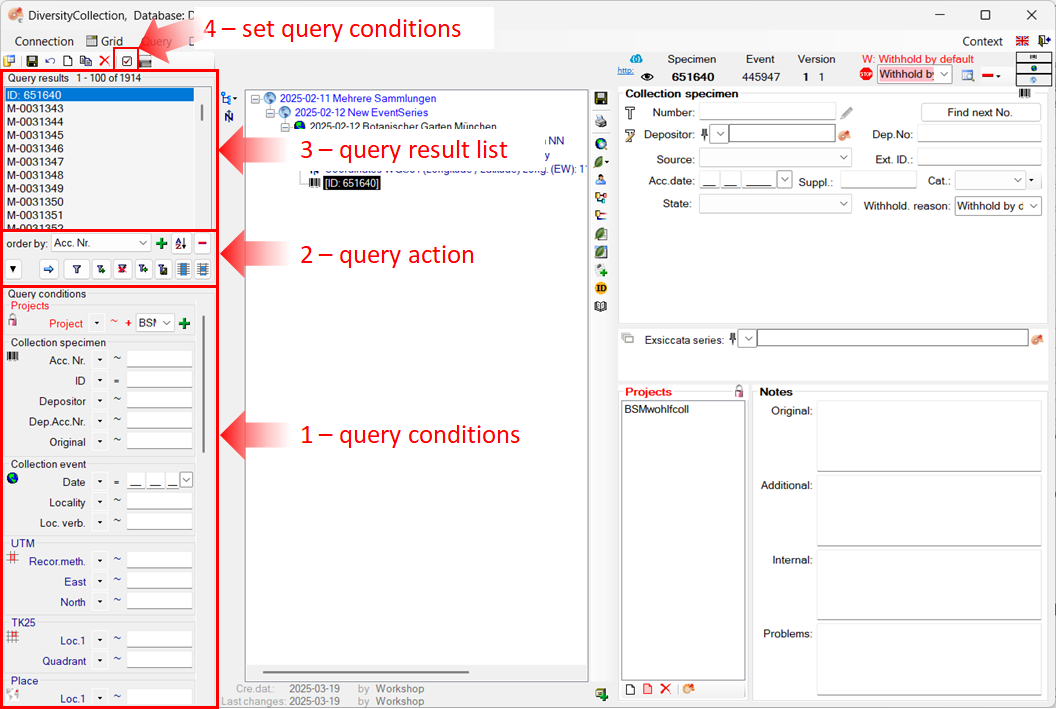
Structure of the query panel
All fields relevant to the query are displayed in the query area on the left-hand panel (see image above).
-
In the lower section (see point 1 in the image above), you can enter your query criteria. For example, by selecting a project and specifying an accession number.
You can also define which query fields are shown (see the section Customise your query conditions).
-
In the middle section (see point 2 in the image above), you will find all buttons used to trigger a search and perform related actions.
-
The results are displayed in the upper section (see point 3 in the image above). When you select a result by clicking on it, the details are shown in the panels to the right of the query area.
For more detailed information, see the chapter Query.
Customise your query conditions
-
To customise and define your query conditions, click the button
 in the top panel (see point 4 in the image above).
-
A window will open, as shown below.
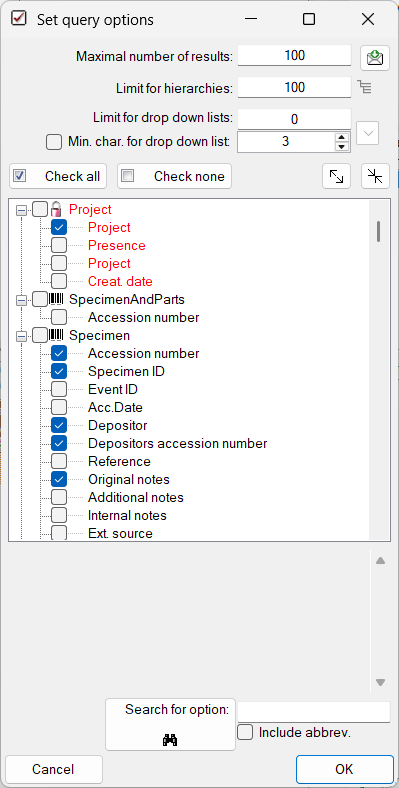
The Maximum number of results allows you to limit the size of the data package
retrieved from the server. For a slow connection to the
database server, choose a low value (e.g. 100, as set by default).
The Limit for drop-down lists restricts the number of
drop-down lists that will be generated. For a slow connection, a lower value is recommended.
The default is set to 0, meaning
no drop-down lists will be created.
Click the Check none button to clear any previous selections. Then
select the following entries:
- Project → Project
- Specimen → Accession number of specimen
- Specimen → User who created the data set
- Specimen → Date when the dataset was created
- Event → Collection date
- Organism → Organism present
- Organism → Only observed
- Storage → Material category
- Image → Type
Click OK to close the window. Your query conditions will now be displayed as
shown in the image below.
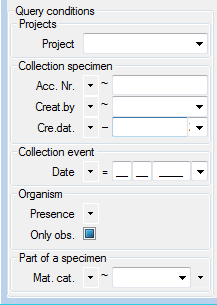
Project → Project: Here, you can choose from a list of available
entries. Select your current project.
Collection specimen → Acc. Nr.: From the operator drop-down list,
choose “~” and enter the first letters of your accession number. You
may include wildcards. Other operators include “-” for a
range or “>” for a lower limit. Note: The conditions are interpreted as
text, so for example, 2 will be listed after 10.
Collection specimen → Creat. by.: From the operator drop-down list,
choose “=” and select your username from the list.
Collection specimen → Cre. dat.: From the operator drop-down list,
choose “=” and choose the current date using the calendar.
Collection event → Date: >From the operator drop-down list, choose
“=” and enter the current year in the last field.
Organism → Presence: From the operator drop-down list, choose “•”
which indicates that an organism is present.
Organism → Only obs: Uncheck the checkbox to find organisms that
were not only observed.
Part of a specimen → Mat.cat.: Click the  button on the right side of the combobox to open the hierarchy and select
“herbarium sheet”.
button on the right side of the combobox to open the hierarchy and select
“herbarium sheet”.
Once all query conditions have been set, click the
button to run the query. The result list should include the
specimen created during this tutorial. If the  remember query option is active, the last query will be saved and is available after restarting the application.

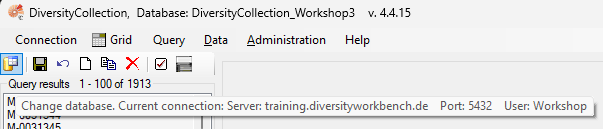
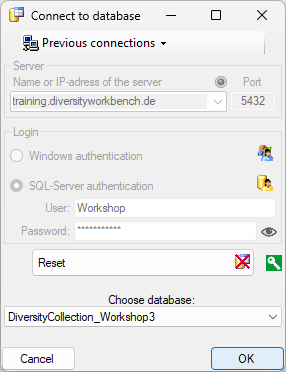
 , or select Connection → Database… from the menu.
 in the top right corner of the main window indicates that you are now connected to the database.
The tooltip of this button displays your current login information (see below).
in the top right corner of the main window indicates that you are now connected to the database.
The tooltip of this button displays your current login information (see below).