Diversity Collection
Tutorial

Query
To search for data in the database, use the query area in the left-hand panel (see the image below). You can query almost any field in the database. Additionally, you can customise the view and specify the query options according to your needs.
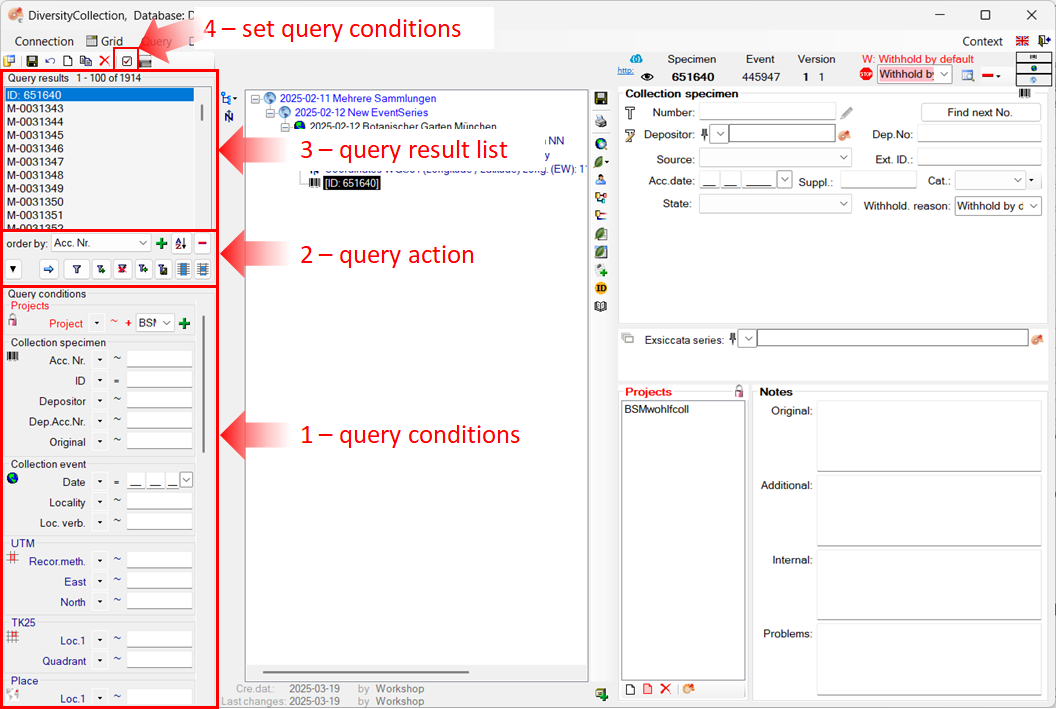
Structure of the query panel
All fields relevant to the query are displayed in the query area on the left-hand panel (see image above).
-
In the lower section (see point 1 in the image above), you can enter your query criteria. For example, by selecting a project and specifying an accession number. You can also define which query fields are shown (see the section Customise your query conditions).
-
In the middle section (see point 2 in the image above), you will find all buttons used to trigger a search and perform related actions.
-
The results are displayed in the upper section (see point 3 in the image above). When you select a result by clicking on it, the details are shown in the panels to the right of the query area.
For more detailed information, see the chapter Query.
Customise your query conditions
-
To customise and define your query conditions, click the button
 in the top panel (see point 4 in the image above).
 -
A window will open, as shown below.
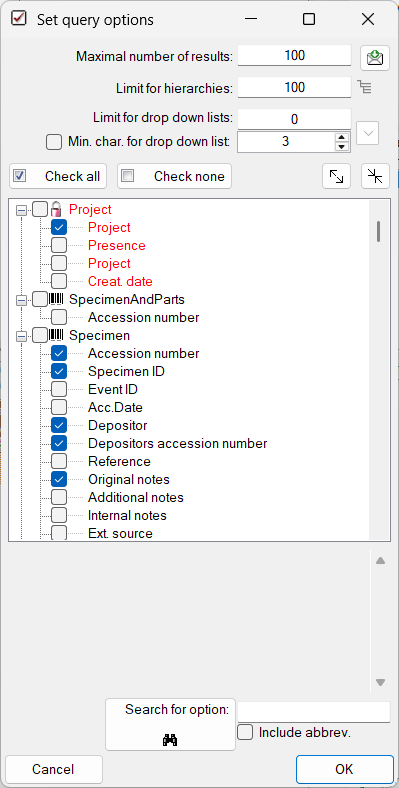
The Maximum number of results allows you to limit the size of the data package retrieved from the server. For a slow connection to the database server, choose a low value (e.g. 100, as set by default).
The Limit for drop-down lists restricts the number of drop-down lists that will be generated. For a slow connection, a lower value is recommended. The default is set to 0, meaning no drop-down lists will be created.
Click the Check none button to clear any previous selections. Then select the following entries:
- Project → Project
- Specimen → Accession number of specimen
- Specimen → User who created the data set
- Specimen → Date when the dataset was created
- Event → Collection date
- Organism → Organism present
- Organism → Only observed
- Storage → Material category
- Image → Type
Click OK to close the window. Your query conditions will now be displayed as shown in the image below.
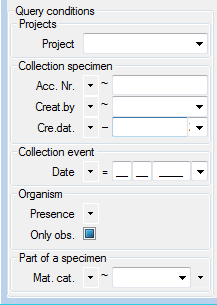
Project → Project: Here, you can choose from a list of available entries. Select your current project.
Collection specimen → Acc. Nr.: From the operator drop-down list, choose “~” and enter the first letters of your accession number. You may include wildcards. Other operators include “-” for a range or “>” for a lower limit. Note: The conditions are interpreted as text, so for example, 2 will be listed after 10.
Collection specimen → Creat. by.: From the operator drop-down list, choose “=” and select your username from the list.
Collection specimen → Cre. dat.: From the operator drop-down list, choose “=” and choose the current date using the calendar.
Collection event → Date: >From the operator drop-down list, choose “=” and enter the current year in the last field.
Organism → Presence: From the operator drop-down list, choose “•” which indicates that an organism is present.
Organism → Only obs: Uncheck the checkbox to find organisms that were not only observed.
Part of a specimen → Mat.cat.: Click the  button on the right side of the combobox to open the hierarchy and select
“herbarium sheet”.
button on the right side of the combobox to open the hierarchy and select
“herbarium sheet”.
Once all query conditions have been set, click the
button to run the query. The result list should include the
specimen created during this tutorial. If the  remember query option is active, the last query will be saved and is available after restarting the application.