Diversity Taxon Names

Lists for taxonomic names
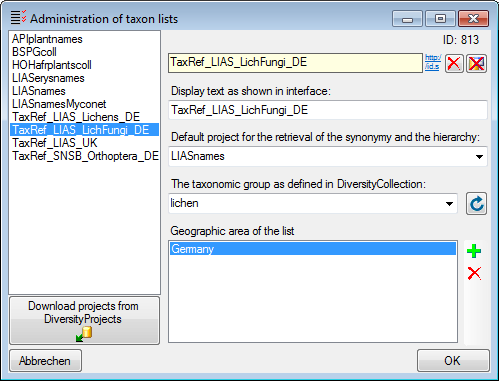
With DiversityTaxonNames you can document list for taxonomic names like e.g. checklists. The taxon lists may refers to a project defined in DiversityProjects (see Administration - User … in the menu). To edit the taxon lists choose Administration → Taxon lists … from the menu. A window as shown below will open, where you can enter, edit or delete taxon lists. The administrative functions are only available for administrators.
For the detailed documentation of the Taxon lists please use
DiversityProjects. To load projects into the list, click on the
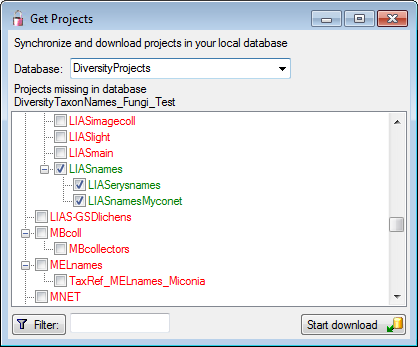
Download projects from DiversityProjects  button (see above). A window as shown below will open. If several
Databases for DiversityProjects are available on your server you have to
choose one of these. The projects available in the DiversityProjects
database will be listed as shown below where those already present are
checked and green, while missing
projects are red. Check those
projects you need as lists and click the Start download
button.
button (see above). A window as shown below will open. If several
Databases for DiversityProjects are available on your server you have to
choose one of these. The projects available in the DiversityProjects
database will be listed as shown below where those already present are
checked and green, while missing
projects are red. Check those
projects you need as lists and click the Start download
button.
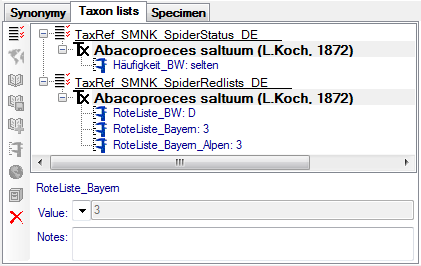
For access to the related data choose the tab Taxon lists (see below).
To enter a new list, click on the button. This
will open a window where you can choose from the available taxon lists.
Choose the list in which you want to include your name and click OK.
Area
The geographical area can be definded for a single name (via
 Distribution) or for the whole taxon list. The
entries refer to the World geographical scheme for recoding plantdistributions. To enter the
geographic area for the whole list, click on the
Distribution) or for the whole taxon list. The
entries refer to the World geographical scheme for recoding plantdistributions. To enter the
geographic area for the whole list, click on the  button. A form will open where you can choose geographical places from
the module DiversityGazetteer. To open the link to the module, click on
the
button. A form will open where you can choose geographical places from
the module DiversityGazetteer. To open the link to the module, click on
the  button and search for the region as described in
the chapter Module related entry.
button and search for the region as described in
the chapter Module related entry.
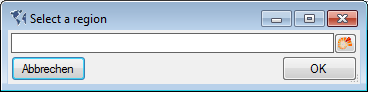
If you need a certain region not provided in the list, just type the name of the region and click OK. The new region will be listed directly underneath the list (see below).

References
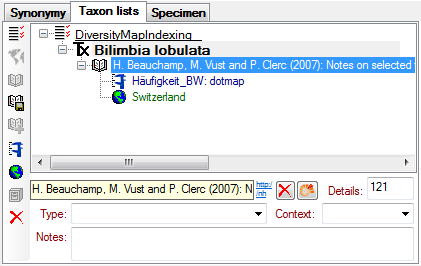
For every name in a taxon list, you can enter the references where the
informations for the list are derived from. To add a reference, select
the list for which you want to add a reference and click on the
 button. The entry for the reference will
appear underneath the taxon as shown below. To edit this entry, select
it in the hierarchy and use the contols underneath the tree. You may
link the reference to an external source like DiversityReferences or one
of the provided webservices.
button. The entry for the reference will
appear underneath the taxon as shown below. To edit this entry, select
it in the hierarchy and use the contols underneath the tree. You may
link the reference to an external source like DiversityReferences or one
of the provided webservices.
If you want to transfer the informations of a reference together with
depending  analysis and
distribution entries to another name, select the reference in the tree
und click on the
analysis and
distribution entries to another name, select the reference in the tree
und click on the  button. As a result you
can use the
button. As a result you
can use the  button to insert these
informations at a different place.
button to insert these
informations at a different place.
Analysis
For a name within a list, you can enter an analysis either directly for the name or a reference linked to this name. Select the name or the reference in the tree and click on the button to enter a new analysis. Depending on the definition of the analysis To edit the analysis used within the database, select it in the tree and use the area below the the tree. Depending on the definition of the analysis (see above) the values are either typed or selected from a list.
To prevent a analysis from publication e.g. via the cache database in
DiversityCollection, enter a withholding reason in the corresponding
field  . The sorting in an interface is set via the
sorting. To check the current sorting click on the
. The sorting in an interface is set via the
sorting. To check the current sorting click on the  button.
Distribution
For every entry in a taxon list, you can document the
distribution of a taxon (see below). This
information may be linked to the taxon or a reference (see below).
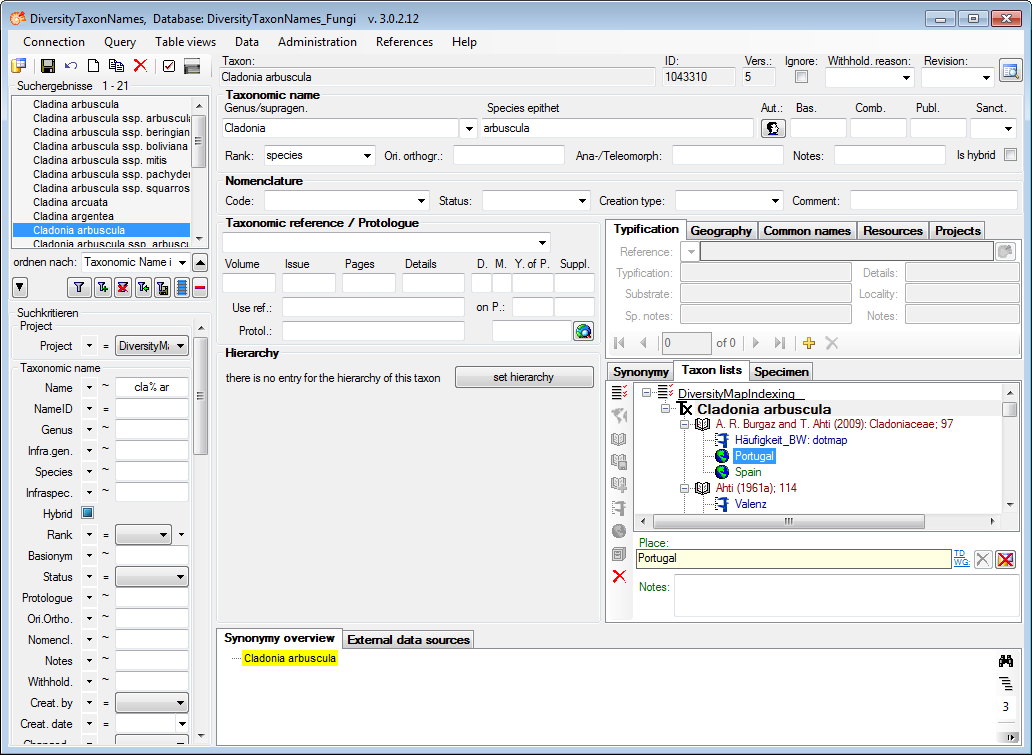
Choose either the list taxon or the reference in the tree and click on
the button to insert a new distribution. The
entries refer to the World geographical scheme for recoding plantdistributions. A form will open
where you can choose geographical places from the module
DiversityGazetteer. To open the link to the module, click on the
button and search for the region as described in the
chapter Module related entry.
If you need a certain region not provided in the list, just type the name of the region and click OK.
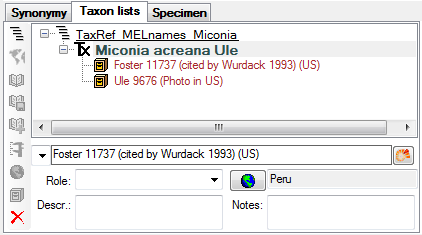
Specimen
For every entry in a taxon list, you can document the collection
specimen linked to this taxonomic name (see below). The entries may be
linked to the module DiversityCollection. To enter a distribution for
the specimen, use the button. A window will open
(see above), where you can select a geographic region as defined in the
World geographical scheme for recoding plant
distributions.
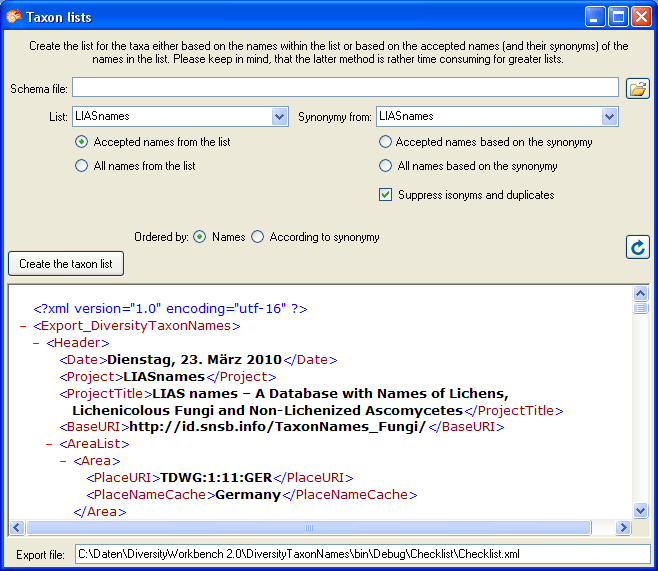
Export
To export the taxon lists resp. checklist, choose Data → Export
taxon list … from the menu. A window as shown below will open. By
default the data will be exported as XML (see below). Choose a schema
file of your choice to convert the XML-output in a HTML document. You
have several options for the export in regard of the names as shown in
the window below. The export may be based on the names in the list and
can be restricted to the accepted names among these (see below - left).
In the second option (see below - right), the accepted names for all
names in the list will be selected and the taxon list will contain only
these names and optionally their synonyms. Regarding the synonyms, if
you want to suppress the export of isonyms and duplicates, use the
according checkbox. For long lists, the second method will be rather
time consuming, as the synonymy must be checked for every single name.
The synonymy for the exort may be derived from any available project.
The path of the exported file (either *.xml or *.html) is shown in the
field Export file at the bottom of the form. The names in the list may
be sorted according to the names or the synonymy where synonyms will be
inserted after their assigned accepted names. The format the XML-export
with a schema file of your choice, choose the schema file and click on
the ![]() button.
button.
The tables involved in the storage for the taxon list are documented in the taxon list tables part.