Diversity Collection
Tutorial

Organisms
(= Identification Units)
The organisms or items in a CollectionSpecimen are referred to as IdentificationUnits. A specimen may contain multiple IdentificationUnits, for example, an insect (1) feeding on a fungus (2) growing parasitically on a plant (3). For more detailed information about Organisms (=IdentificationUnits), see the chapter Organisms.
Presets
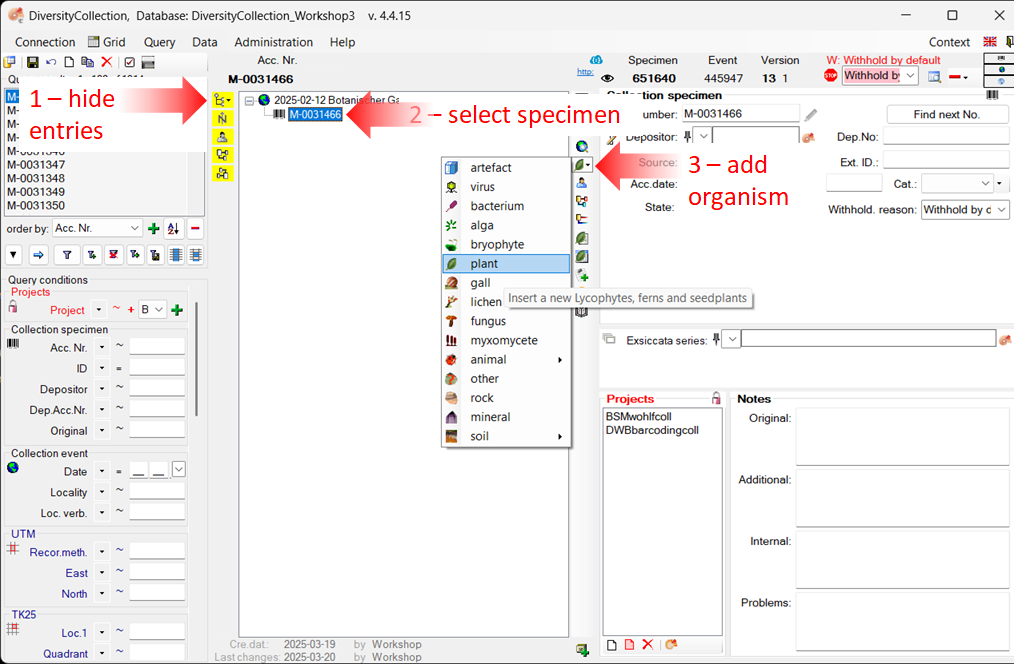
To focus on the specimen and its organisms, hide all other entries in the tree by clicking the corresponding buttons on the left-hand side of the specimen tree. A yellow background on a button indicates that the respective information is currently hidden (see point 1 in the image below).
Add a new organism
You can add any number of organisms to a specimen. Organism types are selected from a list. To add a new organism, follow the steps below:
- Select the specimen entry in the tree (see point 2 in the image below).
- Then select the appropriate organism from the list — in this example, a plant .
-
This will insert an entry for the organism (
) along with an identification (  )
beneath the specimen entry (
)
beneath the specimen entry (  ) (see the image
below).
) (see the image
below). -
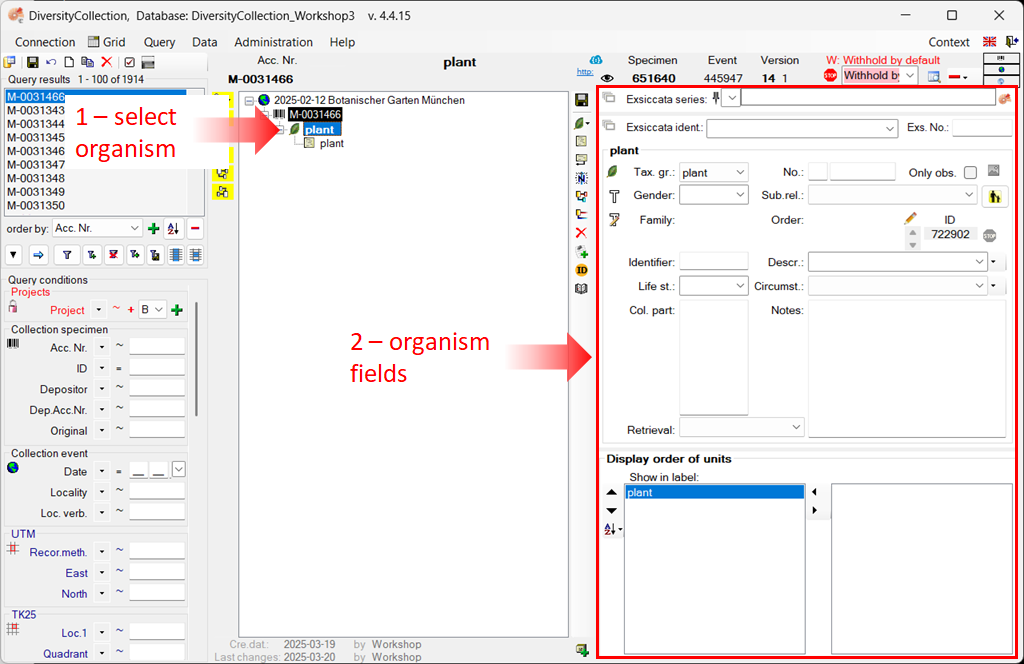
To view or enter the details of the organism, select the organism entry in the tree (see points 1 and 2 in the image below).
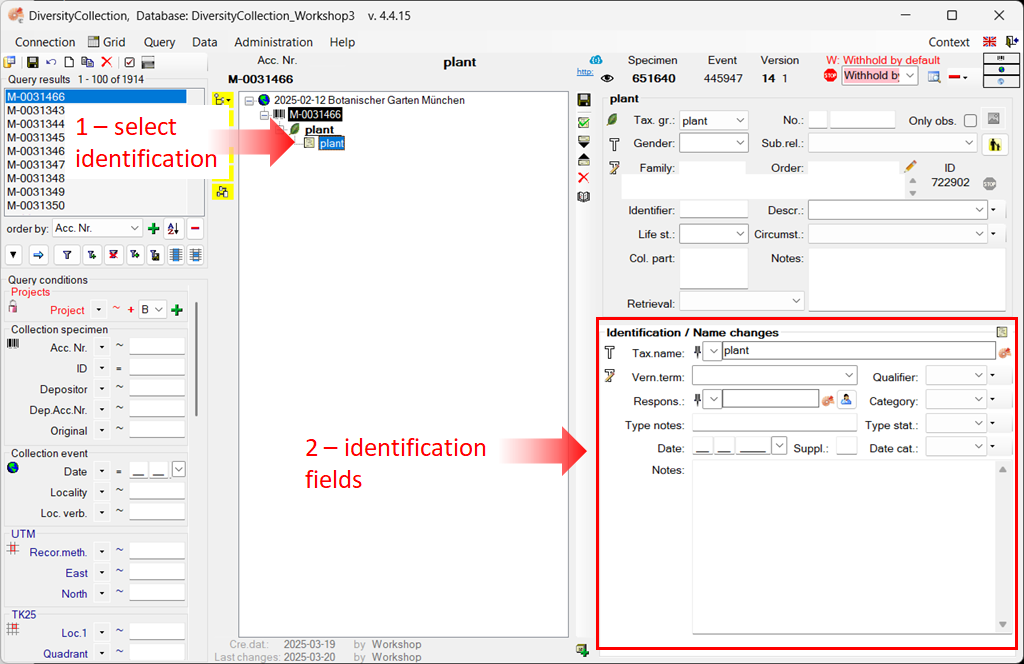
- To view or enter the details of the identification entry, such as taxon name, etc., select the identification entry in the tree (see points 1 and 2 in the image below), and then follow the next section Add details to the identification.
You can add as many identifications as you like to an organism. For more information, see the section Enter an additional identification for an organism.
Add details to the identification
To view the information for the identification, select the identification entry in the tree view (see point 1 in the image above). The fields for the identification will appear on the right-hand side of the tree view (see point 2 in the image above).
You can enter taxonomic names in different ways:
-
Enter the taxonomic name without linking it.
-
Link the taxonomic name to a module, such as DiversityTaxonNames, or to a web service.
All options are demonstrated below using examples.
Enter a taxonomic name without linking
In the first example, we will enter a taxonomic name for the plant without linking it.
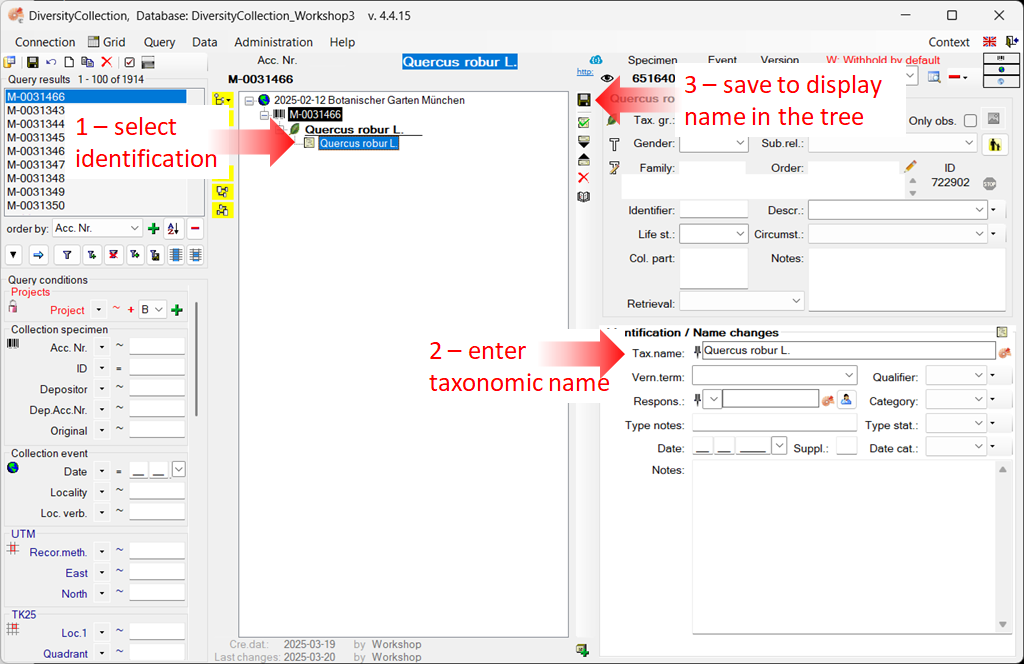
- Select the identification entry in the tree (see point 1 in the image below).
- In the identification area of the main window, enter a taxonomic name by simply typing it into the Tax. name field (see point 2 in the image below).
- To save the dataset and display the taxonomic name in the tree,
click the
 save button (see point 3 in the image
below).
save button (see point 3 in the image
below).
Enter a taxonomic name and link it to DiversityTaxonName
In this second example, we link a taxonomic name to the DiversityTaxonName module.
For more information about linking to remote modules, see the chapter Remote Query.
Please note: To demonstrate the various possibilities, we previously added two more organisms — a fungus and an insect — to our specimen example. Instructions for this can be found in the chapter Enter more organisms to a specimen.
In this example, we will add a linked taxonomic name to the fungus:
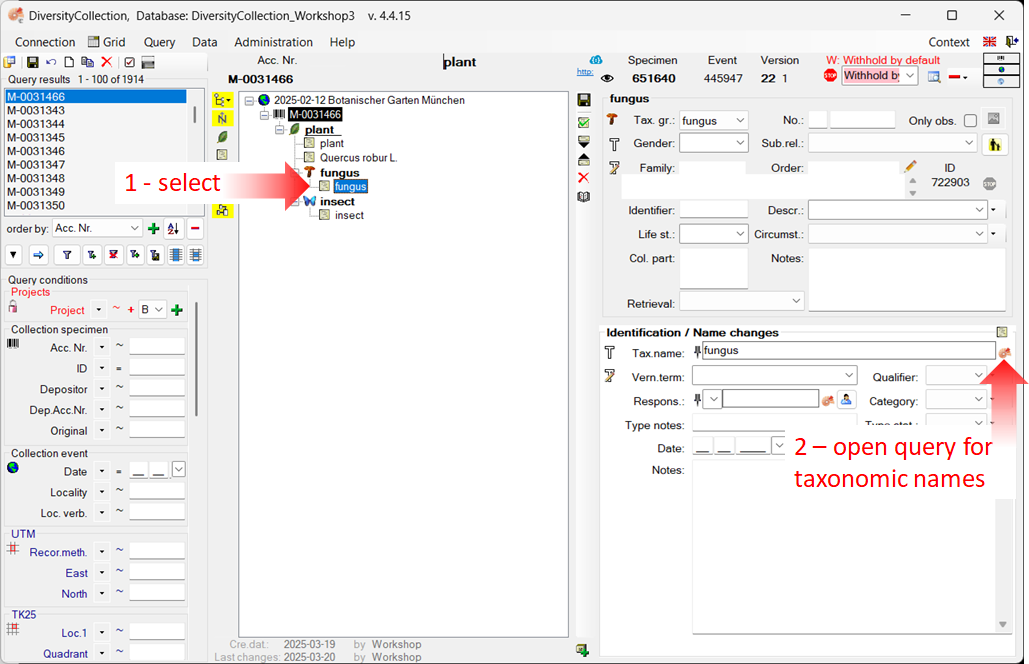
- Select the identification entry of the fungus in the tree (see point 1 in the image below).
- In the identification area of the main window, click the button
 to open the window for the remote modules (see point 2 in the image
below).
to open the window for the remote modules (see point 2 in the image
below).
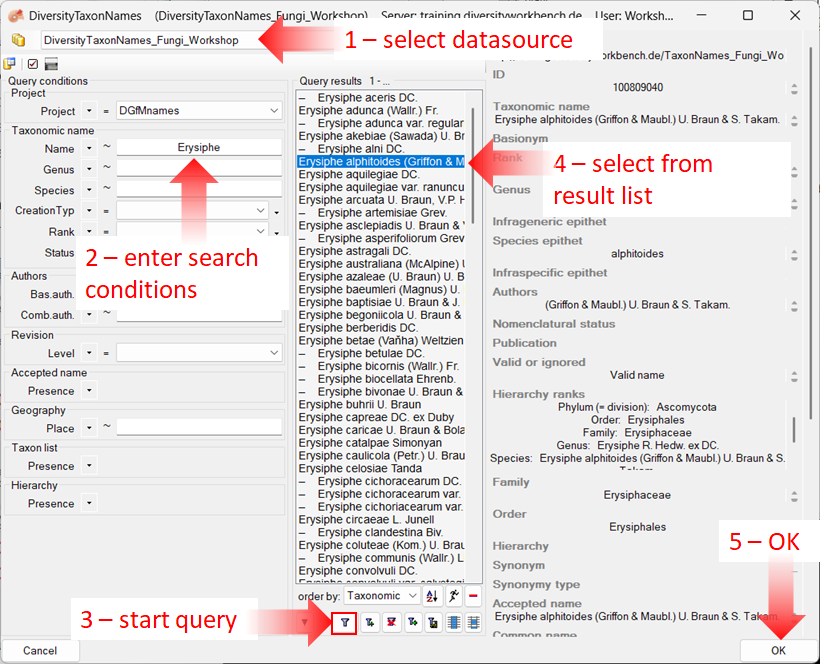
In the newly opened window, you must first select the database or the web service to which you want to link.
- Select the database DiversityTaxonNames_Fungi (see point 1 in the image below).
- Enter the search conditions, e.g. the beginning of the taxonomic name (see point 2 in the image below).
- Start the query
 (see point 3 in the image below).
 - From the result list, select the taxonomic name (see point 4 in the image below).
- Click OK (see point 5 in the image below) to transfer the selected name to the main form.
- To save the dataset and display the taxonomic name in the tree,
click the save button.
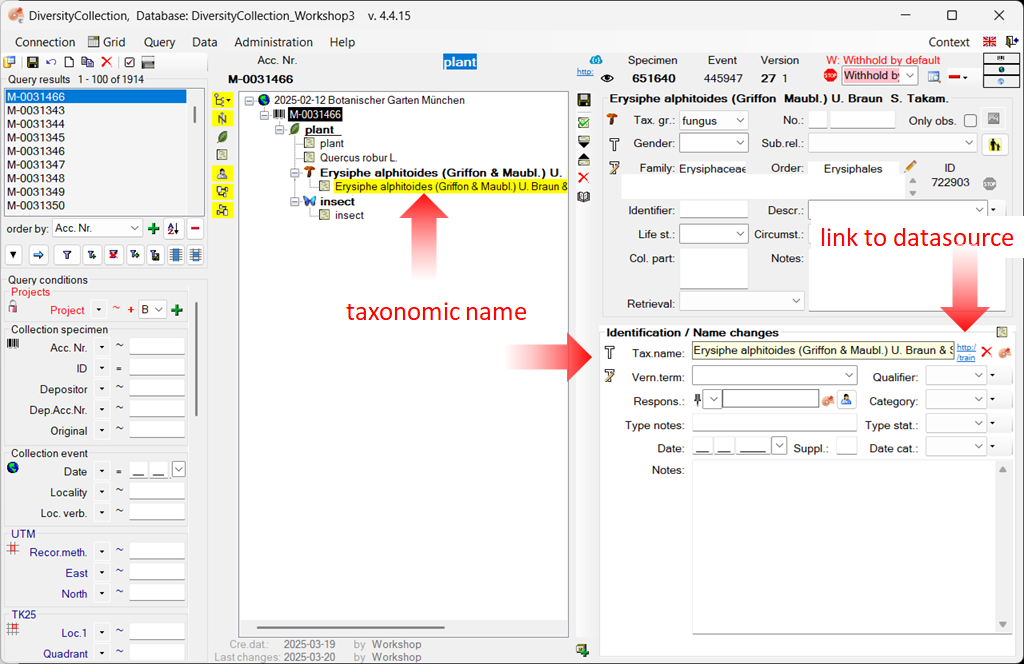
The name of the selected taxon is inserted into the “Taxonomic name” field, along with a link to the data source (see image below).
The taxonomic name cannot be edited directly while it is linked to a data source (highlighted in yellow).
To remove the link, click the button  . To view the details of the linked name in the data source, click the button .
Enter a taxonomic name and link it to a web service
In this third example, we will link a taxonomic name to the Catalogue Of Life web service.
For more information about linking to remote modules, see the chapter Remote Query.
Please note: To demonstrate the various possibilities, we previously added two more organisms — a fungus and an insect — to our specimen example. Instructions for this can be found in the chapter Enter more organisms to a specimen.
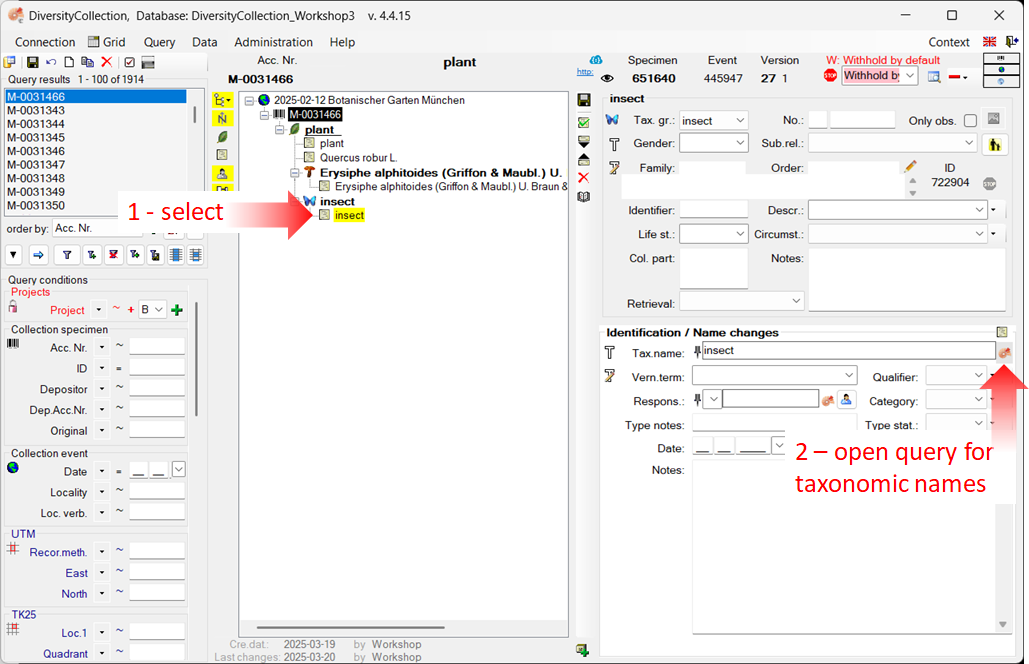
In this example, we will add a linked taxonomic name to the insect:
- Select the identification entry of the insect in the tree (see point 1 in the image below).
- In the identification area of the main window, click the button
to open the window for the remote modules (see point 2 in the image
below).
In the newly opened window, you must first select the database or web service to which you want to link.
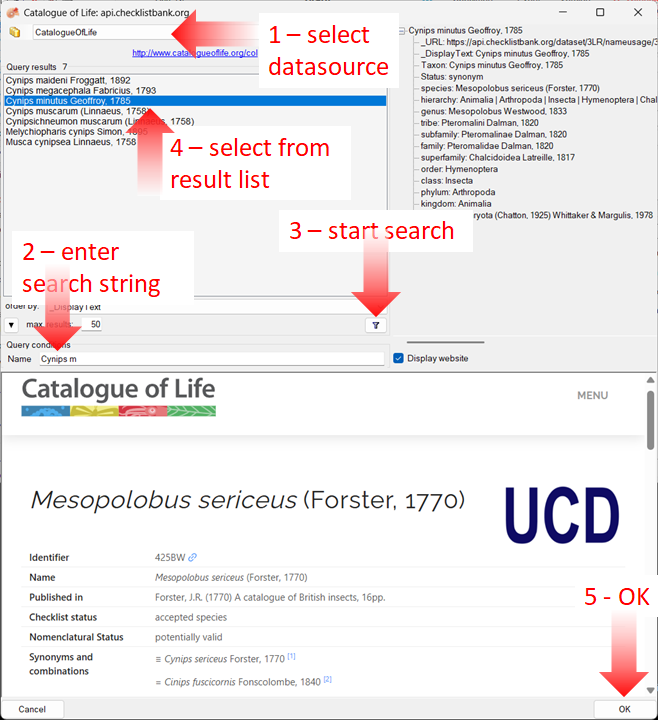
- Select the web service CatalogueOfLife (see point 1 in the image below).
- Enter the beginning of the taxonomic name (see point 2 in the image below).
- Start the query (see point 3 in the image below).
- From the result list, select the desired taxonomic name (see point 4 in the image below).
- Click OK (see point 5 in the image below) to transfer the selected name to the main form.
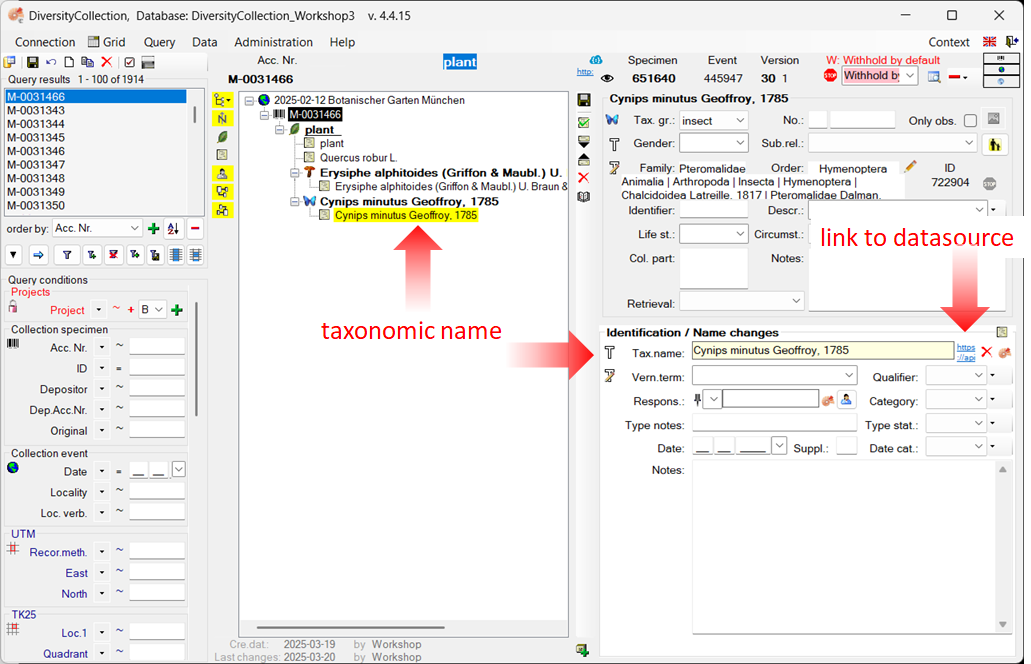
The name of the selected taxon will be inserted into the “Taxonomic Name” field, along with a link to the data source (see image below).
The taxonomic name cannot be edited directly while it is linked to a data source (yellow background). To remove the link, click the button . To view the details of the linked name as stored in the data source, click the button .
Enter more organisms to a specimen
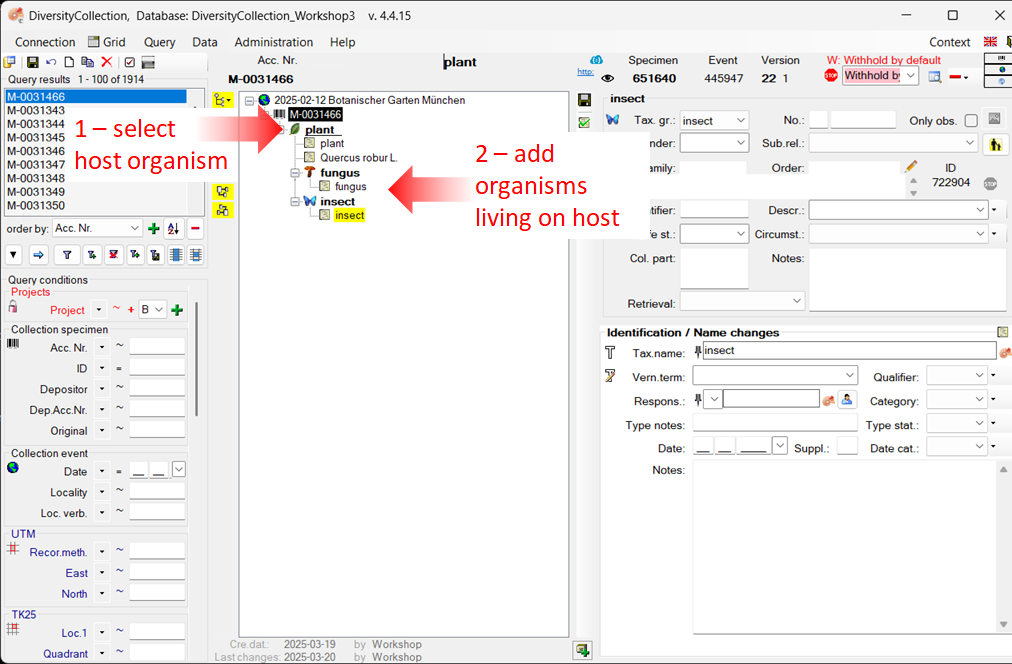
To enter additional organisms living on the plant (see point 2 in the image
below), select the plant in the tree (see point 1 in the image below)
and create new organisms as described above in the section Add a new organism .
Enter an additional identification for an organism
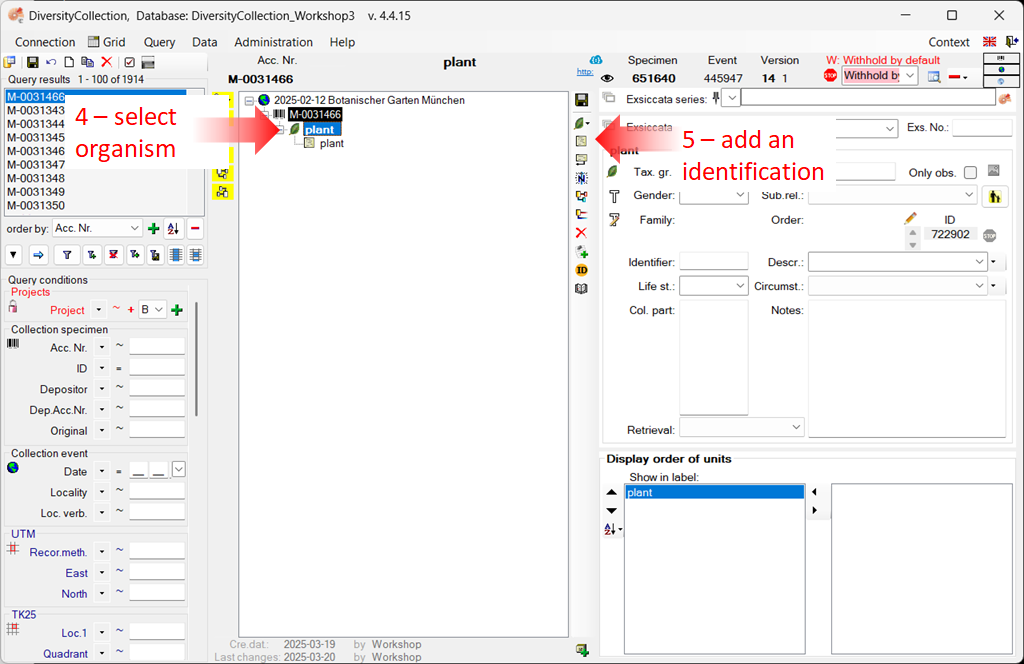
To enter an additional identification for an organism, select the organism in the tree (see
point 4 in the image below), and click the button (see point 5 in the image below).
This will insert a dataset for an additional identification of the organism beneath the organism entry, as shown below.
Next chapters
This tutorial continues in the sections listed below.
- section Specimen parts and storage
- section Searching the database