GIS Editor

Layout
The layout of the Diversity GIS Editor could be divided into 3 regions:
- Control Panel
- Sample List
- Working Area
Control Panel

The Control Panel consists of the following elements:
- 8 buttons to load
, save
, delete
, print
or add
samples, switch GPS
, detect samples
and to open
the Settings window
- 2 text boxes for sample Identifier (ID) and Description (Text)
- 7 radio buttons to select the operation mode (Map, Shift, Adapt, Edit, Point, Line, Area)
- 1 button
 to switch to a new object, if
the current sample is composed of multiple lines or areas
to switch to a new object, if
the current sample is composed of multiple lines or areas - 4 controls to adjust color and transparency of the samples (for stroke and fill) or to zoom the working area
- Status lines with screen and world coordinates (if any) and an
appropriate symbol
 ,
,
 ,
,
 or
or

- A hint about the user interaction, which is possible or expected
Sample List
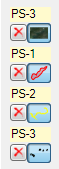
The Sample List is the container for added maps or objects. Each entry is composed of the following elements:
- Identifier of the sample
- Delete button to remove the sample
- Toggle button to hide or show the sample
The toggle button is illustrated with a small picture of the associated sample. Switching these controls using the left mouse button will hide or show the corresponding sample. Using the right mouse button will effect all samples except the corresponding one and the background map:
- When right clicking on an active toggle button, all other samples will be switched off.
- When right clicking on an inactive toggle button, all other samples will be switched on.
If the number of samples in the list do not fit into the window area, a scroll bar will be displayed.
Working Area
This is the drawing space containing loaded maps and objects. In Shift mode the area could be moved or zoomed.