Edit Project

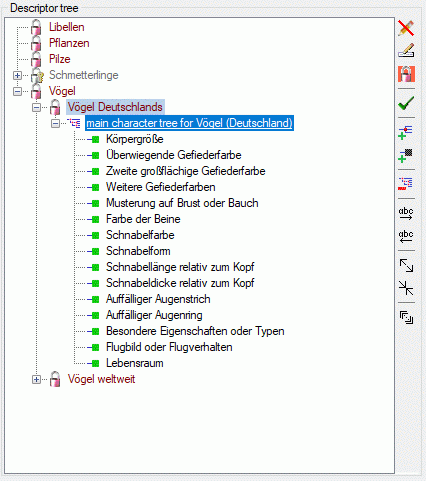
Descriptor tree
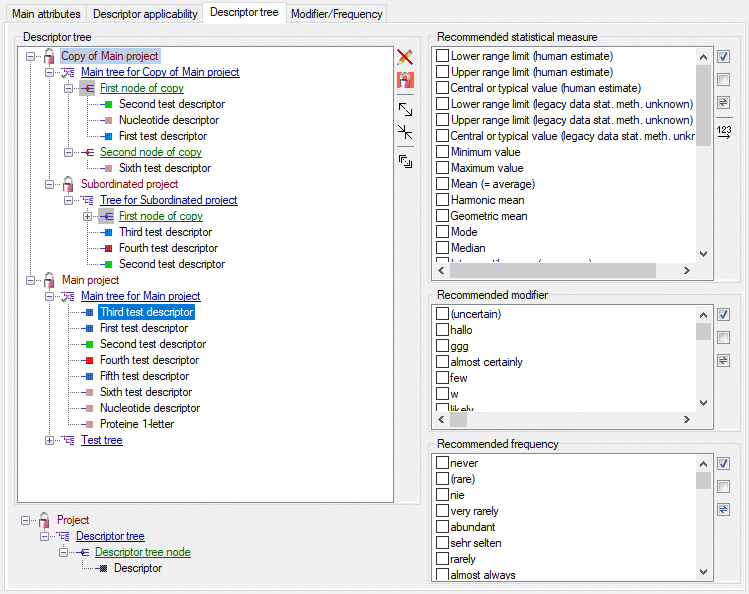
The Descriptor tree tab provides the possibility for a structured
assignment of the descriptors to the projects. The Descriptor tree
consists of three node types, which show the administered projects, descriptor
trees, descriptor tree nodes
and descriptors. The tree parts’ colours are shown in the example at
the bottom. By pressing the  button on the tool
strip at the right side the example may be hidden. The buttons displayed
on the too strip will change depending on the selected entry.
button on the tool
strip at the right side the example may be hidden. The buttons displayed
on the too strip will change depending on the selected entry.
By default only the selected project. its subordinated projects and
their descriptor trees are displayed. You may select the “Show all
projects” option by clicking the button  in the
tool strip to show alle projects. To indicate that this option is
active, the icon background will be changed to red color (see images below). Be aware that this
option might slow down data loading.
in the
tool strip to show alle projects. To indicate that this option is
active, the icon background will be changed to red color (see images below). Be aware that this
option might slow down data loading.
The descriptor trees support three main functions:
- Assignment of descriptors to a certain project
- Selection of recommended Frequency/Modifier values and Statistical measures for a certain descriptor
- Structured arragement of the descriptors, e.g. for hierarchical selection lists and definition of descriptor subsets for description editing and export
Descriptor trees are the root of a tree
and may only be appended at a project. To insert a new descriptor tree
select a project and press , to delete it select
the descriptor tree and press  . Descriptor tree
nodes may be appended at a descriptor tree or another
descriptor tree node. To insert a new descriptor tree node, select the
parent and press
. Descriptor tree
nodes may be appended at a descriptor tree or another
descriptor tree node. To insert a new descriptor tree node, select the
parent and press  , to remove it select the
descriptor tree node and press
, to remove it select the
descriptor tree node and press  .
Descriptors may be appended to a descriptor tree or a descriptor
tree node. To append a descriptor select the parent and press
.
Descriptors may be appended to a descriptor tree or a descriptor
tree node. To append a descriptor select the parent and press
 , to remove it select the descriptor and press
 . All these functions can alternatively be
accessed by the context menu by a right click on the entry. The
descriptor type is indicated by different icons. Categorical descriptors
are marked as
. All these functions can alternatively be
accessed by the context menu by a right click on the entry. The
descriptor type is indicated by different icons. Categorical descriptors
are marked as  , quantitative descriptors as
 , text descriptors as
  and sequence descriptors as
  .
.
You may change the name of a Descriptor tree or a Descriptor tree node in three different ways:
- Select the tree element (single click) and then click once on it.
- Select the tree element (single click) and click on button
 in the tool bar on the right.
 - Right-click the tree element and select item
Edit name from the context menu.
You may edit the name of the selected node within the tree. The Descriptor tree must be globally unique. The Descriptor tree node names must be unique with respect to their tree position, i.e. all nodes with the same parent within a descriptor tree must have distinguished names.
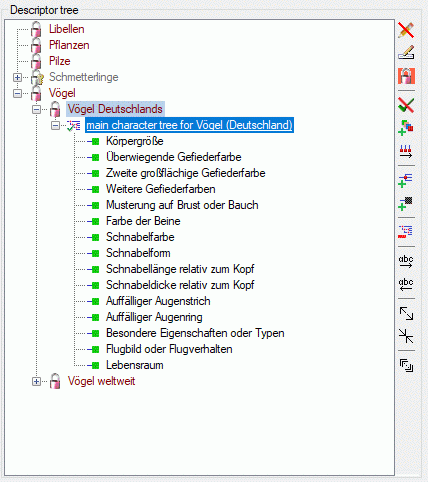
If projects and their associated descriptor trees cannot be changed, because the project has been set to “read-only” state, these parts are displayed with grey text color (see project “Schmetterlinge” in picture above).
When a new descriptor tree or descriptor tree node is inserted it gets a
numeric name, which may be changed by clicking on the node or selecting
 from the context menu. Take care that the names
of the discriptor trees must be unambiguous within the whole database!
The names of the descriptor tree nodes must only be unambiguous within
one parent.
from the context menu. Take care that the names
of the discriptor trees must be unambiguous within the whole database!
The names of the descriptor tree nodes must only be unambiguous within
one parent.
If no descriptor tree is installed for a certain project, all descriptors, modifier/frequency values and statistical measures will be usable in the project’s descriptions. Anyway, if you export data or generate documents an do not have an appropriate descriptor tree, you might have missing data! If a project contains several descriptor trees, the available descriptors are the superset of the descriptors assigned to all contained trees.
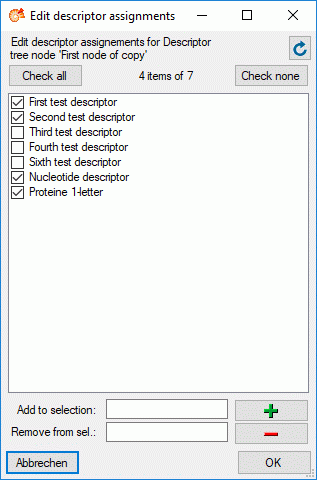
Editing the project descriptor assignemnts for a tree node
When you use button to append a descriptor to a
tree node, you will be offered all accessible descriptors in the
database. In many cases, when you have already assigned all required
descriptors to the project, you may wish to build some additional
structured descriptor trees. If you select a descriptor tree or a
descriptor tree node, the button  is shown
(see image below left). After clicking this button you will get a
selection list with all descriptors assigned to the project. Descriptors
that are included in the tree node are selected in the list (see image
below right). You may easily change the selection and click “OK” to make
the changes effective.
is shown
(see image below left). After clicking this button you will get a
selection list with all descriptors assigned to the project. Descriptors
that are included in the tree node are selected in the list (see image
below right). You may easily change the selection and click “OK” to make
the changes effective.
Sorting of descriptor tree elements
By pressing the  button you can expand the tree
view to display all elements, by pressing
button you can expand the tree
view to display all elements, by pressing  the
tree will be collapsed to descriptor tree level. With the arrow buttons
(
the
tree will be collapsed to descriptor tree level. With the arrow buttons
(![]()
 rsp.
rsp.
![]()
![]() ) you can move descriptors or descriptor tree
nodes up or down rsp. to the top or the bottom. An additional ordering
option is to select the descriptor tree node you want to move and click
the
) you can move descriptors or descriptor tree
nodes up or down rsp. to the top or the bottom. An additional ordering
option is to select the descriptor tree node you want to move and click
the  button. The button’s back color changes to
red and you may now select the new position
in the tree. If you select a descriptor tree or a descriptor tree node,
you may arrange the contained descriptors in alphabedical order by
clicking the buttons
button. The button’s back color changes to
red and you may now select the new position
in the tree. If you select a descriptor tree or a descriptor tree node,
you may arrange the contained descriptors in alphabedical order by
clicking the buttons  (ascending) or
 (descending).
A descriptor tree may be marked as “tree complete” to indicate that this
tree shall contain all descriptors for the project. This is done by
selecting the descriptor tree node and clicking the button
 . To indicate that the tree is marked as complete the
tree icon changes to
. To indicate that the tree is marked as complete the
tree icon changes to  (see picture
below).
(see picture
below).
The “tree complete” flag may be removed by clicking the button
 and the tree icon will be changed back to
 (see picture below).
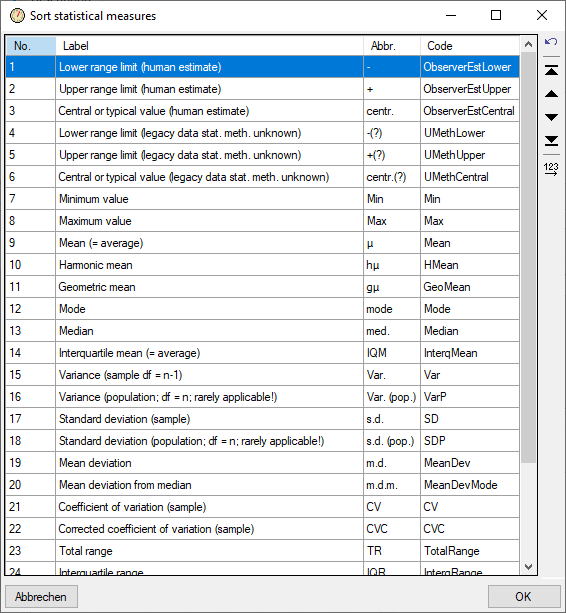
If a descriptor tree is marked as “tree complete”, it can be used to
take over the sorting of the descriptor nodes to the sequence number of
the descriptors. But you must be aware that the descriptor’s sequence
number (field “No.” in “Edit descriptor” main panel) is not project or
tree dependent, i.e. that this operations will have influence on the
dispolay sequence of all descriptions using these descriptors. Click on
button  (see picture above) to open the
descriptor sorting window below.
(see picture above) to open the
descriptor sorting window below.
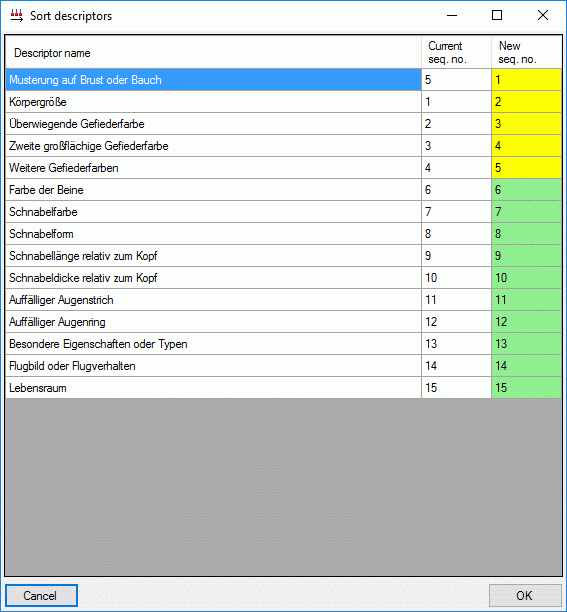
The first column shows the descriptor names as sorted in the descriptor tree, the second column shows the current sequence number int the database and the last column shows the new sequence number. If the sequence number stays unchanged, the new sequence number is displayed with green background, otherewise with yellow background. You may click on a new sequence number and change its value manually. By clicking on the table headers, you may sort the table display according descriptor names, old or new sequence numbers. If a descriptor may not be changed, because it is assigned to a project where the user has no write access, the whole line is displayed with grey backgound and cannot be changed. Finally click on OK to accept or Cancel to reject the changes.
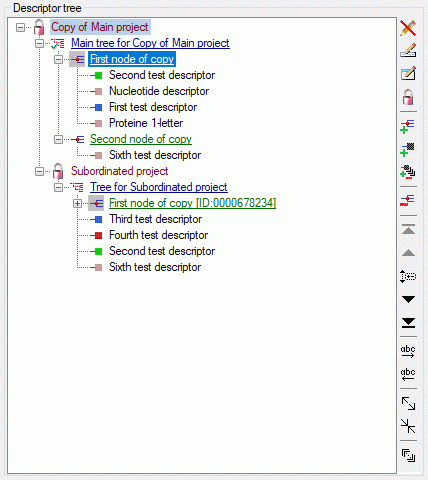
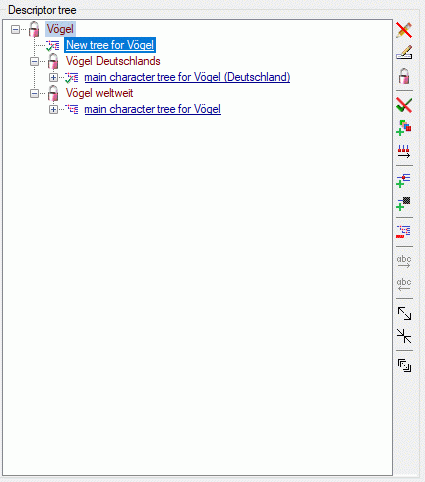
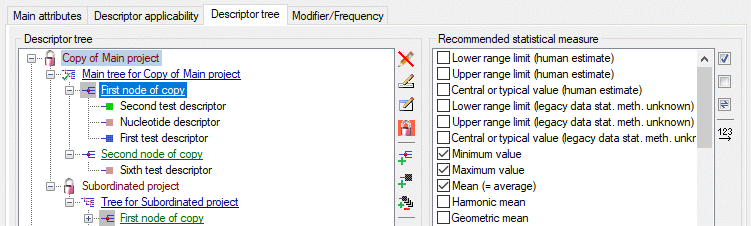
An additional option available for complete trees is to copy missing
descriptors with button . The descriptors available for a certain
project include all descriptors assigned to all descriptor trees of the
project and its sub-projects. In our example a new descriptor tree has
been assigned to the upmost project (see image below left). After
clicking the  button all valid descriptors are
inserted to the descriptor tree (see image below right).
button all valid descriptors are
inserted to the descriptor tree (see image below right).

Descriptor tree node details
For Descriptor tree nodes you may enter
an abbreviation a details text and assign resource data. Select the
Descriptor tree node (single click) and
click on button  in the tool bar on the right.
Alternatively you may right-click the Descriptor
tree node and select Edit
details from the context menu. An edit window as shown below will be
opened.
in the tool bar on the right.
Alternatively you may right-click the Descriptor
tree node and select Edit
details from the context menu. An edit window as shown below will be
opened.
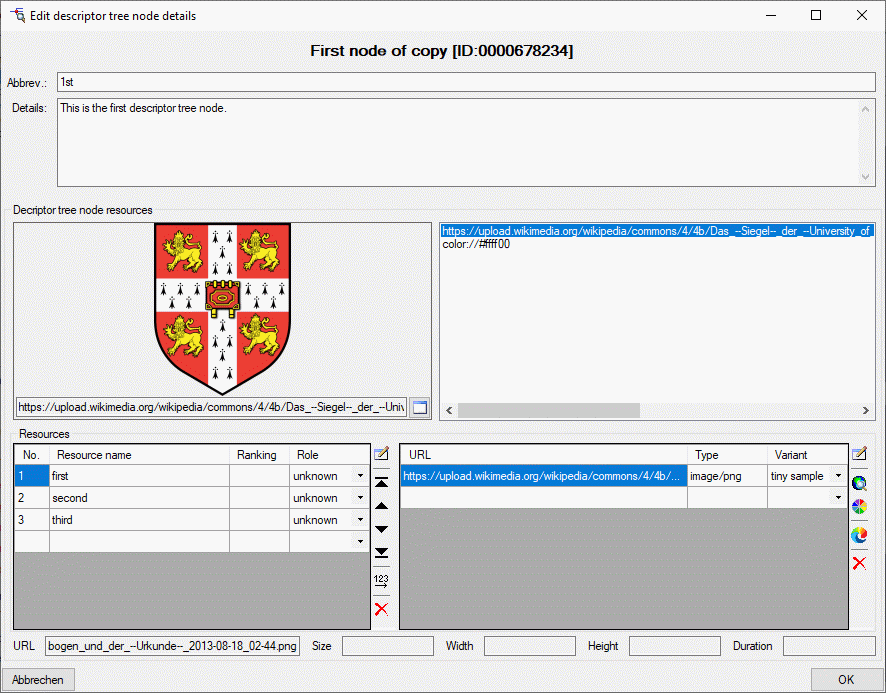
If resources are assigned to a Descriptor tree
node, its symbol is shown with grey background in the descriptor tree. You may
view the resources by right-clicking it and selecting
 View resources from the context menu.
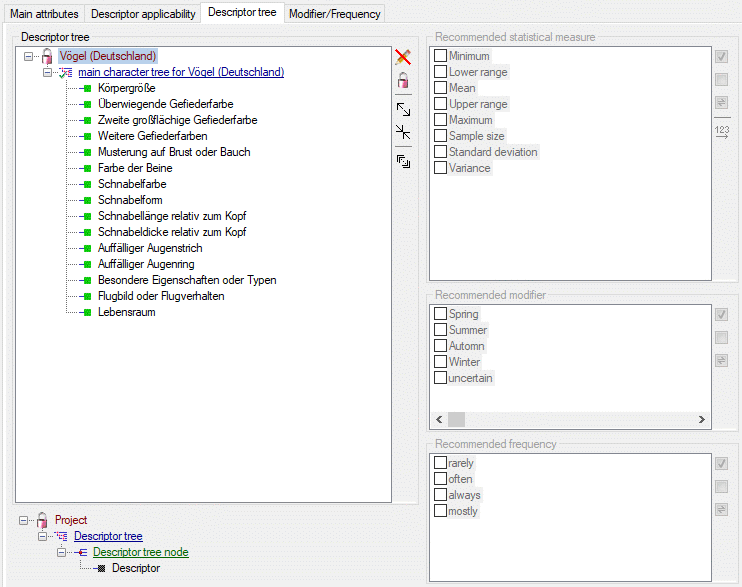
Recommended statistical measures, modifiers and frequency values
Click on  in the tool bar to close the edit window
in the right part of the tab or on to reopen it.
In the edit window you can select recommended modifier/frequency values
and statistical measures. The recommended values can be administered for
a selected descriptor or for a selected descriptor tree node. In the
latter case selected values are inherited by all subordinate nodes,
which will be indicated by the background
colour if a subordinate node is selected in the descriptor tree.
in the tool bar to close the edit window
in the right part of the tab or on to reopen it.
In the edit window you can select recommended modifier/frequency values
and statistical measures. The recommended values can be administered for
a selected descriptor or for a selected descriptor tree node. In the
latter case selected values are inherited by all subordinate nodes,
which will be indicated by the background
colour if a subordinate node is selected in the descriptor tree.
To define the available modifier and frequency values and their display
sequence, refer to the Modifier/Frequency
tab. The statistical measure values are predefined, nevertheless their
display sequence may be modified using the  button
(see image above). A form as shown below will appear. With the arrow
buttons (
button
(see image above). A form as shown below will appear. With the arrow
buttons (![]() ) you can move the
selected entries up or down within the table, clicking button
) you can move the
selected entries up or down within the table, clicking button
![]() or
or ![]() shifts the
selected entries to the top respective bottom of the table. After
ordering the entries click button to renumber the
table entries (starting with “1” for the first table entry) and make the
changes effective.
shifts the
selected entries to the top respective bottom of the table. After
ordering the entries click button to renumber the
table entries (starting with “1” for the first table entry) and make the
changes effective.
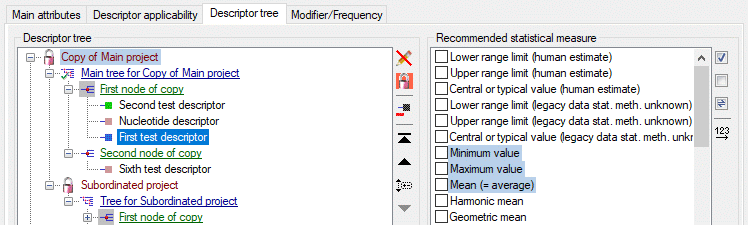
The picture below shows an example for a descriptor where the recommended statistical measures Mini mum value, Maximum value and Mean are inherited by the superior node.
For the contained descriptor only additional values may be selected, but the inherited values cannot be de-selected.
Continue with:
- Edit projects - Main attributes tab
- Edit projects - Descriptor applicability tab
- Edit projects - Move/Copy descriptor trees
- Edit projects - Modifier/Frequency tab