Wizard Tutorial Step 2

Step 2 - Import of descriptors
Choose Data → Import -> Import wizard ->
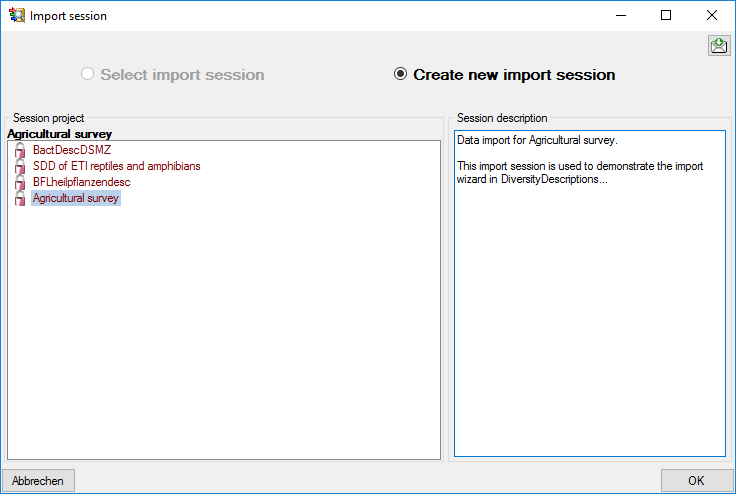
 Import descriptors … from the menu. A window as
shown below will open to create a new import session. Select project
“MycoPhylogenyNet” and enter a session description.
Import descriptors … from the menu. A window as
shown below will open to create a new import session. Select project
“MycoPhylogenyNet” and enter a session description.
After clicking [OK] the following window opens that will lead you through the import of the descriptor data. The window is separated in three areas. On the left side, you see a list of possible data related import steps according to the type of data you choosed for the import. On the right side you see the list of currently selected import steps. In the center part the details of the selected import step are shown.
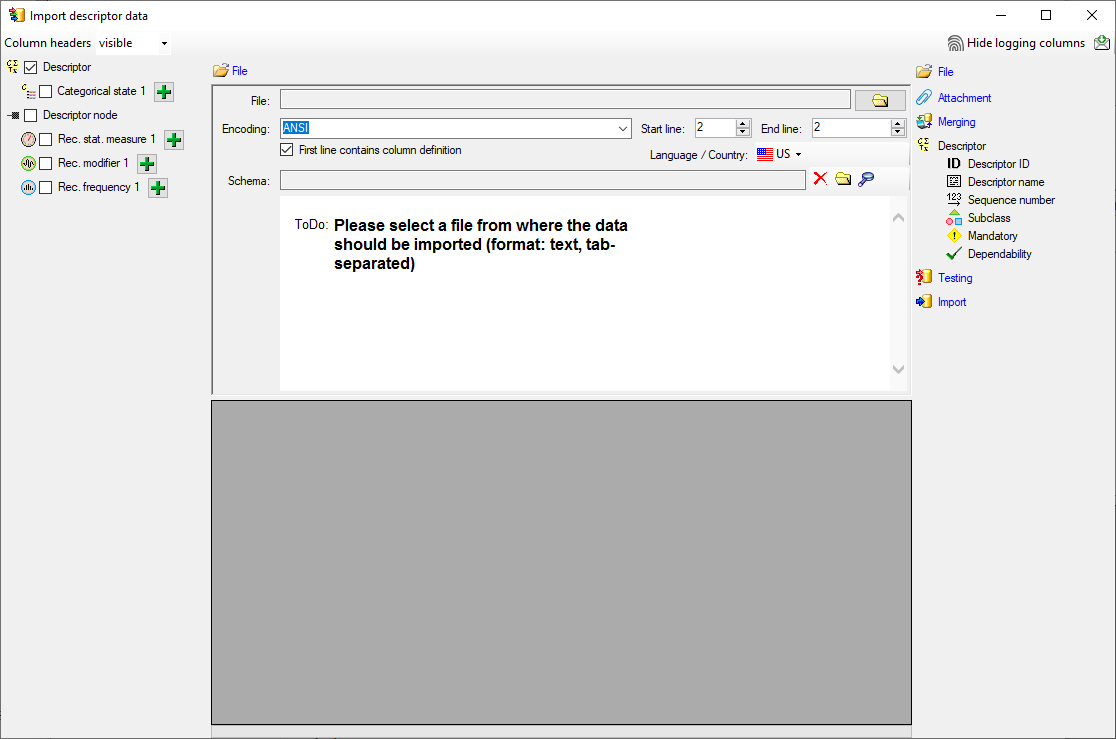
Choosing the File
As a first step, choose the  File from where the data should be
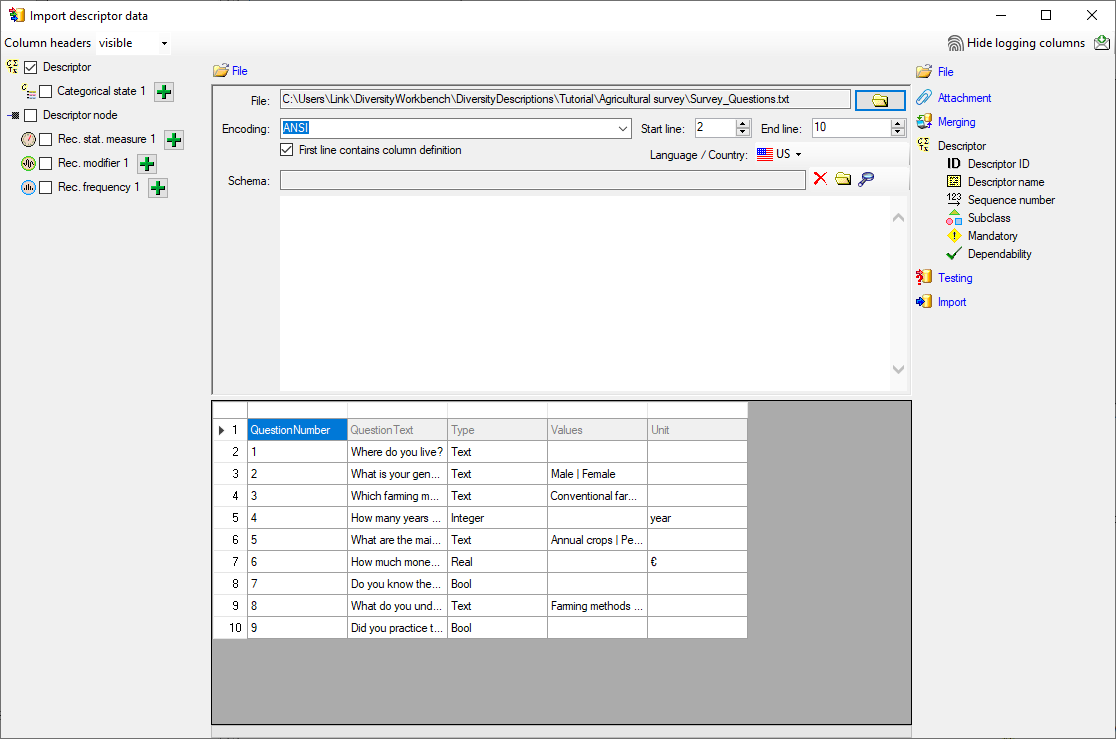
imported. Open file “Survey_Questions.txt”. The preselected encoding
ANSI should be sufficient for our test file. The file column
“QuestionText” contains the descriptor names that shall be imported. In
file column “QuestionNumber” there is a unique number assigned to each
descriptor that will be used by other data tables to reference a certain
descriptor. “Type” might give a hint for the descriptor type
(categorical, quantitative or text) and “DisplayOrder” may be used to
determine the sequence number of the descriptor.
File from where the data should be
imported. Open file “Survey_Questions.txt”. The preselected encoding
ANSI should be sufficient for our test file. The file column
“QuestionText” contains the descriptor names that shall be imported. In
file column “QuestionNumber” there is a unique number assigned to each
descriptor that will be used by other data tables to reference a certain
descriptor. “Type” might give a hint for the descriptor type
(categorical, quantitative or text) and “DisplayOrder” may be used to
determine the sequence number of the descriptor.
Selecting the data ranges
In the selection list on the left side of the window all possible import steps for the data are listed according to the type of data you want to import.
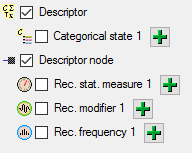
The step Descriptor is already selected and
cannot be de-selected, additionally we select
 Descriptor node, because we want to
assign each imported descriptor to a descriptor tree (see above). In the
step table at the right side you find the import step
Descriptor and below the most important data
groups of the import step. Click on
Descriptor node, because we want to
assign each imported descriptor to a descriptor tree (see above). In the
step table at the right side you find the import step
Descriptor and below the most important data
groups of the import step. Click on  Descriptor ID
and in the center window the assignemt data for the descriptor id (“id”)
are displayed. Click on
Descriptor ID
and in the center window the assignemt data for the descriptor id (“id”)
are displayed. Click on  to make this the
decisive column, further click on
to make this the
decisive column, further click on  From
file to select the column “QuestionNumber” as data source. After that
the column should look as shown below.
From
file to select the column “QuestionNumber” as data source. After that
the column should look as shown below.

Remark: The Descriptor ID is a number that is
generated automatically from the database when a new descriptor is
created. Anyway in the data file there is a field “QuestionNumber” that
is linked to a certein descriptor and used in other tables to reference
a certain descriptor. The mapping from the “QuestionNumber” values to
the internally generated Descriptor ID values
will be stored in a separate import mapping table for the actual import
session. In the later import steps this mapping table will allow to find
the correct descriptor assigned to a certain “QuestionNumber”.
Now the descriptor name must be selected, therefore click on
 Descriptor name. The center window shows three
data columns: “label”, “abbreviation” and “detail”. Click on
From file in the “label” line to
select file column “QuestionText” (see below).
Descriptor name. The center window shows three
data columns: “label”, “abbreviation” and “detail”. Click on
From file in the “label” line to
select file column “QuestionText” (see below).

Next click on  Sequence number. In the center
window select the data column “display_order”, click on
From file and select file column
“QuestionNumber”. (see below).
Sequence number. In the center
window select the data column “display_order”, click on
From file and select file column
“QuestionNumber”. (see below).

As already mentioned before the file column “Type” contains information
that can be used to determine the descriptor type. Therefore click on
 Subclass, select the “subclass” line, click on
From file and select the file column
“Type”. Now click on button
Subclass, select the “subclass” line, click on
From file and select the file column
“Type”. Now click on button ![]() to open the
transformation window. As only transformation step select
to open the
transformation window. As only transformation step select
![]() to insert a translation table and
to insert a translation table and
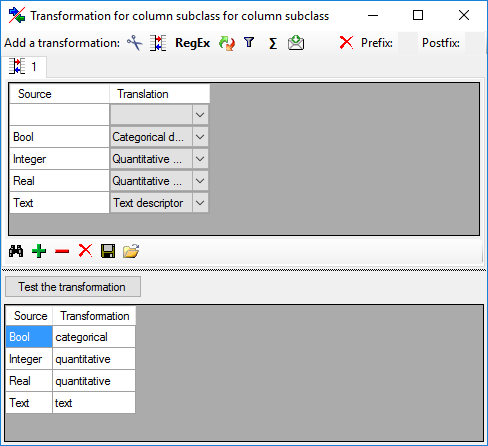
 to list the values contained in the file column.
“Bool” shall be converted to “Categorical descriptor”, “Integer” and
“Real” will become “Quantitative descriptor” and the rest “Text
descriptor” (see below).
to list the values contained in the file column.
“Bool” shall be converted to “Categorical descriptor”, “Integer” and
“Real” will become “Quantitative descriptor” and the rest “Text
descriptor” (see below).
The file rows that contain entries in column “Values” seem to specify categorical descriptors but are simply inserted as text characters. We will correct those values when we import the categorical states in a later step. The “subclass” data column now looks as shown below.

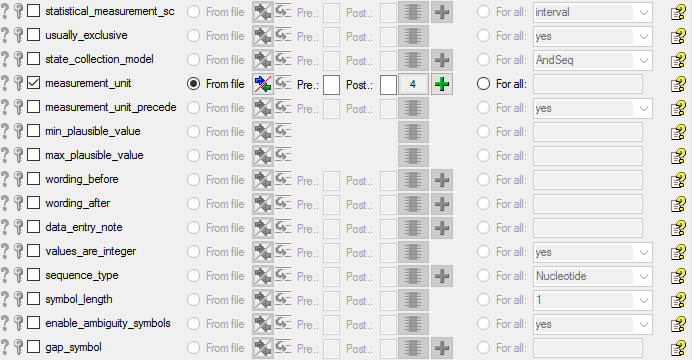
The descriptor step at the right displays the most important data
columns grouped in separate steps. Anyway, there are several additional
data columns available that can be accessed by clicking on the
Descriptor step itself. Here we select data
column “measurement_unit”, choose file column “Unit” (see below).
To do the assignment of the imported descriptors to the descriptor tree
that was created in the preparation step, select
Descriptor node ID from step Descriptor
node and supply it exactly the samy way as the
Descriptor ID. (Don’t forget to click on to
make it the decision column.) Furthermore supply the
Sequence number in the same way as described
above.
Finally select import step  Descriptor tree,
select data column “descriptortree_id”, choose
For all: and select entry “Main tree
for Agricultural survey” from the drop down (see below). With this
adjustment every imported descriptor will automatically be assigned to
that descriptor tree.
Descriptor tree,
select data column “descriptortree_id”, choose
For all: and select entry “Main tree
for Agricultural survey” from the drop down (see below). With this
adjustment every imported descriptor will automatically be assigned to
that descriptor tree.

Remark: Although descriptortree_id is a numeric value in the database, the externally visible descriptor tree name is expected here. Since this name is unambigious, the corresponding id will be determined during import.
Testing 
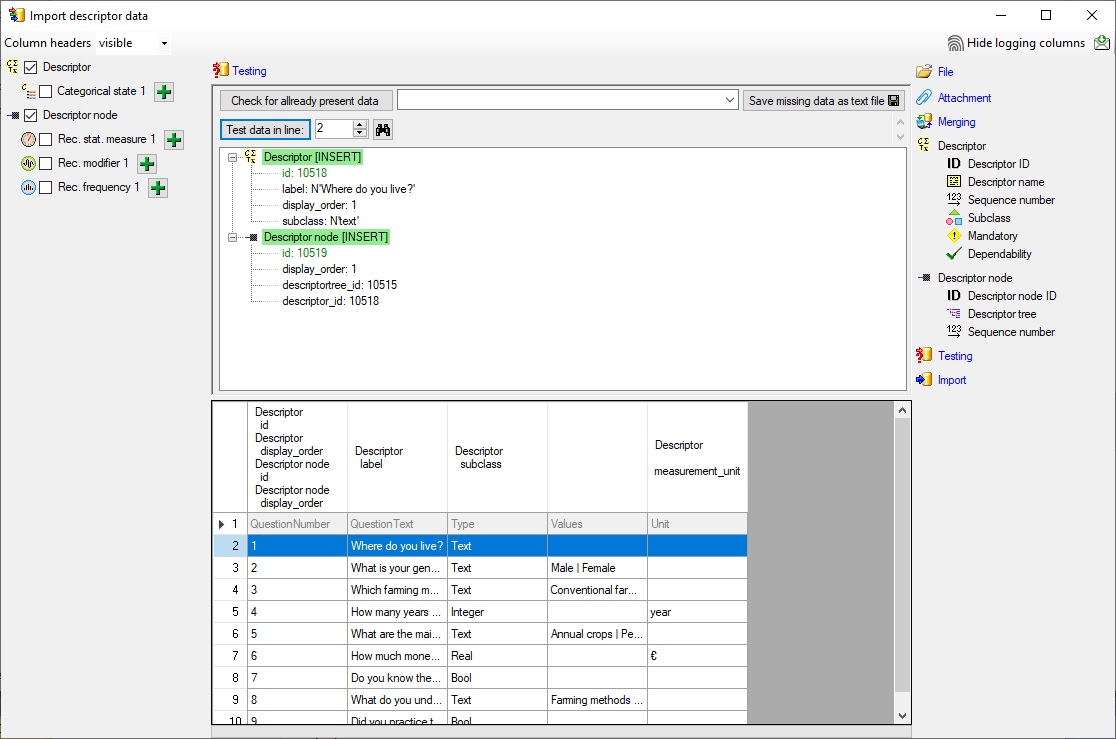
To test if all requirements for the import are met use the
Testing step.
You can use a certain line in the file for your test and than click on
the Test data in line: button. If there are still unmet
requirements, these will be listed in a window. In our example no error
occured and the test for the first data line is shown below.
You can see that in table “Descriptor” for data column “id” a new value 325050 is generated - remember that from file column “ParamID” the value 1 was selected. The mapping of the external value (1) to the internal value (325050) in table “Descriptor” will be stored in the “ImportMapping” table of the actual import session. I.e. if in a subsequent import step for the same session a “Descriptor.id=1” is specified in the import schema, it will automatically be translated to the internal “Descriptor.id=325050”. Anyway, usually you do not have to take care about this automatic translation. This example shall only demonstrate the meaning of the import sessions.
Remark: Since testing works with transaction rollback, the “id” values shown in the test window are different from the values resulting from a real import.
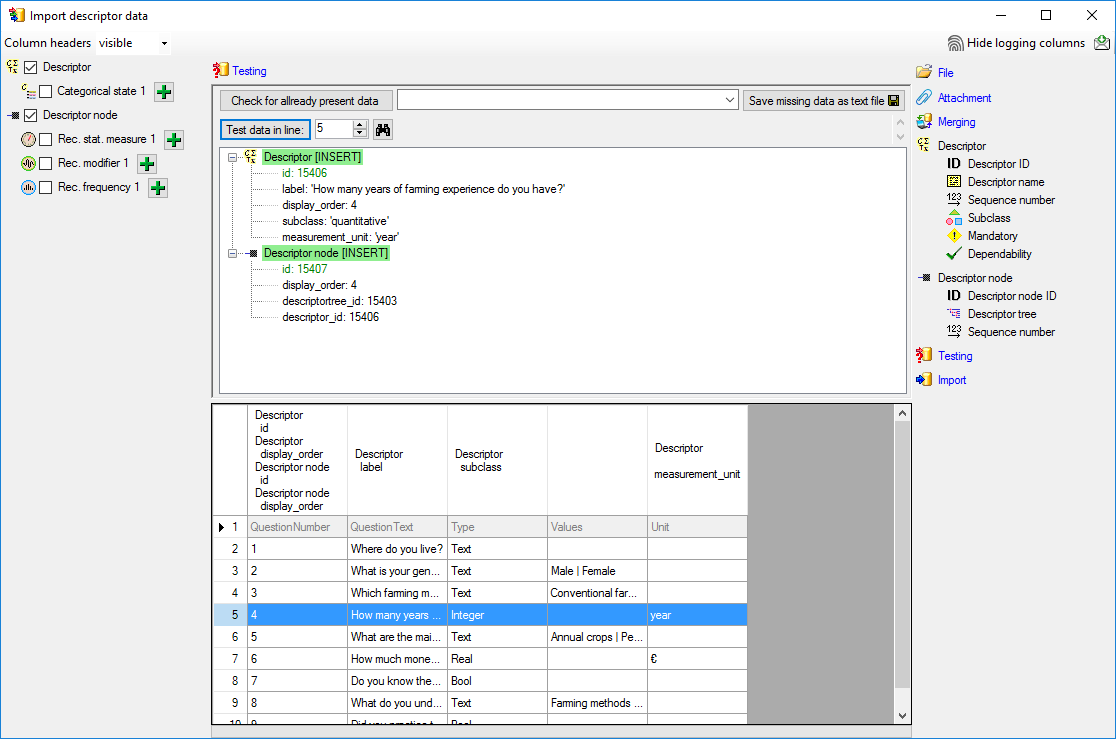
As a second example data line 4 with “DataType=Integer” was selected to demonstrate that the descriptor subtype is correctly set to “quantitative” (see below).
Import 
With the last step you can start to import the data into the database. If you want to repeat the import with the same settings and data of the same structure, you can save a schema of the current settings (see below).
| Schedule for import of tab-separated text files into DiversityDescriptions | |||
| Target within DiversityDescriptions: Descriptor | |||
| Schedule version: | 1 | Database version: | 03.00.17 |
| Lines: | 2 - 10 | First line contains column definition: | ✔ |
| Encoding: | ANSI | Language: | US |
Tables
Descriptor
(Descriptor)
Merge handling:
Insert
| Column in table | ? | Key | Copy | Pre | Post | File pos. | Transformations | Value | Source | Table | |||||||||||||||
|---|---|---|---|---|---|---|---|---|---|---|---|---|---|---|---|---|---|---|---|---|---|---|---|---|---|
| id | ? | 0 | File | ||||||||||||||||||||||
| label | 1 | File | |||||||||||||||||||||||
| display_order | 0 | File | |||||||||||||||||||||||
| subclass | 2 |
|
File | ||||||||||||||||||||||
| measurement_unit | 4 | File |
DescriptorTreeNode
(DescriptorTreeNode)
Parent: Descriptor
Merge handling:
Insert
| Column in table | ? | Key | Copy | Pre | Post | File pos. | Transformations | Value | Source | Table |
|---|---|---|---|---|---|---|---|---|---|---|
| id | ? | 0 | File | |||||||
| display_order | 0 | File | ||||||||
| descriptortree_id | Main tree for Agricultural survey | Interface | ||||||||
| descriptor_id | ParentTable |
Lines that could not be imported will be marked with a red background while imported lines are marked green.
If you want to save lines that produce errors during the import in a separate file, use the “Save failed lines” option. The protocol of the import will contain all settings acording to the used schema and an overview containing the number of inserted, updated, unchanged and failed lines (see below).
