Wizard Tutorial Step 5

Step 5 - Import of categorical states and update of descriptor data
Now we want to import the categorical states that are specified in file
column “Values” and set the subclass for those descriptors from “text”
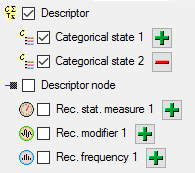
to “categorical”. In the selection list on the left side of the window
 Descriptor,
  Categorical state 1 and
  Categorical state
2 are still selected and
Categorical state
2 are still selected and  Descriptor
node 1 is deselected (see below). Furthermore the descriptor id is
selected for attachment.
Descriptor
node 1 is deselected (see below). Furthermore the descriptor id is
selected for attachment.
Since we want to change the descriptor data, we have to change the
import step  Merge from the list.
For
Merge from the list.
For  Descriptor we select the
 Update option (see below).

In the import step
Descriptor click on
 Subclass, select file column “Values” and click
on button
Subclass, select file column “Values” and click
on button ![]() to open the transformations. By
clicking the
to open the transformations. By
clicking the  button the transformations of
previous steps are removed. In the tranformation window click on
button the transformations of
previous steps are removed. In the tranformation window click on
 to select a filter, then select
 Import a fixed value and enter the
value categorical. Now click on the
Import a fixed value and enter the
value categorical. Now click on the
 button choose column “Values” from the file
and select <not equal> blank (see below).
button choose column “Values” from the file
and select <not equal> blank (see below).
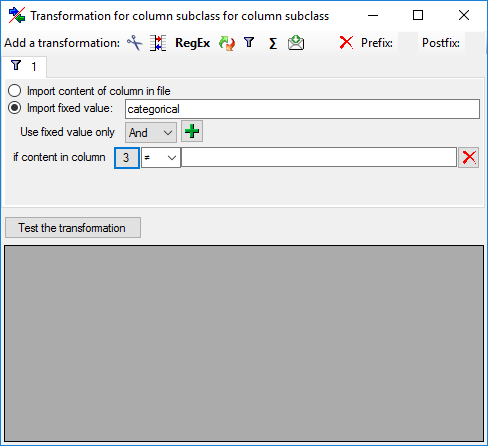
This filter will provide the value “categorical” for database column “subclass” if file column “Values” is not empty. If “Value” is empty, no value is provided and the “subclass” stays unchanged. The column now looks as shown below.

Inserting the categorical states
A closer look on the “Values” file column shows that the states are
provided as a list of values separated by the pipe symbol and blanks ("
| “). To get the single state values, we have to split off a value at
the string " | “. This value will then be used for the
 Categorical state ID and the
 Categorical state name.
In the import step Categorical state 1
click on Categorical state ID and in the center
window the assignemt data for the categorical state id (“id”) are
displayed. Click on  to make this the decisive
column, further click on From file to
select the column “Values” as data source. Now click on button
to make this the decisive
column, further click on From file to
select the column “Values” as data source. Now click on button
![]() to define a transformation.
to define a transformation.
In the tranformation window click on the  cut
transformation, enter Position: 1,
click on
cut
transformation, enter Position: 1,
click on  to enter splitter character | (blank, pipe, blank). By clicking on button
[Test the tranformation] you can check the transformation results
(see below).
to enter splitter character | (blank, pipe, blank). By clicking on button
[Test the tranformation] you can check the transformation results
(see below).
![]()
![]()
The column now looks as shown below.

Remark: The Categorical state ID is a number that
is generated automatically from the database when a new categorical
state is created. At first sight it seems confusing that we select a
string - the catigorical state name - for this numeric key. The point is
that in the file with the description data the corresponding catogorical
state is idenified by exactly this categorical state name. Since we
select this categorical state name for the  Categorical state ID, the mapping between these two values will be
stored in a separate import mapping table for the actual import session.
In the later import steps this mapping table will allow to find the
correct categorical state.
Categorical state ID, the mapping between these two values will be
stored in a separate import mapping table for the actual import session.
In the later import steps this mapping table will allow to find the
correct categorical state.
Now supply exactly the same filter settings for  Categorical state name but do not mark it as decisive column (see
below).
Categorical state name but do not mark it as decisive column (see
below).

Finally we supply the  Sequence number. Select
For all: with 1 (see below).
Sequence number. Select
For all: with 1 (see below).

And now there is some “fun”:
The longest entry in column “Values” contains four entries separated by
pipes and blanks. Therefore click two more times on the
button of step
Categorical state 1 on the left side and select the new steps
Categorical state 3 and
Categorical state 4. For each of the
remaining steps supply the columns in the same way as for
Categorical state 1, but increase the
Position: value in the cut transformations and
the For all: value in Sequence number.
Testing 
To test if all requirements for the import are met use the
 Testing step.
The test for data line 9, where all eleven descriptor states are
present, is shown below.
Testing step.
The test for data line 9, where all eleven descriptor states are
present, is shown below.

Import 
With the last step you can start to import the data into the database. If you want to repeat the import with the same settings and data of the same structure, you can save a schema of the current settings. There were 4 lines that contained descriptors (see below).
