Wizard Tutorial Step 7

Step 7 - Import of description data
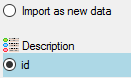
In this step we attach categorical, quantitative and text data to the
descriptions. In import step  Attach at the right
side we select
Attach at the right
side we select  id (see below). It
indicates that we do not want to attach data to an existing description.
id (see below). It
indicates that we do not want to attach data to an existing description.
Select the import step  Merging from the list.
For
Merging from the list.
For  Description we select the
Attach option because this table shall not be
changed (see below).
Description we select the
Attach option because this table shall not be
changed (see below).

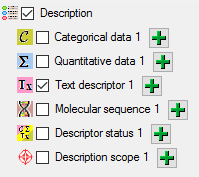
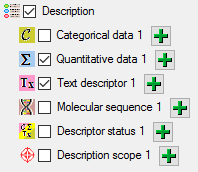
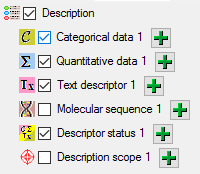
Deselect every column from import step
Description except “id”. The “id” column was already marked as
 Key column for comparison in the previous step.
Now the column looks as shown below.
Key column for comparison in the previous step.
Now the column looks as shown below.

Inserting text descriptor data
We will now include the text, quantitative, categorical and status data
step by step. First we will attach the text descriptor data. Select the
 Text descriptor 1 step at the left (see
below).
Text descriptor 1 step at the left (see
below).
At the right side you find the import step
Text descriptor 1 and below the data groups of the import step. Click
on  Descriptor ID and in the center window the
assignemt data for the referenced descriptor’s id (“descriptor_id”) are
displayed. Click on
Descriptor ID and in the center window the
assignemt data for the referenced descriptor’s id (“descriptor_id”) are
displayed. Click on  From file to
select the file column “QuestionNumber” as data source. After that the
column should look as shown below.
From file to
select the file column “QuestionNumber” as data source. After that the
column should look as shown below.

Now the description text must be selected, therefore click on
 Text. The center window shows two data
columns: “content” and “notes”. In line “content” click on
Text. The center window shows two data
columns: “content” and “notes”. In line “content” click on
 to make it the decisive column, further on
From file to select file column
“Answer”. In line “notes” click on From
file to select file column “Notes”. After that the columns should look
as shown below.
to make it the decisive column, further on
From file to select file column
“Answer”. In line “notes” click on From
file to select file column “Notes”. After that the columns should look
as shown below.

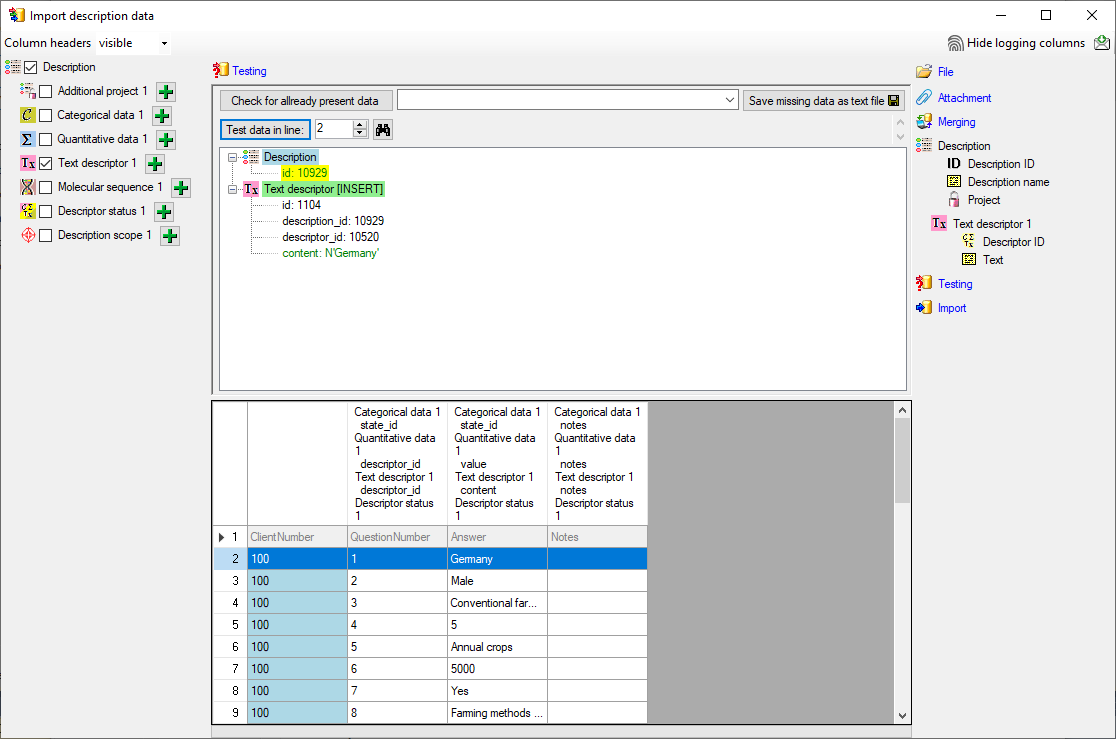
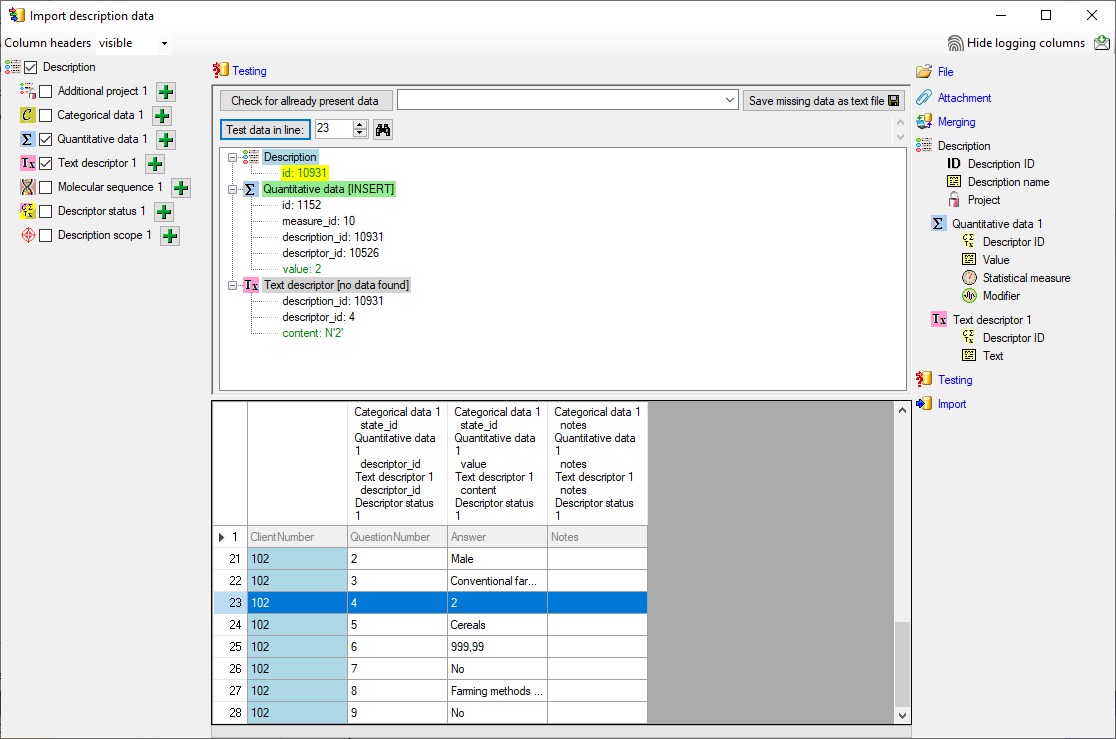
Testing the text descriptor data import
To test if all requirements for the import are met use the
 Testing step.
The test for the first data line is shown below.
Testing step.
The test for the first data line is shown below.
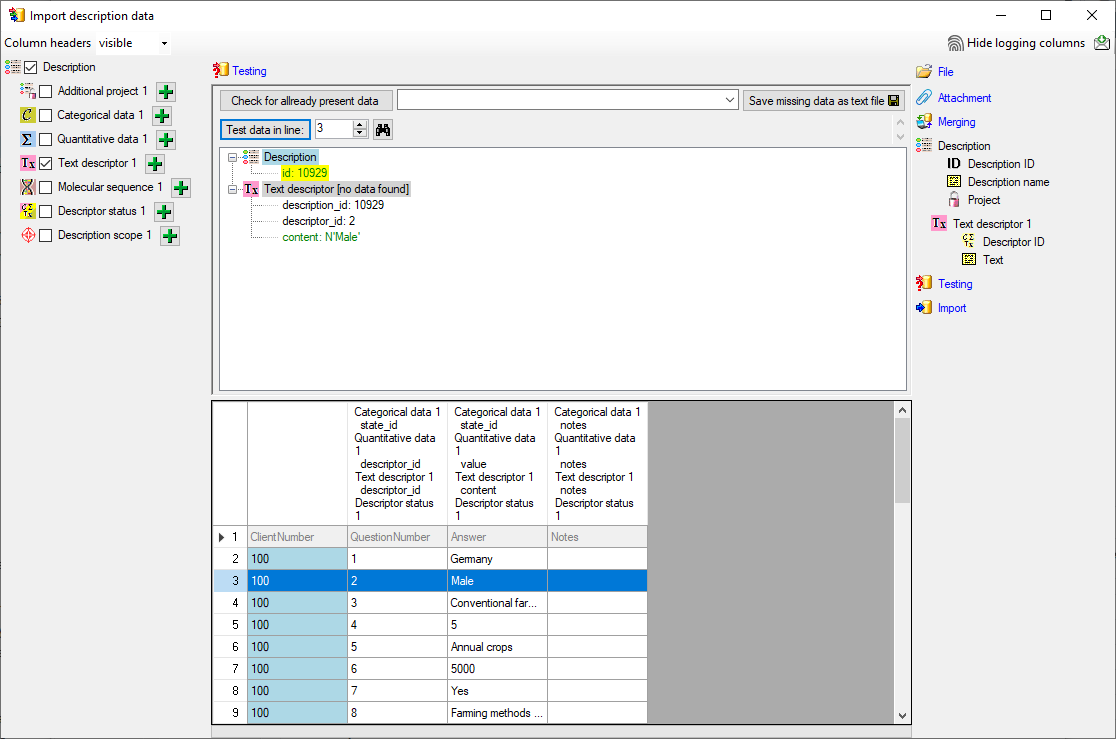
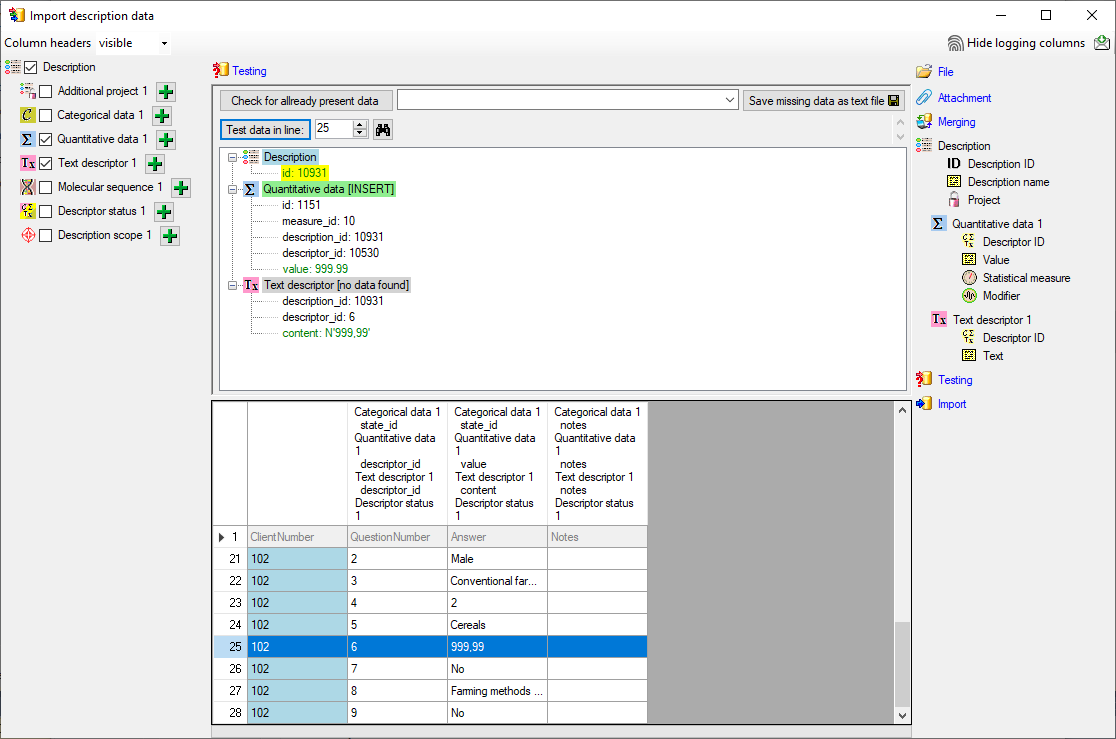
An additional test is done for the next data line. This line contains no
text data but a categorical state. You can see below that this line will
not be imported as text descriptor data, because the descriptor (given
by Descriptor ID) is automatically checked for
the correct type.
Inserting quantitative summary data
We will now include the quantitative summary data. Select the
 Quantitative data 1 step (see below).
At the right side you find the import step
Quantitative data 1 and below the data groups of the import step.
Click on Descriptor ID and select the file
column “QuestionNumber” as data source.
Now the value must be selected, therefore click on
Value. The center window shows two data columns: “value” and
“notes”. In line “value” click on to make it
the decisive column, further on From
file to select file column “Answer”. In line “notes” click on
From file to select file column
“Notes”. After that the columns should look as shown below.

For quantitavie measures you must specify which statistical measure is
given by the value. We assume all imported values are mean values,
therefore click on the import step  Statistical measure and in the center window the assignemt data for
the statistical measure (“measure_id”) are displayed. Click on
For all: and select entry “Central or
typical value (human estimate)” from the drop down (see below).
Statistical measure and in the center window the assignemt data for
the statistical measure (“measure_id”) are displayed. Click on
For all: and select entry “Central or
typical value (human estimate)” from the drop down (see below).

Testing the quantitative summary data import
To test if all requirements for the import are met use the
Testing step.
The test for data line 25 with integer data is shown below.
The test for data line 25, which contains real number fails (see below).
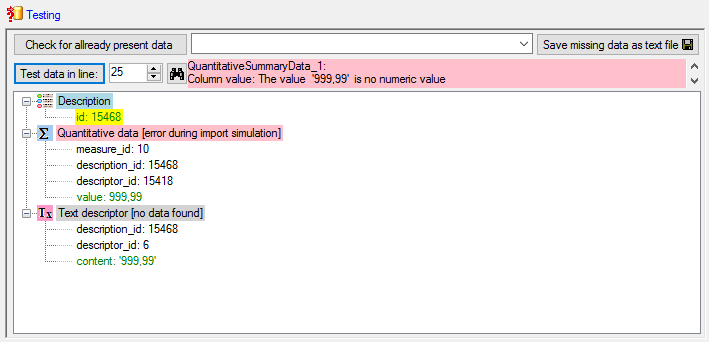
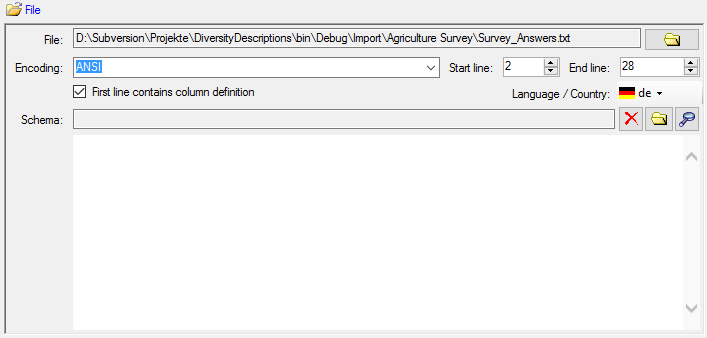
A closer look on the data in column “Answer” shows that the decimal
separator is a comma, because the table has been generated by a progam
using the German localization. The database expects a decimal point as
separator. To interpret the localized file values correctly, select the
step  File and choose Language /
Country:
File and choose Language /
Country:  de (see below).
With this settings the test now works fine (see below).
Inserting categorical summary data
Now we will include the categorical summary data. Select the
 Categorical data 1 step at the left (see
below).
Categorical data 1 step at the left (see
below).
At the right side you find the import step
Categorical data 1 and below the data groups of the import step. Click
on  Categorical state ID. The center window
shows the data column “state_id”. Click on to
make it the decisive column, further on
From file to select file column “Answer”. If you perform a quick
import test you will see that this setting works perfectly for data file
lines 3, 4 and 6, but fails for line 8 (see below).
Categorical state ID. The center window
shows the data column “state_id”. Click on to
make it the decisive column, further on
From file to select file column “Answer”. If you perform a quick
import test you will see that this setting works perfectly for data file
lines 3, 4 and 6, but fails for line 8 (see below).
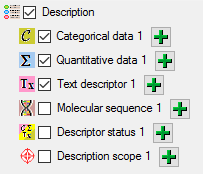
The reason is that we used the state name as external key for the
categorical state. For the descriptors 6 and 8, which both represent
boolean values, the states names are ambigious (“Yes” and “No” for both
descriptors), therefore the import wizard does not know which descriptor
shall be used. To overcome this ambiguity the
Categorical state ID step allows the additional specification of the
descriptor id. Select import step
Categorical state ID. In the center click on the  button at the end of line “state_id”. Select file column
“QuestionNumber”, which contains the reference to the descriptor and
enter the separator character | (pipe
symbol) in field Pre.: of the new line. After that the column should
look as shown below.
button at the end of line “state_id”. Select file column
“QuestionNumber”, which contains the reference to the descriptor and
enter the separator character | (pipe
symbol) in field Pre.: of the new line. After that the column should
look as shown below.

If you repeat the quick import test for line 8, it will now work.
Now click on Notes. The center window shows
the data column “notes”. Click on From
file to select file column “Notes”. After that the columns should look
as shown below.

Testing the categorical summary data import
To test if all requirements for the import are met use the
Testing step.
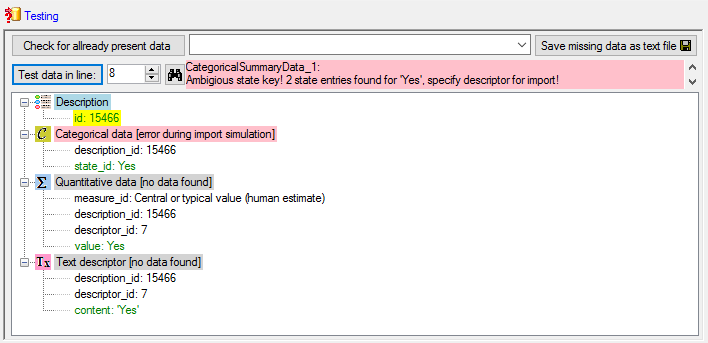
The test for data line 15 with categorical data and notes is shown
below.
Inserting the descriptor status data
There is an empty lines in the file. For this line we want to set the
descriptor status “Data unavailable” to indicate that the descriptor
should be present in the description. Select the
 Descriptor status 1 step at the left (see
below).
Descriptor status 1 step at the left (see
below).
At the right side you find the import step
Descriptor status 1 and below the data groups of the import step.
Click on Descriptor ID and select the file
column “QuestionNumber” as data source. Furthermore click on
Notes and select the file column “Notes”.
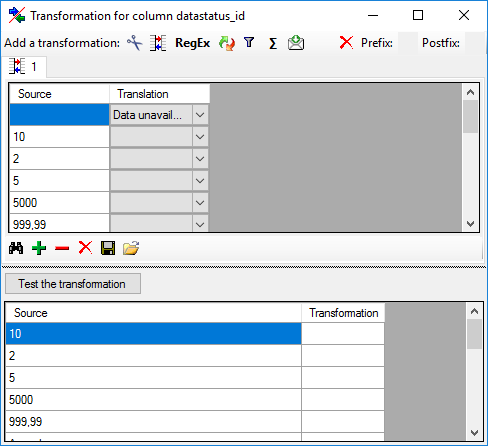
Now click on  Data status. The center window
shows the data column “statusdata_id”. Click on
to make it the decisive column, further on
From file to select file column
“Answer”. Now click on button
Data status. The center window
shows the data column “statusdata_id”. Click on
to make it the decisive column, further on
From file to select file column
“Answer”. Now click on button ![]() to define a
transformation. In the tranformation window click on
to define a
transformation. In the tranformation window click on
![]() to select translation. In the translation
window click the
to select translation. In the translation
window click the  button to list the values
contained in the file column. For the empty entry in the first line
select the translation value “Data unavailable” (see below). All data
entries will therefore be mapped to “empty”, i.e. no data status will be
set. Only if the data file line ist empty, the selected data status will
be inserted.
button to list the values
contained in the file column. For the empty entry in the first line
select the translation value “Data unavailable” (see below). All data
entries will therefore be mapped to “empty”, i.e. no data status will be
set. Only if the data file line ist empty, the selected data status will
be inserted.
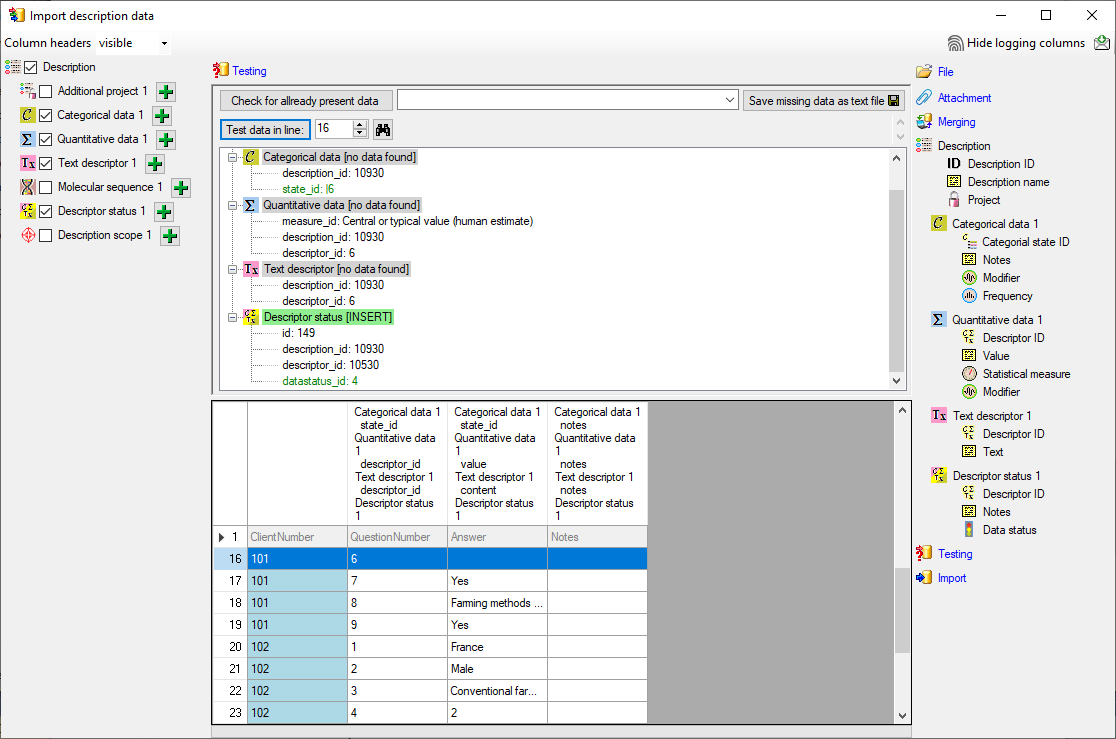
Testing the descriptor status data import
To test if all requirements for the import are met use the
Testing step.
The test for data line 16 is shown below.
Import
With the last step you can start to  import the data into the database.
If you want to repeat the import with the same settings and data of the
same structure, you can save a schema of the current settings. There
were 26 lines imported and one failed line (see below).
import the data into the database.
If you want to repeat the import with the same settings and data of the
same structure, you can save a schema of the current settings. There
were 26 lines imported and one failed line (see below).
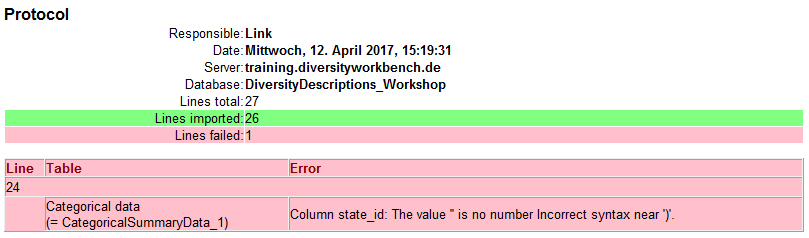
The erroneous lines are stored into separate text file (e.g. “Survey_AnswersError.txt”) for a detailled analysis and a separate import after error corrections. In our example the error is caused by the undefined value “Cereals” in the “Answer” column of file line 24.