Diversity Collection

Collection
The parts of a specimen can be stored in several collections. To see the
place where a specimen or parts of it are stored use the lower tree and
click on the icon to select the display
according to the collections as shown below and in a short tutorial
 .
.
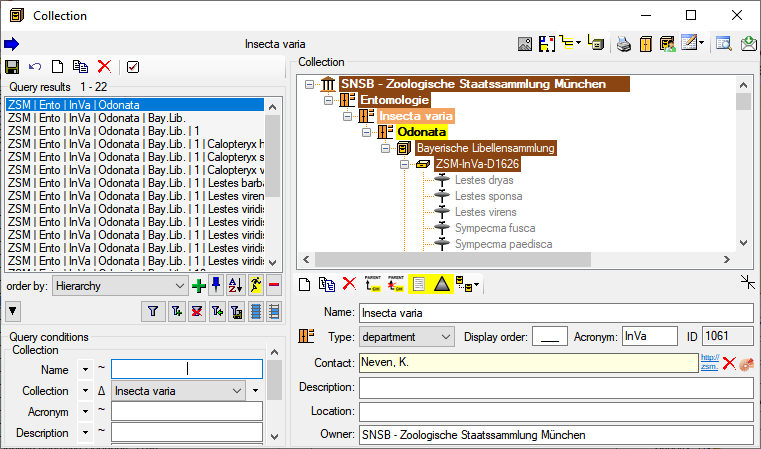
In the tree shown above select the collection
to display the data fields as shown below.
To be able to edit the details of a collection, you must be a collection manager of this collection. The restrictions for the access for editing the collections are defined in the CollectionManager section.
At the base of the fields you find the default collection, used for the
creation of new specimen parts. Specimen parts that are not created as a
part of another part will be placed in this collection. Use the  edit button to edit this entry (see below) For another
possiblity to edit this value choose Administration - Customizedisplay from the menu.
edit button to edit this entry (see below) For another
possiblity to edit this value choose Administration - Customizedisplay from the menu.

Administration of the collections
If you need further information about a collection click on the button or choose Administration -
Collections... from the menu to open the window for the collection
administration (this menu entry is only available for collection
managers). This will open a window (see below) where you can edit the
collections used in your database for which you are a collection
manager. You can choose among several options to show resp. hide the
hierarchy:
 Show whole hierarchy
 Superior datasets and children of
current dataset
Superior datasets and children of
current dataset Restrict to superior datasets
 Hide the hierarchy
Specimen placed in the collections
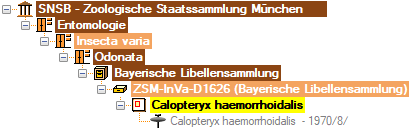
With the  button, you can display the
specimen stored in a collection within the hierarchy (see below).
button, you can display the
specimen stored in a collection within the hierarchy (see below).
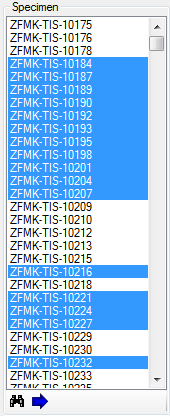
As an alternative the specimens stored in a selected collection can be
listed in the specimen list. You can hide / show this list using the
[  ]/
button. The specimen list will appear as shown below. Click on the
collection in the tree view to fill the list and see the specimens that
contain parts which are placed in the current collection. To transfer
the parts of certain specimen from the current collection to another
collection, choose them in the list and click on the
]/
button. The specimen list will appear as shown below. Click on the
collection in the tree view to fill the list and see the specimens that
contain parts which are placed in the current collection. To transfer
the parts of certain specimen from the current collection to another
collection, choose them in the list and click on the ![]() button. To change to a specimen from this list
click on the
button. To change to a specimen from this list
click on the  button.
As an alternative you may select the specimen in the main form a choose
Data - ![]() Transfer -
To Collection ... from the menu. A window will open where you can
select the collection in which you want to transfer the specimen. With
this option [ALL] parts of the selected specimen will be
transferred into the selected collection.
Transfer -
To Collection ... from the menu. A window will open where you can
select the collection in which you want to transfer the specimen. With
this option [ALL] parts of the selected specimen will be
transferred into the selected collection.
Creating new collections
To create a new collection use the  button either
above the Query results or the button right of the
hierarchy, where the new collection will be placed underneath the
collection selected in the hierarchy. To copy a collection either use
the
button either
above the Query results or the button right of the
hierarchy, where the new collection will be placed underneath the
collection selected in the hierarchy. To copy a collection either use
the  button or the
  button. The latter will copy the collection including all child
collections. To set the superior collection, use the
button. The latter will copy the collection including all child
collections. To set the superior collection, use the  button. The user creating the new collection
will automatically be inserted as a collectionmanager for this collection. To remove
button. The user creating the new collection
will automatically be inserted as a collectionmanager for this collection. To remove
 a collection, any collection manager must be
removed from this collection first. Click on the
a collection, any collection manager must be
removed from this collection first. Click on the  button to open a window for the
administration of the collection managers. For new versions of the
database the removal of the link of collection managers to deleted
collection will be done automatically. To transfer collections in the
list as children into another collection, click on the
button to open a window for the
administration of the collection managers. For new versions of the
database the removal of the link of collection managers to deleted
collection will be done automatically. To transfer collections in the
list as children into another collection, click on the
![]() button in the upper left corner.
button in the upper left corner.
Administration of collection types
To administrate the types for the collections, click on the  button. A window will open where you can create
new types and add icons representing a type (see below).
button. A window will open where you can create
new types and add icons representing a type (see below).
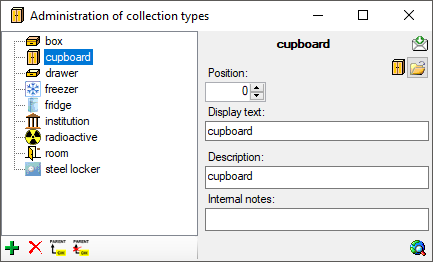
Use the  buttons to add resp. remove a type and the
  buttons to handle the hierarchy. For new types you can use the
  button to add an icon for the new type.
The type  regulation is provided for the
collections that are meant to administrate the access to transactions of
the type regulation. See chapter Transaction or
further details.
regulation is provided for the
collections that are meant to administrate the access to transactions of
the type regulation. See chapter Transaction or
further details.
Images
If there are images depicting the collection a yellow background
 will
indicate the availability of these images. To show the images, click on
the show images
will
indicate the availability of these images. To show the images, click on
the show images  button. The button will get a red background and this will open the area for the images as shown below. Use the new and delete
buttons to add or delete images of your collection. For further details
about handling images see chapter Images.
button. The button will get a red background and this will open the area for the images as shown below. Use the new and delete
buttons to add or delete images of your collection. For further details
about handling images see chapter Images.
Plan
If a floor plan is available for a collection this will be indicated by a yellow background
 . For details see chapter collection floor pan.
Label
To print labels for e.g. drawers, click on the print  button. The area for printing the labels will be shown (see below). Further details about printing labels are described in the chapter Label.
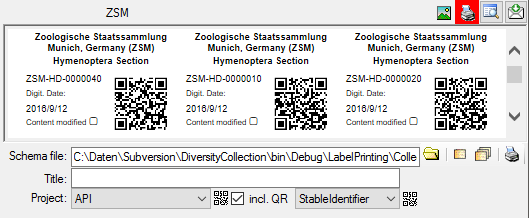
For the generation of QR-Codes there are 2 options:
- Collection name: The name of the collection will be coded in the QR code.
- Stable identifier: Provided the stable identifier for the database is set, the ID (= CollectionID) will be coded in the QR code e.g. http://development.diversityworkbench.de/collection_Test_2/Collection/55.
Data in tables
To edit the contents of the tables in the table editor select
 -
Collection resp.
-
Image from the menu. For Details
see chapter TableEditors.
-
Collection resp.
-
Image from the menu. For Details
see chapter TableEditors.
History
To view the history of a dataset, click on the  history button. A window
with the history will open. For more details see chapter
History.
history button. A window
with the history will open. For more details see chapter
History.
Data
For details about handling data see the Data section. Data of the collections is stored in the table Collection.