Edit Description

Editing the description
After starting a database query and selecting an entry in the result
list the dataset is diplayed in the edit window. In the header area the
dataset name, the default project language and the URI of the current
dataset are show (see picture below). Below the header area the
description name may be edited in a text box. Changes of the description
data, e.g. the name, will be visible in the header after saving the
dataset. To check dataset changes, click on the  button to open the history. By clicking button
 you may open a simplified HTML
form to view and edit the description data.
you may open a simplified HTML
form to view and edit the description data.
The main description data may be accessed in the first Mainattributes tab, which is described below. Click on one of the other tabs in the picture below to go directly to the appropriate manual chapter.
Main attributes tab
The main attributes tab provides in the upper area a field to enter
additional description details and a wording for natural language
support. The optional filed AID may keep an alpha-numeric alternate
ID of the dataset. If used, it should be unambigious within the project,
but this is not checked by the program. Click on  to
get an overview of the used keys.
to
get an overview of the used keys.
Scopes
The next section Description scopes allows specification of
description scopes. This sections consists of the scope table with scope
type and value and a edit section to modify a seleted scope entry or to
enter e new scope. The scope types Geographic ares, Reference,
Specimen, Observation and Taxon name allow input of a
free-form text or reference to the corresponding DiversityWorkbench
module or a web service. The connection to to a module or web service is
done using the button  . After
selecting the entry in the referenced database the text will be taken
over and the backround colour of the scope value field changes to yellow. A further editing of the text will not be
possible (see below).
. After
selecting the entry in the referenced database the text will be taken
over and the backround colour of the scope value field changes to yellow. A further editing of the text will not be
possible (see below).

Additionally the edit section now shows the buttons
 to view the database link and
 to remove the database link. In the latter case
editing of the scope value will be possible again.
to remove the database link. In the latter case
editing of the scope value will be possible again.
If a scope entry has been selected in the scope table, it can be
modified in the edit section. If you want to enter a new scope value
instead, press the  button at the end of the edit
line. The scope entry in the scope table will be deselected and a
selection box for the scope type appears in the edit section (see
below).
button at the end of the edit
line. The scope entry in the scope table will be deselected and a
selection box for the scope type appears in the edit section (see
below).
You may insert mutiple scope values with links to a DiversityWorkbench
module or a webservice. Therfore enter a new scope value with scope type
Geographic ares, Reference, Specimen, Observation and
Taxon name (or select one, which is not yet linked). Besides the
scope type dropdown box the button  is shown,
which allows insert of multiple scopes (see image below).
is shown,
which allows insert of multiple scopes (see image below).
You may insert mutiple scope values with links to a DiversityWorkbench
module or a webservice. Therfore enter a new scope value with scope type
Geographic ares, Reference, Specimen, Observation and
Taxon name (or select one, which is not yet linked). Besides the
scope type dropdown box the button is shown,
which allows insert of multiple scopes (see image below).
In the remote query panel you find the section Unit list, where you
may add the currently selected query result by clicking the
 button. When you select an entry in the Unit
list, you may remove it by clicking
button. When you select an entry in the Unit
list, you may remove it by clicking  or view the data in a separate window by clicking
  . When you have collected all query results click the OK button and the scopes
are inserted for the description (see below).
. When you have collected all query results click the OK button and the scopes
are inserted for the description (see below).

Project scopes
Besides the already mentioned scope types that allow input of a free text or reference to a database entry, the scope types Sex, Stage, Part and Other scope provide pre-defined scope values. The values can be administrated as described in the Editing theProject chapter. For each project a different set of values can be selected as “recommended” values. If for the current description project scope values are defined/assigned, they are shown in the right part of the description scopes as Project scopes (see below).
Selecting or deleting of a scope entry can be easily done by selecting clickin on the check box before the scope value. You may select rsp. deselect all scope values of a certain scope type (Sex, State, Part or Other scope) by clicking the check box of the category. If for a scope value a detailled description text has been stored, you may view it as bubble help by moving the mous cursor over the values.
If for a description a scope value is selected, that is not assigned to its project, the value ist show with yellow background (see below). Such a situation can occur, if the scope value has been removed for the project or if a description has been moved to a different project.
Project
The section Project allows the selection of the project the description is assigned to. This adjustment has influence of the available values of scope types Sex, Stage and Other scope, the available descriptors and recommended modifier/frequency values and statistical measures of the description. Therefore this unambiguous adjustment might be seen as the “terminology project” of the description item. The access rights for a certain user to the projects are controlled with the login settings (see chapter Loginadministration). When you click on a project name, you may view some additional project data (see image below middle).

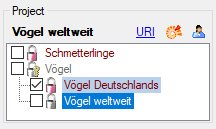
If access to a certain project is restricted to “read only”, it is
displayed with grey colour and symbol
 in the Project section (see pictures
above). A “read only” project cannot be selected for the actual
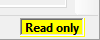
description. If the selected description has already been assigned to a
“read only” project by another user with appropriate rights, this is
indicated at the right bottom corner of the application window (see
above below right).
in the Project section (see pictures
above). A “read only” project cannot be selected for the actual
description. If the selected description has already been assigned to a
“read only” project by another user with appropriate rights, this is
indicated at the right bottom corner of the application window (see
above below right).
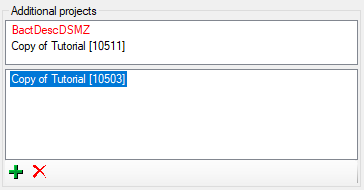
Additional projects
In section Additional projects you may make the description
accessible for additional projects. To assign a description to a project
click on the button. To remove it from a project,
select the project from the list and click on the
button. Additional projects without write access are shown in the upper
part of the window, projects with full access in the lower (or only)
part (see image below). If you do not have any access to a project, it
is shown as red text. Be aware that by
entering additional projects you may grant editing rights for single
descriptions to users that have no write access to the current project!
Be aware that by entering additional projects you may grant editing rights for dedicated descriptions to users that have no write access to the current project! If you have write access to the terminologyproject of a description item and granted access to another project, where you have read-only access, you nevertheless may withdraw these rights by removing it from the Additional projects.
Continue with:
- Edit descriptions - Descriptor view tab
- Edit descriptions - Molecular sequence symbols
- Edit descriptions - Import sequence data
- Edit descriptions - Export sequence data
- Edit descriptions - Continuous view tab
- Edit descriptions - Resource links tab
- Edit descriptions - Sample data tab