Creating Diversity Agents

Create new agent
To create a new agent, click on
the new-button  above the
search result listbox. You will be asked, if you are sure.
above the
search result listbox. You will be asked, if you are sure.
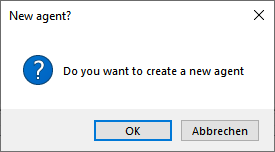
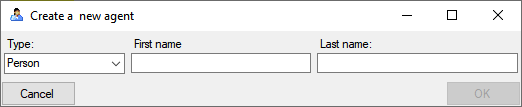
Click OK and a form will be show where the basic entries “agent type”, “First name” and “Last name” need to be given. By pressing the OK button the new agent will be created.
Forwarding changes to linked data
After changes to a dataset, the button  will get a pink background if any part related to linked datasets is concerned. This relates to all dataset in the databases select for an update as described in chapter
  connections. To add the current dataset independed of changes to changes, choose
  Insert current ID in backlink list from the context menu. To insert all items from the query in the backlink list, click on the
  button. To check the content of the current backlink list select
  in the context menu. To clear the backlink list, select
  in the context menu. Provided the permission to update the respective tables you can forward the changes to datasets in linked modules with a click on the button as described in the tutorial
For further information see the chapter Editing
Delete agents
The service of DiversityAgents is used by other modules. Therefore it must be avoided to delete referenced datasets. Instead of deleting an agend, consider to set it to a synonym of a valid entry and set the type of the synonymy to replaced with.
To remove an agent you have 2 options:
- Select the agent in the result list of the query and click on the
 delete button
 - Choose all agents in the result list of the query with a click on the button and choose Data -
 select all Remove agents from the menu
If the agents should only be removed from a project choose in the menu Data - Remove from project. This option will fail for agents with only one project. Agents will not be removed from the last project.