Tutorial Descriptions

Tutorial - Enter description data
Now that we have entered several descriptors and categorical states we
have defined a “terminology” to enter descriptive data. To create a new
description, select edit mode descriptions from menu
Edit->Descriptions. Now click on the ![]() button in the upper left panel (see point 1 in
image below). If you are asked for the project, select “Tutorial”.
button in the upper left panel (see point 1 in
image below). If you are asked for the project, select “Tutorial”.
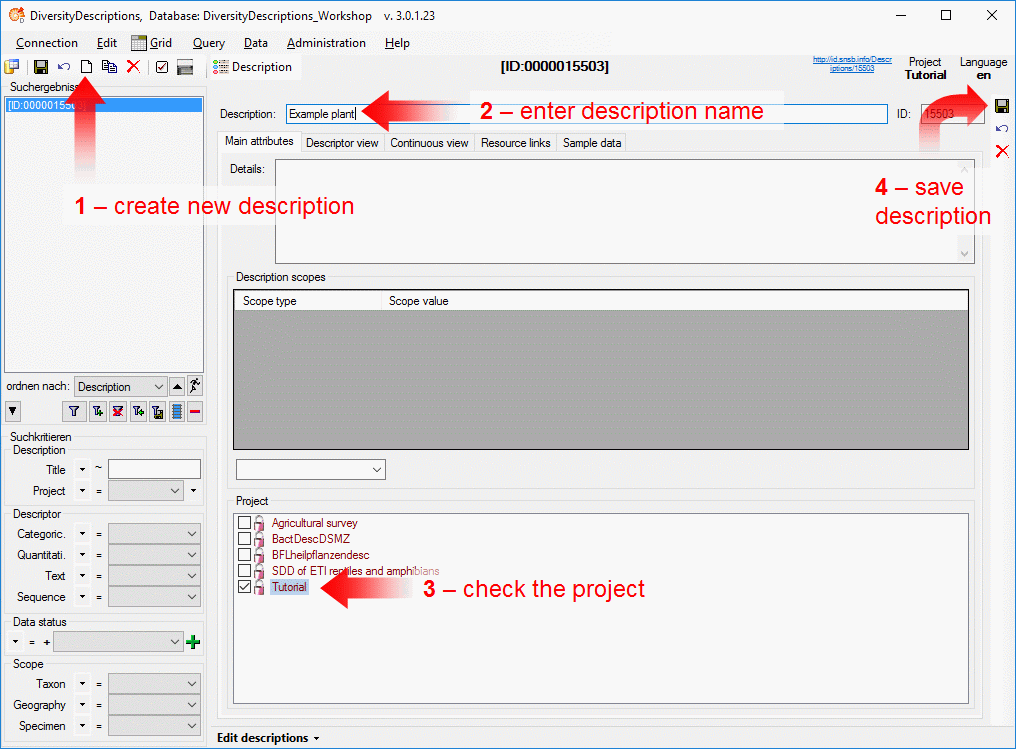
The new description is created with a numeric name. Change it to “Example plant” (see point 2 in image above) and check that project “Tutorial” is assigned to the new description (see points 3 in image above). Finally save the description (see point 4 in image above) and the description name will be updated in the header and the query panel at the left side of the window.
Enter resources for the description
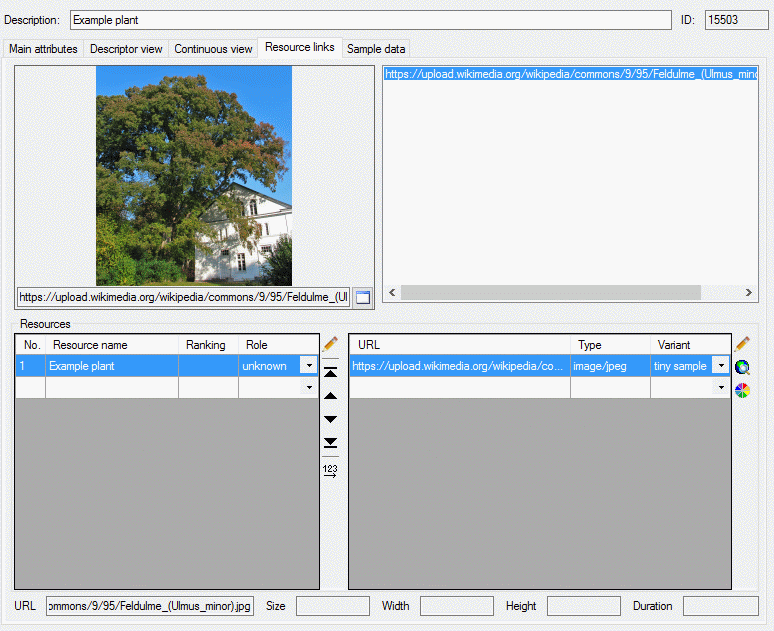
As described for the descriptors, for each description resources may be assigned. Therefore click on the “Resource links” tab, which looks exactly the same as described in chapter “Enter a textdescriptor” (see image below, a link to Wikipedia was used).
Enter descriptive data
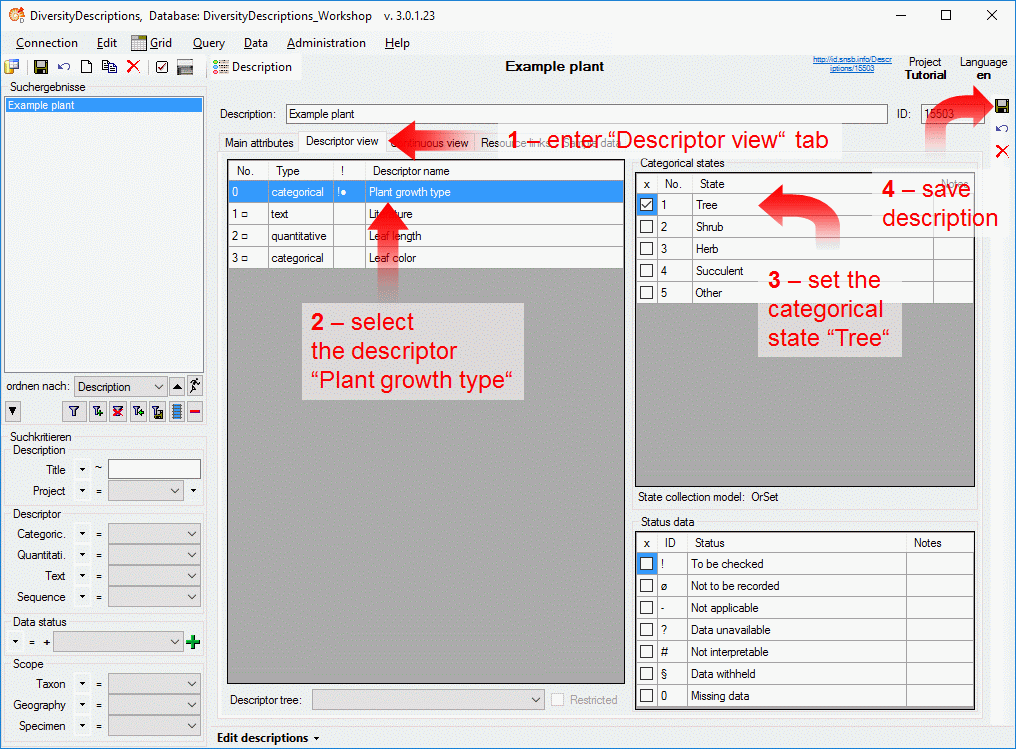
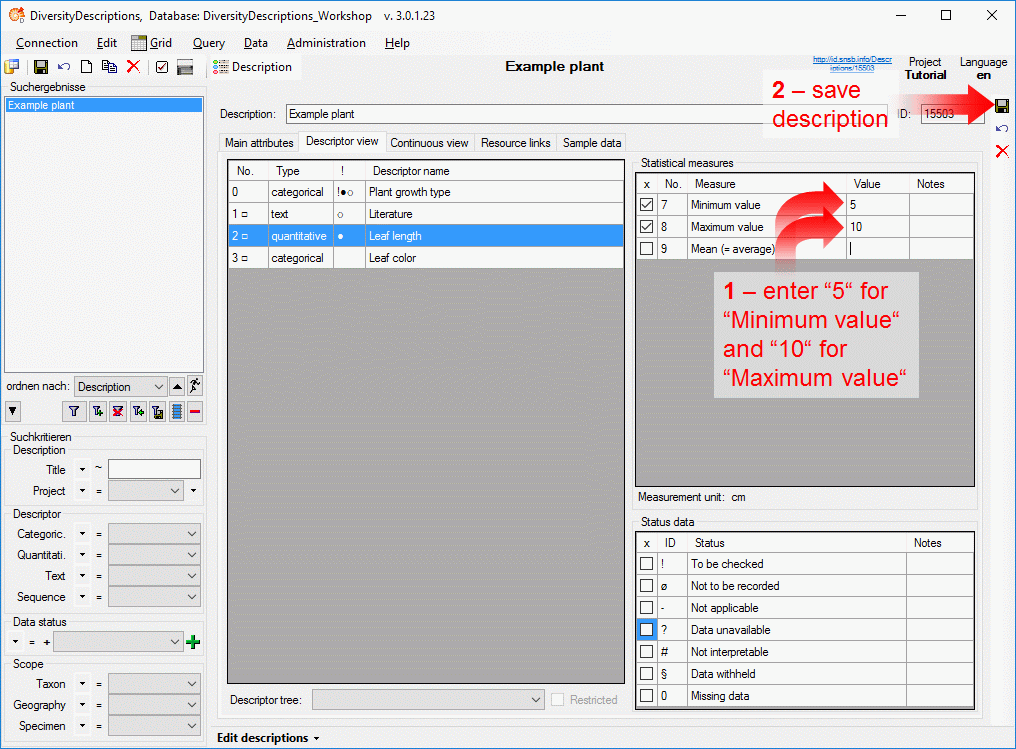
Now let’s start entering the descriptive data. Open the “Descriptor view” tab (see point 1 in image below). In the left part of the window there is a list of the desriptors. Select descriptor “Plant growth type” (see point 2 in image below) and on the right side the associated categorical states are diplayed. Click on the square in columne “x” besides the state “Tree” to set the check mark (see point 3 in image below). Finally save the description (see point 4 in image above).
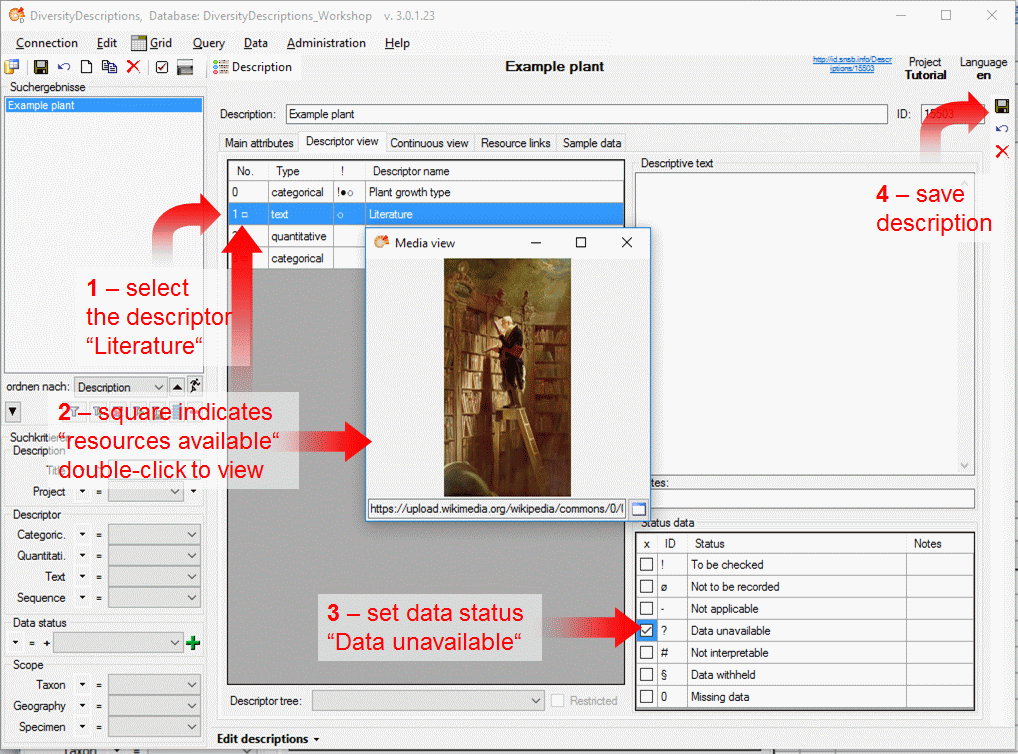
Next select the descriptor “Literature” tab (see point 1 in image below). In principle you could enter a text in the right area “Descriptive text”, but for this example two other things shall be demonstrated. In the first column of the descriptor list the sequence number (“Nr.”) is displayed. A small square behind the number indicates that resources have been attached to the descriptor (see point 2 - upper arrow - in image below). You can view the attached resources by a double-click on the sequence number (see point 2 - right arrow - in image below). In some cases you do not have data available for a certain descriptor but you want to express that data should be entered. Therefore you can sen one or more “Status data” values in the right lower part of the window (see point 3 in image below). Finally save the descriptor (see point 4 in image below).
For each categorical state resources may be assigned. Therefore select the categorical state where you want to enter the resources (see point 1 in image below) and enter a resource name (see points 2 in image below). In this case we do not assign an URL to a picture but attach color values. Therefore click the button in the “…” column and select a color value (see points 3 and 4 in image below). Finally save the descriptor (see point 5 in image below).
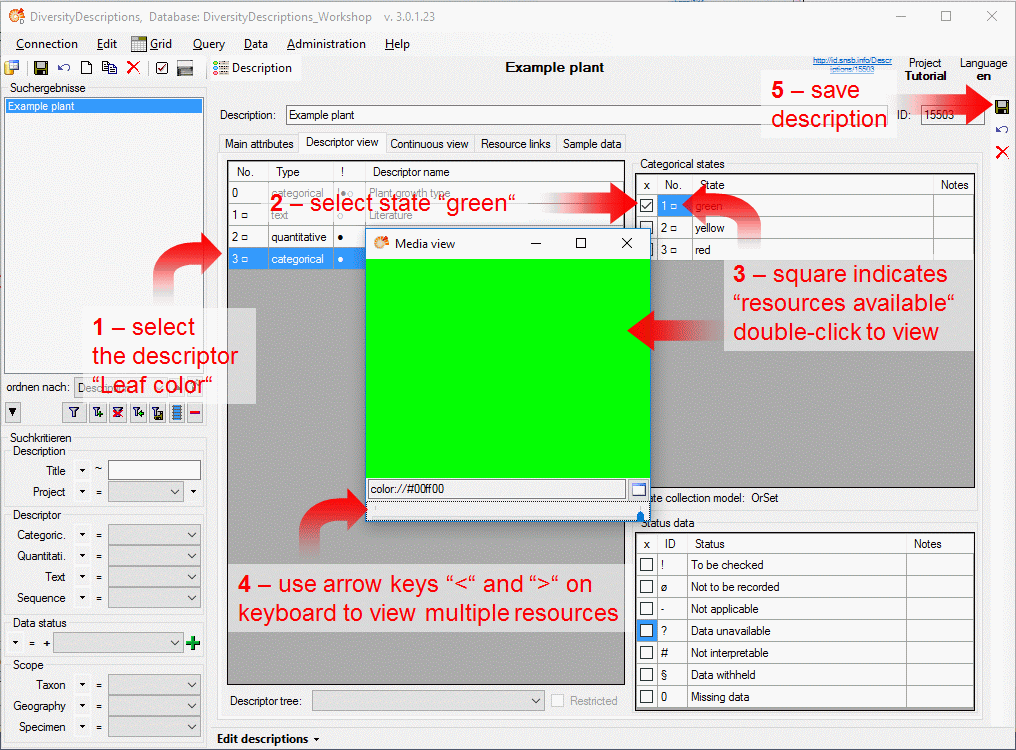
The last descriptor not yet used is “Leaf color”. Select it from the descriptor list an chek the categorical state “gree” (see points 1 and 2 in image below). The square in column “Nr.” of the “Categorical states” indicates that resources are attached. Double-click it to view the resources (see point 3 in image below). Since we attached three different colors for that categorical state, you may scroll through the different resources by using the “right” and “left” arrow key on the keyboard (see point 4 in image below). Finally save the descriptor (see point 5 in image below).
An alternate description data view
If you have defined many descriptors and one specific description references only a small amount of the descriptors, the “Descriptor view” might be quite confusing. In this case an alternate representation, the “Continuous view” might be helpful (see image below). Here only the descriptors that have been referenced in the description data are shown and the values (categorical states, statistical measures or plain text data) are attached at the descriptors. Additionally some extra information is color coded, e.g. “Plant type” is displayed in light red text because it is a mandatory descriptor. For details check the Editdescriptions section of this manual.

Enter description scope
As last step in this section the insert of “Description scopes” shall be demonstrated. In our example we want to enter a taxon name and link it to a taxon name service in the internet.
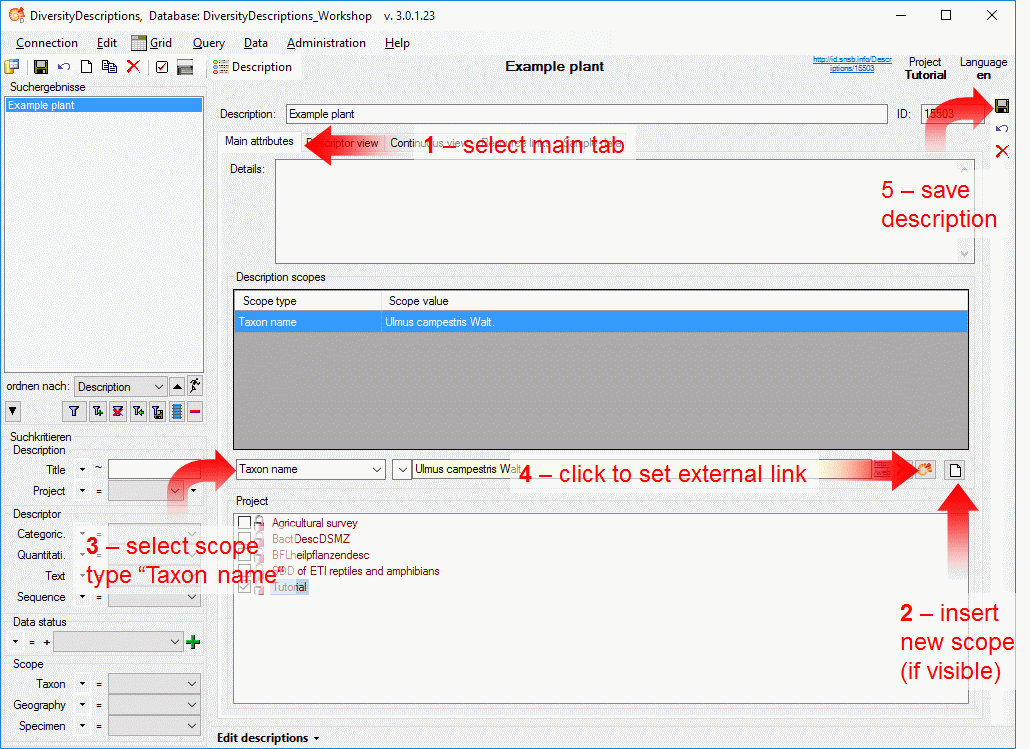
First select the “Main attributes” tab and click button


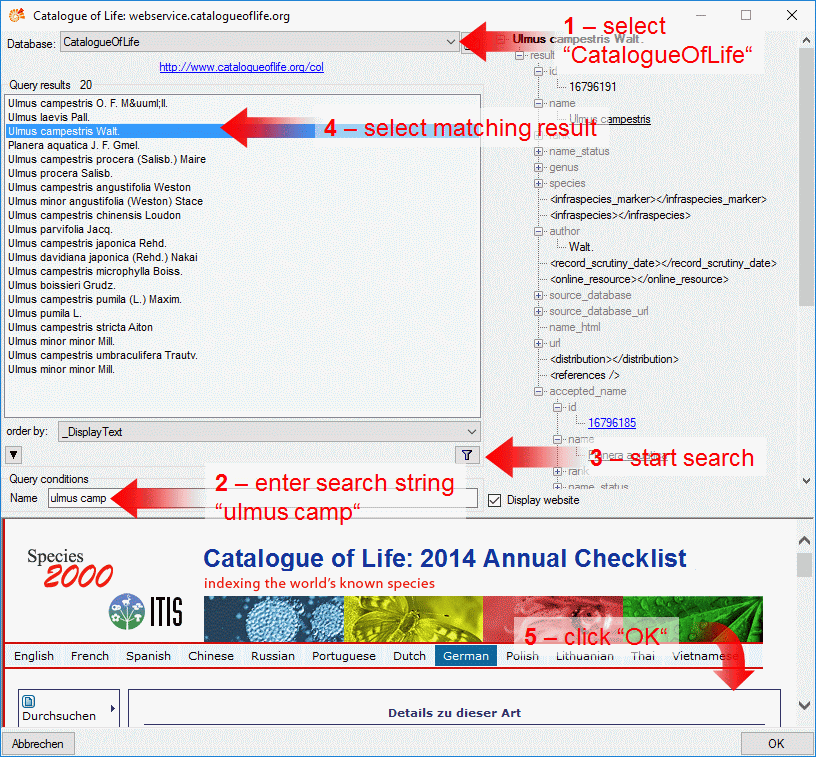
For scope type “Taxon name” links to three different internet services may be set. If you use the DiversityWorkbench module DiversityTaxonNames, you can build an own taxon database and link entries to descriptions. Other scoe types that allow linking to DiversityWorkbench modules are “Geographic area” (DiversityGazzeteers), “Reference” (DiversityReferences), “Specimen” (DiversityCollection) and “Observation” (DiversityCollection also). Additionally there are the scope types “Sex”, “Stage”, “Part” and “Other scope”, which have certain values defined in the Edit projects section. Remember that in step Create a new project we inserted the sex values “Male” and “Female” and assigned them for the tutorial project. Try to insert the scope value “Female” for the example description!
A more detailled description of all editing options can be found in the Edit descriptions section of this manual.
This tutorial is continued in the sections listed below.
- section Searching the database
- section Generate an HTML document
- section Sort the descriptors
- section Assign modifiers
- section Enter descriptor dependencies